
NoWhat?
Odds are that you’ve heard rumblings of a new set of technologies lumped under the umbrella of NoSQL. Discussions of this ‘NoSQL thing’ are often accompanied by exotic names like Cassandra, Project Voldemort, or CouchDB. You may have even heard of one of the most popular of these technologies, MongoDB.
MongoDB (derived from ‘humongous’) is a NoSQL database offering from 10Gen. Although MongoDB is developed and maintained by 10Gen, it is an open source product whose source code is freely available on GitHub and available for commercial use entirely for free. Paid support is available from 10Gen.
MongoDB was developed as a database that would scale gracefully across several machines over a network, often referred to as horizontal scalability. It was also designed as a data-store for web applications. MongoDB is a proud member of the NoSQL family, of the ‘document-database’ type. This means that objects are stored as markup in documents. Since document databases store information as schema-less data organized into collections, they can be thought of as a middle ground between the rich object models available in a relational database and the extreme lightweight data storage of a simple key/value store. The schema is imposed by the application rather than being inherent in the way the data is stored. However, ad-hoc querying is made possible due to the use of secondary indexes
Also differing from many of its NoSQL counterparts, MongoDB provides some level of transactional guarantee through strong consistency, rather than the full write-ahead logging of an RDBMS. While not fully ACID compliant MongoDB can, by using safe mode rather than ‘fire and forget’ IP messages, guarantee that operations are replicated across other peers in the MongoDB cluster within the scope of a transaction. This feature combined with Journaling allows MongoDB to provide some level of durability in the event that a single MongoDB node goes down. As this type of transactional replication does carry a performance penalty, the amount of replication necessary per transaction can easily be scaled up or down-or disabled completely-to meet your needs.
Getting MongoDB Up and Running
MongoDB can be up and running in a few easy steps…
- Download the latest stable production release for Windows from here. While MongoDB is available for both 32-bit and 64-bit flavors of Windows, only the 64-bit flavor is intended for production. MongoDB stores its datasets in memory so the addressing limitations in the 32-bit build will cause your database to fail if your data ever exceeds 2GB.
- Create a directory on your hard drive at c:\data\db. This is the default location where MongoDB will expect to store its data files.
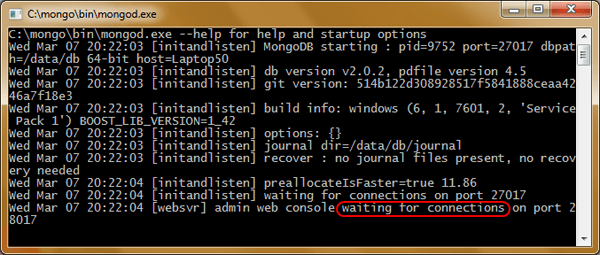
- In the unpacked MongoDB zip file you’ll find a /bin/ directory containing several executables. Running mongod.exe from the command line will result in a command window displaying several messages pertaining to initialization and listening. Congratulations! You’ve just launched your first instance of MongoDB.
- Now, return to the /bin/ directory and run mongo.exe from the command line, which is the MongoDB administration shell. By default, the shell will connect to the MongoDB instance that you just started.
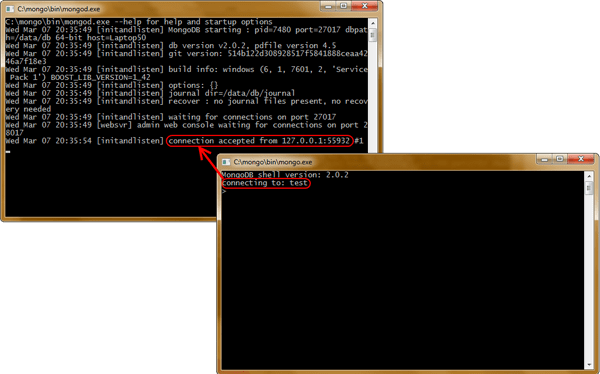
- From the mongo.exe client, enter the following command…
> db.my_docs.save({a:‘me‘});
Congratulations! You’ve just created your first MongoDB collection (my_docs) and inserted your first document ({a:’me’}) into it!
Running MongoDB as a Windows Service
While launching MongoDB from the command line was easy, we obviously won’t be launching the executable by hand in a production environment. In the Windows world, we’ll launch the application as a Windows Service in order to ensure that it’s available each time the machine starts. Luckily, mongod.exe ships with the capability to install itself as a Windows Service.
You can install mongod.exe as a Windows Service by following these simple steps…
- Using a command prompt launched as an Administrator, navigate to the directory where you unzipped the MongoDB download.
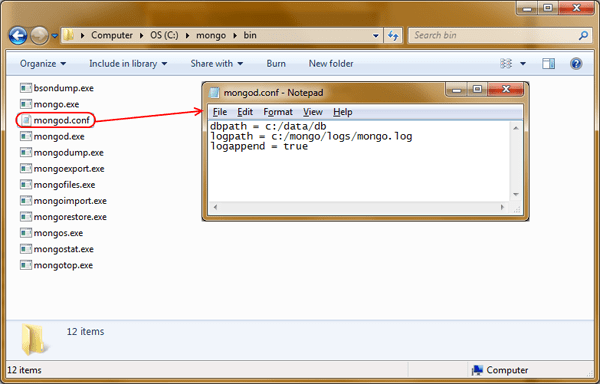
- Using a text editor, create a text file beside the bin/mongod.exe executable called mongod.conf and enter the following information in it:
dbpath = c:/data/db
logpath = c:/mongo/logs/mongo.log log
append = true
The dbpath parameter specifies where the mongo database files will live while the logpath parameter specifies the location of the log files. Make sure that both the ‘data/db’ and ‘mongo/logs’ directory already exist on disk. The logappend parameter prevents the log file from being truncated each time the service is restarted.
- From the command prompt, enter the following command to install mongodb as a service.
> mongod —config “c:\mongo\bin\mongod.conf“ –install
- From the command prompt, enter the following command to start the MongoDB service.
> net start “Mongo DB“
To verify that the service is running correctly, simply fire up your mongo.exe client and begin interacting with MongoDB as before. By default, the mongo.exe client will connect to an instance of mongod.exe listening on 127.0.0.1, which is the instance now running as a Windows Service.
Working with MongoDB from Your .NET Application
Now that you have the MongoDB service up and running, it’s time to start working with it from your .NET application. Luckily there are several mature .NET drivers for MongoDB available. We’ll be using the official .NET driver from MongoDB created by 10Gen which is available from here.
Downloading the Drivers
10Gen makes the .NET drivers available from their GitHub repository in both MSI and ZIP format. For our purposes, you can simply download the ZIP of the drivers, unzip them to your machine, and reference the DLLs directly from your project.
Alternatively, the drivers are also available from the NuGet official package source as a NuGet package which can be added directly to your solution.
Connecting to the MongoDB database
To get started working with MongoDB you’ll need establish a connection to both your MongoDB server and database.
|
1 2 3 |
const string ConnectionString = "mongodb://localhost/?safe=true"; var server = MongoServer.Create(ConnectionString); var blog = server.GetDatabase("blog"); |
The connection string above simply connects to the default instance of MongoDB running on the local machine. While this is a pretty simple connection string, it’s possible to specify more advanced options such as a username and password or other options to use while making the connection. For example, the safe=true option will notify you of any errors that occur during saves or inserts. You can see the full capabilities of the connection string here. If you find yourself taking advantage of these more advanced features then you should use the MongoUrlBuilder class to construct a connection string that meets your needs.
The server.GetDatabase(“blog”) method returns the database on the current MongoDB instance with the name of “blog”. If no such database exists, then it will be created for you automatically when you insert your first document.
Working with Collections
A Collection in MongoDB is loosely akin to a Table in SQL databases. Just as a Table may contain many related Rows, a Collection may contain many related Documents.
|
1 |
var posts = blog.GetCollection<Post>("posts"); |
The blog.GetCollection<Post>(“posts”) method returns a collection named “posts” in the given database. Just as with the GetDatabase(“blog”) method, if no such collection exists it will be created for you automatically when your first document is inserted into it.
Note that the GetCollection<Post>(“posts”) method is strongly typed which makes working with Posts quite convenient since it is not necessary to cast them to the proper type. However, since Collections in MongoDB are Schema-less there are weaker overloads of GetCollection() available in the event that you would like to store items of differing structures in the same collection.
Now that we have a reference to our collection of posts, we can begin saving documents to the collection using the Save() method. This method is actually a special type of command known as an ‘upsert’, which combines an update with an insert. Upserts are smart enough to determine whether or not an item already exists in the collection, and if so, simply update the existing item with the new data. Otherwise, a new item will be inserted in to the collection. This is a simple concept that can save you from a lot of tedious code when deciding whether to use an insert or an update.
|
1 2 3 |
var firstPost = new Post("First post!", "This is the first post on my very popular blog."); posts.Save(firstPost); |
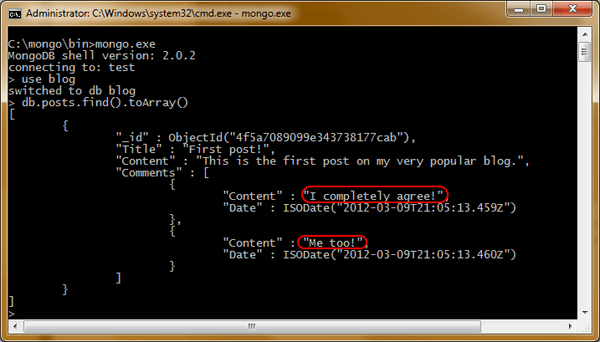
After executing this code we can view the post by inspecting the contents of our MongoDB instance using the mongo.exe shell.
- From the command line, launch the mongo.exe executable.
- Enter the command show dbs to display the databases available on the instance, including our new “blog” database.
- Now that we’ve verified the “blog” database was created, we can switch to it using the use blog command.
- To determine if the “posts” collection has been created in this database, we can view all collections with the show collections command.
- Finally, we can view our actual document in “posts” using the db.posts.find().toArray() command to retrieve the first 10 items in the collection.
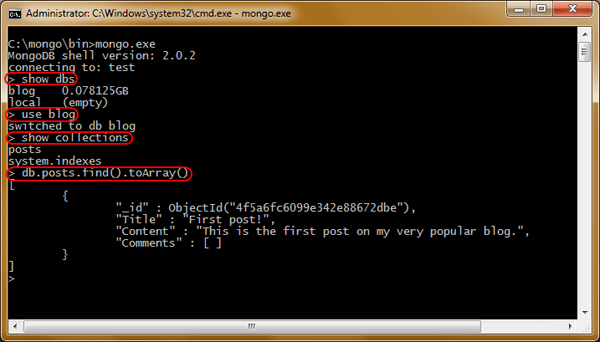
Note that the MongoDB driver has mapped our “Id” field to a field called “_id”. These are the keys that MongoDB uses internally to identify Documents as well as determine whether or not the Document is being inserted anew or simply updated. While this conversion is transparent when working with Ids in the application code, we’ll need to remember to reference “_id” when querying MongoDB for items by their Id.
You may have noticed that we’ve chosen to represent Id as an ObjectId. Since NoSQL databases are designed to scale horizontally across multiple nodes the inherent uniqueness of an ObjectId ensures that Id will always be given a unique value across all nodes.
Working Directly with BSON
Although we’re working with domain objects, such as Post, the .NET driver also allows us to work directly with the BSON objects that represent the items natively in the MongoDB database. BSON is a binary version of the popular JSON data format which combines both efficiency of storage with ease of serialization. Although you have full access to the BSON serialization library, MongoDB.Bson, which is used by the .NET MongoDB driver, in most cases you can leave the automatic serialization to the driver.
Querying
Now that we’ve stored our first MongoDB document, let’s talk about ways to retrieve from our collection.
The MongoDB driver provides a rich library for the creation of complex queries, however, we can easily locate our post by querying by the title.
|
1 2 3 4 |
var query = Query.EQ("Title","First post!"); foreach (var matchingPost in posts.Find(query)) { } |
In addition, we can return all posts in the collection by using the FindAll() method.
Adding to our Blog
Imagine that our readers are asking for the chance to join in the conversation. Let’s add a collection of Comments to our Post object.
|
1 2 3 |
var firstPost = new Post("First post!", "This is the first post on my very popular blog."); firstPost.Comments.Add(new Comment("I completely agree!")); firstPost.Comments.Add(new Comment("Me Too")); |
Note that even though Comments are separate objects than Posts, in MongoDB they are serialized into the same document.
Now imagine that our readers have mentioned they would like to add titles to their comments. We can simply add the Title field to our Comments object and begin working with it. Any Comments with Titles will be easily stored alongside Comments without Titles.
|
1 2 |
var secondPost = new Post("Second post!", "The great posts just keep coming!"); secondPost.Comments.Add(new Comment("Doubtful", "I'm not sure I agree with you...")); |
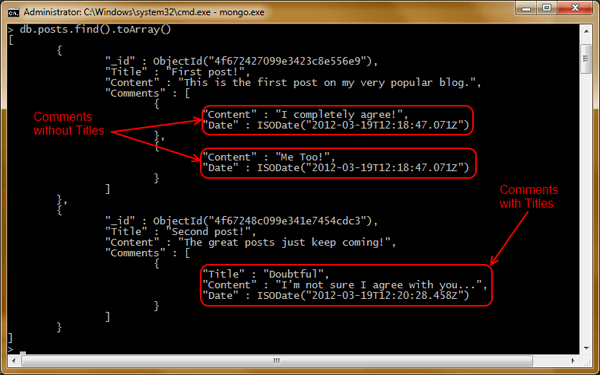
Remember that although we can store Comments with Titles alongside those without, it’s still the responsibility of your application to know how to handle both types of Comments when it encounters them.
Where MongoDB Fits for You
Hopefully this article has given you some insight into why NoSQL databases like MongoDB have surged in popularity in recent years. If you’d like to see a full working a solution of a MongoDB application with .NET in action you can download the source code for this article from the bottom of this article. Remember that this sample solution has been designed to illustrate the steps required to interact with MonogDB in the clearest possible way and doesn’t necessarily reflect the coding style or best practices that you should use in a production application.
Since NoSQL databases can happily coexist alongside traditional relational databases, remember that NoSQL should be thought of not as ‘NO SQL’ but rather as ‘Not-only SQL’. Just as not every scenario is a best fit for a NoSQL database, not every scenario is a best fit for a relational database. But now you have the option to choose the best tool for the job.
Special thanks to Robert Stam, 10Gen Software Engineer and maintainer of the official MongoDB C#/.NET driver, for lending his technical expertise and insight to this article.
Load comments