
SignalR is a powerful, open source library that allows developers to quickly and easily implement real-time communications across different platforms. Although SignalR is predominantly used in web applications, the library is versatile enough to be used in mobile apps as well. This means that you can implement native real-time connected applications without requiring the use of a web view. SignalR provides client libraries for .NET, JavaScript, Windows Phone, Windows Universal applications, iOS and Android.:p>
There are two ways to add SignalR to cross-platform mobile applications. For .NET developers, there is the option to “write-once deploy-everywhere, leveraging the power of C# and Xamarin. Xamarin is a 3rd party library that takes advantage of the .NET framework and provides a unified SDK that binds directly to the native libraries in order develop mobile applications. Because Xamarin works on top of the .NET framework, it means that all that’s needed in order to use SignalR is to add the necessary .dll to the solution, usually through NuGet.
If you don’t want to go down the route of Xamarin, there are also native ports of the SignalR library both in Objective-C and Java. For iOS development you can use this port (SignalR-ObjC), and for Android development there’s this port (SignalR/java-client). There is, however, a small caveat when using these ports: because these two libraries are not officially supported by the SignalR community, there is a chance that they may be out of date or have features missing.
In this article, we are going to develop a sample Windows Universal Application (store and mobile) and implement basic real-time communications between the application and a back-end service using SignalR.
The Server setup
To demonstrate the real-time communication framework, we are going to implement a sample stock price service. Clients that are connected through SignalR will receive real-time stock prices when these are updated on the server. The server will use just a mock service to generate dummy prices for the purpose of this demo. In a production environment, this data would be coming from a real API.
The SignalR hub will be installed on a WebAPI 2.0 running on top of ASP.NET 4.5. The hub will only have one public method which will be used to broadcast the data to all connected clients.
On a new, empty WebAPI solution in Visual Studio, open the NuGet console manager and run the following command:
|
1 |
Install-Package Microsoft.AspNet.SignalR |
This will install SignalR along with the necessary dependencies such as Owin (ASP.NET’s middleware framework). Owin is used to bootstrap SignalR and route all incoming SignalR requests to the hub.
By default, SignalR hubs are configured to reject incoming request from external domains. This means that if your SignalR hub (WebAPI) is running under the https://contoso.com and clients are trying to connect from https://mydomain.com, then the requests will fail with an HTTP 500 error. To fix this problem, we can configure Owin to accept cross-domain requests (CORS). Go back to the NuGet console manager and run the following command:
|
1 |
Install-Package Microsoft.Owin.Cors |
With the dependencies installed, we can now start configuring the hub. Right-click on the WebAPI project and add a new class. Name the class Startup.cs and paste the following code:
|
1 2 3 4 5 6 7 8 9 10 11 12 13 14 15 16 17 18 19 |
using Microsoft.AspNet.SignalR; using Microsoft.Owin.Cors; using Owin; namespace SignalRService { public class Startup { public void Configuration(IAppBuilder app) { app.Map("/signalr", map => { map.UseCors(CorsOptions.AllowAll); var hubConfiguration = new HubConfiguration { }; map.RunSignalR(hubConfiguration); }); } } } |
This code bootstraps SignalR and configures CORS in order to allow cross-domain clients to connect. At the moment all external clients can hit the hub because we defined CorsOption.AllowAll. Unless you wish to create a truly open API, it is advisable that you restrict access to the service.
Before we create the hub, we need a mock service to feed stock data to the clients. Add a new class to the project and name it StockService. Paste the following code in it:
|
1 2 3 4 5 6 7 8 9 10 11 12 13 14 15 16 17 18 19 20 21 22 23 24 25 26 27 28 29 30 31 32 33 34 35 36 37 38 39 40 41 42 |
using Microsoft.AspNet.SignalR; using Newtonsoft.Json; using System; using System.Collections.Concurrent; using System.Threading; namespace SignalRService { public class StockService { private static Timer timer; private static Random random; public ConcurrentDictionary<string, decimal> Stocks; private static int interval = 5000; public StockService() { random = new Random(); timer = new Timer(UpdateStockPrices, null, interval, interval); Stocks = new ConcurrentDictionary<string, decimal>(); Stocks.TryAdd("GOOG", new decimal(2.50)); Stocks.TryAdd("MSFT", new decimal(3.15)); Stocks.TryAdd("APPL", new decimal(4.57)); } private void UpdateStockPrices(object state) { foreach (var stock in Stocks.Keys) { Stocks[stock] = random.NextDecimal(); } BroadcastStockPriceChanges(); } public void BroadcastStockPriceChanges() { var hub = GlobalHost.ConnectionManager.GetHubContext<StocksHub>(); hub.Clients.All.sendStockData(JsonConvert.SerializeObject(Stocks)); } } } |
The service is pretty basic. It creates a timer which is used to push stock data at a 5 second interval. There are a couple of extension methods that are used to generate random decimals. Add a new class to your project and name it Extensions. Paste the following code:
|
1 2 3 4 5 6 7 8 9 10 11 12 13 14 15 16 17 18 19 20 21 22 23 24 25 26 27 28 |
using System; namespace SignalRService { public static class Extensions { public static int NextInt32(this Random rng) { unchecked { int firstBits = rng.Next(0, 1 << 4) << 28; int lastBits = rng.Next(0, 1 << 28); return firstBits | lastBits; } } public static decimal NextDecimal(this Random rng) { byte scale = (byte)rng.Next(29); bool sign = rng.Next(2) == 1; return new decimal(rng.NextInt32(), rng.NextInt32(), rng.NextInt32(), sign, scale); } } } |
With the service in place, the last step in creating the service process is adding the SignalR hub to relay data to and from the clients. Right-click on the WebAPI project and add a new class. Name it StocksHub and paste the following code:
|
1 2 3 4 5 6 7 8 9 10 11 12 13 14 |
using Microsoft.AspNet.SignalR; namespace SignalRService { public class StocksHub : Hub { private readonly StockService stockService; public StocksHub() { stockService = new StockService(); } } } |
I understand your surprise. The hub is, in fact, empty. We only use it to instantiate the StockService. This is the beauty of SignalR. The hub can act as the conduit -passing information back and forth between the client and some arbitrary back-end service. This is all we need to do to get a functional hub. Next, we’ll look into what’s required to allow a Windows Universal application to receive data from the SignalR hub.
The Client Setup
The steps used to enable SignalR on the Windows Universal apps are the exact same steps you would follow if you were working on a Xamarin application. Open up Visual Studio and create a new Windows Universal app. In the end, the solution should consist of 3 projects:
- Windows Phone Application
- Windows Desktop Application
- Shared project
We will use the shared project to add the common logic, such as the SignalR client and configuration settings. The individual projects will have only the UI specific logic necessary to display the data retrieved through SignalR.
We’ll start by adding the SignalR packages. Open the NuGet console manager and run the following command:
|
1 |
Install-Package Microsoft.AspNet.SignalR.Client |
Next, open up App.xaml.cs and add the following public property and private method in the class:
|
1 2 3 4 5 6 |
public SignalRClient Client { get; set; } private async Task StartHub() { Client = new SignalRClient(); await Client.Connect(); } |
Change the OnLaunched() method to be async by changing the method declaration like this:
|
1 |
protected override async void OnLaunched(LaunchActivatedEventArgs e) |
and add the following line anywhere in the body of the method:
|
1 |
await StartHub(); |
The above code will start up the client and connect to the remote hub in order to start receiving data. Next, since we’re working with XAML, we can take advantage of data binding so that we can update the UI asynchronously and automatically when new data is received. In the shared project, create a new class and name it PageData. Add the following code:
|
1 2 3 4 5 6 7 8 9 10 11 12 13 14 15 16 17 18 19 20 21 22 23 24 25 26 27 28 29 30 31 32 33 34 35 36 37 38 39 40 41 42 43 44 45 46 47 48 49 50 51 52 |
using System.ComponentModel; namespace SignalRApp { public class PageData : INotifyPropertyChanged { private double _GOOG; private double _MSFT; private double _APPL; public event PropertyChangedEventHandler PropertyChanged; public double GOOG { get { return _GOOG; } set { _GOOG = value; NotifyPropertyChanged("GOOG"); } } public double MSFT { get { return _MSFT; } set { _MSFT = value; NotifyPropertyChanged("MSFT"); } } public double APPL { get { return _APPL; } set { _APPL = value; NotifyPropertyChanged("APPL"); } } public void NotifyPropertyChanged(string propertyName) { if (PropertyChanged != null) { PropertyChanged(this, new PropertyChangedEventArgs(propertyName)); } } } } |
In a proper application, we would opt in for proper MVVM framework that can eliminate most of the above boiler plate code. Nonetheless, this is a demo app with limited requirements so there’s no reason to complicate the design and add unnecessary dependencies. Finally, we need to create the SignalR client. Add a new class to the shared project and name it SignalRClient. Paste the code below:
|
1 2 3 4 5 6 7 8 9 10 11 12 13 14 15 16 17 18 19 20 21 22 23 24 25 26 27 28 29 30 31 32 33 34 |
using Microsoft.AspNet.SignalR.Client; using Microsoft.AspNet.SignalR.Client.Transports; using System; using System.Threading.Tasks; namespace SignalRApp { public class SignalRClient { private readonly HubConnection connection; private readonly IHubProxy proxy; public event EventHandler<dynamic> OnDataReceived; public SignalRClient() { connection = new HubConnection("http://localhost:9246"); proxy = connection.CreateHubProxy("StocksHub"); } public async Task Connect() { await connection.Start(new WebSocketTransport()); proxy.On("sendStockData", (dynamic data) => { if (OnDataReceived != null) { OnDataReceived(this, data); } }); } } } |
In the code above, we create a proxy and then we define an event handler that listens for a “sendStockData()” method. Notice how this event name matches exactly the StockService method we defined in our hub on the server. This instructs the client to raise an event every time the server calls that method.
At the point of writing this, ‘Windows Universal apps’ seems to also suffer from a small bug when connecting to a hub. The connection process is particularly slow due to protocol failures. To resolve this problem, we need to define the transport protocol during our attempt to instantiate the connection. This is achieved here by requesting that the connection uses the Web Sockets protocol:
|
1 |
await connection.Start(new WebSocketTransport()); |
Finally, it’s worth noting that when creating a new HubConnection() we need to pass the hub URL, which is the same as the WebAPI URL. Make sure you use the right URL otherwise your connection will fail.
The last step is to update the UI in the phone and desktop apps to use the SignalR data. On the Windows phone project, open the MainWindow.xaml and replace the <Grid></Grid> root element with the code below:
<Grid.RowDefinitions>
<RowDefinition Height=”150″></RowDefinition>
<RowDefinition Height=”*”></RowDefinition>
</Grid.RowDefinitions>
<TextBlock Grid.Row=”0″ Style=”{StaticResource HeaderTextBlockStyle}” Margin=”25,0,0,0″>STOCK PRICES</TextBlock>
<StackPanel Grid.Row=”1″ Margin=”25,0,0,0″>
<StackPanel Orientation=”Horizontal”>
<TextBlock Style=”{StaticResource BodyTextBlockStyle}” Width=”70″>GOOG:</TextBlock>
<TextBlock Style=”{StaticResource BodyTextBlockStyle}” Text=”{Binding GOOG }”></TextBlock>
</StackPanel>
<StackPanel Orientation=”Horizontal”>
<TextBlock Style=”{StaticResource BodyTextBlockStyle}” Width=”70″>MSFT:</TextBlock>
<TextBlock Style=”{StaticResource BodyTextBlockStyle}” Text=”{Binding MSFT}”></TextBlock>
</StackPanel>
<StackPanel Orientation=”Horizontal”>
<TextBlock Style=”{StaticResource BodyTextBlockStyle}” Width=”70″>APPL:</TextBlock>
<TextBlock Style=”{StaticResource BodyTextBlockStyle}” Text=”{Binding APPL}”></TextBlock>
</StackPanel>
</StackPanel>
We also need to add the necessary code to retrieve and bind the data to the UI View, so open MainView.xaml.cs and paste the code below:
|
1 2 3 4 5 6 7 8 9 10 11 12 13 14 15 16 17 18 19 20 21 22 23 24 25 26 27 28 29 30 31 32 33 34 |
using Newtonsoft.Json; using Windows.UI.Core; using Windows.UI.Xaml.Controls; using Windows.UI.Xaml.Navigation; namespace SignalRApp { public sealed partial class MainPage : Page { private PageData pageData; public MainPage() { this.InitializeComponent(); this.NavigationCacheMode = NavigationCacheMode.Required; pageData = new PageData(); this.DataContext = pageData; var app = App.Current as App; app.Client.OnDataReceived += Client_OnDataReceived; } private void Client_OnDataReceived(object sender, dynamic e) { Dispatcher.RunAsync(CoreDispatcherPriority.Normal, () => { var result = JsonConvert.DeserializeObject<PageData>(e); pageData.APPL = result.APPL; pageData.GOOG = result.GOOG; pageData.MSFT = result.MSFT; }); } } } |
Since this is a universal application, we need to apply similar code changes to the Windows Store project. Go to the MainView.xaml and paste the following code, which should replace the root <Grid></Grid> element:
<Grid Background=”{ThemeResource ApplicationPageBackgroundThemeBrush}”>
<Grid.RowDefinitions>
<RowDefinition Height=”150″></RowDefinition>
<RowDefinition Height=”*”></RowDefinition>
</Grid.RowDefinitions>
<TextBlock Grid.Row=”0″ Style=”{StaticResource HeaderTextBlockStyle}” Margin=”25,20,0,0″>STOCK PRICES</TextBlock>
<StackPanel Grid.Row=”1″ Margin=”25,0,0,0″>
<StackPanel Orientation=”Horizontal”>
<TextBlock Style=”{StaticResource SubheaderTextBlockStyle}” Width=”120″>GOOG:</TextBlock>
<TextBlock Style=”{StaticResource SubheaderTextBlockStyle}” Text=”{Binding GOOG }”></TextBlock>
</StackPanel>
<StackPanel Orientation=”Horizontal”>
<TextBlock Style=”{StaticResource SubheaderTextBlockStyle}” Width=”120″>MSFT:</TextBlock>
<TextBlock Style=”{StaticResource SubheaderTextBlockStyle}” Text=”{Binding MSFT}”></TextBlock>
</StackPanel>
<StackPanel Orientation=”Horizontal”>
<TextBlock Style=”{StaticResource SubheaderTextBlockStyle}” Width=”120″>APPL:</TextBlock>
<TextBlock Style=”{StaticResource SubheaderTextBlockStyle}” Text=”{Binding APPL}”></TextBlock>
</StackPanel>
</StackPanel>
</Grid>
And the equivalent code-behind to provide the data for the view:
|
1 2 3 4 5 6 7 8 9 10 11 12 13 14 15 16 17 18 19 20 21 22 23 24 25 26 27 28 29 30 31 32 |
using Newtonsoft.Json; using Windows.UI.Core; using Windows.UI.Xaml.Controls; namespace SignalRApp { public sealed partial class MainPage : Page { private PageData pageData; public MainPage() { this.InitializeComponent(); pageData = new PageData(); this.DataContext = pageData; var app = App.Current as App; app.Client.OnDataReceived += Client_OnDataReceived; } private void Client_OnDataReceived(object sender, dynamic e) { Dispatcher.RunAsync(CoreDispatcherPriority.Normal, () => { var result = JsonConvert.DeserializeObject<PageData>(e); pageData.APPL = result.APPL; pageData.GOOG = result.GOOG; pageData.MSFT = result.MSFT; }); } } } |
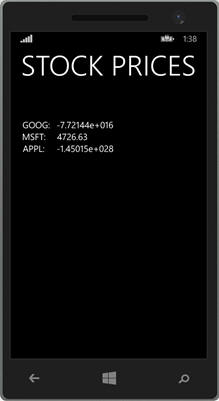
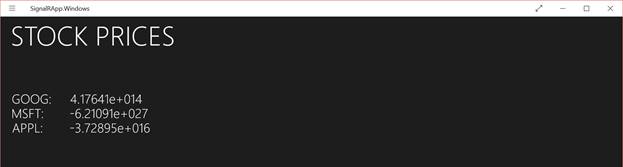
To test the whole system, run the WebAPI first and then run the Windows Phone and Store apps in the order you like. The end result should look like this:
Conclusion
In this article, we saw how easy it is to get started with real-time communication across platforms using SignalR. It doesn’t matter if you’re targeting web, mobile or desktop platforms. In the end, we’ve proved that SignalR requires minimal code to provide something that in the past was clunky, unreliable and very hard to implement. I would like to close with Arthur C. Clarke’s quote - “Any sufficiently advanced technology is indistinguishable from magic“. SignalR is advanced enough to make real-time communications seem like magic.
Load comments