
The series so far:
- Automating Day-to-Day PowerShell Admin Tasks – Part 1: Jobs and Workflow
- PowerShell Day-to-Day Admin Tasks – Part 2: WMI, CIM and PSWA
- PowerShell Day-to-Day Admin Tasks – Part 3: Monitoring Performance
- PowerShell Day-to-Day Admin Tasks – Part 4: Securing Scripts
- PowerShell Day-to-Day Admin Tasks – Part 5: Events and Monitoring
- PowerShell Day-to-Day Admin Tasks - Part 6: Real Time IT Dashboard
Overview
This article demonstrates the different methods you can use to simultaneously execute administration tasks on all of the devices that you manage.
When I identify a task that I need to perform, I ask myself two questions:
- How many times will I have to perform it?
- How much time will it take me to do the task manually?
By asking, and answering, these two questions, I then know if I must script the task using PowerShell.
We are likely to start by undertaking every task in PowerShell as a separate unit. This means that when we perform a script as a set of instructions, we must then wait for its return before we interact again with the console.
It is simple to get around this restriction by starting up a second PowerShell console in order to perform a new instruction while the first console is still running. This works well up to a point but it isn’t the ideal way for the systems administrator to manage their work because:
- The values of variables cannot be transmitted between consoles
- Results cannot be easily passed from one console to another
- The separate console processes cannot be individually identified
Let’s imagine a simple example: you get to your work station tomorrow morning and you receive an email telling you to perform an action on about fifteen servers. Are you going to open fifteen PowerShell consoles? Probably not.
A feature that is designed to resolve these problems with multiple consoles is at your disposal in PowerShell: The jobs. Let’s look at jobs in detail.
The jobs
Jobs allow you to perform background instructions and scripts asynchronously. The following instructions (Cmdlets) apply themselves to jobs:
|
CMDLET |
Description |
Module Name |
|
Get-Job |
List the jobs |
Microsoft.PowerShell.Core |
|
Receive-Job |
Get results from jobs |
Microsoft.PowerShell.Core |
|
Remove-Job |
Delete jobs |
Microsoft.PowerShell.Core |
|
Resume-Job |
Restart a job |
Microsoft.PowerShell.Core |
|
Start-Job (1) |
Start a job |
Microsoft.PowerShell.Core |
|
Stop-Job (2) |
Stop a job |
Microsoft.PowerShell.Core |
|
Suspend-Job |
Interrupt a job |
Microsoft.PowerShell.Core |
|
Wait-Job |
Wait for the end of another action |
Microsoft.PowerShell.Core |
(1) Cannot be used for a remote instruction. The use of Invoke-Command is required.
(2) In normal time, you should not have a need for it because a job stops automatically when its actions are completed.
There are several types of job. Background, Remote, Scheduled and Workflow. Let’s look at them in detail.
BackgroundJob
Let’s take, for example, the following instruction that lists the active rules of your firewall, sorting them by direction.
|
1 |
Show-NetfirewallRule| sort direction | ?enabled-eq"true" | ft-property @{label="Name" ; expression={$_.displayname}}, @{label="Direction" ; expression={$_.direction}} |
I deliberately used an instruction with conditions so as to have a longer processing time.
To start a job, I simply pass the previous instruction line to Start-Job in a ScriptBlock. Then we use Get-Job to follow what is going on with the job.
|
1 2 |
Start-Job -ScriptBlock{Show-NetfirewallRule| sort direction | ?enabled -eq"true" | ft-property @{label="Name" ; expression={$_.displayname}}, @{label="Direction" ; expression={$_.direction}}} Get-Job |
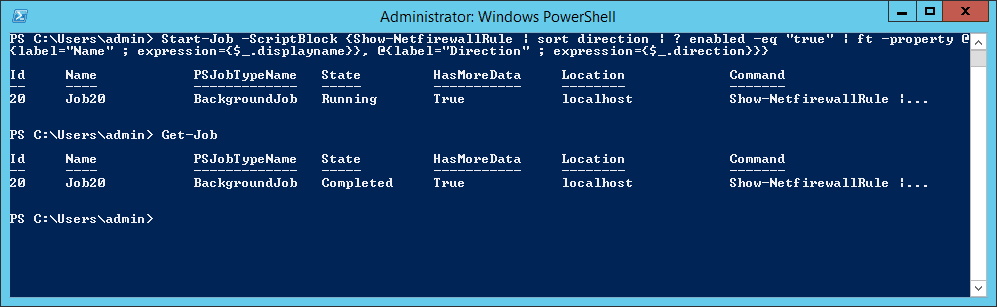
Figure 2 -Process of a background job
The displayed result on the console contains:
- A unique “ID”
- A name composed by default with the following syntax : “Job<ID>”
- The type of job. In our case, it’s a BackgroundJob.
- Its position: “Running”, “Failed” or “Completed”
- whether the data is available to be displayed
- The station where the instruction was performed.
- The instruction that was completed.
The data procurement is done with the help of Receive-Job.
Note: Add the –Keep to Receive-Job for recovering the data. This lets you keep results after verification. Otherwise, if this is not done, they will be erased but the job will remain available.
I can therefore obtain the firewall rules on my computer:
|
1 |
PS > Receive-Job -ID 2 -Keep |
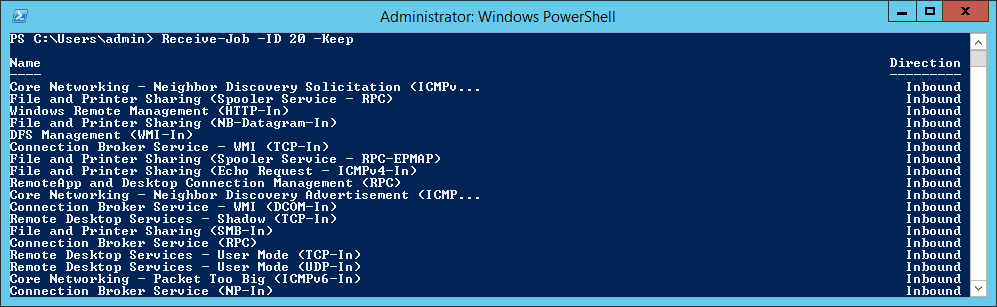
Figure 3 – Result of the Receive-Job instruction
Note: Always remember to delete jobs after using them.
|
1 |
PS > Remove-Job -ID <ID> |
Up to this point, there is nothing intricate in what we’re doing, but my advice would be to think about naming your jobs (Start-Job -Name <JobName>) for easier visibility.
RemoteJob
As a systems administrator, we would like to automate recurring tasks to a maximum. Furthermore, we are often asked to process actions on several servers and obviously to do it the quickest way possible (‘ASAP Please!’). Time is of the essence. You must therefore optimise it to make your life easier. The RemoteJob was created for that. Below is an example:
|
1 |
PS > Get-ItemPropertyHKLM:\SOFTWARE\Wow6432Node\Microsoft\Windows\CurrentVersion\Uninstall\* | Select-Object DisplayName,DisplayVersion,Publisher,InstallDate| ? {$_.DisplayName-ne $null} | sort DisplayName |
This instruction lists the software (x64) installed on the computer. The search is performed in the registry and retrieves the desired information.
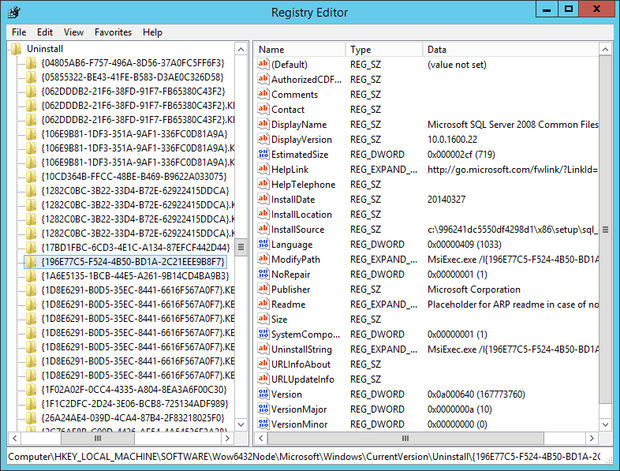
Figure 4 – Information on the software installed in the registry
Please note that the settings for software (x86) installations are stored in:
|
1 |
HKLM:\SOFTWARE\Microsoft\Windows\CurrentVersion\Uninstall\ |
To do this, there are several possibilities:
- I) Launch a job with a connection to a remote a PC through a –Scriptblock. Thus the job is displayed on your workstation:
1Start-Job -Scriptblock {Do something -ComputerName Server1}
- (II) Launch a background job on a remote station. The instruction situated in the Scriptblock works remotely, but the data are displayed on your work station. The key word –Asjob does the job remotely with the assistance of the parameter –ComputerName.
1Invoke-Command -Scriptblock{Do something} -ComputerNameServer1 -AsJob
- III) Begin a remote session on a machine. The actions done on a remote session are identical to those that are done locally. However, everything is handled on the remote unit. (We will deal with the management of remote units in more details in the second part of this series)
1PS >Enter-PSSession-ComputerNameServer1[Server1]: PS > Start-Job -ScriptBlock{Do something}
PSScheduleJob
This is the next stage. We have now used PowerShell jobs locally and remotely. Furthermore, you are aware of scheduled tasks in Windows. Do you see where I am going? We are going to schedule PowerShell jobs. The two main advantages are:
- The management of planned tasks with the job cmdlets. It means that we can use for example Receive-Job to get results of the scheduled job.
- The automatic creation of tasks in the Windows Scheduler.
The following example retrieves all the windows services that are configured in “automatic” mode but which have not been started. This will allows us to check, each morning, if there is a problem on a server.
|
1 |
PS >Get-wmiobject win32_service -Filter "startmode = 'Auto' AND state != 'running' " | select name, startname |
For more visibility, I’ll store the instruction in a temporary ScriptBlock variable.
I use Register-ScheduledJob and give a name to the job.
|
1 2 |
PS >$checkService = {Get-wmiobject win32_service -Filter "startmode = 'Auto' AND state != 'running' " | select name, startname} Register-ScheduledJob-ScriptBlock$checkService-Name 'Check Services' |
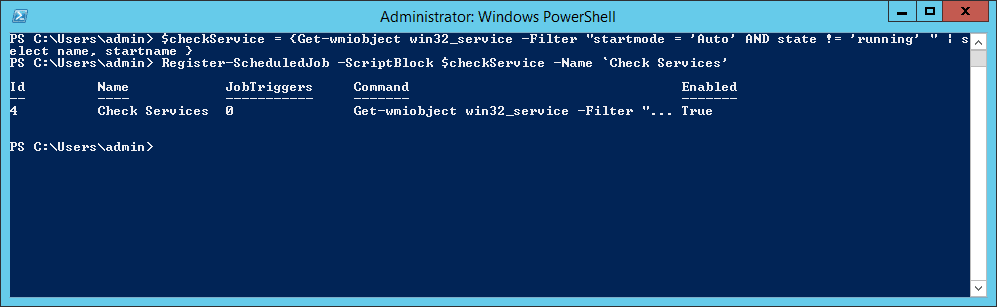
Figure 5 – Usage of the instruction “Register-ScheduledJob”
[To create a scheduled job on a remote unit, it is necessary to use Invoke-Command]
For the time being, no trigger is linked to this job.
Note: The Trigger is when we want to run the ScheduledJob. We will start the job at a specific date/time, or when a specific event occurs for example: when the computer enters in an idle state.
|
1 2 3 |
PS > Get-ScheduledJob-Id 1 | select Jobtriggers JobTriggers----------- {0} |
The only possible action is to do it manually. In our case, we’re going to plan it. The trigger management is done through the following cmdlet:
|
CMDLET |
Description |
Module Name |
|
Add-JobTrigger |
Add Jobtrigger |
PSScheduledJob |
|
Disable-JobTrigger |
Disable Jobtrigger |
PSScheduledJob |
|
Enable-JobTrigger |
Enable Jobtrigger |
PSScheduledJob |
|
Get-JobTrigger |
Get Jobtrigger |
PSScheduledJob |
|
New-JobTrigger |
Create Jobtrigger |
PSScheduledJob |
|
Remove-JobTrigger |
Delete Jobtrigger |
PSScheduledJob |
|
Set-JobTrigger |
Set Jobtrigger |
PSScheduledJob |
Figure 6 – Chart of cmdlets ScheduledJob
First of all, we will create a Trigger that we’ll then store in the temporary $dailyTrigger. The latter will begin its actions at 7am. I like to get all the various results as I get to work each morning so as to have all necessary information for the daily check.
Once this trigger is created, we use the cmdlet Add-JobTrigger so as to link it to our previous job. We note that JobTriggers tips over from 0 to 1.
|
1 2 3 |
$dailyTrigger= New-JobTrigger-Daily -At "07:00:00" Add-JobTrigger-Name "Check Services" -Trigger $dailyTrigger Get-ScheduledJob |
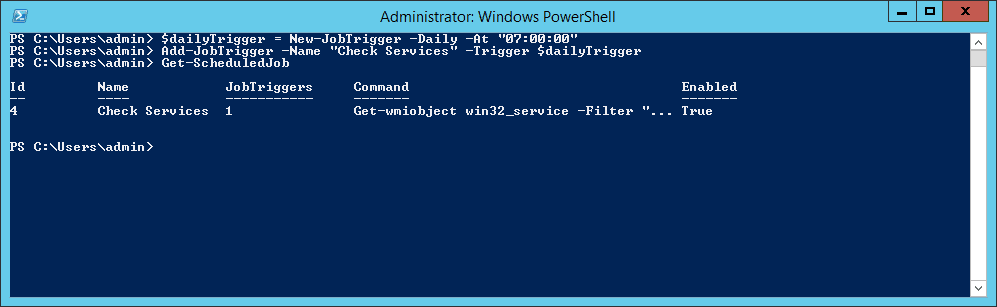
Figure 7 – Management of triggers
Let’s process a Get-ScheduledJob to ensure that it is activated with the associated parameters. If necessary, I can disable the trigger with the cmdlet Disable-JobTrigger
|
1 |
Get-ScheduledJob-name "Check Services" | Get-JobTrigger |

Figure 8 – List of triggers
I now open the Windows tasks scheduler and notice that the trigger Check Services is created in the folder PowerShell.
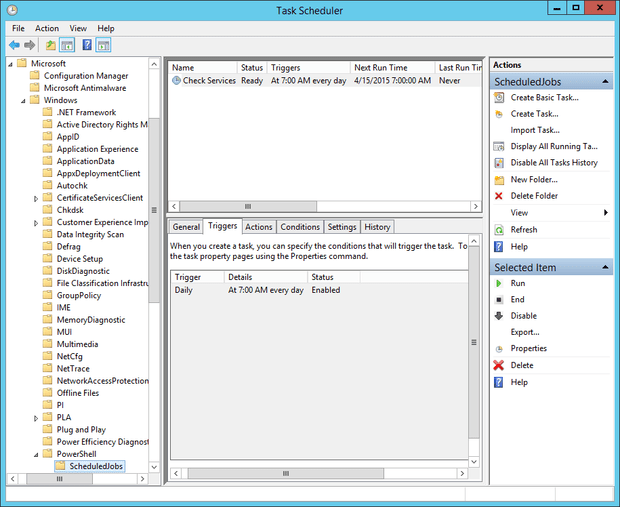
Figure 9 – Windows tasks scheduler
To close off on the subject of triggers, please note that some advanced options can be set. Options parameter is optional. Below is a full example:
|
1 2 3 4 5 6 |
$dailyTrigger= New-JobTrigger-Daily -At "07:00:00" $MyOptions= New-ScheduledJobOption-RunElevated $checkService = {Get-wmiobject win32_service -Filter "startmode = 'Auto' AND state != 'running' " | select name, startname} Register-ScheduledJob-ScriptBlock$checkService-Name 'Check Services'-ScheduledJobOption$MyOptions Add-JobTrigger-Name "Check Services" -Trigger $dailyTrigger Get-ScheduledJob |
The following parameters can be used to customize your Scheduled Job:
|
1 2 3 4 5 6 7 8 9 10 11 12 13 14 |
-StartIfOnBatteries -StopIfGoingOnBatteries -WakeToRun -StartIfNotIdle -StopIfGoingOffIdle -RestartOnIdleResume -IdleDuration -IdleTimeout -ShowInTaskScheduler -RunElevated -RunWithoutNetwork -DoNotAllowDemandStart -MultipleInstancePolicy -JobDefinition |
PSWorkflowJob
Last but not least is a workflow job. So far, we understand that jobs are here to help us complete tasks simultaneously, but not all system admin jobs are amenable to this. In reality, your system has to deal with such things as
- The restarting of the remote station (on which you are working).
- Processing of bulk work (the expansion of virtual stations on Hyper-V, migration of mailbox on the Exchange, …)
- Having to adjourn a task.
To show how to get around these, I shall demonstrate PowerShell workflows. They were introduced in version three of PowerShell.
Below is a simple workflow that tells me basic facts about my operating system:
|
1 2 |
workflow myfirstworkflow { Get-CimInstance -ClassName Win32_OperatingSystem | select Caption, Version} myfirstworkflow |
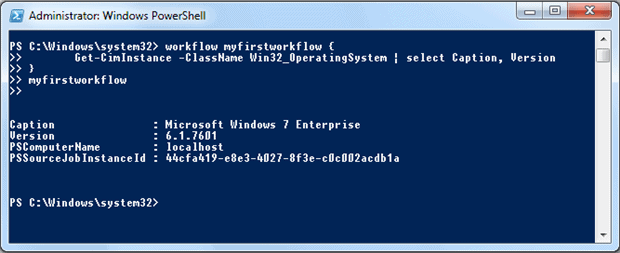
Figure 10 – Utilization of Workflows
If you know how to define PowerShell functions, then you will quickly understand how to define workflows. The structure is identical; you only need to use the keyword Workflow followed by a name.
Each command contained in Workflow is totally independent from the following one. This means that a variable will not be seen by another command. There is no sharing of the state of data. Restrictive? In fact, you can do it with one condition: you place them in an InlineScript block. PowerShell then considers it to be a stand-alone script in a one-off session.
|
1 2 3 4 5 6 7 8 9 10 11 12 |
Workflow DemoWFW { InlineScript { $var1 = Get-Host $version = $var1 | select version $version } } DemoWFW |
A PowerShell workflow may also be processed as a background job. To do this, use parameter –AsJob when workflow requests it.
|
1 2 3 4 |
PS > DemoWFW-AsJob-PSComputerNameServer1 Id Name PSJobTypeNameState HasMoreDataLocation Command -- ---- ------------------ ------- ------------------ --------- ---------- 6 Job6 PSWorkflowJobRunningTrue Server1 DemoWFW |
Let’s now look at the simultaneous processing of commands. Tasks that run in parallel are processed by adding the keyword-Parallel. In this case, I use a loop in Foreach to process a similar action simultaneously on each of the servers on my list. This processing is done totally random.
|
1 2 3 4 5 6 7 8 9 10 |
Workflow Get-SrvDiskDrive { $servers = "ADM01","ADM11" Foreach -Parallel ($srv in $servers) { Get-CimInstance -PSComputerName $srv -ClassName Win32_DiskDrive } } Get-SrvDiskDrive |
To summarise the parallel execution of activities in a workflow, I compiled a simple diagram. It is possible to launch several commands simultaneously as well as running a series of sequential commands in parallel with the keyword Sequence followed by the sequential commands as a ScriptBlock. We will then have a workflow similar to the one below:
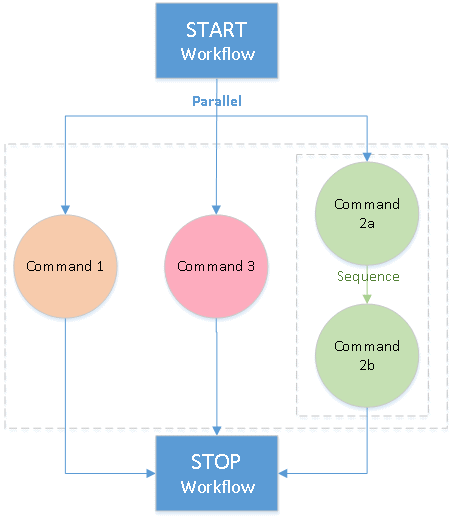
Figure 11 – Simplified workflow with tasks in series and simultaneous
To illustrate my explanation, the following example will be useful run daily: the arrival of a new employee in your business.
|
1 2 3 4 5 6 7 8 9 10 11 12 13 14 15 16 17 18 19 |
Workflow Create-NewEmployee { parallel { Create VM # Command 1 sequence { Create AD account # Command 2a Create Mailbox # Command 2b } Create phone configuration # Command 3 } } Create-NewEmployee |
You have the option to adjourn your workflow at certain stages. If you have to process one or more commands at a specific time, then you will use Suspend-Workflow. To retrieve it, you will need to add its job ID to the cmdlet Resume-Job.
Another interesting facility is available from the Cmdlet Checkpoint-Workflow. You can snapshot the current data of your workflow. These snapshots include the values of variables and any output generated. If the workflow is interrupted, and subsequently resumed, then the last saved snapshot will be used and processing continued from that point. Without checkpointing, the whole workflow would have to be restarted.
Below is an example that backs-up at the end of the processing of each server:
|
1 2 3 4 5 6 7 8 9 10 11 |
Workflow MyWorkflow { $variable = "Server1","Server2" Foreach -Parallel ($var in $variable) { # Do something ... Checkpoint-Workflow } } MyWorkflow |
Note that there is a performance impact when a CheckPoint is done. Data is collected and written on disk.
I must emphasise the difference between Suspend-Workflow and Checkpoint-Workflow. Suspend-Workflow will pause the current command, whereas Checkpoint-Workflow will only persist the state of the workflow at a point in time by creating a snapshot of the current work.
To create a workflow in PowerShell, a XAML ‘declarative’ workflow is generated (eXtensible Application Markup Language) that is then used by Windows Workflow Foundation to run the workflow. It is possible to see this code from the console as indicated in the following example. First we create a workflow, and then look at the XAML representation of it.
|
1 2 3 4 5 |
Workflow Check-WinFeature { Get-WindowsFeature } Check-WinFeature |
To obtain this workflow in the XAML format:
|
1 |
PS > (Get-Command Check-WinFeature).XamlDefinition |
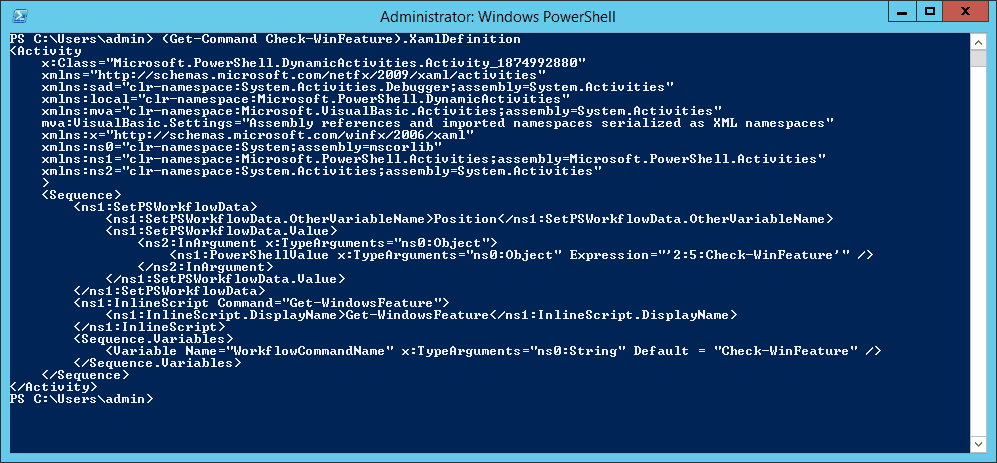
Figure 12 – Workflow in format XAML
Conclusion
We have arrived at the end of this article dedicated to administrations tasks with PowerShell. We have looked at how the use of Jobs and Workflows can help you in your routine tasks.
A good starting point in working out the best strategy for the implementation of PowerShell tasks in a series of steps :
- First step : Job
- Second step : Workflow
- And finally new complex combinations. For example: a workflow within another workflow.
From my experience, two mains benefits of creating a PowerShell Job are:
- Running simple commands in background. Think about the visibility of your command line.
- Reviewing the results of your jobs whenever you want.
It makes it easier to manage a remote background Job if you collect the results in a central location unless the data is sensitive. In that case, I maintain results on the remote computer for security purposes.
In my opinion, Workflow is very flexible and can be easily customized to match with your corporate IT environment. Workflow comes into its own if you identify those activities which can be executed in parallel and add them into a Workflow.
I hope that you now understand better the usage of jobs and workflow while processing your daily actions. Just remember that the more your tasks are automated, the more time will save. Simplify your life to the maximum.
Load comments