
One of the great features of PowerShell is its extensibility. In PowerShell version 1 it was possible for other product teams within Microsoft or elsewhere to use a delivery mechanism known as snap-ins to extend PowerShell with additional PowerShell cmdlets. Although the snap-in mechanism is still supported within PowerShell version 2, the new feature known as a PowerShell module has made it much easier to extend PowerShell to make it more appropriate for specialised uses.
PowerShell modules bring extendibility to the systems administrator, DBA, and developer. Whether it’s simply as a method to share functions and scripts you have created or delving further into providing what would have been snap-in territory in version 1, you should be aware of the capabilities of modules.
PowerShell is an integral part of Windows 7 and Windows Server 2008 R2. Window Server 2008 R2 ships with a number of built-in modules. Further modules become available after installing various additional components of the operating system.
In this article we will examine the fundamentals of modules and then, by way of an example, look at some practical ways you can make use of them in Windows Server 2008 R2.
PowerShell Modules
in PowerShell version 1, Snap-ins were popular with systems administrators who used cmdlets provided by third parties, such as Quest’s Active Directory cmdlets and VMware’s PowerCLI cmdlets. However, you did not find many of those same administrators creating their own snap-ins, particularly if they were just starting out learning PowerShell because it would typically involve writing some C# code.
PowerShell version 2 makes it easier to achieve the objective of sharing functions and scripts as part of a module. In addition, whilst a snap-in can only contain cmdlets and providers, a module can also contain other common PowerShell items such as functions, variables, aliases and PowerShell drives.
Creating Your First PowerShell Module
Before you create your first PowerShell Module you will need to know what to create and where to store it. PowerShell will look in the paths specified in the $env:PSModulePath environment variable when searching for available modules on a system. By default this contains two paths; one in a system location %windir%\System32\WindowsPowerShell\v1.0\Modules and also in the currently logged on user location %UserProfile%\Documents\WindowsPowerShell\Modules . In this article for the sake of convenience we will store our module in the %UserProfile% location.
Each module should be stored in a sub folder of either of these paths and typically be the name of the module – within that folder you will then store the files that make up the module. At the least, we need a *.psm1 file. In this file could be placed a number of functions or variables that make up the module. In addition it is possible to place PowerShell scripts in *.ps1 files in the module’s folder and reference them in the *.psm1 file. As a final touch, a module manifest file can be created which will give a more professional and rounded feel to your module, but we will come on to manifests later.
Let’s look at the process of creating an example module.
To start with we will place a couple of functions in a *.psm1 file to make the module. There is nothing special in a *.psm1 file other than the file extension, so we can take a normal *.ps1 PowerShell script file containing our functions and rename it to make the *.psm1 file.
Firstly, let’s create two functions that we can use for our module which we will call CurrencyConversion. The first function will convert British Pounds into Euros. It does this by connecting to a web service at http://www.webservicex.net to obtain the current conversion rate between British Pounds and Euros, and then multiplies the inputted value of Pounds by the conversion rate to output the Euro value.
|
1 2 3 4 5 6 7 8 |
Function ConvertTo-GBPEuro { param ([int]$Pounds) $Currency = New-WebServiceProxy -Uri http://www.webservicex.net/CurrencyConvertor.asmx?WSDL $GBPEURConversionRate = $Currency.ConversionRate('GBP','EUR') $Euros = $Pounds * $GBPEURConversionRate Write-Host "$Pounds British Pounds convert to $Euros Euros" } |
The second function carries out the reverse operation; it converts Euros into their value in British Pounds.
|
1 2 3 4 5 6 7 8 |
Function ConvertTo-EuroGBP { param ([int]$Euros) $Currency = New-WebServiceProxy -Uri http://www.webservicex.net/CurrencyConvertor.asmx?WSDL $EURGBPConversionRate = $Currency.ConversionRate('EUR','GBP') $Pounds = $Euros * $EURGBPConversionRate Write-Host "$Euros Euros convert to $Pounds British Pounds" } |
Executing these functions with a value of 10 each time produces the following results:
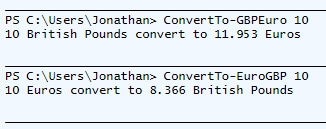
Fig 1. Executing the Conversion Functions
We now save these functions into the CurrencyConversion.psm1 file and save it into the folder C:\Users\Jonathan\Documents\WindowsPowerShell\Modules\CurrencyConversion.
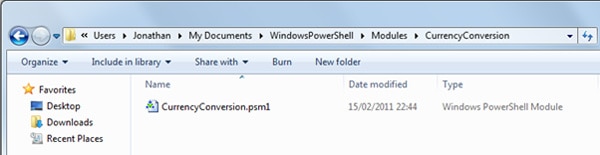
Fig 2. The CurrencyConversion Module File Location
So far, so simple – no real magic required. We can use the Get-Module cmdlet to reveal the modules that are available on our system (Note: it is Windows 7, later in this article we will look in particular at modules which ship with Windows Server 2008 R2) and we are pleased to see that with very little effort we have created our first module CurrencyConversion.
|
1 |
Get-Module -ListAvailable |
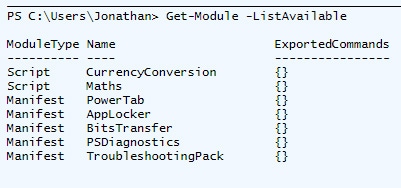
Fig 3. List Available Modules
We can now make the functions in our CurrencyConversion module available to the current PowerShell session via the Import-Module cmdlet. Note: For illustrative purposes we will use the -PassThru parameter to display the output of this cmdlet to the console; by default this does not happen.
|
1 |
Import-Module CurrencyConversion -PassThru |
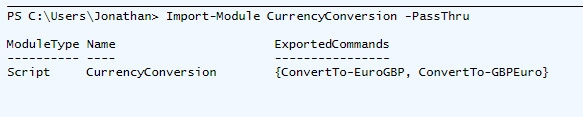
Fig 4. Importing the CurrencyConversion Module
We can see that the two functions are available to us in this PowerShell session, by using the Get-Command cmdlet.
|
1 |
Get-Command -Module CurrencyConversion |
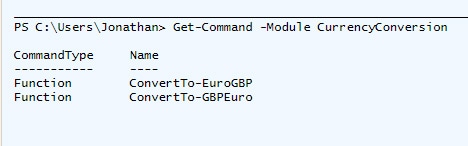
Fig 5. Viewing the Functions in the CurrencyConversion Module
Remember, to make these functions available to somebody else, there is no need to bundle them up into an MSI file for installation, like a PSSnapin, all that needs to be done is the CurrencyConversion folder and files to be copied to the right location. Currently this module only contains two functions, however it would be quite straightforward to expand it to contain conversion functions for all kinds of currencies and add these to the CurrencyConversion.psm1 file and no further work would be necessary since it is already a valid module.
PowerShell Module Manifests
Earlier in this article we mentioned that it was possible to smarten up your modules and give them a more professional look by using module manifests. For instance you may wish to include some Author and Versioning information as part of the module or you may wish to specify minimum versions of PowerShell and / or the .NET Framework which are needed for components of your module. So how do you go about creating a module manifest? Well Microsoft have made creating a basic module manifest easy by giving us the New-ModuleManifest cmdlet. Whilst it is possible to create a module manifest manually (simply create a *.psd1 file containing your requirements and place it in the module folder), using the cmdlet makes it easy to create a basic one. Let’s continue with the CurrencyConversion module and create a basic module manifest using New-ModuleManifest.
We have two options when using this cmdlet. We can either specify all of the parameters we wish to include in the manifest and supply them on the command line, or we can simply enter New-ModuleManifest and be prompted for parameters that we might want to provide.
For this example we’ll take the latter method. Entering New-ModuleManifest first prompts us for a path to the module manifest file; in this case we give the path to the CurrencyConversion module and the name of the manifest file: C:\Users\Jonathan\Documents\WindowsPowerShell\Modules\CurrencyConversion\CurrencyConversion.psd1.
(Note: in all of these examples I am using the built-in PowerShell ISE rather than the basic console, consequently the screenshots are dialogue boxes)
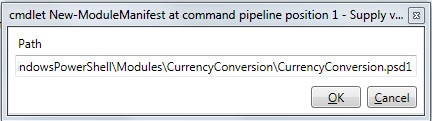
Fig 6. Enter the Path to the Module Manifest
We will then be prompted for a number of other options, particular ones to consider are:
Author: if you don’t specify one PowerShell will use the value of the currently logged on user.
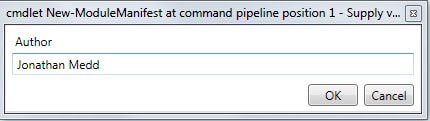
Fig 7. Enter the Author of the Module
ModuleToProcess: Specify the name of the *.psm1 file used to store the functions in the module.
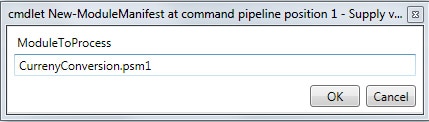
Fig 8. Enter the name of the *.psm1 file
You can Use Get-Help New-ModuleManifest to examine in more detail other options you may wish to include in your module manifest.
The resultant file created from New-ModuleManifest will look something like the below, which can now be modified further if necessary:
|
1 2 3 4 5 6 7 8 9 10 11 12 13 14 15 16 17 18 19 20 21 22 23 24 25 26 27 28 29 30 31 32 33 34 35 36 37 38 39 40 41 42 43 44 45 46 47 48 49 50 51 52 53 54 55 56 57 58 59 60 61 62 63 64 65 66 67 68 69 70 71 72 73 74 75 76 77 78 79 80 81 82 83 84 85 86 87 88 89 |
# # Module manifest for module 'CurrencyConversion' # # Generated by: Jonathan Medd # # Generated on: 16/02/2011 # @{ # Script module or binary module file associated with this manifest ModuleToProcess = 'CurrencyConversion.psm1' # Version number of this module. ModuleVersion = '1.0' # ID used to uniquely identify this module GUID = 'c6f2e5e7-91ff-4924-b4bb-8db0624195c9' # Author of this module Author = 'Jonathan Medd' # Company or vendor of this module CompanyName = 'Unknown' # Copyright statement for this module Copyright = '(c) 2011 Jonathan Medd. All rights reserved.' # Description of the functionality provided by this module Description = 'Convert values between different currencies' # Minimum version of the Windows PowerShell engine required by this module PowerShellVersion = '' # Name of the Windows PowerShell host required by this module PowerShellHostName = '' # Minimum version of the Windows PowerShell host required by this module PowerShellHostVersion = '' # Minimum version of the .NET Framework required by this module DotNetFrameworkVersion = '' # Minimum version of the common language runtime (CLR) required by this module CLRVersion = '' # Processor architecture (None, X86, Amd64, IA64) required by this module ProcessorArchitecture = '' # Modules that must be imported into the global environment prior to importing this module RequiredModules = @() # Assemblies that must be loaded prior to importing this module RequiredAssemblies = @() # Script files (.ps1) that are run in the caller's environment prior to importing this module ScriptsToProcess = @() # Type files (.ps1xml) to be loaded when importing this module TypesToProcess = @() # Format files (.ps1xml) to be loaded when importing this module FormatsToProcess = @() # Modules to import as nested modules of the module specified in ModuleToProcess NestedModules = @() # Functions to export from this module FunctionsToExport = '*' # Cmdlets to export from this module CmdletsToExport = '*' # Variables to export from this module VariablesToExport = '*' # Aliases to export from this module AliasesToExport = '*' # List of all modules packaged with this module ModuleList = @() # List of all files packaged with this module FileList = 'CurrencyConversion.psm1' # Private data to pass to the module specified in ModuleToProcess PrivateData = '' } |
Now that we have created a basic module manifest, we can take that as a template for future modules and customise it for our needs.
In Fig 3. you saw that our CurrencyConversion module had a ModuleType of Script , whilst other built-in and third-party modules had a ModuleType of Manifest. Now that we have created a module manifest file let’s see if that has made a difference to our CurrencyConversion module.
|
1 |
Get-Module -ListAvailable |
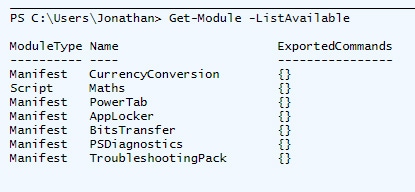
Fig 9. CurrencyConversion Module of ModuleType Manifest
Our CurrencyConversion module is now right up there with the Windows Server 2008 built-in modules! OK, maybe not, but hopefully you get the idea.
PowerShell Modules Built-In to Windows Server 2008 R2
Now that we have seen how to create our own modules, let’s take a look at some of the modules which ship as part of the Windows 2008 R2 operating system. As previously seen, to find out what modules are available we use the Get-Module cmdlet.
|
1 |
Get-Module -ListAvailable |
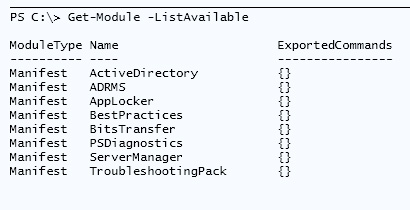
Fig 10. Available Modules on a Windows Server 2008 R2 System
You will notice that in Fig 10, the available modules are slightly different from those we saw earlier on a Windows 7 system. Out of the box we have the BestPractises and ServerManager modules, and in this particular case we have the ActiveDirectory and ADRMS modules. Windows Server 2008 R2 has evolved to become a more modular style operating system, where not everything is installed by default. Instead, depending on the role of the server, the required components for that role are installed as required. So an Active Directory Domain Controller may not necessarily have the IIS components installed, and a File Server may not have the DNS components installed.
When an additional server role or feature is installed, the relevant PowerShell modules are installed. In Fig .10 the Remote Server Administration Tools for Active Directory have been installed, consequently the ActiveDirectory and ADRMS modules are present.
Server Manager Module
In fact there is actually a module included as part of Windows Server 2008 R2 to help you manage the modular components that are installed, the ServerManager module. By importing this module and using the Get-WindowsFeature cmdlet we can see which components have been installed. By default this will produce a long list of results so it is possible to use wildcard filters to narrow the search down to what we are interested in – in this case Active Directory. Note in Fig. 11 that the elements marked with a X are those which have been installed.
|
1 2 |
Import-Module ServerManager Get-WindowsFeature *AD* |

Fig 11. Viewing Installed Components
To install a component we use the Add-WindowsFeature cmdlet from the ServerManager module. (Note that this is an operation that will require elevated privileges so you will need to run PowerShell as an Administrator first.) In this case we will install the Print Server Role Service. Firstly we need to find out the name of the Print Server Role Service and then we can add it.
Get-WindowsFeature *print*
Add-WindowsFeature Print-Server
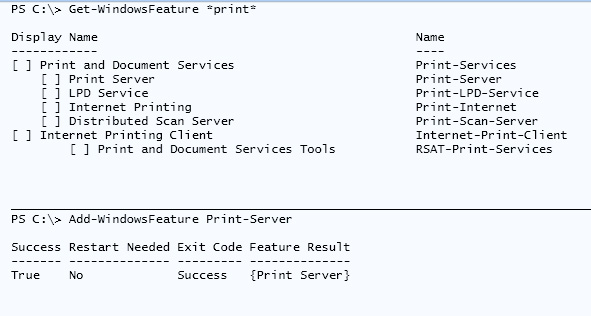
Fig 12. Adding the Print Server Role Service
The ServerManager module is great for deployment scenarios. As an alternative to storing different virtual machine templates for different server roles, it would be possible to maintain fewer base OS templates and then have different build scripts ready to deploy the different server roles. These scripts could also contain customised settings for that server role, e.g. fine tuned registry settings.
Troubleshooting Pack Module
Windows Server 2008 R2 was a big leap forward in terms of PowerShell cmdlet coverage and there are now cmdlets available via modules for everything from Active Directory, through Group Policy and Failover Clusters to IIS. For a full list check out the below table on Technet.
http://technet.microsoft.com/en-us/library/ee308287%28WS.10%29.aspx#BKMK_Appendix
Another example is the built-in TroubleshootingPack PowerShell module. To start using it we need to first of all import it and then find out what cmdlets are available to us after importing it.
|
1 2 |
Import-Module TroubleshootingPack Get-Command -Module TroubleshootingPack |
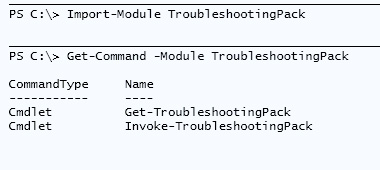
Fig 13. Cmdlets Available in the TroubleshootingPack Module
From Fig 11. we can see that there are two cmdlets available in this module. Troubleshooting Packs are found in the C:\Windows\Diagnostics folder. From a base install of Windows Server 2008 R2 we appear to have two available, Networking and the Program Compatibility Wizard.
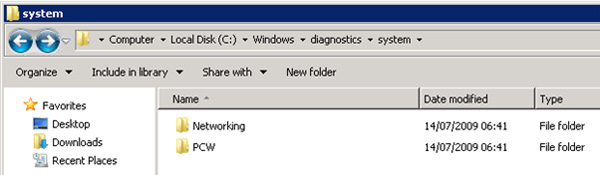
Fig 14. Available Troubleshooting Packs
Let’s examine the Networking Troubleshooting Pack and see what we might be able to do with it:
|
1 |
Get-TroubleshootingPack C:\Windows\Diagnostics\System\Networking | Format-List * |
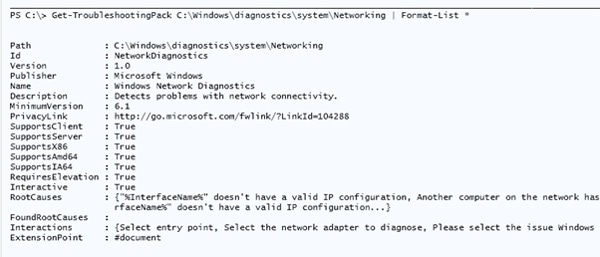
Fig 15. Networking Troubleshooting Pack
It looks like we should be able to use this to help troubleshoot networking issues on this machines. We can execute the Networking Troubleshooting Pack with the other cmdlet from the module Invoke-TroubleshootingPack.
|
1 |
Get-TroubleshootingPack C:\Windows\Diagnostics\System\Networking | Invoke-TroubleshootingPack |
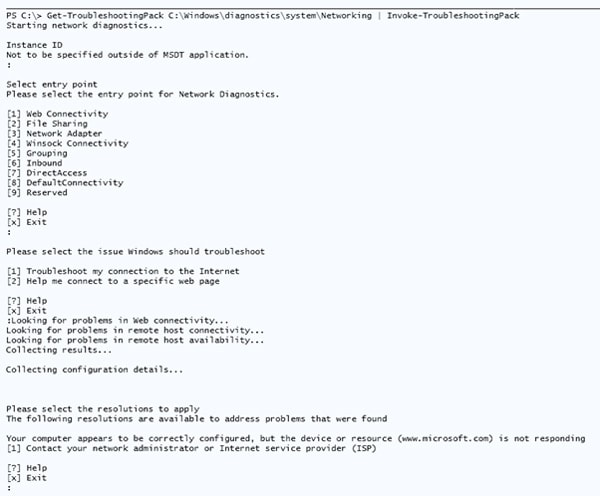
Fig 16. Invoking the TroubleShooting PowerPack
During the running of this TroubleShooting Pack I was first prompted for an InstanceID, which I left blank, and then which test to carry out – I choose [1] Web Connectivity. I knew that this server did not have Internet connectivity so I choose that it should troubleshoot [1] Troubleshoot my connection to the Internet.
It correctly determined that whilst the server appeared to be configured for Internet access it was not able to contact external resources. This is possibly not the most practical of examples, but you get the idea and the enormous scope for these Troubleshooting Packs.
Third-Party Modules
Many organisations and community members are taking advantage of the modules feature and there are already many modules you can obtain via the Internet. A great starting point for finding these is the Codeplex site http://www.codeplex.com/. Head to the site and search for ‘PowerShell Module’. As of the time of this article there are over 50 modules including the PowerShell Community Extensions Module, the BSonPosh Module and SQLPSX. I encourage you to look at the site and check out the many options there.
Summary
In this article we have looked at how the use of Modules has made it much easier to package and distribute PowerShell scripts and functions for special purposes. No longer do the creators of scripts need to be developers who can compile code into PSSnapins as with PowerShell 1. Modules can be developed that fit the particular needs of a particular application or server role.
This is a great encouragement to DBAs and Systems Administrators to create PowerShell cmdlets to automate a number of processes, and make them accessible via modules. It has also enabled Microsoft to provide modules to accompany added roles or features of the OS that ease the administrative workload. Getting access to these modules is a simple process by installing the correct role or feature and then importing the module. As IT organisations strive to greater automation it is well worth checking out the automation possibilities that these modules bring.
This document contains proprietary information and is protected by copyright law.
Copyright © 2026 Red Gate Software Limited. All rights reserved
Load comments