
Virtualised environments can range pretty wildly in size; from one physical server in a small business or test lab with a few VMs, right up to large enterprises with hundreds or thousands of physical servers and seemingly limitless VMs. Whatever the size of your environment, as a good system administrator, you know that it’s important to configure it in a consistent manner, and automate as much as is reasonably possible.
If you’re using VMware ESX / ESXi hypervisors and vCenter as the management software, then you already have access to a number of automation tools to assist with making your infrastructure function as smoothly as possible. These include VMware vSphere PowerCLI, VMware vSphere CLI and VMware vSphere SDK for Perl. In this article, I will be focusing on VMware vSphere PowerCLI, the automation tool supplied as a snapin for Microsoft’s Windows PowerShell command line tool and scripting language, as well as 10 ways that any system administrator can kick-start the automation of their virtual infrastructure.
Getting Started
As I just mentioned, vSphere PowerCLI is provided as a snapin for Microsoft’s Windows PowerShell, and so to use it you will need:
- .NET Framework 2.0 SP1
- Windows PowerShell 1.0 or 2.0
Note
If you have Windows PowerShell 2.0, then I’d advise installing .NET Framework 3.5 SP1, since you’ll then have access to the built-in PowerShell ISE and cmdlets (such as Out-GridView).
Of course, you should always refer to the VMware website for up-to-date system requirements. At the time of writing, PowerCLI is currently in version 4.0 Update 1, and is supported on the following 32 bit and 64 bit platforms:
- Windows Vista
- Windows XP SP2
- Windows 2003 Server SP2
PowerCLI itself will connect to and manage:
- VMware ESX 4.0 Update 1/vCenter Server 4.0 Update 1
- VMware ESX 4.0i
- VMware ESX 4.0/vCenter Server 4.0
- VMware ESX 3.5
- VMware ESX 3i
- VMware VirtualCenter 2.5
- VMware ESX 3.0/VirtualCenter 2.0
There is also a separate PowerShell snapin available for VMware Update Manager, which is the tool provided as an accompaniment to VMware vCenter to centrally manage the patching of ESX / ESXi hosts and guest virtual machines. This snapin has similar system requirements to the main PowerCLI tools, although it must be noted that these cmdlets require VMware vSphere PowerCLI 4.0 Update 1, and will only work with VMware Update Manager 4.0 U1. So, if your vCenter is the base 4.0 release or earlier, you will not be able to use them, and you’ll need to upgrade.
Both of the above sets of cmdlets can be found and downloaded from the VMware PowerCLI site, which is a great reference site for everything needed to get started with PowerCLI. If you really get stuck, there are experts waiting in the forums to answer any queries you may have. Bear in mind that when you’re getting started, it is likely that the majority of your questions will already have been answered in these forums, and a simple search will find those answers.
Once all of the system requirements have been installed, the PowerCLI cmdlets can easily be accessed via the shortcut which the installer places on the desktop. Alternatively, if you’re already familiar with Windows PowerShell, you may simply want to add the VMware snapins to your own session. If you’re unsure how to do this, you can just use the Add-PSSnapin cmdlet to make these cmdlets available to the current session, as shown below:
|
1 2 3 4 |
Standard PowerCLI cmdlets Add-PSSnapin VMware.VimAutomation.Core VMware Update Manager cmdlets Add-PSSnapin VMware.VumAutomation |
For regular use, it would make sense to add these to your default PowerShell profile, which can be opened by entering this command from within PowerShell:
|
1 |
notepad $profile |
This will open a text file containing the custom configuration to run each time a PowerShell session is opened. If you receive an error that the profile file does not exist (i.e. one has not yet been created), a profile file can be simply created via:
|
1 |
New-Item -Path $profile -ItemType file -Force |
Once you’ve got your profile open, you just need to add this line to it:
|
1 |
Add-PSSnapin VMware.VimAutomation.Core, VMware.VumAutomation |
The final step to getting started with PowerCLI is to make a connection to either VMware vCenter or directly to an ESX / ESXi host; this is similar in concept to opening the vSphere client and making a connection to VMware vCenter or directly to an ESX / ESXi host. Use the Connect-VIServer cmdlet to make the connection to VMware vCenter:
|
1 |
Connect-VIServer vCenterServerName |
…or a host, if directly configuring a host:
|
1 |
Connect-VIServer HostServerName |
The system will use the credentials you are currently logged-on with to establish a connection with the target. Alternative credentials can be specified with the -Username and -Password parameters, if necessary. If the current credentials are not sufficient, then you may be prompted to enter more appropriate credentials via a standard Windows dialogue box.
10 Steps to Kick Start Automation
Now that you’ve got your VMware automation tools configured and connected, it’s time to look at how to use them to get as much of your VM maintenance automated as possible. As you’ll see, I’ve broken this kick-start process down into bite-sized steps to make it easier to follow. These steps are individual stand alone operations, although they can be scripted to make powerful combinations. Taken together, all 10 steps will give you a solid foundation for putting some more sophisticated automation in place. Before you get started, I recommend downloading Alan Renouf’s excellent Quick Reference Guide (PDF), just in case you want to look up the details of any of the cmdlets I’ll be discussing.
1) Reviewing and Configuring Virtual Machines
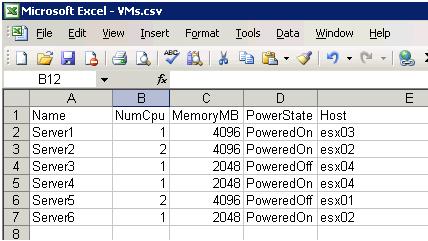
The reason virtual infrastructures are put together is primarily (and unsurprisingly) to run virtual machines, so a good place to start is with the Get-VM cmdlet, which can produce a simple inventory of all VMs currently found within VMware vCenter . Using the Get-VM cmdlet, and the standard PowerShell Select-Object cmdlet, you can retrieve the particular properties that are of interest and use Export-CSV to export that data into the ever-useful CSV file format for further manipulation and distribution.
|
1 2 |
Get-VM | Select-Object Name,NumCPU,MemoryMB,PowerState,Host | Export-CSV VMs.csv -NoTypeInformation |
A sample result of which is shown below:
Another example where this cmdlet can be put to good use is to alleviate a common stumbling block when attempting to VMotion virtual machines from one ESX host to another (in case you don’t use VMware regularly, “to VMotion virtual machines…” means “to use VMware VMotion to Live Migrate virtual machines to another physical host…”). There are a number of reasons why a virtual machine might not be permitted to VMotion; one of the most common is because it has a local CD-Rom drive attached. The below set of commands will iterate through all virtual machines, filter them based on whether the connection state of their CD-Rom drive is true, and return the name of the offending virtual machine(s):
|
1 2 3 |
Get-VM | Where-Object {$_ | Get-CDDrive | Where-Object { $_.ConnectionState.Connected -eq "true" } } | Select-Object Name |
One of the great things about PowerShell is the intuitive possibility to gradually build up a set of commands to carry out increasingly more complex actions. This means it becomes possible to both review and appropriately configure your VMs in a single step. In this instance, as well as retrieving the list of virtual machines where the CD-Rom is connected, it is very simple to extend the above command to automatically disconnect these CD-Roms, rather than carry out that task manually. Simply use the Set-CDDrive cmdlet to change the connection status of any connected CD-Roms which have been found:
|
1 2 3 |
Get-VM | Where-Object {$_ | Get-CDDrive | Where-Object { $_.ConnectionState.Connected -eq "true" } } | Get-CDDrive | Set-CDDrive -Connected $false -Confirm:$false |
This is just a single example, but now that you know how to quickly gather the data you need, you can easily target specific settings and make appropriate configurations a snap. You can find out more about what cmdlets are available to adjust your VMs’ settings from the PowerCLI website, as mentioned earlier.
2) Basic Capacity Information
The PowerCLI cmdlets can be used to give a quick overview of the number of hosts and VMs that exist within the Virtual Center; it could be useful to record these figures on a monthly basis so that the growth of the environment can be tracked over time. How about finding the average number of VMs per host in a cluster? Again, a useful figure to regularly record so as to observe what consolidation ratios are being achieved and to plan for future capacity needs, and a figure which PowerCLI can help you find.
In the code below, we retrieve the ESX / ESXi hosts & VMs and observe their count; note the use of the $DefaultVIServer variable, which is updated each time a connection is made to a vCenter.
For the average number of VMs in each cluster, we find the total number of ESX / ESXi hosts and VMs and perform some basic maths to arrive at a figure. Note the use of some basic .NET [math]::round code and the number of decimal places (1) required to format the output as desired:
|
1 2 3 4 5 6 7 8 9 10 11 12 13 14 15 16 17 18 19 |
# Total number of hosts $TotalVMHosts = (Get-VMHost).Count Write-Host "There are $TotalVMHosts Hosts in $DefaultVIServer" # Total number of guests $TotalVMs = (Get-VM).Count Write-Host "There are $TotalVMs Virtual Machines in $DefaultVIServer" # Average VMs Per Cluster $Clusters = Get-Cluster foreach ($Cluster in $Clusters){ $VMHosts = Get-Cluster $Cluster | Get-VMHost $VMs = Get-Cluster $Cluster | Get-VM $AverageVMsPerCluster = [math]::round(($VMs.count / $VMHosts.count), 1) Write-Host "$Cluster has $AverageVMsPerCluster guests per VMware host" } |
3) Rescanning for New Storage
What used to be one of the most onerous tasks for a VMware administrator was using the vSphere Client GUI to re-scan all hosts in a cluster for new storage after an additional SAN Lun had been provisioned. This would require individually selecting each host within the cluster, scanning it for new storage, and then moving on to the next host until all were complete – a process which quickly becomes frustrating.
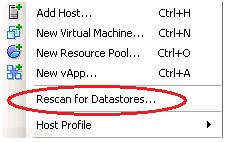
Thankfully, in vSphere 4.0, VMware added a new option when right-clicking a cluster – Rescan for Datastores. Once initiated, this task would work through each host in the cluster and scan for new storage.
However, if you are running a VMware version prior to version 4.0 in your environment, or maybe you want to rescan hosts in more than one cluster, then the Get-VMHostStorage cmdlet has two parameters which you’ll find useful: -RescanAllHba and -RescanVmfs. Used in combination with the Get-Cluster and Get-VMHosts cmdlets, Get-VMHostStorage can quickly become very powerful; for example, the command below will rescan for new storage on all of the hosts in Cluster 1:
|
1 2 |
Get-Cluster 'Cluster 1' | Get-VMHost | Get-VMHostStorage -RescanAllHba -RescanVmfs |
4) VMotion Virtual Machines to other Hosts
As a virtual infrastructure admin you will, from time to time, need to carry out maintenance on a host server, whether through patching or hardware replacement. As I’ve already alluded to, VMware provide some fantastic VMotion technology within ESX and vCenter, which enables virtual machines to be transferred from one physical host to another with no downtime incurred for the virtual machine. To move all VMs from one host to another, use this simple one liner:
|
1 |
Get-VMHost esx01 | Get-VM | Move-VM -Destination (Get-VMHost esx02) |
Of course, you may not have enough resources on the target host to move all VMs across, and consequently might wish to distribute them more evenly across a number of hosts. Wrapping all that lovely technology into just one elegant step, the short script below will VMotion all of the virtual machines from one host in a cluster to random other hosts within the same cluster.
|
1 2 3 4 5 6 7 8 9 |
$sourcehostname = (Get-VMHost 'esx01').name $clusterhosts = Get-Cluster 'Cluster 1' | Get-VMHost | Where-Object {$_.name -notlike "$sourcehostname"} $vms = Get-VMHost $sourcehostname | Get-VM foreach ($vm in $vms){ $targethost = $clusterhosts | Get-Random Move-VM -VM $vm -Destination $targethost } |
First of all, the name of the source host will be stored in the variable $sourcehostname. Then we retrieve all of the hosts within Cluster 1, drop the source host from that list, and store the results in $clusterhosts. Next, we retrieve all of the virtual machines on the source host, storing them in $vms, and finally we cycle through each virtual machine, generate a random target host and move the VM to that target host.
5) Storage VMotion Virtual Machines to a New SAN
In a similar way to how the VMotion technology migrates a virtual machine from one physical host to another, it is also possible to move the disks for a virtual machine between datastores whilst the virtual machine remains online – this technology is known as Storage VMotion. This is even possible between different SANs, provided the hosts are configured to see storage on both old and new SANs and there is sufficient bandwidth to transfer the necessary data.
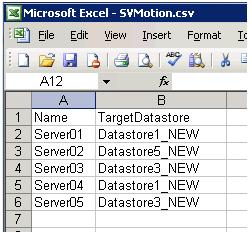
Let’s say you have mapped out in, a CSV file, which datastore the disks for each virtual machine are moving to:
We can bring that data into the PowerShell session with the Import-CSV cmdlet, and then feed it into the Get-VM and Move-VM cmdlets to Storage VMotion those virtual machines to the new SAN.
|
1 2 3 4 5 |
$vms = Import-CSV C:\Scripts\SVMotion.csv foreach ($vm in $vms){ Get-VM $vm.name | Move-VM -Datastore $vm.targethostname } |
Note that the Import-CSV cmdlet will take the column headers in the CSV file and enable access to them as property labels; i.e. for line 2, $vm.name is Server01 and $vm.targetdatastore is Datastore1_NEW.
When carrying out such a SAN migration, you may wish to carry out the work outside of normal office hours to take advantage of low-use periods on the SAN, and consequently move the data quicker. So, why not create a Windows Scheduled Task to kick off the above script and schedule it for the required time? If you wanted to be really smart, you could use the Send-MailMessage PowerShell cmdlet to have it email you each time a Storage VMotion completes.
6) Deploying Virtual Machines from a Template
Deploying new virtual machines is a simple task, particularly if you’ve created a base template and use the Guest Customisation feature to sysprep a new Windows virtual machine. However, even this process can quickly become tedious if you’re deploying multiple virtual machines from the GUI.
Let’s take an example where you have the requests for five new virtual machines provided to you in a CSV file:
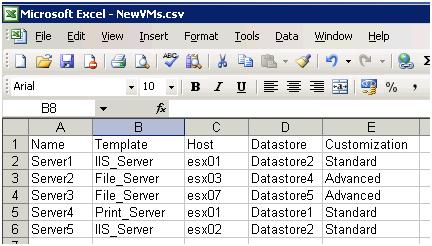
The virtual machines can be easily deployed by, once again, using Import-CSV to read in the input data. Then we cycle through the virtual machines and, for each deployment, get the template, host,datastore and customization to use, before finally executing the New-VM cmdlet and feeding it those various parameters to use for creating each VM:
|
1 2 3 4 5 6 7 8 9 10 |
$vms = Import-CSV C:\Scripts\NewVMs.csv foreach ($vm in $vms){ $Template = Get-Template $vm.template $VMHost = Get-VMHost $vm.host $Datastore = Get-Datastore $vm.datastore $OSCustomization = Get-OSCustomizationSpec $vm.customization New-VM -Name $vm.name -OSCustomizationSpec $OSCustomization ` -Template $Template -VMHost $VMHost -Datastore $Datastore -RunAsync } |
7) Configuring vSwitches and Port Groups
Keeping the networking configuration consistent and accurate across all ESX / ESXi hosts in a cluster is crucial. This is particularly the case for technologies like VMotion, which requires identically configured networking on the source and target hosts to enable virtual machines to transfer between them. In an enterprise environment, it would be very common to have multiple VLANs made available via multiple port groups on different vSwitches. Consequently, when deploying a new ESX / ESXi host into a cluster, a significant amount of manual networking configuration could be required, which could easily lead to mistakes being made, and one very bored administrator.
To address this, VMware have introduced some new technology into vSphere 4.0, known as Host Profiles; however this is only available to customers who have purchased Enterprise Plus licensing. Well known PowerCLI community expert Alan Renouf has provided a simple alternative solution to this problem via his blog (rather than reproduce the script here, I recommend you take a look at his blog once you’ve finished here. I’ll include a link at the end of the article). This short script will prompt the administrator for a source and target host, copy the network configuration from the source host and apply it to the target. Simple, yet very effective, and a great time saver; and no requirement to use Host Profiles.
8) Configuring an NTP Time Server
Another item to keep consistently configured across the ESX / ESXi hosts is the NTP server used to keep the time. Whether setting this on a new host or making a change across all hosts, it’s a snap to do it with PowerCLI. To add an NTP server to a new host, esx01, not previously configured use:
|
1 |
Get-VMHost esx01 | Add-VMHostNtpServer -NtpServer ntpservername |
Or to first of all clear existing NTP server(s) then set the new one:
|
1 2 3 |
Get-VMHost esx01 | Remove-VMHostNtpServer ` -NtpServer (Get-VMHost esx01 | Get-VMHostNtpServer) Get-VMHost esx01 | Add-VMHostNtpServer -NtpServer ntpservername |
9) Patching Via VMware Update Manager
As mentioned at the beginning of the article, there is an additional set of commands which can be used in conjunction with VMware Update Manager to assist with the automation of patching ESX / ESXi hosts or VMs. When planning a patch deployment, it might be necessary to provide information up front to management regarding the list of patches which you intend to install. Whilst VMware Update Manager has a GUI which is useful for most tasks, it is difficult to extract this information out from the GUI and into a distributable format.
The code below will find the compliance status of a host, as scanned against a baseline, and then export a list of patches required by that host out to a CSV file:
|
1 2 3 4 5 6 |
$ComplianceStatus = Get-Compliance -Entity 'esx01' -Detailed $ComplianceStatus.NotCompliantPatches | Select-Object Name,IDByVendor,Description,` @{n='Product';e={$_.product | Select-Object -expandproperty Version}},ReleaseDate | Export-Csv patches.csv -NoTypeInformation |
Or how about bringing any newly installed ESX / ESXi host immediately up-to-date with the current standard patch baseline? Easy.
Retrieve the required baseline:
|
1 |
$Baseline = Get-Baseline "Current ESX Baseline" |
Attach the baseline to the required ESX / ESXi host:
|
1 |
$Baseline | Attach-Baseline -Entity esx01 |
Scan the host to determine required patches:
|
1 |
Scan-Inventory -Entity esx01 |
– Remediate the host against the required baseline:
|
1 |
$Baseline | Remediate-Inventory -Entity esx01 -Confirm:$false |
These commands could all be added to a short script to be run at the end of a build process, to ensure that all newly deployed hosts are at the required patch level.
10) Schedule the vCheck Reporting Script to Run Daily
The previously mentioned PowerCLI community expert, Alan Renouf, has put together an amazing and, very generously, completely free PowerShell reporting script, which can be run against a vCenter environment and report back on many common issues and best practises. This report is known as vCheck, and is available from Alan’s Virtu-Al.net website. It is a great way to be proactive and find issues with the infrastructure before they become serious.
Common issues that will be found include snapshots which are over a specified number of days old, VMs with no VMware Tools installed, and datastores with less than a specified amount of free space available. It is highly recommended to schedule this report to run against your vCenter and have it email you with the results on a daily basis – you will most likely find issues you did not even know you had!
Summary
VMware environments of any size, small or large, can benefit greatly from automation. This article has introduced you to some of these possibilities and how you might use them to make your systems run better, in a more consistent fashion. The beauty of this is twofold: you’ll find it significantly easier to be aware of the status of all your virtual environments, and you’ll have more time to spend on the projects that you never get around to.
Not only will you be proactive, but you’ll also have more time to feel self-satisfied about it. PowerCLI is intuitive to use, and it is incredibly simple to very quickly get real results with it – I urge you to give it a try, if you haven’t already done so!
Resources
VMware Tools:
- ESX / ESXi
- vSphere PowerCLI
- vSphere CLI
- vSphere SDK for Perl
- Alan Renouf’s vSwitch Script
- Alan Renouf’s vCheck
This article was commissioned by Red Gate Software, engineers of ingeniously simple tools for optimizing your Exchange email environment.
Learn more about Exchange Server Archiver and PST Importer.
This document contains proprietary information and is protected by copyright law.
Copyright © 2026 Red Gate Software Limited. All rights reserved
Load comments