
In my previous article in this series, An Incremental Database Development and Deployment Framework, I defined the goals in developing such a framework, described its components parts and explained how they work together to automate database deployments.
We’re now ready to work through a relatively simple use case. We’ll review a typical development cycle structure for incremental database development and deployment and then step through an example that will demonstrate an iteration of this development cycle, when creating a completely new database. The example comprises the following five steps:
- Create a new, empty database (
ExampleDB) - Create a schema (
reports), add two tables (ReportHeadersandReportLines), a database role (ReportReader) with read access to these tables, and a user (WebConnect) who is a member of this role - Create a stored procedure (
GetTheBigBossReport), revoke direct table access fromReportReader, and instead assign execute privileges onGetTheBigBossReport - Add a new column (
Comments) toReportHeadersand updateGetTheBigBossReportto include it in its output - Having completed our development, we generate a single script to create and deploy all schema objects, as they exist in Step 4, and another script to deploy the code objects (in this case,
GetTheBigBossReport)
The code download provides the database upgrade packages (ExampleDB), one for each of the above steps, including all necessary scripts, utilities and configuration files.
An Overview of the Development Cycle
Every action is a “change” that we must script and track. We script each database object into a separate text file, stored in a version control system, in order to track all changes to these files. When developing a new database, we start with an empty database, and then iteratively change it, adding new objects and amending existing ones until the database reaches the desired state. Figure 1 shows a development cycle to support incremental database development.

Figure 1: Steps of the Database Development Cycle
In our example, we’ll start from a “clean slate”, creating a completely new, empty database (build 0.0.0.1) and then we’ll write T-SQL scripts, and adjust configuration files, including the change log, as we incrementally upgrade it through various sub-builds. At build 0.0.0.4, we’ll consider the development cycle complete, and generate a full build script containing all schema objects from scratch (we deal with code objects separately).
This creation of the full build script corresponds to the final box in Figure 1, listed as optional because it’s not always applicable. Once we deploy a database, and it contains live production data, we cannot simply drop it and recreate it from scratch. From that point on, we must incrementally upgrade it, using changes described in the change log and taking care to preserve the existing data (we’ll return to this topic in the next article).
Developing and Deploying a New Database
In order to work through this example, you will need the code download file supplied at the bottom of the article. If you already downloaded the file with the previous article, there is no need to do so again, as the two files are identical.
Extract the file to disk and within you should find a series of five folders (one for each of the five previously described steps). The structure of each of these database projects is as described in the previous article but, for convenience, I’ll reproduce the structure diagram here.
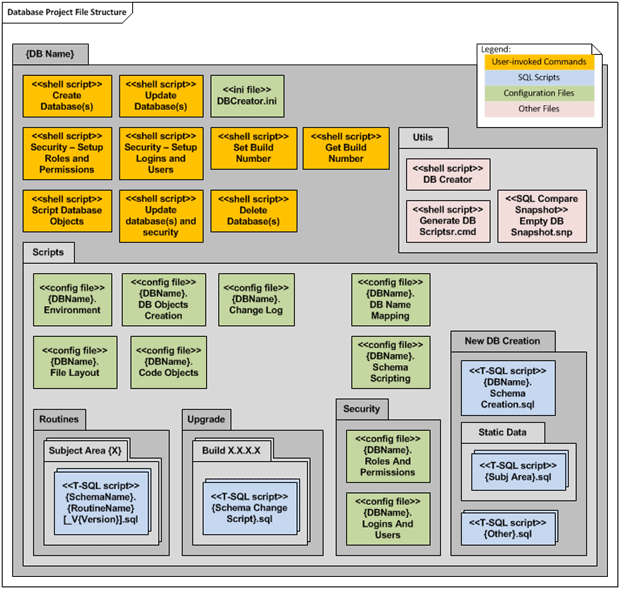
Figure 2: Database Project File Structure
Note that for the purpose of this demo, we can simply store all the files on the file system, but in reality, they will obviously be under Source Control.
You’ll also need a machine with SQL Server 2005/2008 on which you can log in with administrative privileges. The scripts provided in the download assume that you use local default SQL Server instance. If you use a named SQL Server instance, or it is located on different machine, simply modify the DBCreator.ini file appropriately. The file contains two parameters: MachineName for the server name and SqlInstanceName for the named instance. If you use the default instance, leave the latter blank.
Mixed authentication mode is used. The framework supports use of Windows authentication but we don’t use it in this example. Step 5 assumes use of Red Gate SQL Compare 10.0 (see the relevant section below for further details).
Step 1: Create the Empty Database
Our first task is to create a new empty database called ExampleDB. In the supplied code download package, you’ll find five folders, corresponding to our five steps. Inside the first folder, 01.New DB Creation, you’ll find the ExampleDB folder, which is the database upgrade package for this step.
Extract it to disk and you’ll see that its contents are as shown in Figure 3.
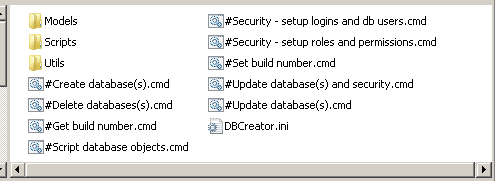
Figure 3: Contents of the ExampleDB database upgrade package
At the top level, we see the .cmd files (and the .ini file) and the contents of Scripts and Utils are as described in the previous article. Note that we don’t use the Models folder in this example but it’s where we’d store database models built with Erwin or Visio or any other similar tools.
Since all the scripts and files are “pre-prepared”, all we need to do to create our empty ExampleDB database is execute #Create database(s).cmd. A few windows will pop up and close again and once the operation is complete, we can see our new database in SSMS object explorer.
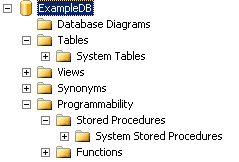
Figure 4: Initial ExampleDB Database Structure
Now, run #Get build number.cmd and you’ll see that newly created database is marked with build number 0.0.0.1.

Figure 5: ExampleDB database version (build number) after Step 1
The process outputs all the actions it performs and their result into a log file named DBEnvironmentBuilderLog.txt. If an error occurs during the process, this file will provide the details.
The process can feel a little like “black magic” the first time, so let’s briefly look deeper at what happened here. After the initial section that reads the configuration parameters (not discussed further here), the key line in #Create database(s).cmd is as shown in Listing 1.
|
1 |
"Utils\DBCreator.vbe" create /sqlservername:%MachineName%%SqlInstanceName% /envconfig:"%EnvConfigFile%" /dbnamemapping:"%DbNameMappingFile%" |
Listing 1: Calling DBCreator.vbe with the create command
It calls DBCreator.vbe (simply an encrypted form of the .vbs file), and supplies the “create” command, plus the relevant parameters for the server name and instance, environment configuration file and mapping file (all defined in DBCreator.ini).
As described in the previous article, this invokes database creation steps in DBCreator.vbe, which creates the initial environment comprising the databases, logins, users, role and permissions, as defined in the Environment configuration file (and referenced files therein).
In other words, we use configuration files to define the basic environment, including the empty database, and the deployment utility uses these files to create the environment. We then use SQL scripts to create database objects (tables, data) and another set of configuration files for the permissions setup.
Listing 2 shows the contents of our Environment configuration file.
|
1 2 3 4 5 6 7 8 9 10 11 12 13 14 15 16 17 18 19 |
<System id="ExampleDB" database environment"> <Build Number="0.0.0.1"/> <Databases> <Database id="ExampleDB""> <FileLayout ConfigurationFileid="ExampleDB".FileLayout.config"/> <ObjectDataCreationScript ConfigurationFileid="ExampleDB".DatabaseObjectsCreation.config"/> <FullBuildObjectCreation ConfigurationFileid="ExampleDB".SchemaScripting.config"/> <RolesAndObjectLevelPermissions ConfigurationFileName="Security\ExampleDB.RolesAndPermissions.config"/> </Database> <!-- Current environment consists only of one database but many other may be added--> </Databases> <Security> <LoginsAndUsers ConfigurationFileName="Security\ExampleDB.LoginsAndUsers.config"/> </Security> <SchemaChangeLog Fileid="ExampleDB".ChangeLog.config"/> </System> |
Listing 2: ExampleDB.Environment.config
We can see that it stores the build number (0.0.0.1), which we set manually in most cases, though in step 5 it is updated automatically. Following the build number, we have four database level configuration files (FileLayout, DatabaseObjectsCreation, SchemaScripting and RolesAndPermissions), one server-level (LoginsAndUsers) and the change log (ChangeLog).
Since the database is currently empty, there isn’t at this stage a lot of interest in many of these files, but if you take a look in ExampleDB.FileLayout.Config, you’ll see the creation of two filegroups (primary and ReportData) and then some example environments for the names, initial size, location, growth characteristics, and so on, of the files in each filegroup.
The SQL Server instance name (SqlInstanceName from DBCreator.ini), named or default, identifies each deployment environment. If there is no match on the instance name, or we omit any parameters, then DBCreator will create the ExampleDB database with, in this case, two filegroups named correctly (primary and ReportData), with one data file in each. However, it will place the files in the default file and log folders, and size them according to the default settings in model, for your SQL Server instance rather than according to the Environment configuration file.
In order to correct this, for this example, simply specify appropriate settings for the Default local instance for your environment.
|
1 2 3 4 5 6 7 8 9 10 11 12 13 14 15 16 17 18 19 20 21 22 23 24 25 26 27 28 29 |
<Environment id="Default""> <SQLServerInstances> <SQLServerInstance id="MyDevelopmentBox""/> <SQLServerInstance id="AnotherDevelopmentBox\SQL2008R2""/> <SQLServerInstance id="BuildBox""/> </SQLServerInstances> <Filegroup id="primary""> <File LogicalName="PrimaryDataFile_01" PhysicalName="D:\SQLDATA\{{DBNAME}}_{{FGNAME}}_{{FILENAME}}.mdf" InitialSize="5MB" Growth="2MB" MaxSize="1024GB" /> </Filegroup> <Filegroup id="ReportData""> <File Logicalid="ReportData"01" PhysicalName="D:\SQLDATA\{{DBNAME}}_{{FGNAME}}_{{FILENAME}}.ndf" InitialSize="5MB" Growth="10MB" MaxSize="100GB" /> </Filegroup> <Log> <File LogicalName="LogFile_01" PhysicalName="D:\SQLDATA\{{DBNAME}}_{{FILENAME}}.ldf" InitialSize="5MB" Growth="10MB" MaxSize="100GB" /> </Log> </Environment> <Environment id="AK"'s Development boxes"> <SQLServerInstances> <SQLServerInstance id="AK-VPC1""/> <...etc....> |
Listing 3: ExampleDB.FileLayout.config with a specified default environment
Use of multiple entries in the <SQLServerInstances> segment allows us to set configuration for several machines together (those machines should be of similar configuration. For example, they must have the drive D: available with appropriate space on it).
In the filegroup specifications, note the placeholders in double curly brackets: {{DBNAME}}, {{FGNAME}}, and {{FILENAME}}. The deployment utility substitutes them with the database name, filegroup and logical file names so making it very easy to enforce a naming convention. For example, the file for the primary file group is “D:\SQLDATA\ExampleDB_primary_PrimaryDataFile_01.mdf“.
To specify different environments, such as “development” or “production”, we simply copy the whole “Environment” section and modify appropriately (and add the appropriate MachineName and SqlInstanceName to the DBcreator.ini file).
Step 2: Adding Tables and a User
In this step, we create the Reports schema, and add two tables Reports.ReportHeaders and Reports.ReportLines. We create the SQL script for this change and store it in:
"…\ ExampleDB \Scripts\Upgrade\0.0.0.2\01.Report tables created.sql"
We also reference the script in the Change Log (“…\ExampleDB\Scripts\ExampleDB.ChangeLog.config“), as follows:
|
1 2 3 4 5 6 7 8 9 10 11 |
<Builds> <Build Number="0.0.0.1" /> <Build Number="0.0.0.2"> <Step Number="1" id="Type=""sql" DBid="ExampleDB"" FileName="Upgrade\0.0.0.2\01.Report tables created.sql" /> ... other steps can be here... </Build> </Builds> |
Listing 4: ExampleDB.ChangeLog.config – adding the table creation script
Next, we want to we create a database user that will have read access to the tables. First, we define the new ReportReader database role, in the file “…\ExampleDB\Scripts\Security\ExampleDB.RolesAndPermissions.config“.
|
1 2 3 4 5 6 |
<Roles> <Role id="ReportReader""> <Object id="Reports.ReportHeaders"" Permission="select" /> <Object id="Reports.ReportLines"" Permission="select" /> </Role> </Roles> |
Listing 5: ExampleDB.RolesAndPermissions.config – assigning read permissions to the ReportReader role
The deployment utility compares the security configuration defined in this configuration file against the database. It creates any roles and permissions listed in the file that don’t currently exist in the database. Conversely, note that it drops any that exist in the database but don’t appear in the configuration file. All roles and permissions that match remain untouched, which allows live system update.
Second, we create a SQL Server user named WebConnect in the file “…\ExampleDB\Scripts\Security\ExampleDB.LoginsAndUsers.config“.
|
1 2 3 4 5 6 7 8 9 10 11 12 13 |
<Environment id="Default""> <SQLServerInstances> <SQLServerInstance id="machinename\instancename"" /> < ...ETC...> <Logins> <Login Type="sql" id="WebConnect"" Password="p@$$w0rd"> <Database id="ExampleDB"" User="WebConnect"> <Role id="ReportReader"" /> </Database> </Login> </Logins> </Environment> |
Listing 6: ExampleDB.LoginsAndUsers.config – adding the SQL Server login
Again, the deployment utility compares the defined security configuration against the database and any logins defined in the database but not listed in the configuration file lose rights to connect to the database, but the logins are preserved since they may be used for other databases.
In order to create the new tables, role and user, open the folder “02.New Tables Added\ExampleDB” and copy the contents into the same folder you created in Step 1. In other words, any new files will be added and any existing files will be overwritten with the new ones. Update configuration files as appropriate for your environment, as described above, and then run the “#Update database(s) and security.cmd” file. It will flash several times again and you will see the database structure changed, as shown in Figure 5.
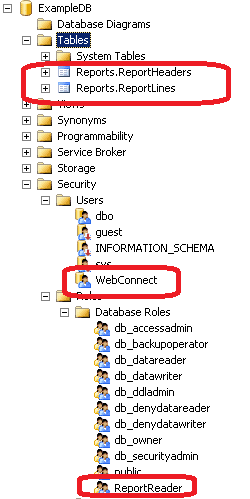
Figure 5: Database Changes After Step 2
Now, you can try to connect to the database using WebConnect user, with the password p@$$w0rd (as defined in ExampleDB.LoginsAndUsers.config). You should be able to query the newly created tables (even though there is no data in them yet).
The database version (build number) is updated to 0.0.0.2, as it is specified in the change log from which that number is taken during the upgrade process. Run “#Get build number.cmd” to confirm it.
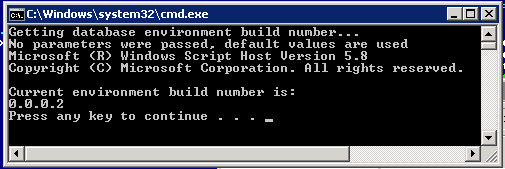
Figure 6: Database Version (Build Number) After Step 2
Step 3: Adding a Stored Procedure
In this step, we create the new GetTheBigBossReport stored procedure, which will read data from our ReportLines table. We create a script for the procedure, and store it in “…\ExampleDB\Scripts\Routines\Reports.GetTheBigBossReport.sql“.
We also add the creation of the procedure as a step in the change log, for the current build.
|
1 2 3 4 5 6 7 8 9 10 11 12 13 14 15 16 17 |
<Builds> <Build Number="0.0.0.1" /> <Build Number="0.0.0.2"> <Step Number="1" id="Type=""sql" DBid="ExampleDB"" FileName="Upgrade\0.0.0.2\01.Report tables created.sql" /> ... other steps can be here... </Build> <Build Number="0.0.0.3"> ... path to the applied stored procedure is specified as relative to the change log location: <Step Number="1" id="Type=""sql" DBid="ExampleDB"" FileName="Routines\Reports.GetTheBigBossReport.sql" /> ... other steps can be here... </Build> </Builds> |
Listing 7: ExampleDB.ChangeLog.config – adding the stored procedure
We also modify the file “…\ExampleDB\Scripts\Security\ExampleDB.RolesAndPermissions.config” to revoke direct table access from the database role, ReportReader, and replace it with execute permission for the newly created procedure.
|
1 2 3 4 5 |
<Roles> <Role id="ReportReader""> <Object id="Reports.GetTheBigBossReport"" Permission="execute" /> </Role> </Roles> |
Listing 8: ExampleDB.RolesAndPermissions.config – revoke direct table access
As discussed earlier, simply by removing the original roles permissions from this file will cause the deployment utility to remove them when we update the database. The database will have security set up as defined in the configuration file, with all excessive privileges removed.
To simulate creation and modification of these files, open the folder “03.New Routine Added \ExampleDB” and copy the contents into the same folder you created in Step 1 and updated in Step 2.
Having done this, simply run the “#Update database(s) and security.cmd” file. It will flash several times again and you will see the database structure changed.
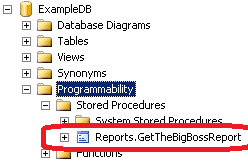
Figure 7: Database Changes After Step 3
The database version (build number) is updated to 0.0.0.3 and, once again, we can run “#Get build number.cmd” to confirm it.
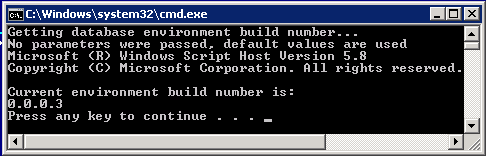
Figure 8: Database Version (Build Number) After Step 3
Now, if you try to access the tables using the WebConnect user, you should receive an “access denied” error. However, you should be able to execute newly created stored procedure (it will return no data, because our tables are still empty of data).
Step 4: Table Structure and Stored Procedure Code Change
In this step, we modify both a schema object, adding a Comments column to Reports.ReportHeaders, and a routine, adapting the GetTheBigBossReport stored procedure to return the new column.
First, to create the new Comments column, we add the script “…\ExampleDB\Scripts\Upgrade\0.0.0.4\01. Reports.ReportHeaders – Comments column added.sql“.
Second, we alter the original procedure creation script “…\ExampleDB\Scripts\Routines\Reports.GetTheBigBossReport.sql” to return the new column. This modification assumes that the client application will be able to handle an extra column in the returned result set. We’ll discuss scripting stored procedures in more etrail in the next article.
We also append the step to the change log.
|
1 2 3 4 5 6 7 8 |
<...as per previous build steps...then...> <Build Number="0.0.0.4"> <Step Number="1" id="Type=""sql" DBid="ExampleDB"" FileName="Upgrade\0.0.0.4\01. Reports.ReportHeaders - Comments column added.sql" /> <Step Number="1" id="Type=""sql" DBid="ExampleDB"" FileName="Routines\Reports.GetTheBigBossReport.sql" /> </Build> |
Listing 9: ExampleDB.ChangeLog.config – adding a build step for modifying the stored procedure and ReportsHeader table
As before, copy into the existing folder the contents of “04.Table and Routine Modified\ExampleDB” and run “#Update database(s) and security.cmd” file.
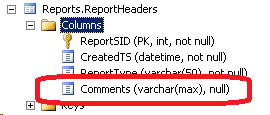
Figure 9: Database Changes after Step 4
Running “#Get build number.cmd” will confirm that the new build number is 0.0.0.4.
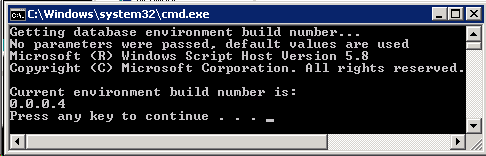
Figure 10: Database Version (Build Number) After Step 4
If the WebConnect user invokes GetTheBigBossReport, it should receive an (empty) result set, which includes the new Comments column.
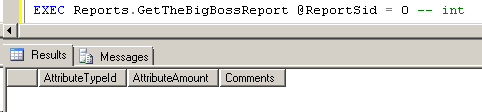
Figure 11: Procedure Output after Step 4
Step 5: Database Creation Scripts Preparation
At this point, we’re going to pretend that our development cycle is complete, and that we wish to deploy out new database in a single operation. To do this, we need to create a database upgrade package that wraps into a single step all of our intermediate updates, for all of the objects that comprise the database.
Currently, the environment build number is set to 0.0.0.4, as verified in Figure 10. However, the configuration build number in Environment.Config is still 0.0.0.1.
Our first job is to generate a script (ExampleDB.SchemaCreation.sql) that will create all of the database schema objects (tables, indexes, constraints) in their current form. At step 1, that file was empty. Now, we produce the code by running “#Script database objects.cmd” (as discussed in the previous article- refer back for details). In the supplied example, the “…\ExampleDB\Utils\#make db script.cmd” file is configured to use SQL Compare 10.0 installed on x64 machine. If you have a different version of that tool or some other tool, then simply modify that file to call the appropriate program.
Remember that this file will compare the current build in the environment (0.0.0.4) to our pre prepared SQL Compare snapshot of the empty database and generate a script to synchronize the two. Having run this command, open “…\ExampleDB\Scripts\NewDbCreation\ExampleDB.SchemaCreation.sql” and view its contents.
|
1 2 3 4 5 6 7 8 9 10 11 12 13 14 15 16 17 18 19 20 21 22 23 24 25 26 27 28 29 30 31 32 33 34 35 36 37 38 39 40 41 42 43 44 45 46 47 48 49 50 |
SET NUMERIC_ROUNDABORT OFF GO SET ANSI_PADDING, ANSI_WARNINGS, CONCAT_NULL_YIELDS_NULL, ARITHABORT, QUOTED_IDENTIFIER, ANSI_NULLS ON GO PRINT N'Creating schemata' GO CREATE SCHEMA [Reports] GO PRINT N'Creating [Reports].[ReportLines]' GO CREATE TABLE [Reports].[ReportLines] ( [ReportSID] [int] NOT NULL , [AttributeTypeId] [int] NOT NULL , [AttributeAmount] [numeric](10, 2) NULL ) ON [ReportData] GO PRINT N'Creating primary key [pk_Reports_ReportLines] on [Reports].[ReportLines]' GO ALTER TABLE [Reports].[ReportLines] ADD CONSTRAINT [pk_Reports_ReportLines] PRIMARY KEY CLUSTERED ([ReportSID], [AttributeTypeId]) ON [ReportData] GO PRINT N'Creating [Reports].[ReportHeaders]' GO CREATE TABLE [Reports].[ReportHeaders] ( [ReportSID] [int] NOT NULL IDENTITY(1, 1) , [CreatedTS] [datetime] NOT NULL CONSTRAINT [DF__ReportHea__Creat__0519C6AF] DEFAULT ( GETDATE() ) , [ReportType] [varchar](50) NOT NULL , [Comments] [varchar](MAX) NULL ) ON [ReportData] TEXTIMAGE_ON [ReportData] GO PRINT N'Creating primary key [PK__ReportHe__0C41EE8503317E3D] on [Reports].[ReportHeaders]' GO ALTER TABLE [Reports].[ReportHeaders] ADD CONSTRAINT [PK__ReportHe__0C41EE8503317E3D] PRIMARY KEY CLUSTERED ([ReportSID]) ON [ReportData] GO PRINT N'Adding foreign keys to [Reports].[ReportLines]' GO ALTER TABLE [Reports].[ReportLines] ADD CONSTRAINT [fk_Reports_ReportLines_to_ReportHeaders] FOREIGN KEY ([ReportSID]) REFERENCES [Reports].[ReportHeaders] ([ReportSID]) GO |
Listing 10:ExampleDB.SchemaCreation.sqlafter running #Script database objects.cmd
Note that, in real projects, it may be necessary to modify this script manually. Alternatively, you might need to fine-tune the SQL Compare parameters in order to include or exclude certain objects. However, the SQL Compare command-line configuration does not allow us to suppress certain objects, such as schemas and users.
If you now reopen the Environment.Config file, you should see that deployment utility updated the configuration build number to 0.0.0.4.
Next, we need to deal with the “re-deployable” code objects (stored procedures, UDFs, triggers, etc.), which in this example simply means our GetBigBossReport stored procedure.
The configuration file “…\ExampleDB\ExampleDB.CodeObjects.config” references all the code objects (stored procedures, UDFs, trigger, and so on), which are coded as separate T-SQL files (we have a comment <!--utility routines--> for database structure maintenance section; ignore these for now).
|
1 2 3 4 5 6 7 8 9 10 11 12 |
<Steps> <!-- DDL TRIGGERS --> <Step Type="sql" DBid="ExampleDB"" id="FileName=""Routines\Triggers\DDL.Database version modification on DB change.sql" /> <!--Utility routines --> <Step Type="sql" DBid="ExampleDB"" id="FileName=""Routines\Misc\dbo.ExecuteSchemaModificationCommand.sql" /> <Step Type="sql" DBid="ExampleDB"" id="FileName=""Routines\Misc\dbo.LogError.sql" /> <Step Type="sql" DBid="ExampleDB"" id="FileName=""Routines\Misc\dbo.ToggleDdlWatchdogTriggerState.sql" /> <!--Business-oriented routines--> <Step Type="sql" DBid="ExampleDB"" id="FileName=""Routines\Reports.GetTheBigBossReport.sql" /> </Steps> |
Listing 11:ExampleDB.CodeObjects.config – adding a step to redeploy the stored procedure
For now, updating this file is a manual process.
Remember that the DatababaseOjectsCreation.config file, which our deployment utility uses it to create all schema and code objects, as well as any static data, references both the CodeObjects.config file and the SchemaCreation.sql script.
|
1 2 3 4 5 6 7 8 9 10 11 12 13 |
<Steps> <Step Type="sql" DBid="ExampleDB"" id="Database" schema creation" FileName="NewDbCreation\ExampleDB.SchemaCreation.sql" /> <Step Type="sql" DBid="ExampleDB"" id="Database" schema creation" FileName="NewDbCreation\Change db owner to SA.sql" /> <Step Type="list" DBid="ExampleDB"" id="Database" code(SPs, UDFs) creation" Fileid="ExampleDB".CodeObjects.config" /> <!-- Static data inserted --> <Step Type="sql" DBid="ExampleDB"" id="Static" data inserted" FileName="NewDbCreation\StaticData\ExampleDB.InitialStaticData.sql" /> <!-- End of static data --> </Steps> |
Listing 12: ExampleDB.DatababaseOjectsCreation.config
Here, also, we have a few scripts not described previously, such as one that changes the database owner to SA (rather than the current user, which is set by default); others can be added.
If you have SQL Compare installed and you have already generated the ExampleDB.SchemaCreation.sql script then you simply need to copy CodeObjects.config over the top of the existing copy of the file, in order to complete the preparation for Step 5. Alternatively, in order to simulate all of these preparatory steps, simply copy the contents of the ExampleDB folder “05.New DB Creation with All Objects” into the same folder you created in Step 1 and updated in the subsequent steps. Note that in this example this folder contains all the files in a final state, so you will overwrite all the files in the target folders.
Having completed the preparatory steps, one way or the other, you can now drop the existing ExampleDB by executing “#Delete databases(s).cmd“. Next, re-create the database by executing “#Create database(s).cmd“. Once complete, run “#Get build number.cmd” to confirm that the database build number is 0.0.0.4
The database created by Steps 1-4 must be identical to the database created in Step 5. One could confirm this by taking a database backup (or SQL Compare snapshot) after Step 4, and comparing it with the result of Step 5.
Conclusion
This article showed how we use the various configuration files and scripts in the incremental development and deployment framework to usher a database through a complete iteration of the development cycle. For support and upgrade of existing databases, Step 1 is redundant and therefore so is Step 5, and the cycle comprises only Steps 2 -4.
It can seem a little bewildering at first, trying to keep track of all the necessary updates to each file, but ultimately it will save you much time and frustration in your database deployments. The next article will demonstrate why, in more detail, and describes some finer details of the framework, which we’ve glossed over up to now.
Load comments