
The series so far:
- Power BI Introduction: Tour of Power BI — Part 1
- Power BI Introduction: Working with Power BI Desktop — Part 2
- Power BI Introduction: Working with R Scripts in Power BI Desktop — Part 3
- Power BI Introduction: Working with Parameters in Power BI Desktop — Part 4
- Power BI Introduction: Working with SQL Server data in Power BI Desktop — Part 5
- Power BI Introduction: Power Query M Formula Language in Power BI Desktop — Part 6
- Power BI Introduction: Building Reports in Power BI Desktop — Part 7
- Power BI Introduction: Publishing Reports to the Power BI Service — Part 8
- Power BI Introduction: Visualizing SQL Server Audit Data — Part 9
Database teams trying to comply with regulations such as the Health Insurance Portability and Accountability Act of 1996 (HIPAA) or the Sarbanes-Oxley Act of 2002 (SOX) commonly use auditing as part of their compliance strategies to help track potential threats to stored data. For example, teams running SQL Server might turn to SQL Server Audit to log actions at both the server and database levels. SQL Server Audit is built into the database engine and, starting with SQL Server 2016, is available in all SQL Server editions.
If you’re a DBA tasked with implementing SQL Server Audit, you’ll find that setting up the auditing components is a relatively straightforward process. The more significant challenges often lie in trying to determine what user actions to audit, how to handle the potentially large amounts of audit data, and what tools to use to monitor and review that data.
Although these are all important considerations, this article is concerned primarily with the last one—monitoring and reviewing the audit data. SQL Server makes it easy to collect the data but provides no mechanisms for working with that data in a meaningful way, other than to review it manually.
One way to address this issue is to bring in a third-party solution such as EventTracker to consolidate, manage, and monitor the audit data, but this comes with additional licensing and implementation considerations.
Another approach is to use Power BI to create reports that provide quick visual insights into the data. Although Power BI is not designed for auditing and alerting to the same degree as more robust log management tools, it provides a relatively simple method for tracking user behavior. Best of all, the basic Power BI service is free, as is Power BI Desktop, a downloadable tool for transforming and visualizing different types of data.
In this article, I demonstrate how you can use Power BI to work with SQL Server Audit data, walking you through the steps necessary to set up a test environment, generate sample audit data, pull that data into Power BI Desktop, and create a report that contains tables and visualizations. Keep in mind, however, that SQL Server Audit and Power BI Desktop are both powerful solutions that support far more capabilities than can be covered in a single article. The information here should at least provide you with a conceptual overview of how the tools can be used together and what it takes to get started using Power BI Desktop to review audit data.
Setting Up a Test Environment
To prepare your environment for the examples in this article, you should first create the ImportSales test database, which contains one schema, Sales, and one table, Sales.Customers. You can then populate the table with data from the Sales.Customers table in the WideWorldImporters database. For this article, all audited actions are limited to Customers table in the ImportSales database.
To create the ImportSales database, run the following T-SQL code:
|
1 2 3 4 5 6 7 8 9 10 11 12 13 14 15 16 17 18 19 20 21 22 23 24 25 26 27 |
USE master; GO DROP DATABASE IF EXISTS ImportSales; GO CREATE DATABASE ImportSales; GO USE ImportSales; GO CREATE SCHEMA Sales; GO CREATE TABLE Sales.Customers( CustID INT IDENTITY PRIMARY KEY, Customer NVARCHAR(100) NOT NULL, Contact NVARCHAR(50) NOT NULL, Email NVARCHAR(256) NULL, Phone NVARCHAR(20) NULL, Category NVARCHAR(50) NOT NULL); GO INSERT INTO Sales.Customers(Customer, Contact, Email, Phone, Category) SELECT c.CustomerName, p.FullName, p.EmailAddress, p.PhoneNumber, cc.CustomerCategoryName FROM WideWorldImporters.Sales.Customers c INNER JOIN WideWorldImporters.Application.People p ON c.PrimaryContactPersonID = p.PersonID INNER JOIN WideWorldImporters.Sales.CustomerCategories cc ON c.CustomerCategoryID = cc.CustomerCategoryID; GO |
If you don’t have the WideWorldImporters database installed, you can populate the Customers table with your own data. If you want to use a different table and database for these examples, skip the T-SQL statements above and use a database and table that best suit your needs (and are not in a production environment, of course). Just be sure to replace any references to the ImportSales database or Customers table in the subsequent examples.
The next step is to create an audit object at the SQL Server instance level and a database audit specification at the ImportSales database level. The audit object serves as a container for organizing the server and database audit settings and for delivering the final audit logs. For this article, you’ll be saving the audit data to a local folder, but know that SQL Server Audit also lets you save the data to the Windows Application log or Security log.
A database audit specification is created at the database level and is associated with an audit object, which means that the audit object needs to exist before you can create the database audit specification. The specification determines what actions should be audited at the database level. You can also create a server audit specification for auditing actions at the server level, but for this article, you need only the database audit specification.
To create both the audit object and database audit specification, run the following T-SQL code:
|
1 2 3 4 5 6 7 8 9 10 11 12 13 14 15 16 17 |
USE master; GO CREATE SERVER AUDIT ImportSalesAudit TO FILE (FILEPATH = 'C:\DataFiles\audit\'); GO ALTER SERVER AUDIT ImportSalesAudit WITH (STATE = ON); GO USE ImportSales; GO CREATE DATABASE AUDIT SPECIFICATION ImportSalesDbSpec FOR SERVER AUDIT ImportSalesAudit ADD (SCHEMA_OBJECT_CHANGE_GROUP), ADD (SELECT, INSERT, UPDATE, DELETE ON Object::Sales.Customers BY public) WITH (STATE = ON); GO |
The CREATE SERVER AUDIT statement creates an audit object named ImportSalesAudit that saves the audit data to the C:\DataFiles\Audit folder. You must then run an ALTER SERVER AUDIT statement as a separate step to set the STATE property to ON.
Next comes the CREATE DATABASE AUDIT SPECIFICATION statement, which defines a specification named ImportSalesDbSpec. The specification includes two ADD clauses. The first ADD clause specifies the action group SCHEMA_OBJECT_CHANGE_GROUP, which audits all CREATE, ALTER, and DROP statements issued against any schema objects in the database. Because this is a group action, it must be specified separately from individual actions, such as those in the second ADD clause.
The second ADD clause specifies four individual actions:
- The
SELECTaction audits allSELECTstatements. - The
INSERTaction audits allINSERTstatements. - The
UPDATEaction audits allUPDATEstatements. - The
DELETEaction audits allDELETEstatements.
The ON subclause in the second ADD clause points to the Customers table, which means that the SELECT, INSERT, UPDATE, and DELETE actions are all specific to that table. In addition, because the BY subclause specifies the public login, the auditing applies to all users.
Under normal circumstances, you would likely be auditing many more users and actions than you’ve done here, but this is enough to demonstrate the basic principles behind using Power BI to review audit data.
With the auditing structure in place, run the following T-SQL code to create three test user accounts within the ImportSales database, assigning a different set of permissions to each user:
|
1 2 3 4 5 6 7 8 9 10 11 12 |
CREATE USER User01 WITHOUT LOGIN; GRANT ALTER, SELECT, INSERT, DELETE, UPDATE ON OBJECT::Sales.Customers TO user01; GO CREATE USER User02 WITHOUT LOGIN; GRANT SELECT, INSERT, DELETE, UPDATE ON OBJECT::Sales.Customers TO user02; GO CREATE USER User03 WITHOUT LOGIN; GRANT SELECT ON OBJECT::Sales.Customers TO user03; GO |
The user accounts are created without logins to keep the testing simple. For the same reason, all the granted permissions are specific to the Customers table, with access defined as follows:
User01can access and modify all data within the table as well as update the table’s definition.User02can access and modify all data within the table but is not permitted to update the table’s definition.User03can access all data within the table but is not permitted to modify any of the data or update the table’s definition.
You can set up the test users and their permissions any way you like, so that you have them in place when you’re ready to generate audit data to use in Power BI Desktop.
Generating Test Audit Data
To generate the audit data, you should run a series of data manipulation language (DML) statements and data definition language (DDL) statements against the Customers table, running them within the execution context of the three database user accounts. The easiest way to do this is to use an EXECUTE AS statement to specify the user context, run one or more statements, and then run a REVERT statement to switch back to the original user.
You can run whatever DML and DDL statements you want, as long as you test each account and the permissions assigned to that account. On my system, I ran several sets of T-SQL statements, most of them multiple times to generate a reasonable amount of data. If you want to use the same statements that I used, start with the following DML statements, running them under the User01 account:
|
1 2 3 4 5 6 7 8 9 10 11 12 |
EXECUTE AS USER = 'User01'; SELECT * FROM Sales.Customers; INSERT INTO Sales.Customers (Customer, Contact, Email, Phone, Category) VALUES('Wingtip Toys (Eugene, OR)', 'Flora Olofsson', 'flora@wingtiptoys.com', '(787) 555-0100', 'Gift Store'); DECLARE @LastID INT = (SELECT SCOPE_IDENTITY()) UPDATE Sales.Customers SET Category = 'Novelty Shop' WHERE CustID = @LastID; DELETE Sales.Customers WHERE CustID = @LastID; REVERT; GO |
Be sure to run these statements multiple times, according to how much audit data you want available. I ran the DML statements about five times and the DDL statements either one or two times.
After you run the preceding DML statements, run the following statements to add a column to the Customers table, again as User01:
|
1 2 3 4 5 |
EXECUTE AS USER = 'User01'; ALTER TABLE Sales.Customers ADD Status BIT NOT NULL DEFAULT(1); REVERT; GO |
Next, repeat the same DML statements for User02, again running the block of statements multiple times:
|
1 2 3 4 5 6 7 8 9 10 11 12 |
EXECUTE AS USER = 'User02'; SELECT * FROM Sales.Customers; INSERT INTO Sales.Customers (Customer, Contact, Email, Phone, Category) VALUES('Tailspin Toys (Bainbridge Island, WA)', 'Kanti Kotadia', 'kanti@tailspintoys.com', '(303) 555-0100', 'Gift Store'); DECLARE @LastID INT = (SELECT SCOPE_IDENTITY()) UPDATE Sales.Customers SET Category = 'Novelty Shop' WHERE CustID = @LastID; DELETE Sales.Customers WHERE CustID = @LastID; REVERT; GO |
Now try to add another column to the Customers table, but this time as User02, using the following T-SQL:
|
1 2 3 4 5 |
EXECUTE AS USER = 'User02'; ALTER TABLE Sales.Customers ADD LastUpdated DATETIME NOT NULL DEFAULT(GETDATE()); REVERT; GO |
The statement should generate an error because the User02 account does not have the proper permissions to modify the table definition. Be aware, however, that if you run one or more T-SQL statements under the context of a specific user and one of the statements fails, the REVERT statement will not run, in which case, you must rerun the REVERT statement, without the other statements, to ensure that you close that execution context. (A better approach, of course, is to add the proper logic to your code to ensure that the REVERT statement always runs.)
Next, run the same DML statements as before, but under the User03 account:
|
1 2 3 4 5 6 7 8 9 10 11 12 |
EXECUTE AS USER = 'User03'; SELECT * FROM Sales.Customers; INSERT INTO Sales.Customers (Customer, Contact, Email, Phone, Category) VALUES('Tailspin Toys (Bainbridge Island, WA)', 'Kanti Kotadia', 'kanti@tailspintoys.com', '(303) 555-0100', 'Gift Store'); DECLARE @LastID INT = (SELECT SCOPE_IDENTITY()) UPDATE Sales.Customers SET Category = 'Novelty Shop' WHERE CustID = @LastID; DELETE Sales.Customers WHERE CustID = @LastID; REVERT; GO |
In this case, the INSERT, UPDATE, and DELETE statements each return an error because of the lack of permissions, which means you’ll once again need to run the REVERT statement separately. The same goes for the following ALTER TABLE statement, which also returns an error:
|
1 2 3 4 |
EXECUTE AS USER = 'User03'; ALTER TABLE Sales.Customers ADD LastUpdated DATETIME NOT NULL DEFAULT(GETDATE()); REVERT; |
Again, you can run whatever DML and DDL statements you like to generate the test audit statements. The idea is to have enough data to use in Power BI Desktop.
Connecting to SQL Server Audit Data in Power BI Desktop
When connecting to SQL Server within Power BI Desktop, you can retrieve the data from specific tables and views, or you can run a query that returns exactly the data you need from multiple tables and views. With a query, you can also use system functions such as sys.fn_get_audit_file, a table-valued function that returns data from SQL Server Audit log files. (You cannot use this function to retrieve data from the Application or Security log.)
For this article, you will use the function in the following SELECT statement to return the user account, action, success status, T-SQL statement, and event time of each logged event:
|
1 2 3 4 5 6 7 8 9 10 11 12 13 14 15 16 17 18 |
SELECT f.database_principal_name [User Acct], (CASE WHEN a.name = 'STATEMENT ROLLBACK' THEN 'ROLLBACK' ELSE a.name END) [User Action], (CASE WHEN f.succeeded = 1 THEN 'Succeeded' ELSE 'Failed' END) [Succeeded], f.statement [SQL Statement], f.event_time [Date/Time] FROM sys.fn_get_audit_file ('C:\DataFiles\audit\ImportSalesAudit_*.sqlaudit', default, default) f INNER JOIN (SELECT DISTINCT action_id, name FROM sys.dm_audit_actions) a ON f.action_id = a.action_id WHERE f.database_principal_name IN ('User01', 'User02', 'User03') |
The statement joins the sys.fn_get_audit_file function to the sys.dm_audit_actions function to return an action’s full name, rather than its abbreviation. The statement also limits the results to the three test user accounts.
You’ll use this SELECT statement when setting up your SQL Server connection in Power BI Desktop. To configure the connection, create a new report in Power BI Desktop, click the Get Data down arrow on the Home ribbon, and then click SQL Server. When the SQL Server database dialog box appears, click the Advanced options arrow to expand the dialog box, as shown in Figure 1.
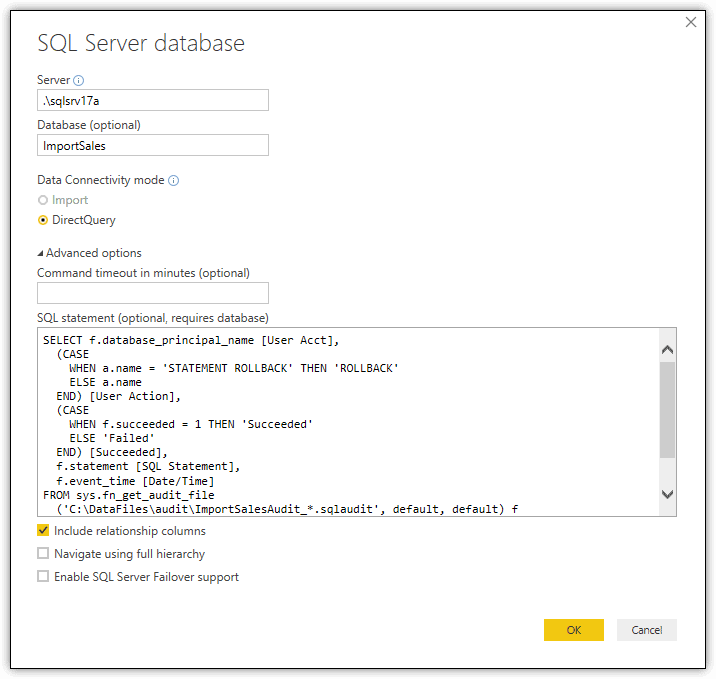
Figure 1. Defining a SQL Server connection in Power BI Desktop
To configure the connection:
- Type the SQL Server instance in the Server text box.
- Type the name of the database,
ImportSales, in the Database text box. - Select an option in the Data Connectivity mode section. I chose DirectQuery.
- Type or paste the
SELECTstatement into the SQL statement text box.
When you select DirectQuery, no data is imported or copied into Power BI Desktop. Instead, Power BI Desktop queries the underlying data source whenever you create or interact with a visualization, ensuring that you’re always viewing the most current data. Be aware, however, that if you plan to publish your report to the Power BI service, you’ll need to set up a gateway connection that enables the service to retrieve the source data. Also, note that you cannot create a Power BI Desktop report that includes both a DirectQuery SQL Server connection and an Import SQL Server connection. You must choose one or the other.
After you’ve configured the connection in the SQL Server database dialog box, click OK. This launches a preview window, where you can view a sample of the audit data, as shown in Figure 2.
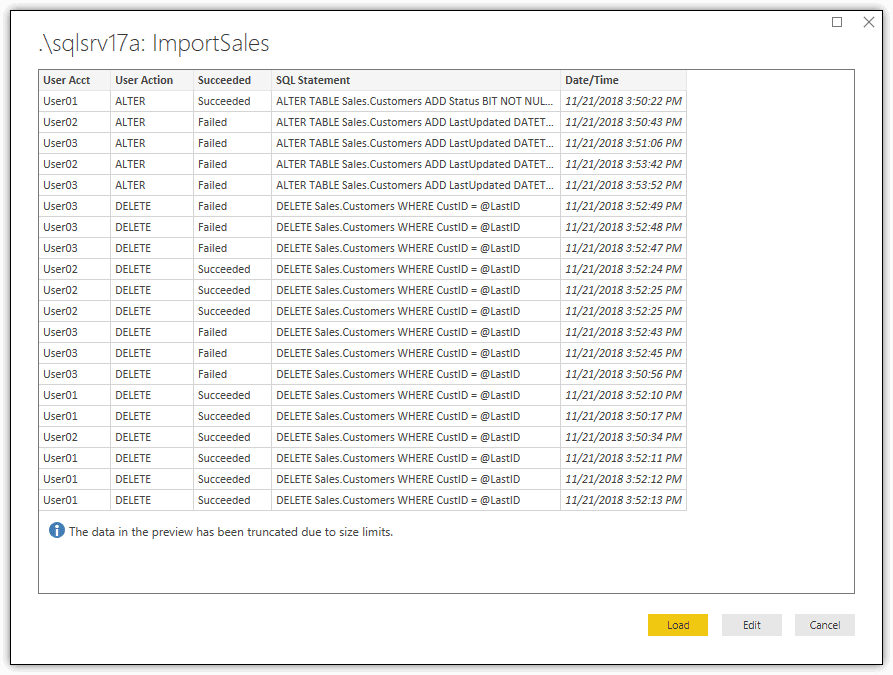
Figure 2. Verifying the SQL Server Audit data
If everything looks as you would expect, click Load to make the data available to Power BI Desktop, where you can use the data to add tables or visualizations. If you selected DirectQuery, you’re loading only the table schema into Power BI Desktop, with no source data imported until it is needed.
As noted earlier, you’re not limited to saving the audit data to log files. You can also save the data to the Application or Security log, but that means taking extra steps to get the data out of the logs and into a digestible format, such as a .csv file.
For example, you can export the data from Windows Event Viewer or the Log File Viewer in SQL Server Management Studio (SSMS), but the resulting format can be difficult to work with, and you could end up with much more data than you need. Another approach is to use PowerShell to retrieve the log data, creating a script that can be scheduled to run automatically. In this way, you have far more control over the output, although there’s still some work involved to get it right.
Regardless of how you make the data available to Power BI Desktop, the more important consideration is data security. The Security log might be the safest approach initially, but once you export the data to files, you’re up against the same issues you face when sending the data directly to log files. The data in those files needs to be fully protected at all times both at-rest and in-motion. There would be little point in implementing an audit strategy to comply with regulatory standards if the auditing process itself puts the data at risk.
Once you’ve made the test audit data available to Power BI Desktop, you can create reports that present the data in ways that offer different insights. Throughout the rest of the article, I show you several approaches that I’ve tried, using both tables and visualizations, in order to demonstrate ways you can present SQL Server Audit data. For details on how to actually create these components, refer to Part 7 of this series, Building Reports in Power BI Desktop.
Adding a Table to Your Report
One useful approach to presenting information is to make at least some of the data available in tables. For example, Figure 3 shows a table that includes all the audit data I pulled into Power BI Desktop. You can, of course, filter the data however you need to, such as with Slicers, depending on your specific audit strategy. The auditing that’s implemented for this article is very simple in comparison to the types and amounts of data that you will likely be generating.

Figure 3. Adding a table and slicers to a report page
In addition to the table, I added three slicers to the report page for filtering the data by users, actions, and successes and failures. For example, Figure 4 shows the data I generated on my system after I filtered the information by the User03 account and the Failed status.

Figure 4. Using slicers to filter data in a table
When you apply a filter, Power BI updates the data in the table and slicers, based on the selected values. In this way, you have a quick and easy way to access various categories of data, without needing to manually weed through gobs of data or generate a new T-SQL statement each time you want to focus on different information.
Adding a Matrix to Your Report
Another effective way to provide quick insights into the data is to add a matrix that summarizes the data. For example, Figure 5 shows a matrix that displays the number of actions per user and action type. (A ROLLBACK statement is issued when a primary statement fails, such as when a user does not have the permissions necessary to run a statement.)
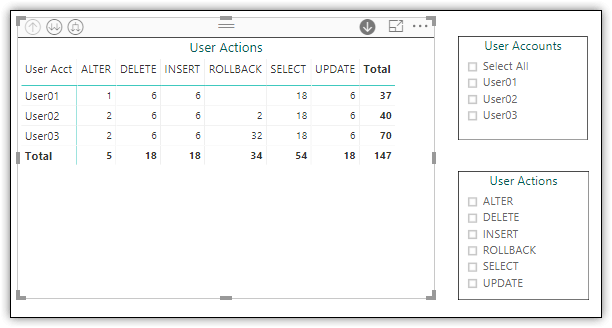
Figure 5. Adding a matrix and slicers to a report page
On the same report page as the matrix, I added two slicers, one for user accounts and the other for user actions, again allowing me to easily filter the data as needed.
What is especially useful about the matrix is that you can set it up to drill down into the data. In this case, the matrix allows you to drill to the number of actions that have succeeded or failed. For example, Figure 6 shows the matrix after drilling down into all users, although it’s also possible to drill down into specific users.
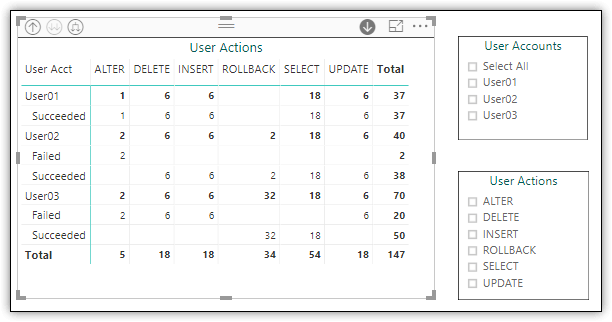
Figure 6. Drilling into a matrix
When setting up the drill-down categories in a matrix, you can choose the order in which to present each layer, depending on the type of data and its hierarchical nature. For example, this matrix can also be configured to drill down further into the T-SQL statements associated with each category.
Adding Visualizations to Your Report
Power BI Desktop supports a wide variety of visualizations, and you can import even more. You should use whichever visualizations help you and other users best understand the types of audit data you’re collecting. For example, Figure 7 shows a report page with three types of visualizations, each providing a different perspective into the audit data (keeping in mind that you’re working with a limited sample size).
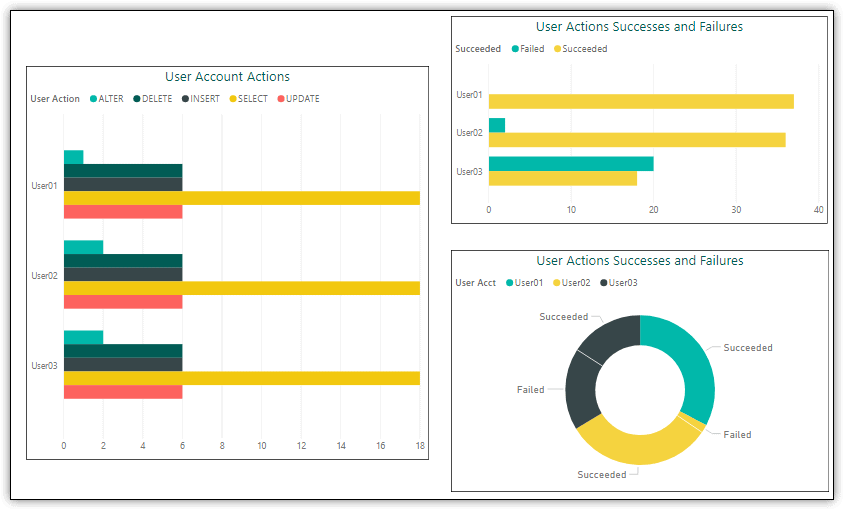
Figure 7. Adding visualizations to a report page
For all three visualizations, I filtered out the ROLLBACK actions, so the visualizations reflect only the statements that were initiated by the users, rather than those generated as a response to their actions. The visualizations on the left and top-right are clustered bar charts. The clustered bar chart lets you group related data in various ways to provide different perspectives.
For example, the clustered bar chart on the left groups the data by user, and for each user, provides a total for each action type. In this case, the DML actions show the same totals across all three user accounts because I ran the statements the same number of times. Even so, the visualization still demonstrates how you can use the clustered bar chart to provide a quick overview of the data from different perspectives, in this case, the types of statements each user has tried to run.
The clustered bar chart at the top right also groups the data by user, but then provides a total of statement successes and failures for each account, making it possible to see which users might be attempting to run statements that they’re not permitted to run.
The bottom right visualization is a basic donut chart. The visualization presents the same data as the clustered bar chart above it, but in a different way. If you hover over one of the elements, for example, you’ll get the percentage of total actions. What all this points to is that you can try out different visualizations against the same data to see which ones provide the best perspectives into the underlying information.
When you place elements on the same report page, Power BI automatically ties them together. In this way, if you select an element in one visualization, the other visualizations will reflect the selection. For example, if you click the Failed bar for User03 in the top right clustered bar chart, the corresponding data elements in the other visualizations will be selected, resulting in the nonrelated elements being grayed out.
Adding a Gauge to Your Report
Power BI Desktop also lets you add elements such as gauges, cards, and key performance indicators (KPIs) to a report. For example, I added the gauge shown in Figure 8 to display the number of ROLLBACK statements that were executed in response to the users’ failed attempts to run T-SQL statements.
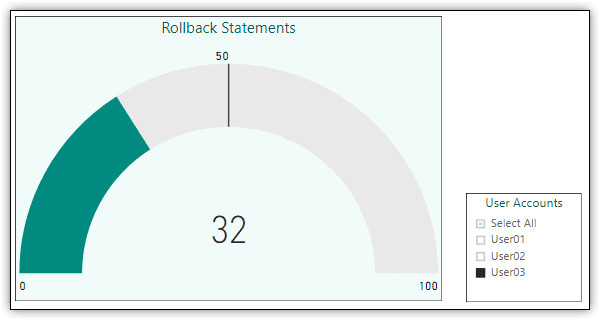
Figure 8. Adding a gauge to a report page
I also added a slicer for the user accounts to make it easy to see whether individual users are hitting the specified threshold. In Figure 8, the User03 account is selected in the slicer, so the gauge shows only the number of rollbacks that pertain to that user. The gauge also specifies a target of 50, but you can specify any target value.
The reason the target value is significant is that you can set alerts based on that value in the Power BI service (something you cannot do in Power BI Desktop). To use this feature, however, you must have a Power BI Pro license, which allows you to set up alerts that notify you regularly about potential issues. You can also set up alerts that generate email notifications on a regular basis. Plus, you can add alerts to card and KPI visuals.
Visualizing Audit Data in Power BI
Using Power BI to visualize SQL Server Audit data can provide you will a powerful tool for reviewing the logged information in a quick and efficient manner. What I’ve covered here only scratches the surface. There’s far more to SQL Server Audit and Power BI Desktop, and both topics deserve much more attention.
But this article should at least offer you a good starting point for understanding what it takes to use Power BI to work with SQL Server Audit data. It’s up to you to decide how far you want to take this and how extensively you might want to use the Power BI service, in addition to Power BI Desktop, keeping in mind the importance of protecting the audit data wherever it resides.


Load comments