
Being a pragmatist, I recognize that—like the eternal spaces vs tabs debate—one’s branching and merging styles are often held dear. If I may ask you to set all that aside for just a few minutes though, have a look and see if any of the following might make your environment more productive. The next caveat is that this article is focused on Git, which is a distributed version control system (DVCS). The conclusions may or may not be relevant to other DVCS’s but probably not to centralized version control systems, like Subversion, where branches can be expensive.
When to Branch
Creating a branch in Git is very cheap: no file copying at all, just creating a new pointer. Similarly, destroying a branch is very cheap. And Git has great flexibility and support for merging. So the generally accepted recommendation for when to branch is simply: for any work you do. Why? Each member of your team can work independently, on a separate branch. One could commit frequently, whether it be finished code or partial chunks of code, even non-working code. Should you need to interrupt your work to fix a higher priority issue, simply stash your work on your branch and go over to a different branch, then come back when you are ready to resume. When a task is complete, then you can open a pull request and the code on the branch can be easily reviewed. Finally, that branch can be merged back to master once the code has been fully vetted. If at some point, you have gone down a path that turns out to be fruitless, that work can be abandoned quickly by discarding the branch; no rollbacks needed.
The master branch should be considered different from all other branches. (Note this would apply to other such release branches as well if, for example, you are maintaining multiple releases of your product. I am going to ignore that for purposes of this discussion and just focus on master being your production-ready code, without invalidating any of the arguments.) The master branch should always have working, production-ready code. If that is the case, then any developer at any time can safely pull down that code as a starting point for new work, or merge in latest code to work in progress. Furthermore, you can set up your continuous integration/deployment to grab code from master whenever it is committed, confident in that code being ready to be sent along to your test or staging environments.
When to Commit
At this point you have created a branch and are ready to start your task, whether it is fixing a bug or working on a new feature. What should you commit and how often? Let source control aid your productivity rather than impede it: commit early and often. Commit indentation changes. Commit file renames. Commit broken code or unfinished tests if you like. Commit exploratory code. Just be sure that for each commit you attach a commit message that clearly describes the chunk of work; you will need that both for your cleanup phase and for your pull request. Also, be sure you do not push your commits to your remote repository yet; keeping things local makes the cleanup phase much simpler as well. When you reach a milestone—a point where you have a section of the code now works, or you have finished a logical section, or you are ready to send your code off for review, or you have finished your code review and are ready to merge your code back to master—that is the time for you to do some cleanup. The effort of that cleanup phase may be lessened, though, by keeping a few simple guidelines in mind as you are working.
Each commit should adhere then to the Single Responsibility Principle in a sense. Keep every commit small and focused so it is obvious what you changed and why. Sometimes—okay, frequently—in the heat of working, we all introduce changes to a given file that are not all related to a single purpose. Git comes to the rescue here, though, by letting you stage portions of a file separately, or if you need more resolution to further separate out some commits, it lets you stage down to individual lines. Thus, it is possible to take a chunk of work you just finished and make multiple commits out of it, each with a single purpose, rather than putting everything in one commit.
Each commit should be designed to reduce noise. Even seemingly innocuous commits can introduce unnecessary noise for the reviewer. Consider, for example, whitespace changes. Occasionally you will come across the need to adjust the indent of a large block of code. Resist the temptation to make such indentation changes at the same time you change, say, one line of meaningful code, perhaps changing this conditional (status == widget.opened && flow > defaultFlow) to (status == widget.opened && flow < defaultFlow). That tiny logic change would get completely lost in the noise of the whitespace change, making it very easy for a reviewer to miss. GitHub does provide some hidden support for ignoring whitespace changes by adding the w=1 parameter to the URL of a file diff, but not everyone knows or uses that trick. Better to do one commit that is whitespace-only, then a second commit with the substantive changes from the same file.
Subdivide even a single purpose commit into multiple commits if Git limitations prevent a clear view of what you did. Consider the operation of renaming a class. In many languages when you create a class, you put it in a file of the same name (e.g. class MyWidget is stored in MyWidget.cs or MyWidget.ts or MyWidget.java). Thus, renaming a class really involves two steps: renaming the file and renaming all occurrences of the class name. Those two steps should, if possible, be done in separate commits. Why? Because many source control systems, Git included, show a file rename as a file delete followed by a file add, and do not allow you to see a diff between the two. But being able to view file differences is what a code review is all about! So if you do one commit for the file rename with a commit message that says so, it is perfectly clear what changes you made. Then do a separate commit for the file content changes associated with the rename; your reviewer can then do a diff to see just what you changed. (Of course, if you are working in a language which has powerful refactoring– say C# with ReSharper–the file rename and class rename are done atomically with a single click. I am not going to say to avoid using that power, but be aware that it actually makes your code that little bit more difficult to review.)
When to Create a Pull Request (Code Review)
Once you emerge from the blizzard that is you working feverishly on your task, and you are satisfied you have candidate code ready to be reviewed, now it is time for the cleanup phase before you create your pull request.
The cleanup phase is where you ensure that each of your commits is worthwhile enough to expose publicly, for posterity in a sense. A couple examples should explain what I mean. Let’s say you were working on a small portion of your overall task. You made three commits for this particular section, two in the midst of the work and one when complete. The two commits in the middle were places where you reached a reasonably good plateau. You got the code to a good state, but you knew that for the next bit you would have to tear it apart again so the reason for each commit was simply to let source control bookmark where you were in case you wanted to get back there. Quite possibly those two commits in the middle are bookmarks meaningful only to you; they are not useful for public consumption, i.e. not something useful for reviewers of your code. The main tool to re-organize and tidy up commits is Git’s rebase command used in interactive mode (invoked with the -i option). With rebasing, you can squash the above commits that have no clear purpose leaving just a single commit with a purpose.
Or, perhaps while working on a given subtask, you find you missed one change that belongs with the work you did 4 commits ago. Or maybe you realize you did not update the “readme” with changes from your last commit. Wouldn’t it be nice if you could just tuck such changes back into the commits to which they belong? With rebase, you can. I strongly encourage you to go learn how to do interactive rebasing if you have not yet. Once you do, you will see how straightforward it is to simply make a temporary commit for such a wayward change, then reorganize your commit history to merge that temporary commit into some earlier commit, right where it belongs. Note that working such magic is best done while all your commits are still local. If you have pushed changes to a remote repository, rebasing changes from your best friend to a dangerous ally at best. (Rebasing rewrites your commit history. If you have pushed any changes and someone else has pulled those down, it then becomes extra work on their side to resync with your changes, and they would not even know they are out of sync!)
I have written extensively on preparing a code review (The Zen of Code Reviews) and I encourage you to review those articles for many more details. But in a nutshell, your job is to help others to help you. The more your reviewers understand what you did and why, the better quality feedback they can provide. There are two parts to this process, both equally important. First, be your own first reviewer, sprinkling ‘pre-review comments’ throughout, to provide context to reviewers of your code. But the second part is more relevant to the discussion at hand: eliminate any commits that do not provide value on their own. In my experience, a great way to understand someone else’s code during a review is to scan the individual commits rather than all the file changes at once. A well-organized code review (pull request), excepting those tiny code reviews needed now and then, should have multiple commits, but not just bookmark commits (you know, named work-in-progress-1, work-in-progress-2, etc.). Rather any group of edits you can put a name to should be a separate commit: renamed method x to y, extracted method z for common use, added support for new user control, wired up new button, etc. It is much easier for a reviewer to look through those small pieces of your review for correctness than to look at the entire set of changes as a single unit.
As part of the cleanup phase, you should do due diligence on your changes as well. It is all too easy, in the heat of the moment, to think you have finished up your task and ship it off with a couple clicks to be reviewed. Now you might be able to more easily get away with that if you have automation in place that helps you stay tidy. For example, a continuous test runner can ensure that all your unit tests still pass. Maybe you even wire up your linter to run whenever you save changes. But some things may not be so easy to automate; for example, did you update the readme file per your changes? I like to use a checklist to make sure I have covered all the necessary bases:
- Have you updated all necessary documentation?
- Have you added necessary unit tests? (an easy one to check off for those TDD practitioners amongst you!)
- Have you run all unit tests? (a continuous testing tool like NCrunch or Wallaby.js makes this one a given as well!)
- Have you run all integration tests?
- Have you run lint on your code? Most any popular language will have a ‘lint’ tool to check for things that a compiler would not. A good linter catches things that, while not syntactically incorrect, are potential problems or inconsistencies with your code or coding style. Linters tend to be language specific, so if you use JavaScript, you need a JavaScript linter. But you also need a CSS linter. And an HTML linter. I even use a markdown linter for my ‘readme’ files. Those are a few that I happen to use; there are many other good linters out there, too.
- Have you executed your code in all appropriate environments? (e.g. development build vs production build, browser A vs browser B vs browser C, etc.)
Once you have gone through all that, then you can have a good confidence level about letting your colleagues review your code. It is hardly useful to have your colleagues reviewing your code for things that can be statically checked. Not only is it a waste of human effort to write and to receive a comment like “you are missing a semicolon on line 42” or “tried to run your code but it would not execute”, but also it gives you the appearance of being sloppy (when you are in fact doing work that requires a mindset quite the opposite). That is, if you did not even bother to run your unit tests—because 12 of them failed when I did—then why should I bother to invest time in reviewing your code?
When to Merge
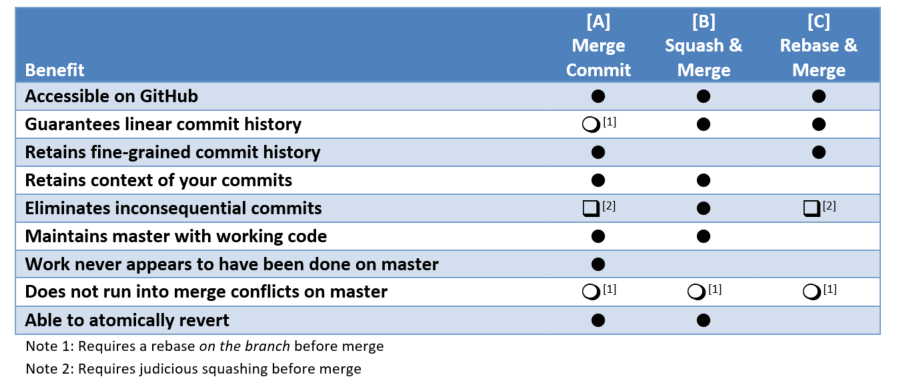
Once you are satisfied with your code, and you have satisfied your reviewers, and you have tested your code to ensure that you have not broken anything else, then you can think about merging back to master. It is important to consider your merge strategy before you do this important merge step. Do you rebase? Do you squash? Do you do a fast-forward commit or a merge commit? There are a number of considerations to weigh. Consider first the table shown, detailing the three most common merge strategies that, not coincidentally, are precisely the merge strategies available with a press of the big green button on GitHub.
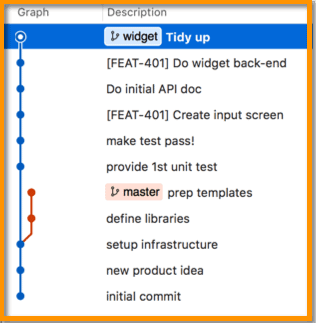
Let’s consider each of the characteristics in the table, but starting from a graphical view of the above strategies. These images come from the Git client called SourceTree, but similar graphical representations are available from other clients as well (even from the command-line git log command!). The first image is our starting point. The timeline starts at the bottom and goes up. The master branch shows five commits ending with ‘prep templates’. Meanwhile, a widget branch was forked at the third commit, and includes six additional commits to implement this new widget feature that is now ready to merge.
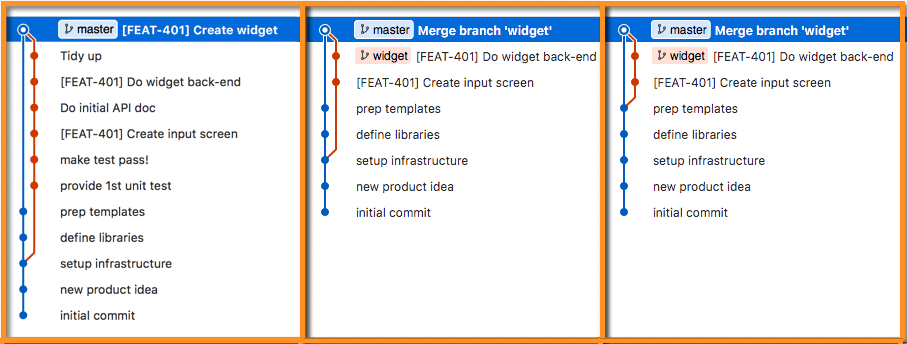
The next figure shows each of the merge strategies in action given the above starting point. With a merge commit (A), the branch merges into master at the top; all the commits remain, nicely grouped on the branch, even when the branch is deleted (notice the widget label is gone). The squash-and-merge strategy (B) reduces all commits to a single commit, and that single commit is spliced onto master, effectively removing all traces of the branch. The rebase-and-merge strategy (C) is quite similar, just without the squash, so you still see all the same commits that used to be on the branch. These images reflect the minimal benefits from the table, i.e., without the additional work implied by the footnotes, which are discussed below.

With the illustrations as a reference, now let’s consider each of the characteristics in the table.
Guarantee Linear Commit History
Both B and C strategies are applied directly to master, getting rid of the branch completely, so by definition they maintain a linear history. By contrast, strategy A is not linear because it does not make sense to lay out the commits on master and the commits on the branch in a single line. If you are looking at the Git history (e.g. via git log) that makes it more difficult to follow what happened when. Note that strategy A can be made linear, per note 1, by rebasing on the branch before doing the merge. The next section provides an illustration of this.
Retain Fine-Grained Commit History
Both A and C strategies retain a fine-grained commit history. That is, even after the merge, each commit that was done on the branch is still present. Thus, you get more specific information from using git blame or git log. And it is often easier to comprehend the changes in a smaller commit, so this is generally a good thing. But it could easily be a bad thing unless you make sure the commits are worded for context (see Retain Context of Commits below) and make sure to apply judicious squashing (see Eliminate Inconsequential Commits below). By contrast, strategy B does not retain any details of individual commits, as it squashes all of them into a single commit.
Retain Context of Commits
Only strategy A retains the context of the original commits after the merge. As the figure shows, you can instantly see which commits were involved leading up to the merge. By contrast, strategy C has all the same commits, but they are just spliced onto master so there is no way to discern which ones are related, thus making it more difficult to understand the set of changes. Unless you are very thoughtful in crafting your commit messages, those that could be reasonably understood in the context of your development branch might leave the reader clueless once they are on master. As a trivial example, you might have a commit labeled Updated unit tests. When viewing a history of commits on your branch, it is rather apparent what unit tests you are referring to. If that now appears on master, it has to stand on its own and it offers no context. Oddly, strategy B effectively maintains context, too, since it does encapsulate all the commits into a single commit, so there is certainly no ambiguity over which commits belong to that merged feature.
Eliminate Inconsequential Commits
Inconsequential commits are those that say fixed typos or cleaned up whitespace or oops, etc. All the ones that were fine for work on a branch but have no business being committed on master for posterity. By definition, strategy B eliminates all of the original commits, creating one combined commit, therefore any inconsequential commits are eliminated, too. Both A and C strategies, per note 2, can also eliminate inconsequential commits by doing judicious squashing on the branch before doing the merge.
Maintain Working Code on Master
A best practice of the source control process is that the master branch should always contain working code. That way, any of the plethora of developers on your team that use the repository never have to guess, or hunt for, the last known good commit. It makes it easy if you need to, for example, find and fix a bug quickly because it is causing customer-facing issues. You can just start a new branch off master knowing that you start from a working state. Now once you are ready to merge, your last commit should be in a similar, known good state. With strategy A, once the merge is complete (modulo fixing merge conflicts) what you actually commit on master will still be in a known good state. Strategy B is identical from this perspective. But with strategy C any of the commits prior to the last one on your branch should be considered in an unknown state. There is no reason to maintain only known good commits on your working branch; in fact, that would make work a lot more tedious. So if all those commits are spliced into master, then master is composed of mostly questionable commits with just an occasional known good one.
Work Never Appears to Have Been Done on Master
Closely tied in to the last point, the master branch should really just be a place to keep your known good commits; you should never do work directly on master. This is clearly the case with strategy A, because the work looks as if it remains on the branch. By contrast, this is never the case with strategy C–it looks like all the work was done on master! Strategy B is just the same: there is only one commit and it is on master, so where else could the work have been done? I liken this characteristic to the social situation where, even if there was no impropriety in a given situation, what counts is avoiding the appearance of impropriety!
Branch Contains Final Code
When you do a merge using any of the three strategies without the additional step about to be described, it is quite possible that you will have merge conflicts when you attempt to merge to master. You need to resolve those merge conflicts on master, which means you must introduce code changes that were not on your branch. If you are using continuous integration, it typically monitors any code pushed up to your branch and runs your battery of unit tests, linting, smoke tests, etc., and indicates whether your branch is clean to merge or not. That is why it is vital that you resolve any merge conflicts on your branch. One way to do this is rebase your branch to master just before you apply any of the three merge strategies. It almost seems redundant with strategy B or C, which both include rebasing already, but those would be doing the work on master, not on your branch, thus skirting around the vital guard step provided by your CI system.
Able to Atomically Revert
Sometimes, despite your best efforts, problems are introduced in a merge. So it is helpful to be able to revert to an earlier, problem-free state. With strategy A, all the commits are nicely grouped on a branch, albeit unnamed after the merge. But the key is that there is only a single commit on master so you can easily back out by going back to the prior commit. And that reversion must take place atomically—in one step—so you are guaranteed not to leave half a merge sticking around. Similarly strategy B is contained entirely in a single commit, so reverting it is also atomic. By contrast, strategy C puts potentially many commits on master, so you need to be darned sure you revert the whole group of them.
The Merge Strategies Revisited
Referring now back to the table, several benefits are adorned with footnotes; realizing those benefits requires extra work. Consider strategy A first, the merge commit, as visually it is the most illustrative.
The Merge Commit
![]()
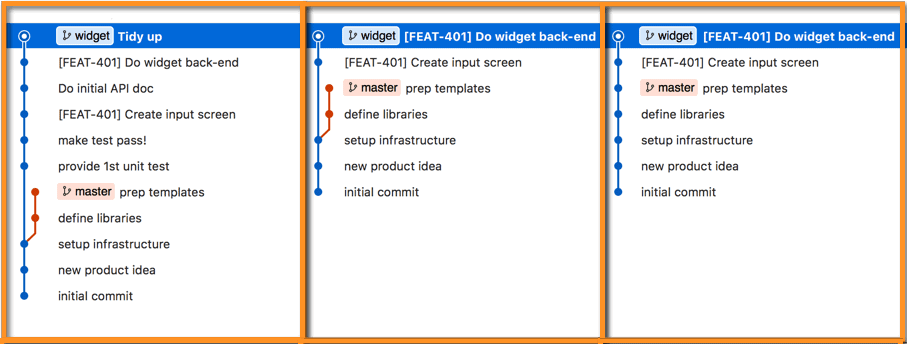
The leftmost panel below repeats the merge-commit from the last figure. No additional work has been applied. Using judicious squashing (footnote 2 above) before the merge yields the result in the center panel. Observe that trivial and inconsequential commits have been squashed into their neighbors, removing some noise from the commit history. That is, reviewing the history in the center panel yields a shorter yet clearer history. The rightmost panel goes even farther: besides judicious squashing it also rebases the branch to master so that there are no intervening commits on master between where the branch originated and where it terminates at the merge. This provides the additional benefits in the table noted by footnote 1, allowing a CI system to vet the branch as well as guaranteeing a linear commit history.
For strategies B and C, we need a different set of snapshots for discussion purposes. Let’s take the same image just above and rewind one commit, to just before the commit. Those are shown below. So the leftmost panel in the next figure shows the original set of commits before the merge. The center panel shows judicious squashing applied, and the rightmost panel adds to the center panel, adding rebasing the branch to master. This preparation for the merge is essentially the same regardless of which merge strategy selected.
The Squash and Merge
![]()
For strategy B, squash-and-merge, which already includes a squash-all, there is no value in doing a judicious squash first. The rebase is still important, though, even though the end result of squash-and-merge in the commit history will look exactly the same as it did before: a single commit added to master. But, as discussed above, the rebase supports proper continuous integration support. And that is not just me being pedantic. I encountered a situation where suddenly everyone’s build was breaking. It turned out that one developer inadvertently had introduced a bug that broke the build on master. How? Because he/she did not rebase on the branch and give the CI system the opportunity to vet the automatic merged changes. It took a couple hours to diagnose and correct that issue, during which time, no one was able to do any merges to master, backing up the pipeline for a while. So as enticing as pressing that big green button in GitHub is, please rebase right before you merge!
The Rebase and Merge
![]()
For strategy C, rebase-and-merge, both a judicious squash and a rebase-on-branch are useful. You might think, analogous to strategy B that already includes a squash so the judicious squash was not needed, that here with strategy C a rebase is not needed because it already includes one. But that is not the case! When you press the big green button on GitHub to rebase-and-merge, that is rebasing back onto master directly, bypassing any checks from the CI system. So though it may seem tedious, for safety you should rebase on the branch first, just as with strategy A and strategy B. Once your CI system reports a clean bill of health, immediately proceed with the merge.
Merge Conflicts
In large teams of developers, merge conflicts are inevitable. Earlier, I touched tangentially on merge conflicts only to mention that you should work them out on your branch rather than on master. But handling conflicts is so important (just like with co-workers, I suppose!) that it deserves more.
Merge conflicts come in two kinds, what I will call ‘overt’ and ‘insidious’. Overt merge conflicts occur when two developers modify the same lines of code. Your source control system, when preparing for a merge, cannot determine what to do, so it brings this to your attention—usually loudly and prominently—so you may examine the code and decide what to keep, what to discard, and what to modify. And it typically offers a variety of tools to resolve them.
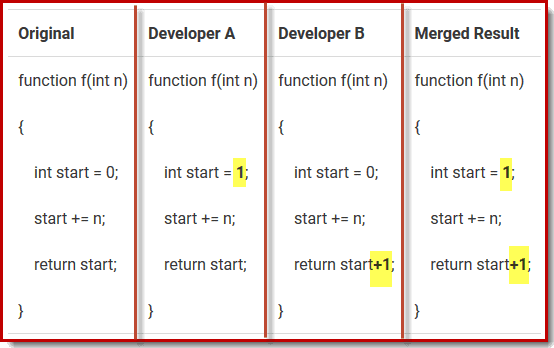
Insidious merge conflicts, on the other hand, usually sneak right by without even being noticed. Consider this example. Let’s assume that you are editing a file, and another member of your team is editing that same file. As long as the changes are on different lines of the code, Git can merge in both of your changes when you do a commit. So you make some changes… your neighbor makes some changes… you both commit… life goes on. But watch out! No source control system deals with semantics; merging is purely mechanical. Consider the progress from left to right in the table below. Developer A works on a particular bug, changing the line indicated in the file. Developer B, unbeknownst to Developer A, works on the same bug, making the change shown. Individually, the solution from Developer A and the solution from Developer B produce the same output from the function. The changes are on different lines, so there is no problem merging them all together mechanically to get the final result shown—and then the function gives a different answer!!
In theory, you should have unit tests in place to catch such issues. That is why, again, you want to rebase the latest code on master onto your working branch before you do your final merge, so you have the opportunity to check for compile errors, lint errors, unit test errors, and the like. But unit tests are sometimes incomplete. Or a merge may have introduced an error that would not be caught by a unit test; perhaps it needs an integration test. Presumably you already ran and exercised your full application before you decided you are ready to prepare to merge to master. But really you should run your application again after rebasing master onto your branch even if your unit tests all pass. Be paranoid; avoid insidious merge conflicts!
Summary
Work on a short-lived feature branch. That tends to keep your pull request smaller so it is more easily comprehensible to reviewers and minimizing your divergence from master reducing the complexity of any conflict resolution.
Master should always have working, production-ready code. That avoids the burden to everyone in having to decide if a particular commit is safe to use as a starting point for a branch, for a demo, etc.
Improve clarity with judicious squashing. Use an interactive rebase to squash trivial commits as well as commits that are not particularly relevant to other developers. Remember, you’re committing for posterity so reduce the noise in the commit history.
Improve clarity with judicious non-squashing. You might decide the path of least resistance is to always squash all commits into one (strategy B). This does have advantages (e.g. less work cleaning up your commit history to make sense, and certainly less complex to do). However, just be aware that it makes your commit history, by necessity, have less detailed messages. Those messages show up in git log and git blame so they then offer less context. This may not be a bad thing, mind you. This particular bullet point really depends on what works for your team.
Do your conflict resolution on your branch so your CI system can provide a safety net to avoid introducing failures to master.
Don’t forget to be a good netizen and cleanup after yourself. Delete your branch on GitHub after your work has been merged. GitHub makes that very easy: as soon as you press the big, green button to confirm the merge, it updates the page with a button to delete your now-unneeded branch. Even if you merge from the command-line, refresh the GitHub page for your PR and it will present you with the same button to delete your unneeded branch.
This document contains proprietary information and is protected by copyright law.
Copyright © 2026 Red Gate Software Limited. All rights reserved
Load comments