

Batched deletions are a common strategy in SQL Server to manage large datasets without overloading the system, but poorly tuned deletes can cause blocking, long-running transactions, and heavy log usage. Learn how to monitor and optimize these processes for smooth, efficient database performance.
In previous articles I showed patterns for working with large amounts of data on big tables while keeping locking at a minimum. These processes can allow migrations and maintenance without requiring downtime but, in environments with unpredictable database workloads, there is a risk of heavy traffic starting at any time and disrupting a once smooth operation. In this article, I’ll demonstrate how to augment these processes to allow dynamic adjustment of the configuration.
For most systems, the main limitation these techniques run into is the speed and throughput of I/O (input/output). During periods of low traffic, a large batch size may perform great with no impact to production, but as traffic increases, the storage subsystem may not be able to keep up.
I’ll show two workarounds to deal with this issue: lowering the batch size, and introducing a small delay in between batches. Both will allow the process to continue running with less I/O demand but, if this still isn’t enough, we can easily stop the process and restart at a different time.
Logging Tables in SQL Server
Before we get into the configuration options, let’s consider how we can get feedback on our process while it’s running, so we’re better informed about the adjustments we want to make. Let’s review the code for purging in batches explored in this article:
|
1 2 3 4 5 6 7 8 9 10 11 12 13 14 15 16 17 18 19 20 21 22 23 24 25 26 27 28 29 30 31 32 33 34 35 36 37 38 39 |
SET NOCOUNT ON; --control the number of rows deleted per iteration DECLARE @BatchSize INT = 5000; --variable used to tell the process to stop DECLARE @Stop INT = 0; IF (OBJECT_ID ('tempdb..#ToProcess') IS NULL) CREATE TABLE #ToProcess (Id INT NOT NULL PRIMARY KEY CLUSTERED); IF (OBJECT_ID ('tempdb..#Batch') IS NULL) CREATE TABLE #Batch (Id INT NOT NULL PRIMARY KEY CLUSTERED); -----------------Gather Ids------------------------------------ INSERT INTO #ToProcess (Id) SELECT Id FROM dbo.Posts WHERE CreationDate < '2011'; -----------------Main Loop------------------------------------ WHILE (@Stop = 0) BEGIN --Load up our batch table while deleting from the main set DELETE TOP (@BatchSize) #ToProcess OUTPUT DELETED.Id INTO #Batch (Id); --Once the rowcount is less than the batchsize, -- we can stop (after this loop iteration) IF @@ROWCOUNT < @BatchSize SELECT @Stop = 1; --Perform the DELETE DELETE FROM p FROM dbo.Posts p JOIN #Batch b ON p.Id = b.Id; --Clear out Batch table TRUNCATE TABLE #Batch END; |
Now, we’ll add a new table to hold our logging:
|
1 2 3 4 5 6 7 8 9 10 11 12 13 14 15 |
IF (OBJECT_ID('dbo.PurgeLogging') IS NULL) CREATE TABLE dbo.PurgeLogging ( LogId INT IDENTITY(1,1) NOT NULL PRIMARY KEY CLUSTERED ,StartTime DATETIME2(7) NOT NULL DEFAULT GETDATE() ,EndTime DATETIME2(7) NULL ,Duration_ms AS DATEDIFF(MILLISECOND , StartTime , ISNULL(EndTime, GETDATE())) ,RowsAffected INT NULL ,[BatchSize] INT NOT NULL ,DelayTime varchar(8) NOT NULL ,ErrorCode INT NULL ,ErrorMessage NVARCHAR(255) NULL ) |
This table will contain a row for every iteration of the loop, tracking the time it takes for the DELETE statement to run (because that’s what will alert us to any blocking). Depending on the latency demands of your system, even a 1-2 second iteration may be too slow, but other systems may function without issue as long as this is below the default timeout of 30 seconds.
Besides the time tracking, we’ll also record the values of our configuration parameters and any errors that come up during the operation. We do this by inserting a record at the beginning of our loop:
|
1 2 3 |
INSERT INTO dbo.PurgeLogging (StartTime,[BatchSize], DelayTime) SELECT GETDATE(), @BatchSize, @DelayTime SELECT @LogId = SCOPE_IDENTITY() |
And by updating that record at the end of our loop:
|
1 2 3 4 5 6 |
UPDATE dbo.PurgeLogging SET EndTime = GETDATE() , RowsAffected = @RowsAffected , ErrorMsg = @ErrorMsg , ErrorNum = @ErrorNum WHERE LogId = @LogId |
Configuration Tables in SQL Server
In our previous script we used a static variable to hold the BatchSize, but we’ll now store this in a table along with other parameters to adjust the process.
This allows us to make changes on the fly without stopping the script and rolling back a midflight transaction. It also opens up the possibility of using an automated process to tweak these parameters based on system load.
Let’s look at our configuration table:
|
1 2 3 4 5 6 7 8 |
IF (OBJECT_ID ('dbo.PurgeConfig') IS NULL) CREATE TABLE dbo.PurgeConfig ( ConfigId INT NOT NULL DEFAULT (1) PRIMARY KEY CLUSTERED , DelayTime varchar(8) NOT NULL , [BatchSize] INT NOT NULL , [Stop] bit NOT NULL DEFAULT (0) , CONSTRAINT CH_PurgeConfig_ConfigId CHECK (ConfigId=1) ); |
This table contains our parameters as well as a check constraint to ensure we only have one row stored at any time. We’ll update the running variables at the end of each loop (as well as at the beginning of the script):
|
1 2 3 4 5 |
SELECT @BatchSize = [BatchSize] , @DelayTime = [DelayTime] --ONLY UPDATE @Stop when it is 0 , @Stop = CASE WHEN @Stop = 1 THEN 1 ELSE [Stop] END FROM dbo.PurgeConfig |
Error Handling in SQL Server
While we are making improvements to the script, let’s add some polish by introducing error handling inside the main loop. This can be as simple as adding a TRY/CATCH block and some variables to store the error message and number.
You might also opt to set @Stop = 1 in this section if you want the script to stop any time it hits an error. In this example, I’m letting it continue because I can address the error and rerun the script later; any records that failed to delete will be scooped up by the insert to the #ToProcess table on the next run.
Putting It All Together
Now let’s look at what our script looks like with these new tables:
|
1 2 3 4 5 6 7 8 9 10 11 12 13 14 15 16 17 18 19 20 21 22 23 24 25 26 27 28 29 30 31 32 33 34 35 36 37 38 39 40 41 42 43 44 45 46 47 48 49 50 51 52 53 54 55 56 57 58 59 60 61 62 63 64 65 66 67 68 69 70 71 72 73 74 75 76 77 78 79 80 81 82 83 84 85 86 87 88 89 90 91 92 93 94 95 96 97 98 99 100 101 102 103 104 105 106 107 108 109 110 111 112 113 114 115 116 117 118 119 120 121 122 123 |
SET NOCOUNT ON; --control the number of rows deleted per iteration DECLARE @BatchSize INT; --variable used to tell the process to stop DECLARE @Stop INT = 0; --add a delay between iterations DECLARE @DelayTime VARCHAR(8); --logging variable for rowcount DECLARE @RowsAffected INT; --logging variable for the log record DECLARE @LogId INT; --logging variables for errors DECLARE @ErrorMsg nvarchar(4000) , @ErrorNum INT; IF (OBJECT_ID ('tempdb..#ToProcess') IS NULL) CREATE TABLE #ToProcess (Id INT NOT NULL PRIMARY KEY CLUSTERED); IF (OBJECT_ID ('tempdb..#Batch') IS NULL) CREATE TABLE #Batch (Id INT NOT NULL PRIMARY KEY CLUSTERED); --------------Logging Table----------------------------------- IF (OBJECT_ID('dbo.PurgeLogging') IS NULL) CREATE TABLE dbo.PurgeLogging ( LogId INT IDENTITY(1,1) NOT NULL PRIMARY KEY CLUSTERED ,StartTime DATETIME2(7) NOT NULL DEFAULT GETDATE() ,EndTime DATETIME2(7) NULL ,Duration_ms AS DATEDIFF(MILLISECOND , StartTime , ISNULL(EndTime, GETDATE())) ,RowsAffected INT NULL ,[BatchSize] INT NOT NULL ,DelayTime varchar(8) NOT NULL ,ErrorCode INT NULL ,ErrorMessage NVARCHAR(255) NULL ); -----------------Configuration Table--------------------------- IF (OBJECT_ID ('dbo.PurgeConfig') IS NULL) BEGIN CREATE TABLE dbo.PurgeConfig ( ConfigId INT NOT NULL DEFAULT (1) PRIMARY KEY CLUSTERED , DelayTime varchar(8) NOT NULL , [BatchSize] INT NOT NULL , [Stop] bit NOT NULL DEFAULT (0) , CONSTRAINT CH_PurgeConfig_ConfigId CHECK (ConfigId=1) ); -----------------Add Initial Configuration--------------------- INSERT INTO dbo.PurgeConfig (DelayTime, [BatchSize], [Stop]) VALUES ('00:00:00', 5000, 0); SELECT @BatchSize = [BatchSize] , @DelayTime = [DelayTime] --ONLY UPDATE @Stop when it is 0 , @Stop = CASE WHEN @Stop = 1 THEN 1 ELSE [Stop] END FROM dbo.PurgeConfig; END -----------------Gather Ids------------------------------------ INSERT INTO #ToProcess (Id) SELECT Id FROM dbo.Posts WHERE CreationDate < '2011'; -----------------Main Loop------------------------------------ WHILE (@Stop = 0) BEGIN --Create a logging record INSERT INTO dbo.PurgeLogging (StartTime,[BatchSize], DelayTime) SELECT GETDATE(), @BatchSize, @DelayTime; SELECT @LogId = SCOPE_IDENTITY(); --Load up our batch table while deleting from the main set DELETE TOP (@BatchSize) #ToProcess OUTPUT DELETED.Id INTO #Batch (Id); --Once the rowcount is less than the batchsize, -- we can stop (after this loop iteration) IF @@ROWCOUNT < @BatchSize SELECT @Stop = 1; BEGIN TRY --Perform the DELETE DELETE FROM p FROM dbo.Posts p JOIN #Batch b ON p.Id = b.Id; --Store the rowcount SELECT @RowsAffected = @@ROWCOUNT; END TRY BEGIN CATCH --if we have an error, store the message and log it -- optionally you can stop the process here by setting @stop =1 SELECT @ErrorMsg = ERROR_MESSAGE() , @ErrorNum = ERROR_NUMBER() END CATCH --Update the logging table UPDATE dbo.PurgeLogging SET EndTime = GETDATE() , RowsAffected = @RowsAffected , ErrorMessage = @ErrorMsg , ErrorCode = @ErrorNum WHERE LogId = @LogId; --Refresh running configuration from config table SELECT @BatchSize = [BatchSize] , @DelayTime = [DelayTime] --ONLY UPDATE @Stop when it is 0 , @Stop = CASE WHEN @Stop = 1 THEN 1 ELSE [Stop] END FROM dbo.PurgeConfig; --Clear out Batch table TRUNCATE TABLE #Batch; –-Wait before running the next batch WAITFOR DELAY @DelayTime END; |
After we kick off this script we can monitor the progress by querying the PurgeLogging table:
|
1 2 |
SELECT TOP 100 * FROM dbo.PurgeLogging ORDER BY LogId DESC |
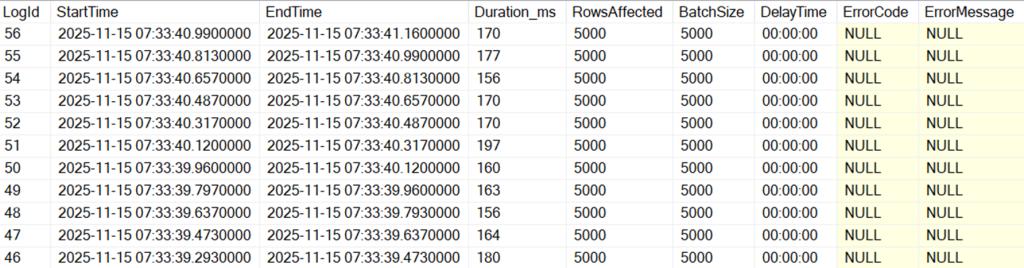
This results in each batch taking less than 200 milliseconds to complete:
Then, if we want to change the batch size or add a delay in between batches, we can update the PurgeConfig table like so:
|
1 2 3 |
UPDATE PurgeConfig SET DelayTime = '00:00:02' , [BatchSize] = 100000 |
We can see in our logging table that the change takes effect seamlessly:
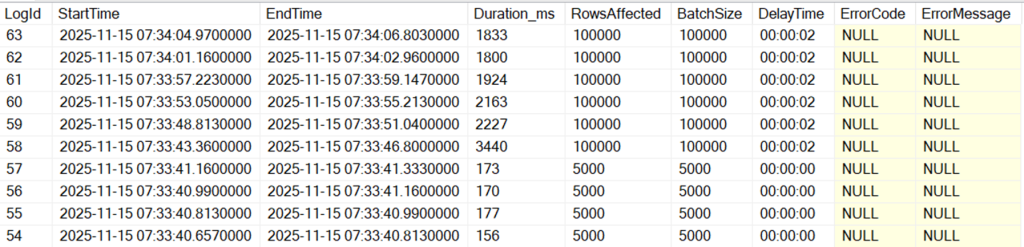
Notice that there’s now a second gap between the StartTime and EndTime of the previous row, which could help slower disks keep up.
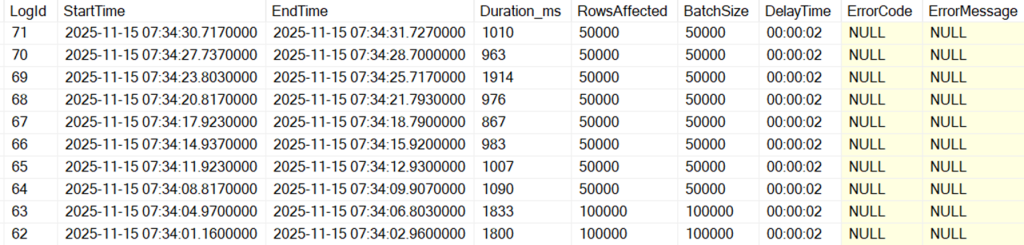
We can also see that each batch is now taking more than a second – if we feel this is too long, we can update our PurgeConfig table once again to lower the batch size:
Conclusion
Adding logging and dynamic configuration to this technique allows us to tune the process to the unique capabilities and requirements of any environment. By looking at the time each loop takes to execute, we can adjust the batch size to keep our impact to an acceptable amount. If our I/O is saturated, we can add a delay in between batches to allow other processes to complete.
This technique can be used to purge old data as I have shown here, but it can also be used for more advanced processes like changing the datatype on a column while a table is being used, or deleting from multiple tables with foreign key relationships.
10 tools for every stage of SQL Server development
FAQs: Batched Deletions in SQL Server
1. What is a batched delete in SQL Server?
2. Why use batched deletes in SQL Server?
Batched deletes in SQL Server improve stability, avoid long locks, and prevent transaction log issues during large data purges.
3. How do I pick a batch size in SQL Server?
Start small (e.g., 1,000 rows), monitor performance, and adjust until you balance speed with minimal blocking.
4. How do batched deletes affect the transaction log in SQL Server?
Deletes are fully logged. Smaller batches help control log growth and make backups faster.
5. Do batched deletes in SQL Server cause fragmentation?
Yes. Plan index maintenance and update statistics after large deletes.
6. How can I prevent blocking?
Prevent blocking in SQL Server by using indexed predicates, short transactions, smaller batches, and consider snapshot isolation.
7. What should I monitor when using batched delete in SQL Server?
Track rows per batch, duration, waits, blocking, CPU/IO, and log usage.
8. Can partitioning speed up deletes in SQL Server?
Yes! Partition switching is much faster and less disruptive than row-by-row deletes.
9. How do I resume after a failure?
Save the last processed key and restart from there to avoid duplicates.
10. How do I confirm efficiency?
Check execution plans for index seeks, avoid scans, and tune predicates.
This document contains proprietary information and is protected by copyright law.
Copyright © 2026 Red Gate Software Limited. All rights reserved


Load comments