


Today’s applications require robust security to ensure your application’s sensitive and confidential information is not compromised. This is exactly where access tokens and refresh tokens come in.
Typically, these tokens are generated based on JWT open standard. JWT tokens should be generated in such a way that they have a short expiry time – the shorter the expiry time, the safer they are. There needs to be a way to refresh these tokens, re-authenticate the user, and generate new JWT tokens to continue to use the application uninterrupted.
This article explains JWT-based authentication, access and refresh tokens, and how you can implement them in an ASP.NET Core application.
What do you need to use refresh tokens in ASP.NET Core?
To work with the code examples illustrated in this article, you need Visual Studio 22 – download it here if you haven’t done so already. You’ll also need.NET Core: https://dotnet.microsoft.com/download/archives
What is JWT-based authentication?
Tokens are digitally encoded signatures that are used to authenticate and authorize access to protected resources in an application. JWT (JSON Web Token) is an open standard commonly used for exchanging information between two parties in a secure manner. Typically, a JWT token is used in ASP.NET Core applications to authenticate users and, if the authentication is successful, provide them access to protected resources in the application.
To understand how refresh tokens operate, it’s imperative that you have a thorough knowledge of how JWT tokens work. Since they are signed digitally, this information is trustworthy and verifiable. If you want to sign a JWT, you can either use a secret key (by leveraging the HMAC algorithm) or a pair of public/private keys (RSA or ECDSA).
What are access tokens?
An access token is a digital (cryptographic) key that provides secure access to API endpoints. A token-based authentication system uses access tokens to allow an application to access APIs on the server. After authentication with valid credentials is successful, access tokens are issued to the user.
The tokens are then passed as ‘bearer’ tokens in the request header while a user requests data from the server. As long as the token is valid, the server understands that the bearer is authorized to access the resource.
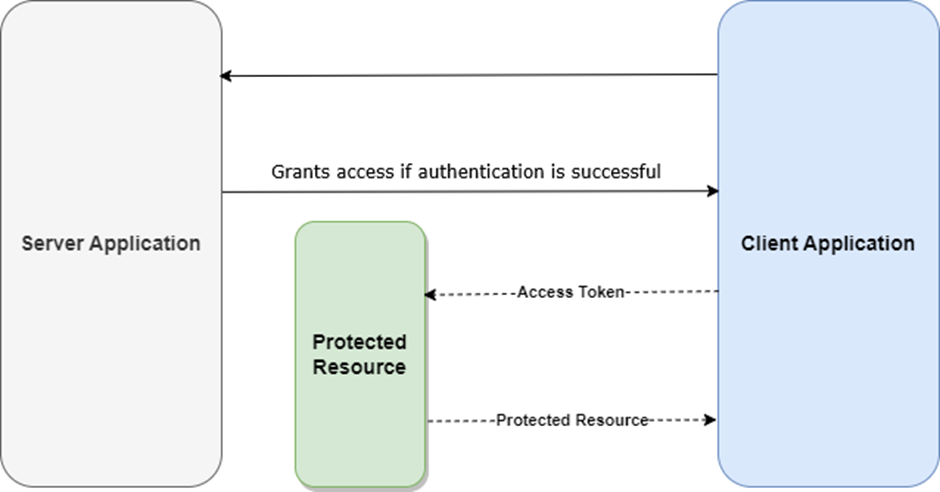
Since access tokens cannot be used for an extended period of time, you should leverage refresh tokens to re-authenticate a user in your application sans the need of authenticating the user again. This explains why refresh tokens are used by most applications to refresh access to protected resources by reissuing an access token to the user.
What are Refresh Tokens? Why are they needed?
Since access tokens expire after a certain amount of time, refresh tokens are used to obtain new access tokens after the original has expired. This allows users to remain authenticated without having to log in to the application each time the access token expires – effectively, they are a ‘renewal’ mechanism.
Here are the benefits of refresh tokens at a glance:
- Extended access: Refresh tokens allow you to access APIs and applications for prolonged periods without re-logins even after access tokens have expired.
- Enhanced security: A long-lived refresh token can reduce token theft considerably since access tokens expire quickly.
- Improved user experience: The use of refresh tokens makes it easier for users to interact with apps without the need for re-entering the credentials.
How do refresh tokens work?
Here’s a simplified explanation of how refresh tokens work:
- As a first step, the client sends the login credentials to the authentication component.
- As soon as the user logs into the application, the credentials are sent to the authentication server for validation.
- Assuming the authentication process completes successfully, the authentication component generates two tokens, i.e., an access token and a refresh token, and sends them to the client application.
- From now on, the client application takes advantage of the access token to gain access to protected resources of the server application, i.e., the APIs or services.
- The access token is verified and, if it’s valid, access to the protected resource is granted.
- Steps 4 and 5 are repeated until the access token is no longer valid, i.e., after the access token expires.
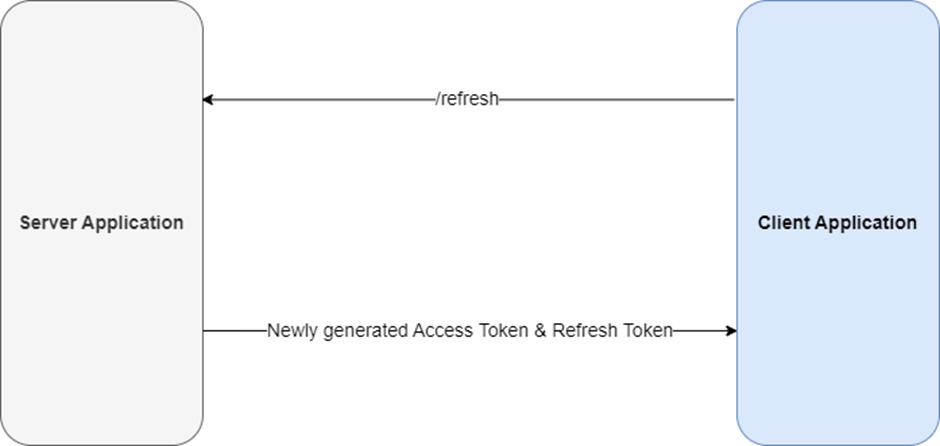
- Upon expiry of the access token, the client application requests a new access token from the server application using the refresh token.
- Lastly, the authentication component generates two new tokens again, i.e., an access token and a refresh token.
9. Steps 4 to 8 are repeated until the refresh token expires.
10. As soon as the refresh token has expired, the authentication server generates access and refresh tokens yet again since the client should be re-authenticated.
How to implement refresh tokens in ASP.NET Core: getting started
In this section, we’ll examine how we can implement refresh tokens in an ASP.NET Core application. We’ll build an ASP.NET Core Web API application to demonstrate how it all works and test the API endpoints using Postman.
In this example, we’ll use the following files:
- LoginModel (This model is used to store user credentials to login to the application)
- RegisterModel (This model stores user data required to register a new user)
- TokenModel (This model contains the access and refresh token and is used to send these tokens in the response)
- ApplicationUser (This class extends the functionality of the IdentityUser class of the ASP.NET Core Identity Framework)
- ApplicationDbContext (This represents the DbContext used to interact with the underlying database)
- MessageCode (This record type contains a list of message codes.)
- MessageProvider (This record type contains a list of notification and error messages.)
- JwtOptions (This type is used to read configuration data.)
- Response (This represents the custom response format we’ll use for sending formatted response out of the controller action methods.)
- IAuthenticationService
- AuthenticationService (This class represents the Authentication Service that wraps all logic for registering a new user, logging in an existing user, refreshing tokens, etc.)
- AuthenticationController (This represents the API that contains action methods to register a new user, login an existing user, refresh tokens, etc. It calls the methods of the AuthenticationService class to perform each of these operations.)
Save 35% on Redgate’s .NET Developer Bundle
How to implement refresh tokens in ASP.NET Core: step-by-step guide
To build the application discussed in this article, follow these steps:
- Create a new ASP.NET Core application
- Install the NuGet packages
- Create the models
- Create the data context
- Register the data context
- Create the repositories
- Add services to the container
How to create a new ASP.NET Core web API application
To create a new ASP.NET Core Web API project, run the following commands at the command prompt:
|
1 2 3 |
dotnet new sln --name RefreshTokenDemo dotnet new webapi -f net10.0 --no-https --use-controllers --name RefreshTokenDemo dotnet sln RefreshTokenDemo.sln add RefreshTokenDemo/RefreshTokenDemo.csproj |
Install the NuGet package(s)
In this example, you’ll take advantage of JWT tokens for implementing authentication. You can use the Microsoft.AspNetCore.Authentication.JwtBearer NuGet package to work with JWT tokens in ASP.NET Core applications; this can be installed via the NuGet Package Manager or NuGet Package Manager Console.
You’ll need to install the following packages:
|
1 2 3 4 5 |
Microsoft.AspNetCore.Authentication.JwtBearer Microsoft.EntityFrameworkCore.SqlServer Microsoft.AspNetCore.Identity.EntityFrameworkCore Microsoft.EntityFrameworkCore.Tools Microsoft.EntityFrameworkCore.Design |
To do this, run the following commands in the NuGet Package Manager Console Window:
|
1 2 3 4 5 |
Install-Package Microsoft.AspNetCore.Authentication.JwtBearer Install-Package Microsoft.EntityFrameworkCore.SqlServer Install-Package Microsoft.AspNetCore.Identity.EntityFrameworkCore Install-Package Microsoft.EntityFrameworkCore.Tools Install-Package Microsoft.EntityFrameworkCore.Design |
Alternatively, you can install these packages by executing the following commands at the Windows shell:
|
1 2 3 4 5 |
dotnet add package Microsoft.AspNetCore.Authentication.JwtBearer dotnet add package Microsoft.EntityFrameworkCore.SqlServer dotnet add package Microsoft.AspNetCore.Identity.EntityFrameworkCore dotnet add package Microsoft.EntityFrameworkCore.Tools dotnet add package Microsoft.EntityFrameworkCore.Design |
Create the models
Create three record types – LoginModel, RegisterModel and TokenModel – as shown in the following code listing:
|
1 2 3 4 5 6 7 8 9 10 11 12 13 14 15 16 17 18 |
public record LoginModel { public string Username { get; set; } public string Password { get; set; } } public record RegisterModel { public string Username { get; set; } public string Email { get; set; } public string Password { get; set; } } public record TokenModel { public string? AccessToken { get; set; } public string? RefreshToken { get; set; } } |
While the LoginModel and RegisterModel types will be used to store login and register data for the user, the TokenModel will be used to store the access and refresh tokens respectively. Note the usage of record type in the preceding code example.
In C#, a record is a class (or struct) primarily designed to store data when working with immutable data models. You can use a record type in place of a class or a struct when you want to create a data model with value-based equality and define a type that comprises immutable objects.
Next, create a new class named ApplicationUser. This extends the IdentityUser class to add custom properties to the default ASP.NET Core IdentityUser class:
|
1 2 3 4 5 6 |
using Microsoft.AspNetCore.Identity; public class ApplicationUser : IdentityUser { public string? RefreshToken { get; set; } public DateTime RefreshTokenExpiryTime { get; set; } } |
Create the MessageCode enum
Create an enum named MessageCode. This will contain the message codes (as integer constants) we’ll use in this example:
|
1 2 3 4 5 6 7 8 9 10 11 12 13 |
public enum MessageCode { LoginSuccess, InvalidCredentials, UserAlreadyExists, UserCreationFailed, UserCreatedSuccessfully, InvalidRequest, InvalidTokenPair, AccessTokenSuccess, RefreshTokenSuccess, UnexpectedError } |
Create the MessageProvider type
Next, create a record type called MessageProvider. This will be used to return a text message based on the value of the MessageCode enum as a parameter. Hence, if the value of the parameter is LoginSuccess (or integer value 0), the text “User logged in successfully.” will be returned:
|
1 2 3 4 5 6 7 8 9 10 11 12 13 14 15 16 17 18 19 20 21 22 23 24 25 26 27 28 29 30 |
public record MessageProvider { public static string GetMessage(MessageCode code) { switch (code) { case MessageCode.LoginSuccess: return "User logged in successfully."; case MessageCode.InvalidCredentials: return "Invalid credentials."; case MessageCode.UserAlreadyExists: return "User already exists."; case MessageCode.UserCreationFailed: return "User creation failed."; case MessageCode.UserCreatedSuccessfully: return "User created successfully."; case MessageCode.InvalidRequest: return "Invalid request."; case MessageCode.InvalidTokenPair: return "Invalid access token or refresh token."; case MessageCode.RefreshTokenSuccess: return "Token refreshed successfully."; case MessageCode.UnexpectedError: return "An unexpected error occurred."; default: throw new ArgumentOutOfRangeException ("Invalid message code."); } } } |
Create the response type
In this example, we’ll use a custom response record type that can be used to send out responses from the controller in a pre-defined custom format. Create a new record type called Response and replace the auto-generated code with:
|
1 2 3 4 5 6 7 8 9 10 11 12 13 14 15 16 17 18 19 20 21 22 |
public record Response<T> { public string? Message { get; set; } public T? Data { get; set; } public HttpStatusCode StatusCode { get; set; } public static Response<T> Create( HttpStatusCode statusCode, T? data = default, MessageCode? messageCode = null) { return new Response<T> { StatusCode = statusCode, Data = data, Message = messageCode.HasValue ? MessageProvider.GetMessage(messageCode.Value) : null }; } } |
The Response record type shown here is a generic wrapper. It contains fields corresponding to the message to be sent as a response from the action methods of the controller (a HTTP status code), as well as data which will optionally contain the controller-generated access token and refresh token.
Create the JWT section in the configuration file
Create a new section in the appsettings.json file. This is to define the necessary security parameters for validating and generating JWT tokens in your ASP.NET Core API.
|
1 2 3 4 5 6 7 |
"JWT": { "ValidAudience": "http://localhost:4200", "ValidIssuer": "http://localhost:5000", "SecretKey": "Specify your custom secret key here", "AccessTokenValidityInMinutes": 1, "RefreshTokenValidityInMinutes": 60 } |
This configuration data will be read in the Program.cs file using the JwtOptions record type we’ll now create.
Create the JwtOptions type
The JwtOptions record type is used to read the configuration data required to create and manage the tokens.
|
1 2 3 4 5 6 7 8 |
public sealed record JwtOptions { public string SecretKey { get; init; } = string.Empty; public string ValidIssuer { get; init; } = string.Empty; public string ValidAudience { get; init; } = string.Empty; public int AccessTokenValidityInMinutes { get; init; } = 0; public int RefreshTokenValidityInMinutes { get; init; } = 0; } |
This type is used in the AuthenticationService class in this application.
Subscribe to the Simple Talk newsletter
Create the data context
Now that the models have been created, you can now create the data context class for interacting with the underlying database. In Entity Framework Core, the data context acts as the bridge of communication between your application and the underlying database. It represents a session of connectivity with the database, enabling you to execute database operations without having to write raw SQL queries.
In this example, the data context class is named ApplicationDbContext. It extends the IdentityDbContext of the ASP.NET Core Identity Framework:
|
1 2 3 4 5 6 7 8 9 10 11 12 |
using Microsoft.AspNetCore.Identity.EntityFrameworkCore; using Microsoft.EntityFrameworkCore; public class ApplicationDbContext : IdentityDbContext<ApplicationUser> { public ApplicationDbContext(DbContextOptions<ApplicationDbContext> options) : base(options) { } protected override void OnModelCreating(ModelBuilder builder) { base.OnModelCreating(builder); } } |
Create the authentication service
The AuthenticationService class encapsulates the process of token creation, token validation, and token refresh logic in one place. It implements the IAuthenticationService interface:
|
1 2 3 4 5 6 7 8 9 10 11 12 |
public interface IAuthenticationService { Task<Response<object>> LoginAsync(LoginRequest request, CancellationToken cancellationToken = default); Task<Response<object>> RegisterAsync(RegisterRequest request, CancellationToken cancellationToken = default); Task<Response<object>> RefreshTokensAsync(RefreshTokenRequest request, CancellationToken cancellationToken = default); } |
The AuthenticationService class uses constructor injection to create instances of the UserManager class, and the JwtOptions record class, pertaining to the ASP.NET Core Identity Framework. JwtOptions reads the required configuration data:
|
1 2 3 4 5 6 7 8 9 10 11 12 13 14 15 16 17 18 19 20 21 |
public sealed class AuthenticationService : IAuthenticationService { private readonly UserManager<ApplicationUser> _userManager; private readonly JwtOptions _jwtOptions; public AuthenticationService( UserManager<ApplicationUser> userManager, IOptions<JwtOptions> jwtOptions) { _jwtOptions = jwtOptions.Value ?? throw new ArgumentNullException(nameof(jwtOptions)); _userManager = userManager ?? throw new ArgumentNullException(nameof(userManager)); if (string.IsNullOrWhiteSpace(_jwtOptions.SecretKey)) { throw new InvalidOperationException ("The Secret Key is not configured."); } } } |
The AuthenticationService class contains three async methods: LoginAsync, RegisterAsync and RefreshTokensAsync. Each of these methods are called from the controller class. The source code of these three methods is:
|
1 2 3 4 5 6 7 8 9 10 11 12 13 14 15 16 17 18 19 20 21 22 23 24 25 26 27 28 29 30 31 32 33 34 35 36 37 38 39 40 41 42 43 44 45 46 47 48 49 50 51 52 53 54 55 56 57 58 59 60 61 62 63 64 65 66 67 68 69 70 71 72 73 74 75 76 77 78 79 80 81 |
public async Task<Response<object>> LoginAsync(LoginRequest request, CancellationToken cancellationToken = default) { var user = await _userManager.FindByNameAsync(request.Username); if (user == null || !await _userManager.CheckPasswordAsync(user, request.Password)) { return Response<object>.Create( HttpStatusCode.BadRequest, null, MessageCode.InvalidCredentials); } var tokens = await GenerateTokensAsync(user, cancellationToken); return Response<object>.Create( HttpStatusCode.OK, new { tokens.AccessToken, tokens.RefreshToken }, MessageCode.LoginSuccess); } public async Task<Response<object>> RegisterAsync(RegisterRequest request, CancellationToken cancellationToken = default) { var existingUser = await _userManager.FindByNameAsync(request.Username); if (existingUser != null) { return Response<object>.Create( HttpStatusCode.BadRequest, null, MessageCode.UserAlreadyExists); } var user = new ApplicationUser { Email = request.Email, SecurityStamp = Guid.NewGuid().ToString(), UserName = request.Username }; var result = await _userManager.CreateAsync(user, request.Password); if (!result.Succeeded) { return Response<object>.Create( HttpStatusCode.BadRequest, null, MessageCode.UserCreationFailed); } return Response<object>.Create( HttpStatusCode.OK, null, MessageCode.UserCreatedSuccessfully); } public async Task<Response<object>> RefreshTokensAsync(RefreshTokenRequest request, CancellationToken cancellationToken = default) { var principal = GetPrincipalFromExpiredToken(request.AccessToken ?? string.Empty); var username = principal.Identity?.Name; var user = await _userManager.Users .FirstOrDefaultAsync( u => u.UserName == username && u.RefreshToken == request.RefreshToken, cancellationToken); if (user == null || user.RefreshTokenExpiryTime <= DateTime.UtcNow) { return Response<object>.Create( HttpStatusCode.BadRequest, null, MessageCode.InvalidTokenPair); } var tokens = await GenerateTokensAsync(user, cancellationToken); return Response<object>.Create( HttpStatusCode.OK, new { tokens.AccessToken, tokens.RefreshToken }, MessageCode.RefreshTokenSuccess); } |
The complete source code for the AuthenticationService class is available in the Github repository.
How to create migrations using Entity Framework (EF) Core
In Entity Framework (EF) Core, migrations enable schema versioning for your database. You can either create or update the schema from your application using C# models (such as the ApplicationUser model in this example).
Once the migration has been executed successfully and you’ve applied the changes to the database, a new database with the name you specified in the configuration file – along with the associated identity database tables such as AspNetUsers and AspNetRole – will be created automatically.
To create a migration in EF Core, run the Add-Migration command in the Package Manager Console window:
|
1 |
Add-Migration RefreshTokenDemoMigration |
You can also create a migration by running the following command at the .NET CLI:
|
1 |
dotnet ef migrations add RefreshTokenDemoMigration |
Once you run the migration, a new solution folder called Migrations will be created. To apply the migration you created against the underlying database, run the Update-Database command at the Package Manager Console window:
|
1 |
Update-Database |
Once you’ve executed the command, the changes will be applied against the underlying database. A new database will be created, as well as the tables created per your model design. The database will be named whatever you specified in the connection string.
Create the authentication controller
The AutenticationController contains action methods that can be called to register a new user, login an existing user, and regenerate both access and refresh tokens if the former has expired. The actual logic for each of these actions is wrapped inside the AuthenticationService class to ensure your controller is lean, clean, and maintainable.
The following code shows the AuthenticationController class and its action methods. Note how the instance of type IAuthenticationService is injected using constructor injection:
|
1 2 3 4 5 6 7 8 9 10 11 12 13 14 15 16 17 18 19 20 21 22 23 24 25 26 27 28 29 30 31 32 33 34 35 36 37 38 39 40 41 42 43 44 45 46 47 48 49 50 51 52 53 54 55 56 57 58 59 60 61 62 63 64 65 66 67 68 69 70 71 72 73 74 75 76 77 78 79 80 81 |
[Route("api/[controller]")] [ApiController] public class AuthenticationController : ControllerBase { private readonly IAuthenticationService _authenticationService; public AuthenticationController(IAuthenticationService authService) { _authenticationService = authService; } [HttpPost("login")] public async Task<IActionResult> Login([FromBody] LoginRequest request) { if (!ModelState.IsValid) { var response = Response<object>.Create( System.Net.HttpStatusCode.BadRequest, null, MessageCode.InvalidCredentials); return BadRequest(response); } var responseFromService = await _authenticationService.LoginAsync(request); if (responseFromService != null) { if (responseFromService.StatusCode == System.Net.HttpStatusCode.BadRequest) { return BadRequest(responseFromService); } } return Ok(responseFromService); } [HttpPost("register")] public async Task<IActionResult> Register([FromBody] RegisterRequest request) { if (!ModelState.IsValid) { var response = Response<object>.Create( System.Net.HttpStatusCode.BadRequest, null, MessageCode.UserCreationFailed); return BadRequest(response); } var responseFromService = await _authenticationService.RegisterAsync(request); if (responseFromService != null) { if (responseFromService.StatusCode == System.Net.HttpStatusCode.BadRequest) { return BadRequest(responseFromService); } } return Ok(responseFromService); } [HttpPost("refresh-token")] public async Task<IActionResult> RefreshToken([FromBody] RefreshTokenRequest request) { var responseFromService = await _authenticationService.RefreshTokensAsync(request); if (responseFromService != null) { if (responseFromService.StatusCode == System.Net.HttpStatusCode.BadRequest) { return BadRequest(responseFromService); } } return Ok(responseFromService); } } } |
What is the Program.cs file?
The Program.cs file serves as the entry point of for your ASP.NET Core application, analogous to the Main() function in your console applications. This file contains code that bootstraps the web host, configures the services you need, and sets up the HTTP request processing pipeline.
For example, the following statement in the Program.cs file loads configuration data, environment variables, sets up the web host, and prepares the dependency injection container for registering the services you’ll need:
|
1 |
var builder = WebApplication.CreateBuilder(args); |
The next section in the Program.cs file registers the services with the request processing pipeline. For example, the following code adds an instance of type IAuthenticationService to the services collection:
|
1 2 3 4 5 |
builder.Services.AddDbContext<ApplicationDbContext>(options => { options.UseSqlServer( builder.Configuration.GetConnectionString("DefaultConnection")); }); |
Next, you should use the following piece of code in the Program.cs file to register the ASP.NET Core Identity system in the DI container. This is required to provide user management capabilities in your application.
|
1 2 3 |
builder.Services.AddIdentity<ApplicationUser, IdentityRole>() .AddEntityFrameworkStores<ApplicationDbContext>() .AddDefaultTokenProviders(); |
The following code snippet shows how you can add an instance of type IAuthenticationService as a scoped service so that you can access it in the application:
|
1 |
builder.Services.AddScoped<IAuthenticationService, AuthenticationService>(); |
In the following code snippet, the statement Configure<JwtOptions> takes advantage of the Options Pattern to automatically bind the “JWT” section from the appsettings.json to the JwtOptions record type we created earlier:
|
1 2 |
builder.Services.Configure<JwtOptions>( builder.Configuration.GetSection("JWT")); |
The complete source code of the Program.cs file is available in the GitHub repository for your reference.
How to execute the application using Postman
In this example, we’ll use Postman to test the API endpoints. Postman is a powerful, versatile API testing platform that lets you create, test, document, and manage your APIs. With it, you can send HTTP requests using verbs such as GET, POST, PUT, PATCH, and DELETE, and work with a wide variety of data formats. You can also use Postman to handle authentication, create automated test scripts, and even create mock servers for testing purposes.
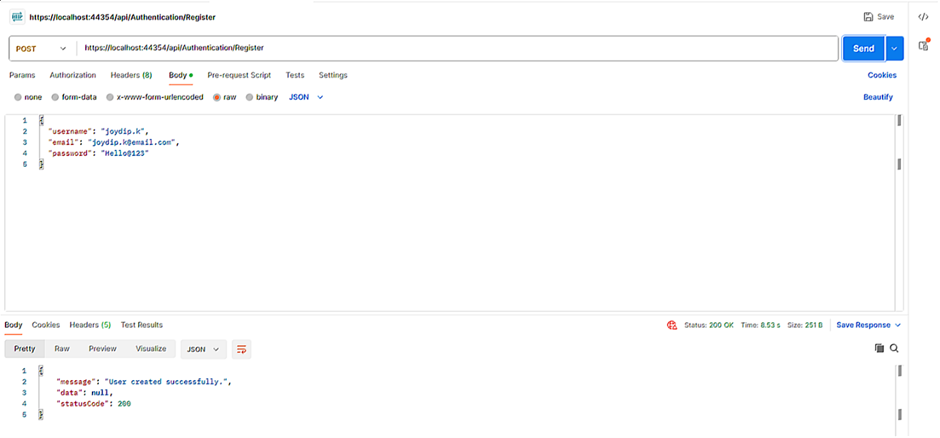
When the application is launched, you’ll be able to invoke the API endpoints from Postman. The first thing you should do is register a new user by invoking the api/Authentication/Register endpoint and specifying the new user’s username, password, and email address in the request body:
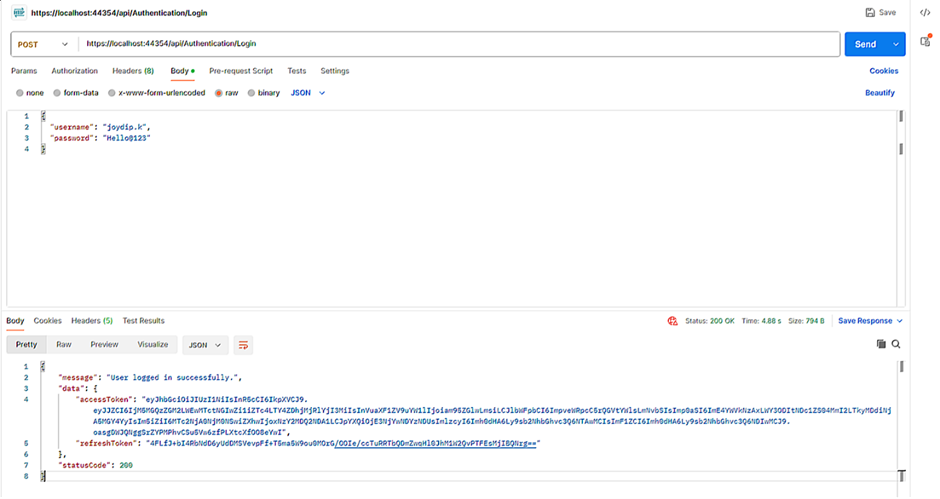
Once a new user has been registered, you should be able to invoke the api/Authentication/Login endpoint to login to the application by specifying the user’s credentials in the request body. If the request is valid, an access token and a refresh token will be returned in the response:
If you pass the access token generated here as a Bearer Token in the body of the request to invoke the HTTP Get endpoint of the WeatherForecast controller, the authentication system will validate the access token passed. If validated, you’ll be able to see data returned in the response:
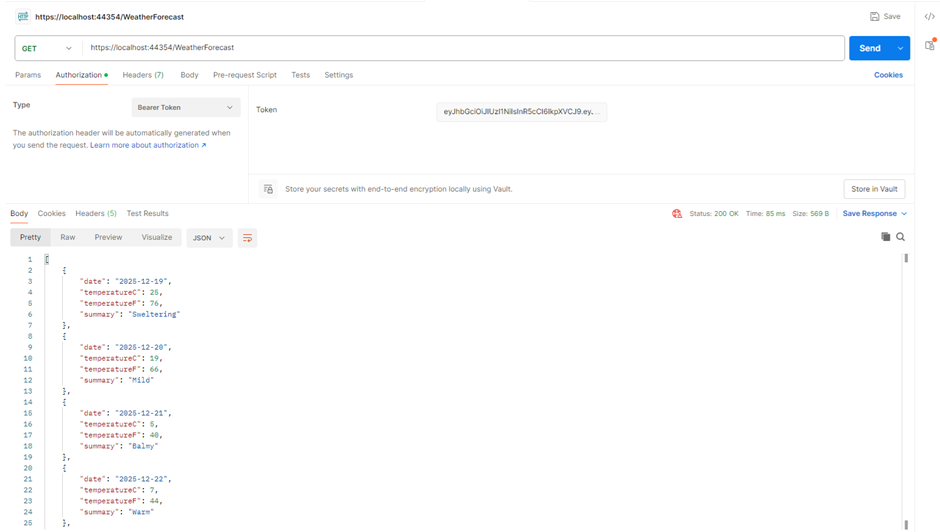
The WeatherForecast controller is created by default when you create a new ASP.NET Core Web API project in Visual Studio.
If you invoke the same endpoint after the expiry of the access token, the HTTP GET endpoint of the WeatherForecast controller will return an HTTP 401 response. This implies that the token is no longer valid, so the request has not been authenticated and the user is no longer authorized to access this endpoint.
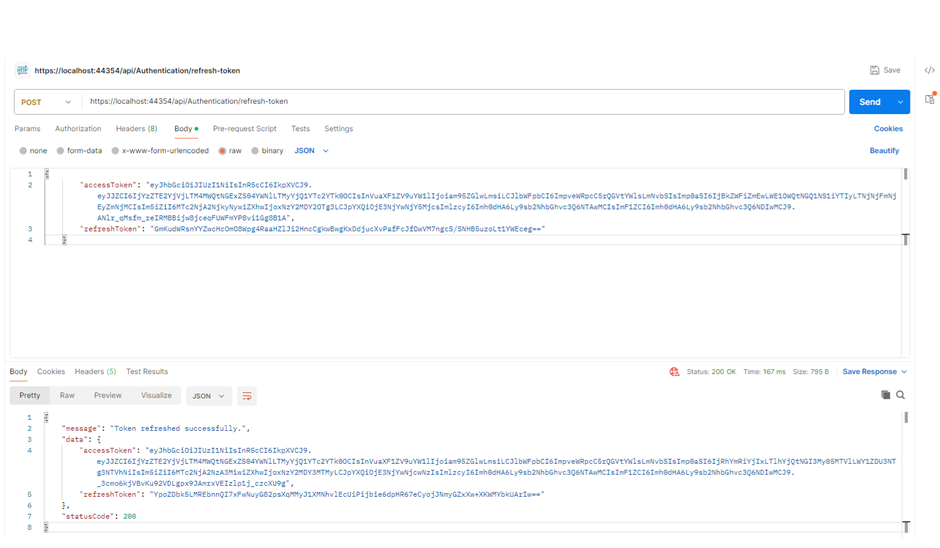
At this point, you’ll need a valid access point to access the endpoint again. To do this, you should pass the access token and the refresh token generated when you invoked the api/Authentication/Login endpoint earlier:
Final thoughts
In this article, we’ve examined the approaches you should take to implement refresh tokens to secure your APIs with high reliability – all while providing end users with the most seamless experience.
By enabling your application to refresh tokens when they expire, many of the issues associated with traditional static tokens can be addressed, and this approach can be effectively used in a distributed application. When your application can recreate the tokens used to authenticate users, you can enforce a one-time-use policy – and even revoke tokens on-demand.
This document contains proprietary information and is protected by copyright law.
Copyright © 2026 Red Gate Software Limited. All rights reserved


Load comments