
Since Roy Fielding coined REST in 2000, many applications have been built worldwide by adhering to the REST architectural constraints. REST has become widely popular primarily because of its simplicity and improved performance.
However, APIs today have become much more complex, and you need efficient data retrieval from a data store that might contain vast amounts of structured and unstructured data. Hence an alternative to REST was imperative.
Facebook chose to revamp its applications in 2012 to improve performance and efficiency. It was a time when Facebook’s mobile strategy didn’t work due to high network usage. While caching may have helped improve the app’s performance, the need of the hour was changing the data fetching strategy altogether. Here’s why GraphQL came in, and it has since grown in popularity by leaps and bounds within the development community.
GraphQL is a platform-independent, language-neutral query language that has been around for a while and may be used to run queries and retrieve data. GraphQL, like REST, is a standard that offers an easy and flexible method to query your data. GraphQL Foundation is now responsible for maintaining GraphQL.
This article talks about the characteristics and benefits of GraphQL before demonstrating how to use GraphQL with ASP.NET Core 5.
Pre-requisites
To work with the code examples illustrated in this article, you should have Visual Studio 2019 installed on your computer. If you don’t have a copy of it yet, you can grab one from here. If you don’t have .NET Core installed in your system, you can download a copy.
You can also find the complete code for the example in this article in GitHub repository.
What is GraphQL?
GraphQL is an open-source, flexible query language (“QL” stands for query language) for APIs, as well as a runtime for query execution on existing data. It was initially developed internally by Facebook in 2012 and then made public in 2015. GraphQL can make APIs more responsive, flexible, and developer friendly. It prioritizes providing clients with only the information they need. A REST alternative, GraphQL allows developers to create requests that pull data from multiple data sources in a single API call.
In GraphQL, you would typically send a declarative request in JSON format to get the data you need. The developer can define the requests and the responses using a strongly typed query language, enabling the application to determine what data it needs from an API.
One of the significant differences between REST and GraphQL is that the API determines the request and response in REST, whereas, in GraphQL, the client decides the data that the API should return to the client.
If you develop an application that uses RESTful architecture, the number of endpoints may grow over time, making maintenance a nightmare. If you’re using GraphQL, you might be able to get all the data you need using just one endpoint: API/Graphql.
Why do you need GraphQL?
Fewer roundtrips to the server – GraphQL requires fewer roundtrips, i.e., fewer back-and-forth calls to the server to get all the data you need.
No over-fetching or under-fetching – Unlike REST, you will never have too little or too much data when using GraphQL since you can specify all the information you need from the API upfront.
No versioning problems – GraphQL does not need versioning, and if you do not remove fields from the types, the API clients or consumers will not break.
Reduced bandwidth – GraphQL usually requires fewer requests and less bandwidth. You can get all the data you need using a single API call to the API endpoint. Since you can specify the data you need, rather than retrieving all fields for a type, you may retrieve only the ones you need, thus reducing bandwidth and resource usage.
Documentation – GraphQL is adept at creating GraphQL endpoints documentation, much like Swagger does for REST endpoints.
Despite all the advantages GraphQL has to offer, there are a few downsides as well. GraphQL is complex, and it is difficult to implement caching or rate-limiting in GraphQL than in REST.
How does a GraphQL query work?
Each GraphQL query passes through three phases: parse, validate and execute. In the parse phase, the GraphQL query is tokenized and parsed into a representation known as an abstract syntax tree. In the validation phase, the graphical query is validated against the schema as shown in Figure 1.
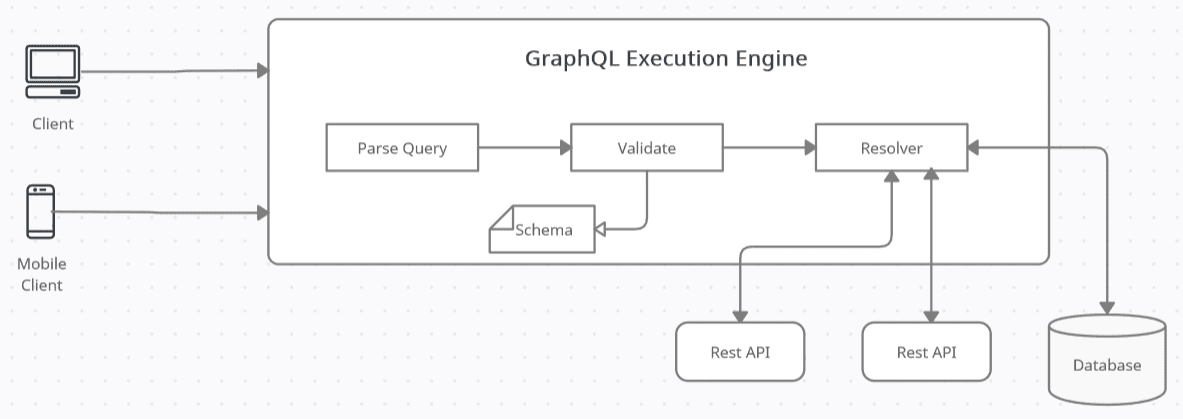
Figure 1: GraphQL execution
Finally, in the execute phase, the GraphQL runtime walks through the abstract syntax tree from the tree’s root, retrieves and aggregates the results, and sends the data back to the GraphQL client as JSON.
GraphQL vs. REST
Take a quick look at the differences between GraphQL and REST:
- Unlike REST, which may need multiple API calls to obtain the data you want, GraphQL exposes just one endpoint you can use to get the information you need.
- REST only works with HTTP, while GraphQL does not need HTTP.
- Unlike REST, which allows you to use any HTTP verb, GraphQL enables you to use only the HTTP POST verb.
- In REST, the API specifies the request and response. On the contrary, in GraphQL, the API defines the resources accessible, and the clients or consumers can request exactly the data they need from the API.
- When working with REST, the server determines the size of the resource. On the contrary, with GraphQL, the API specifies the accessible resources, and the client requests just what it needs.
- REST and GraphQL are both platform and language-neutral, and both can return JSON data.
Goals of GraphQL: What Problem Does It Solve?
There are several downsides of REST:
- Over-fetching – this implies your REST API sends you more data than you need
- Under-fetching – this implies your REST API sends you less data than you need
- Multiple requests – requiring multiple requests to get the data you need
- Multiple round trips – multiple requests required to complete an execution before you can proceed
Over-fetching and under-fetching are two of the common problems you would often encounter when working with REST APIs. This is explained in more detail in the next section.
The Problem of Under-Fetching and Over-Fetching Explained
Here is a typical example of REST endpoints for a typical application that manages blog posts.
|
1 2 3 4 |
GET /blogposts GET /blogposts/{blogPostId} GET /authors GET /authors/{authorId} |
To aggregate the data, you will have to make several calls to the endpoints shown here. Note that a request to the /blogposts endpoint would fetch the list of blogposts together with authorId, but it will not return author data. You need to make a call to /authors/{authorId} multiple times to get author details of the authors. This problem is known as under-fetching since your API payload contains less data than you need. You can take advantage of Backend for Frontend or the Gateway Aggregation pattern to solve this problem. Still, in either case, you will need multiple calls to the API endpoints.
On the contrary, your API payload might be too verbose as well. For example, you might want to know only details of the blogposts by calling the /blogposts endpoint, but your payload will also contain authorId. This problem is known as over-fetching, which implies that your API payload comprises more data than you need, hence consuming more network bandwidth. Here’s where GraphQL comes to the rescue.
Building Blocks of GraphQL
The main building blocks of GraphQL comprise schemas and types.
Schema
In GraphQL, there is just one endpoint. This endpoint provides a schema used to inform API consumers about the functionality available for clients to consume, i.e., what data they may expect and what actions they can perform. A Schema in GraphQL is a class that extends the Schema class of the GraphQL.Types namespace.
GraphQL has three primary operations: Query for reading data, Mutation for writing data, and Subscription for receiving real-time updates. A schema contains Query, Mutation, and a Subscription..
- Query – In GraphQL, you can take advantage of queries for fetching or consuming data efficiently. The consumer or the client can mention the field or fields it needs instead of getting data for all the fields from a particular type. The client can only consume the fields that the API has exposed.
- Mutation – In GraphQL, mutations are used to add, modify, or delete data. The client can only take advantage of the mutations that the schema has exposed to modify the data. In other words, a GraphQL client cannot manipulate data exposed by the API unless there is an appropriate mutation available.
- Subscriptions – In GraphQL, subscriptions allow a server to send data to its clients, notifying them when events occur. Subscriptions support event-driven architectures, and they use WebSockets to provide real-time notifications.
GraphQL Object Types
One of the essential components of GraphQL schema is the object type, used to describe the kind of item that may be retrieved through your API. Object Types in GraphQL are represented using GraphQL.Types.ObjectGraphType class and contain fields and methods.
Implementing a GraphQL API in ASP.NET Core
Now leverage all learned thus far to build an application that uses GraphQL for performing CRUD operations.
Getting Started: The Solution Structure
Figure 2 below illustrates the solution structure of the completed application.
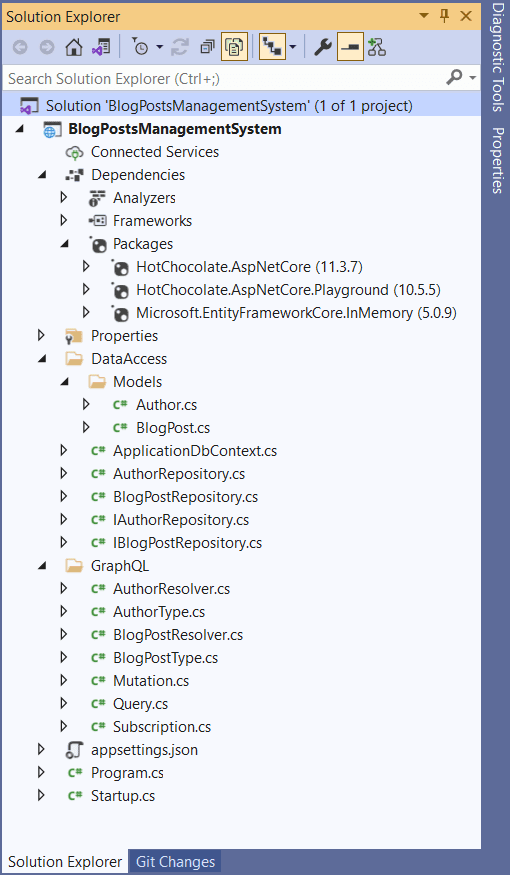
Figure 2: Application structure
As you can see, there is only one project in the Solution for the sake of simplicity. The DataAccess and GraphQL solution folders are under the root of the project. The Models solution folder is under the DataAccess solution folder. So, when this project is compiled, the following three libraries will be generated:
- BlogPostsmanagementSystem.dll
- BlogPostsManagementSystem.DataAccess.dll
- BlogPostsManagementSystem.DataAccess.Models.dll
To help understand the organization of your code, including the dependencies, you can take advantage of CodeMaps in Visual Studio. Figure 3 below shows the CodeMap for this solution generated in Visual Studio 2019.
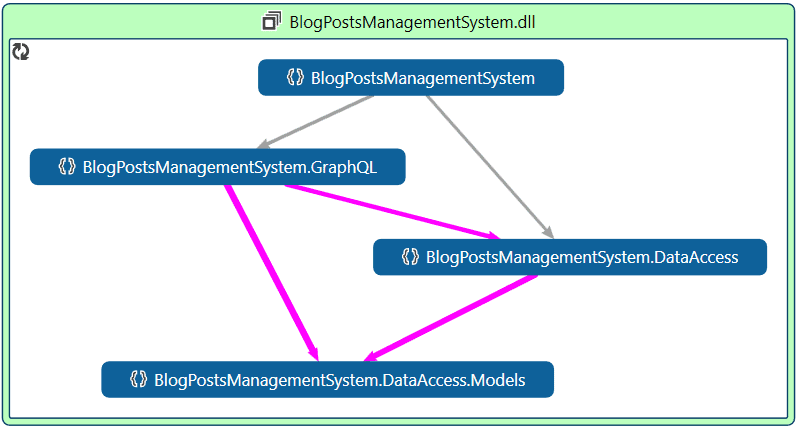
Figure 3: Organization of Code and Dependencies as Viewed using CodeMaps
Steps to build a GraphQL API in ASP.NET Core 5
To build the application discussed in this article, follow these steps:
- Create a new ASP.NET Core 5 application
- Install the NuGet Packages
- Create the Models
- Create the Data Context
- Register the Data Context
- Create the Repositories
- Add Services to the Container
- Build the GraphQL Schema
- Query
- Mutation
- Subscription
- Create the Resolvers
- Configure the GraphQL Middleware
Create a new ASP.NET Core 5 Application
First off, create a new ASP.NET Core 5 project. To do this, execute the following command at the shell:
|
1 |
dotnet new web -f net5.0 --no-https --name BlogPostsManagementSystem |
When you execute the above command, a new ASP.NET Core 5 project without HTTPS support will be created in the current directory.
You can now take advantage of Visual Studio 2019 to open the project and make changes as needed. You’ll use this project in the sections that follow.
Install the NuGet Packages
In this example, you’ll take advantage of HotChocolate for working with GraphQL. Hot Chocolate is an open-source .NET GraphQL platform that adheres to the most current GraphQL specifications. It serves as a wrapper around the GraphQL library, making building a full-fledged GraphQL server easier.
HotChocolate is very simple to set up and configure and removes the clutter from creating GraphQL schemas. You can take advantage of HotChocolate to create a GraphQL layer on top of your existing application layer.
Since support for GraphQL is not in-built in ASP.NET Core, you’ll need to install the necessary NuGet packages via the NuGet Package Manager or the NuGet Package Manager Console.
You’ll need to install the following packages:
|
1 2 3 |
HotChocolate.AspNetCore HotChocolate.AspNetCore.Playground Microsoft.EntityFrameworkCore.InMemory |
To do this, run the following commands at the NuGet Package Manager Console Window:
|
1 2 3 |
Install-Package HotChocolate.AspNetCore Install-Package HotChocolate.AspNetCore.Playground Install-Package Microsoft.EntityFrameworkCore.InMemory |
Alternatively, you can install these packages by executing the following commands at the shell:
|
1 2 3 |
dotnet add package HotChocolate.AspNetCore dotnet add package HotChocolate.AspNetCore.Playground dotnet add package Microsoft.EntityFrameworkCore.InMemory |
Run the application now, then add /playground to the URL to view the playground. . Here’s how the output will look in the web browser.
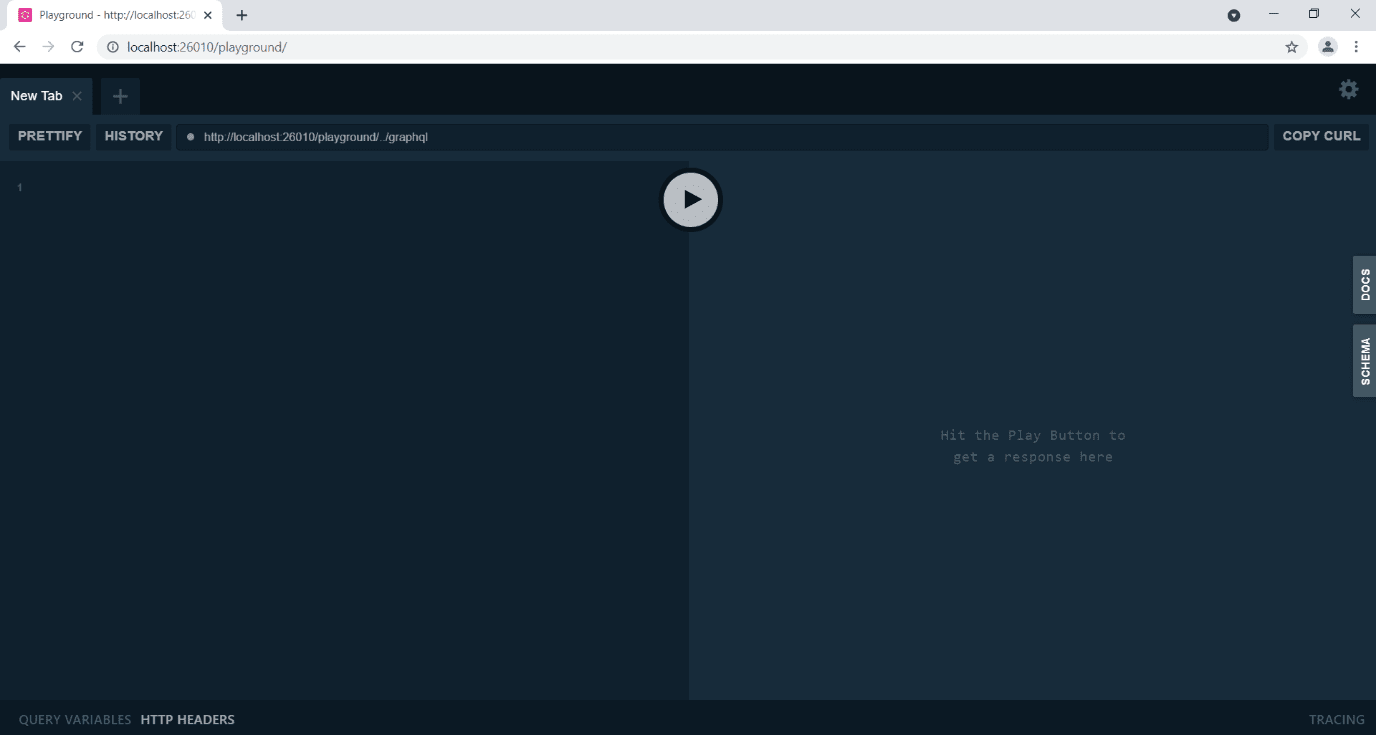
Figure 4: Output from web browser
Create the Models
Create a solution folder called DataAccess at the root of the project. Create another solution folder inside the DataAccess folder called Models; this is where the entity classes will go.
To make things simple, you’ll use two model classes in this example named Author and BlogPost. Select your project in the Solution Explorer Window, right-click and select Add -> New Folder. Inside this folder, create two .cs files named Author.cs and BlogPost.cs with the following content:
Author.cs
|
1 2 3 4 5 6 7 8 9 10 11 12 13 14 |
using HotChocolate; using HotChocolate.Types; namespace BlogPostsManagementSystem.DataAccess.Models { public class Author { [GraphQLType(typeof(NonNullType<IdType>))] public int Id { get; set; } [GraphQLNonNullType] public string FirstName { get; set; } [GraphQLNonNullType] public string LastName { get; set; } } } |
BlogPost.cs
|
1 2 3 4 5 6 7 8 9 10 11 12 13 |
using HotChocolate; using HotChocolate.Types; namespace BlogPostsManagementSystem.DataAccess.Models { public class BlogPost { public int Id { get; set; } [GraphQLType(typeof(NonNullType<StringType>))] public string Title { get; set; } [GraphQLNonNullType] public int AuthorId { get; set; } } } |
The BlogPost class contains a reference to the Author class. Hence a BlogPost can be written by only one author, but an author can write many blog posts.
Build the DataContext
This example takes advantage of Entity Framework Core (in-memory) to work with data. Create a class called ApplicationDbContext inside the DataAccess solution folder of your project and write the following code in it:
ApplicationDbContext.cs
|
1 2 3 4 5 6 7 8 9 10 11 12 13 14 15 16 17 18 19 20 21 22 23 24 25 26 27 28 29 30 31 32 33 34 35 36 37 38 39 40 41 42 43 44 45 46 47 48 49 50 51 52 53 54 55 56 57 58 59 60 61 62 63 64 65 66 67 68 69 70 71 |
using BlogPostsManagementSystem.DataAccess.Models; using Microsoft.EntityFrameworkCore; namespace BlogPostsManagementSystem.DataAccess { public class ApplicationDbContext : DbContext { public ApplicationDbContext(DbContextOptions <ApplicationDbContext> options) : base(options) { } public DbSet<Author> Authors { get; set; } public DbSet<BlogPost> BlogPosts { get; set; } protected override void OnModelCreating (ModelBuilder modelBuilder) { Author author1 = new Author { Id = 1, FirstName = "Joydip", LastName = "Kanjilal" }; Author author2 = new Author { Id = 2, FirstName = "Steve", LastName = "Smith" }; Author author3 = new Author { Id = 3, FirstName = "Anand", LastName = "Narayanaswamy" }; modelBuilder.Entity<Author>().HasData( author1, author2, author3); modelBuilder.Entity<BlogPost>().HasData( new BlogPost { Id = 1, Title = "Introducing C# 10.0", AuthorId = 1 }, new BlogPost { Id = 2, Title = "Introducing Entity Framework Core", AuthorId = 2 }, new BlogPost { Id = 3, Title = "Introducing Kubernetes", AuthorId = 1 }, new BlogPost { Id = 4, Title = "Introducing Machine Learning", AuthorId = 2 }, new BlogPost { Id = 5, Title = "Introducing DevSecOps", AuthorId = 3 } ); } } } |
Register a Data Context Factory
Now that the data context is ready, you should register it. However, you’ll register a DbContextFactory in lieu of registering a DbContext instance since it would allow for easy creation of DbContext instances in the application when needed.
You might often want to perform multiple units-of-work within a single HTTP request. In such cases, you can use the AddDbContextFactory method to register a factory (in the ConfigureServices method of the Startup class) for creating DbContext instances. Then you can leverage constructor injection to access the factory in your application.
The following code snippet illustrates how you can take advantage of the AddDbContextFactory method to register a DbContextFactory instance:
|
1 2 |
services.AddDbContextFactory<ApplicationDbContext>( options => options.UseInMemoryDatabase("BlogsManagement")); |
The above code informs Entity Framework Core to create an in-memory database named BlogsManagement.
Create the Repositories
Create an interface named IAuthorRepository in a file called IAuthorRepository.cs inside the DataAccess solution folder of your project with the following code in there. Make sure the interfaces are public.
IAuthorRepository.cs
|
1 2 3 4 5 6 |
public interface IAuthorRepository { public List<Author> GetAuthors(); public Author GetAuthorById(int id); public Task<Author> CreateAuthor(Author author); } |
Create another interface named IBlogPostRepository in the same folder with the following code:
IBlogRepository.cs
|
1 2 3 4 5 |
public interface IBlogPostRepository { public List<BlogPost> GetBlogPosts(); public BlogPost GetBlogPostById(int id); } |
The AuthorRepository and BlogPostRepository classes will implement the interfaces IAuthorRepository and IBlogPostRepository, respectively.
Create a file named AuthorRepository.cs in the DataAccess solution folder with the following code:
AuthorRepository.cs
|
1 2 3 4 5 6 7 8 9 10 11 12 13 14 15 16 17 18 19 20 21 22 23 24 25 26 27 28 29 30 31 32 33 34 35 36 37 38 39 40 41 42 43 44 45 46 47 48 49 50 51 52 |
using BlogPostsManagementSystem.DataAccess.Models; using Microsoft.EntityFrameworkCore; using System.Collections.Generic; using System.Linq; using System.Threading.Tasks; namespace BlogPostsManagementSystem.DataAccess { public class AuthorRepository : IAuthorRepository { private readonly IDbContextFactory <ApplicationDbContext> _dbContextFactory; public AuthorRepository(IDbContextFactory <ApplicationDbContext> dbContextFactory) { _dbContextFactory = dbContextFactory; using (var _applicationDbContext = _dbContextFactory.CreateDbContext()) { _applicationDbContext.Database .EnsureCreated(); } } public List<Author> GetAuthors() { using (var applicationDbContext = _dbContextFactory.CreateDbContext()) { return applicationDbContext.Authors.ToList(); } } public Author GetAuthorById(int id) { using (var applicationDbContext = _dbContextFactory.CreateDbContext()) { return applicationDbContext.Authors. SingleOrDefault(x => x.Id == id); } } public async Task<Author> CreateAuthor(Author author) { using (var applicationDbContext = _dbContextFactory.CreateDbContext()) { await applicationDbContext.Authors .AddAsync(author); await applicationDbContext.SaveChangesAsync(); return author; } } } } |
Inside the same solution folder, create a file named BlogPostRepository.cs. Replace the default generated code using the following code:
BlogPostRepository.cs
|
1 2 3 4 5 6 7 8 9 10 11 12 13 14 15 16 17 18 19 20 21 22 23 24 25 26 27 28 29 30 31 32 33 34 35 36 37 38 39 40 41 |
using BlogPostsManagementSystem.DataAccess.Models; using Microsoft.EntityFrameworkCore; using System.Collections.Generic; using System.Linq; namespace BlogPostsManagementSystem.DataAccess { public class BlogPostRepository : IBlogPostRepository { private readonly IDbContextFactory <ApplicationDbContext> _dbContextFactory; public BlogPostRepository(IDbContextFactory <ApplicationDbContext> dbContextFactory) { _dbContextFactory = dbContextFactory; using (var applicationDbContext = _dbContextFactory.CreateDbContext()) { applicationDbContext.Database .EnsureCreated(); } } public List<BlogPost> GetBlogPosts() { using (var applicationDbContext = _dbContextFactory.CreateDbContext()) { return applicationDbContext .BlogPosts.ToList(); } } public BlogPost GetBlogPostById(int id) { using (var applicationDbContext = _dbContextFactory.CreateDbContext()) { return applicationDbContext.BlogPosts .SingleOrDefault(x => x.Id == id); } } } } |
Add Services to the Container
You should now add the following services in the ConfigureServices method of the Startup class so that you can take advantage of dependency injection to access instances of these types.
|
1 2 |
services.AddScoped<IAuthorRepository, AuthorRepository>(); services.AddScoped<IBlogPostRepository, BlogPostRepository>(); |
Build the GraphQL Schema
A GraphQL Schema comprises the following:
- Query
- Mutations
- Subscriptions
Since GraphQL is not bound to any language or framework, it is not adept at understanding the CLR classes, i.e., C# POCO classes. In GraphQL, types are used to specify the fields of the domain classes you would like to expose. You’ll now create two classes, namely AuthorType in a file named AuthorType.cs and another class named BlogPostType in a file called BlogPostType.cs.
To create a type in GraphQL, you should create a class that extends ObjectGraphType<T> and pass your entity type as an argument. You should also register the properties of the class as Field types so that GraphQL can recognize this type.
Create your GraphQL folder, then create the following two classes in the files AuthorType.cs and BlogPostType.cs , respectively inside the folder.
AuthorType.cs
|
1 2 3 4 5 6 7 8 9 10 11 12 13 14 15 16 17 18 |
using BlogPostsManagementSystem.DataAccess.Models; using HotChocolate.Types; namespace BlogPostsManagementSystem.GraphQL { public class AuthorType : ObjectType<Author> { protected override void Configure(IObjectTypeDescriptor<Author> descriptor) { descriptor.Field(a => a.Id).Type<IdType>(); descriptor.Field(a => a.FirstName).Type<StringType>(); descriptor.Field(a => a.LastName).Type<StringType>(); descriptor.Field<BlogPostResolver>(b => b.GetBlogPosts(default, default)); } } } |
BlogPostType.cs
|
1 2 3 4 5 6 7 8 9 10 11 12 13 14 15 16 17 |
using BlogPostsManagementSystem.DataAccess.Models; using HotChocolate.Types; namespace BlogPostsManagementSystem.GraphQL { public class BlogPostType : ObjectType<BlogPost> { protected override void Configure(IObjectTypeDescriptor<BlogPost> descriptor) { descriptor.Field(b => b.Id).Type<IdType>(); descriptor.Field(b => b.Title).Type<StringType>(); descriptor.Field(b => b.AuthorId).Type<IntType>(); descriptor.Field<AuthorResolver>(t => t.GetAuthor(default, default)); } } } |
Query
You also need a class that would fetch author and blog post-related data. To do this, create a file called AuthorQuery.cs with the following content inside.
Query.cs
|
1 2 3 4 5 6 7 8 9 10 11 12 13 14 15 16 17 18 19 20 21 22 23 24 25 26 27 28 29 30 31 32 33 34 35 36 37 38 39 40 41 42 43 44 45 46 47 48 49 50 51 52 53 54 |
using BlogPostsManagementSystem.DataAccess; using BlogPostsManagementSystem.DataAccess.Models; using HotChocolate; using HotChocolate.Subscriptions; using System.Collections.Generic; using System.Threading.Tasks; namespace BlogPostsManagementSystem.GraphQL { public class Query { public async Task<List<Author>> GetAllAuthors([Service] IAuthorRepository authorRepository, [Service] ITopicEventSender eventSender) { List<Author> authors = authorRepository.GetAuthors(); await eventSender.SendAsync("ReturnedAuthors", authors); return authors; } public async Task<Author> GetAuthorById([Service] IAuthorRepository authorRepository, [Service] ITopicEventSender eventSender, int id) { Author author = authorRepository.GetAuthorById(id); await eventSender.SendAsync("ReturnedAuthor", author); return author; } public async Task<List<BlogPost>> GetAllBlogPosts([Service] IBlogPostRepository blogPostRepository, [Service] ITopicEventSender eventSender) { List<BlogPost> blogPosts = blogPostRepository.GetBlogPosts(); await eventSender.SendAsync("ReturnedBlogPosts", blogPosts); return blogPosts; } public async Task<BlogPost> GetBlogPostById([Service] IBlogPostRepository blogPostRepository, [Service] ITopicEventSender eventSender, int id) { BlogPost blogPost = blogPostRepository.GetBlogPostById(id); await eventSender.SendAsync("ReturnedBlogPost", blogPost); return blogPost; } } } |
Mutation
GraphQL uses mutation to allow the clients or consumers of an API to add, remove or modify data on the servers. You will need a query type to read data – this was discussed earlier.
Create a class called Mutation in a file named Mutation.cs inside the GraphQL solution folder and add the following code:
Mutation.cs
|
1 2 3 4 5 6 7 8 9 10 11 12 13 14 15 16 17 18 19 20 21 22 23 24 25 26 27 28 |
using BlogPostsManagementSystem.DataAccess; using BlogPostsManagementSystem.DataAccess.Models; using HotChocolate; using HotChocolate.Subscriptions; using System.Threading.Tasks; namespace BlogPostsManagementSystem.GraphQL { public class Mutation { public async Task<Author> CreateAuthor([Service] AuthorRepository authorRepository, [Service] ITopicEventSender eventSender, int id, string firstName,string lastName) { var data = new Author { Id = id, FirstName = firstName, LastName = lastName }; var result = await authorRepository.CreateAuthor(data); await eventSender.SendAsync("AuthorCreated", result); return result; } } } |
Subscription
You can take advantage of subscriptions in GraphQL to integrate real-time functionality in your GraphQL applications. Subscriptions enable servers to send data to subscribed clients to notify them when an event occurs. Subscriptions use WebSockets to allow clients to subscribe to notifications emails in real-time. The server executes the query again and then sends the updated results to the subscribed event.
Now, create a class named Subscription in a file called Subscription.cs and replace the default code with the following:
Subscription.cs
|
1 2 3 4 5 6 7 8 9 10 11 12 13 14 15 16 17 18 19 20 21 22 23 24 25 26 27 28 29 30 31 32 33 34 35 36 37 38 39 40 41 42 43 44 45 46 47 48 49 50 51 52 53 54 55 56 57 58 |
using BlogPostsManagementSystem.DataAccess.Models; using HotChocolate; using HotChocolate.Execution; using HotChocolate.Subscriptions; using HotChocolate.Types; using System.Collections.Generic; using System.Threading; using System.Threading.Tasks; namespace BlogPostsManagementSystem.GraphQL { public class Subscription { [SubscribeAndResolve] public async ValueTask<ISourceStream<Author>> OnAuthorCreated([Service] ITopicEventReceiver eventReceiver, CancellationToken cancellationToken) { return await eventReceiver.SubscribeAsync <string, Author>("AuthorCreated", cancellationToken); } [SubscribeAndResolve] public async ValueTask<ISourceStream <List<Author>>> OnAuthorsGet([Service] ITopicEventReceiver eventReceiver, CancellationToken cancellationToken) { return await eventReceiver.SubscribeAsync<string, List<Author>>("ReturnedAuthors", cancellationToken); } [SubscribeAndResolve] public async ValueTask<ISourceStream<Author>> OnAuthorGet([Service] ITopicEventReceiver eventReceiver, CancellationToken cancellationToken) { return await eventReceiver.SubscribeAsync<string, Author>("ReturnedAuthor", cancellationToken); } [SubscribeAndResolve] public async ValueTask<ISourceStream<BlogPost>> OnBlogPostsGet([Service] ITopicEventReceiver eventReceiver, CancellationToken cancellationToken) { return await eventReceiver.SubscribeAsync<string, BlogPost>("ReturnedBlogPosts", cancellationToken); } [SubscribeAndResolve] public async ValueTask<ISourceStream<BlogPost>> OnBlogPostGet([Service] ITopicEventReceiver eventReceiver, CancellationToken cancellationToken) { return await eventReceiver.SubscribeAsync<string, BlogPost>("ReturnedBlogPost", cancellationToken); } } } |
Create the Resolvers
A resolver is a function responsible for populating data for one field of your schema. In other words, it is a function that resolves the value of a type of field within a schema. Resolvers can return objects and scalars such as Strings, Numbers, or Booleans. You can define how it populates the data, including fetching data from a third-party API or back-end database.
Create a class called AuthorResolver in a file named AuthorResolver.cs inside the GraphQL solution folder with the following code:
AuthorResolver.cs
|
1 2 3 4 5 6 7 8 9 10 11 12 13 14 15 16 17 18 19 20 21 22 23 |
using BlogPostsManagementSystem.DataAccess; using BlogPostsManagementSystem.DataAccess.Models; using HotChocolate; using HotChocolate.Resolvers; using System.Linq; namespace BlogPostsManagementSystem.GraphQL { public class AuthorResolver { private readonly IAuthorRepository _authorRepository; public AuthorResolver([Service] IAuthorRepository authorService) { _authorRepository = authorService; } public Author GetAuthor(BlogPost blog, IResolverContext ctx) { return _authorRepository.GetAuthors().Where (a => a.Id == blog.AuthorId).FirstOrDefault(); } } } |
Create another class named BlogPostResolver in a file called BlogPostResolver.cs with the following code:
BlogPostResolver.cs
|
1 2 3 4 5 6 7 8 9 10 11 12 13 14 15 16 17 18 19 20 21 22 23 24 25 |
using BlogPostsManagementSystem.DataAccess; using BlogPostsManagementSystem.DataAccess.Models; using HotChocolate; using HotChocolate.Resolvers; using System.Collections.Generic; using System.Linq; namespace BlogPostsManagementSystem.GraphQL { public class BlogPostResolver { private readonly IBlogPostRepository _blogPostRepository; public BlogPostResolver([Service] IBlogPostRepository blogPostRepository) { _blogPostRepository = blogPostRepository; } public IEnumerable<BlogPost> GetBlogPosts( Author author, IResolverContext ctx) { return _blogPostRepository.GetBlogPosts() .Where(b => b.AuthorId == author.Id); } } } |
Configuring the GraphQL Middleware
Write the following code in the ConfigureServices method of the Startup class to add GraphQLServer to the container:
|
1 |
services.AddGraphQLServer(); |
A GraphQL server can expose data via GraphQL API endpoints so that the same data can be consumed by the clients (mobile clients, web clients, etc.) or the consumers of the API.
Next, write the following code in the Configure method of the Startup class to configure the GraphQL endpoint:
|
1 2 3 4 5 6 7 8 9 10 11 12 13 14 15 16 17 18 19 20 |
public void Configure(IApplicationBuilder app, IWebHostEnvironment env) { if (env.IsDevelopment()) { app.UseDeveloperExceptionPage(); app.UsePlayground(new PlaygroundOptions { QueryPath = "/graphql", Path = "/playground" }); } app.UseWebSockets(); app .UseRouting() .UseEndpoints(endpoints => { endpoints.MapGraphQL(); }); } } |
At this moment, your ConfigureServices method should look like this:
|
1 2 3 4 5 6 7 8 9 10 11 12 13 14 15 16 17 |
public void ConfigureServices(IServiceCollection services) { services.AddDbContextFactory<ApplicationDbContext>( options => options.UseInMemoryDatabase("BlogsManagement")); services.AddInMemorySubscriptions(); services.AddScoped<IAuthorRepository, AuthorRepository>(); services.AddScoped<IBlogPostRepository, BlogPostRepository>(); services .AddGraphQLServer() .AddType<AuthorType>() .AddType<BlogPostType>() .AddQueryType<Query>() .AddMutationType<Mutation>() .AddSubscriptionType<Subscription>(); } |
You should include the following namespaces in the Startup.cs file:
|
1 2 3 4 5 6 7 8 9 |
using BlogPostsManagementSystem.DataAccess; using BlogPostsManagementSystem.GraphQL; using HotChocolate.AspNetCore; using HotChocolate.AspNetCore.Playground; using Microsoft.AspNetCore.Builder; using Microsoft.AspNetCore.Hosting; using Microsoft.EntityFrameworkCore; using Microsoft.Extensions.DependencyInjection; using Microsoft.Extensions.Hosting; |
Here’s the complete source code of the Startup class for your reference:
Startup.cs
|
1 2 3 4 5 6 7 8 9 10 11 12 13 14 15 16 17 18 19 20 21 22 23 24 25 26 27 28 29 30 31 32 33 34 35 36 37 38 39 40 41 42 43 44 45 46 47 48 49 50 51 |
using BlogPostsManagementSystem.DataAccess; using BlogPostsManagementSystem.GraphQL; using HotChocolate.AspNetCore; using HotChocolate.AspNetCore.Playground; using Microsoft.AspNetCore.Builder; using Microsoft.AspNetCore.Hosting; using Microsoft.EntityFrameworkCore; using Microsoft.Extensions.DependencyInjection; using Microsoft.Extensions.Hosting; namespace BlogPostsManagementSystem { public class Startup { public void ConfigureServices(IServiceCollection services) { services.AddDbContextFactory<ApplicationDbContext>( options => options.UseInMemoryDatabase("BlogsManagement")); services.AddInMemorySubscriptions(); services.AddScoped<IAuthorRepository, AuthorRepository>(); services.AddScoped<IBlogPostRepository, BlogPostRepository>(); services .AddGraphQLServer() .AddType<AuthorType>() .AddType<BlogPostType>() .AddQueryType<Query>() .AddMutationType<Mutation>() .AddSubscriptionType<Subscription>(); } public void Configure(IApplicationBuilder app, IWebHostEnvironment env) { if (env.IsDevelopment()) { app.UseDeveloperExceptionPage(); app.UsePlayground(new PlaygroundOptions { QueryPath = "/graphql", Path = "/playground" }); } app.UseWebSockets(); app .UseRouting() .UseEndpoints(endpoints => { endpoints.MapGraphQL(); }); } } } |
GraphQL in Action!
Now it’s time to execute GraphQL queries using HotChocolate. Run the application, remembering to have /playground in the URL.
Query
Here’s an example of a GraphQL query you can use to get the data about all authors.
|
1 2 3 4 5 6 7 |
query { allAuthors{ id firstName lastName } } |
When you execute this query, here’s how the output would look like:
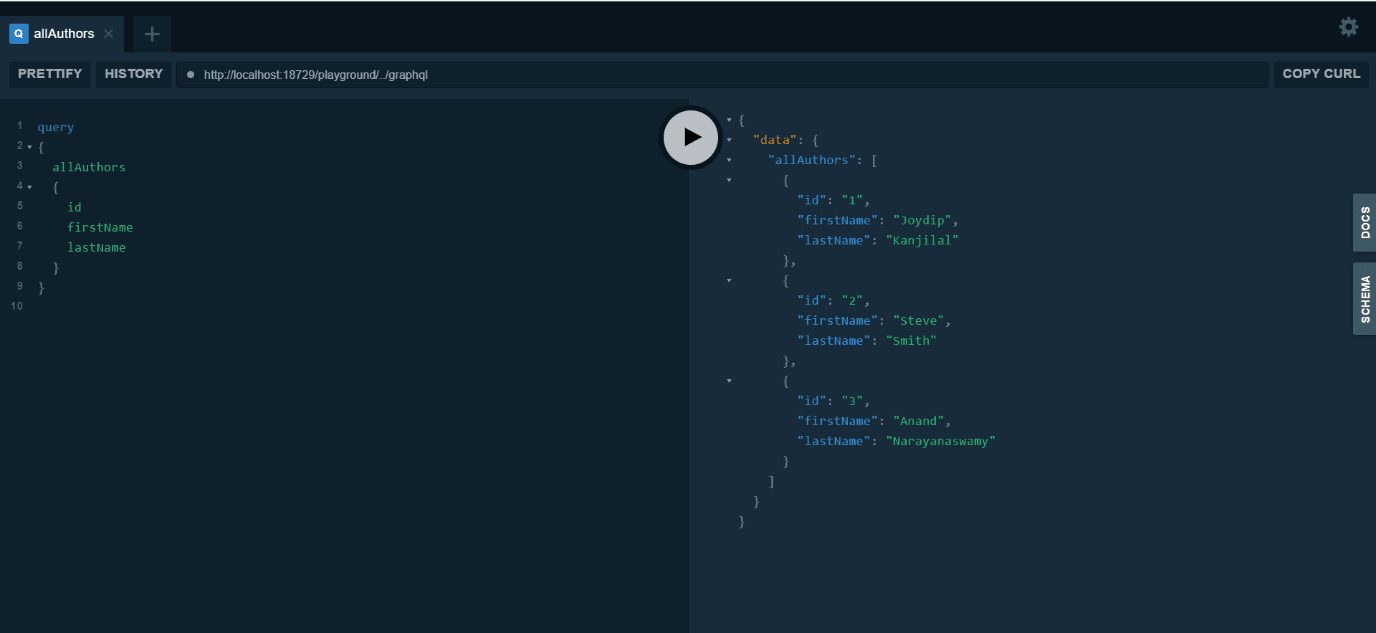
Figure 5: Query output
If you would like to get the data about a particular author together with the blogs they have written, you can take advantage of the following query instead.
|
1 2 3 4 5 6 7 8 9 10 11 12 |
query { authorById (id: 1){ id firstName lastName blogPosts { id title } } } |
Run the above query. Figure 6 below shows the output in the Playground tool.
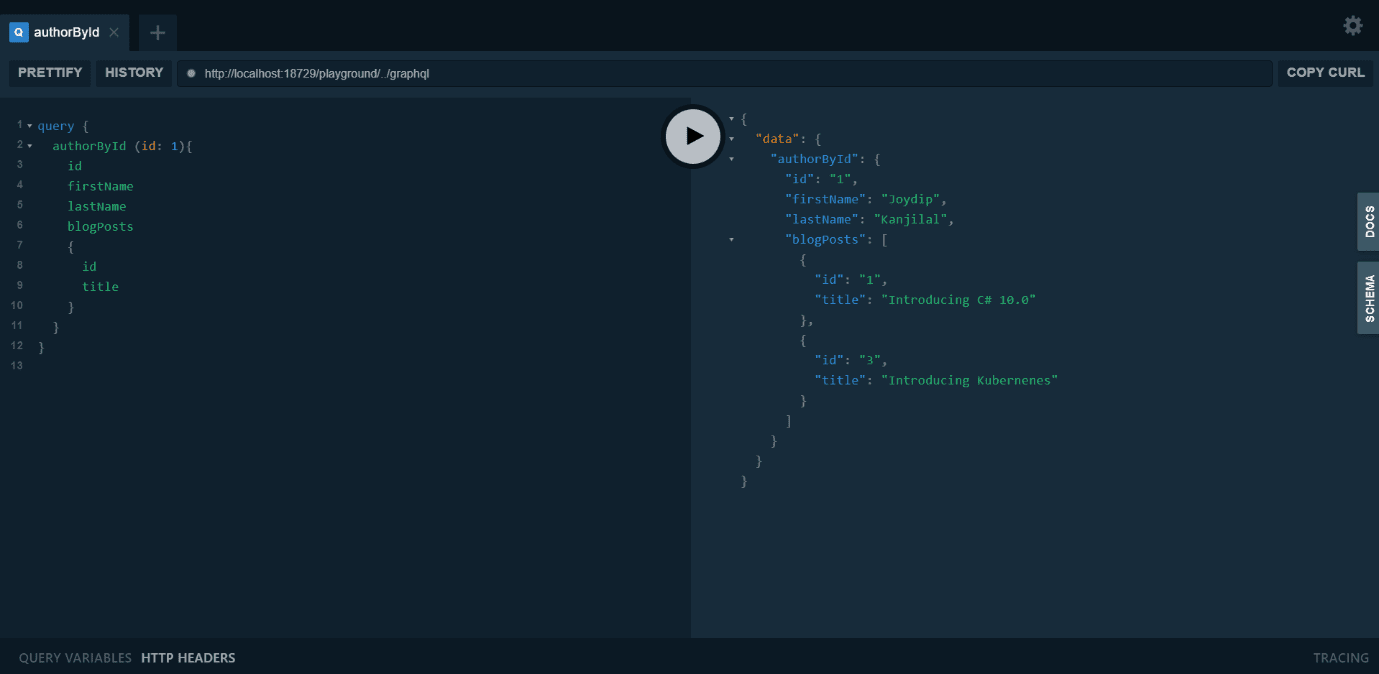
Figure 6: Output in Playground tool
Mutation
Now write the following query to test mutation:
|
1 2 3 4 5 6 7 |
mutation{ createAuthor(id: 4, firstName: "Scott", lastName: "Miller"){ id firstName lastName } } |
When you run it, you’ll observe that the CreateAuthor method of your Mutation class is called. Note that the breakpoint is hit successfully.

Figure 7: CreateAuthor method
Subscription
To test Subscription, execute the application, browse to the /playground endpoint, and write the query shown below:
|
1 2 3 4 5 6 7 8 |
subscription{ onAuthorsGet { id firstName lastName } } |
When you click the Execute button, the application subscribes to the OnAuthorGet event.
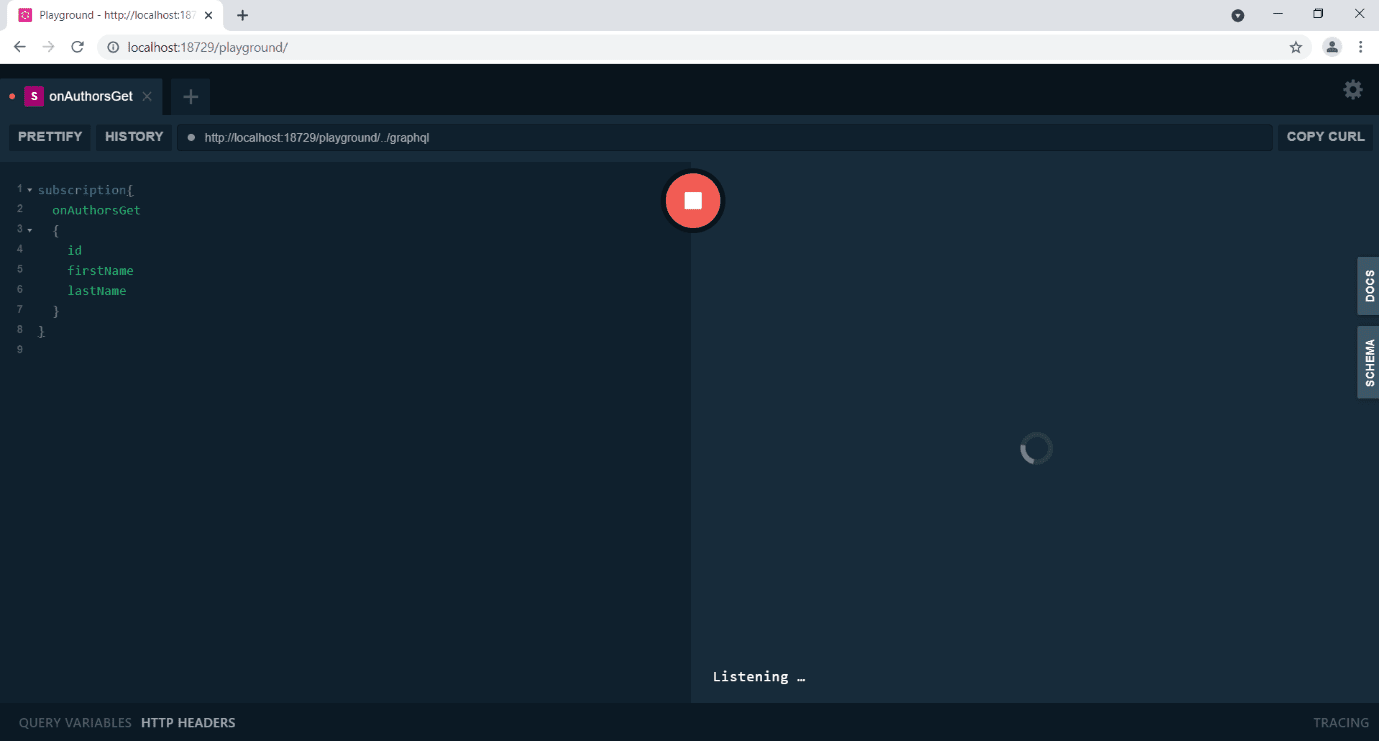
Figure 8: Click Execute button
Next, launch the same URL in another browser window and write and execute the query shown in Figure 9.
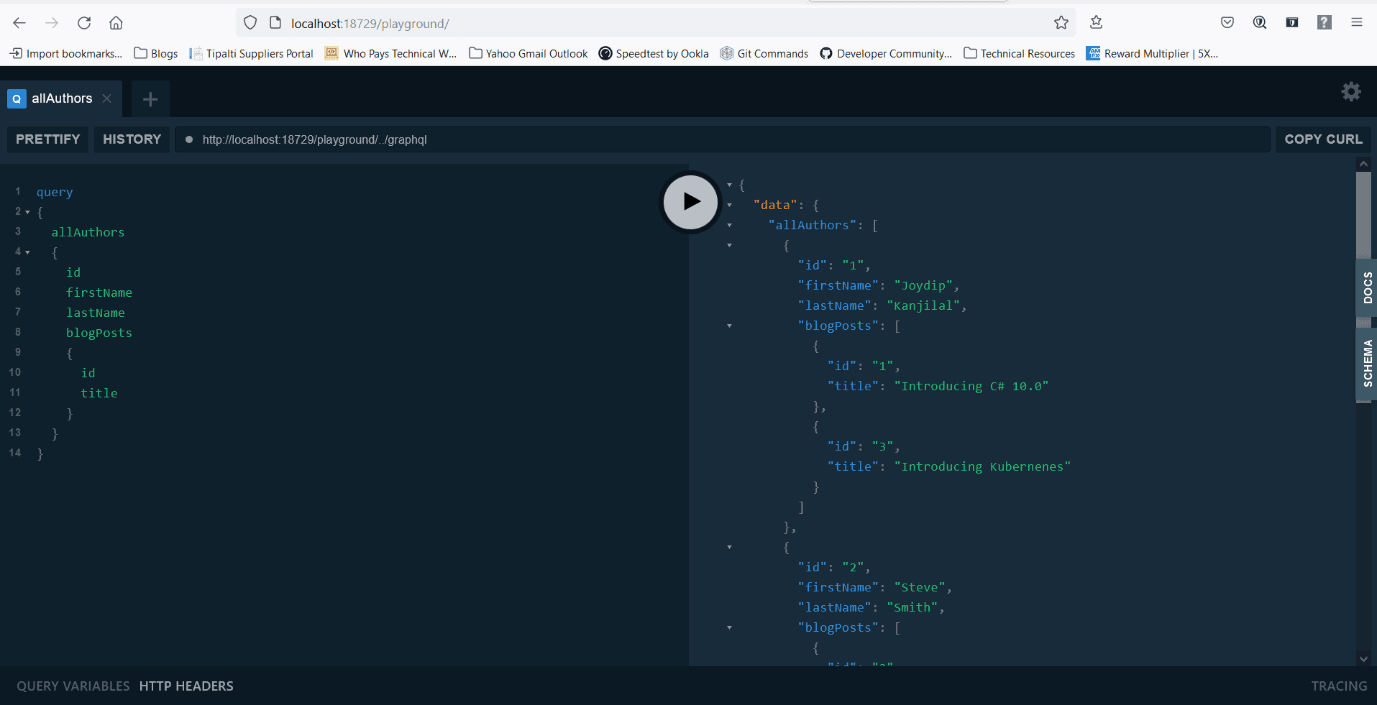
Figure 9: Launch and execute the query
This query will trigger the OnAuthorsGet event as shown in Figure 10.
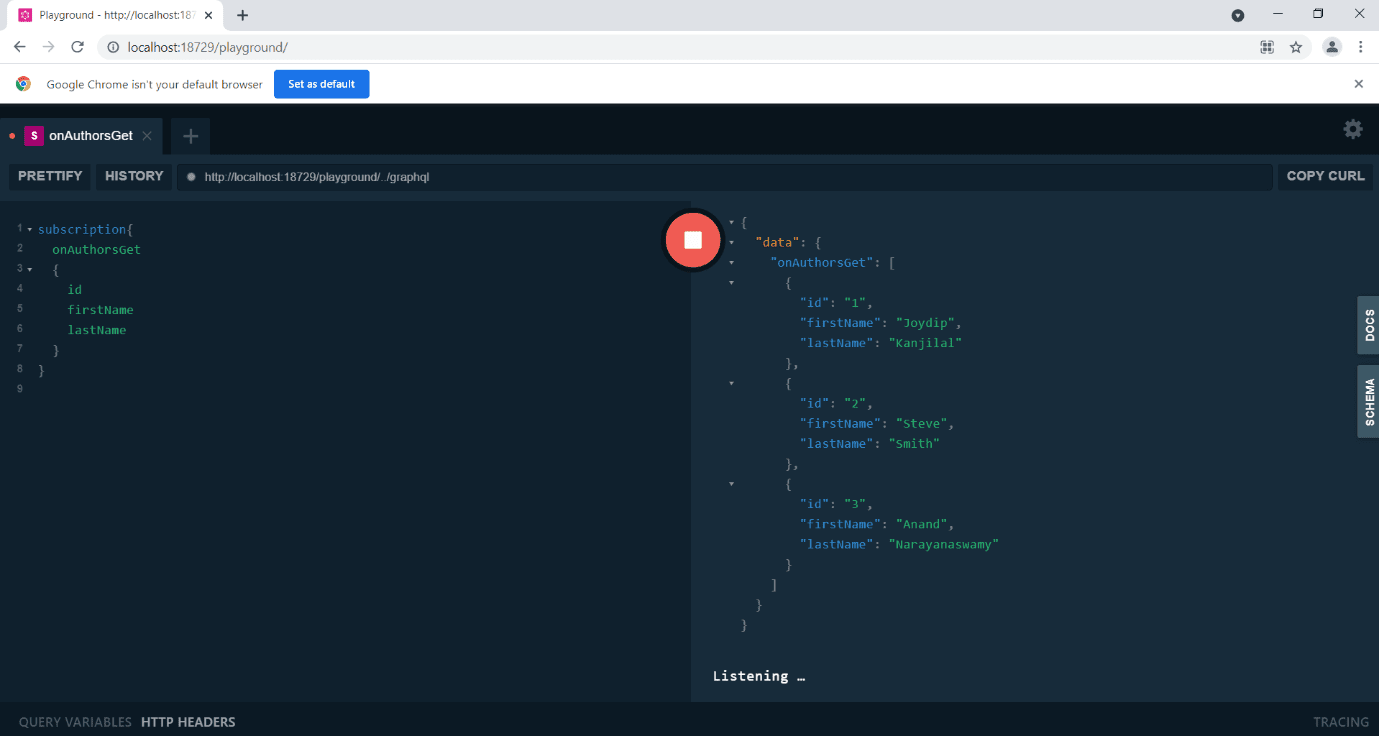
Figure 10: The OnAuthorsGet event
Summary
GraphQL is an open-source API standard developed by Facebook that provides a powerful, flexible, and versatile alternative to REST. GraphQL supports declarative data fetching, which allows the user to specify precisely the data it needs. HotChocolate, an implementation of GraphQL, can be used to create GraphQL servers in ASP.NET Core.
If you liked this article, you might also like Building and consuming GraphQL API in ASP.NET Core 3.1 – Simple Talk (red-gate.com).
This document contains proprietary information and is protected by copyright law.
Copyright © 2026 Red Gate Software Limited. All rights reserved


Load comments