
In recent articles, I covered several data manipulation language (DML) statements-UPDATE, INSERT, and MERGE-and provided examples that demonstrated how to use each one to manipulate data in a SQL Server database. To help round out the discussion of DML statements, I’m now going to cover the DELETE statement, which lets you remove all or some data from a SQL Server table.
Before we get into that, however, it’s worth nothing that the SQL Server documentation also includes the SELECT and BULK INSERT statements in its list of DML statements. The SELECT statement lets you retrieve data from a table, and the BULK INSERT statement lets you import data from a file into a table. The DML documentation, however, does not include the TRUNCATE TABLE statement, although the statement, like DELETE, also lets you delete data from a SQL Server table.
Of all the DML statements, the DELETE statement is probably the easiest to use. For instance, if you want to remove all the data from a table, you need to specify only the DELETE keyword and the name of the table, as you’ll see in the examples later in the article. You can also use the DELETE statement to remove specific rows form the table, but as you would expect, the statement becomes a bit more complex. Again, I provide examples that demonstrate how this is done.
If you want to try out these examples, you should run the following code to create and populate the SalesStaff table in the AdventureWorks2008 database:
|
1 2 3 4 5 6 7 8 9 10 11 12 13 14 15 16 |
USE AdventureWorks2008; IF OBJECT_ID ('SalesStaff', 'U') IS NOT NULL DROP TABLE SalesStaff; CREATE TABLE SalesStaff ( StaffID INT NOT NULL PRIMARY KEY, FirstName NVARCHAR(50) NOT NULL, LastName NVARCHAR(50) NOT NULL, CountryRegion NVARCHAR(50) NOT NULL ); INSERT INTO SalesStaff SELECT BusinessEntityID, FirstName, LastName, CountryRegionName FROM Sales.vSalesPerson; |
I created the SalesStaff table on a local instance of SQL Server 2008. However, with a few minor changes, you can run the examples against the AdventureWorks database on an instance of SQL Server 2005. To do so, you must change the database name and the name of the BusinessEntityID column when retrieving data from the Sales.vSalesPerson view. In the AdventureWorks database, the column is named SalesPersonID.
NOTE: Because all the examples delete data from the SalesStaff table, I re-created and repopulated the SalesStaff table before running each statement.
Creating a Basic Delete Statement
Let’s first look at a DELETE statement at its most basic, which, as I’ve mentioned, lets you delete all the data from the table. The statement requires only the DELETE keyword and the name of the table (qualified as necessary), as shown in the following example:
|
1 |
DELETE SalesStaff; |
When you run this statement, every row will be removed from the table. You should also be aware that the DELETE statement supports the optional FROM keyword, which is inserted between the DELETE keyword and the name of the table, as the following example demonstrates:
|
1 |
DELETE FROM SalesStaff; |
As with the previous example, this statement will remove every row from the table.
NOTE: I mentioned above that the TRUNCATE TABLE statement also removes all rows from a table. TRUNCATE TABLE has several advantages over DELETE, when used to remove all rows from a table. TRUNCATE TABLE uses less transaction log space, requires fewer locks, and leaves zero pages for the table. For more information about the TRUNCATE TABLE statement, see the topic “TRUNCATE TABLE (Transact-SQL)” in SQL Server Books Online.
As simple as it is to delete all the rows from a table, often you’ll want to remove specific rows, in which case, you can add a WHERE clause to your DELETE statement. The WHERE clause specifies a search condition that determines which rows should be removed. When the search condition evaluates to true, that row is removed. For instance, in the following DELETE statement, I add a WHERE clause specifying that the CountryRegion value in the SalesStaff table should equal “United States”:
|
1 2 |
DELETE FROM SalesStaff WHERE CountryRegion = 'United States'; |
Because the WHERE clause has been added to this statement, only the rows in which the search condition evaluates to true are removed. The other rows remain untouched.
Another way you can remove only a subset of rows from a table is to include the TOP clause. The TOP clause determines the number or percent of random rows that will be deleted from the target table. If you want to remove a specific number of rows, you must include that number after the TOP keyword. The number is always enclosed in parentheses. If you prefer to remove a percentage of rows, the number you specify must be the percentage-again, enclosed in parentheses-plus the word PERCENT, as shown in the following example:
|
1 2 |
DELETE TOP (20) PERCENT FROM SalesStaff; |
As you can see, I add the TOP keyword after the DELETE keyword. I then follow with the percentage of rows to be removed, which in this case is 20. Notice that I’ve enclosed the 20 in parentheses. Then I add the PERCENT keyword to indicate that the top 20 percent of rows should be removed.
Deleting Rows Based on a Table Lookup
There will be times when you’ll want to delete rows from a table based on data in another table. For example, suppose you want to delete rows from the SalesStaff table for only those salespeople who had no sales in the preceding year. However, the SalesStaff table does not contain this information, but the vSalesPerson view does.
One approach you can take in deleting those rows from the SalesStaff table is to create a subquery that retrieves data from the vSalesPerson view. In the following statement, I use a subquery in the WHERE clause to retrieve those salespeople who had no sales the previous year:
|
1 2 3 4 5 6 7 |
DELETE SalesStaff WHERE StaffID IN ( SELECT BusinessEntityID FROM Sales.vSalesPerson WHERE SalesLastYear = 0 ); |
As you can see, the subquery returns the BusinessEntityID values for those whose SalesLastYear value is 0. I then use the IN function in the WHERE clause search condition to determine whether the StaffID value in the SalesStaff table matches one of the IDs returned by the subquery. If the StaffID value matches one of the values, the search condition evaluates to true, and the row in the SalesStaff table with that ID is then deleted.
Another method you can use to achieve the same results is to create what’s referred to as a Transact-SQL extension. An extension is essentially a join between the target table and the table that contains the lookup information. For example, in the following DELETE statement I join the vSalesPerson view to the SalesStaff table:
|
1 2 3 4 5 |
DELETE SalesStaff FROM Sales.vSalesPerson sp INNER JOIN dbo.SalesStaff ss ON sp.BusinessEntityID = ss.StaffID WHERE sp.SalesLastYear = 0; |
Notice that I first specify the table targeted for deletion in the DELETE clause. Next I add a FROM clause that creates an inner join. The join links the BusinessEntityID column in the vSalesPerson view to the StaffID column in the SalesStaff table. Finally, I use the WHERE clause to limit the deletions to those rows whose SalesLastYear value equals 0.
NOTE: The FROM keyword used in the join clause is different from the optional FROM keyword you can use in the DELETE clause. I didn’t include the optional FROM keyword to help avoid redundancy and confusion.
As you can see in the previous example, I assigned the sp alias to the vSalesPerson view and the ss alias to the SalesStaff table. You can use the ss alias in the DELETE clause if you choose, as I’ve done in the following example:
|
1 2 3 4 5 |
DELETE ss FROM Sales.vSalesPerson sp INNER JOIN dbo.SalesStaff ss ON sp.BusinessEntityID = ss.StaffID WHERE sp.SalesLastYear = 0; |
The results achieved by this statement-the deletion of rows whose sales were 0-are the same as the preceding example. Only the use of the alias has changed.
Another approach you can take to look up data in a second table in order to delete data in the target table is to use a common table expression (CTE). The CTE returns the rows that are to be deleted, and you can then create a Transact-SQL extension in your DELETE statement that joins to the CTE, as I’ve done in the following example:
|
1 2 3 4 5 6 7 8 9 10 11 |
WITH cteSalesPerson AS ( SELECT BusinessEntityID FROM Sales.vSalesPerson WHERE SalesLastYear = 0 ) DELETE SalesStaff FROM cteSalesPerson sp INNER JOIN dbo.SalesStaff ss ON sp.BusinessEntityID = ss.StaffID; |
Notice that the CTE returns those BusinessEntityID values for all rows whose SalesLastYear value equals 0. I then join the SalesStaff table to the CTE in the extension, basing the join on the BusinessEntityID and StaffID values. Because this is an inner join, the DELETE statement will remove only those rows that are included in the joined data, which are the rows with a SalesLastYear value of 0.
Another way you can do this is to reference the CTE in a subquery, as shown in the following example:
|
1 2 3 4 5 6 7 8 9 10 |
WITH cteSalesPerson AS ( SELECT BusinessEntityID FROM Sales.vSalesPerson WHERE SalesLastYear = 0 ) DELETE SalesStaff WHERE StaffID IN (SELECT* FROM cteSalesPerson); |
Notice that the subquery retrieves all the results from the CTE. As you saw in an earlier example, I then use the IN function to match the StaffID value to the values returned by the subquery, in other words, those values returned by the CTE.
I realize that using the CTE in this way is overkill for our simple example, but I wanted to demonstrate that you can use a CTE with a DELETE statement, and in cases where retrieving the lookup data is a complex process, or if deletions have to be done in a particular order due to table-constraints, the CTE might prove useful in simplifying your statements. You’ll need to decide which approach-subquery, extension, or either of these with a CTE-works best in your situation, in terms of statement clarity and performance. For certain tasks such as the deletion of a branch of a hierarchy from a table, the use of a recursive CTE greatly simplifies the operation, but this topic requires its own article.
Outputting Deleted Data
One other element of the DELETE statement that’s important to point out is its support for the OUTPUT clause. As with other DML statements, you can output the results of your data modifications to a table variable or to an actual table.
In the following statement, I use a Transact-SQL extension to determine which rows to delete and then output those deleted rows to the @Output variable:
|
1 2 3 4 5 6 7 8 9 10 11 12 13 14 |
DECLARE @Output table ( StaffID INT, FirstName NVARCHAR(50), LastName NVARCHAR(50), CountryRegion NVARCHAR(50) ); DELETE SalesStaff OUTPUT DELETED.* INTO @Output FROM Sales.vSalesPerson sp INNER JOIN dbo.SalesStaff ss ON sp.BusinessEntityID = ss.StaffID WHERE sp.SalesLastYear = 0; SELECT * FROM @output; |
First, I declare the @Output table variable and define the variable’s columns to match the SalesStaff table. That way I can output all deleted data to the variable, rather than just selected columns.
After I declare the variable, I create a DELETE statement that will remove data from the SalesStaff table. As you saw in earlier examples, the statement uses an extension to join the vSalesPerson view to the SalesStaff table. However, this example also includes an OUTPUT clause, which follows the initial DELETE clause.
The OUTPUT clause uses the DELETED column prefix to indicate which values should be outputted. The asterisk serves as a wildcard that means all columns should be included. If only specific columns were to be included, then those columns would have to be declared individually, repeating the DELETED column prefix for each one.
The OUTPUT clause then contains an INTO subclause which specifies that the deleted data should be saved to the @Output variable. I then added a SELECT statement to my example in order to retrieve data from that variable. The contents of the variable will show the rows that have been deleted from the SalesStaff table.
The OUTPUT clause can be a handy way to log and audit your deleted data and is a valuable addition to your DELETE statements. More importantly, however, is understanding how to use the DELETE statement to remove data from your SQL Server tables, particularly when you want to remove only specific rows. The last thing you want to do is to remove the wrong data. But my hope is that this article has provided you with the foundation you need to understand how to use the DELETE statement correctly. However, be sure to check out the topic “DELETE (Transact-SQL)” in SQL Server Books Online for more details about the statement and to view additional examples.
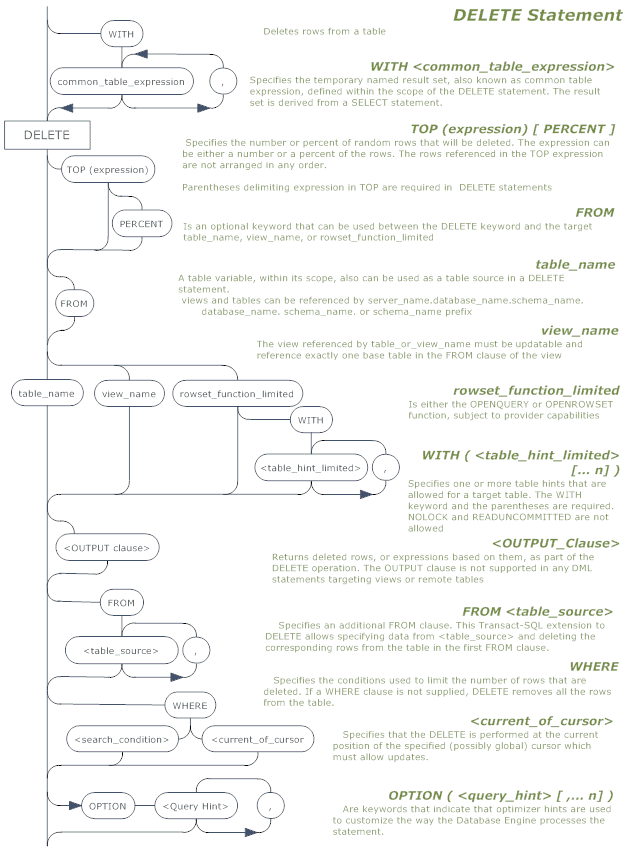
The railroad’ diagram for the DELETE statement, and the associated ones for the OUTPUT and WITH <common_table_expression> clause, are available for download as a PDF file below. This will allow a full-size printout as a wallchart!


Load comments