
Many web development tools have tried to incorporate WYSIWYG editors. However, WYSIWYG isn’t usually practical in web development. Most of the time developers are content to engage deeply in their code whilst knee deep in angle brackets. There are times however that you might need to change the visual design of a project, or debug a misbehaving element, and it is easier to do this with a tool that is able to work with the rendered version of the code.
Browser tools
Many web browsers today include some type of tool to inspect elements whilst debugging rendered code. Internet Explorer, Fire Fox and Chrome all come with equipped with full-featured inspection tools that allow the developer to make real-time adjustments to the HTML and CSS code, but these changes are only temporary since they cannot easily be saved to disk. Although such an element-editing tool may be helpful in solving a design problem, it often leaves the developer repeating the debug process several times to completely fix a difficult problem.
Visual Studio includes Page Inspector, an HTML & CSS inspection tool that is tightly integrated with HTML development, but it has insufficient CSS capabilities. In regards to CSS editing, its features are very similar to that of a browser’s inspection tool. It is good enough for debugging, but lacks the facility to make fixes on the fly.
CSS Editors
Chrome Autosave fills the gap. It is neither a fully featured WYSIWYG editor, nor a full CSS development tool, but it is a browser plugin that allows those CSS changes that have been made by the CSS inspection tool in Chrome to be saved back to the project.
This does not replace the need for a CSS Editor. Full featured CSS editors are invaluable. Many CSS editors include features like intellisense (autocomplete), color pickers, code highlighting and more. However, few CSS editors work in real time with the browser. Generally, changes made to the code must be made, saved, and then the browser must be refreshed. This isn’t a problem most of the time, but when you’re trying to debug your CSS or make changes to fine detail, the process can be quite cumbersome.
Chrome Autosave brings real-time CSS editing to the browser where it makes sense. Viewing the results natively ensures that the final edits are rendered correctly. It also eliminates the need to switch back and forth between your code editor and the browser while constantly refreshing the page to see changes take effect.
Real time editing is helpful when:
- Debugging floats
- Adjusting element width or height
- Adjusting font sizes
- Changing element or font colors
- Debugging CSS overrides
Setup and configuration
Setting and configuring Chrome Autosave is relatively easy. Let’s walk through the process and see some examples of how to make the best of this handy tool.
Before you start:
- Install Google Chrome if you do not already have it. It is necessary because this plugin is not available for other browsers.
- Prepare your source control system. I highly recommend that source control be used with this tool. Chrome Autosave can write to your CSS files at will and if a mistake is made, source control may be the only way to recover the changes. The following examples in this article will use GitHub for Windows since it gives a simple visual representation of the changes made in the CSS files.
- Install Node.js. It is used by Chrome Autosave to install the server component of the tool.
I’ll also cover how to configure Chrome Autosave with Visual Studio. Since configuration can be vaguely different from platform to platform.
Installation
At this point we’ll assume that the Chrome browser has already been installed on the system and you are familiar with the basics of its inspection tool.
Chrome Autosave is a two part system that consists of an extension and server. Both parts must be installed for the tool to work properly.
Installing the extension
Using Chrome open the Chrome Webstore and search for “Autosave”. Find the extension named DevTools Autosave and choose “Add to Chrome”.
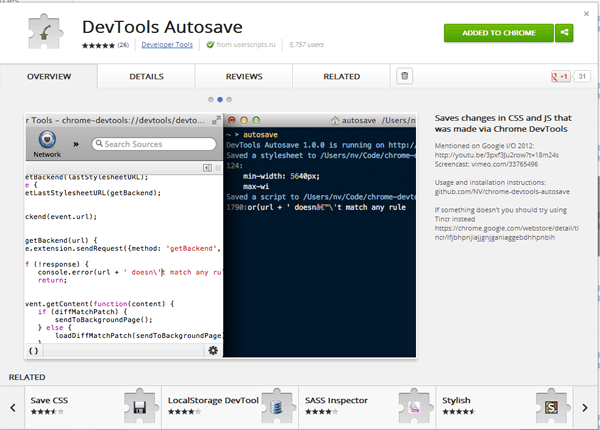
Image Installing Chrome autosave
Installing the server
The server component runs on Node.js. If you do not have Node.js installed on your system download and install node.js. The installer is at nodejs.org.
A reboot may be required.
Run the following command from the command line:
|
1 |
npm -g install autosave |
Configuration
Once Chrome Autosave has been installed it can be configured to use with any project. Here, I’ll walk through how to configure the tool to work with ASP.NET MVC.
- Open Chrome and navigate to chrome://chrome/extensions/
- Under DevTools Autosave, click Options
- In the Match field enter the URL your project uses when it’s running (example:
http://localhost:56323/ - In the Save To field enter the projects root path (example: X:\MyProject\)
- Connect the “route” to the “server”
Now the Chrome Autosave is ready to use on this project. Repeat the process for additional projects with which you would like to enable Autosave.
Usage
Let’s work through a few examples using Chrome Autosave. In the following examples we’ll use the default MVC project template, and GitHub for Windows as source control. In the examples, we have already configured the project to use Autosave.
To begin, we’ll need to start Autosave. To do this, open a command prompt and type “autosave”. This will tell autosave to begin listening for changes in made in the browser’s inspection tool. Whenever a property value is changed and the property field loses focus, the changes will be saved back to the CSS file.
|
1 |
$ autosave |
Example: Changing colors
In this example, we’ll examine how we can change colors of elements on the fly. This is especially useful if you have a client who is asking for frequent color changes or you are trying to ensure that text elements on the page have enough contrast from the background.
Let’s assume that our client has requested that the site theme have “more blue”. We can quickly modify the site theme to give it a blue background, links, and blue footer. We can do this directly in the browser and see the results as we make our changes. By making our changes in real time, we can see how the modifications affect other elements on the page, such as background colors being too dark for the text color in the foreground.
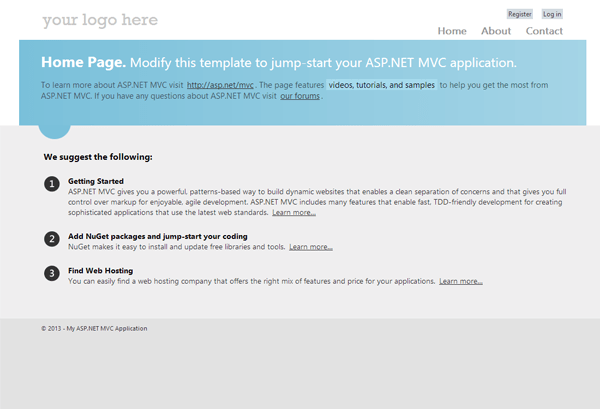
Default MVC project template
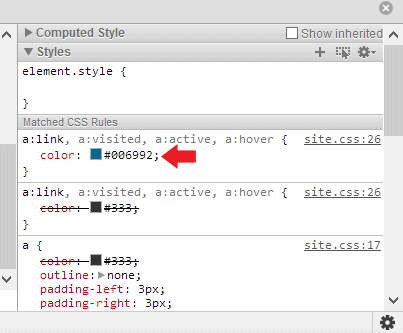
To begin, run the project using Chrome. We’ll start with by adjusting the link color by right clicking directly on a link in the page body and choosing “inspect element” from the context menu. Our link element should now be selected in Chrome’s HTML inspection window and the CSS being applied to the element should be visible under the section labeled “Matched CSS Rules”
Next, click directly on the small box next to the property “color:”, enabling a color picker box. From here, you can change the color property; the results will be reflected in the browser. In addition to the color-chooser, the color can be entered directly by clicking on the color property’s value #333. We’ll make this blue by changing the value to #006992.
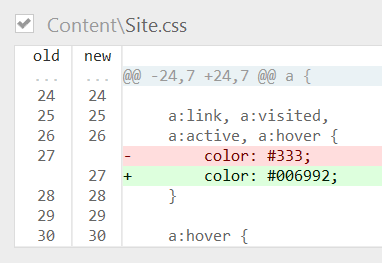
The command prompt will display the change that was made to the CSS file. We should also be able to see the CSS file change in our Git repository.
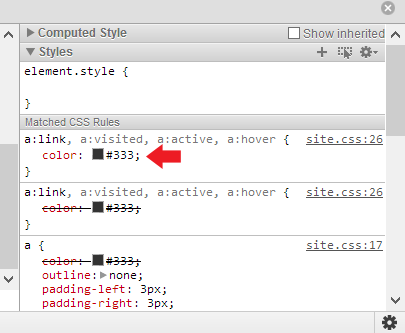
Initial link value using Chrome’s inspection tool
Changing a property value directly in the inspection tool
GitHub for Windows showing the file has been modified
Continue by changing the main body element’s background color. To do this, hover over the main body and use the inspect element command by right clicking on the element and choosing inspect element. The div element with the id of “body” should be selected. In the Matched CSS rules the #body CSS rule should be selected. Change the background property value to #DAF8FF.
Let’s finish up by changing the footer and page background colors. We’ll do this by repeating the same process we used above. Use the inspect element command on the footer, and change the background color property’s value to #7AC0DA. Next, set the page color by selecting the root html tag, and change the background color property to #6193A5.
Now the site’s theme has been changed to blue to complete our client’s request.
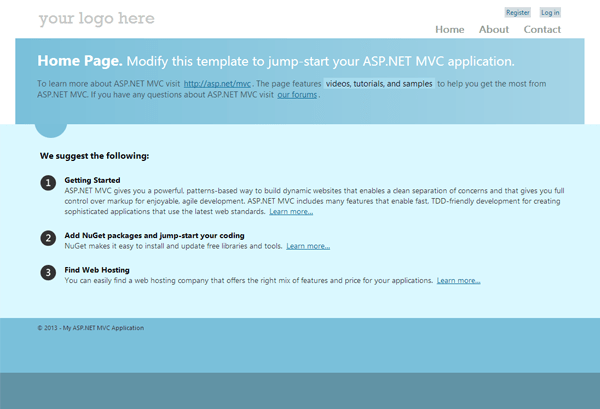
Modified using Chrome autosave
Example: font size
In this example, we’ll assume that our client has called us with another “quick fix”. The client has requested that the overall font size on the site should be increased. Let’s also assume that we didn’t develop the CSS ourselves and we are using a site template. We aren’t exactly sure where the font size for the site is set, and how changing it might affect the look of the page.
We’ll begin by examining the page with the Chrome inspection tool. To do this, use the inspect element command. Using the inspection tool, select the introduction paragraph and view the CSS properties. Notice that the element .featured p has a font size of 1.1em.
Next inspect the first header on the page that reads “Home Page”. Notice that the h1 element has a font size of 2em. After inspecting each element we can see that the use of “ems” is common throughout the page. Since “ems” are measured relative to their container, we can assume that, by changing the root font size, the fonts on the rest of the page will also increase in size.
To complete the task, navigate through the HTML tree using the page inspector and select the body element. The body element has a font size of .85em. Changing this font size will affect all fonts using “ems” on the document since the size is relative to the container and the body element is the root element.
Select the font size’s property value, and change it to 1.0em. Notice the fonts on the page increase in size. Let’s assume that this isn’t enough to please the client, so we’ll change the value again to 1.2em.
Now the font size is reasonably larger and we can follow up with the client for approval.
Example: working with multiple style sheets and overrides
Often projects will use multiple style sheets. Some styles may be made up of properties that are defined in several places. This is usually done to override existing styles when building upon frameworks so that the core files are not modified in case the framework needs to be updated later on. When using the inspection tool, the element’s matched style is shown with the corresponding file name where the style is defined. Autosave is capable of saving changes to the appropriate file without any additional configuration. Let’s look at this feature in action by adding a new style sheet to the project and making some modifications.
We’ll assume that, in our current project, the Site.css file is part of our framework and we will no longer be modifying this file. Instead we will use CSS overrides to make alterations to the theme. To begin, add a new style sheet to the project: For simplicity we’ll call it StyleSheet1.css. Made sure that you tell MVC to include the file in the Bundle configuration (App_Start / BundleConfig.cs) and that the file is added after the Site.css file. The order of operations is important here because a style that is defined at the end of the page will override any style defined before it.
For an example, we’ll create an empty style in the StyleSheet1.css file for the #body element. This will give us an override we can modify in the browser to examine how Autosave handles working with multiple files. Save the style sheet, and then view the site in the browser.
|
1 |
#body { } |
Next, using the inspection tool, select the div element with the id of “body”. Notice that the inspection tool now shows two matched styles for this element, one for each file where the style was defined.
To override Site.css by using the new StyleSheet1.css file, click inside the empty braces for the #body style and type background-color [tab] #EDE1B4 [tab]. Note that additional styles can be added by continuing to a new line with the [tab] key. Now the StyleSheet1.css file should be changed, while the Site.css file remains the same. The page should now have a new background color. You can observe that the property has been overridden by looking at the #body style under the Site.css matched style, notice that the background-color property has a strike through.
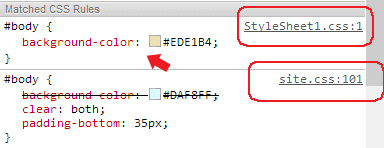
The inspection tool showing a CSS override

GitHub for windows showing the file has been modified
Conclusion
Autosave isn’t a replacement code editor, or a WYSIWYG editor, instead it’s extending the functionality of something you already use out of necessity. It’s ideal for making fine-tuned adjustments in real time, which can be a huge time saver for the “perfectionist”. As a CSS developer who frequently uses in-browser inspection tools, I believe that having the ability to save adjustments is the next logical step for the inspection tool.
This document contains proprietary information and is protected by copyright law.
Copyright © 2026 Red Gate Software Limited. All rights reserved
Load comments