
Contents
What are Some of the benefits of using SQL Virtual Restore?
Restoring Missing Objects and Data
Database Corruption Prevention and Backup Verification
Maintaining Your Development/Test/QA Environments
Reporting
Auditing
How Does SQL Virtual Restore Work Under the Covers?
Installing SQL Virtual Restore
Putting SQL Virtual Restore to the Test
Give SQL Virtual Restore a Try
Introduction
In the 15 years I have been a DBA, I have seen a lot of new SQL Server tools. Most of these tools fit into discrete categories, such as database modeling tools, schema compare tools, or backup compression tools: but every once in a while you run into a product that defies simple categorization, and one such product is SQL Virtual Restore from Red Gate Software. In brief, what SQL Virtual Restore does is to mount a SQL Server backup to a SQL Server instance as a fully functional, live database. In other words, the mounted database works exactly like any other database from SQL Server’s perspective, except the data, for the most part, is stored in a backup file.
“So what?” you might ask. “Can’t you just restore a database backup to accomplish the same goal?”.
You can, but SQL Virtual Restore offers several important benefits to DBAs that a standard restore can’t provide: substantial space savings and substantial “restore” time savings. Here’s what I mean.
Substantial Space Savings: When you perform a regular physical restore of a native backup file to SQL Server, the resulting database’s data (MDF) and log (LDF) files are stored on disk in an uncompressed format. In addition, most database files have a lot of “empty” space that is not currently being used. For example, you might have a database with a 100 GB MDF file, of which only 60 GB is used and of which 40GB has been pre-allocated for future growth. In fact, it is very common, and considered to be a best practice, to pre-size MDF files to a future expected growth size so that you don’t have to rely on autogrowth to grow your databases. The same applies to LDF files.
On the other hand, if you use SQL Virtual Restore to mount a compressed database backup as a fully functional database, instead of restoring the normal 100 GB database, there can be a large savings in space. For example, not only is the unused space in the database (40 GB in our example) not stored as part of the backup, the remaining data (60 GB in our example) is compressed; sometimes resulting in up to a 95% compression ratio (the amount of backup compression depends on the backup compression technology and the type of data stored in the database). To be conservative, let’s assume that a 100 GB database can be compressed by 80% using backup compression, which would result in a 12 GB compressed backup file (100 GB – 40 GB = 60 GB, 60 GB x .2 = 12 GB). If you mount this compressed backup as a database instead of the full, 100 GB database, you would be saving 88 GB of space, a huge space savings. Keep in mind that the mounted 12 GB database, from the perspective of SQL Server, acts exactly like the 100 GB database, except it is 88% smaller.
Substantial “Restore” Time Savings: One aspect of performing a standard restore of a database backup that is often overlooked is the amount of time it can take for the restore to complete. For very large databases, this can be very time consuming.
SQL Virtual Restore, on the other hand, doesn’t perform a “standard restore”. Instead, it mounts the backup directly to SQL Server. In my testing, mounting a database can be up to 75% faster than performing a standard database restore. The reason a virtual restore is faster than a standard restore is because less data has to be restored (e.g. a compressed backup vs. an uncompressed backup), reducing the I/O (and time) required to mount the database.
The time that can be saved by mounting a compressed backup instead of restoring a backup conventionally will vary depending on the type of compression used for the backup. In our example, let’s assume that it takes 25 minutes to perform a standard database restore of a 100 GB database. To be conservative, let’s assume, in our example, that the mounting time for a compressed backup is 50% faster, which means that mounting the compressed backup, as compared to performing a standard restore, is now 12.5 minutes instead of 25 minutes. While the time savings may not seem like a lot on a smaller database, it can add up if the databases are multi-terabyte in size.
Note: Although the product is called SQL Virtual Restore, it has nothing to do with server virtualization, such as Hyper-V or VMware, nor with the virtual server names used in clustering. In the context of SQL Virtual Restore, when a compressed backup is mounted to a SQL Server instance, it is called a virtual database, while still retaining all the functionality of a normal database.
In this review I will put SQL Virtual Restore to the test and explore its various uses and benefits. In addition, I will show you how it works, how to install it, and provide an example of how it works.
What are Some of the Benefits of Using SQL Virtual Restore?
OK, now that you understand how using SQL Virtual Restore can save substantial amount of disk space, along with saving restore time, why would a DBA even care about this? In fact, there are many reasons why this is beneficial. Let’s take a look at some of the most important ones.
Restoring Missing Objects and Data
How many times, as a DBA, have you been asked to restore a table, a view, a stored procedure-just to name a few of the many different database objects-from a backup at a specific point in time because it was accidently modified or deleted and can’t be recovered any other way? If this is the case, one option is to restore the entire backup in order to retrieve the missing object or data. If the database in question is large, performing this task could be time consuming (if a long restore is required), or perhaps not even possible if you don’t have enough extra disk space to restore the database. While disk space may be inexpensive, not all DBA shops have lots of extra space available, especially if the database that needs to be restored is very large.
Another option to retrieve missing objects and data is to use a third-party object restore tool that allows you to extract the object you need restored from an existing backup. Depending on the technology used, some of these tools only allow you to retrieve tables, and not other objects. In other cases, retrieving a single table is problematic because of referential integrity issues. For example, if the requested table to be restored is a sales header table, but if it has a foreign-key relationship with a sales detail table and a vendor table, then all three of these objects need to be restored. And this doesn’t even consider the issue with changes in the data that occurred since the backup occurred.
SQL Virtual Restore, on the other hand, removes the obstacles described above. You can quickly virtually restore an entire database from a backup with minimal disk space. And since you now have all the objects (and their data) at hand, you can then retrieve and restore the missing object or data as appropriate. You can also do this knowing that the data in the restored database is fully consistent, with its Declarative Referential Integrity (DRI) intact.
Database Corruption Prevention and Backup Verification
In a perfect world with unlimited resources, it would be a great idea if every database was checked on a daily basis for potential database corruption using the DBCC CHECKDB command. This is because the earlier you find any database corruption, the sooner you can fix it, reducing potential data loss. Unfortunately, running DBCC CHECKDB is a time and resource intensive process. Because of this, many large databases are only checked weekly or monthly, if at all.
Along the same lines of thinking, ideally every database backup should be verified that it is good after it is made. This is because backups can become corrupt themselves, rendering this unusable, and the only way to know for sure if a backup is good is to restore it. But like running DBCC CHECKDB, this can be a time consuming process, plus it takes disk space to restore the backups in order to test them. This can be a problem if your database is multiple terabytes in size.
SQL Virtual Restore can help solve this problem. For example, you could take a compressed backup of the database nightly, then virtually restore the backup to another SQL Server using SQL Virtual Restore, then run DBCC CHECKDB against the backup. This kills two birds with one stone. Not only are you testing the integrity of the backup, you are also testing the integrity of the database. In addition, the DBCC CHECKDB is completed on another server, so it won’t affect the performance of the production database. Because a SQL Virtual Restore database uses so much less space than the original database, and virtual restores are much faster, it makes the above process feasible. Something that is otherwise not generally practical for very large databases.
Maintaining Your Development/Test/QA Environments
Depending on the DBA shop, there may be three or more copies of development/test/QA databases for every production database. If the production databases are large, this can result in a huge requirement for disk space. For example, let’s say that your organization has developed its own in-house application that runs against a 1TB database. Let’s also assume that there are five developers who are independently working on the database, each of which wants a copy of the entire database on their workstation to perform their development work. In addition to this, there might be test and QA copies needed of the database to be used for testing before any changes are rolled out to production. This adds up to a lot of disk space very quickly; 7 TB in our example. It also adds up to a lot of restore time, especially if the database is refreshed seven different times a day.
One option that is used in some DBA shops, to reduce the storage footprint of multiple copies of large databases, is to literally remove much of the data from a database so the databases are smaller and easier to work with. On the other hand, it is not a trivial task to remove data from a database, and besides, doing so might negatively affect a developer’s or tester’s ability to test changes in a database because it is only a subset of the actual database, and not fully representative of the actual production database.
SQL Virtual Restore overcomes this problem because it not only substantially reduces the amount of disk space required, it also reduces the time spent restoring each of the copies. Using the conservative estimate of 80% disk space savings, what was once 7 TB of data used in development/testing/QA is now only 1.4 TB of data, a huge savings.
Reporting
DBAs have many different options to implement reporting solutions against their production databases. One inexpensive, and tried and tested method that meets the reporting needs of many companies, is to nightly restore a backup of the production database onto a separate reporting server. This way, the reporting load is moved from the production OLTP server to the reporting server. This is not a problem if the production database is relatively small, but if the database is huge, this can present a problem if the reporting server is lacking in disk space, or if the “restore” maintenance window is limited.
SQL Virtual Restore makes the above reporting solution much easier because SQL Virtual Restore databases use much less space, and take much less time to perform a virtual restore, the problem of not enough disk space, or not a long enough maintenance window, goes away.
Auditing
Depending on what industry you are in, your organization might be subject to regular audits. Depending on the auditor, and the nature of the audit, sometimes the auditor wants their own copy of the database to perform their work. In other cases, you might want an auditor to use a copy of the production database because it is possible that the queries they may be running might negatively affect your production server’s performance. In addition, if fraud, or an anomaly, is detected, a forensic analysis may require a large number of point-in-time backups being mounted to determine when and how the anomaly occurred.
SQL Virtual Restore makes the above process much easier because less disk space is required for the database copy, along with a savings in “restore” time. The larger the database, the greater the benefits.
These are just some of the many ways that SQL Virtual Restore can be used to make your life easier as a DBA. If you think about your particular environment, I am sure you can think of many additional ways that SQL Virtual Restore can make you more productive and save your organization money.
Now that I have introduced you to some of the benefits of SQL Virtual Restore, so you have a basic understanding of what it can do, let’s take a look at how it works.
How Does SQL Virtual Restore Work Under the Covers?
So how does SQL Virtual Restore perform its magic? How does it convince SQL Server that a compressed (and perhaps encrypted) backup is a full-fledged SQL Server database that allows SQL Server to read and write to it like any other database? Before we can understand how SQL Virtual Restore works, we first need to take a high-level look at how SQL Server interacts with the Windows OS (operating system).
While SQL Server performs many of its own tasks internally using the SQLOS (SQL Server Operating System), one of the things it doesn’t personally handle is the reading and writing of data directly to disk. Whenever SQL Server needs to read or write to a MDF or LDF file, it passes off the I/O request to the Windows I/O Manager, which is a part of the OS’s kernel. At that point, the Window’s I/O manager passes the I/O request to a device driver, and eventually the data is read from, or written to disk.
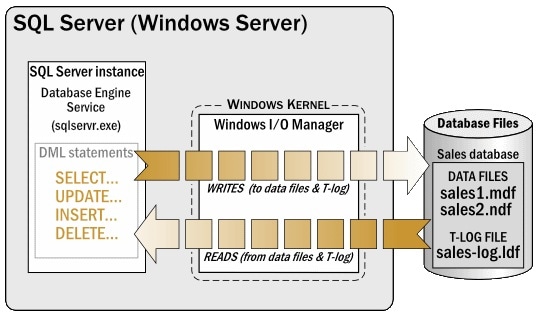
Figure 1: A high-level overview of how SQL Server interacts with the OS.
For example, in figure 1 above, any DML statement executed within the database engine that requires data to be moved to or from the SQL Server Buffer cache to disk is passed through the Windows I/O manager to either the MDF or LDF files, as appropriate.
When the MDF or LDF files are backed up conventionally, data is read from the MDF and LDF files by the SQL Server database engine, then written back to disk in the form of BAK or TRN files, which include all the data necessary to restore a database. As with standard read and write activity, all backup-related physical I/O is handled by the Windows I/O Manager and its related OS components.
Note: The above description of how backups are made with SQL Server assumes there is no backup compression. Third-party compression tools work in different ways. SQL HyperBac belongs to a class of tool that intercept the data to be backed up from SQL Server, using what is called a file system filter driver, which works in full cooperation with the Windows I/O Manager. For example, when SQL HyperBac becomes aware that a SQL Server backup is being made, it grabs the data in cooperation with the Windows I/O manager, compresses it, then passes it back to the Windows I/O manager before it is written to disk. This is how database backups can be compressed by up to 95% (the level of compression depends on how “compressible” the data is).
Now that we know a little about how SQL Server works with the Windows I/O Manager, let’s find out how SQL Virtual Restore turns a SQL Server backup file into a fully functional database. When SQL Virtual Restore is set up, it installs and starts what is called the HyperBac Control Service. This service is like any other OS service and runs under the LocalSystem security context (or an administrative user context if performing a virtual restore from a remote backup). Its job, in cooperation with the Windows I/O Manager, is to intercept the read and write requests from SQL Server. SQL Server doesn’t even know that the HyperBac Control Service even exists, because all the SQL Server database engine knows is to pass off its I/O requests to the Windows I/O Manager. And since SQL Virtual Restore works within the context of the Windows I/O Manager, SQL Server is none the wiser.
With the HyperBac Control Service running, SQL Virtual Restore now has the ability to mount a backup file (perform a virtual restore) as a fully functional database. When a RESTORE DATABASE command is executed, using standard Transact-SQL syntax, the backup is mounted, and SQL Server thinks the backup is an actual SQL Server database.
Now, you are probably asking, how can a backup file act as a database, especially given that it does not include MDF or LDF files? The secret is that when the RESTORE DATABASE command is executed, behind the scenes, the HyperBac Control Service has created a VMDF and a VLDF file for the virtual database, that act as substitutes for the standard MDF and LDF files. Once a backup has been mounted to SQL Server, whenever an I/O read is requested from SQL Server, it passes on this I/O request to the Windows I/O Manager. Inside the Windows I/O Manager, the HyperBac Control Service recognizes this request, and then grabs the requested data directly from the backup or VMDF file, which is then passed back to SQL Server.
If you want to INSERT, UPDATE, or DELETE data from the database, all these activities are logged to the VLDF file, exactly like data modifications are written to an LDF file, ensuring database consistency and integrity that are identical to a standard SQL Server database. On the other hand, since the backup file is a read-only file, all the modified data is stored in the VMDF file, just as data is normally stored in a MDF file. This means that, if the database experiences a lot of data modification activity, the VMDF and the VLDF files will grow, as they contain the changes made to the database since it was restored as a virtual database. The size of the VLDF file is managed just like any LDF file, by performing transaction log backups (assuming the database uses the full or bulk-logged recovery models). If the database uses the simple recovery model, then the VLDF file size doesn’t need active maintenance. If desired, the virtual database can be backed up and restored like any database.
If the backups have been compressed using a technology that SQL Virtual Restore understands, such as that provided by SQL HyperBac, SQL Backup Pro, or native SQL Server backup compression, SQL Virtual Restore will automatically decompress the data from the backup on the fly as it is routed back to SQL Server. The ability of SQL Virtual Restore to use compressed backups is a great benefit, as described earlier in this article.
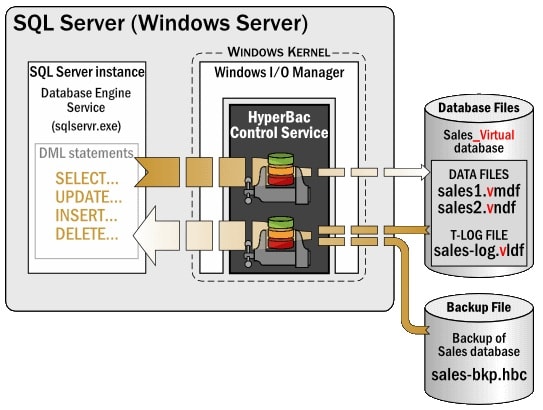
Figure 2: How SQL Virtual Restore performs its magic.
To ensure that you have a good understanding of how SQL Virtual Restore works, let’s walk through a brief example. See figure 2 above. If a SELECT statement is executed against a database mounted by SQL Virtual Restore, and the requested data is not in SQL Server’s buffer cache, then the SQL Server Database Engine will pass on a read request to the OS, where the request is handled by the Windows I/O Manager. When this occurs, the HyperBac Control Service recognizes the read request, which in turn, with the assistance of the Windows I/O Manager, grabs the requested data from the backup file. The requested data is then returned back to SQL Server with SQL Server having no knowledge that the data was stored in a backup file.
If an INSERT, UPDATE, or DELETE statement is executed against a database, this activity is first logged to the VLDF file, and is eventually written to the VMDF file, just like any DML activity in a standard database. The VMDF file keeps track of all the changes, so that when any DML activity against the database is requested, the most current data is always used, whether the data is stored in the backup file or the VMDF file. As far as SQL Server is concerned, the data returned is always fully consistent and accurate.
While this may seem like a lot of work, it is all invisible to you and SQL Server. As a DBA, you don’t treat the database restored by SQL Virtual Restore any differently that you would any other database. While the I/O mechanics may be a little different under the surface, that is the only difference. A database restored with SQL Virtual Restore protects data just as well as any standard SQL Server database can.
Installing SQL Virtual Restore
Now that we know what SQL Virtual Restore can do, and how it works, it’s time to find out how to install it. Fortunately, this is a fast and painless task. SQL Virtual Restore is installed on every server where you want to restore compressed backups as virtual databases.
SQL Virtual Restore comes in a zip file that includes three different versions of the product.
- Intel 32-Bit
- Intel 64-bit
- Itanium 64-bit
Unzip the installation file that matches your system’s CPU and operating system, and double-click on the setup file, and the following screen appears.
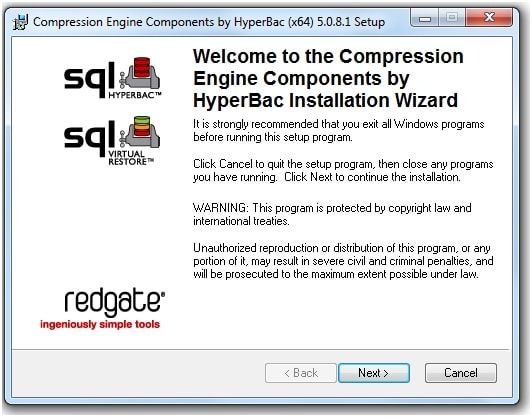
Figure 3: The SQL Virtual Restore splash screen.
Click next to get the License Agreement screen.
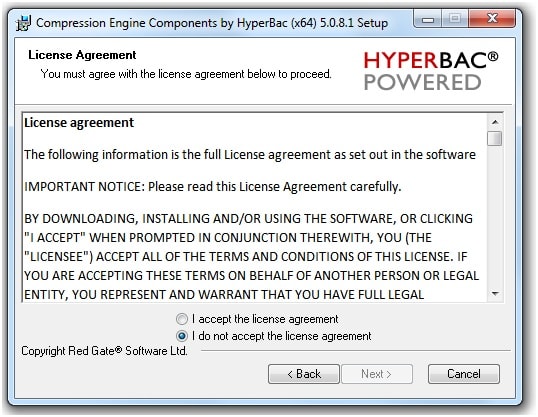
Figure 4: The SQL Virtual Restore License Agreement screen.
Select that you accept the License Agreement and click Next.
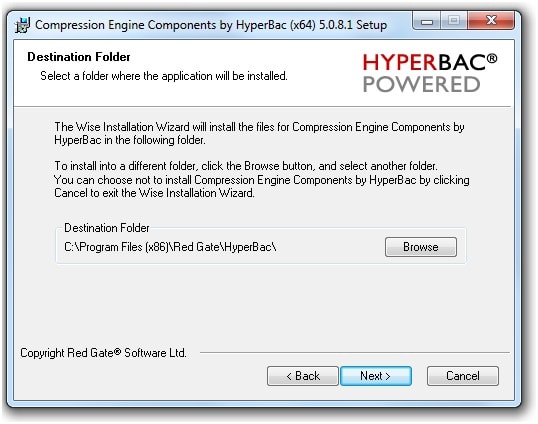
Figure 5: Specify where you want the SQL Virtual Restore executables and related files to be stored.
You can choose to store the executables in the default folder, or select your own. Personally, I store these files on the same drive where the SQL Server executables are located. Once you have made your choice, click Next.

Figure 6: Final screen before installation begins.
Click Next once again, and the installation begins.
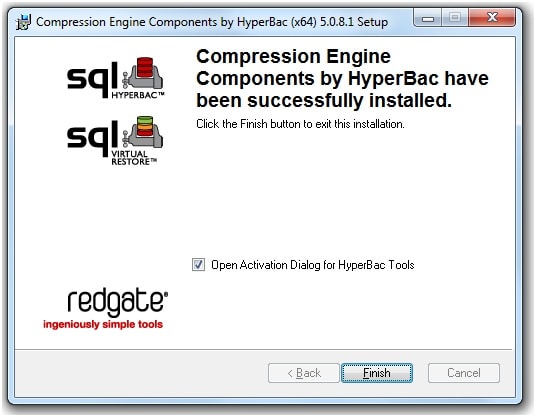
Figure 7: SQL Virtual Restore has been installed.
The software has now been installed, and the final step is to enter the license number. If you click the Finish button, the License Activation screen appears.
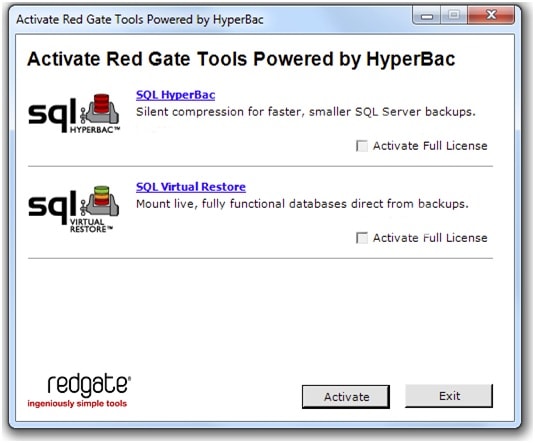
Figure 8: Enter your license key.
Don’t let this screen confuse you. If you have only purchased SQL Virtual Restore, then you will need to activate it by entering the license key. On the other hand, many people purchase SQL HyperBac with SQL Virtual Restore, so this option is displayed on the screen as a convenience. While SQL Virtual Restore works well in tandem with SQL Hyperbac, it also works with SQL Backup Pro and SQL Server native compression. After you have activated SQL Virtual Restore, it is ready for use.
The installation process installed the HyperBac Control Service, a Help file, the Hyperbac Configuration Utility, and the SQL Virtual Restore Wizard. In the next section, we learn how to use SQL Virtual Restore.
Note: SQL Virtual Restore works with the Developer, Standard, and Enterprise editions of SQL Server 2000 (SP 3 or later); SQL Server 2005; SQL Server 2008; and SQL Server 2008 R2. Operating systems supported include XP Professional (SP1 & SP2), Vista, Windows 7, Windows 2000 (SP 4), Windows Server 2003 (SP 1 & SP2), Windows Server 2008, and Windows Server 2008 R2.
Putting SQL Virtual Restore to the Test
In this section, I am going to show you how to mount a compressed backup as a SQL Server database using SQL Virtual Restore. After that, I’m going to show you the results of a couple of tests I have done with the software, tests that I recommend that you run yourself if you are trialing the product and are considering purchasing SQL Virtual Restore.
Mounting a compressed backup using SQL Virtual Restore can be done in one of two ways. The first option is to use the standard Transact-SQL RESTORE DATABASE command. Even though an actual restore is not performed by this command when mounting a compressed backup, SQL Server doesn’t know the difference. In fact, any Transact-SQL command can be executed against a database that is mounted by SQL Virtual Restore.
The second way to mount a compressed backup is to use the SQL Virtual Restore Wizard, an intuitive GUI interface. I am going to be using the Wizard to show you how SQL Virtual Restore works, although later I will show you the Transact-SQL code the Wizard produces to mount a compressed backup.
To make this example as realistic as possible, I am going to use a real production database that I often use when testing, called Big_Database.
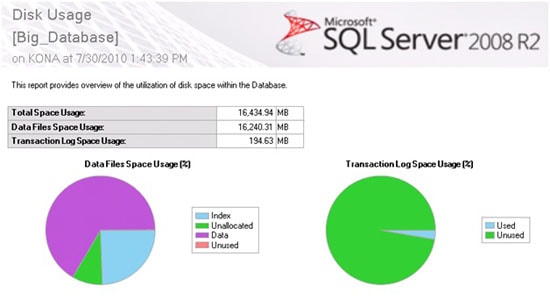
Figure 9: Big_Database has a 16.2 GB MDF file and a 195 MB LDF file.
The database has an MDF file of about 16.2 GB and a LDF file of about 195 MB. The database is set to the full recovery mode. In figure 9 above, notice that both the MDF and the LDF files are not 100% full, which is to be expected.
Let’s assume for the moment that this is our production database and that we want to make a compressed backup of this database, and then mount the compressed backup using SQL Virtual Restore. This new database, which we will call Big_Database_Virtual, can then be used for many different tasks, as described earlier in this article.
The first step is to create the compressed backup of the production database. While I have the option to create a compressed backup using SQLHyperBac, SQL Backup Pro, or native SQL Server compression, I will be using SQL HyperBac for this example, as I have found in my testing with this particular database that you get slightly smaller database footprints, and faster restore times, than when using the other two options.
So, I back up the Big_Database using SQL HyperBac, which compresses the database backup down to 1.95 GB, a disk savings of about 88%. At this point, I am ready to use SQL Virtual Restore to mount this backup as live database.
Note: Since this is an article on SQL Virtual Restore, and not on SQL HyperBac, I’m skipping the steps where I actually perform the compressed backup.
Because the compressed backup will be used for the new database, I will move it to the same folder where I normally store my MDF files. This is because the compressed backup, although not a MDF file, will be used as if it were a MDF file, and I want it to have all the performance and high availability afforded by the RAID 10 array I use to store my MDF files. This is not a requirement of using SQL Virtual Restore, but a best practice I recommend based on my testing.
Note: In my example, I will be using a single full backup to mount my database. SQL Virtual Restore also allows you to combine full, differential, and transaction log backups, and mount them together, as if they are a single database.
Now that the compressed backup is in the right location, it is time to start the SQL Virtual Restore Wizard. You can start it from the Start Menu, or better yet, you can start it directly from SSMS (SQL Server Management Studio).

Figure 10: SQL Virtual Restore can be started from SSMS, or from the Start Menu.
To start the SQL Virtual Restore Wizard from SSMS, click on the Tools menu and select SQL Virtual Restore, and the Wizard appears.
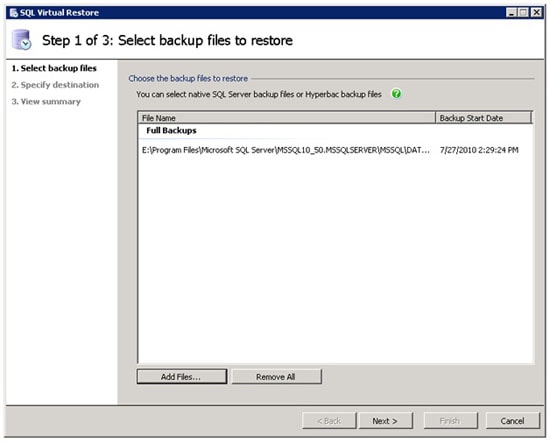
Figure 11: The first step is to select the compressed backup you want to work with.
The Wizard includes three steps. The first step is to add the file (or files if you are mounting full, differential, and transaction log backups) you want to use by clicking on the Add Files button and then selecting the file(s). In figure 11 above, I have already selected the compressed backup file of the Big_Database database.
Once you have selected the file(s), click Next, and the second screen of the Wizard appears.
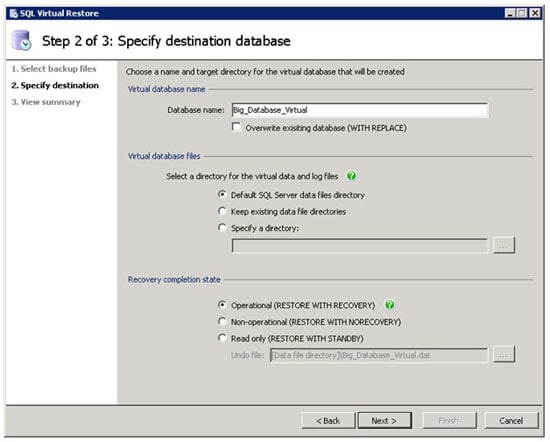
Figure 12: In most cases, the defaults on this screen work well.
The second screen of the Wizard allows you to specify the name of the database you are going to mount. By default, “_Virtual” is added to the original database name. Of course, you can use any name that works for you.
The second option on the screen allows you to specify the location of the VMDF and VLDF files that will be created once the database is mounted. These files were discussed earlier in the article when I explained how SQL Virtual Restore performs its magic. I personally prefer that the VMDF and VLDF files be located in the same locations where I normally store my MDF and LDF files, which is on separate arrays on my server. Unfortunately, the Wizard only gives you the option to store both the VMDF and LDF files in the same folder, not in separate folders which is the way you’d normally prefer to do it, so what I do is to select “Default SQL Server data files directory” on this screen; then in the next step, I manually alter the VLDF location in the Transact-SQL script that is used to mount the backup and create the VMDF and VLDF files. I’ll demonstrate this in a moment.
The third option on the screen allows you to specify if the mounting process leaves the database Operational, Non-operational, or Read only. Assuming that you have specified all of the files necessary in the previous screen (full, differential, transaction log backups), then choose Operational. The other two options would only be used if you don’t select all of the files in the previous screen, and intend to add them at a later time.
Once you have made your choices, click on Next.
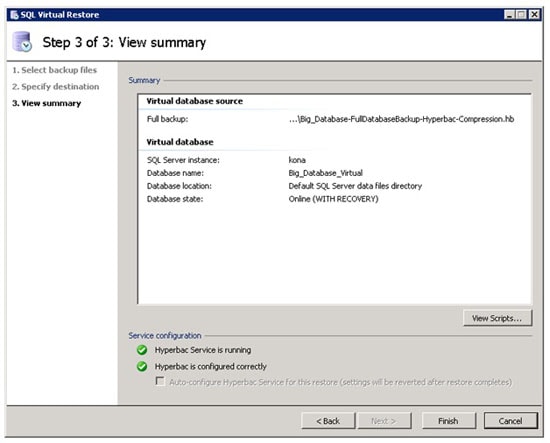
Figure 13: This screen summarized your choices, and also allows you to view the Transact-SQL script.
The third and last screen of the Wizard summarizes your choices. If you are happy with your choices, you can click on Finish and the compressed backup will be mounted. Or, if you are like me, I prefer to click on the View Scripts button, copy the script to a SSMS query windows, modify the script so that the LMDF files are stored along with my other LDF files, and run the script from there. So let’s do that.
Here is what the script looks like, after I have made a changed the location of the VLDF file from drive E to drive F.
|
1 2 3 4 5 6 7 8 9 |
RESTORE DATABASE [Big_Database_Virtual] FROM DISK= 'E:\Program Files\Microsoft SQL Server\MSSQL10_50.MSSQLSERVER\MSSQL\DATA\Big_Database-FullDatabaseBackup-Hyperbac-Compression.hbc' WITH MOVE 'dc4_live_Data' TO 'e:\Program Files\Microsoft SQL Server\MSSQL10_50.MSSQLSERVER\MSSQL\Data\Big_Database_Big_Database_Virtual.vmdf', MOVE 'dc4_live_Log' TO 'f:\Program Files\Microsoft SQL Server\MSSQL10_50.MSSQLSERVER\MSSQL\Data\Big_Database_log_Big_Database_Virtual.vldf', NORECOVERY, STATS GO RESTORE DATABASE [Big_Database_Virtual] WITH RECOVERY GO |
If you are familiar with the RESTORE DATABASE command, you will notice that the syntax is exactly the same as it is when restoring a native database backup. What is different is that the backup file, the VMDF file, and the VLDF file are specified using the file extensions used by SQL Virtual Restore.
For the purpose of my tests, I am going mount my Big_Database backup file as a virtual database. Once I run the above script, the backup is mounted. Once mounted, SQL Server treats the new database just like any other database. In my particular test, the mounting time was 60 seconds, which is 76% faster than it takes to restore the database the standard way.
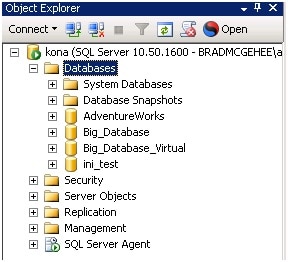
Figure 14: The new Big_Database_Virtual database has been added, and SQL Server thinks it is a regular database.
After Big_Database_Virtual is mounted, it appears in SSMS just like any other database. If you run the Disk Usage report, like I did earlier with the Big_Database and Big_Database_Virtual, they appear identical.
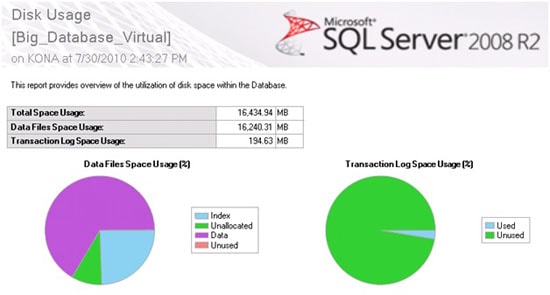
Figure 15: SQL Server report back that Big_Database_Virtual is the same size as the original Big_Database, although it is not.
So how do you know that Big_Database_Virtual is not using all of the space as reported above? Well, you can’t do it from SQL Server, as SQL Server doesn’t know that it is being fooled. To see how much actual space Big_Database_Virtual is using, you must look at the file system.

Figure 16: The VMDF and HBC files are on drive E, and the VLDF file is on drive F.
In figure 16 you see the three files that make up the Big_Database_Virtual database. Most of the space is taken up with the compressed backup, (SQL HyperBac compressed backup files have a HBC extension), which is 1.95 GB (after being converted from KB), and that the VMDF file is only 257 KB and that the VLDF file is only 512 KB. This is about an 88% smaller footprint than the 16.4 GB used by the original database. As far as SQL Server is concerned, these two databases are identical, although we know better.
Now that you can see that Big_Database_Virtual is much smaller than the original Big_Database, you may be asking what, if any, is the performance hit when using Big_Database_Virtual? While I haven’t had time to do extensive testing on this subject yet, I did perform three simple performance tests to get a feeling for any performance hit, and here are the results from my test system.
Note: Don’t assume that the results shown here will be the exact same results you get, as the data in the database, along with my hardware, OS configuration, and SQL Server configuration, will be different than yours. On the other hand, I used default settings for all of the above.
The first test I wanted to do was to see how SELECT performance is affected, as it is probably the most common command you will be running against a virtual database. For my simple test, I found a table in the database that had 2,217,036 rows, then I ran a SELECT * against the table, forcing a clustered index scan and returning all of the rows.
| Seconds (full buffer cache) | Seconds (empty buffer cache) | |
| Big_Database: | 43 | 43 |
| Big_Database_Virtual: | 43 | 43 |
Based on my configuration, the time it took to run a SELECT on either the Big_Database or Big_Database_Virtual, were identical, even if the buffer cache was full or empty. In other words, using a compressed backup for the database did not affect SELECT performance in this particular test.
Note: You might ask how is it possible that the time was identical for a full buffer cache (when all the data has been loaded from disk) and from an empty buffer cache (where the data has to be physically read from disk into the buffer cache). In this particular case, it is because the data was stored in the RAID controller’s disk during my test, negating the needs for disk access. If the data had not been stored in the RAID controller’s cache, then the time for the empty buffer cache would be higher than the full buffer cache.
My second test was to see how long it would take to run the DBCC CHECKDB command against both databases. For this simple test, I ran the following command, which performs extensive database corruption checking, and is a very resource intensive task.
|
1 |
DBCC CHECKDB ('DATABASE_NAME') WITH NO_INFOMSGS, ALL_ERRORMSGS |
| Minutes:Seconds | |
| Big_Database: | 1.17 |
| Big_Database_Virtual: | 1.44 |
In this test, Big_Database_Virtual was not quite as fast as Big_Database when running the DBCC CHECKDB command. Although using the mounted compressed backup took a little longer to run, if you perform this task on a test server, as recommended, the extra time it takes to run is insignificant, and not only does it allow you to check for database corruption, but to also verify that you have a good backup. There is also another less apparent time saving I want to point out. Let’s say that you currently restore a non-compressed backup to a server every day and run DBCC CHECKDB against it. If you compare the time it takes to do a standard restore and DBCC CHECKDB against a SQL Virtual Restore and a DBCC CHECKDB, then the overall savings in time from the restore will negate any extra time it takes for the DBCC CHECKDB to run against a virtual database.
The third test was to see what the INSERT performance was between the two databases. Although inserting a lot of data into a virtual database would not be a common occurrence, I still wanted to see what the performance hit would be. I first created a simple, identical table in both of the two databases. The table had a clustered index with a monotonically increasing index value. Then I used SQL Data Generator to insert 5,000,000 identical rows into each table.
| Minutes:Seconds | |
| Big_Database: | 1.18 |
| Big_Database_Virtual: | 2.04 |
In this test, the Big_Database_Virtual database performed more slowly than the Big_Database database, indicating that there is a performance hit when using the virtual database over the original database when inserting huge numbers of rows into a table. Part of the reason for the performance hit is that there is no way to pre-allocate space in the VMDF and LMDF files, which means they grow as the data is inserted, which introduces additional overhead as they are expanded. The original database, on the other hand, had plenty of extra room for growth and did not need to grow, so it did not incur his extra overhead.
While INSERT performance in this test took a hit in the virtual database, it was admittedly, an extreme test, something which you would not usually experience when using SQL Virtual Restore for common use-cases. In fact, most of the benefits of SQL Virtual Restore, such as using a virtual database for object and/or data recovery, backup verification, reporting, and auditing, are gained without writing to the database so performance is virtually identical to the original database. After all, a virtual database is not a replacement for a production database. In general, I would say that giving up a little INSERT performance for big savings in disk space and restore time is well worth the tradeoff. In cases where a mounted database will experience DML activity, the odds are that the performance hit will not be noticed at all. This is because DML activity would only occur in the virtual database in cases where it is used for development, test, and QA, where the performance hit would most likely not be noticed at all.
Give SQL Virtual Restore a Try
As we have seen, SQL Virtual Restore offers DBAs a way to save substantial amounts of disk space and restore time as compared to native backups and restores. We also learned that these benefits work great for doing such things as:
- Restoring Missing Objects and Data
- Database Corruption Prevention and Backup Verification
- Maintaining Your Development/Test/QA Environments
- Reporting
- Auditing
Each of these can offer DBAs and their organization an opportunity to not only increase productivity, but to save money as well.
If this article has piqued your interest in SQL Virtual Restore, I highly recommend you download a free 14-day trial of the application. Only by testing itself will you be able to explore it and determine if it will meet your needs.
This article was updated in February 2011.
Load comments