

If critical data has been deleted or updated incorrectly and you don’t have an accessible full backup, you can still recover the data using SQL Server’s transaction log – provided the database is in Full recovery model and you have differential and transaction log backups available. The technique involves restoring a differential backup to a point in time just before the error, then replaying transaction log backups with STOPAT to recover to the exact moment before the bad operation. For cases where even differential backups are unavailable, this article demonstrates how to use DBCC PAGE and fn_dblog() to read data directly from the transaction log pages.
In more than 10 years of experience, I have dealt with cases where someone has performed incorrect operations on a table, such as updating or deleting wrong rows, in a SQL Server database that does not have full backups available. There are multiple reasons for no full backup: corrupted backups, taking too much time to restore, etc.
In this post, I want to show an alternative for these cases, an ace up one’s sleeve, that you can use to recover data. This method also provides a deep understanding of the internal workings of how your SQL Server stores data. So, in addition to learning how to recover data, you will gain more insights into the internals of SQL.
Note: It is important to emphasize that this approach does not replace a regular backup plan, as it involves many complex steps and is not guaranteed to work in all scenarios. It is also not guaranteed to work in all cases but can be a useful tool when all else fails.
Everything I will demonstrate here has already been used by me in at least two real production cases to recover data. All examples have been tested on SQL Server 2022 Developer, and I have used this method since 2008. Therefore, the procedure remains consistent for previous versions and likely for the upcoming 2025 version.
Since we will be working with record recovery, it is essential to have a fundamental understanding of how records are stored in pages. Therefore, if you do not already have a basic knowledge of how SQL stores data, I recommend reviewing that information first. I will provide an explanation sufficient for you to comprehend the procedures discussed here. However, having some prior understanding will facilitate a better grasp of the remainder of this post. Here are a few articles from Simple Talk that can get you started:
- SQL Server Storage Internals 101 – Simple Talk
Check out Mark Rasmussen’s post explaining the structure of pages and records. It’s a great starting point with helpful visual content for understanding. - Transaction Log Architecture and Recovery Model
It is important to understand what a transaction log (t-log) is and the basics of how operations are logged within it. This article by Greg Larsen serves as an excellent starting point and covers all necessary information:
Additionally, you may refer to Paul Randal’s wonderful posts for more in-depth details about transaction logs.
A “Real” Scenario
Imagine this scenario: You recently started working for a new company to manage an SQL server. The backup policy is a full backup every Monday, daily differentials, and transaction logs every 10 minutes. All backups are managed by an external tool that copies files from the local backup directory to its storage daily.
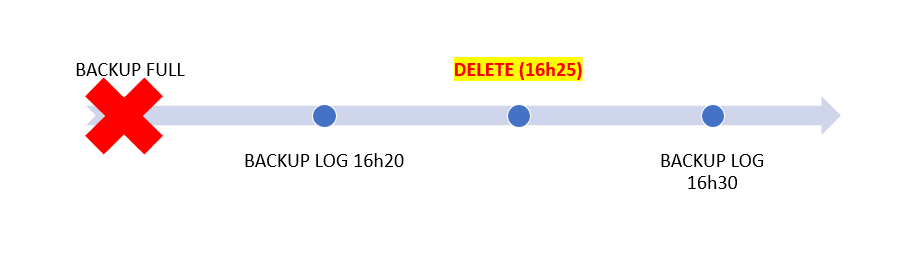
At 16:25, someone deleted 10,000 important rows. You were asked to restore these rows due to their high importance.
The backup team informs you that there is an issue with the backup tool, making it impossible to restore backups for three days. You only have the daily differential backup and transaction log backups since 00:00.
If you had an accessible (and recent) full backup, this task would be straightforward: Simply restore the full backup along with the differential backups and logs up to 16:25, then retrieve the data or replace the existing database.
The following script creates a sample database and scenario (Editor note: This script should work on any edition of SQL Server. I tested it on Express. Only one statement later in the article needs to be changed to not compress the backup that is being taken.)
The script is fairly long, but it is a good idea to read over the code and see the settings that are being applied and used.
|
1 2 3 4 5 6 7 8 9 10 11 12 13 14 15 16 17 18 19 20 21 22 23 24 25 26 27 28 29 30 31 32 33 34 35 36 37 38 39 40 41 42 43 44 45 46 47 48 49 50 51 52 53 54 55 56 57 58 59 60 61 62 63 64 |
USE master GO -- test database IF DB_ID('SimpleTalk') IS NOT NULL EXEC('ALTER DATABASE SimpleTalk SET RESTRICTED_USER WITH ROLLBACK IMMEDIATE; DROP DATABASE SimpleTalk'); CREATE DATABASE SimpleTalk; GO -- Recovery Model FULL ALTER DATABASE SimpleTalk SET RECOVERY FULL; -- Create a test table USE SimpleTalk GO DROP TABLE IF EXISTS dbo.Customer; CREATE TABLE dbo.Customer ( Id int PRIMARY KEY IDENTITY ,FirstName varchar(100) NOT NULL ,Age tinyint ,Type char(1) NULL ,DtInsert datetime ,Code bigint ,LastName varchar(100) NULL ) -- Generate 10k test rows INSERT INTO dbo.Customer SELECT TOP 10000 FirstName = CHOOSE(T.N,'Rodrigo','Natalia','Miguel','Clarice', 'Laerte','Louis','Fabricio') ,Age = T.R%60 + 1 ,Type = CHOOSE(T.N2,'A','B',NULL) ,DtInsert = DATEFROMPARTS( ((T.N*100)%29) + 1992, ((T.N*100)%12) + 1 ,((T.N*100)%27) + 1) ,Code = T.R ,LastName = CHOOSE(T.N2,'Silva','Gates','Gomes','Junior') FROM sys.all_objects O1 CROSS JOIN sys.all_objects O2 CROSS APPLY ( SELECT N = R.R%7 + 1 ,N2 = R.R2%4 + 1 ,R.* FROM ( SELECT R = CONVERT(int,ABS(CHECKSUM(O1.object_id,O2.object_id,rand()*2000))) ,R2 = CONVERT(int,ABS(CHECKSUM(O1.object_id,O2.object_id,rand()*1000))) ) R ) T -- "Lost" te full backup! BACKUP DATABASE SimpleTalk TO DISK = 'nul'; -- "Lost" some log backup! BACKUP LOG SimpleTalk TO DISK = 'nul'; |
The script will:
- Create an ample database structure
- Insert 10,000 rows
- Perform a full backup
- Execute a log backup
As a scenario, suppose it’s 16:25 and someone issues a command that deletes the data in your Customer table . Also, imagine your backup job included a normal log backup and you have access to that file:
|
1 2 3 4 5 6 7 8 9 10 11 12 13 14 15 16 17 18 19 |
USE SimpleTalk GO -- This is just for we compare restored rows and see is same! -- Of course, in real case, i dont have that. Using tempdb to hold -- this copy, so it will not be there after a restart. Use a different -- database if needed. drop table if exists tempdb.dbo.CustomerBak; select * into tempdb.dbo.CustomerBak from dbo.Customer -- Simulate wrong deletion of records! DELETE FROM dbo.Customer; -- Simulate next log backup, after dele! -- Chose a existing path that sql instance have access! -- You will reference that path after! BACKUP LOG SimpleTalk TO DISK = ‘T\Log16h30.trn’ WITH FORMAT,INIT,COMPRESSION; --Note: Compression is not allowed on Express Edition |
This was very close to a real case I encountered. The main difference was that many hours had passed, so numerous backups existed post-deletion. I asked the team for the approximate time of occurrence and isolated all log backups from that period.
In our case, we need the backup file located at T:\Backup16h30.trn.
Read also: SQL Server database growth and autogrowth
Fast, reliable and consistent SQL Server development…
The Value of the Logs
Rodrigo, why do we need that log backup? SQL Server logs every change made to the database. When you insert, delete, or update rows, it records those operations in the transaction log (t-log) in a specific binary format. This is necessary for rollback purposes, allowing the system to undo changes and restore the previous state if something fails. When the database is in FULL recovery mode, all logged data is copied to log backups, which enables you to rebuild the database state precisely at a specific point in time since the logs contain all registered changes.
Understanding this, I know that the deleted data is within the .trn file because it was the first log backup after the deletion occurred. When the deletion happened at 16:25, the data was logged to the .ldf file. Then, at 16:30, when the log backup statement ran, it copied that data from the .ldf to the .trn file and cleared the .ldf file (although the actual procedure is more complex than described here, for the sake of this post, imagine it as simplified).
Therefore, what we require now is the log backup containing those rows. If your database operates under simple recovery mode, then nothing can be done, as once you complete a transaction (commit or rollback), the logged data is replaced without being copied to log backups (under simple recovery, SQL Server assumes log backups are not needed and does not allow you to run backup log statements). However, if you act quickly, there may still be a way to retrieve the logged data before it is replaced. This could be discussed in a future post. For now, let’s focus on this simple, easy and more realistic case.
Note: The example works because this is a fully logged operation. It would not work if a TRUNCATE TABLE statement was executed.
We have the Log Backup File, now what?
Should I open it in a text editor to get the data?
The t-log backup file is a binary file that does not store logged data as plain ASCII characters viewable in a text editor. Instead, it employs a more efficient binary format. This format is not fully documented publicly by Microsoft.
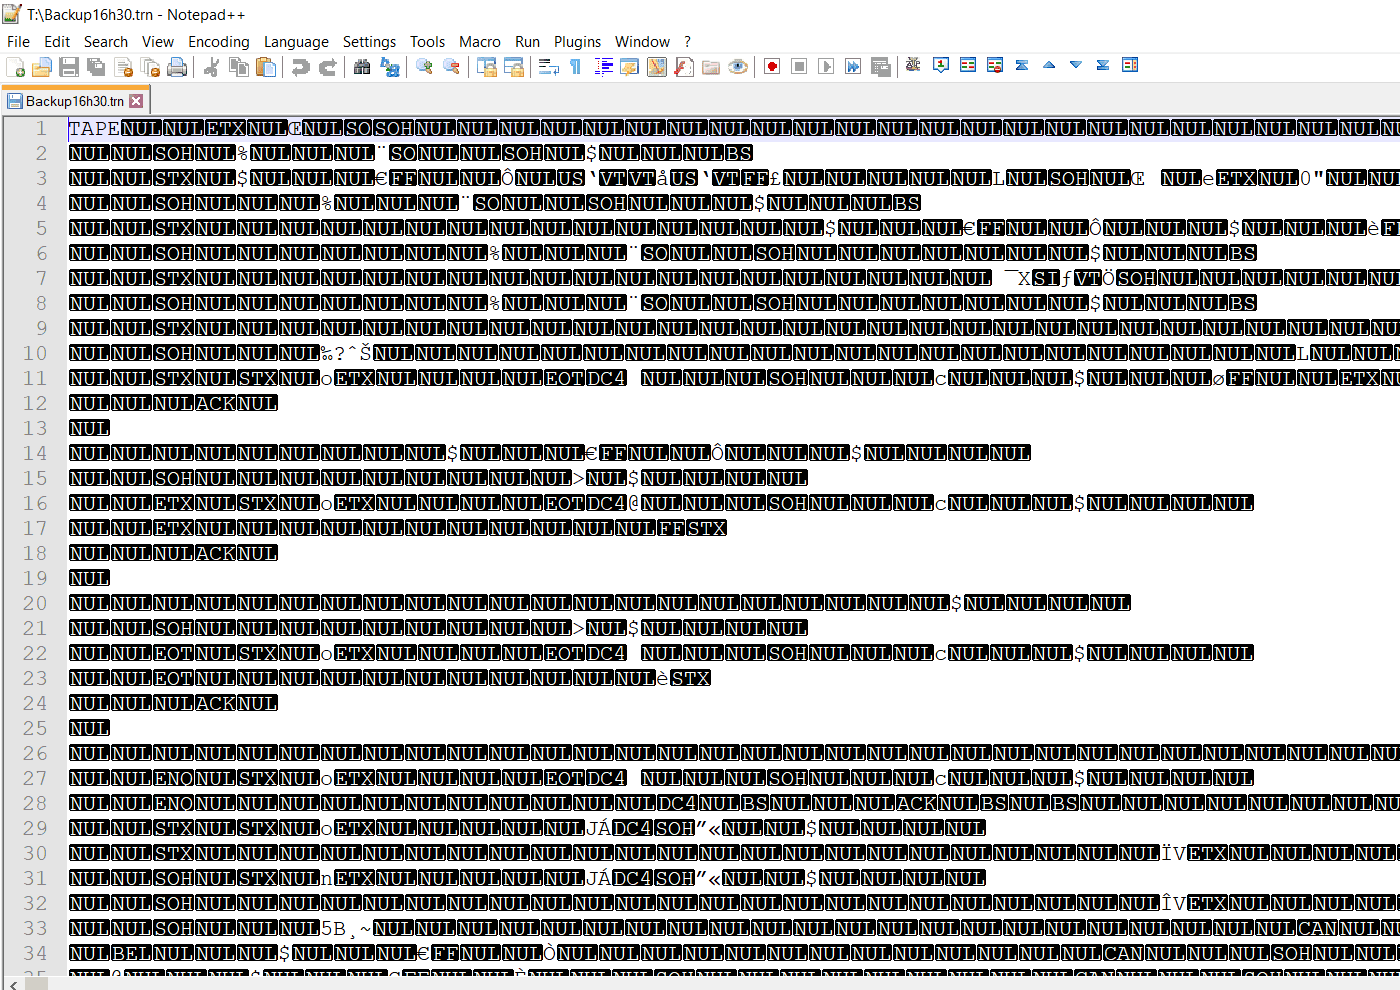
However, we possess a valuable tool: fn_dump_dblog. This undocumented function enables you to read the transaction log backups. With it, one can execute SELECT statements within the structure of the transaction log. The first instance of encountering this was in this post by Paul Randal.
Basically, this is a table-valued function where you pass the path to your log backup, and it returns one row for each log record. When SQL Server writes to the log, it documents the changes in a structure called Log Records.
There is another function that performs a similar task: fn_dblog. However, that function reads the current transaction log.
Important: It is not recommended to run either fn_dump_dblog or fn_dplog on a production instance, as they are not supported by Microsoft. Therefore, any issues arising from their use will not be covered by support. Good practice is to run these functions on a test instance. In the case of fn_dump_dblog, simply copy the backup file to the target machine where your test instance resides.
Here is how to use fn_dump_dblog with a .trn file. I will use a literal for the backup location, to keep the examples simple:
|
1 2 3 4 5 6 7 8 9 10 11 12 13 14 15 16 17 |
--> Note that you don;t need use original db to run fn_dump_dblog! -- Can be any db! just need point to correct file SELECT * FROM fn_dump_dblog ( NULL, NULL, N'DISK', 1, N'T:\Log16h30.trn', DEFAULT, DEFAULT, DEFAULT, DEFAULT, DEFAULT, DEFAULT, DEFAULT, DEFAULT, DEFAULT, DEFAULT, DEFAULT, DEFAULT, DEFAULT, DEFAULT, DEFAULT, DEFAULT, DEFAULT, DEFAULT, DEFAULT, DEFAULT, DEFAULT, DEFAULT, DEFAULT, DEFAULT, DEFAULT, DEFAULT, DEFAULT, DEFAULT, DEFAULT, DEFAULT, DEFAULT, DEFAULT, DEFAULT, DEFAULT, DEFAULT, DEFAULT, DEFAULT, DEFAULT, DEFAULT, DEFAULT, DEFAULT, DEFAULT, DEFAULT, DEFAULT, DEFAULT, DEFAULT, DEFAULT, DEFAULT, DEFAULT, DEFAULT, DEFAULT, DEFAULT, DEFAULT, DEFAULT, DEFAULT, DEFAULT, DEFAULT, DEFAULT, DEFAULT, DEFAULT, DEFAULT, DEFAULT, DEFAULT); |
You just need to replace that path to path where you put the trn file.
What are the parameters of the function?
- The first two parameters are Start and End LSN; use null to avoid filtering specific LSN.
**LSN (Log Sequence Number) is a unique sequential number assigned to each log record by SQL engine. - The third parameter is the media type (e.g., TAPE, DISK).
- The fourth parameter is the file number within the backup (similar to the FILE parameter in the RESTORE statement).
- The remaining parameters are the files that make up the backup. You can split a backup into up to 64 parts, specifying each in the remaining parameters. For a single
.trnfile backup, specify this file, and set the rest to default or null. Note that SQL Server requires all parameters to be passed to functions, unlike procedures where you can omit some parameters.
Read also:
SQL Server 2025 Zstandard backup compression
SQL Server triggers for audit logging
Finding your deleted data
We can now read the binary file containing log records. To identify the records that represent deleted rows, we need to focus on specific columns from the output of fn_dump_dblog. The relevant subset includes:
- Current LSN: This is the Log Sequence Number of each record, providing a unique identifier for each log entry. Although not necessary for this recovery case, it is good know it and its purpose.
- Operation: This indicates the logged operation, typically starting with
LOPfollowed by a descriptor, which likely stands for “Log Operation” (an educated guess). For our purposes, we are interested in the valueLOP_DELETE_ROWS, identified through experience and observation. - Context: This provides more details about the operation, such as the affected structure. For example,
LOP_DELETE_ROWSmay showLCX_MARK_AS_GHOST, indicating that the row was marked as a ghost record rather than being physically deleted, orLCX_CLUSTERED, indicating deletion from a clustered index, orLCX_HEAP, for when table has no cluster index. It is useful to apply some filtering here to remove other log records that may be logged but are not related to the deleted row. Again, I guess thatLCXstands for “Log ConteXt”. - AllocUnitId: Each table contains allocation units, where pages are stored, and each allocation unit has a unique ID. To find the allocation unit ID for a table, use the following query:
|
1 2 3 4 5 |
SELECT AU.allocation_unit_id FROM sys.partitions P JOIN sys.allocation_units AU ON AU.container_id = P.hobt_id WHERE P.object_id = OBJECT_ID('dbo.Customer') AND P.index_id <= 1 |
- Row Log Contents 0: This field contains the binary of the row’s content, representing the column values. In SQL, binary data appears as hexadecimal, starting with `0x`. Each pair of hex digits represents one byte. For instance, `0xFF` is the byte `FF` (255), and `0x01FF` comprises bytes `01` and `FF`.
We have identified the main columns needed to recover our 10,000 deleted rows. Let’s query that data from the log and store it in a table to avoid repeatedly querying the log. Depending on server CPU and disk speed, this can take some time (as it involves reading, parsing, and filtering all log records). In my tests, the script runs in less than 30 seconds.
|
1 2 3 4 5 6 7 8 9 10 11 12 13 14 15 16 17 18 19 20 21 22 23 24 25 26 27 28 29 30 31 32 33 34 35 36 37 38 39 40 |
USE SimpleTalk --> Now, we need run that script under original database, due to the allocation unit subquery! GO DROP TABLE IF EXISTS dbo.LogDeletes SELECT Lsn = [Current LSN] ,Operation ,Context ,AllocUnitId ,RowContent = [RowLog Contents 0] INTO LogDeletes FROM fn_dump_dblog ( NULL, NULL, N'DISK', 1, N'T:\Log16h30.trn', DEFAULT, DEFAULT, DEFAULT, DEFAULT, DEFAULT, DEFAULT, DEFAULT, DEFAULT, DEFAULT, DEFAULT, DEFAULT, DEFAULT, DEFAULT, DEFAULT, DEFAULT, DEFAULT, DEFAULT, DEFAULT, DEFAULT, DEFAULT, DEFAULT, DEFAULT, DEFAULT, DEFAULT, DEFAULT, DEFAULT, DEFAULT, DEFAULT, DEFAULT, DEFAULT, DEFAULT, DEFAULT, DEFAULT, DEFAULT, DEFAULT, DEFAULT, DEFAULT, DEFAULT, DEFAULT, DEFAULT, DEFAULT, DEFAULT, DEFAULT, DEFAULT, DEFAULT, DEFAULT, DEFAULT, DEFAULT, DEFAULT, DEFAULT, DEFAULT, DEFAULT, DEFAULT, DEFAULT, DEFAULT, DEFAULT, DEFAULT, DEFAULT, DEFAULT, DEFAULT, DEFAULT, DEFAULT, DEFAULT) T WHERE AllocUnitId IN ( SELECT AU.allocation_unit_id FROM sys.partitions P JOIN sys.allocation_units AU ON AU.container_id = P.hobt_id WHERE P.object_id = OBJECT_ID('dbo.Customer') AND P.index_id <= 1 ) AND Operation = 'LOP_DELETE_ROWS' AND Context IN ('LCX_CLUSTERED','LCX_MARK_AS_GHOST','LCX_HEAP') |
Please note that this query returns exactly 10,000 rows. Is it a coincidence? No! Thanks to our precise filtering, we identified the exact log records that SQL Server logged for each deleted row. But in my case, I was lucky — the only delete operations during that period were the incorrect ones. You might face a situation where normal application deletes also occurred. If that’s your case, you’ll need to analyze the data and discuss with the business or developers to define the criteria you’ll use to identify normal deletes from the application. In addition to checking the data, you can also use other columns from fn_dump_dblog, such as [Transaction SID], which is the login SID and can help filter deleted rows by user.
However, if the same user was used by both the app and the mistaken delete, that won’t help much. So, each case will need to be evaluated individually. Just keep in mind that with this query, you’re recovering all deletes made during that backup time window.. We will look at the output in coming sections.
Without the full backup, we successfully located our rows using only the log backup. Our next objective is to convert the binary data we recovered into its original data types.
Converting Binary Data
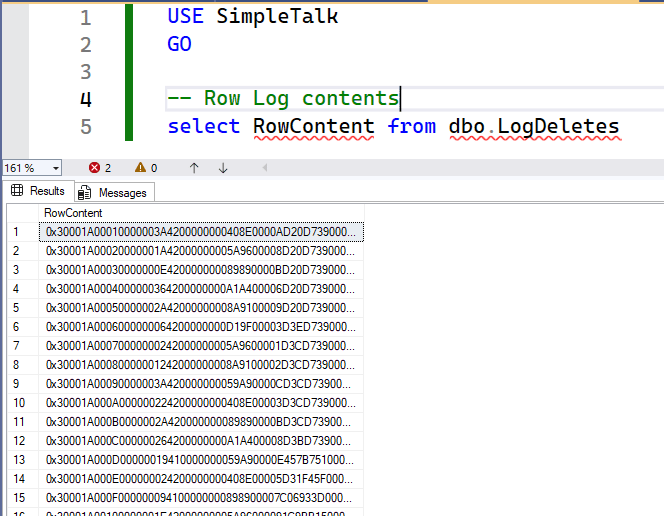
In the LogDeletes table, there is a column called RowContent. This data originates from the log, specifically [Row Logs Contents 0], which contains the content of the deleted row.
One important aspect to remember is that the data is uncompressed. This is crucial because if rows are compressed, the binary format changes. For this post, we will assume the row format is uncompressed. And I’m referring to table compression options (ROW or PAGE compression). It is important note that I never tested that with columnstore, so this steps would be unlikely to work with storage other than uncompressed rowstore format.
I also never tested with compressed format, but I guess that works because in ROW or PAGE compression, the rows change a bit, but values (or some of them) are there in binary format. With this understanding, we can also work with compressed rows, and a future post will provide more details on that. All the cases I have encountered used uncompressed rows, although dealing with environments with compressed rows is also quite common.
|
1 2 3 4 5 |
USE SimpleTalk; GO SELECT RowContent FROM dbo.LogDeletes; |
This will return something similar to the following results:
All column values are present. Now, we need to apply SQL Server internals to revert the data.
First, we need the table structure, including data types and order. This metadata gives meaning to the raw binary value, allowing us to break it down into columns.
We can use sp_help to query the structure:
|
1 2 |
EXECUTE SimpleTalk..sp_help 'Customer'; GO |
This will return the structure:

The most important information we need is highlighted in red within the image. Essentially, it includes:
- Column name
- Data type (and length)
- Whether it is nullable
Although collation is significant, I will omit it for simplicity since it is typically the same as the collation of the database. If you are using different collations, you can easily add them into your solution. The collation setting helps in correctly converting binary data back to string using proper encoding if non-Unicode data types are involved (due to code pages, etc.). Since we will convert back using the same default collation of the database, it can safely be omitted. However, please note its importance. If you would like more details on this, leave comments, and I can prepare a post specifically discussing recovery with different collations.
It is very important that you can recover the structure information that matches the moment the delete occurred. If any changes occurred in the structure between the time of the deletion and the time you are querying it, this could produce incorrect results. So, in this sample scenario (and in my real case), we have access to the original database where the table is stored, and the structure was not changed after the delete. So, it is okay to query using sp_help.
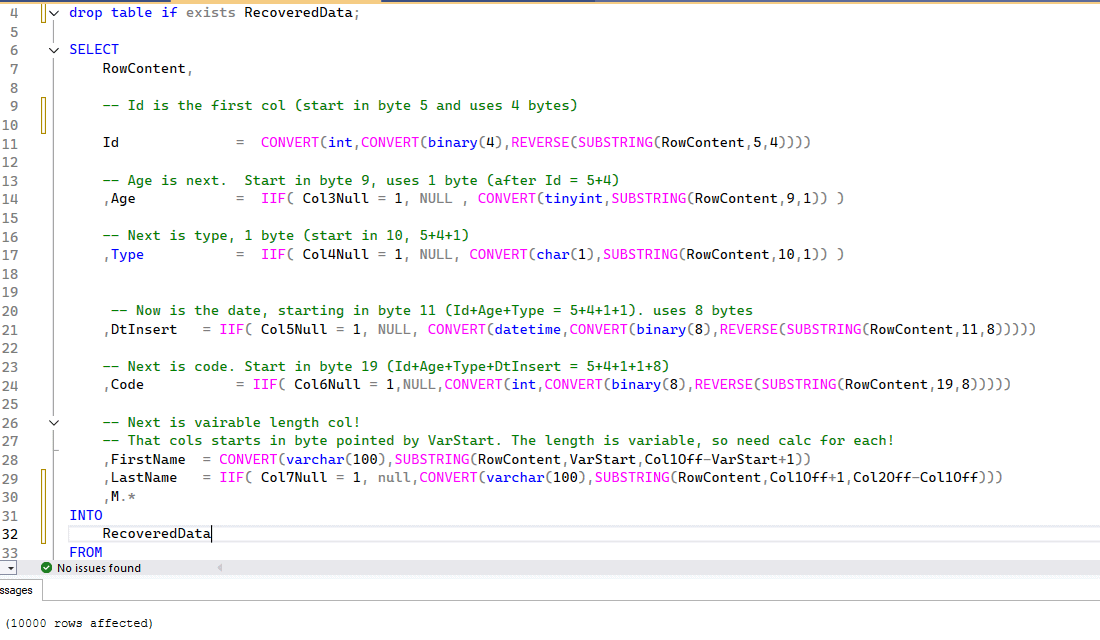
Now, knowing how SQL Server stores and formats row data, we can convert that binary value back to the original data. This query does that:
|
1 2 3 4 5 6 7 8 9 10 11 12 13 14 15 16 17 18 19 20 21 22 23 24 25 26 27 28 29 30 31 32 33 34 35 36 37 38 39 40 41 42 43 44 45 46 47 48 49 50 51 52 53 54 55 56 57 58 59 60 61 62 63 64 65 66 67 68 69 70 71 72 73 |
USE SimpleTalk GO SELECT RowContent, -- Id is the first col (start in byte 5 and uses 4 bytes) Id = CONVERT(int,CONVERT(binary(4),REVERSE(SUBSTRING(RowContent,5,4)))) -- Age is next. Start in byte 9, uses 1 byte (after Id = 5+4) ,Age = IIF( Col3Null = 1, NULL , CONVERT(tinyint,SUBSTRING(RowContent,9,1)) ) -- Next is type, 1 byte (start in 10, 5+4+1) ,Type = IIF( Col4Null = 1, NULL, CONVERT(char(1),SUBSTRING(RowContent,10,1)) ) -- Now is the date, starting in byte 11 (Id+Age+Type = 5+4+1+1). uses 8 bytes ,DtInsert = IIF( Col5Null = 1, NULL, CONVERT(datetime,CONVERT(binary(8),REVERSE(SUBSTRING(RowContent,11,8))))) -- Next is code. Start in byte 19 (Id+Age+Type+DtInsert = 5+4+1+1+8) ,Code = IIF( Col6Null = 1,NULL,CONVERT(int,CONVERT(binary(8),REVERSE(SUBSTRING(RowContent,19,8))))) -- Next is vairable length col! -- That cols starts in byte pointed by VarStart. The length is variable, so need calc for each! ,FirstName = CONVERT(varchar(100),SUBSTRING(RowContent,VarStart,Col1Off-VarStart+1)) ,LastName = IIF( Col7Null = 1, null,CONVERT(varchar(100),SUBSTRING(RowContent,Col1Off+1,Col2Off-Col1Off))) --,M.* --add back to see all the details FROM LogDeletes CROSS APPLY ( SELECT M. * ,NV.* , NullBmp = SUBSTRING(RowContent,NullBmpBytesStart,NullBmpBytes) ,VarCount = CONVERT(binary(2),REVERSE(SUBSTRING(RowContent,VarCountStart,2))) -- Total Variable length slots ,VarOffsetStart = VarCountStart+2 FROM ( --> Calculate null bitmap col count offset SELECT B.* ,NullCount = CONVERT(smallint,CONVERT(binary(2),REVERSE(SUBSTRING(RowContent,NullBmpStart,2)))) ,NullBmpBytesStart = NullBmpStart+2 FROM ( --> Base data to find null bmp SELECT NullBmpStart = CONVERT(smallint,CONVERT(varbinary(2),REVERSE(SUBSTRING(RowContent,3,2))))+1 ) B ) M CROSS APPLY ( --> Calculate null bmp starts SELECT N1.* ,VarCountStart = NullBmpBytesStart+NullBmpBytes --> Varcount starts after null bitmap! FROM ( SELECT -- Total bytes used in NULL bitmap NullBmpBytes = CONVERT(int,CEILING(M.NullCount/8.0) * 8)/8 ) N1 ) NV ) M CROSS APPLY ( SELECT Col1Null = IIF(power(2,1-1) & NullBmp > 0,1,0) ,Col2Null = IIF(power(2,2-1) & NullBmp > 0,1,0) ,Col3Null = IIF(power(2,3-1) & NullBmp > 0,1,0) ,Col4Null = IIF(power(2,4-1) & NullBmp > 0,1,0) ,Col5Null = IIF(power(2,5-1) & NullBmp > 0,1,0) ,Col6Null = IIF(power(2,6-1) & NullBmp > 0,1,0) ,Col7Null = IIF(power(2,7-1) & NullBmp > 0,1,0) ) N CROSS APPLY ( SELECT VarStart = VarOffsetStart+VarCount*2 -- variable data start after var offset (two bytes per var col)5 ,Col1Off = CONVERT(smallint,CONVERT(binary(2),REVERSE(SUBSTRING(RowContent,VarOffsetStart,2)))) ,Col2Off = CONVERT(smallint,CONVERT(binary(2),REVERSE(SUBSTRING(RowContent,VarOffsetStart+2,2)))) ) V |
The output of the query will look similar to this:
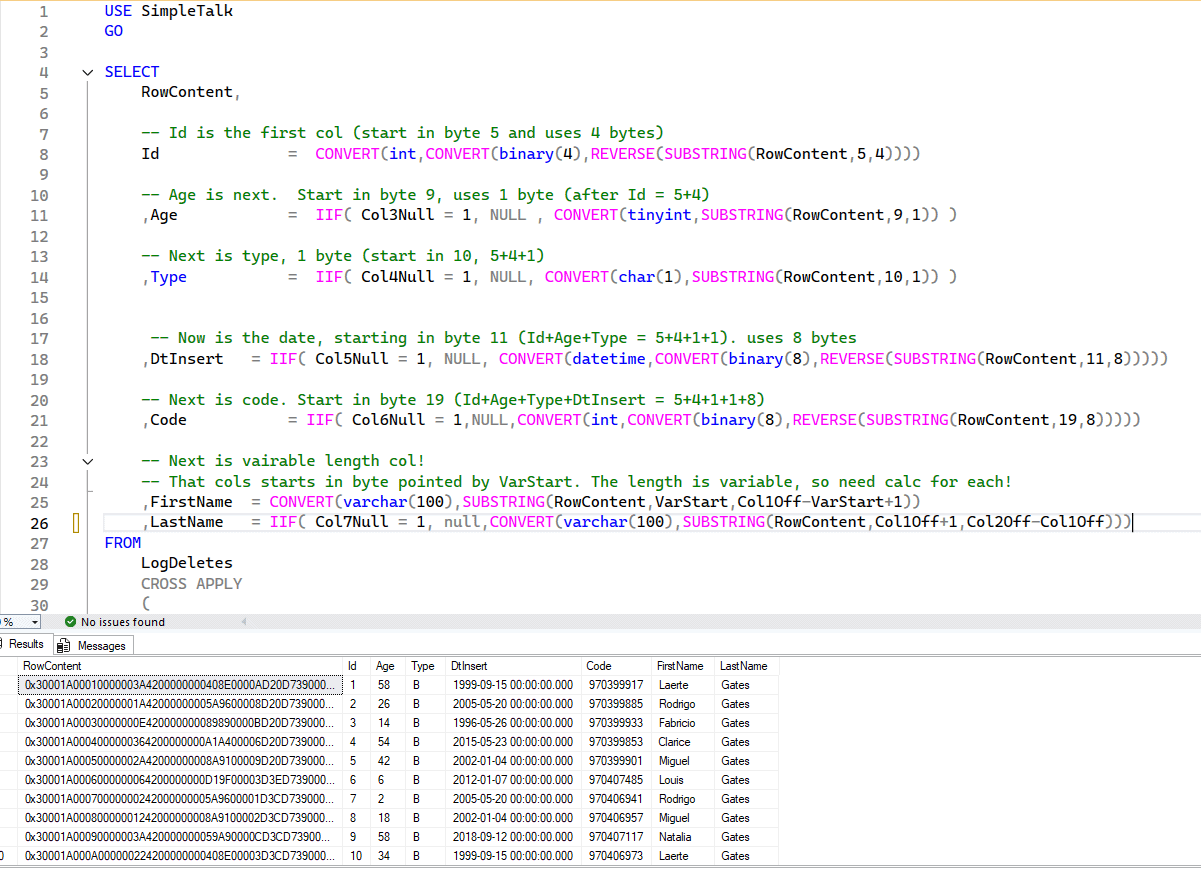
To understand that query, let’s do a simple review of the structure of an uncompressed row in SQL Server (remember that this post focuses on uncompressed rows). I will use a real binary value from my test data, but it may not be the same for you if you generated it using my sample script above.
Don’t worry about that—just stay focused on the specific byte positions:
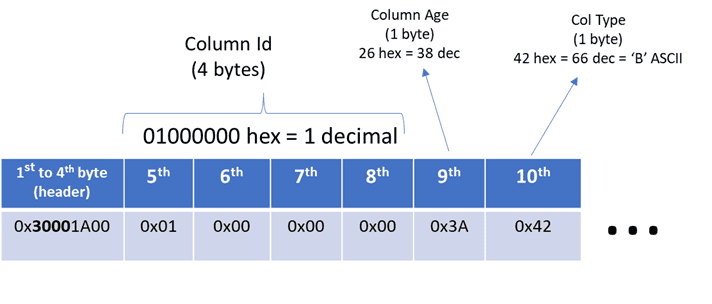
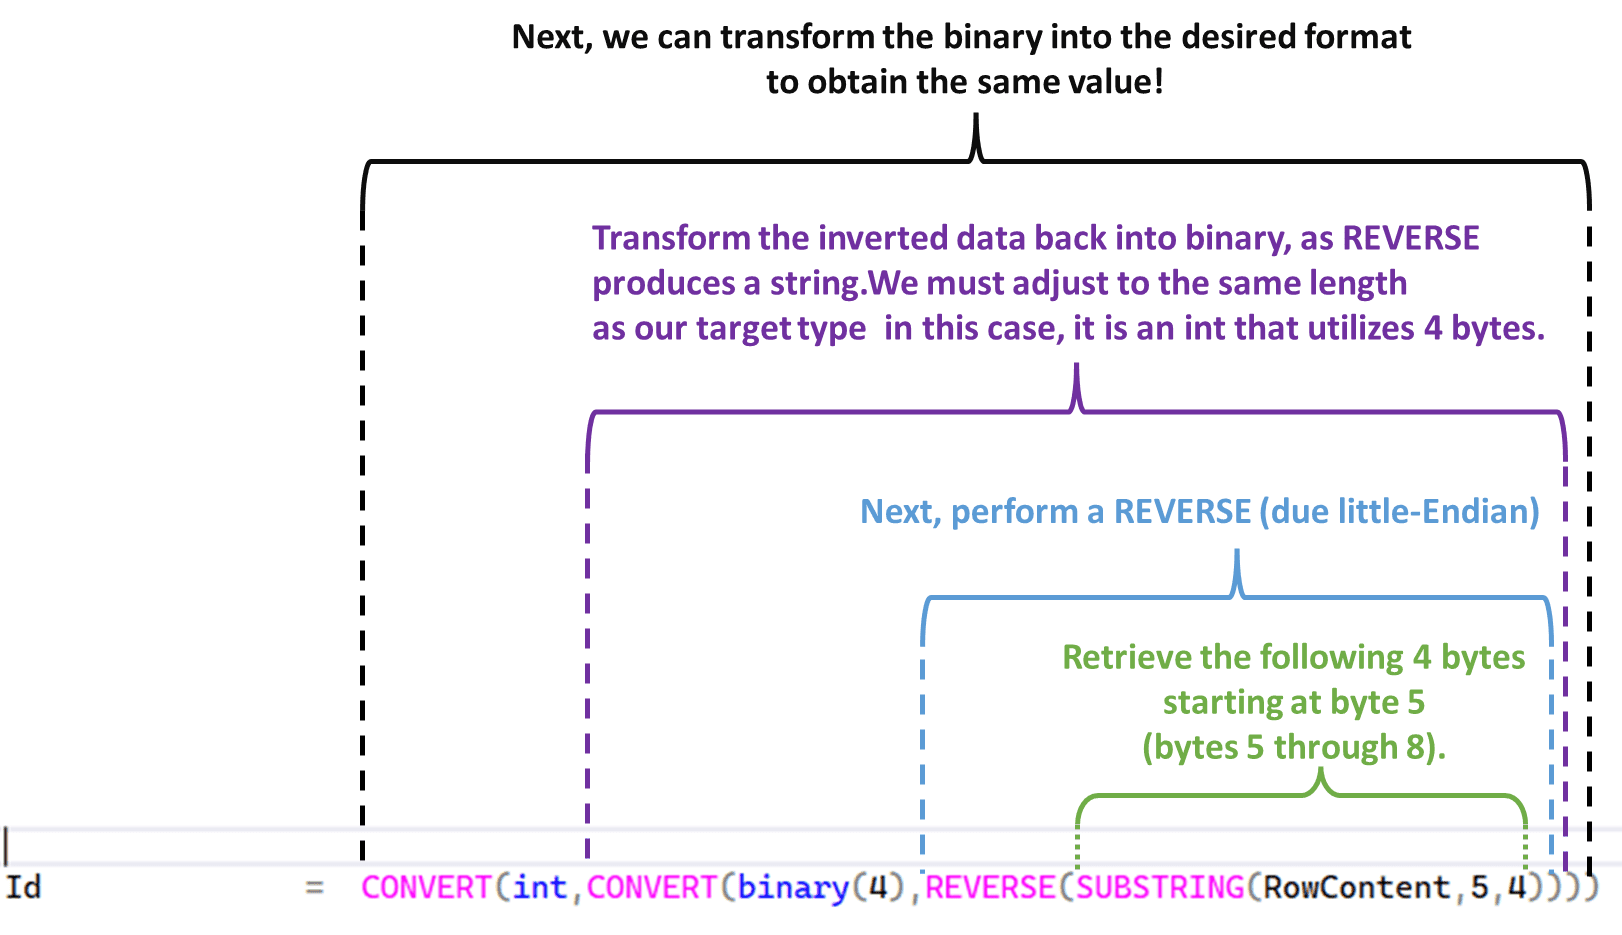
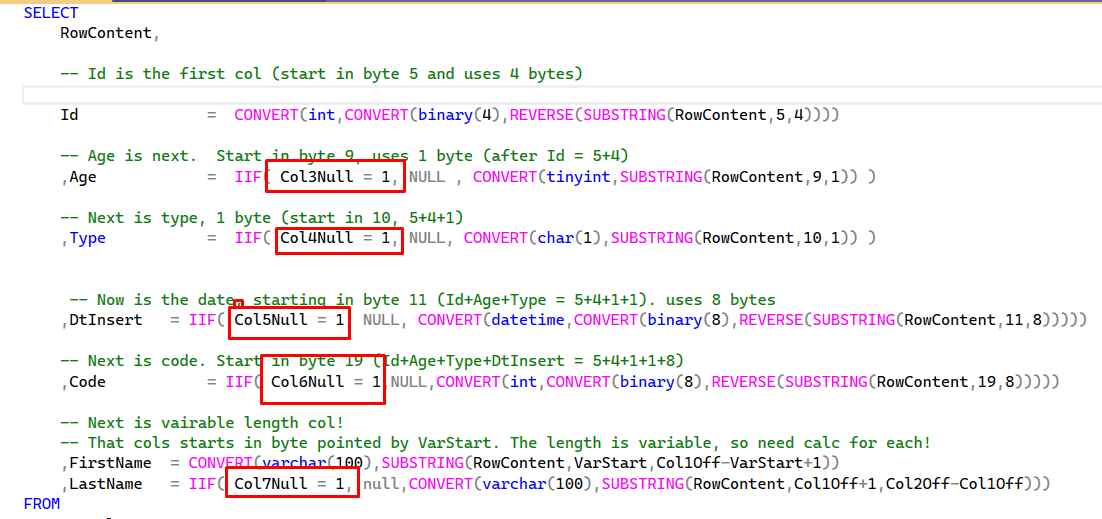
We need some way to extract bytes from that binary value. We can use the SUBSTRING function to do that. The built-in SUBSTRING function allows us to extract a byte sequence from another byte sequence (not just from strings). For example, for the id column, which is an INT data type (and thus requires 4 bytes), we will find it at bytes 5, 6, 7, and 8. The next column, age, uses only 1 byte, and so on.
Enjoying this article? Subscribe to the Simple Talk newsletter
Explaining from the innermost to the outermost function
This is all achieved using using T-SQL code.
It starts with usingSUBSTRING is first used to extract the bytes related to our desired column.
Data is stored in binary format, which can be tricky
Then, we use the REVERSE function to reverse the bytes. This is necessary because, in x86/x64 architectures, bytes are stored in reverse order, known as little-endian. For example, the bytes for an INT value of 1 are 00 00 00 01, but they are stored as 01 00 00 00. So, we need to reverse them to get the correct value. But for some types, reversing is not needed because SQL stores them as arrays of numbers in the correct order.
Other types, like int and datetime, which are single values made up of multiple bytes, are stored in reverse because they are manipulated as a single unit by the processor, which follows the architecture’s endianness. For Unicode types, each character consists of two bytes, and SQL stores each byte in reverse order. However, for types like varchar, you don’t need to reverse individual bytes, because the conversion to nvarchar already handles that for you. Anyway, this is very internal to SQL, and I didn’t find any official doc that explains that, so in some cases, you will need to investigate data type storage by looking at some samples.
The result of REVERSE is a string.
So, even though we reversed a binary, it becomes a string. Then we need to convert it back to binary. Here, we convert it to BINARY(4), the same size as our target column type.
Convert the data
And finally, we convert the binary value to the target type. If the previous steps were done correctly, we will see the expected value!
But things get a bit more interesting. The id column is NOT NULL, so we don’t need to worry about NULL values in this case. However, we do need to take this into consideration because other columns do allow NULL values and might contain them. So, we need to check for that.
Recovering NULL values
Sql Server represents NULL values using a bitmap, that is, there is a reserved area inside that row binary to map which column value is NULL. It is a bitmap, where each bit represents one column. If 1, the value is null; if not null, then it is 0.
The size of the null bitmap is variable and depends on the total number of columns. 1 byte, which is made of 8 bits, can map 8 columns. So, if you have up to 8 columns, the null bitmap is 1 byte. If you have 9 columns, then the null bitmap will be 2 bytes (but only the first 9 bits will be used). If you have 16 columns, then it is still 2 bytes. 17 columns require 3 bytes, and so on.
The null bitmap is found after the fixed columns list. Actually, there is a pointer in the row header (the first 4 bytes) that points to the end of the fixed column list. So, using it, we find the null bitmap column count, which is a 2-byte value representing the total number of columns in the null bitmap. After that, we have the null bitmap itself.
We must use that column count to calculate the total bytes used by the null bitmap!
The image below is a diagram from a real row from my sample data. Read from left to right, starting with the first column:
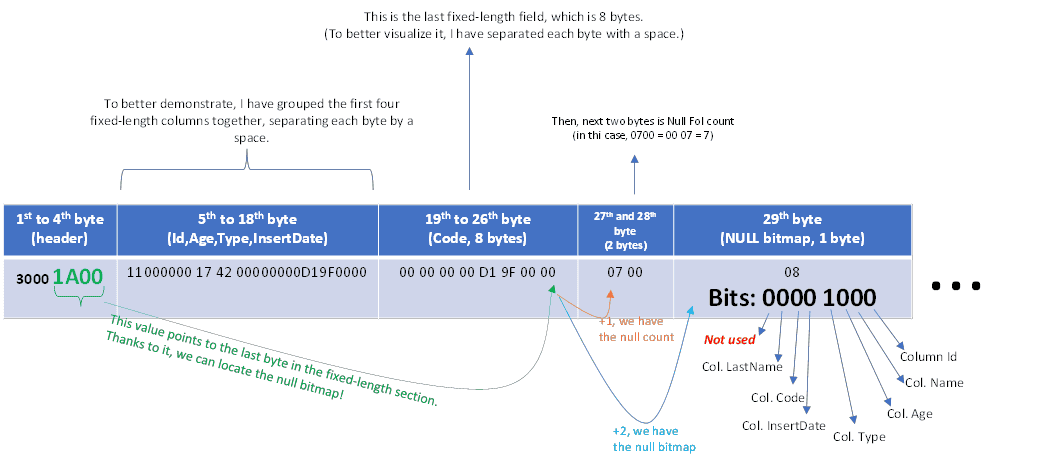
Note how, starting from the row header, which is fixed, we can go to the null column count, which is 2 bytes, and after that, the null bitmap.
Each bit of the null bitmap maps a column in the respective physical order. The least significant bit, that is, bit 0 (from right to left), maps to col Id (because it is not null, it is always 0). The next bit corresponds to the name column, then age, type, and so on…
The last bit, bit 8, is not used because we have only 7 columns. However, because the null bitmap allocation is a multiple of bytes, we may have unused bits. If a column were added to that table, no additional data would be needed, because we already have that unused bit. But if the total columns were 9, then 16 bits (2 bytes) would be allocated, with 9 bits in use and 7 unused.
Now that we have the null bitmap, we can use bitwise operations to get the respective value of each column:
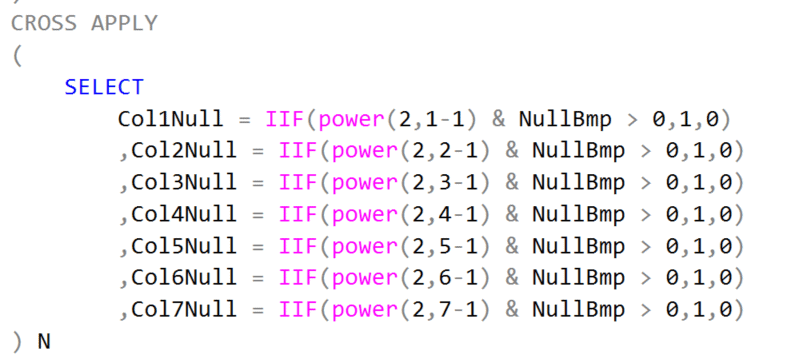
With a little math, we can test if a specific bit is 1 or 0. In the example above, I just used a technique with POWER to generate a bit with 1 at a specific bit position (controlled by the second argument) and performed a logical AND with the null bitmap. If the result is greater than zero, it means that the bit is activated, and in this case, the respective column is NULL. If using SQL Server 2022, you can use the GET_BIT function, and the code becomes much simpler.
Back to our column recovery, if the respective bit is 1, then the column is nullable, and I don’t need to extract data from that specific row.
So, we now have the fixed-length columns and know which columns had NULL values. But we still need the variable-length columns.
Recovering Variable Length data
Variable-length data is a bit more complex, but if you understand NULL, I guess variable-length data is easier to grasp.
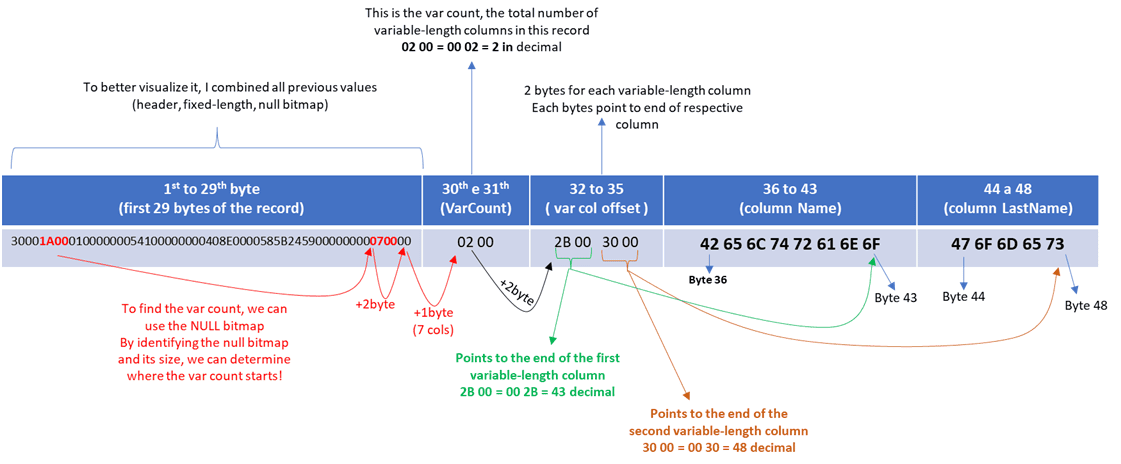
After the null bitmap, we have a value called Variable Column Count. This is a 2-byte value indicating the total number of variable-length columns. After those bytes, we have the variable offset array. This contains two bytes for each variable-length column, indicating where that column ends. Thanks to this, we can find the next columns.
The image above is a summary for you to see how and where the variable-length column is found.
Note that from the null bitmap pointers, we can find the first data we need for variable-length columns: the var count. This, like the null count, indicates how many columns are present, and thanks to it, we can calculate the column offsets.
Using that value, we know the size of the next slot, which is the variable-length offset array: a two-byte value for each column indicating where the column ends.
Knowing where a column ends allows us to extract the complete value from the column and find the start of the next column—except for the first column, where we use the end offset to determine where it starts. So, there are some subqueries in our recovery query just to calculate those offsets using this known position in the row, just like we did with NULL.
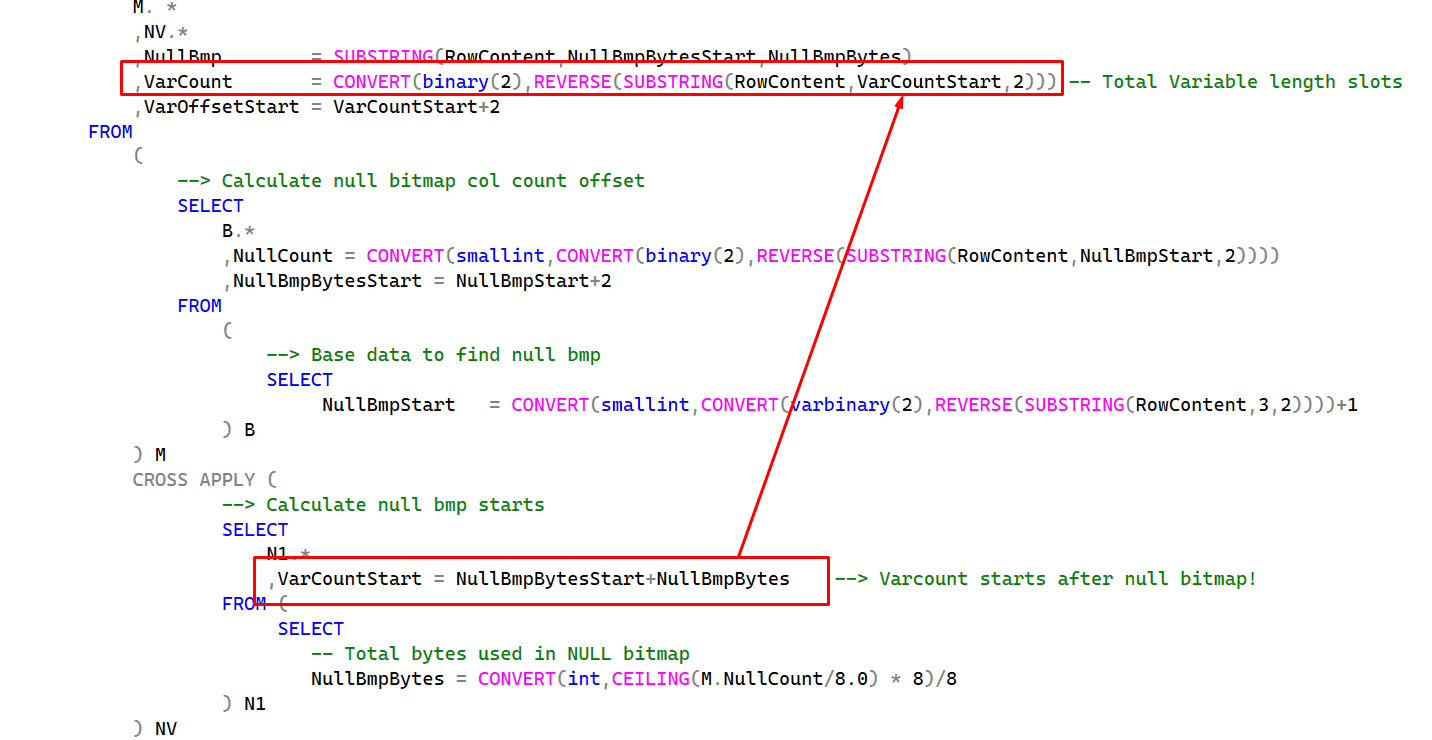
Var count starts right after the null bitmap. So, we have calculated the null bitmap and its size. Just summing it gives us the first byte of the variable column count. Then, from that offset, we just get 2 bytes, and we have the variable column count.
Now, it’s easy—calculate the offset of each column:

The offset is right after the variable column count. Because there are 2 bytes for each column, we just need to multiply the variable count by 2, and we have the total length of the variable offset. After that, we reach the first byte of the first variable-length column.
Then, we get the offset of each column (using the calculations) and can now use that offset to retrieve the data.

The first column starts at the same place as the variable-length column. The second column starts in the next byte after the previous column.
Also, note that in the FirstName column, we don’t check for NULL. This is simple: I know that the column is not nullable, so I don’t need to check it.
Using the offsets, we can calculate both the start of the next column and the total size used by the variable-length column.
Note that, like with the Id column, we don’t check if FirstName is NULL because I know, by looking at the schema, that it is not nullable, so we don’t need to do that.
Now that we have found all columns, we just need to insert the data back into some table to check it. After checking, we can plan to copy it back to the original table.
Remember, we made a backup in the first steps just to verify that this process recovered the same data?
To compare, let’s do a simple thing: read all data, order it by Id, and transform it into XML. Then, we generate a checksum of this and compare. If the data is the same, the checksum must be equal.
|
1 2 3 4 5 6 7 8 9 10 11 12 13 14 15 |
--From the data we saved SELECT RecoveredChecksum = CHECKSUM( (SELECT Id, FirstName, Age, Type, DtInsert, Code, LastName FROM SimpleTalk.dbo.RecoveredData ORDER BY Id FOR XML PATH) ); --From the test data we saved off earlier SELECT BackpChecksum = CHECKSUM( (SELECT Id, FirstName, Age, Type, DtInsert, Code, LastName FROM tempdb.dbo.CustomerBak ORDER BY Id FOR XML PATH) ); |
You should see matching values in the output:
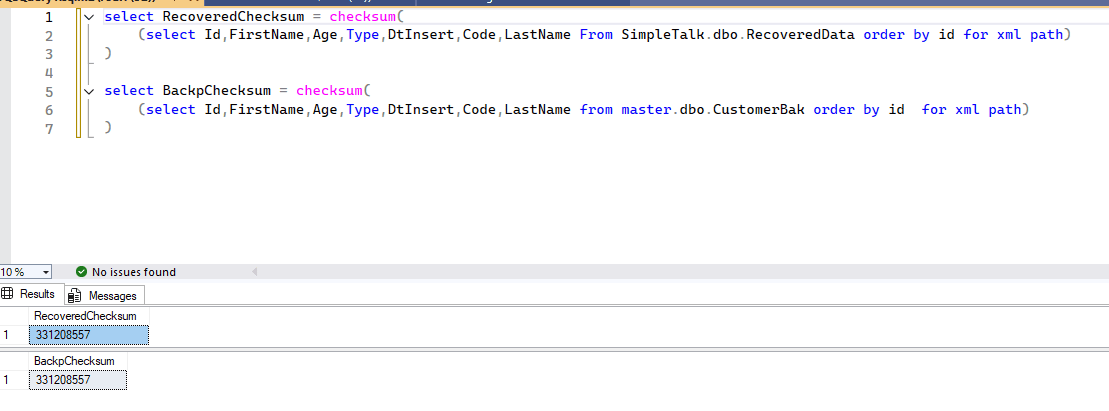
COOL! The data is the same! So, this proves that the process recovered the entire data.
Note that in this part, the columns are hardcoded. But we can automate this using a dynamic query, for example.
Automatized way to do all this
All this post guided you step by step and explained why. So, if you need to do something with different scenarios, types, or schemas, you understand the logic behind it. But a lot of work was hardcoded (like columns), and it would be cool if there was something that could do this when we just pass the schema of the table… And there is!
I created that cool script, just pass the original table and the table where your logged log binary, and it will do all that tasks that your learn:
|
1 2 3 4 5 6 7 8 9 10 11 12 13 14 15 16 17 18 19 20 21 22 23 24 25 26 27 28 29 30 31 32 33 34 35 36 37 38 39 40 41 42 43 44 45 46 47 48 49 50 51 52 53 54 55 56 57 58 59 60 61 62 63 64 65 66 67 68 69 70 71 72 73 74 75 76 77 78 79 80 81 82 83 84 85 86 87 88 89 90 91 92 93 94 95 96 97 98 99 100 101 102 103 104 105 106 107 108 109 110 111 112 113 114 115 116 117 118 119 120 121 122 123 124 125 126 127 128 129 130 131 132 133 134 135 136 137 138 139 140 141 142 143 144 145 146 147 148 149 150 151 152 153 154 155 156 157 158 159 160 161 162 163 164 165 166 167 168 169 170 171 172 173 174 175 176 177 178 179 180 181 182 183 184 185 186 187 188 189 190 191 192 193 194 195 196 197 198 199 200 201 202 203 204 205 |
USE SimpleTalk go --Note: Use this script at your own risk. It is supplied for educational --purposes only and may not cover every possible case. DECLARE @SourceTable SYSNAME = 'Customer', @TlogTable SYSNAME = 'LogDeletes' IF EXISTS(SELECT * FROM sys.partitions P WHERE object_id = Object_id(@SourceTable) AND P.data_compression_desc != 'NONE') SELECT Warning = 'CompressionFound: The source table has compression enabled, which is not supported. This script may produce errors or incorrect results.' IF Object_id('tempdb..#ColList') IS NOT NULL DROP TABLE #collist; SELECT C.NAME, C.max_length, TYPENAME = T.NAME, C.collation_name, C.is_nullable, ColOrder = C2.ordinal_position, E.isvar, VarOrder = Row_number() OVER( partition BY isvar ORDER BY C2.ordinal_position) INTO #collist FROM sys.objects O JOIN sys.columns C ON C.object_id = O.object_id JOIN sys.types T ON T.user_type_id = C.system_type_id JOIN information_schema.columns C2 ON C2.table_schema = Schema_name(O.schema_id) AND C2.table_name = O.NAME AND C2.column_name = C.NAME CROSS apply (SELECT IsVar = CASE WHEN T.NAME IN ( 'varchar', 'nvarchar', 'varbinary' ) THEN 1 ELSE 0 END) E WHERE O.object_id = Object_id(@SourceTable) -- Fixed Length Col Data! IF Object_id('tempdb..#SqlCols') IS NOT NULL DROP TABLE #sqlcols; SELECT L.colorder, SelectCol = NAME + ' = ' + + CASE WHEN L.is_nullable = 1 THEN 'CASE WHEN '+ nullcolname+ ' > 0 THEN NULL ELSE '+extractdata+' END' ELSE extractdata END, NullExpression = nullcolname + ' = POWER(2,' + CONVERT(VARCHAR(10), colorder) + '-1) & NullBmp', VarOffset = CASE WHEN isvar = 1 THEN varoffsetcolname + ' = CONVERT(smallint,CONVERT(binary(2),REVERSE(SUBSTRING(RowContent,VarOffsetStart+' + CONVERT(VARCHAR(10), varoffstart) + ',2))))' END INTO #sqlcols FROM #collist L OUTER apply (SELECT PrevBytes = Isnull(Sum(LA.max_length), 0) FROM #collist LA WHERE LA.colorder < L.colorder AND LA.isvar = 0) LA CROSS apply (SELECT * FROM (SELECT StartByte = CONVERT(VARCHAR(10), 5 + LA.prevbytes), NullColName = 'ColNull' + CONVERT(VARCHAR(10) , colorder), ByteLength = CONVERT(VARCHAR(10), max_length) , TargetType = typename + CASE WHEN typename IN ( 'varchar', 'varbinary', 'nvarchar') THEN '('+ typelen+')' ELSE '' END FROM (SELECT TypeLen = CASE WHEN max_length = -1 THEN 'max' ELSE CONVERT(VARCHAR(10),max_length) END) T) B) F CROSS apply (SELECT C.*, VarOffStart = ( varorder - 1 ) * 2, StartExpr = CASE WHEN varorder = 1 THEN 'VarStart' ELSE prevvaroffsetcolname + '+1' END, LengthExpr = CASE WHEN varorder = 1 THEN varoffsetcolname + '-VarStart+1' ELSE varoffsetcolname + '-' + prevvaroffsetcolname END FROM (SELECT VarOffsetColName = 'VarOffset' + CONVERT( VARCHAR(10) , varorder), PrevVarOffsetColName = 'VarOffset' + CONVERT(VARCHAR(10), varorder-1)) C) V CROSS apply (SELECT ExtractData = CASE WHEN isvar = 0 THEN 'CONVERT(' + targettype + ',CONVERT(varbinary(' + bytelength + '),REVERSE(SUBSTRING(RowContent,' + startbyte + ',' + bytelength + ')))) ' + Isnull('COLLATE '+collation_name, '') ELSE 'CONVERT(' + targettype + ',SUBSTRING(RowContent,' + startexpr + ',' + lengthexpr + '))' END) D DECLARE @RecoverySql NVARCHAR(max), @SelectCols NVARCHAR(max), @NullCols NVARCHAR(max), @VarOffsets NVARCHAR(max) SET @SelectCols = (SELECT Char(13) + Char(10) + Char(9) + ',' + selectcol FROM #sqlcols ORDER BY colorder FOR xml path(''), type) .value('.', 'nvarchar(max)') SET @NullCols = (SELECT Char(13) + Char(10) + Char(9) + ',' + nullexpression FROM #sqlcols ORDER BY colorder FOR xml path(''), type) .value('.', 'nvarchar(max)') SET @VarOffsets = (SELECT Char(13) + Char(10) + Char(9) + ',' + varoffset FROM #sqlcols WHERE varoffset IS NOT NULL ORDER BY colorder FOR xml path(''), type) .value('.', 'nvarchar(max)') SET @RecoverySql = ' SELECT RowContent '+@SelectCols+' FROM '+QUOTENAME(@TlogTable)+' CROSS APPLY ( SELECT M. * ,NV.* ,NullBmp = SUBSTRING(RowContent,NullBmpBytesStart,NullBmpBytes) ,VarCount = CONVERT(binary(2),REVERSE(SUBSTRING(RowContent,VarCountStart,2))) -- Total Variable length slots ,VarOffsetStart = VarCountStart+2 FROM ( --> Calculate null bitmap col count offset SELECT B.* ,NullCount = CONVERT(smallint,CONVERT(binary(2),REVERSE(SUBSTRING(RowContent,NullBmpStart,2)))) ,NullBmpBytesStart = NullBmpStart+2 FROM ( --> Base data to find null bmp SELECT NullBmpStart = CONVERT(smallint,CONVERT(varbinary(2),REVERSE(SUBSTRING(RowContent,3,2))))+1 ) B ) M CROSS APPLY ( --> Calculate null bmp starts SELECT N1.* ,VarCountStart = NullBmpBytesStart+NullBmpBytes --> Varcount starts after null bitmap! FROM ( SELECT -- Total bytes used in NULL bitmap NullBmpBytes = CONVERT(int,CEILING(M.NullCount/8.0) * 8)/8 ) N1 ) NV ) M CROSS APPLY ( SELECT Dummy = 1 '+@NullCols+' ) N CROSS APPLY ( SELECT VarStart = VarOffsetStart+VarCount*2 -- variable data start after var offset (two bytes per var col) '+@VarOffsets+' ) V ' PRINT @RecoverySql; EXEC(@RecoverySql); |
Remember: this script is a version 1 for educational purposes and may fail in some cases. There are some limitations, like not handling LOB cases and what I already mentioned, which is the compressed format. LOBs are a bit more complicated to recover, so I can explore some scenarios in future posts. Let me know in the comments if this is something you would like to see. Also, due to how some types are stored (whether REVERSE needs to be applied or not), the script might fail in some conversions or display strange characters. If you find something like that, just let me know in the comments so I can evaluate it and provide an updated version.
So, to end, I hope you understand this trick—and I hope you never need it 😂. As you see, the best approach is to use a Full Backup, so plan backups correctly and keep communicating with the responsible team, including running tests. In these cases, a good practice is to keep a copy of the last full backup locally on the server, so I can restore it quickly and add some redundancy. However, this incurs additional costs, so each business must evaluate the risks and benefits of this strategy.
But as a DBA, you should bring this type of discussion up whenever possible.
A Final Note
In the end, I think this post is not only about SQL Server internals. It brings a more complex view of the role of a DBA in a company and the importance of learning the internals. If I don’t know how SQL works or how logging works, my only answer to the business in this case would be: ‘Nothing we can do, data is lost.’
But, thanks to that knowledge, I can help the business in some way to minimize the impact. Also, again, thanks to this knowledge, I can guide the business on how high the risk is when backups fail and how complex data recovery can be without them. So, use this post also to reflect on how you are helping your business in challenging situations like that and how you are guiding it to avoid, not only solving, but also improving and optimizing the process!
FAQs: How to recover data in SQL Server without a full backup
1. Can you recover SQL Server data without a full backup?
Yes, if you have differential and transaction log backups and the database uses the Full recovery model. Restore the most recent differential backup, then replay transaction log backups using RESTORE LOG … WITH STOPAT to recover to the point just before the data loss. If no differential exists, you can use fn_dblog() and DBCC PAGE to extract data directly from the log, though this is significantly more complex.
2. How does point-in-time recovery work in SQL Server?
Point-in-time recovery uses the STOPAT parameter in RESTORE LOG to replay transactions up to a specific timestamp. SQL Server reads the transaction log backups and applies changes only up to your specified time, effectively rolling the database back to the state it was in at that moment. This requires the Full recovery model and an unbroken chain of log backups.
3. What is fn_dblog() in SQL Server?
fn_dblog() is an undocumented table-valued function that reads the active transaction log. It returns records of every logged operation – inserts, updates, deletes, page allocations – with enough detail to reconstruct the original data. It’s a last-resort recovery technique when standard restore methods aren’t available.


Load comments