
Database Properties Health Check
Each database has a collection of individual properties, many of which can have a significant effect on a database’s behavior, performance and availability. Most of the time you want to leave these settings at their defaults, but there are some cases where you might need to make some changes. As the DBA, you should be familiar with all of the following settings and what they do. In addition, if any of the settings have been changed from their default values, you should know which settings have been changed, to what values, and why they were changed. Knowing this can be very helpful when troubleshooting many SQL Server related problems.
The purpose of performing a Database Properties Health Check is to determine what your database’s properties are currently set to for each of your SQL Server instances, and to determine if the settings are appropriate for your particular environment. The recommendations made in the article are general in nature and may or may not apply to your particular server’s environment. Because of this, you, as the DBA, must decide what each setting should be to ensure the highest performance and availability of your databases.
Although you can read this article without being in front of a SQL Server instance, you might find it useful to run the following script for one of your instances before reading it. This way, you will be able to check your database’s settings against the recommendations given here. If this is not possible, then you can read the article now and check your databases when you have more time.
If you find some discrepancies in your database’s settings and the recommendations given in this article, please don’t immediately change your database’s settings without first thinking about the setting and your particular environment. If you think one or more of your database settings should be changed based on these recommendations, be sure to first test the change on a test server before making the change on a production server.
Discovering Your Database’s Property Settings
To get you started on performing your Database Properties Health Check, you can run the following script, which will display the settings of each of the database properties for each database on a SQL Server instance. If you like, you might want to cut the results from SSMS and paste it into a spreadsheet for convenience, but later on, we’ll show you how to create a spreadsheet to do the whole process for you Note that you’ll need to comment out the line ‘is_encrypted AS ‘Encryption Enabled’ ,’ if you wish to run it on SQL Server 2005. I give the code for SQL Server 2000 in the PowerShell script in the appendix.
|
1 2 3 4 5 6 7 8 9 10 11 12 13 14 15 16 17 18 19 20 21 22 23 24 25 26 27 28 29 30 31 32 |
USE master GO SELECT name AS 'Database_Name' , snapshot_isolation_state AS 'Allow Snapshot Isolation' , is_ansi_null_default_on AS 'ANSI NULL Default' , is_ansi_nulls_on AS 'ANSI NULLS Enabled' , is_ansi_padding_on AS 'ANSI Paddings Enabled' , is_ansi_warnings_on AS 'ANSI Warnings Enabled' , is_arithabort_on AS 'Arithmetic Abort Enabled' , is_auto_close_on AS 'Auto CLOSE' , is_auto_create_stats_on AS 'Auto Create Statistics' , is_auto_shrink_on AS 'Auto Shrink' , is_auto_update_stats_async_on AS 'Auto Update Statistics Asynchronously' , is_auto_update_stats_on AS 'Auto Update Statistics' , is_cursor_close_on_commit_on AS 'Close Cursor on Commit Enabled' , is_concat_null_yields_null_on AS 'Concatenate Null Yields Null' , is_db_chaining_on AS 'Cross-Database Ownership Chaining Enabled' , is_date_correlation_on AS 'Data Correlation Optimization Enabled' , is_read_only AS 'Database Read-Only' , is_local_cursor_default AS 'Default Cursor' , is_encrypted AS 'Encryption Enabled' , is_arithabort_on AS 'Numeric Round-Abort' , page_verify_option_desc AS 'Page Verify' , is_parameterization_forced AS 'Parameterization' , is_quoted_identifier_on AS 'Quoted Identifiers Enabled' , is_read_committed_snapshot_on AS 'Read Committed Snapshot' , is_recursive_triggers_on AS 'Recursive Triggers Enabled' , user_access_desc AS 'Restrict Access' , is_broker_enabled AS 'Service Broker Enabled' , is_trustworthy_on AS 'Trustworthy' FROM sys.databases ; GO |
A result of ‘0’ (False) means the database property is off, while a result of ‘1’ (True) means the database property is on. A few of the results display the actual setting instead of a “0” or a “1”.
Live Excel Reports
For a busy DBA, it is often more convenient to have reports like this as Excel documents that can be refreshed from within Excel without needing SSMS and Transact SQL. These can be created automatically for all your servers in a one-off process using PowerShell. Because we are displaying the data in Excel, we can make use of formatting to improve the readability of the reports. For the following design, we use a DSN for each server, and assume that all servers are within the domain. Each server has its own worksheet and we can alter the script according to the version of SQL Server being used
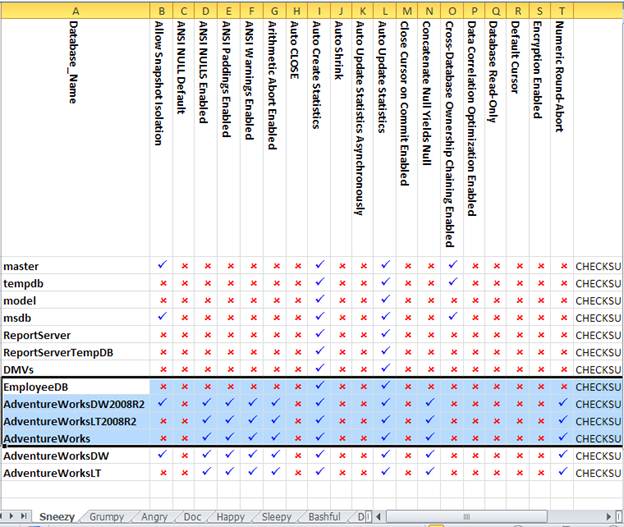
You’ll see that, to inspect the settings of a particular server, you just need to click on the tab to display that worksheet. In order to make sure it is up to date, you just need to click ‘Refresh’. After you’ve created the file, you won’t need that PowerShell file again!
The PowerShell script to make this happen isn’t that big, but could form the basis of a more complex script for your own particular requirements. It was created with Phil Factor’s help. It can be downloaded from the bottom of the article, and is in the appendix of this article.
Database Property Descriptions and Best Practices
There are many different database properties and they are listed alphabetically below. Some of the properties will be covered only briefly, generally because they are rarely used; others will be covered in-depth, especially those that you might consider changing.
Allow Snapshot Isolation
Allow Snapshot Isolation and Read Committed Snapshot are closely related and can be used separately or together, so be sure that you fully understand both of these properties before attempting to change their settings from their defaults. Read Committed Snapshot is covered later in this article.
Allow Snapshot Isolation is a way to help reduce blocking in a database. By default, Allow Snapshot Isolation is set to False (off). When a transaction needs to modify rows, these rows must be locked during the transaction, potentially causing other transactions that need the same data to be blocked. This is necessary in order to ensure data integrity, and is normal behavior. But sometimes the blocking caused by this behavior can slow down the database, as transactions have to wait their turn to access the data they need.
To help avoid some blocking problems, Allow Snapshot Isolation can be set to True (on) at the database level, which provides transaction-level read consistency for any transaction that includes the SET TRANSACTION ISOLATION LEVEL as part of the transaction. You can see Books Online for more information on how to invoke SET TRANSACTION ISOLATION LEVEL in your Transact-SQL code.
How does this work? Briefly, it uses a process called row versioning, which copies the affected rows in the version store of tempdb before the transaction begins. While the transaction is acting on the actual rows (an UPDATE, for example), requests from other queries for the same data can read the rows from the version store without being blocked. These rows are snapshots of the rows before the transaction begins, and as such, do not reflect any changes the transaction might be making on these rows. Once the transaction is complete, the rows in the version store are removed and the modified rows are now accessible by other queries.
If Allow Snapshot Isolation is used, it can greatly increase the use of an instance’s tempdb. This could have negative performance effects on the instance, if the tempdb is not up to the task of handling the extra load required by row versioning. Ideally, if you choose to use Allow Snapshot Isolation, tempdb should be stored on its own storage device, isolated from other database activity.
Should you turn Allow Snapshot Isolation on? Like most questions of this nature, the only way to really know if it will help more than hurt performance, is to benchmark performance before and after making the change, in order to see what the effect on your database actually is.
ANSI NULL Default
When you create a new column, alias data type or CLR user-defined user type, using either the CREATE TABLE or ALTER TABLE statements, and you don’t explicitly specify in the statement whether you want the column to be NULL or NOT NULL, then SQL Server will by default use the value you have specified for this database setting. When ANSI NULL Default is set to False (off), the default setting, the column is defaulted to NOT NULL. If you explicitly always specify the NULL or NOT NULL status for a column, alias data type or CLR user-defined user type when creating it, as you should, this property will not affect you. It is recommended to be left to False (off).
ANSI NULLS Enabled
If the ANSI NULLS Enabled is set to False (off), the default setting for this property, then when a non-UNICODE value is compared to a null value, the comparison will evaluate to TRUE if both of the values being compared are NULL. If this property is set to True (on), then all comparisons to null values will evaluate to UNKNOWN. Changing this setting incorrectly can prevent an application from working correctly, so don’t change it from False unless you are absolutely sure that the application requires the setting to be True in order for it to function properly.
ANSI Paddings Enabled
When ANSI Paddings Enabled is set to False (off), the default setting for this property, trailing blanks for varchar and nvarchar, and zeros for varbinary, are automatically trimmed when data is inserted into a column. This is normal behavior, and if changed, could potentially break an application. Only change this setting if you know that the application requires this property to be set to True.
ANSI Warnings Enabled
When ANSI Warnings Enabled is set to False (off), the default setting for this property, no warning messages occur, but nulls are returned when null values or divide by zero errors occur within columns that are aggregated. If set to True (on), warnings are issued under the above conditions. Only change this setting if you know that the application requires this property to be set to True.
Arithmetic Abort Enabled
When Arithmetic Abort Enabled is set to False (off), the default setting for this property, a warning message is displayed when a mathematical overflow or divide by zero error occurs during a transaction, but the transaction completes as if the error never occurred. If this setting is set to True (on), an overflow or divide by zero error occurs and the transaction is aborted. Only change this setting if you know that the application requires that this setting be set to True.
Auto Close
Auto Close is designed for use with the SQL Server Express edition, not the SQL Server Standard and Enterprise editions. When this property is turned on (the default setting is off), the database is automatically shut down when the last user connection is ended. When a new connection is made to the database, the database automatically restarts. Leave this property at its default setting of False (off) at all times on production databases.
Auto Create Statistics
When Auto Create Statistics is set to True (on), the default setting for this property, SQL Server automatically creates column statistics on any column used as a predicate in a query. This is a good thing, as it provides additional information to the query optimizer so it can make better decisions and produce more optimal query plans. In some rare cases it might need to be turned off, but only turn it off if you know exactly what you are doing and why you are doing it. Otherwise, this property should be set to True (on) all the time.
Auto Shrink
The Auto Shrink property should never be used. Period. When this property is on (the default setting is off), SQL Server will check the database about every 30 minutes, and if it thinks the database has too much unused space, it will shrink it. Why is this bad? Let me count the ways. First, when it turns on unexpectedly, the shrinking process is very resource intensive and can hurt server performance. Second, it causes severe index fragmentation, which hurts performance. Third, using this property flies in the face of database management best practices. As I recommend in all my presentations, database sizing should be done manually by the DBA, not allowing autogrowth or Auto Shrink to automatically modify the size of a database. Fourth, Auto Shrink can lead to what I call the grow-shrink cycle, which is horrible for performance in more ways than I can count. I have known untrained DBAs who think that empty space in a database is a bad thing and essentially should never occur. So as part of their maintenance routine they may rebuild the indexes (which is a good thing), but this can increase the size of a database file, as space is needed in the database to rebuild the indexes (which is normal and expected). Then, to remove the extra space created when rebuilding their indexes, they use either Auto Shrink or a manual shrinking process to remove it. What they don’t realize is that this will cause index fragmentation, which is exactly what index rebuilding is designed to remove. In effect, they negate the positive effect of the index rebuilding process. Hopefully I have convinced you to leave the Auto Shrink to False (off) for all of your databases.
Auto Update Statistics
When Auto Update Statistics is set to True (on), the default setting for this property, the query optimizer will automatically check, before running a query, to see if related index and column statistics are out of date. If statistics are out of date, the query will wait to be executed until the statistics are updated and a new query plan, based on the new statistics, can be created. This is generally a good thing, as you don’t want a query to use a less than optimal query plan because statistics have not been updated. On the other hand, updating statistics on the fly like this (synchronously) can, in some cases, cause the query to pause as the statistics are being updated. This makes it appear as if the query is taking longer than normal to execute, while in fact it is the statistics being updated that’s taking the extra time. This is usually a fair tradeoff, as all the following queries of the same type should, in theory, run faster because they now have a better execution plan to use. In almost all cases, this database property should be left on. There is an exception to this, and it is discussed next.
Auto Update Statistics Asynchronously
As I described above, in most cases it is a good idea to leave the Auto Update Statistics database property set to True (on). This is because the tradeoff is fair between a single query that takes a little extra longer to run one time, as related statistics are being updated, and future queries of the same type that run optimally.
In rare cases though, some organizations want their query performance to be consistent from run to run, and having a query be delayed occasionally by updating statistics may not be desirable. In other cases, if an application’s time-out is very short, it is possible for a query to time out if it’s waiting for statistics to be updated. If this is a regular problem, then the Auto Update Statistics Asynchronously database property might be useful. When it is set to True (on), how statistics are updated changes from synchronous to asynchronous.
Here’s what that means. When a query is sent to the query optimizer, it is evaluated to see if the relevant statistics are valid. If not, the query is executed immediately using the old statistics, instead of waiting for the statistics to be updated. The statistics are updated in the background, so the next time the same query is executed, it will have the latest statistics and an optimal execution plan. One downside to this is that the query that triggered the statistics update may run with a less than optimal query plan, taking longer to run than it would have if it had waited for the statistics to be updated in the first place.
Because of the difficulty in knowing what will happen if this property is turned on, the only way to know if it may be beneficial is to experiment. First, perform a baseline of query performance with this setting off. Then change the setting and perform another baseline of query performance, and check if you can see a useful difference or not. If you can’t, then don’t use this property. If you do see an improvement, then use it.
Some DBAs prefer to turn off both Auto Update Statistics and Auto Update Statistics Asynchronously and manually update the statistics on a pre-determined time schedule. While this does give the DBA more control over when statistics are updated, it can prevent statistics being updated when they need to be, resulting in poor query plans. On a related issue, sometimes the method used by SQL Server to determine if statistics are outdated is not as efficient as it should be, and statistics are not updated as often as they need to be. Because of this, I have been involved with databases where not only do I leave Auto Update Statistics on, but I also manually run a statistics update job periodically throughout the day, ensuring that statistics are updated frequently.
Close Cursor on Commit Enabled
When the Close Cursor on Commit Enabled property is False (off), the default setting, SQL Server will not automatically close a cursor after a transaction has been committed. Normally, when using cursors you should include code to manually close the cursor after the transaction is done using it. This is typically how SQL Server cursors are used. Some applications on the other hand, require that the Close Cursor on Commit Enabled be set to True (on). When turned on, this property tells SQL Server to automatically close any open cursors on a transaction commit or rollback. Only turn this property on if you know your application requires this setting. Of course, if you avoided using cursors in the first place (a best practice for production applications), then this setting will never affect you.
Concatenate Null Yields Null
If the Concatenate Null Yields Null property is set to False (off), the default setting, null values in a concatenation operation are treated as if they were empty character strings. If it is set to True (on), a concatenation operation with a NULL value results in a NULL being returned. Changing this setting incorrectly can prevent an application from working correctly, so don’t change it from False unless you are absolutely sure that the application requires the setting to be True in order for it to function properly.
Cross-Database Ownership Chaining Enabled
While Cross-Database Ownership Chaining can be set at the instance level, here our focus is at the database level. When Cross-Database Ownership Chaining is set to False (off), the default setting for this property, the database cannot be a source or a target of cross-database ownership chaining. This property is set to False by default in order to reduce the security surface area of SQL Server. If you need the ability for cross-database ownership chaining, you can enable it on only those databases on an instance that require it, and leave it off for those databases that don’t need it. Only turn this property on for databases that need this capability.
Data Correlation Optimization Enabled
The Data Correlation Optimization Enabled database property is a performance enhancement that is seldom used, as its use case is very limited, typically restricted to some reporting, decision support or data warehousing applications. The default setting is False (off), which means the property doesn’t do anything. If it is set to True (on), then additional correlation statistics are maintained between any two tables in a database that have a FOREIGN KEY relationship and date or datetime columns. These additional correlation statistics can be used to help boost the performance of queries that perform equi-joins between the two tables whose date or datetime columns are correlated, assuming that a date restriction is included in the query predicate. Don’t use this option unless you know you have queries whose performance it will boost, otherwise the additional overhead of maintaining these correlation statistics will be wasted.
Database Read-Only
As you would expect, the default setting of the Database Read-Only property is False (READ_WRITE), otherwise your production database couldn’t read and write data, and wouldn’t work. So why might you want to change this setting to True (on), making the database read-only? The main reason you might consider making a database read-only is if the database is a read-only reporting database, whose data doesn’t need to change. By telling SQL Server that the database is read-only, SQL Server will make different assumptions about how the database should act, for example, turning off locking, which is not needed in a read-only database. By turning off locking, there is the possibility that the database will experience less overhead and offer better performance, although the performance boost may only be small. The only way to know if setting Database Read-Only to True on a read-only database might boost reporting performance is to perform a baseline before and after changing the setting, and check if there is a difference in performance.
Default Cursor
When the Default Cursor database property is set to False (Global), and a cursor is created but not defined as a local cursor, then it will be global to the connection. This is the default behavior of cursors. But if the Default Cursor database property is set to True (Local), and a cursor is not defined as global, then the scope of the cursor will be local to the Transact-SQL that created it. In other words, this setting determines the default behavior of a cursor if you don’t specify the behavior yourself when the cursor is created. This option should only be changed if required by the calling application. Of course, if you avoid using cursors in the first place (a best practice for production applications), then this setting will never affect you.
Encryption Enabled
This database property only applies to the Enterprise Edition of SQL Server 2008 and higher, as it tells you if the database is enabled for Transparent Database Encryption (TDE) or not. If the Encryption Enabled property is set to False (off), then TDE is not enabled. If the property is set to True (on), the TDE is enabled. You don’t need to manually change this setting yourself, as the change will automatically occur when TDE is turned on for the database using the “Manage Database Encryption” option within SSMS, or using the relevant Transact-SQL commands. Generally speaking, just use this setting to let you know if TDE is off or on. You don’t need to change it manually yourself.
Numeric Round-Abort
The Numeric Round-Abort database property only applies to data types that use precision in the number of digits in a number, such as numeric and decimal. At the default setting of False (off), when the results of an expression lose precision, the results are rounded. But if Numeric Round-Abort is set to True (on), then an error is created when the expression is evaluated and a loss of precision occurs. Changing this setting could potentially break an application. Only change it if you know that the application requires that this property be set to True.
Page Verify
The Page Verify database property has three options: NONE, TORN_PAGE_DETECTION, and CHECKSUM. For SQL Server 2005 and higher, the option should always be CHECKSUM. CHECKSUM calculates a checksum value for the contents of a page before it is written to disk. This value is written to the header of the page. When the page is then read from disk, a checksum is again performed on the page and compared to the checksum from the header. If the two checksums match, it is assumed that the page has not incurred any damage. If the two checksums are different, then it is assumed that the page has incurred some sort of damage. This is an important feature to have turned on for all of your databases, as it can make it easier to catch potential damaged pages early, before too much damage can occur.
If you are using SQL Server 2005 and higher and you find any databases that have TORN_PAGE_DETECTION, and, this is because, when a database is upgraded to a newer version, it does not automatically change this property to CHECKSUM, which is the default setting starting with SQL Server 2005. If this is the case, then TORN_PAGE_DETECTION should be changed to CHECKSUM manually, as it offers better data protection than TORN_PAGE_DETECTION does. After you make the change to CHECKSUM, a checksum is only calculated when a page is written back to disk for the first time. In other words, just changing this setting will not automatically calculate a CHECKSUM for all the pages on the database. Over time, as pages are read and written back to disk, then the CHECKSUM is added to the header.
If you find any databases where Page Verify is set to NONE, this means someone changed it to this setting, most likely because they thought it could boost the performance of SQL Server. While there is a hint of truth in this, as producing a checksum does require some overhead, the benefits of using a few additional resources to calculate the checksum far outweigh the miniscule performance boost you might get. There’s also the chance that you will get corrupted pages and not find out about them until it is too late.
Parameterization
By default, the Parameterization database property is set to False (off). What this means is that the query optimizer is configured to use what is called simple parameterization. Simple parameterization parameterizes non-complex queries to increase the probability of matching them against existing query plans in the plan cache. By reusing execution plans from the plan cache instead of creating new ones every time a similar query runs, SQL Server resources can be conserved, boosting performance. Simple parameterization isn’t very sophisticated, so only the simplest of queries can be parameterized.
If you change the Parameterization setting to True (on), this tells the query optimizer to use forced parameterization instead of simple parameterization. Forced parameterization essentially tells the query optimizer to parameterize all queries (with some exceptions), not just simple queries. If the circumstances are right, doing so can boost execution plan reuse and boost the performance of the database. The key is the circumstances. Generally speaking, forced parameterization works best for databases that have a heavy load of concurrent queries, with statistics in the indexes and columns that are current and normally distributed. If the circumstances aren’t right, using forced parameterization can create problems, such as creating less than optimal execution plans and wasting space in the plan cache which could be better used for other purposes.
Should you turn Parameterization on? As with most questions like this, the only real way to know if it will help rather than hurt performance is to benchmark performance before and after making the change, in order to see what the effect on your database actually is. If you are unable to perform such formal testing, then it is unwise to use this option.
Quoted Identifiers Enabled
When Quoted Identifiers Enabled is set to False (off), the default setting, all Transact-SQL rules for identifiers must be followed. When Quoted Identifiers Enabled is set to True (on), it allows double quotation marks to be used to enclose delimited identifiers, not just the single quotes that are normally used. Unless a poorly written application requires that this setting be changed, don’t change it. While the Quoted Identifiers Enabled option is database wide, you also have the option to enable it on a per connection basis using the SET command, if desired.
Read Committed Snapshot
The Read Committed Snapshot database property is similar to the Allow Snapshot Isolation database property previously described. The major difference is that Read Committed Snapshot is done at the statement level and Allow Snapshot Isolation is done at the transaction level. You will find other differences in Books Online, but this is the key difference. Since they both use row versioning to help reduce blocking, I won’t repeat what I covered previously.
By default, Read Committed Snapshot is set to False (off). So should you use Read Committed Snapshot, Allow Snapshot Isolation, both or neither of them? Again, it depends on your environment. This is a complex topic and beyond the scope of this article. If you think one or more of these options might be useful in your environment, be sure to first perform benchmark testing under each option you’re considering, and then decide for yourself which option to use, if any. If you don’t have time to perform this testing, then don’t use either option, as it could introduce new performance issues.
Recursive Triggers Enabled
Before explaining this database property, a few terms need to be defined. An AFTER trigger is a DML trigger that executes after an INSERT, UPDATE, or DELETE statement is used to modify data in a table or view. An AFTER trigger can be recursive, which means that it has the ability to initiate another trigger. There are two types of recursive AFTER triggers: direct and indirect. A direct recursion occurs when a trigger fires and causes an action that prompts the same trigger to fire again. An indirect recursion occurs when a trigger fires and causes a trigger of the same type to fire. With this in mind, when the Recursive Triggers Enabled property is set to False (off), the default setting, direct recursive firing of AFTER triggers is not permitted. When it is set to True (on), the recursive firing of an AFTER trigger is permitted. Changing the Recursive Triggers Enabled setting can significantly affect the behavior of an application, and it should only be changed if an application needs this feature to be turned on.
Restrict Access
The Restrict Access property has three different options: MULTI_USER (the default setting), RESTRICTED_USER, and SINGLE_USER. The default setting, MULTI_USER, allows any authenticated user to access the database, and is required for production work. In some cases, you may want to restrict “normal” users from accessing the database. If so, you can switch to the RESTRICTED_USER option, which only allows members of the db_owner fixed database role, members of the dbcreator and sysadmins fixed server roles, and SAs to access the database. In other cases, especially when troubleshooting or performing some maintenance tasks, you can switch to the SINGLE_USER option, which only allows a single user to access a database at a given time. For normal production, the MULTI_USER option should be used.
Service Broker Enabled
The Service Broker Enabled tells you if the Service Broker feature of SQL Server has been turned on for this database. By default, when a new database is created, the Service Broker Enabled property is set to False (off), as a means to reduce the security surface level of the database. Generally, when Service Broker is configured for a database, this setting is changed automatically so that you don’t have to do it yourself. Just record the value of this health check item so you know whether the Service Broker is on for a particular database. This can be useful when troubleshooting Service Broker-related problems.
Trustworthy
The Trustworthy property determines if an object with an impersonation context can or cannot access resources outside of the database. The default setting is False (off) for all databases except msdb, so impersonation contexts aren’t permitted. When Trustworthy is set to True (on), then database modules that can use an impersonation context can access databases. Trustworthy should stay at its default setting of off in order to reduce the security surface area of the instance. It should only be turned on when an application requires its use.
Summary
The goal of this article was to get you thinking about the property settings of each of your databases, as their settings can have a significant effect on a database’s behavior, performance and availability. Hopefully, by now you have a good feeling for what each of the settings do, and what each database property setting should be. On the other hand, this article can’t offer every detail about every property setting. If you are still unclear about some of these settings, or are considering changing some of them from their default values, be sure to take some extra time to learn more about the property settings by reading about them in Books Online and by searching for more information about them on the web. Knowledge is the DBA’s most powerful weapon, so use it wisely.
Appendix: The PowerShell script
This script creates the Excel report that can be refreshed for an up to date list of the database settings. in order to run the script, you will need to set up the ODBC DSNs for the servers, and enter them into the XML at the start of the script, along with the version of SQL Server (either 2008 or 2005 in the script, but you should be able to see how to expand your coverage!), instead of the words ‘grumpy’, ‘dozy’ etc. You’ll also need to enter the directory of the file where you’d like to store the excel file and the name of the excel file.
|
1 2 3 4 5 6 7 8 9 10 11 12 13 14 15 16 17 18 19 20 21 22 23 24 25 26 27 28 29 30 31 32 33 34 35 36 37 38 39 40 41 42 43 44 45 46 47 48 49 50 51 52 53 54 55 56 57 58 59 60 61 62 63 64 65 66 67 68 69 70 71 72 73 74 75 76 77 78 79 80 81 82 83 84 85 86 87 88 89 90 91 92 93 94 95 96 97 98 99 100 101 102 103 104 105 106 107 108 109 110 111 112 113 114 115 116 117 118 119 120 121 122 123 124 125 126 127 128 129 130 131 132 133 134 135 136 137 138 139 140 141 142 143 144 145 146 147 148 149 150 151 152 153 154 155 156 157 158 159 160 161 162 163 164 165 166 167 168 169 170 171 172 173 174 175 176 177 178 179 180 181 182 183 184 185 186 187 188 189 190 191 192 |
#change these settings to your environment $DirectoryToSaveTo='C:\MyDirectory\' $Filename='DatabaseProperties' # <# these are actually User ODBC DSNs DSNs. Better for Excel. We associate a version number with each just so you are sure of a script that will run (You can't get this info from the DSN, and Excel only allows one select statement in an Excel query #> $Servers=[xml] @' <serverList> <server version="2008" id="Grumpy"" /> <server version="2005" id="Dozy"" /> <server version="2005" id="Sleepy"" /> <server version="2005" id="Angry"" /> </serverList> '@ # constants. $xlCenter=-4108 $xlTop=-4160 $xlOpenXMLWorkbook=[int]51 # and we put the queries in here $SQL2005=@" SELECT name AS 'Database_Name' , snapshot_isolation_state AS 'Allow Snapshot Isolation' , is_ansi_null_default_on AS 'ANSI NULL Default' , is_ansi_nulls_on AS 'ANSI NULLS Enabled' , is_ansi_padding_on AS 'ANSI Paddings Enabled' , is_ansi_warnings_on AS 'ANSI Warnings Enabled' , is_arithabort_on AS 'Arithmetic Abort Enabled' , is_auto_close_on AS 'Auto CLOSE' , is_auto_create_stats_on AS 'Auto Create Statistics' , is_auto_shrink_on AS 'Auto Shrink' , is_auto_update_stats_async_on AS 'Auto Update Statistics Asynchronously' , is_auto_update_stats_on AS 'Auto Update Statistics' , is_cursor_close_on_commit_on AS 'Close Cursor on Commit Enabled' , is_concat_null_yields_null_on AS 'Concatenate Null Yields Null' , is_db_chaining_on AS 'Cross-Database Ownership Chaining Enabled' , is_date_correlation_on AS 'Data Correlation Optimization Enabled' , is_read_only AS 'Database Read-Only' , is_local_cursor_default AS 'Default Cursor' , ' ' AS 'Encryption Enabled' , --not in 2005 is_arithabort_on AS 'Numeric Round-Abort' , page_verify_option_desc AS 'Page Verify' , is_parameterization_forced AS 'Parameterization' , is_quoted_identifier_on AS 'Quoted Identifiers Enabled' , is_read_committed_snapshot_on AS 'Read Committed Snapshot' , is_recursive_triggers_on AS 'Recursive Triggers Enabled' , user_access_desc AS 'Restrict Access' , is_broker_enabled AS 'Service Broker Enabled' , is_trustworthy_on AS 'Trustworthy' FROM sys.databases ; "@ $SQL2008=@" SELECT name AS 'Database_Name' , snapshot_isolation_state AS 'Allow Snapshot Isolation' , is_ansi_null_default_on AS 'ANSI NULL Default' , is_ansi_nulls_on AS 'ANSI NULLS Enabled' , is_ansi_padding_on AS 'ANSI Paddings Enabled' , is_ansi_warnings_on AS 'ANSI Warnings Enabled' , is_arithabort_on AS 'Arithmetic Abort Enabled' , is_auto_close_on AS 'Auto CLOSE' , is_auto_create_stats_on AS 'Auto Create Statistics' , is_auto_shrink_on AS 'Auto Shrink' , is_auto_update_stats_async_on AS 'Auto Update Statistics Asynchronously' , is_auto_update_stats_on AS 'Auto Update Statistics' , is_cursor_close_on_commit_on AS 'Close Cursor on Commit Enabled' , is_concat_null_yields_null_on AS 'Concatenate Null Yields Null' , is_db_chaining_on AS 'Cross-Database Ownership Chaining Enabled' , is_date_correlation_on AS 'Data Correlation Optimization Enabled' , is_read_only AS 'Database Read-Only' , is_local_cursor_default AS 'Default Cursor' , is_encrypted AS 'Encryption Enabled' , is_arithabort_on AS 'Numeric Round-Abort' , page_verify_option_desc AS 'Page Verify' , is_parameterization_forced AS 'Parameterization' , is_quoted_identifier_on AS 'Quoted Identifiers Enabled' , is_read_committed_snapshot_on AS 'Read Committed Snapshot' , is_recursive_triggers_on AS 'Recursive Triggers Enabled' , user_access_desc AS 'Restrict Access' , is_broker_enabled AS 'Service Broker Enabled' , is_trustworthy_on AS 'Trustworthy' FROM sys.databases ; "@ $SQL2000=@" Select name AS 'Database_Name' , ' ' AS 'Allow Snapshot Isolation' , cast(DATABASEPROPERTYEX(name, 'IsAnsiNullDefault')AS INT) AS 'ANSI NULL Default' , cast(DATABASEPROPERTYEX(name, 'IsAnsiNullsEnabled')AS INT) AS 'ANSI NULLS Enabled' , cast(DATABASEPROPERTYEX(name, 'IsAnsiPaddingEnabled')AS INT) AS 'ANSI Paddings Enabled' , cast(DATABASEPROPERTYEX(name, 'IsAnsiWarningsEnabled')AS INT) AS 'ANSI Warnings Enabled' , cast(DATABASEPROPERTYEX(name, 'IsArithmeticAbortEnabled')AS INT) AS 'Arithmetic Abort Enabled' , cast(DATABASEPROPERTYEX(name, 'IsAutoClose')AS INT) AS 'Auto CLOSE' , cast(DATABASEPROPERTYEX(name, 'IsAutoCreateStatistics')AS INT) AS 'Auto Create Statistics' , cast(DATABASEPROPERTYEX(name, 'IsAutoShrink')AS INT) AS 'Auto Shrink' , ' ' AS 'Auto Update Statistics Asynchronously' , cast(DATABASEPROPERTYEX(name, 'IsAutoUpdateStatistics')AS INT) AS 'Auto Update Statistics' , cast(DATABASEPROPERTYEX(name, 'IsCloseCursorsOnCommitEnabled')AS INT) AS 'Close Cursor on Commit Enabled' , cast(DATABASEPROPERTYEX(name, 'IsNullConcat')AS INT) AS 'Concatenate Null Yields Null' , ' ' AS 'Cross-Database Ownership Chaining Enabled' , ' ' AS 'Data Correlation Optimization Enabled' , CASE WHEN DATABASEPROPERTYEX(name, 'Updateability') ='READ_ONLY' then 1 else 0 end AS 'Database Read-Only' , cast(DATABASEPROPERTYEX(name, 'IsLocalCursorsDefault')AS INT) AS 'Default Cursor' , ' ' AS 'Encryption Enabled' , cast(DATABASEPROPERTYEX(name, 'IsArithmeticAbortEnabled')AS INT) AS 'Numeric Round-Abort' , CASE WHEN DATABASEPROPERTYEX(name, 'IsTornPageDetectionEnabled')=1 THEN 'TORN_PAGE' ELSE 'NONE' end AS 'Page Verify' , ' ' AS 'Parameterization' , cast(DATABASEPROPERTYEX(name, 'IsQuotedIdentifiersEnabled')AS INT) AS 'Quoted Identifiers Enabled' , ' ' AS 'Read Committed Snapshot' , cast(DATABASEPROPERTYEX(name, 'IsRecursiveTriggersEnabled')AS INT) AS 'Recursive Triggers Enabled' , DATABASEPROPERTYEX(name, 'UserAccess') AS 'Restrict Access' , ' ' AS 'Service Broker Enabled' , ' ' AS 'Trustworthy' FROM master..sysdatabases "@ # before we do anything else, are we likely to be able to save the file? # if the directory doesn't exist, then create it if (!(Test-Path -path "$DirectoryToSaveTo")) #create it if not existing { New-Item "$DirectoryToSaveTo" -type directory | out-null } $excel = New-Object -Com Excel.Application #open a new instance of Excel $excel.Visible = $True #make it visible (for debugging more than anything) $wb = $Excel.Workbooks.Add() #create a workbook $currentWorksheet=1 #there are three open worksheets you can fill up foreach ($server in $servers.serverlist.server) { #only create the worksheet if necessary if ($currentWorksheet-lt 4) {$ws = $wb.Worksheets.Item($currentWorksheet)} else {$ws = $wb.Worksheets.Add()} #add if it doesn't exist $currentWorksheet += 1 #keep a tally if ($server.version -eq 2005) {$SQL=$SQL2005} #get the right SQL Script if ($server.version -eq 2008) {$SQL=$SQL2008} if ($server.version -eq 2000) {$SQL=$SQL2000} $currentName=$server.name and name the worksheet $ws.name=$currentName # so it appears in the tab # note we create the query so that the user can run it to refresh it $qt = $ws.QueryTables.Add("ODBC;DSN=$currentName", $ws.Range("A1"), $SQL) # and execute it if ($qt.Refresh()) #if the routine works OK { $ws.Activate() $ws.Select() $excel.Rows.Item(1).HorizontalAlignment = $xlCenter $excel.Rows.Item(1).VerticalAlignment = $xlTop $excel.Rows.Item(1).Orientation = -90 $excel.Columns.Item("B:T").NumberFormat = "[Red][=0]û;[Blue][=1]ü" $excel.Columns.Item("B:T").Font.Name = "Wingdings" $excel.Columns.Item("B:T").Font.Size = 12 $excel.Columns.Item("V:Y").NumberFormat = "[Red][=0]û;[Blue][=1]ü" $excel.Columns.Item("V:Y").Font.Name = "Wingdings" $excel.Columns.Item("V:Y").Font.Size = 12 $excel.Columns.Item("AA:AB").NumberFormat = "[Red][=0]û;[Blue][=1]ü" $excel.Columns.Item("AA:AB").Font.Name = "Wingdings" $excel.Columns.Item("AA:AB").Font.Size = 11 $excel.Rows.Item("1:1").Font.Name = "Calibri" $excel.Rows.Item("1:1").Font.Size = 11 $excel.Rows.Item("1:1").Font.Bold = $true $Excel.Columns.Item(1).Font.Bold = $true } } $filename=$filename -replace '[\\\/\:\.]',' ' #remove characters that can cause problems $filename = "$DirectoryToSaveTo$filename.xlsx" #save it according to its title if (test-path $filename ) { rm $filename } #delete the file if it already exists $wb.SaveAs($filename, $xlOpenXMLWorkbook) #save as an XML Workbook (xslx) $wb.Saved = $True #flag it as being saved $wb.Close() #close the document $Excel.Quit() #and the instance of Excel $wb = $Null #set all variables that point to Excel objects to null $ws = $Null #makes sure Excel deflates $Excel=$Null #let the air out # Hristo Deshev's Excel trick 'Pro Windows PowerShell' p380 [GC]::Collect() |
This document contains proprietary information and is protected by copyright law.
Copyright © 2026 Red Gate Software Limited. All rights reserved
Load comments