

This article is part of Robert Sheldon's continuing series on Mongo DB. To see all of the items in the series, click here.
MongoDB is a scalable database management system that stores data as documents in a collection, rather than as rows in a table, such as you’d find in a relational database system. A document is an object made up of one or more field and value pairs that contain related data. A field’s value can be one of a variety of data types, including arrays or embedded documents. Support for such data types eliminates the need to create the type of complex joins used in relational database.
MongoDB is a NoSQL database system. The acronym NoSQL, which means “not only SQL,” is a term used to describe various types of non-relational databases. NoSQL databases offer more flexibility and greater scalability than relational databases and are often better suited to many of today’s modern workloads. A variety of NoSQL databases are in use today, including document databases, graph databases, wide-column stores, and key-value stores.
MongoDB is considered a type of document database because data is stored as documents. A MongoDB document is similar to a JavaScript Object Notation (JSON) object, a lightweight structure made up of unordered name/value pairs. MongoDB documents are simple to read and understand, yet they can support complex requirements, in part because they can be structured differently within the same collection. This allows a MongoDB database to hold structured data (like a relational database), but also semi-structured and even unstructured data.
MongoDB comes in three editions:
- MongoDB Atlas. A managed service for deploying MongoDB in the cloud. The service includes a free tier, which is ideal for trying out and learning about MongoDB.
- MongoDB Community. An on-premises solution that you can download and install for free. It is available for Linux, macOS, and Windows and can be installed within a Docker container. Like the free tier on MongoDB Atlas, the Community edition is ideal for trying out and learning about MongoDB.
- MongoDB Enterprise. An on-premises, subscription-based solution that includes advanced management and security features for supporting mission-critical workloads. Like the Community edition, the Enterprise edition is available for Linux, macOS, Windows, and Docker.
The basic database functionality is the same regardless of which edition you’re using. If you’re new to MongoDB, you can take advantage of one of the free versions to start exploring the MongoDB environment and learn what it takes to work with document data.
To help with this process, this article introduces you to MongoDB and shows you how get started. The article explains how to connect to MongoDB, create a database and collection, and add a few documents. This article is the first in a series on MongoDB that explores the various ways you can manage and interact with the document data.
For the examples in this article, I use the MongoDB Atlas free tier. I think this is a good way to get to know the platform if you’re new to MongoDB and want to get a sense of how a document database works. This way, you can learn about MongoDB without having to install it on your system or make any long-term commitments. You can also easily access your MongoDB databases from multiple systems.
To interact with MongoDB Atlas, I used MongoDB Compass, an on-premises GUI that you can download for free from the MongoDB site. MongoDB Compass is available for Linux, Windows, and macOS (x86_64 or ARM64). Although you can also use the MongoDB Shell to interact with MongoDB, I think the GUI is a good way to start learning about MongoDB. Compass also comes with the MongoDB Shell embedded directly into the interface, so you get the best of both worlds.
Connecting to MongoDB Atlas from MongoDB Compass
If you want to follow along with the examples in this article (and those in the rest of the series), you’ll need to set up a MongoDB Atlas account and create your first cluster. You’ll also need to install MongoDB Compass on your system and make sure it’s up and running. I installed Compass on a Mac computer, but you can run it on any of the supported platforms.
To set up MongoDB Atlas, you’ll need to head to the Atlas website and register for the service. You should then follow the online instructions to set up your first cluster, referring to the Atlas documentation as necessary. In the next section I will go though the steps that I took as well.
Atlas organizes its services based on a specific hierarchy: Organization > Project > Cluster. However, this hierarchy might not be readily apparent as you step through the process of creating your first cluster. In some cases, Atlas refers to this process as a deployment, which can add to the confusion.
Regardless of how you get there, your main goal is to set up your first cluster so you can connect to it from MongoDB Compass. For this article, I set up my Atlas environment with an organization named org1, a project named proj2, and a cluster named clust1. The following figure shows the Atlas environment after I set up the clust1 cluster.
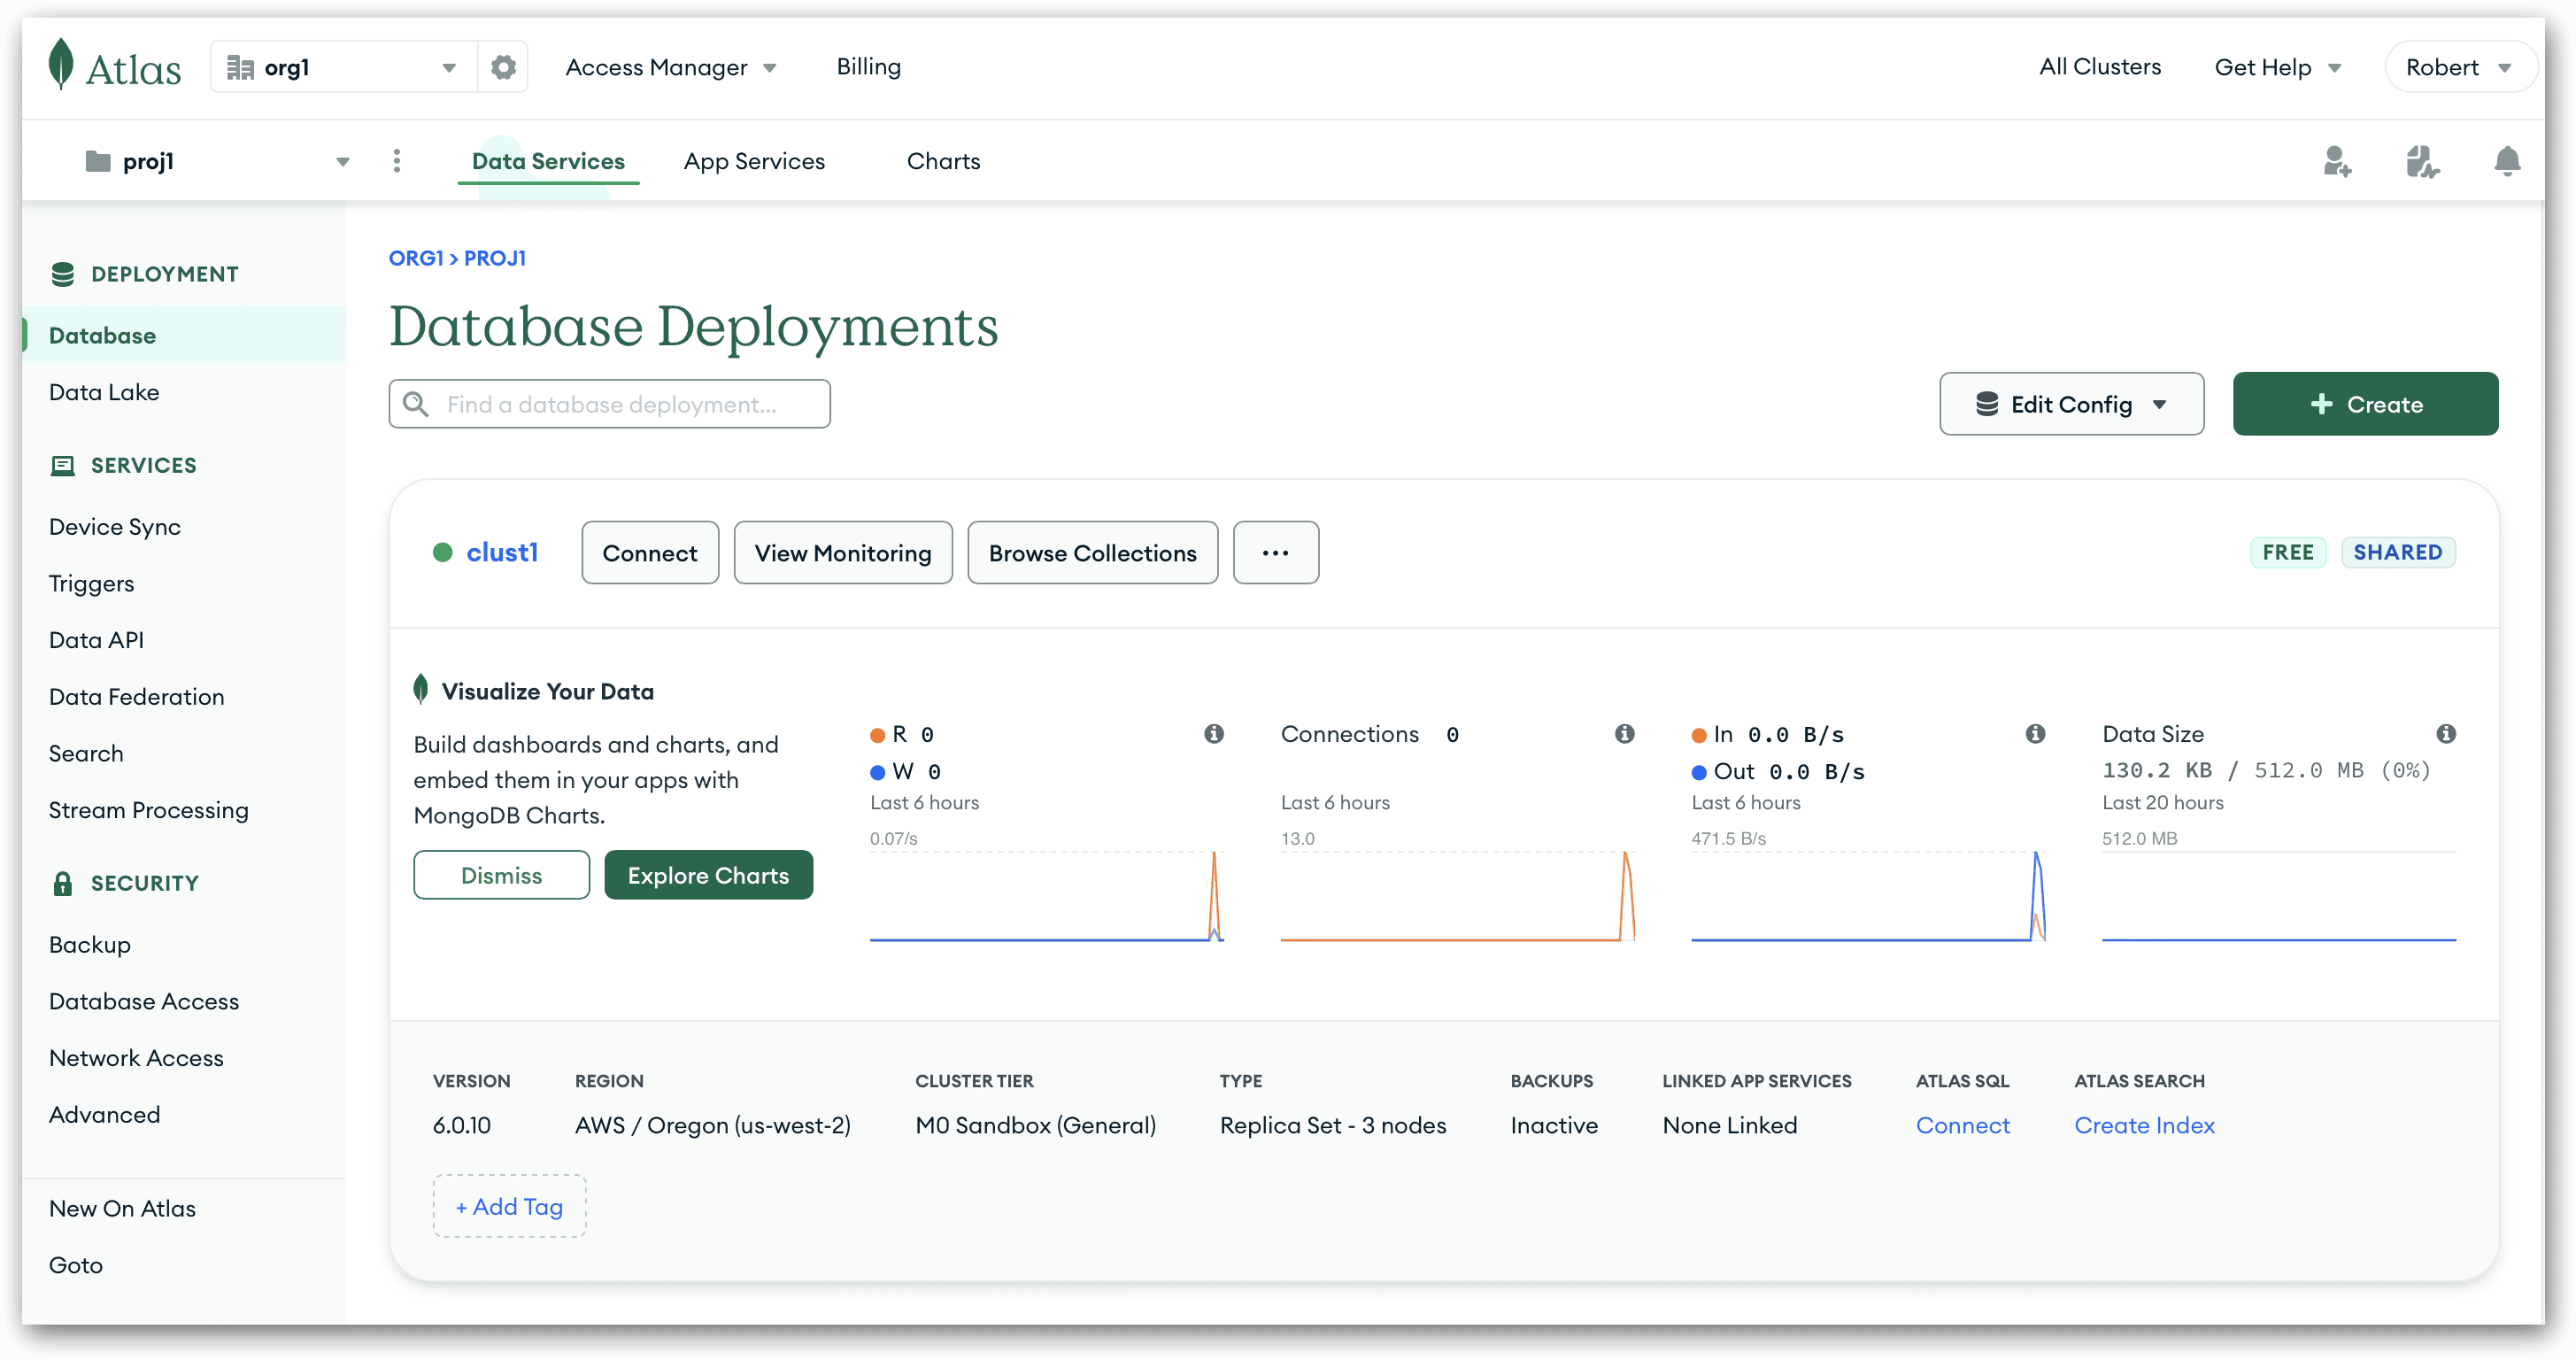
You can use whatever names you want when setting up your Atlas environment. If you use names different from mine, some of the labels you’ll see in the screenshots will not be the same as on your system, but this is a minor issue.
When first setting up your Atlas environment, you’ll be prompted to create a deployment, which steps your through the process of setting up your first cluster. During this process, be sure to select the M0 tier, which is the free service tier available for learning about MongoDB.
You’ll also need to select a provider (AWS, Google Cloud, or Azure) and a region, such as N. Virginia (us-east-1) or Tokyo (ap-northeast-1). Of course, you should pick a region as near to you as possible. Just make sure you select the M0 tier before choosing the provider and region because the free tier is not available to every location.
After you define the basic configuration, you’ll be prompted to create a database user account. This account is different from your MongoDB Atlas account, so you should provide a new username and password. Keep the password handy because you’ll need it again shortly.
After you create the database account, you must then add the IP address of the computer where you’ll be running MongoDB compass. If it’s the same computer you’re using to set up your Atlas environment, simply click Add My Current IP Address. Otherwise, you’ll need to specify the correct IP address. If you have connection issues, this is typically a good first place to start since ISP’s sometimes change addresses without you expecting it.
Note: I’m providing you with only an overview of how to set up your MongoDB Atlas environment. Be sure to carefully read the available documentation and follow the online prompts so you set up your cluster correctly, especially when it comes to selecting the select the M0 service tier. This section is meant only to offer you some pointers for getting started. It is by no means an exhaustive Atlas tutorial.
I would also not consider this method of setting up your cluster good enough for private/personal information.
After you’ve completed setting up your cluster, you should be taken to the Database Deployments screen, which might be only an abbreviated version of the one shown in the figure above. On either version of the screen, there should be a Connect button, which provides access to the connection string you’ll need for MongoDB Compass. When you click the Connect button, you’ll be presented with the Connect to dialog box, as shown in the following figure.
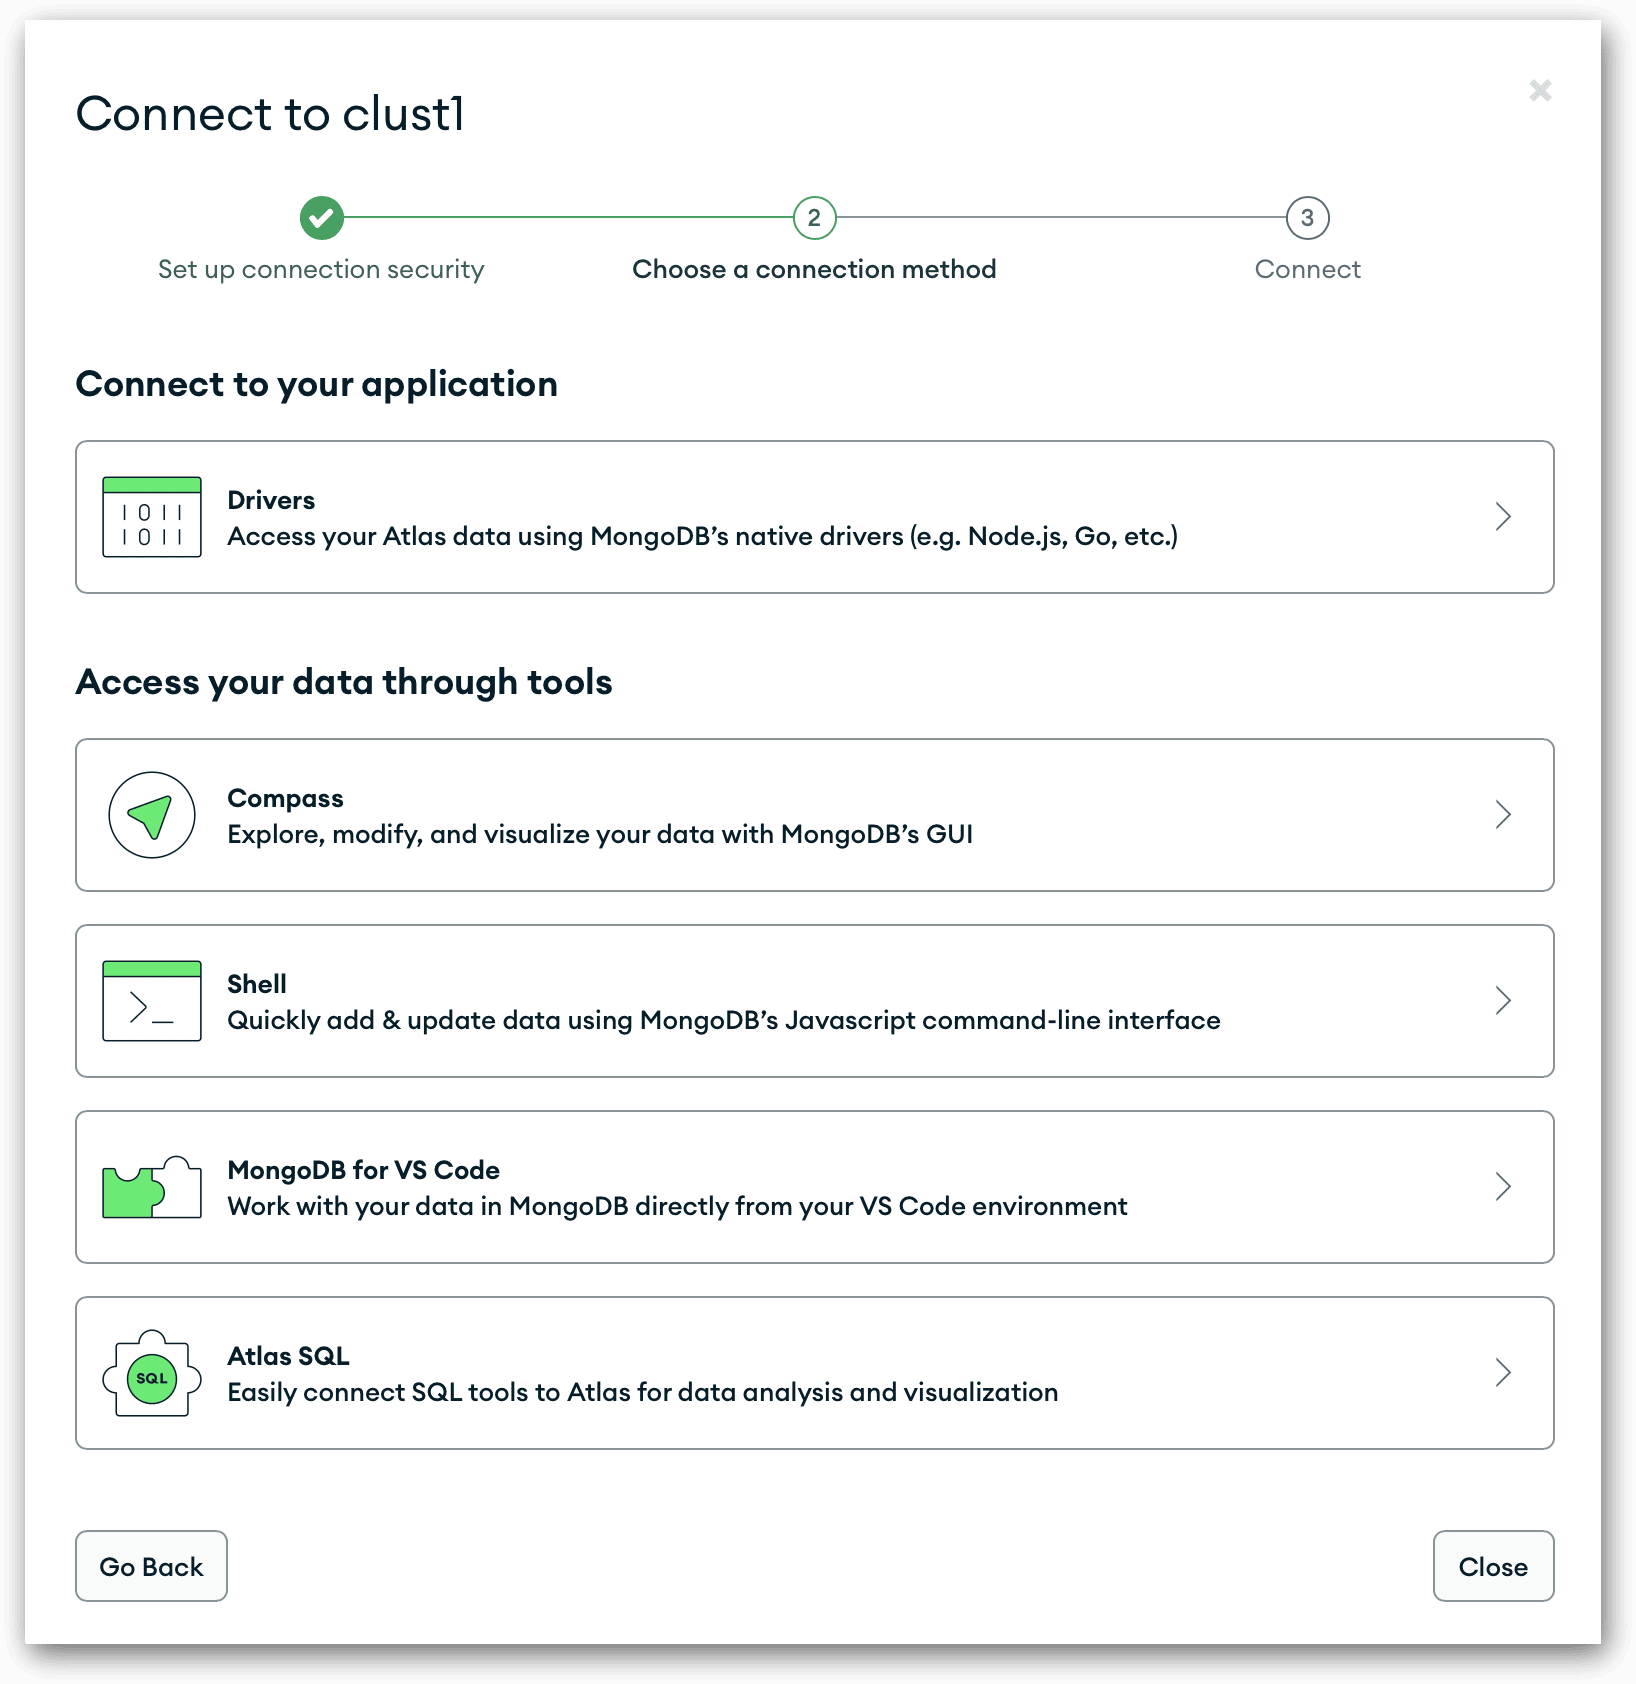
In this dialog box, click the Compass option and, on the next screen, copy the connection string to your clipboard. The connection string includes the username of the database account you just created, followed by a colon and the <password> placeholder. You’ll need to replace the placeholder with the actual password.
If you haven’t already done so, launch MongoDB Compass, which should open to the New Connection screen, shown in the following figure. In the URI text box, delete the default connection string, paste in the connection string from the clipboard, and replace the <password> placeholder with your password.
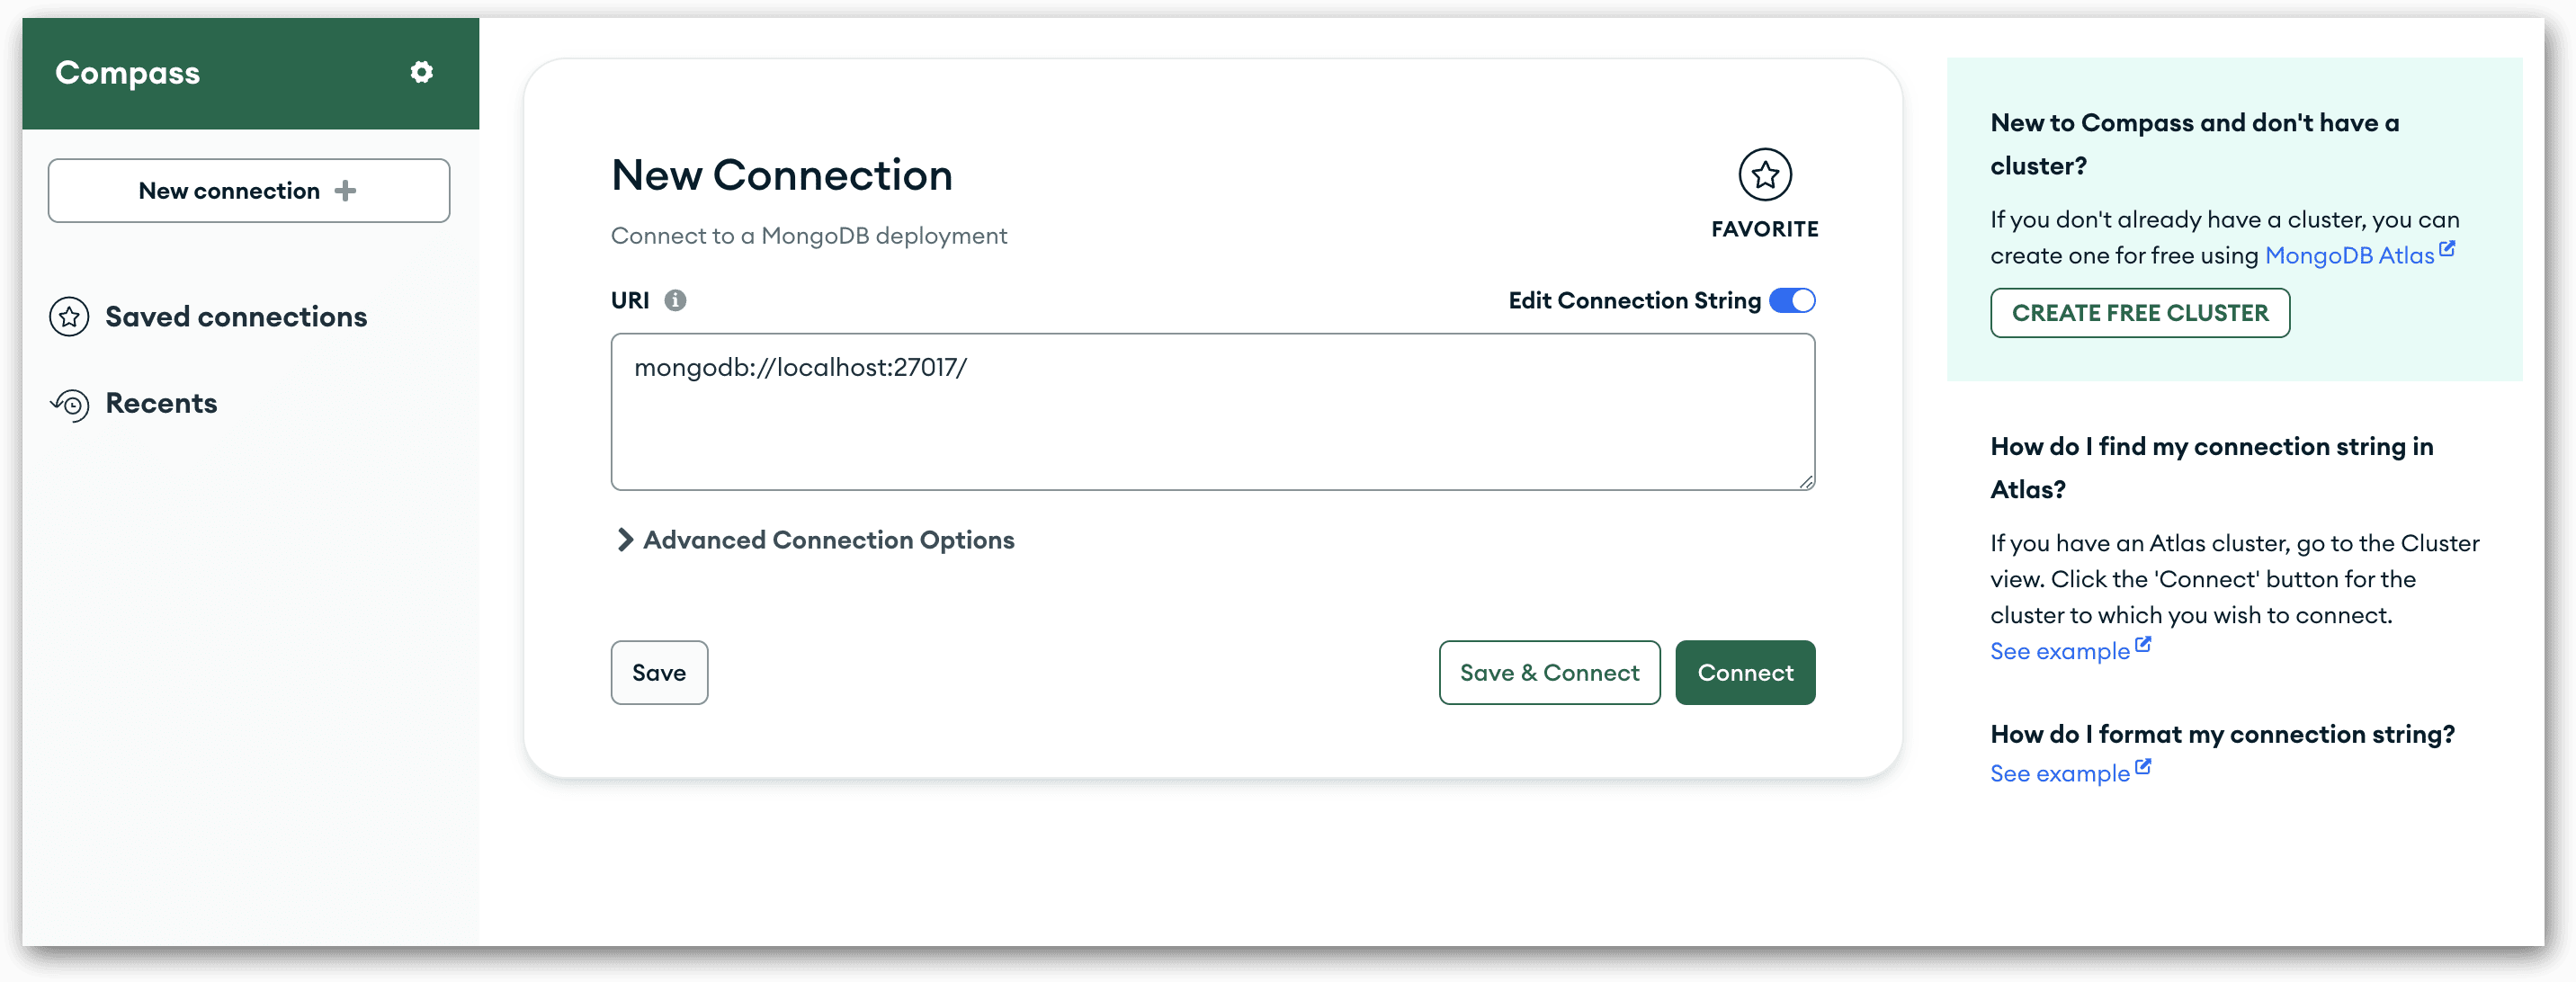
Next, click the edit icon (pencil) to the right of the New Connection title. You need to hover near the title to see the icon. In the Edit favorite dialog box, type a name for the connection, select a color, if desired, and click Save. (On my system, I named the connection connect1 and selected dark green as the color.) Now click Connect.
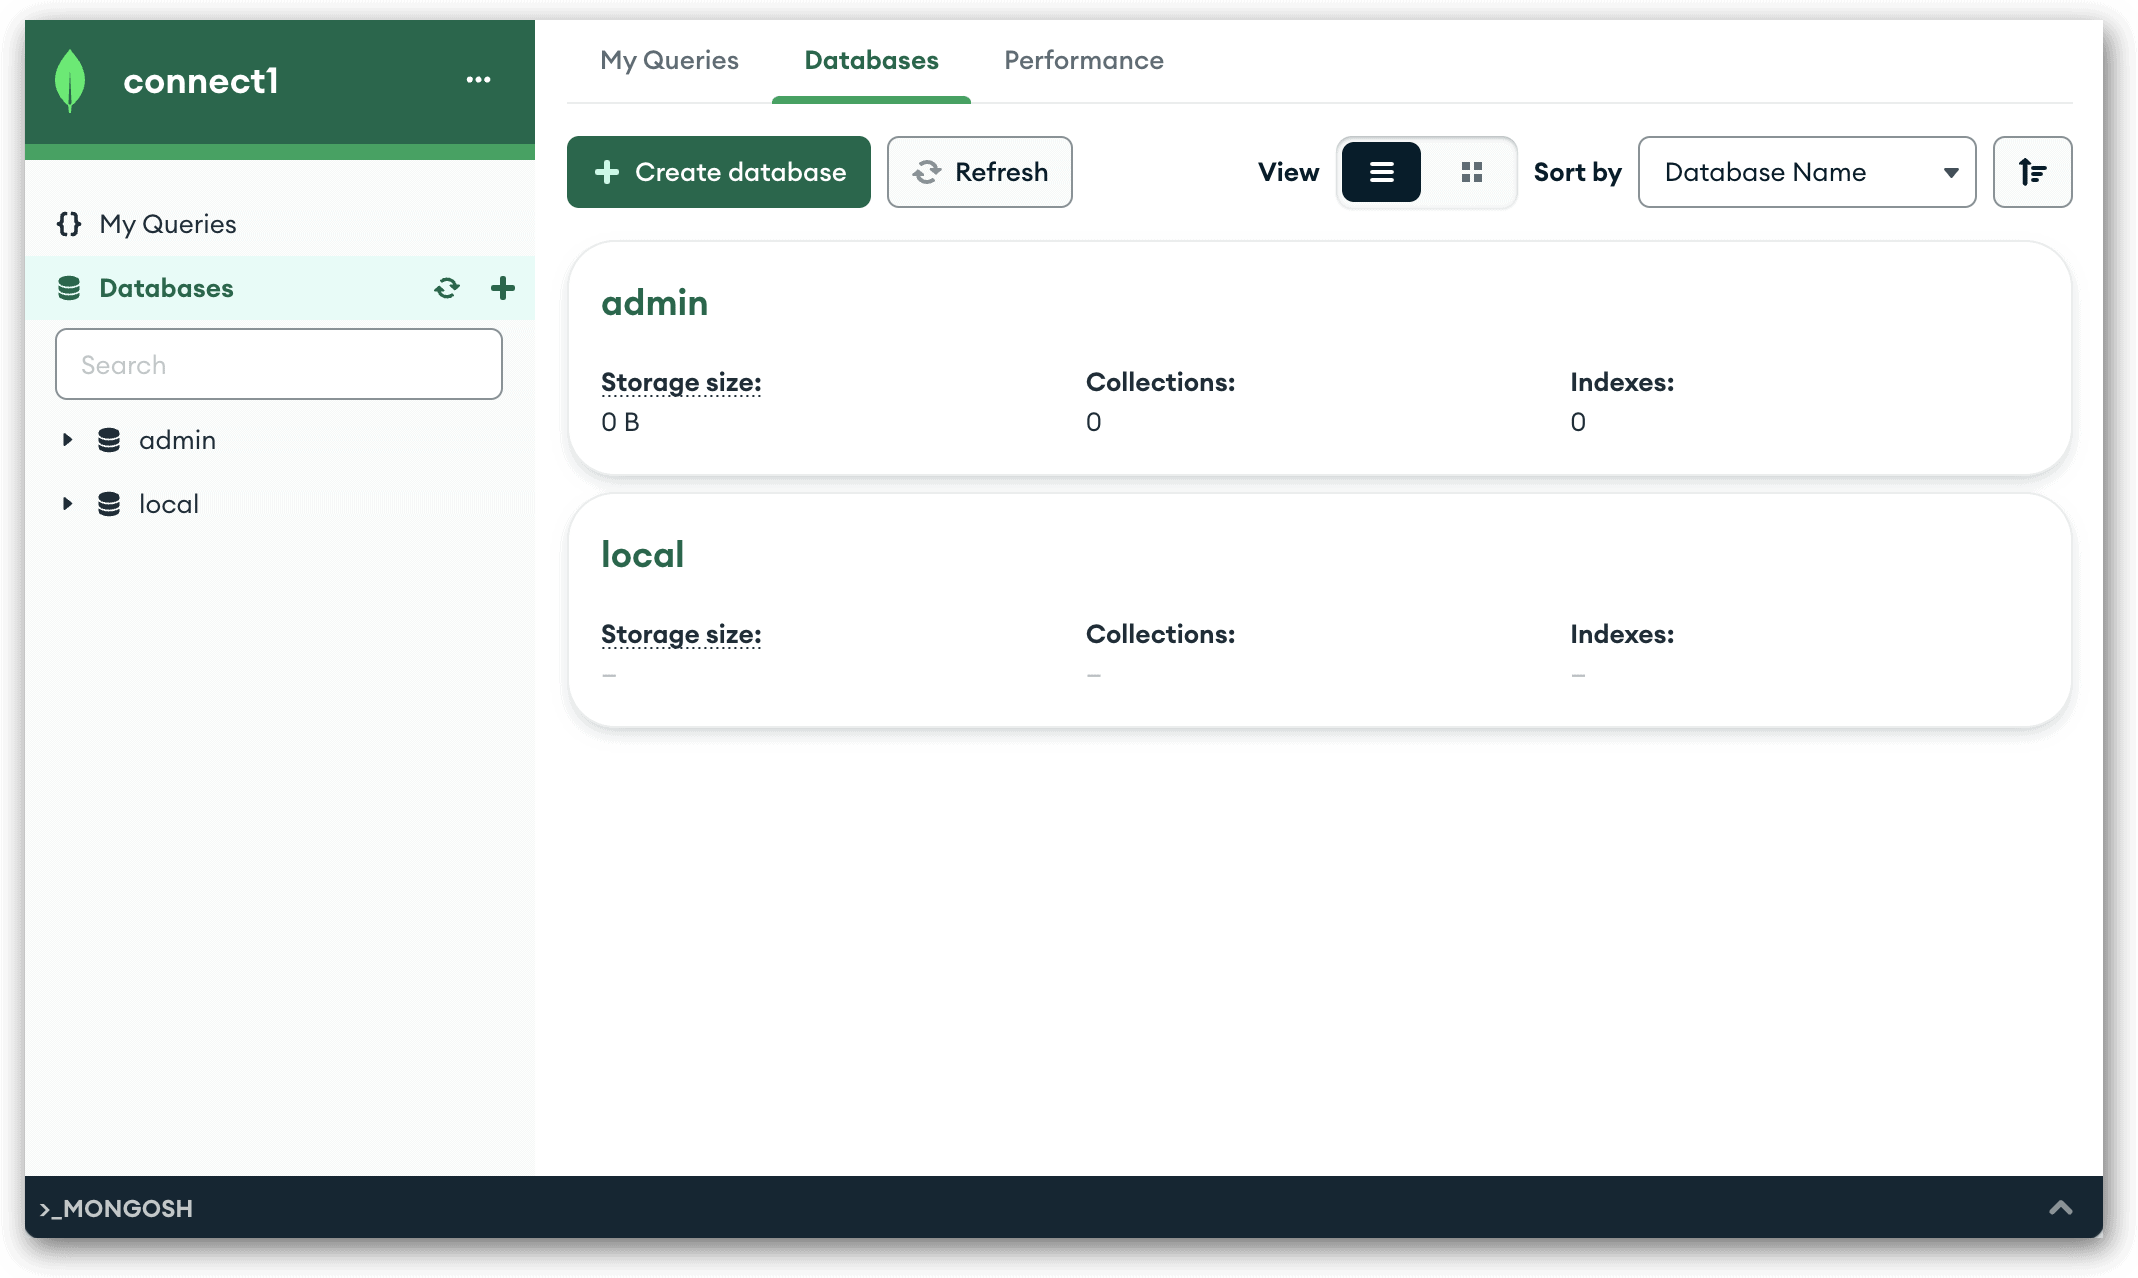
This should connect you to your Atlas cluster and display the My Queries tab in the Compass main window. The left panel should also show two databases nodes: admin and local. MongoDB automatically creates these databases for administrative purposes. You do not need to be concerned with them for now. Just don’t mess with them.
After you’ve established a connection to Atlas, you can sign out of the Atlas service through your browser. Your cluster will continue to run and be available to Compass, where you can add your first database and collection.
If for some reason, you don’t want to create an Atlas account, you can install the MongoDB Community edition on your local computer. I used Homebrew to install it on my Mac, but you’ll need to check the MongoDB documentation for your system.
Once you’ve installed the Community edition, you can create a connection in Compass that points to your MongoDB instance. If Compass and MongoDB are running on the same system, should be able to use the default connection string (mongodb://localhost:27017) when you create your connection in Compass. Refer to the MongoDB documentation for more information.
Whether you connect to Atlas or the Community edition, the process of working MongoDB data is the same. This means you’ll still be able to follow along with the examples in the rest of the article, as well as with those in the rest of the series, because the core functionality is the same in both environments.
Creating a MongoDB database and a collection
Now that we’ve gotten through the setup process, we can move onto something more interesting, which is to create a database and a collection. In MongoDB, a database is simply a container for one or more collections. A collection, in turn, is a structure for holding zero or more documents, similar to a table in a relational database.
Normally, the documents in a collection are related in some way, like rows in a relational table, but this is not an absolute requirement in MongoDB. In fact, the documents don’t even need to adhere to the same structure like a table does. The ability for documents to have different structures within the same collection is a big part of MongoDB’s flexibility. That said, MongoDB does let you define validation rules to enforce a data structure on a collection’s documents, something I’ll be discussing later in this series.
With that in mind, let’s returns to MongoDB Compass. When you click the Databases node in the left panel, Compass displays the current databases in the main window, as shown in the following figure.
Currently, only the admin and local databases should exist, unless you already created other databases. Even if you have, we’re now going to add our own database and collection, which we’ll do in a single step. When you add a database in Compass, you must add a collection at the same time.
Start by clicking the Create database button (plus sign) to the right of the Databases node in the left panel. This launches the Create Database dialog box, shown in the following figure.
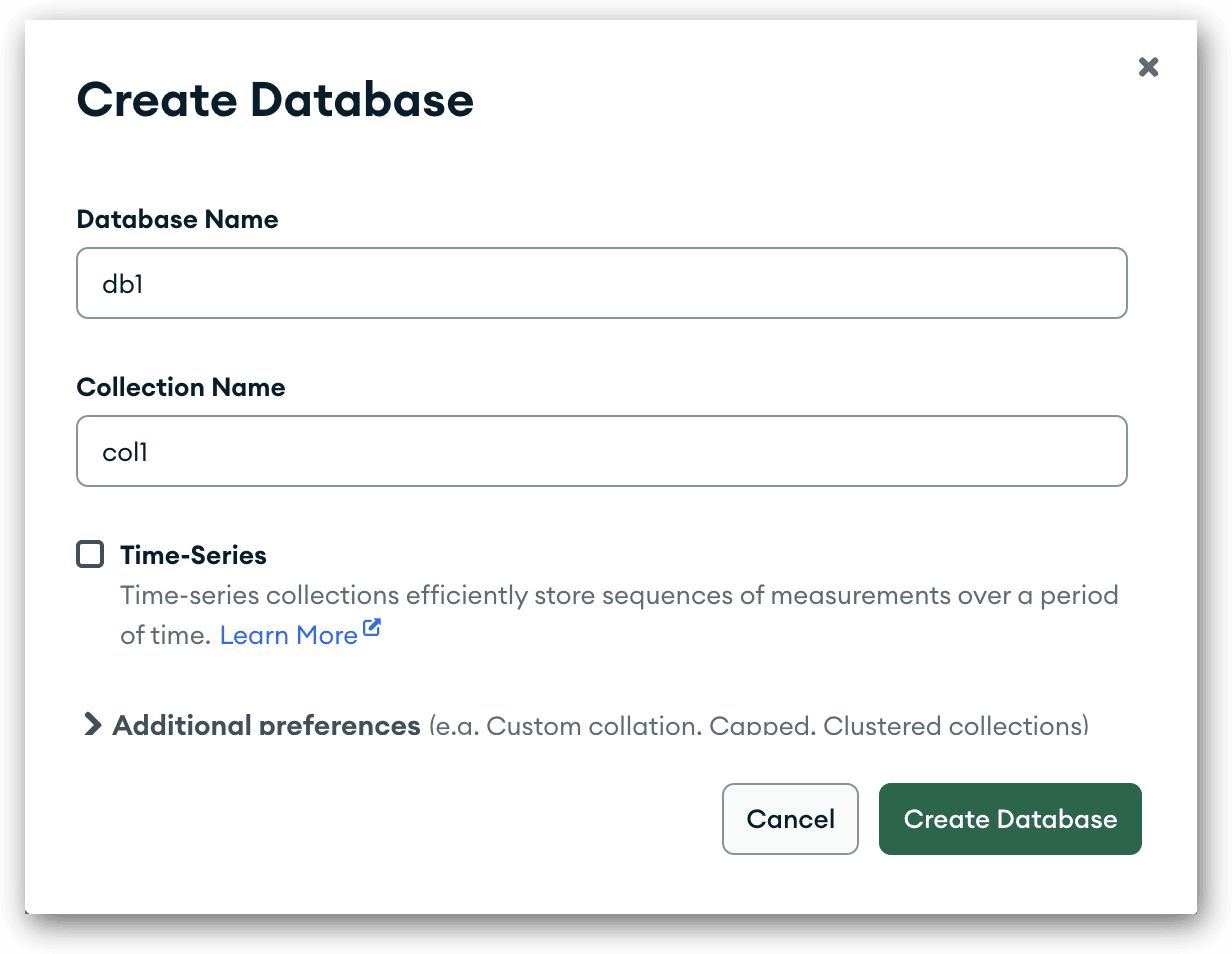
I’ve already filled in the database name (db1) and collection name (col1), but you can name them whatever you want. For now, we’re going to create a basic collection. Later in the series, we’ll discuss other collection types.
After you’ve provided the database and collection names, click Create Database. MongoDB will create both the database and collection and return you to the main Compass window. The db1 database node is now be listed in the left panel, along with the col1 collection node, which should be selected, as shown in the following figure.
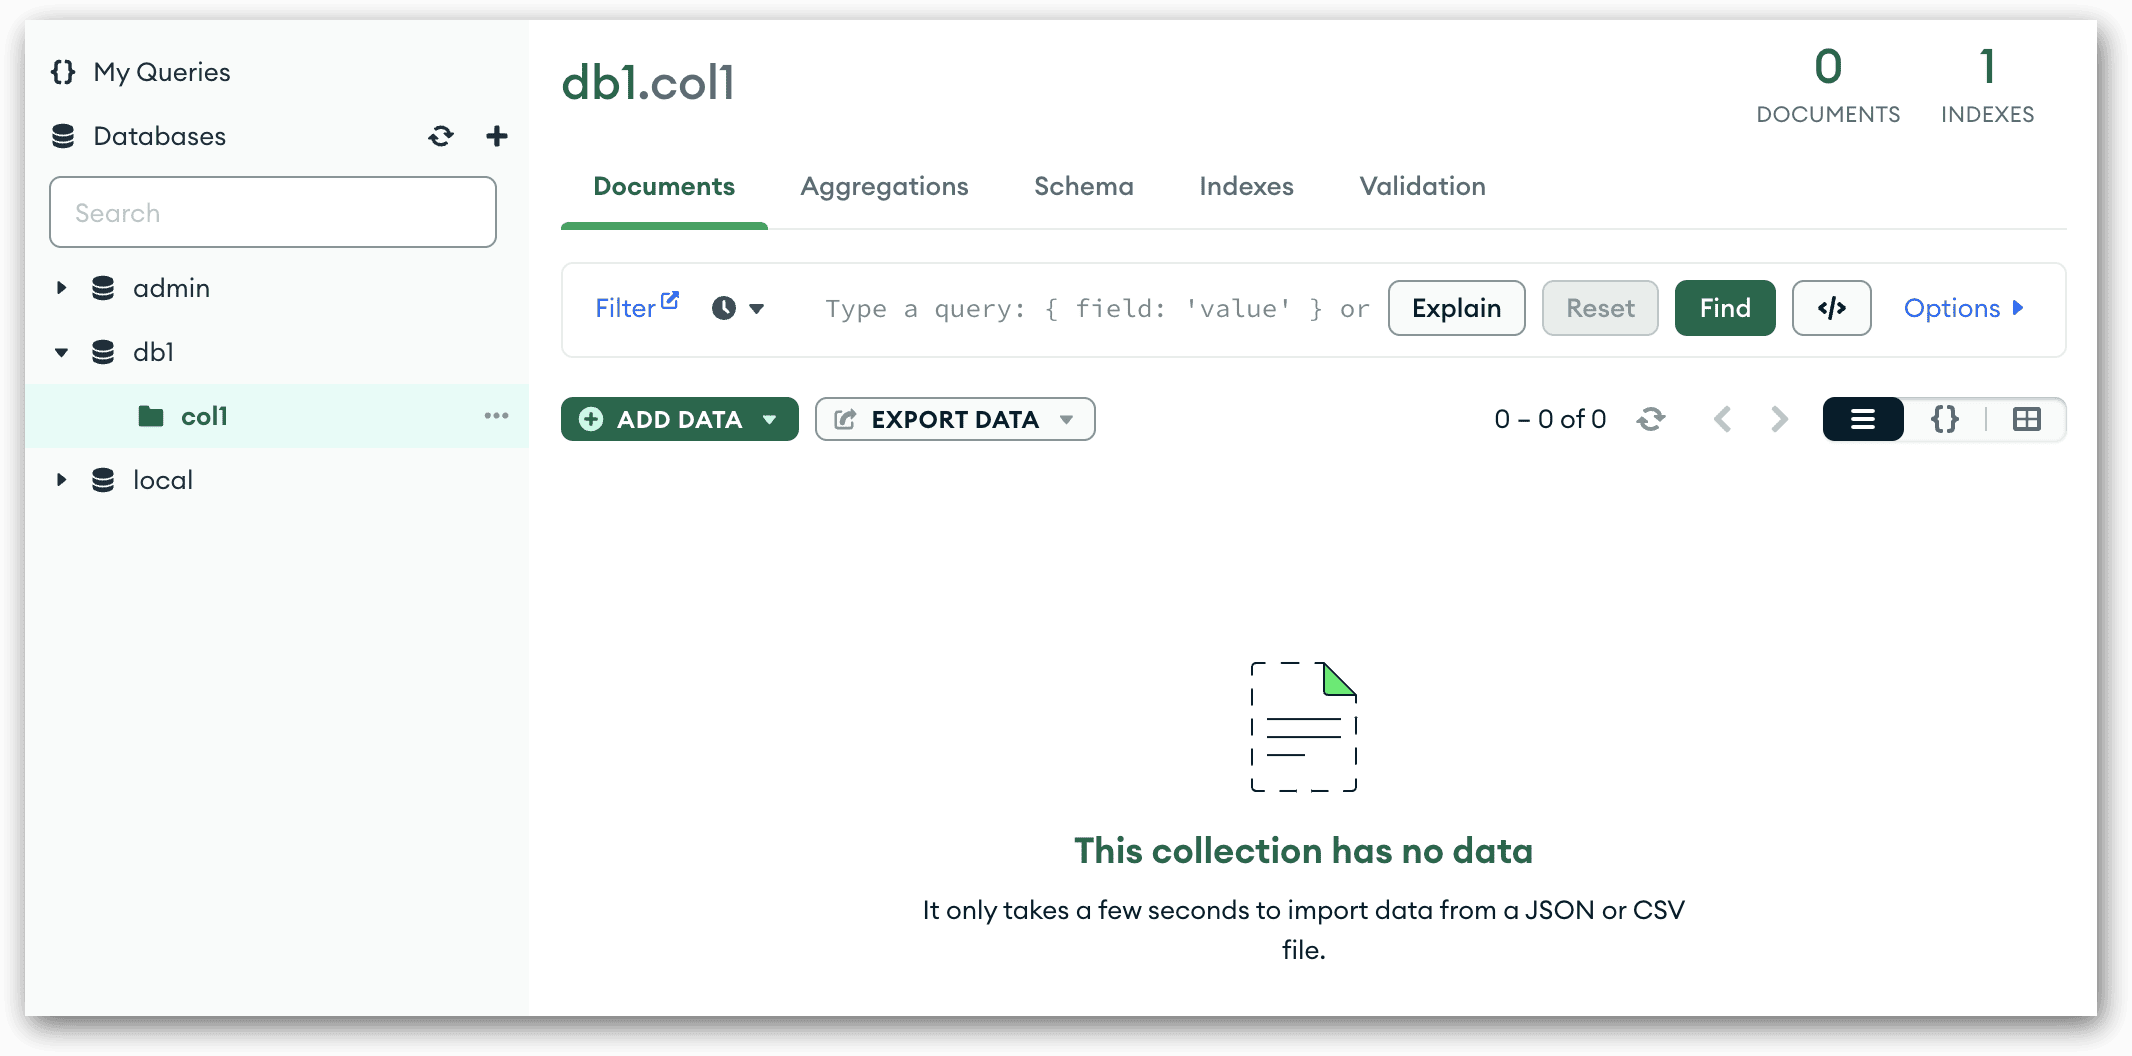
Not surprisingly, the main Compass window indicates that the collection contains no data, but now that you have the database and collection in place, you can start adding documents, which is our next step.
Adding documents to a MongoDB collection
In MongoDB, a document is a data structure that contains one of more sets of field/value pairs. The pairs are separated by commas and enclosed in a set of curly brackets. For example, the following code represents a simple document that contains three field/value pairs:
|
1 |
{ "state": "Oregon", "city": "Portland", "zip": 97201 } |
The first field/value pair is "state": "Oregon". The field’s name is state, and its value is Oregon. The other two field/value pairs work much the same way. The only difference is that the final value is not enclosed in quotation marks because it is being defined as an integer, not a string. MongoDB infers the data types based on the values you provide. For example, you might want to save the zip field as a string value, rather than integer, in which case, you would enclose it in quotes. In addition, MongoDB provides methods for overriding the default behavior so you can define a field with a specific data type.
Although this is a fairly basic document, it gives you an idea of how documents are structured. Later in the series, I’ll go into the document structure in much more detail. Until then, I suggest that you look around for examples of different types of MongoDB documents. You’ll find that even the more complex documents follow the same underlying structure of field/value pairs.
Now let’s add this document to the col1 collection. In MongoDB Compass, make sure that the collection is selected in the left panel. Then, in the main window, click the Add Data drop-down arrow and click Insert document. In the Insert Document dialog box, delete the existing text and type or paste the above code. The dialog box should now look like the following figure.

After you’ve typed in the document, click Insert. MongoDB will add the document to the col1 collection and return you to the main Compass window, with the col1 collection node still selected. The document should now be listed in the main window, as shown in the following figure.
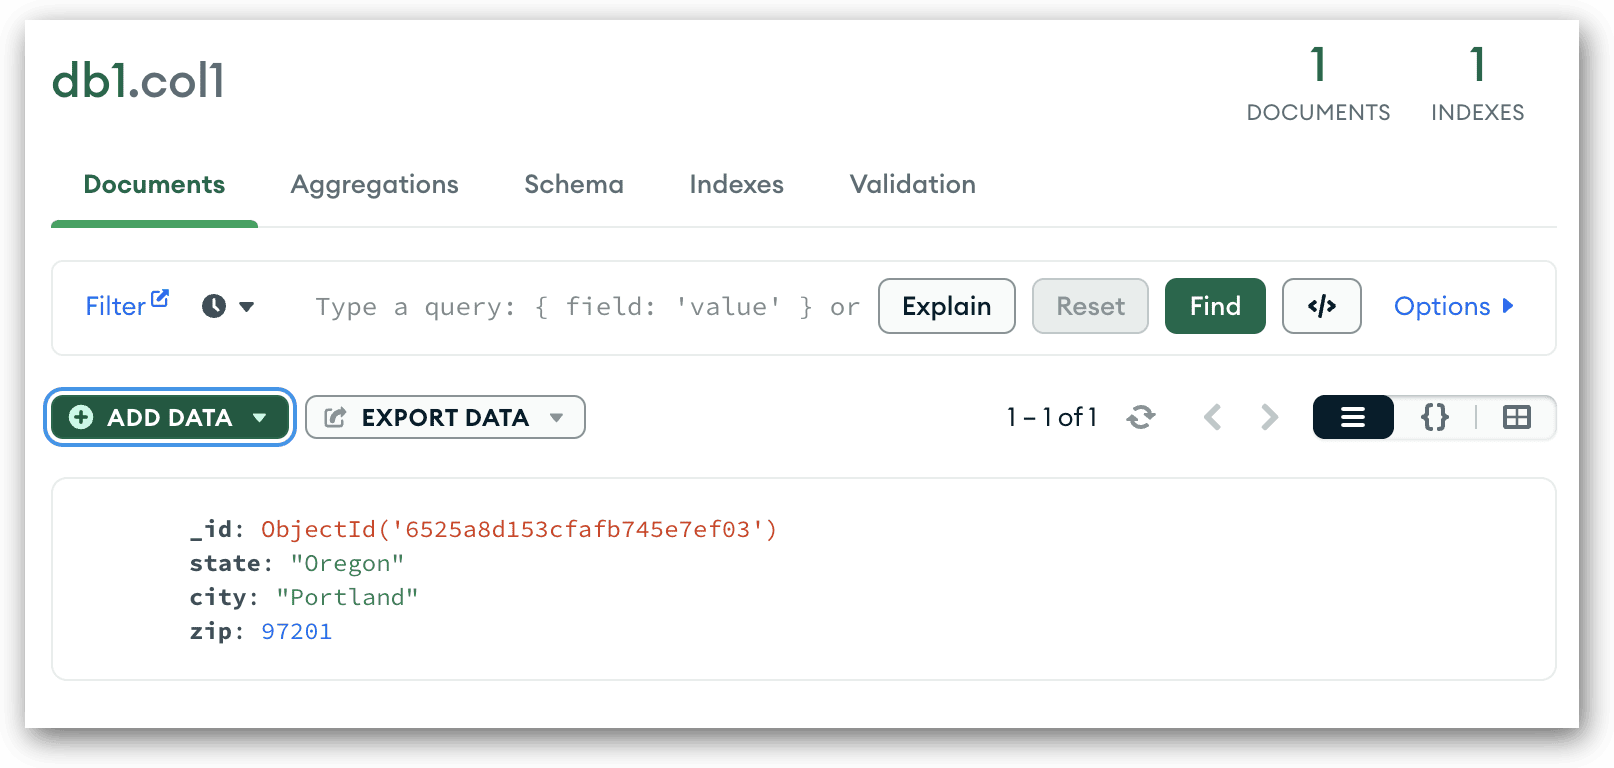
Notice that the document contains the _id field. All MongoDB documents must include this field. It acts like a primary key that uniquely identifies the document within the collection. If you don’t supply the _id field, MongoDB adds it automatically and assigns a unique identifier as its value, which is configured with the ObjectId data type.
In some cases, you might want to provide your own _id field, such as when importing the data from another data store. For example, the following document is the same as the previous one, except that it now includes the _id field:
|
1 |
{ "_id": 10001, "state": "Oregon", "city": "Portland", "zip": 97201 } |
If you were to add this document to a collection, MongoDB would preserve the _id field that you defined and would not generate a unique identifier. However, if the collection already contains a document with the same _id value, MongoDB will return an error instead of adding the document. A document’s _id value must always be unique within a collection. Even if MongoDB is generating the _id values, it would never add a duplicate value.
In Compass, you can add multiple documents to a collection at one time, taking the same approach as with a single document. However, you must enclose the documents in square brackets (creating what is in effect an array) and separate the documents with commas. For example, the following code defines three documents:
|
1 2 3 4 5 |
[ { "state": "California", "city": "San Francisco", "zip": 94102 }, { "state": "Colorado", "city": "Denver", "zip": 80204, "nickname": "Mile High City" }, { "state": "Washington", "city": "Seattle", "zip": 98101, "population": "733,919 (2021)" } ] |
To add these documents, follow the same steps as before. Click the Add Data drop-down arrow and click Insert document. In the Insert Document dialog box, delete the existing content, type or paste the above code, and click Insert. MongoDB adds your documents to the collection.
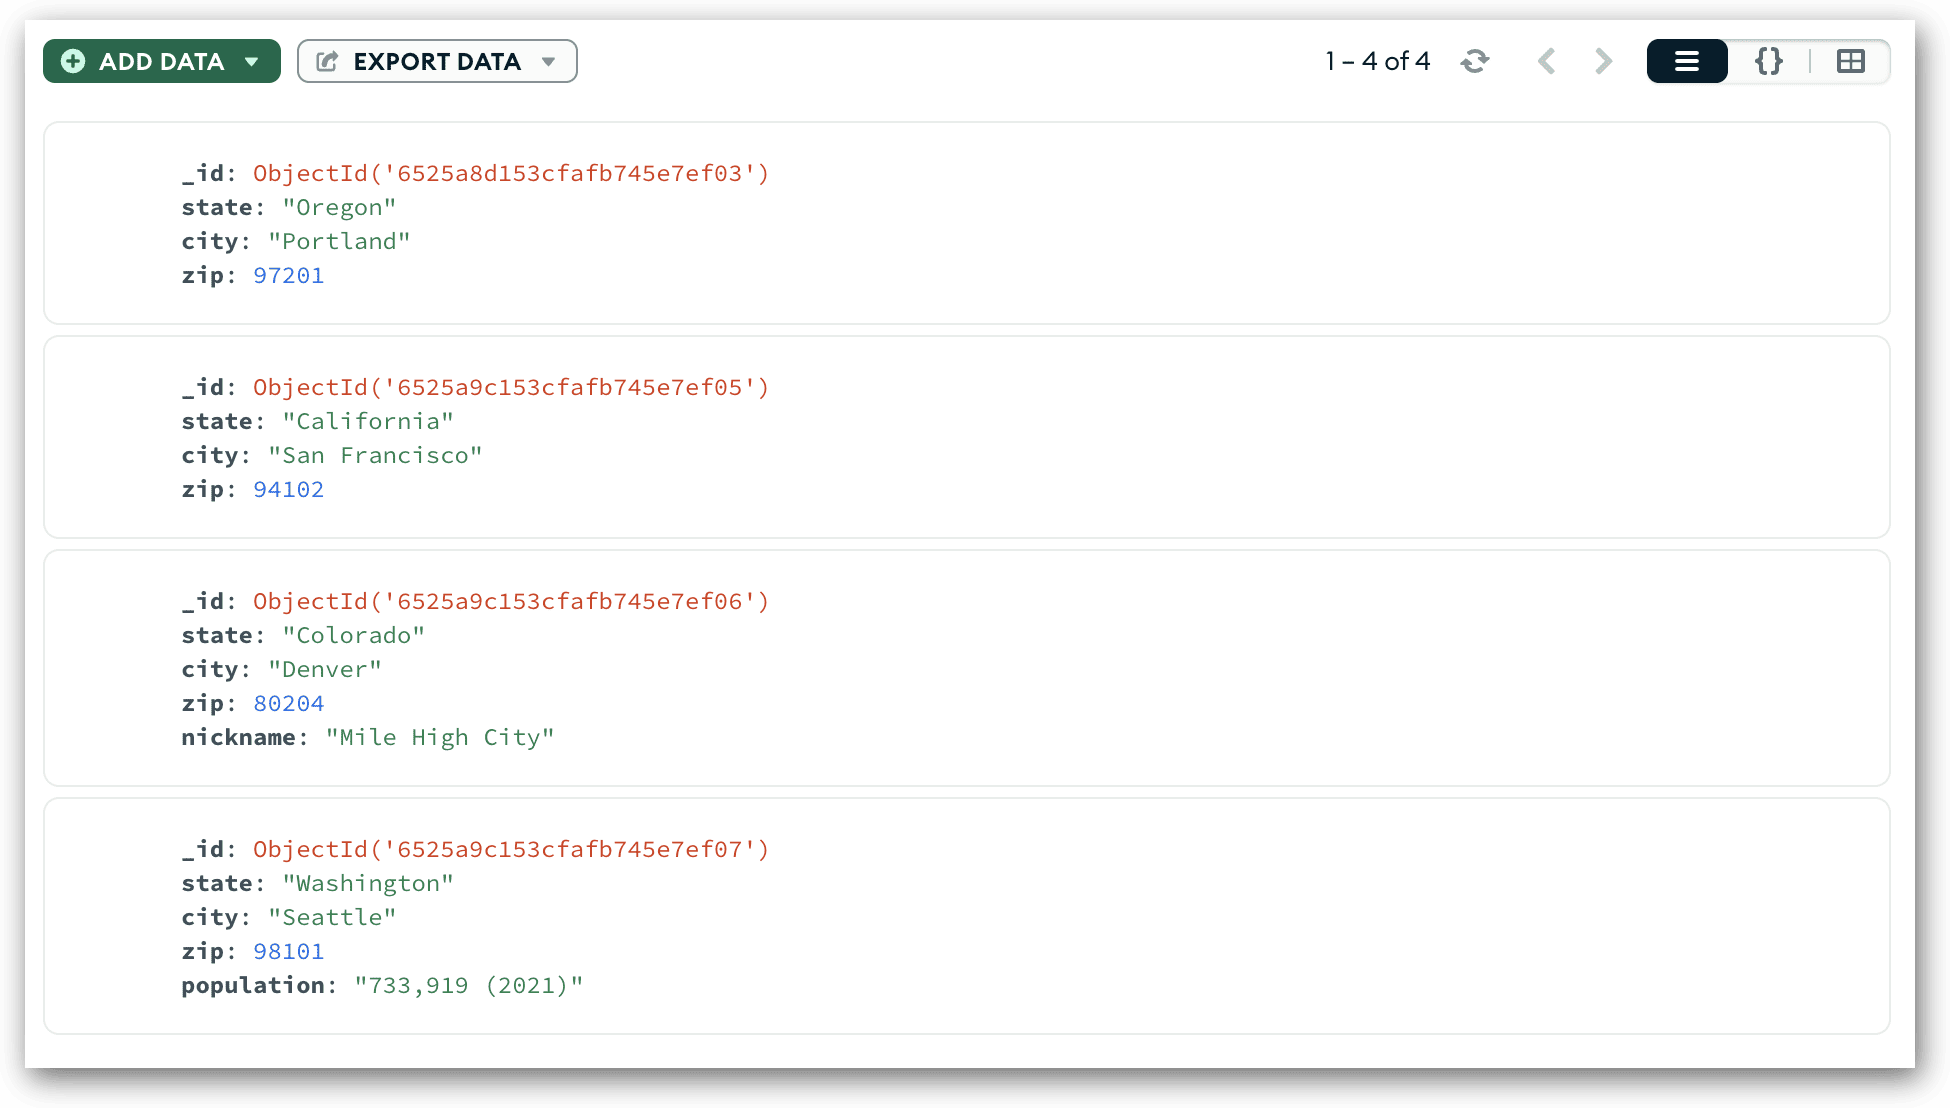
You might have noticed that each document has a slightly different structure. For example, the second document includes a nickname field, and the third document includes a population field. MongoDB lets you create documents with different structures to meet you specific business needs.
Viewing documents in a MongoDB collection
After you add documents to a collection, you can view them in the main Compass window, as you saw in the previous section. For example, the following figure shows the main window with the additional three documents.
This view of the data—referred to as List View—is only one of three views that Compass offers. List View is the default view and provides a simple format for scrolling through the documents and viewing their content. In addition, you can expand embedded documents and arrays, when they exist.
You can also display the documents in JSON View or Table View. To select a different view, click the appropriate button near the upper-right corner of the data display area. The middle button switches to JSON View, which displays the documents as properly formatted JSON objects, as shown in the following figure.
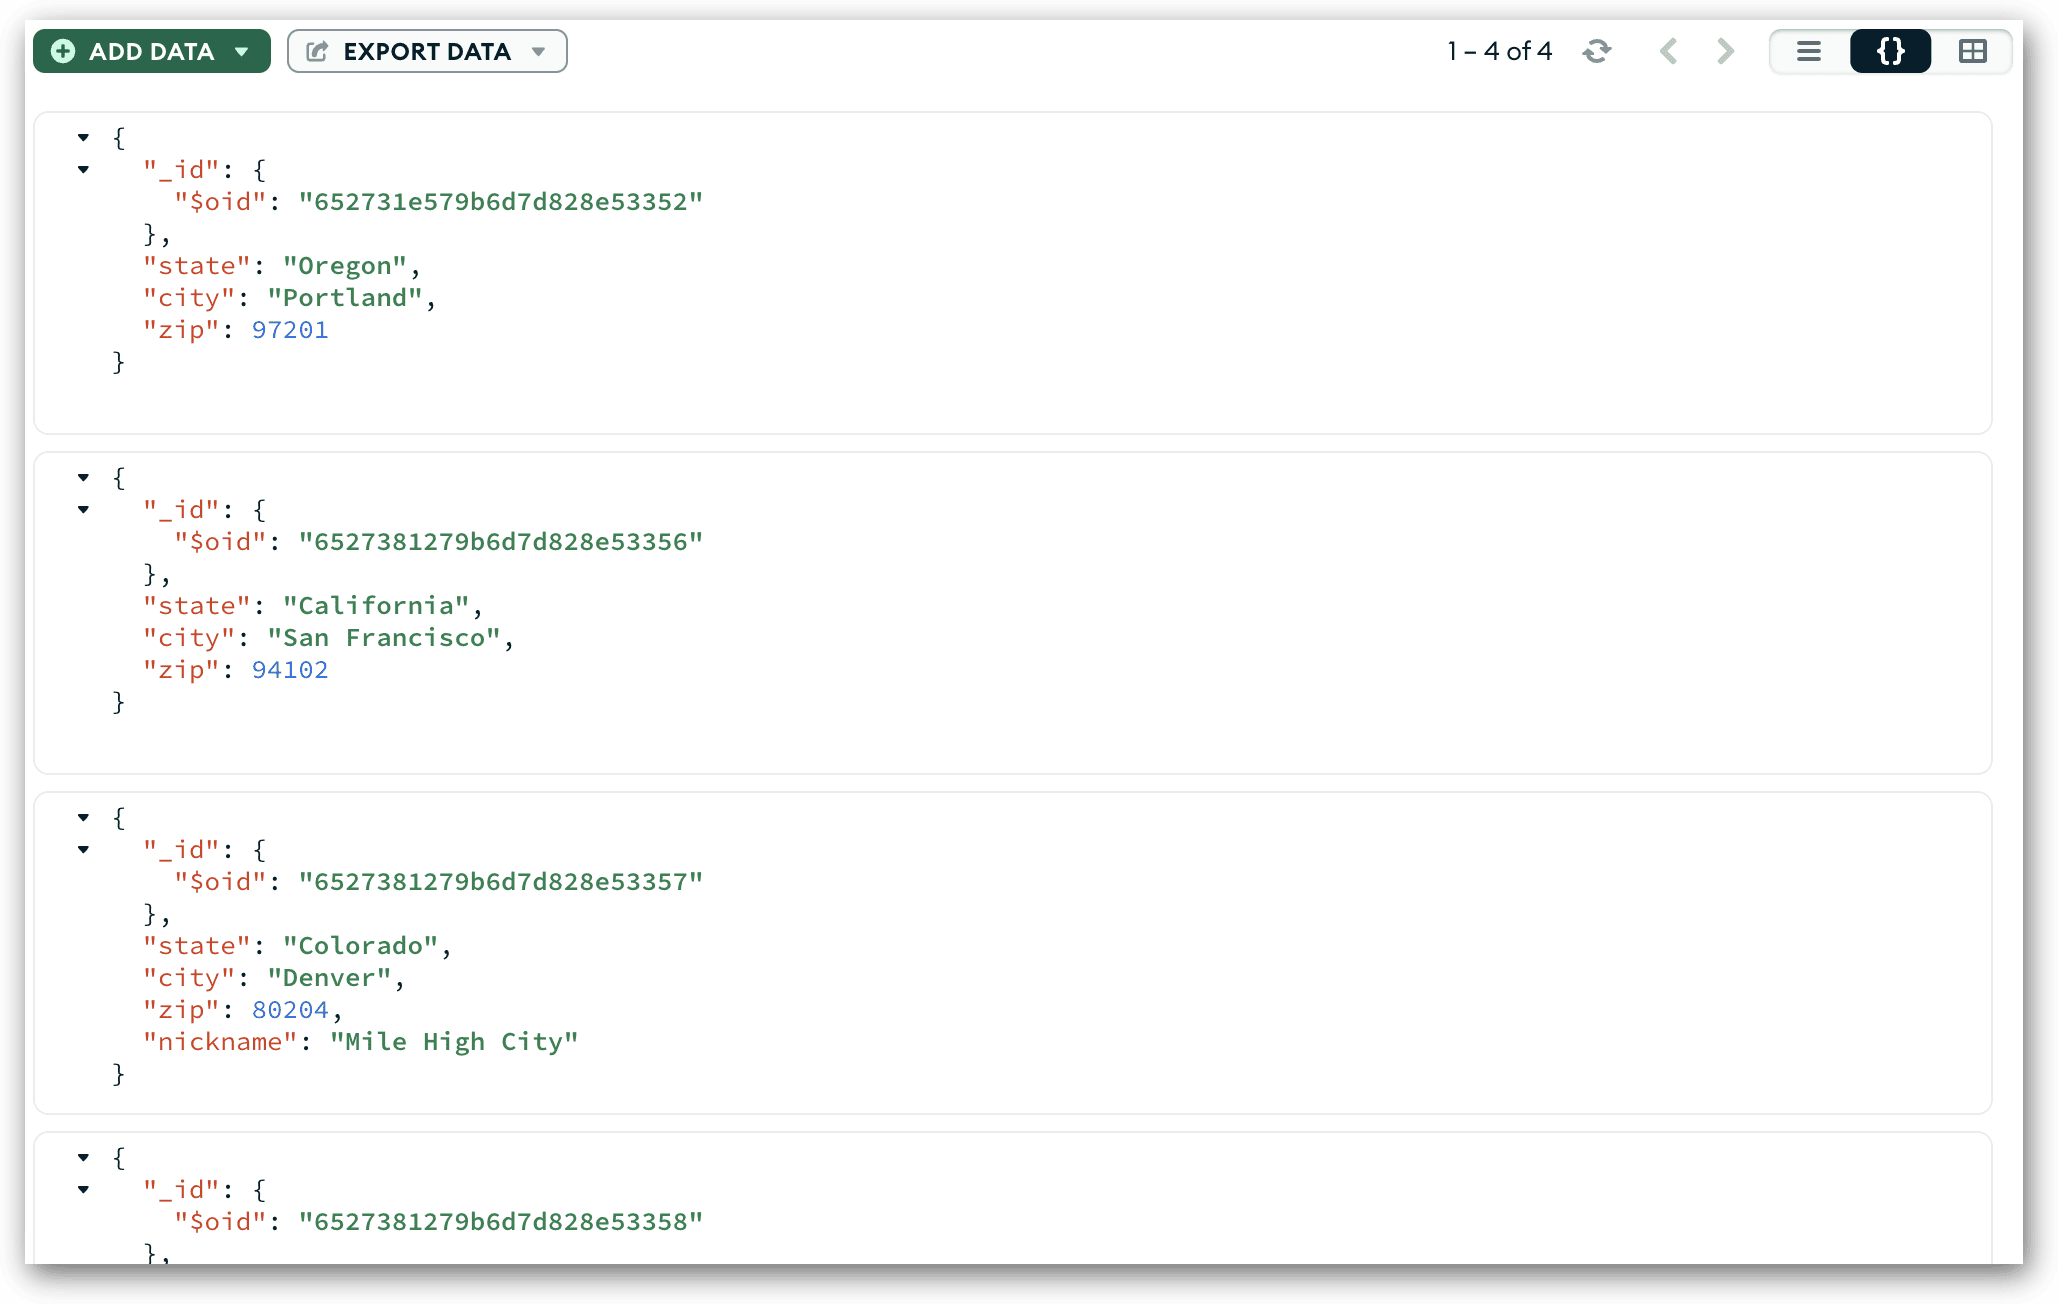
In JSON View, the value for the auto-generated _id field is treated an embedded document with a single $oid field. The $oid field is used in place of ObjectId when rendering the data as JSON.
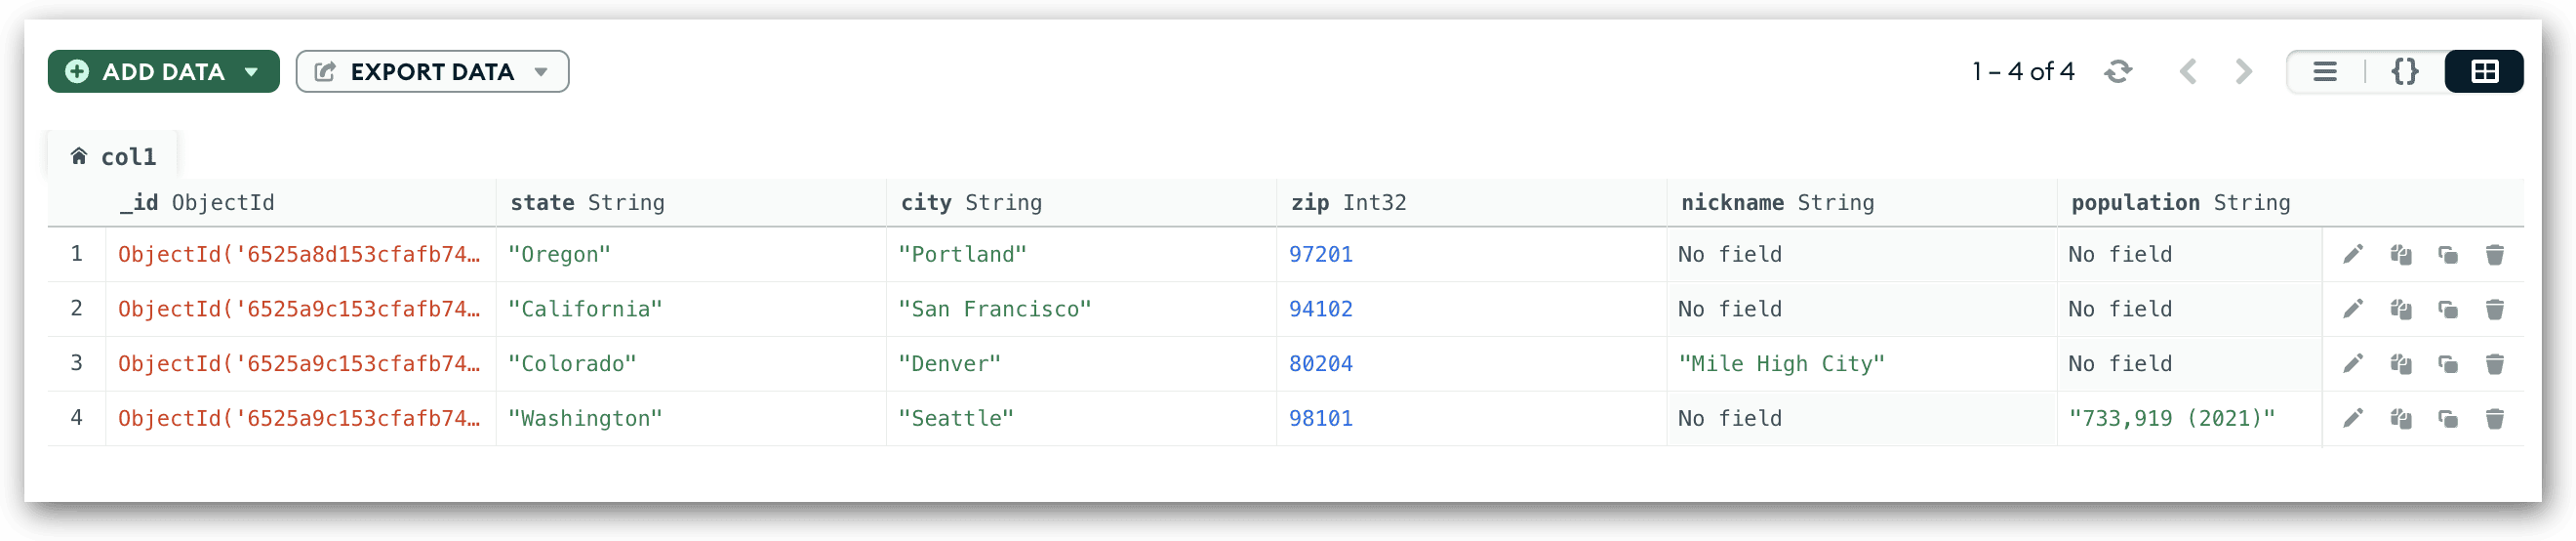
The third view that Compass supports is Table View, which displays the data in a tabular format similar to a spreadsheet or table in a relational database. You can get to this view by clicking the right button in the upper-right corner of the data area. The following figure shows the four documents in Table View. If a document does not contain a field that exists in another document, Compass displays No field as the field value.
There is much more you can do in each view than what we’ve covered here. For example, you can edit, copy, clone, or remove a document. As we progress through this series, I’ll be covering a wide range of topics about the various ways you can work with MongoDB documents, using both the Compass GUI and the embedded MongoDB Shell.
In the meantime, feel free to delete the collection and database at any time, unless you want to play with them for a while. When you’re ready to delete them, click the options button (ellipsis) to the right of the col1 collection node in the left panel and then click Drop collection. In the Drop Collections dialog box, type the collection name in the text box and then click Drop Collection. When you drop a collection that is the only one in the database, MongoDB also drops the database.
Getting started with MongoDB
In this article, I introduced you to the MongoDB platform and provided an overview of how to connect to MongoDB Atlas from the Compass interface. You also learned how to create a database and collection and add a few documents to that collection. I’m hoping that what I’ve provided here will help you get started with MongoDB so you have a basic foundation on which to build as we progress through this series.
In the articles to follow, I will expand on many of the concepts I introduced here and dig into a number of other ones. As part of this process, we’ll be going a lot deeper into the document structures and the various ways you can query those documents. Queries are, in fact, where you’ll likely be spending most of you time with MongoDB, so the better you understand the basics, the better prepared you’ll be for moving on to more advanced topics.
This document contains proprietary information and is protected by copyright law.
Copyright © 2026 Red Gate Software Limited. All rights reserved


Load comments