

This article is part of Robert Sheldon's continuing series on Mongo DB. To see all of the items in the series, click here.
In the previous article in this series, I discussed how to use a find statement to retrieve data from a MongoDB collection. However, the find method is not the only option for retrieving document data. Another important method is aggregate, which lets you group documents, perform calculations on those groups, and in other ways extract the data you need from your database collections.
Along with the find method, the aggregate method is one of the most important language elements you’ll use when working with MongoDB data. The method enables you to retrieve the type of information that decision-makers need when evaluating an organization’s activities and operations. The aggregate method can help them identify important trends, uncover hidden patterns, and in other ways better understand the data.
In this article, I introduce you to the aggregate method and walk you through the process of creating a query, with the goal of helping you establish a foundation on which you can start building your own queries. At its core, an aggregate statement is fairly straightforward, but as you start digging into the underlying elements, you’ll find that things can grow increasingly complex. The better you understand how these elements work, the more effectively you can take advantage of the method’s flexible and robust nature to get at the data you need.
Note: For the examples in this article, I used MongoDB Atlas and MongoDB Compass. The last section of the article—“Appendix: Preparing your MongoDB environment”—provides information about how to set up your environment and includes a link to a .json file that you’ll need to download if you want to try out these examples for yourself.
Introducing the aggregate method in MongoDB
As you’ll recall from the previous article, MongoDB Compass provides two options for querying documents in a collection. You can use MongoDB Shell, which is embedded in Compass, or you can use can use the graphical features built into the Compass interface. When aggregating document data, you can choose either one of these approaches just like when using the find method.
For this article, I focus on MongoDB Shell and how to use it to build a statement based on the aggregate method. The method serves as a counterpart to the find method you learned about in the previous article. As its name suggests, the aggregate method can be used to aggregate a collection’s document data, but it can also be used in other ways to transform the data and control its output.
Even if you plan to use the graphical components in Compass, you should still understand how the aggregate method works so you can get the most out of your aggregations. You can use the method to group, refine, aggregate, and in other ways manipulate the documents in a collection. The following syntax provides a high-level overview of the basic elements that go into an aggregate statement:
|
1 |
db.collection.aggregate( [ pipeline ] , { options} ); |
An aggregate statement includes both required and optional components, as described in the following breakdown:
- db. System variable for referencing the current database and accessing the properties and methods available to the database object.
- collection. The name of the target collection, For this article, we’ll be using the
salescollection, which is part of thereportsdatabase, as described in the appendix. - aggregate. A method available to the collection object for aggregating documents in that collection.
- pipeline. A required parameter that defines one or more stages for carrying out the aggregation. The stages are processed as a single pipeline and are progressive in nature, with each one building on the previous one.
- options. One or more optional settings that can be included in an
aggregatestatement to better refine the query.
This article focuses primarily on the pipeline component because of the critical role it plays in aggregating data. If you want to learn about more about the options available to the aggregate method, refer to the MongoDB topic db.collection.aggregate(). The article provides a description of each option and how to the apply it to your aggregate statements.
Pipelines and Stages Introduction
At the heart of any aggregate statement is the pipeline, which is made up of a series of stages for manipulating the documents in the target collection. The pipeline stages are defined as an array of embedded documents, with one document for each stage, as shown in the following syntax:
|
1 |
[ { stage1 }, { stage2 }, { stage3 }, ... ] |
The aggregate method supports a wide range of stage types. Each type is identified by a keyword, which is preceded by a dollar sign. The keyword provides a general sense of the type of operation that the stage carries out. The stages are processed in a linear fashion—in the order they’re defined in the pipeline—with each one building on the previous one as the documents move through the pipeline.
Each stage, except for the first one, uses the output from the previous stage as its own input. The output from that stage is then used as input for the next stage in the pipeline. Input for the first stage is the collection itself. Output from the last stage represents the query results. For example, a four-stage pipeline flows like this:
collection -> stage1 -> stage2 -> stage3 -> stage4 -> query results
In this example, stage2 uses the data output from stage1, stage3 uses the data output from stage2, and so on. If you were to apply this logic to the statement’s syntax, it would look similar to the following:
|
1 2 3 |
db.collection.aggregate([ { stage1 }, { stage2 }, { stage3 }, { stage4 } ]); |
You can define your stages in whatever order best satisfies your business and performance requirements. You can also repeat stage types where necessary to get at the data you need.
The pipeline is extremely flexible, but you must ensure that each stage returns the correct data or the final output could be incorrect. For example, employing incorrect logic in stage1 will skew the results returned by stage4. In some cases, a problem in an early stage will require that you update all subsequent stages in the pipeline because of the way each one relies on the output from the previous one.
In the rest of this article, I’ll walk you through the process of building an aggregation based on the documents in the sales collection of the reports database. The goal of the aggregation is to determine the number of products sold for each product type, along with the average price for that product. The results will be limited to only those products sold in stores, as opposed to phone orders or online orders. The results will also be sorted by product type.
Adding a $match stage to your aggregation pipeline
We’ll start our aggregation by adding a $match stage to the pipeline. This stage filters the documents in the pipeline based on one or more specified conditions. Only the documents that meet these conditions are passed down the pipeline.
This is a good stage to start with because it immediately limits the number of documents in the pipeline, reducing the processing and memory overhead incurred by subsequent stages. In addition, when $match is the first stage, the query can take advantage of any indexes defined on the collection.
As noted above, each stage is passed in as an embedded document within the pipeline array. The following syntax shows the elements that make up the $match stage, which includes the $match keyword and the query conditions, in their own embedded document:
|
1 |
{ $match: { query_conditions } } |
The query conditions follow the same conventions used for the $expr query operator, which lets you build expressions that compare fields within the same document. An expression can be as simple as verifying a field’s value, or it can incorporate complex logic that uses multiple comparison operators such as $lt, $lte, $gt, or $gte. For more information about the type of expressions you can build, see the MongoDB topic $expr.
For our example aggregation, the $match stage will include only a simple expression. Before we get to that, however, you should launch Compass, open MongoDB Shell, and run the following use statement at the command prompt (if you are using the Mongo DB Compass tool, the shell is in the lower left corner of the application):
|
1 |
use reports; |
The command changes the shell’s context to the reports database so you can work with the sales collection. You can then create the following aggregate statement, which includes a $match stage as the statement’s only stage:
|
1 2 3 |
db.sales.aggregate([ { $match: { purchaseMethod: "In store" } } ]); |
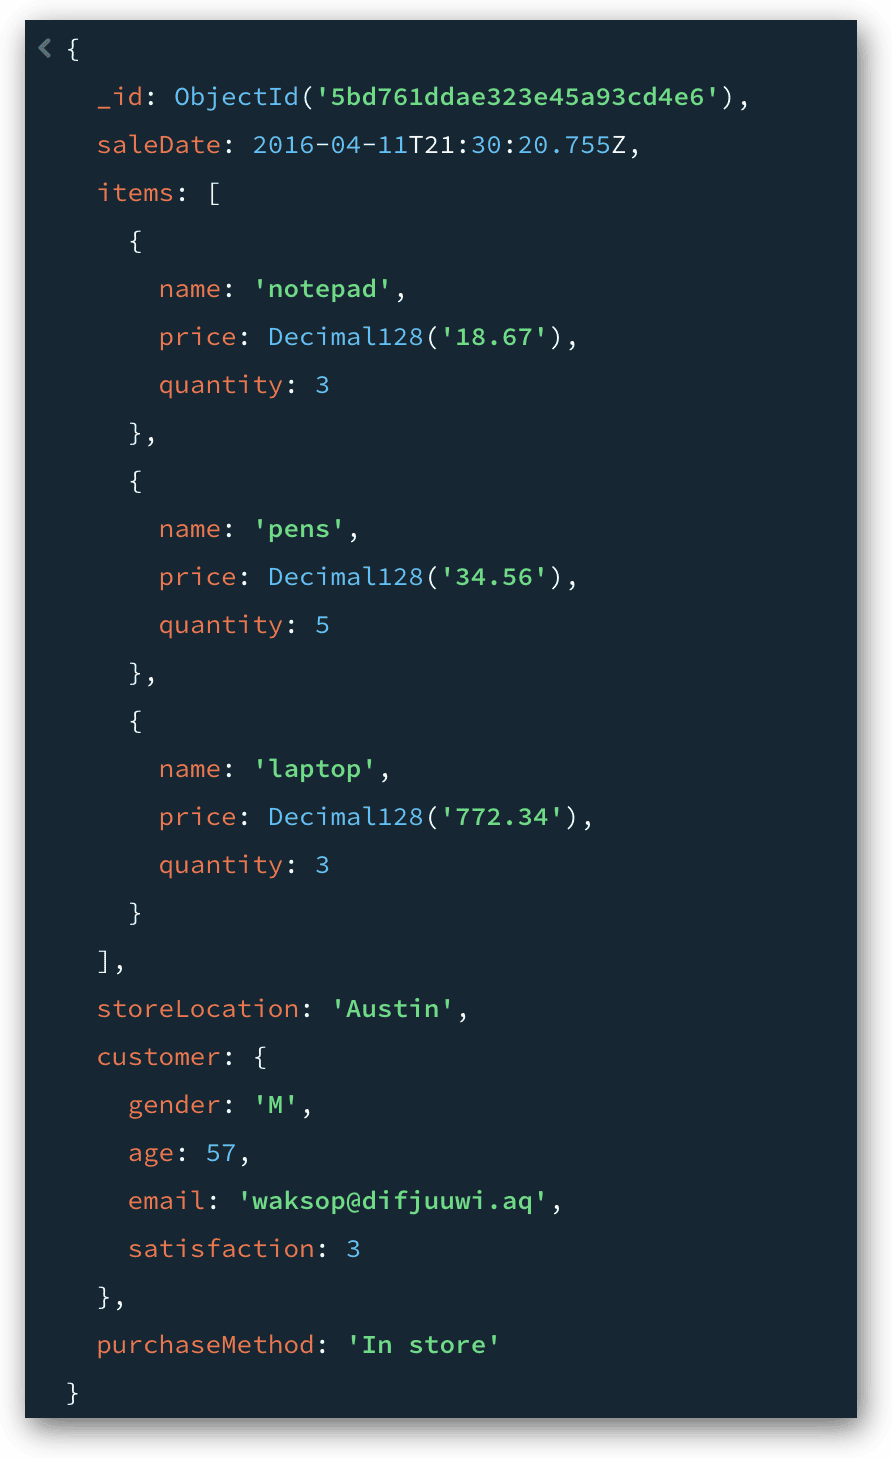
The $match stage is a defined by a single embedded document in the pipeline array. After the $match keyword, the stage specifies the query condition, which is enclosed in curly brackets. The query condition includes two main components: the field name (purchaseMethod) and the field value (In store). If the field value does not equal In store, the document will be filtered out of the pipeline.
In this case, 61 of the collection’s 100 documents meet the search condition. In other words, the purchaseMethod value in each of these 61 documents equals In store. The purchaseMethod value in the other documents does not equal this value. The following figure shows the first document returned by the query.
Not surprisingly, a $match stage can be far more complex that the one I demonstrated here. It all depends on how you want to filter your documents. For more information about the $match stage, see the MongoDB topic $match (aggregation).
Adding an $unwind stage to your aggregation pipeline
You might have noticed in the preceding query results that the documents include the items array, which contains one embedded document for each product sold in that sale. When aggregating data, it can sometimes be helpful to break up an array so you can more easily work with the individual values. This can be especially important if you plan to group data and aggregate based on fields in the array’s embedded documents (which we’ll be doing).
For this, you can use the $unwind stage, which deconstructs the array and generates a document for each of the array’s elements. The basic syntax for $unwind is relatively straightforward:
|
1 |
{ $unwind: "$field" } |
At its most basic, the $unwind stage requires only the name of the target array field. The stage also supports other options, but for now, the basic construction is enough to demonstrate how this stage works. To this end, we can update our aggregate statement to include an $unwind stage after the $match stage:
|
1 2 3 4 |
db.sales.aggregate([ { $match: { purchaseMethod: "In store" } }, { $unwind: "$items" } ]); |
In this case, the $unwind stage specifies the items array field. The field name is preceded by a dollar sign and enclosed in quotation marks. When you run the statement, MongoDB will return 321 documents, rather than the original 61 documents returned by the first stage. The following figure shows two of the returned documents.
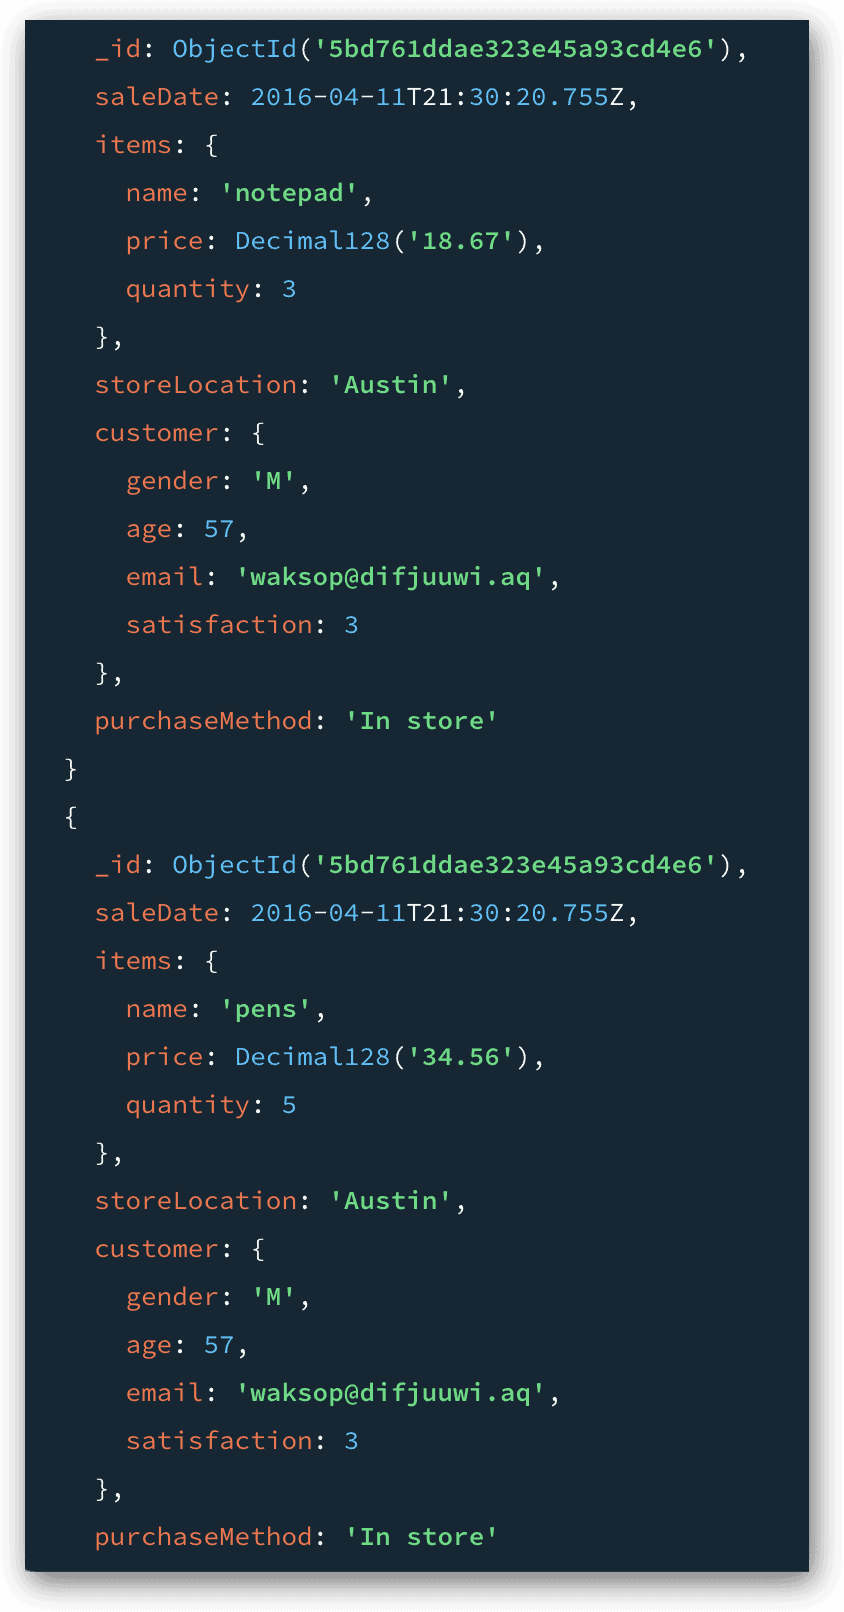
Notice that the documents shown here share the same _id value because they originated from the same input document. However, the items array in each document now includes only one embedded document, which contains details about one of the purchased products. This stage will output the 321 documents to the pipeline, where they’ll be available for the next stage.
As with the $match stage, there are other aspects of the $unwind stage that are not covered here but are worth learning about. For more information about the $unwind stage, see the MongoDB topic $unwind (aggregation).
Adding a $group stage to your aggregation pipeline
Now that the documents are in the initial format we need, we can group and aggregate them by adding a $group stage. During this stage, MongoDB groups the documents based on the group key and aggregates the documents based on the aggregation definitions, as shown in the following syntax:
|
1 |
{ _id: group_key, aggregation, ... } |
The group key is made up of one or more specified fields, which are assigned to the _id field in the stage’s definition. The way in which you define the group key depends on whether you are grouping your documents based on one field or multiple fields. If based on a single field, the group key requires only a simple format:
|
1 |
_id: "$field" |
For the _id value, you need only specify the field name, preceded by a dollar sign and enclosed in quotes. However, if you want to group the documents by multiple fields, you must define the _id value as a document:
|
1 |
_id: { fieldname1: "$field1", fieldname2: "$field2", ... } |
The fieldname1 and fieldname2 placeholders represent the names that you provide for each output field. MongoDB will group the documents based first on field1, then field2, and so on.
In addition to the group key, you can optionally specify how the grouped data should be aggregated. For this, you need to define one or more aggregations. An aggregation is made up of three elements:
|
1 |
fieldname: { accumulator: expression> } |
Each element is represented by a placeholder, as described in the following breakdown:
- fieldname. The name you want to assign to the newly created output field, which will provide the aggregated totals.
- accumulator. An operator that specifies the type of aggregation, such as sum, average, or count. An operator name is always preceded by a dollar sign.
- expression. The field or fields that will be aggregated. A field name should be preceded by a dollar sign.
The best way to understand the $group stage is to see it in action. In the next example, I’ve added a $group stage that groups the data based on the items.name field:
|
1 2 3 4 5 6 7 8 |
db.sales.aggregate([ { $match: { purchaseMethod: "In store" } }, { $unwind: "$items" }, { $group: { _id: "$items.name", totalPurchased: { $sum: "$items.quantity" }, avgPrice: { $avg: "$items.price" } } } ]); |
In this case, the value for the stage’s _id field is only a single field, so we can use the simple format when defining that value. In addition, the stage includes two aggregations:
- The first aggregation uses the
$sumoperator to add together the values in theitems.quantityfield and return that total to thetotalPurchasedoutput field. - The second aggregation uses the
$avgoperator to find the average price of each product group, based on theitems.pricevalue. This total is assigned to theavgPriceoutput field.
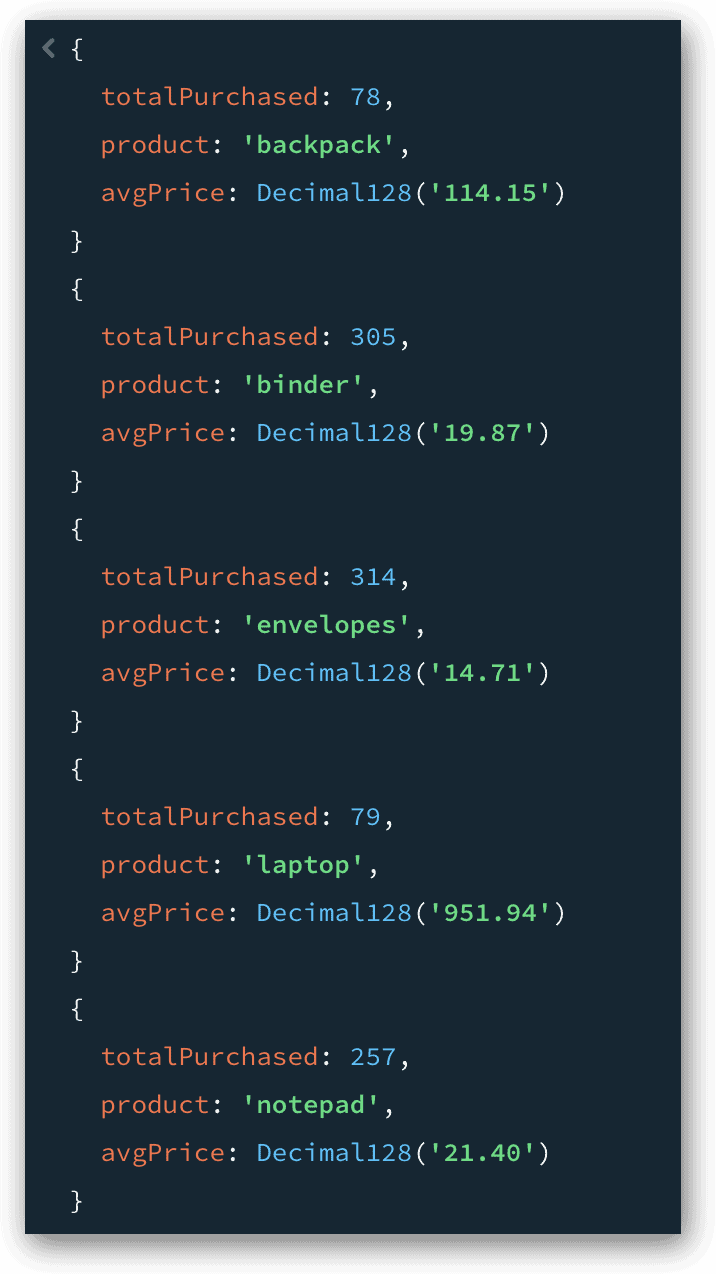
The $group stage returns one document for each defined group. The items.name field contains seven distinct values, so the $group stage will generate seven documents, one for each value. In other words, MongoDB will generate a document for each group, and the document will include the product name, number of purchased products, and average price of those products, as shown in the following figure.
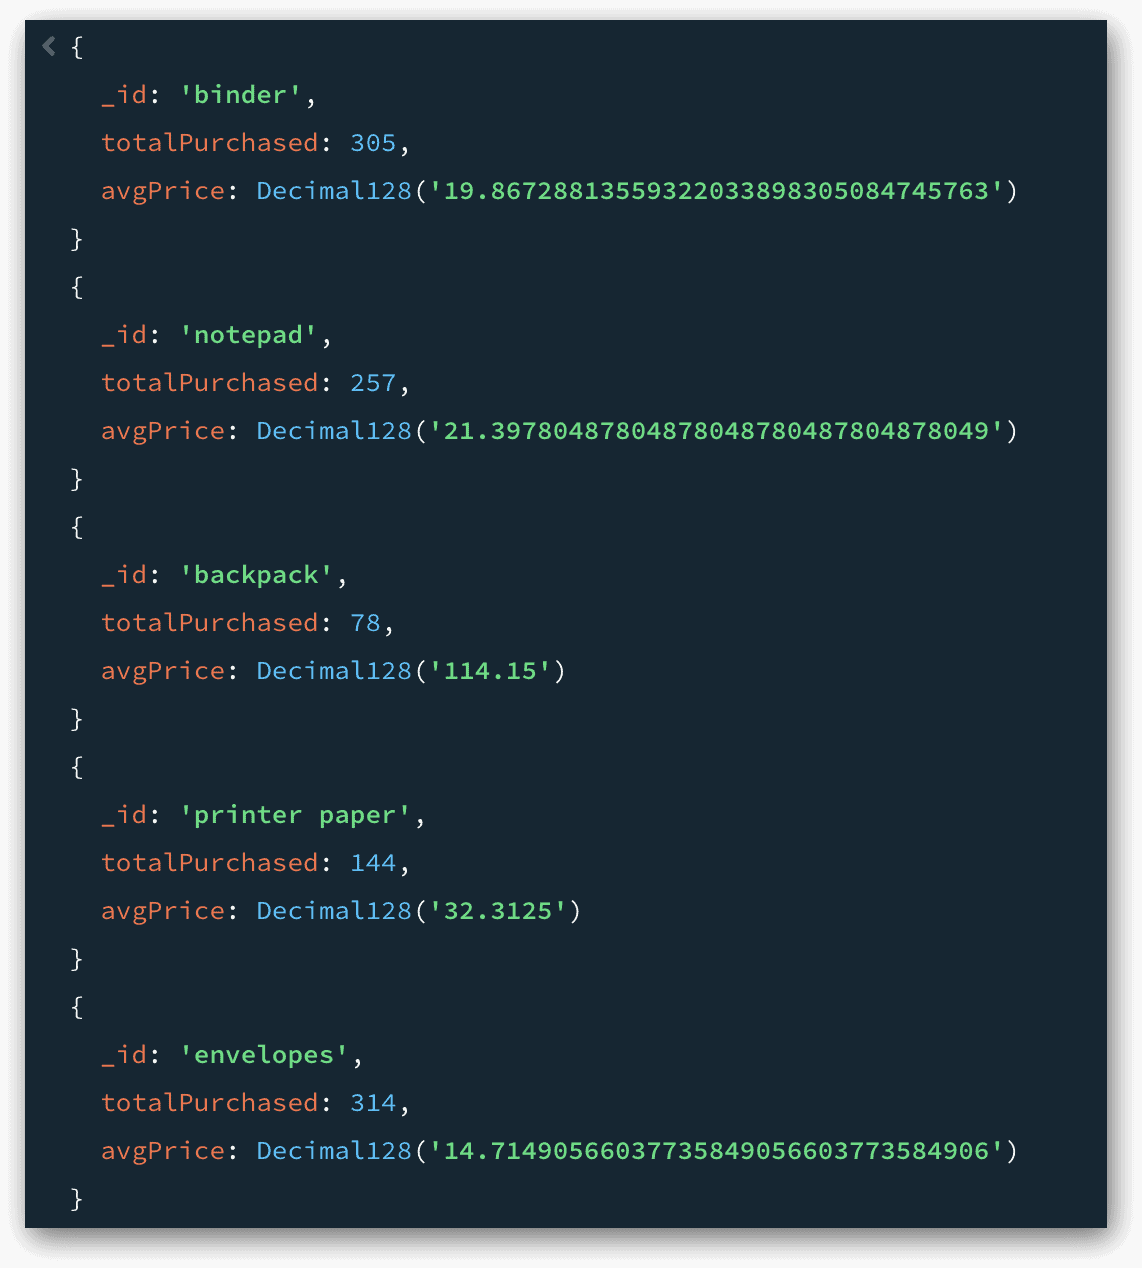
The figure shows only the first five documents, but this is enough to demonstrate how a document is generated for each product group. It also demonstrates how the $group stage can transform the documents in the aggregation pipeline. The input for this stage, which came from the $unwind stage, included 321 documents, but now the pipeline is left with only seven documents, which look much different from the originals.
As with other stages, there’s a lot more to the $group stage than what I’ve covered here. Because of the importance of this stage, you should learn as much as you can about how it works as you start to use this to create queries to aggregate your data in more and more complex ways. For more information about the $group stage, see the MongoDB topic $group (aggregation).
Adding a $project stage to your aggregation pipeline
In some cases, you might want to modify the fields in the aggregation pipeline. For example, you might choose to change the name of the _id field to something more informative. You might also find it useful to round the avgPrice values to ones that are more readable.
For these types of changes, you can use a $project stage, which lets you add fields, remove fields, change their names, or modify their values. The following syntax shows the $project stage at its most basic:
|
1 |
{ $project: { specification, ... } } |
You can add one or more specifications to the $project stage. A specification defines the type of modification that should be made to the documents in the pipeline. The exact format you use for a specification will depend on what you’re trying to achieve, but it will generally adhere to the following syntax:
|
1 |
field: expression |
The expression can be as simple as 1 or 0:
- A value of
1(ortrue) indicates that the field should be included. - A value of
0(orfalse) indicates that the field should be suppressed.
The expression can also take other forms, depending on what you’re trying to achieve. Let’s update our aggregate statement so you can better see how the $project stage works. In the following example, the $project stage includes four specifications:
|
1 2 3 4 5 6 7 8 9 10 11 12 13 |
db.sales.aggregate([ { $match: { purchaseMethod: "In store" } }, { $unwind: "$items" }, { $group: { _id: "$items.name", totalPurchased: { $sum: "$items.quantity" }, avgPrice: { $avg: "$items.price" } } }, { $project: { _id: 0, product: "$_id", totalPurchased: 1, avgPrice: { $round: ["$avgPrice", 2], } } } ]); |
The first two specifications in the $project section work together to change the name of the _id field to product. The first specification suppresses the _id field by assigning a value of 0 to that field. The second specification creates a new field named product and assigns the original _id values to the new field. The expression for the second specification is simply the name of the _id field, preceded by a dollar sign and enclosed in quotes.
By default, MongoDB includes the _id field in the stage’s output, unless you specifically suppress it, which is the preferably option in this case because you’re replacing the field with a new one.
The third specification indicates that the totalPurchased field should be included. If you don’t specify its inclusion, MongoDB automatically excludes it from the output. You must explicitly include any fields other than the _id field, either by defining its value as 1 or creating another type of expression, as is the case in the final specification.
The final specification rounds the values of the avgPrice field to two decimal places and assigns those values to a field with the same name as the original. In effect, the specification replaces the originally field with one that has the same name, only now the values are rounded. The following figure shows the results that the aggregate statement now returns.
Once again, the figure shows only the first five documents returned by the query. As in the previous example, the statement returns seven documents in all.
The expressions defined in the $project stage can get much more complex than the ones shown here. You can, for example, define conditional logic that determines what values to include in the output. For more information about everything you can do with $project stage, see the MongoDB topic $project (aggregation).
Adding a $sort stage to your aggregation pipeline
The final stage we’ll add to our pipeline is $sort, which arranges the documents based on the specified order. You can sort your documents by one or more fields, with each one sorted in either ascending or descending order. The syntax for the $sort stage is very straightforward:
|
1 |
{ $sort: { field: sort_order, ... } } |
For each field you want to include, you should specify the field name, followed by the sort order:
- Specify a value of
1to sort the documents in ascending order. - Specify a value of
-1to sort the documents in descending order.
MongoDB sorts the documents in the order the fields are listed in the $sort stage, that is, it sorts the documents by the first field listed, then by the second field listed, and so on.
For the aggregate statement we’re building, we’ll keep things simple and sort the documents by a single field. The following example now includes the $sort stage, which orders the documents based on the product field, in ascending order:
|
1 2 3 4 5 6 7 8 9 10 11 12 13 14 |
db.sales.aggregate([ { $match: { purchaseMethod: "In store" } }, { $unwind: "$items" }, { $group: { _id: "$items.name", totalPurchased: { $sum: "$items.quantity" }, avgPrice: { $avg: "$items.price" } } }, { $project: { _id: 0, product: "$_id", totalPurchased: 1, avgPrice: { $round: ["$avgPrice", 2], } } }, { $sort: { product: 1 }} ]); |
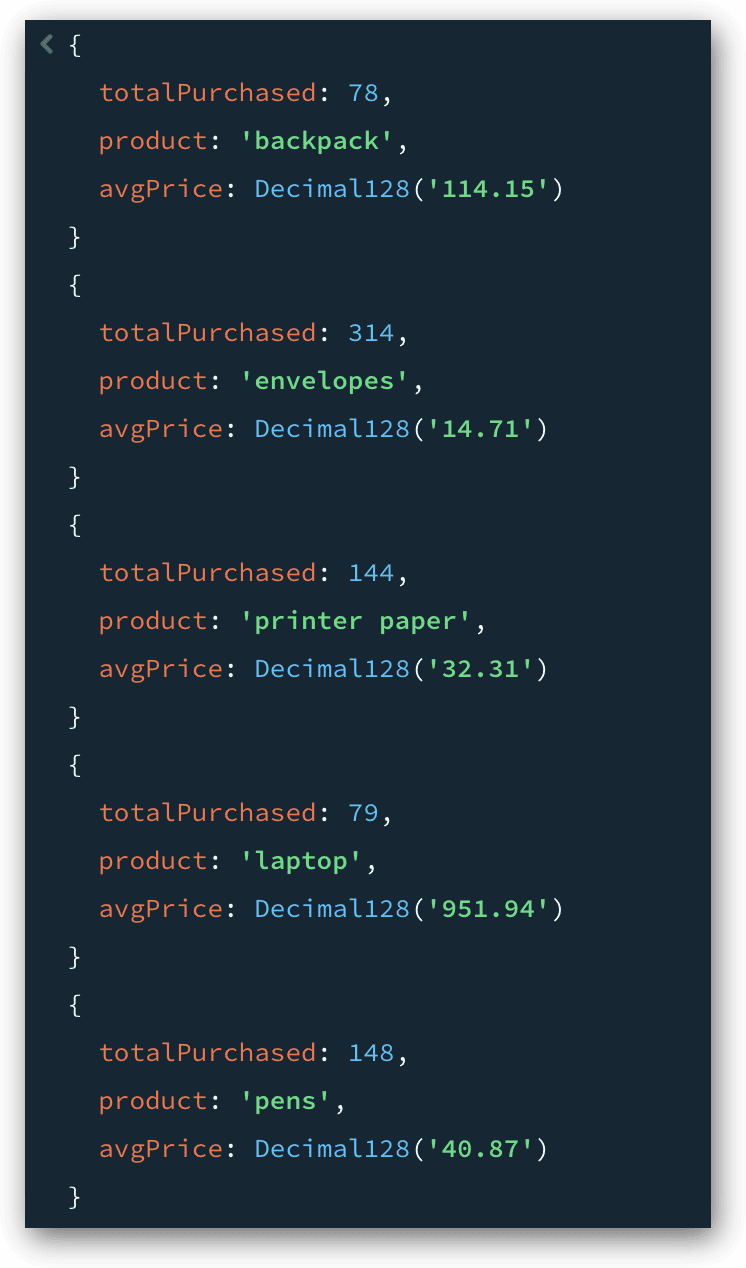
As you can see, the $sort stage specifies a sort order of 1. The following figure shows the first five documents returned by the query. Notice that the documents are now sorted based on the product values.
We could have added other fields to our $sort stage, but in this case there would have been little point. The documents are grouped based on the product values (originally the _id values), so the values are unique, with only one document per group. For this reason, adding more fields to the stage would make no difference to the results. For more information about the $sort stage, see the MongoDB topic $sort (aggregation).
Getting started with MongoDB aggregations
The example aggregation that we walked through in this article is a relatively basic one, in part because we’re working with a fairly basic data set. Aggregation pipelines can get much more complicated, incorporating stages and capabilities I didn’t discuss in this article. Even so, what we did cover should give you a good foundation for getting started with aggregations and learning more about the various ways they work.
In the next article, I plan to cover the graphical features available in MongoDB Compass for working with aggregations. By using these features, you can build a pipeline one stage at a time, previewing a stage’s output as you build it. You can also run the query after each stage to verify that it works as expected.
What you’ve learned in this article will be invaluable to this process, so be sure that you fully understand what we’ve covered here, and check out the MongoDB documentation for information about other aspects of the aggregate method. The better you understand how the method works, the better prepared you’ll be for building effective aggregations.
Appendix: Preparing your MongoDB environment
For the examples in this article, I used MongoDB Atlas to store the data and MongoDB Compass to work with that data. This is the same approach I used for the previous articles in this series. The first of these articles explains how to set up the environments.
The examples in this article are based on a collection I created from the sample_supplies database available through MongoDB Atlas. If you want to try out these examples for yourself, you’ll need to download the sales.json file and save it to a folder that you can access from within MongoDB Compass. You’ll then need to take the following steps to import the data into your collection:
- In MongoDB Compass, connect to your cluster on MongoDB Atlas, if you’re not already connected.
- In the left panel, click the Create database button (plus sign), which is located to the right of the Databases node.
- In the Create Database dialog box, type reports in the Database Name text box, type sales in the Collection Name text box, and click Create Database.
- After the database and collection have been created, select the sales collection node in the left panel if it’s not already selected.
- In the main window, click the Add Data drop-down arrow and click Import JSON or CSV file.
- When your system’s file manager window appears, navigate to the folder that contains the sales.json file, select the file, and click Select. Compass will load the data into the
salescollection.
That’s all you need to do to try out the examples in this article. I plan to go into more detail about both importing and exporting data later in the series.
This document contains proprietary information and is protected by copyright law.
Copyright © 2026 Red Gate Software Limited. All rights reserved


Load comments