

This article is part of Robert Sheldon's continuing series on Mongo DB. To see all of the items in the series, click here.
MongoDB provides an efficient environment for storing document data at scale. However, most of your interactions with MongoDB will not be related to storing data but rather to querying data. The better you understand how to retrieve the data you need, the more effectively you can interact with MongoDB and support your data-driven applications.
To help you get started, this article introduces you to various ways you can query document data in a MongoDB database. I demonstrate how to use both MongoDB Shell and the MongoDB Compass GUI when interacting with your collection data.
Keep in mind, however, that building MongoDB queries is an extensive and many-faceted topic, one that can easily justify multiple articles (if not a book or two). In this article, I introduce you to the basics, with the goal of helping you create a foundation on which you can continue to build. The better you understand the concepts presented here, the more easily you’ll be able to move onto more advanced topics.
Note: For the examples in this article, I used MongoDB Atlas and MongoDB Compass. The last section of this article—“Appendix: Preparing your MongoDB environment”—provides information about how to set up your environment and includes a link to a .json file that you’ll need to download if you want to try out these examples for yourself.
Querying documents in a MongoDB collection
When working in MongoDB Compass, you have two options for finding documents in a collection. You can use MongoDB Shell, which is embedded in Compass, or you can use the graphical components of the Compass interface. I plan to demonstrate both approaches.
The graphical features in Compass are useful when learning about MongoDB or when you want to run ad hoc queries. Compass also makes it easier to view the documents returned by your queries. However, you’ll likely want to work in the shell as well, especially as you gain experience with MongoDB. The shell can be faster and more efficient for some operations, and it enables you to run shell scripts.
By learning both approaches, you can see first-hand how the shell commands and GUI features relate to each other, which can lead to a better understanding of both approaches. You’ll also be able to better decide which approach is best for you from one situation to the next as you become more comfortable with retrieving MongoDB data.
When running queries in the shell, you’ll often use a find statement that specifies which documents to include in the results and which fields to include in the documents. A find statement is actually a call to the find method, which is one of the method’s available to a collection object. The following syntax shows the basic elements that make up a find statement:
|
1 |
db.collection.find( { filter }, { project } ).options; |
A find statement includes both required and optional components. Here’s a breakdown of what each one means:
- db. System variable for referencing the current database and accessing the properties and methods available to the database object.
- collection. Placeholder. The name of the target collection.
- find. The find method, which is one of the methods available to the collection object for retrieving documents from that collection. For this article, you will be using
reportsas the collection name. - filter. Placeholder. An optional parameter that determines which documents are returned from the collection. If the parameter is omitted or passed in as an empty document (
{}), MongoDB returns all documents from the collection. Some MongoDB documentation refers to this element as the query, rather than filter. - projection. Placeholder. An optional parameter that determines which document fields are included in the results. If the parameter is omitted, MongoDB includes all fields in the returned documents.
- options. Placeholder. One or more optional settings that can be included in a
findstatement to better refine the query.
From this syntax, you can see that the simplest find statement is one that returns all documents in a collection and all fields within those documents. In other words, the statement includes no optional components, as shown in the following simplified syntax:
|
1 |
db.collection.find(); |
Before you run a find statement in MongoDB Shell, you should first ensure that you’re working within the context of the target database. If you’re not, you should run a use statement that specifies that database, which in this case, is weather. The weather database contains the reports collection, both of which are discussed in the appendix. The following use statement changes the context to the weather database:
|
1 |
use weather; |
To run this command, type or paste the statement at the shell’s command prompt and then press Enter. If the shell is not displayed in Compass, click the >_MONGOSH link at the bottom left corner of the interface. This will expand the bottom window and display the shell’s command prompt, where you can now run the USE and other MongoDB statements.
After you run your USE statement, you can then run the following find statement, which returns all documents in the reports collection:
|
1 |
db.reports.find(); |
The collection contains 100 documents; however, the shell displays only 20 documents at a time. To view the next set of documents, you must enter it. (The it command stands for iterate.) The following figure shows the find statement and a portion of the first document returned by the query.

As you can see, the figure shows only a small portion of the results, which points to the fact that returning a lot of large documents to the shell can get quite unwieldy. As you progress through this article, you’ll learn various ways to refine your query to get more precise results.
In the meantime, you might find it useful to view only the number of documents that a query would return, rather than returning all those documents. For this, you can use the count option, which you tag onto the end of you statement, as in the following example:
|
1 |
db.reports.find().count(); |
To include the count option, add a period after the find method’s closing parenthesis and then specify the option name, followed by its own set of parentheses. Now the statement will return the value 100, rather than the documents themselves.
If you want to view the collection’s documents in the Compass GUI instead of the shell, you need only open the collection in the main window. Opening a collection is comparable to running a find statement without any of the optional parameters. One of the biggest advantages to using the GUI is that you have three different options for displaying the documents: List View, JSON View, and Table View, which I discussed in the first article in this series.
Adding a basic filter to your MongoDB query
Now that you understand how to run a find statement, you can start adding filters to your queries to control which documents to include in your results. At its most basic, a filter consists of a field name and a field value. The field name comes first and the value follows. The two are separated by a colon and enclosed in curly brackets to define them as an embedded document.
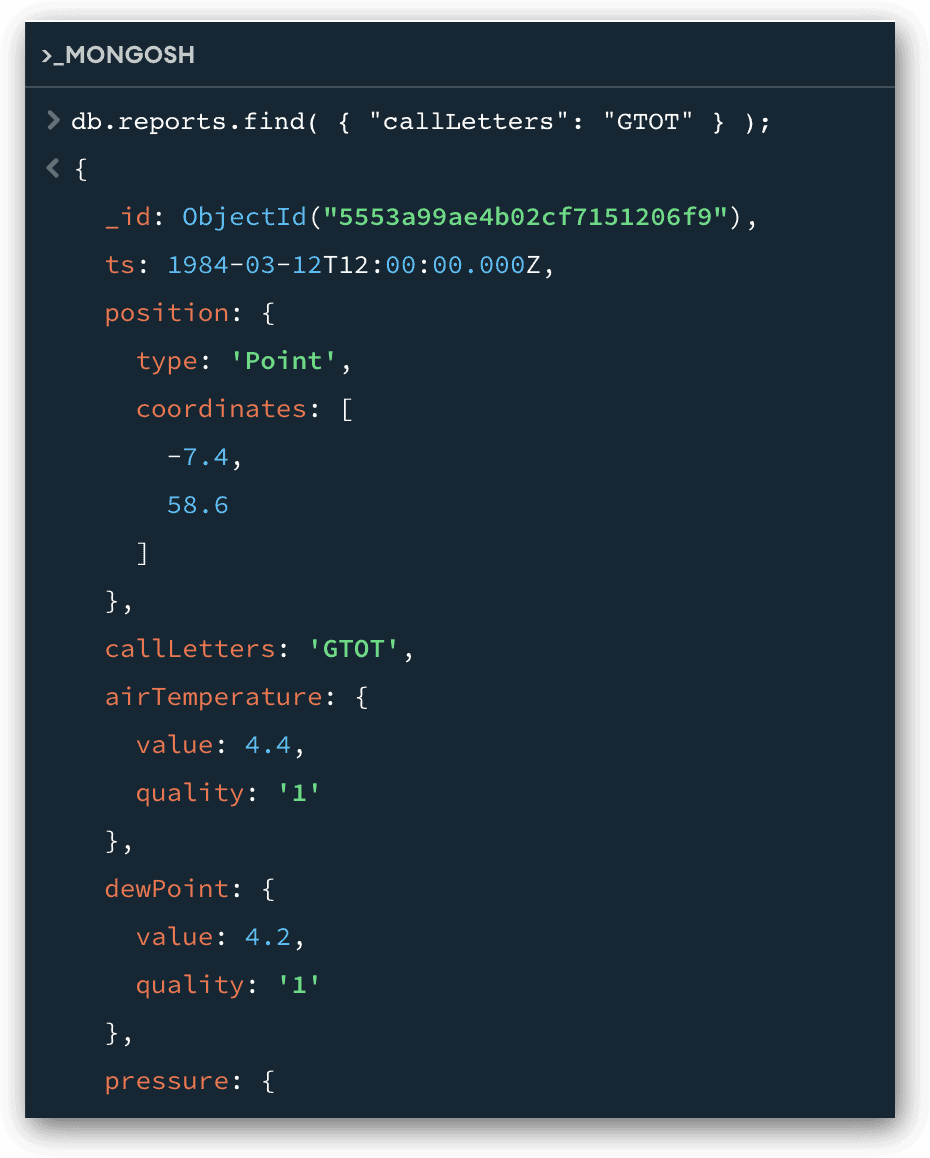
For example, the following find statement includes a filter that specifies callLetters as the field and GTOT as the target value:
|
1 |
db.reports.find( { "callLetters": "GTOT" } ); |
The statement will now return only those documents whose callLetters field has a value of GTOT. As it turns out, only one document meets this search condition. The following figure shows part of the document as it appears in MongoDB Shell. Notice that the callLetters field has a value of GTOT.
If you want to return the same results in the Compass GUI, you must take a slightly different approach to defining your filter parameter. Start by locating the Filter text box that sits above the main GUI window (Just over the Add Data and Export Data buttons). In this box, type or paste the following code snippet:
|
1 |
{ "callLetters": "GTOT" } |
This is the same filter parameter that you defined in the previous Find method call. As before, the filter is an embedded document that specifies the callLetters field with GTOT as the value.
After you add the code to the Filter text box, click the Find button, which is to the right of the text box. Compass will then display the single document, as shown in the following figure.
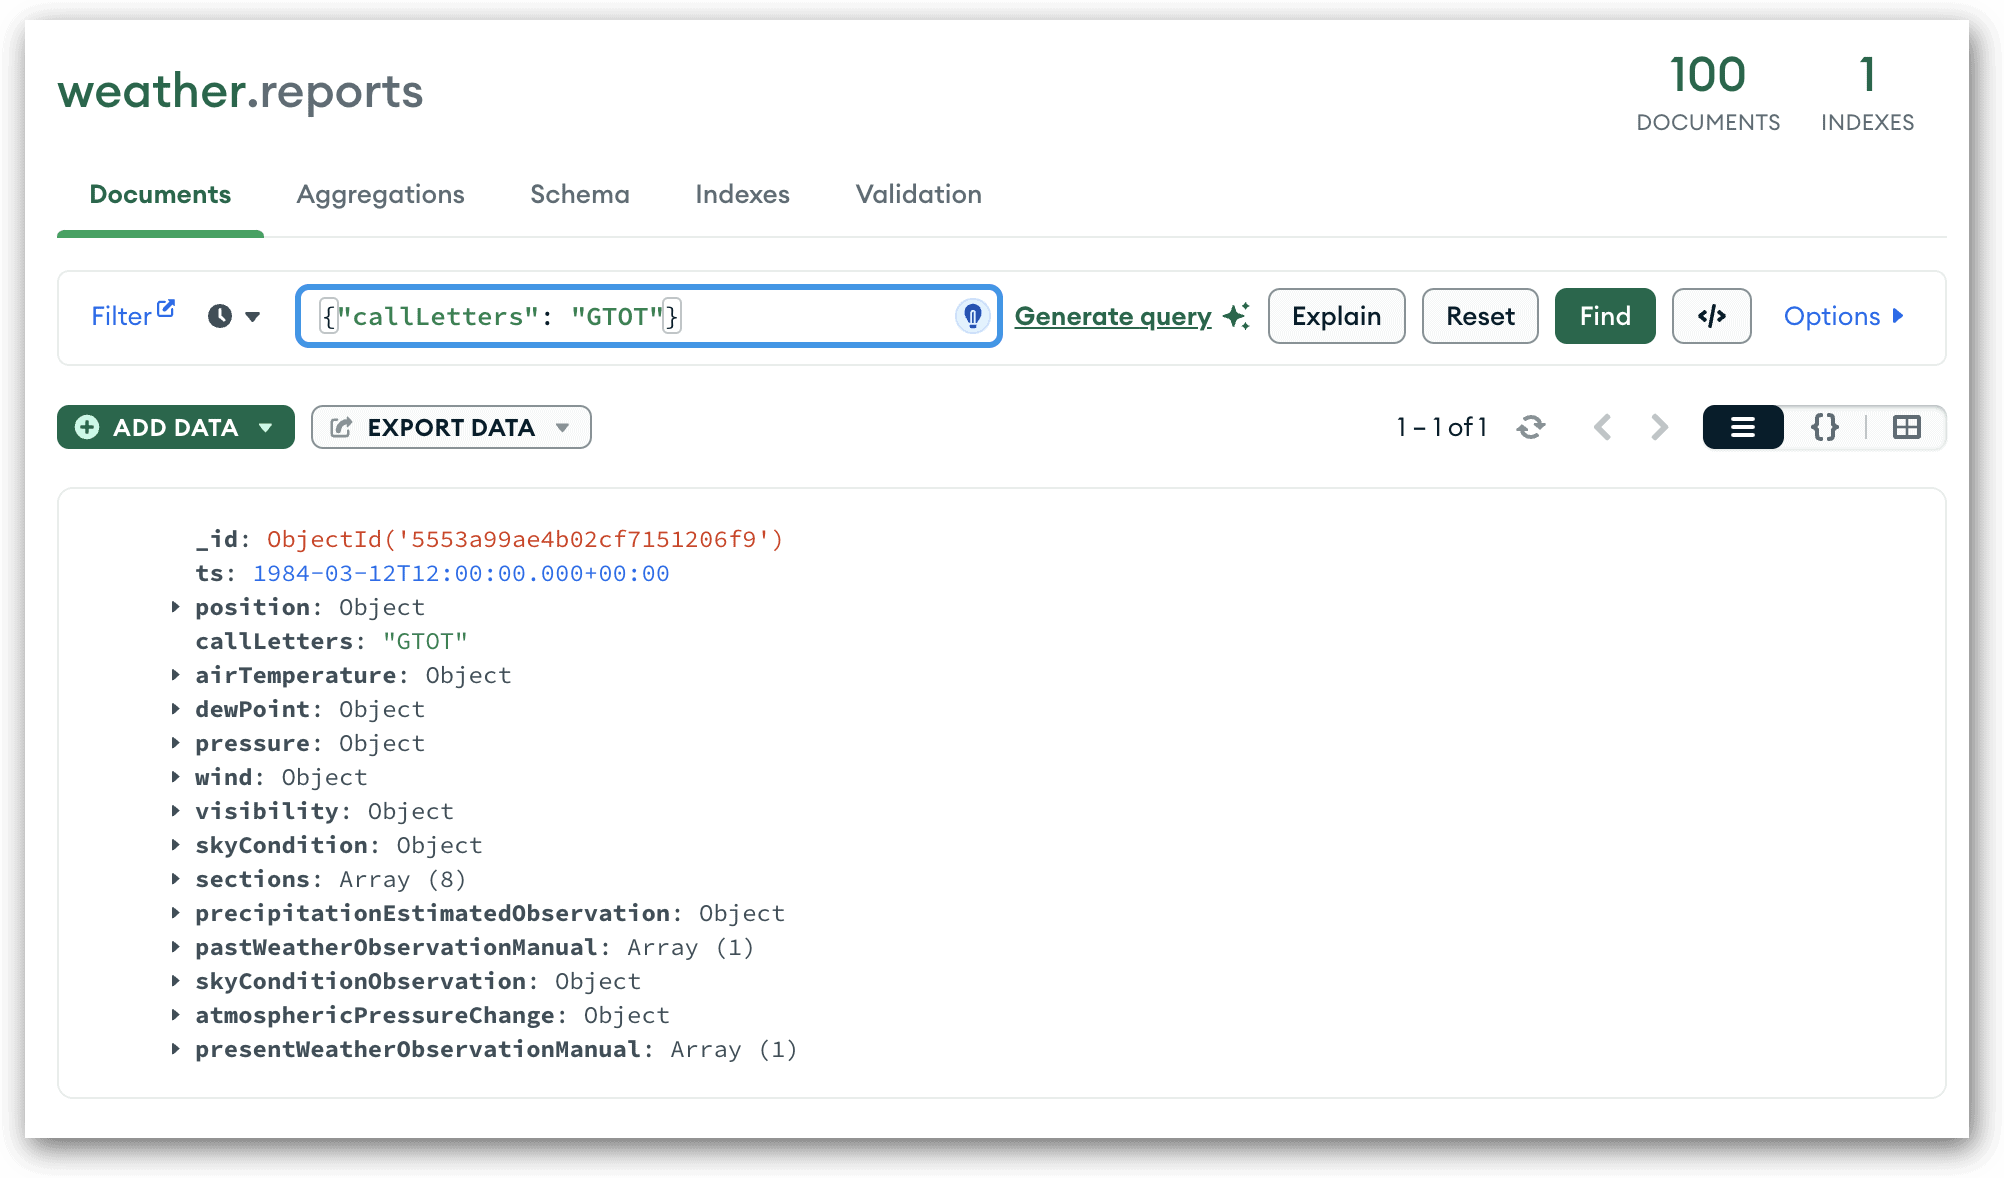
Notice how much easier it is to view the document in the Compass GUI than in the shell. One thing I want to point out, however, is that you must use the correct upper and lower cases when specifying field and value names, whether using the shell or the graphical features. For example, the following find statement uses CallLetters (initial cap) rather than callLetters, so the statement returns no documents:
|
1 |
db.reports.find( { "CallLetters": "GTOT" } ); |
I also want to point out the findOne method, which you can use in place of the find method when working with single documents. As its name suggests, the findOne method returns only one document. The following example demonstrates how this works:
|
1 |
db.reports.findOne( { "callLetters": "GTOT" } ); |
The statement will return the same results as the earlier example because only one document satisfies the search condition. However, if you use the findOne method for a query that would otherwise return multiple documents, MongoDB will return only the first document, based on the natural order of the documents on the disk.
In this case, the findOne method would be comparable to using the find method with the limit option, as in the following example:
|
1 |
db.reports.find( { "callLetters": "GTOT" } ).limit(1); |
The limit option specifies the maximum number of documents that the query should return. Because that argument is 1, only the first document is returned, based on the natural order of the documents on disk. The document is the same one returned by the previous findOne statement. For the most part, you should use a findOne statement only when you’re working with single documents.
Basing your query on an array
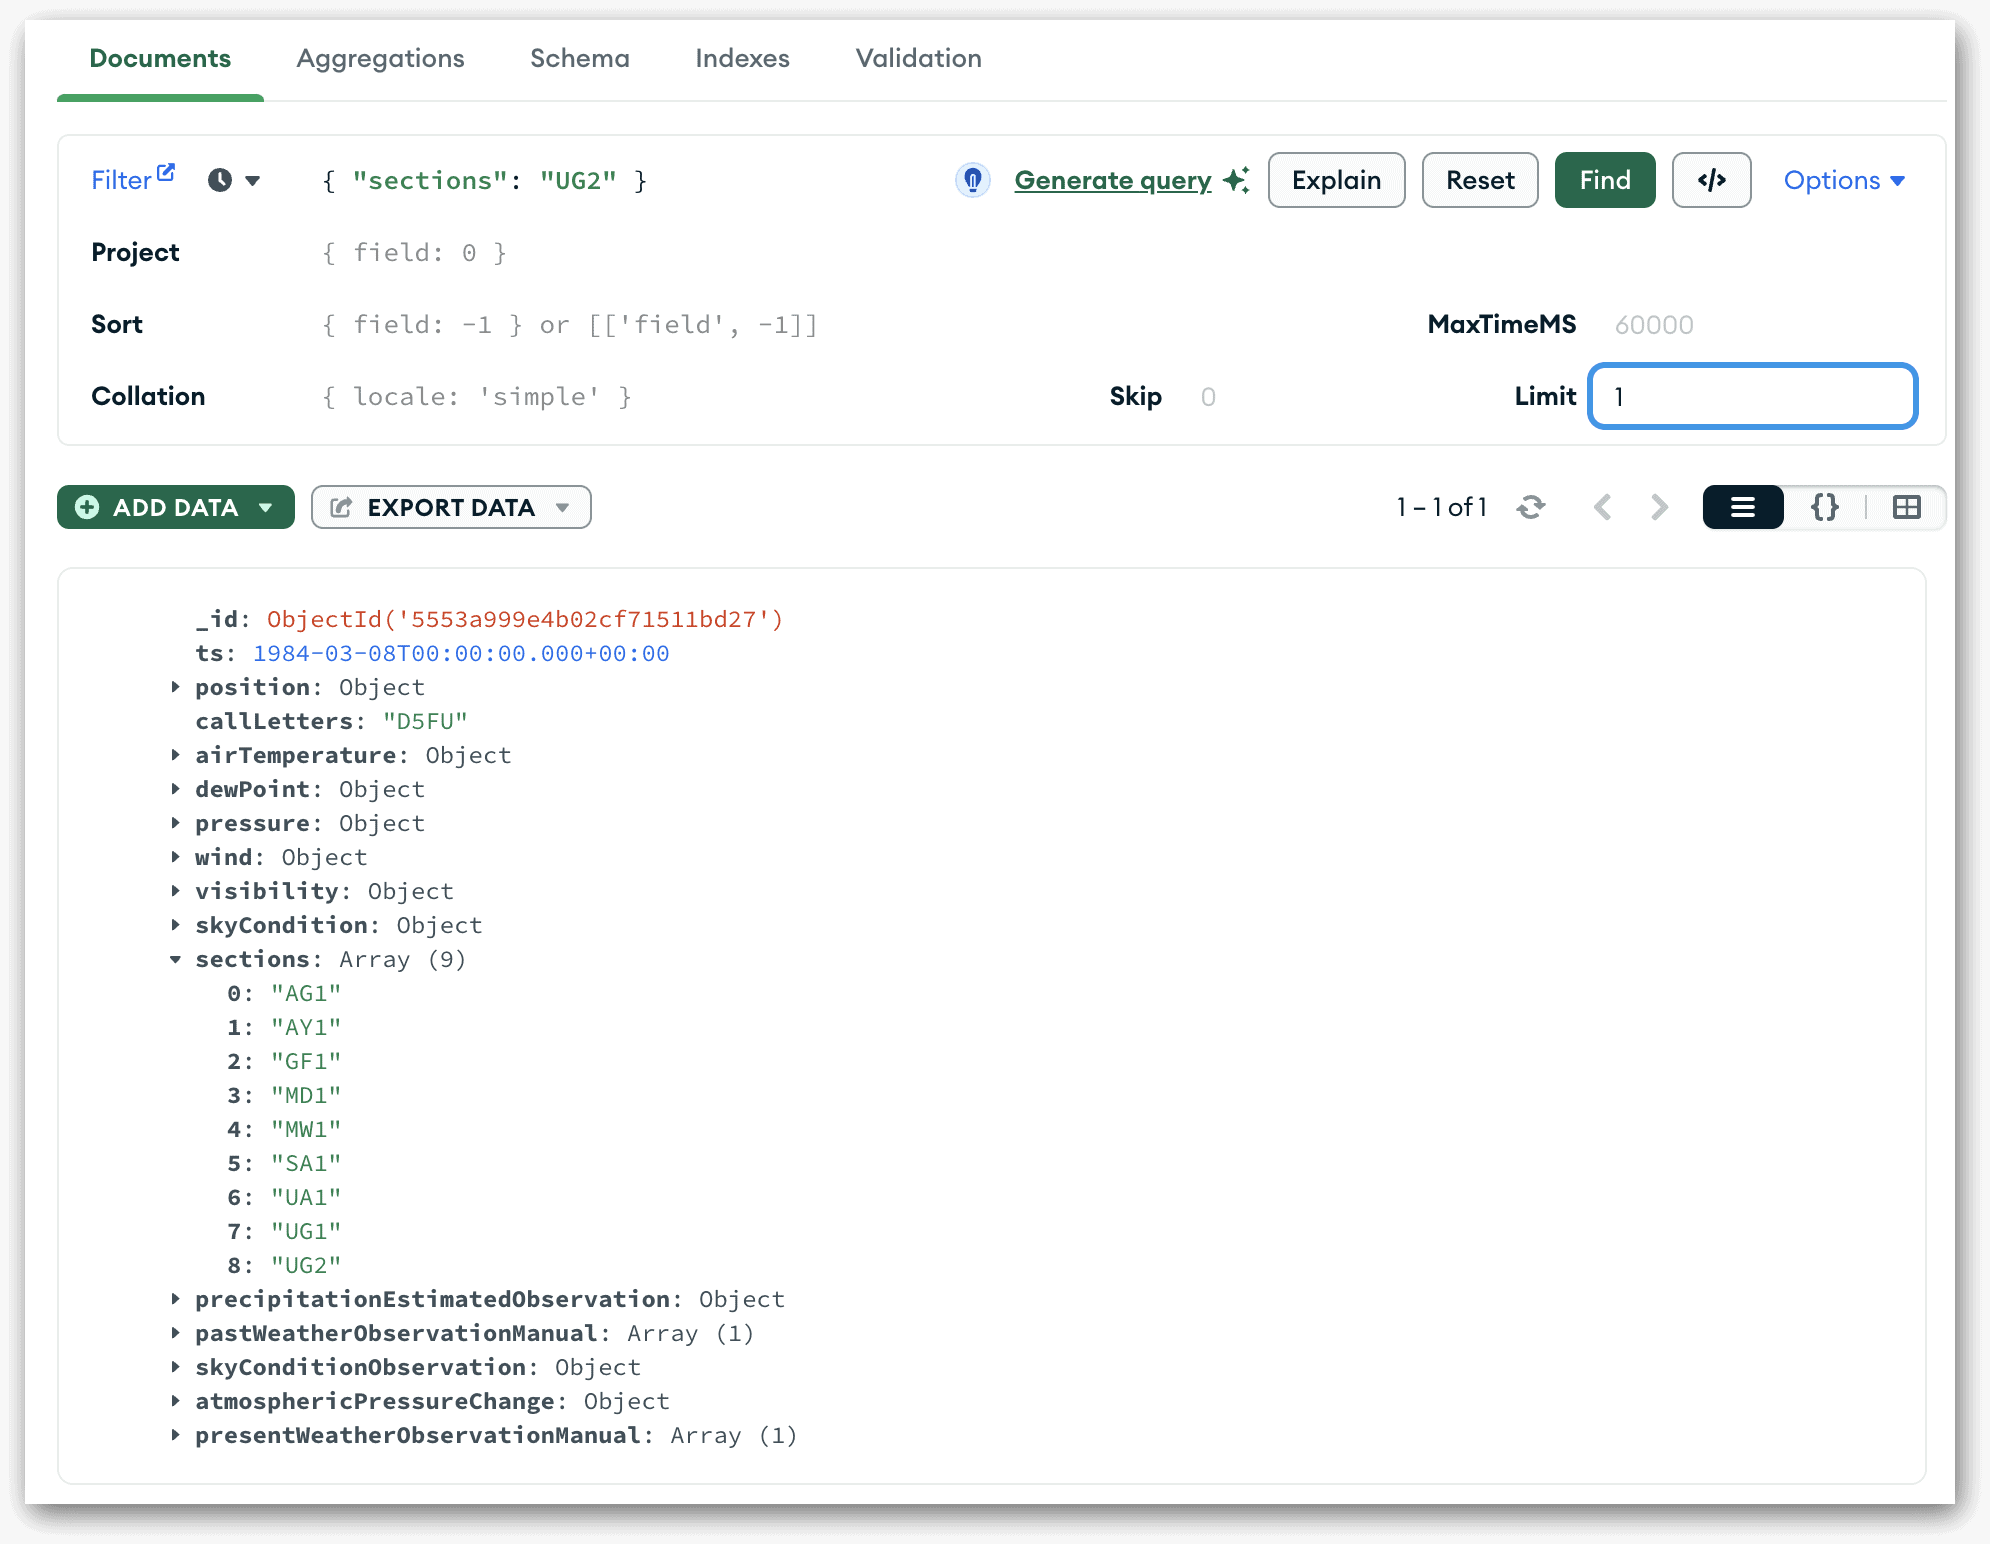
In the previous examples, the filter section (the embedded document) references a string field. However, you can also specify other types of fields in your filter, including arrays and embedded documents. For example, the following find statement filters the documents based on the sections array and the UG2 value in that array.
|
1 |
db.reports.find( { "sections": "UG2" } ); |
When you base your filter on an array, you need only supply the field name and value, just like you saw with the string field. You don’t have to be concerned with where the value is positioned in the array. The statement returns all documents in which the sections array contains the value UG2. Seven documents meet this condition.
You can also achieve the same results in the Compass GUI by entering the following code snippet into the Filter text box and then clicking Find:
|
1 |
{ "sections": "UG2" } |
Compass displays the seven returned documents in the main window, as you saw in the previous examples. If you view the values in the sections array in each document, you’ll see that they include the UG2 value.
Now let’s recast the preceding find statement as a findOne statement and run the new statement in the shell:
|
1 |
db.reports.findOne( { "sections": "UG2" } ); |
This example is identical to the previous one except that it uses the findOne method. As a result, it returns only the first document. You can achieve the same results by running the following find statement, which includes the limit option:
|
1 |
db.reports.find( { "sections": "UG2" } ).limit(1); |
You can also achieve these results in the Compass GUI by entering the following code snippet into the Filter text box:
|
1 |
{ "sections": "UG2" } |
In addition, you must type 1 in the Limit text box in the query form, as shown in the following figure. To access this form, click the Options link at the far right of the interface, above the main window. After you define the Limit option, click the Find button. MongoDB now returns only a single document. Notice that the document’s sections array includes the UG2 value.
You’re not limited to searching on only one value in an array. You can search for multiple values by creating an embedded array for the filter’s value. For example, the following find statement returns documents whose sections array contains either the UG2 value or the AY1 value (but not both):
|
1 |
db.reports.find( { "sections": [ "UG2", "AY1" ] } ); |
As it turns out, the reports collection includes no documents that contain only one of the two values. However, if you want to return documents that include either one or both values, you can use the $in operator as part of the field value:
|
1 |
db.reports.find( { "sections": { $in: [ "UG2", "AY1" ] } } ); |
As with many MongoDB operators, when you use the $in operator, you define an embedded document as the filter’s field’s value. The embedded document includes the $in operator as the embedded document field name and an array as the field value. The array contains the target values.
The $in operator returns all documents that include any of the specified values. In this case, it will return any documents that contain the UG2 value, the AY1 value, or both. As a result, the find statement now returns 93 documents.
In some cases, you might want to return only those documents that contain all the specified array values, in which case, you can use the $all operator rather than $in, as in this following example:
|
1 |
db.reports.find( { "sections": { $all: [ "UG2", "AY1" ] } } ); |
The find statement now returns only six documents, which are the only ones that contain both the UG2 and AY1 values.
You can also use the $in or $all operator when setting up your queries in the Compass GUI. For example, you can duplicate the results of the preceding example by entering the following code snippet into the Filter text box:
|
1 |
{ "sections": { $all: [ "UG2", "AY1" ] } } |
After you click Find, Compass returns the six documents and displays them in the main window. As before, you can view the values in the sections array in each document to verify that they each include both the UG2 and AY1 values.
Basing your query on an embedded document
When working with a MongoDB collection, you’ll likely want to base your queries on embedded documents, just like you saw with arrays. For instance, the documents in the reports collection contain the airTemperature field, which is an embedded document. One of the fields in the airTemperature document is value, which takes a numerical value. You can base your statement’s filter on the value field and its value, as in the following example:
|
1 |
db.reports.find( { "airTemperature.value": 25 } ); |
Similar to what you’ve seen in previous examples, the filter parameter is an embedded document that specifies the field and its target value, which is 25. Notice that the field is specified as a two-part name. The first part is the airTemperature field, and the second part is the value subfield. As a result, the statement returns only those documents whose airTemperature.value field has a value of 25, which turns out to be six documents.
To return the same results in the Compass GUI, you should enter the same filter (embedded document) in the Filter text box and then click Find, just like you did in previous examples:
|
1 |
{ "airTemperature.value": 25 } |
The Compass main window should now display the same six documents that were returned by the previous find statement. You can also drill into the returned documents to verify that they meet the search condition.
In some cases, you might need to dig even deeper into the hierarchy of embedded documents. For instance, the reports collection includes documents that contain the wind field, which is an embedded document. One of the fields in the embedded document is direction, also an embedded document. The direction field, in turn, contains the angle field, which takes a numerical value.
Suppose you want to retrieve only those documents whose angle value is 300. The following find statement demonstrates how to achieve this:
|
1 |
db.reports.find( { "wind.direction.angle": 300 } ); |
When specifying the angle field in your filter, you must qualify the name with the wind field, then the direction field, and finally the angle field. In this case, the angle field must have a value of 300 for the document to be returned. Three documents meet this search condition.
As before, you can achieve the same results in the Compass GUI by entering the statement’s filter into the Filter text box and then clicking Find:
|
1 |
{ "wind.direction.angle": 300 } |
The reports documents also contain the pastWeatherObservationManual field, which is an array. The array contains an embedded document, and the embedded document contains the period field, which is also an embedded document. One of the fields in the period document is value.
You can query the value field by again qualifying the name, as you saw before, even though the top-level field is an array. For example, the following find statement retrieves those documents whose value field has a value of 3:
|
1 |
db.reports.find( { "pastWeatherObservationManual.period.value": 3 } ); |
In this case, the statement returns 10 documents, but you can mix up your queries in other ways. For instance, you can query arrays embedded in documents and even in other arrays.
Specifying fields in a MongoDB query
The examples up to this point showed you different methods of controlling which documents to include in your search results, but you can also control which fields to include in those documents. (Or in other words, what fields to include in your search results.)
To specify the fields, you must add a projection parameter to your statements. The parameter, which follows the filter parameter, is also defined as an embedded document. Within this document, you specify one or more field names, along with a status code that indicates whether to include or exclude the field.
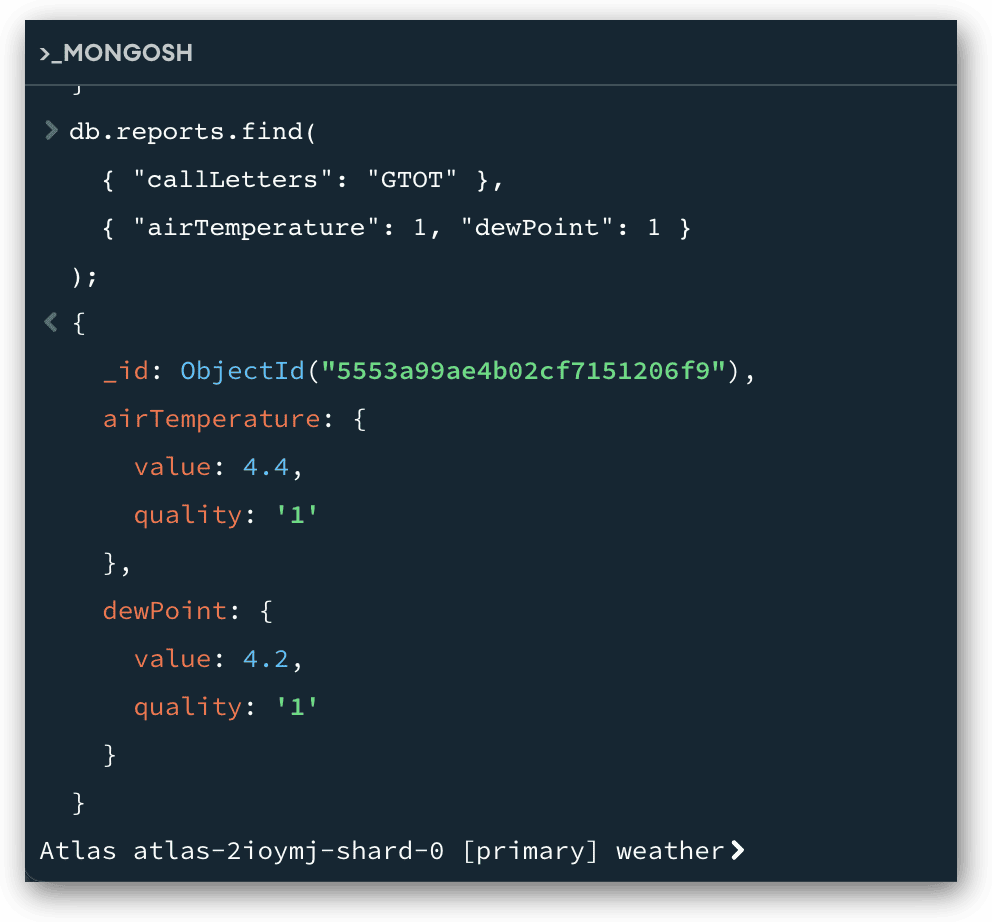
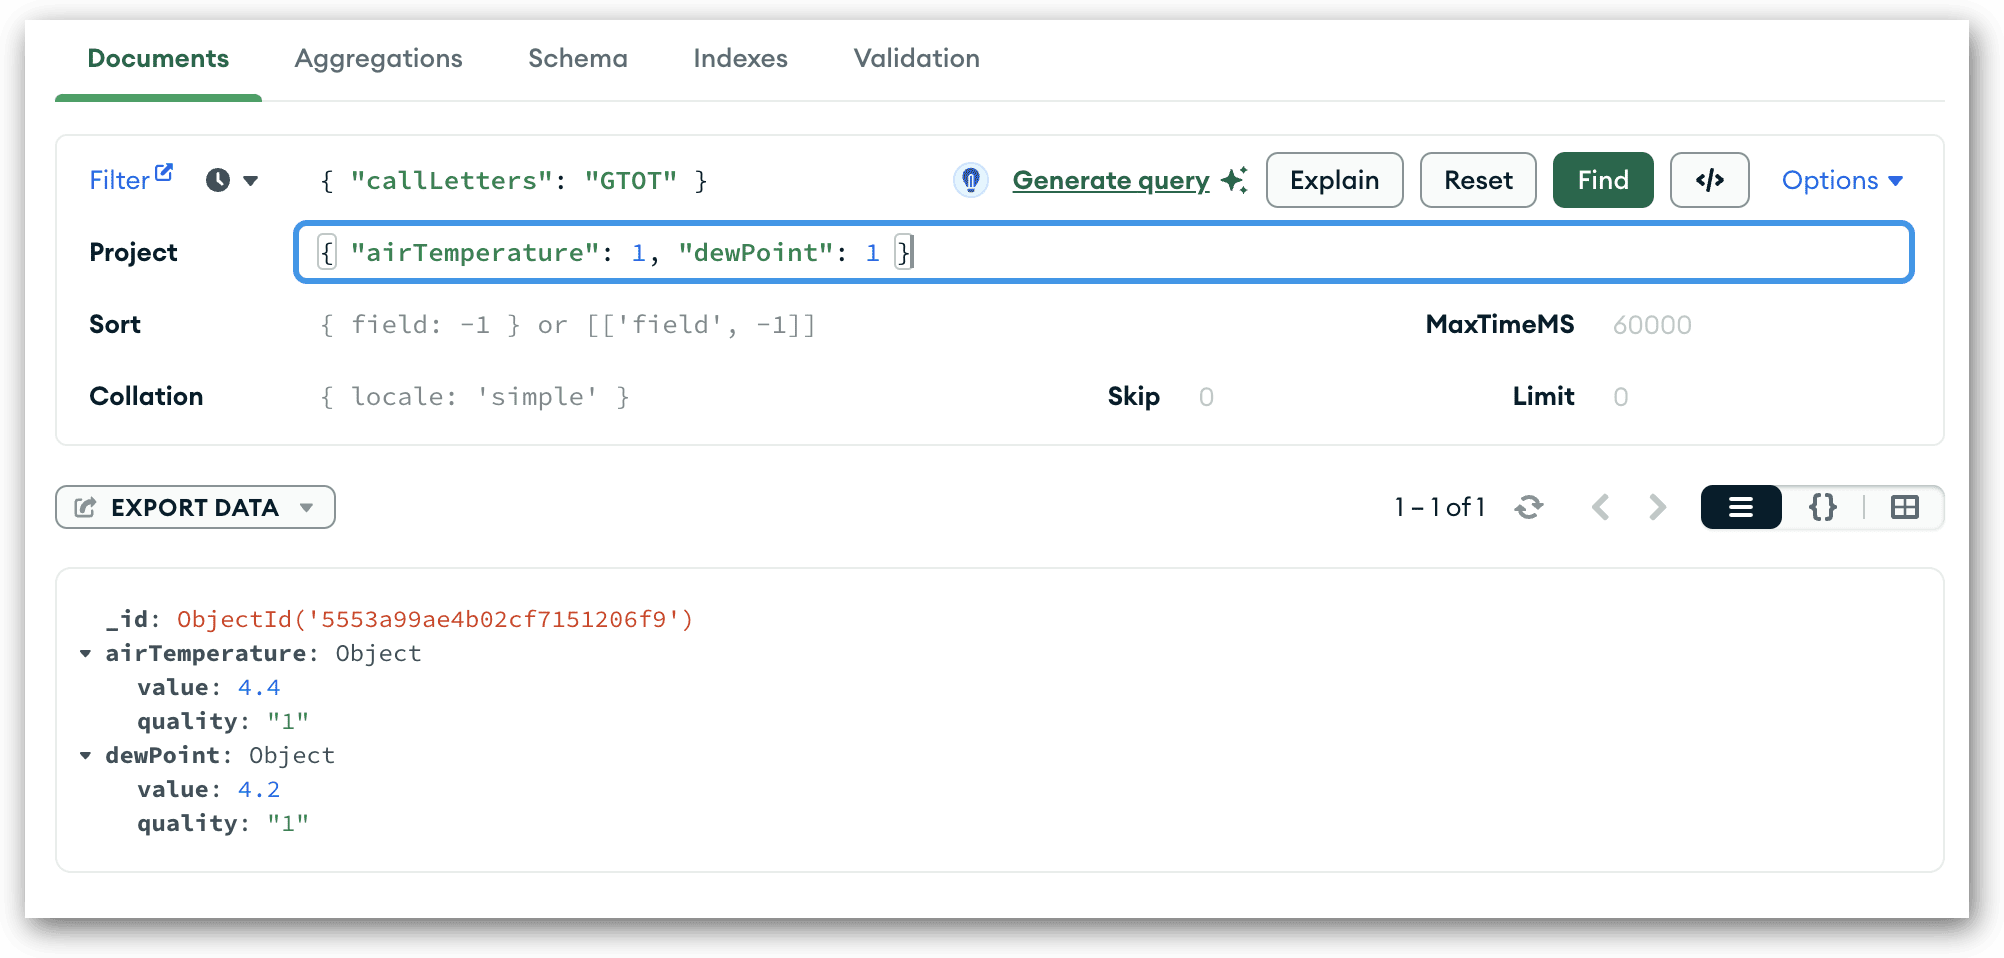
For example, the following find statement defines a projection parameter that includes the airTemperature and dewpoint fields:
|
1 2 3 4 |
db.reports.find( { "callLetters": "GTOT" }, { "airTemperature": 1, "dewPoint": 1 } ); |
For each included field, the projection parameter specifies a value of 1, which means that the two fields should be included in the results. None of the other fields will be included in this output.
The following figure shows the statement and the single document it returns, as they appear in MongoDB Shell. Notice that the results include the _id field along with the fields you specified. MongoDB includes the _id field automatically unless you specifically tell it not to, which I’ll demonstrate in just a bit.
If you want to achieve the same results in the MongoDB GUI, start by clicking the Options link to open the query form, as you saw earlier. Then, in the Filter text box, add the following code snippet:
|
1 |
{ "callLetters": "GTOT" } |
This is just like you defined the filter in the previous examples. The form’s Filter text box serves as the counterpart to the filter parameter in a find statement. Next, enter the following snippet in the Project text box and click Find:
|
1 |
{ "airTemperature": 1, "dewPoint": 1 } |
Similar to the Filter text box, the Project text box serves as the counterpart to the projection parameter in a find statement. The following figure shows the query form with the Filter and Project text boxes completed, along with the returned document.
In some cases, you might want to return all the documents but still limit which fields are returned. You can do this by including an empty filter parameter—a set of curly brackets ({})—in the position where you would normally define the parameter. For example, the following find statement is similar to the previous example except that it returns all 100 documents:
|
1 |
db.reports.find( {}, { "airTemperature": 1, "dewPoint": 1 } ); |
Notice that the first argument in the find method is the filter parameter, which is simply a set of empty curly brackets. The second argument defines the projection parameter.
As noted earlier, the previous two find statements returned the _id field along with the requested fields. However, there might be times when you want to omit this field from your results. If this is the case, you should include the _id field in your projection parameter, but set its value to 0, rather than 1, as in the following example:
|
1 2 3 4 |
db.reports.find( { "callLetters": "GTOT" }, { "airTemperature": 1, "dewPoint": 1, "_id": 0 } ); |
The _id field is somewhat of an anomaly, in terms of how it’s used in a projection. Normally, the parameter’s specified columns must all be set to the same value, either 1 for inclusion or 0 for exclusion (exclusion would return all fields except the excluded ones).
The only exception to this is the _id field. As you can see in this example, it’s okay to define it with a different setting than the other fields.
Adding options to a MongoDB query
Earlier in the article, you saw examples of find statements that included options tagged onto the end. For example, you learned how to use the count option to return the number of documents, rather than the actual documents. You also learned about how to use the limit option to restrict the number of returned documents to the specified amount.
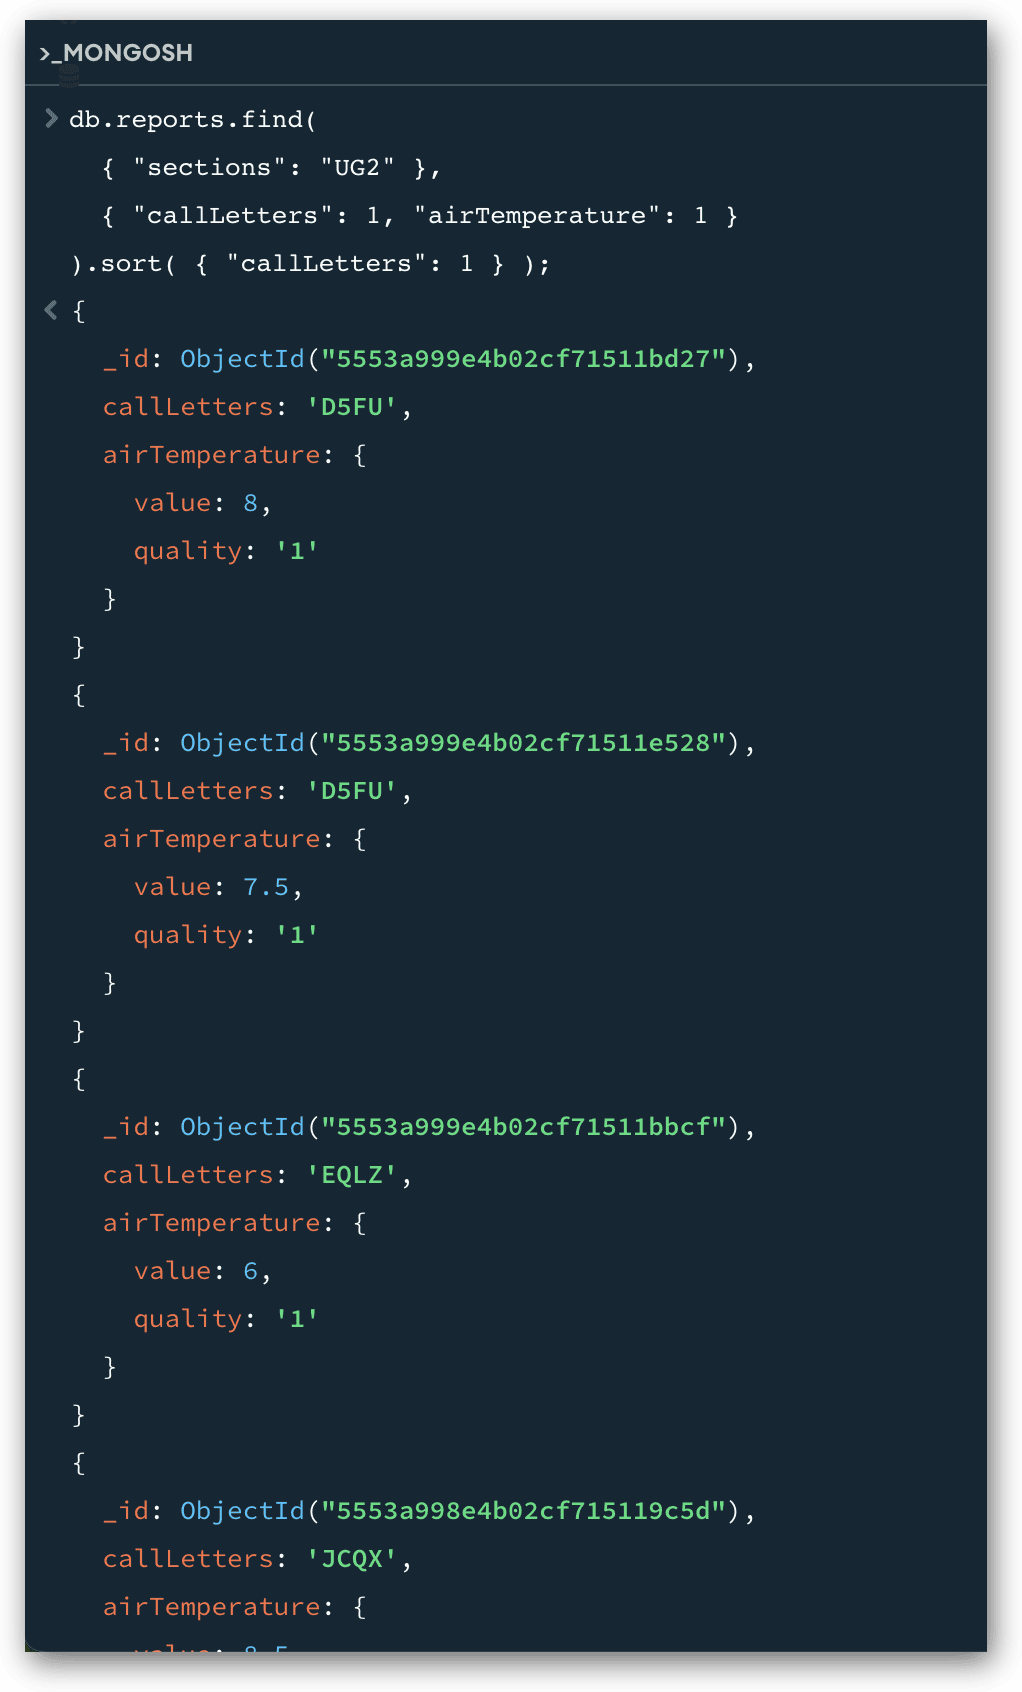
Another useful option is sort, which lets you control how the returned documents are ordered. When you use this option, you include an embedded document as the option’s argument. The embedded document specifies the names of one or more fields on which to base the ordering, along with a code that indicates the sort order. For instance, the following find statement specifies that the returned documents should be sorted by the callLetters field values, in ascending order:
|
1 2 3 4 |
db.reports.find( { "sections": "UG2" }, { "callLetters": 1, "airTemperature": 1 } ).sort( { "callLetters": 1 } ); |
The callLetters field in the sort option is assigned a value of 1, which indicates ascending order. If you want them sorted in descending order, you should specify -1. The following figure shows the statement and several of the returned documents. The statement returns seven documents in all.
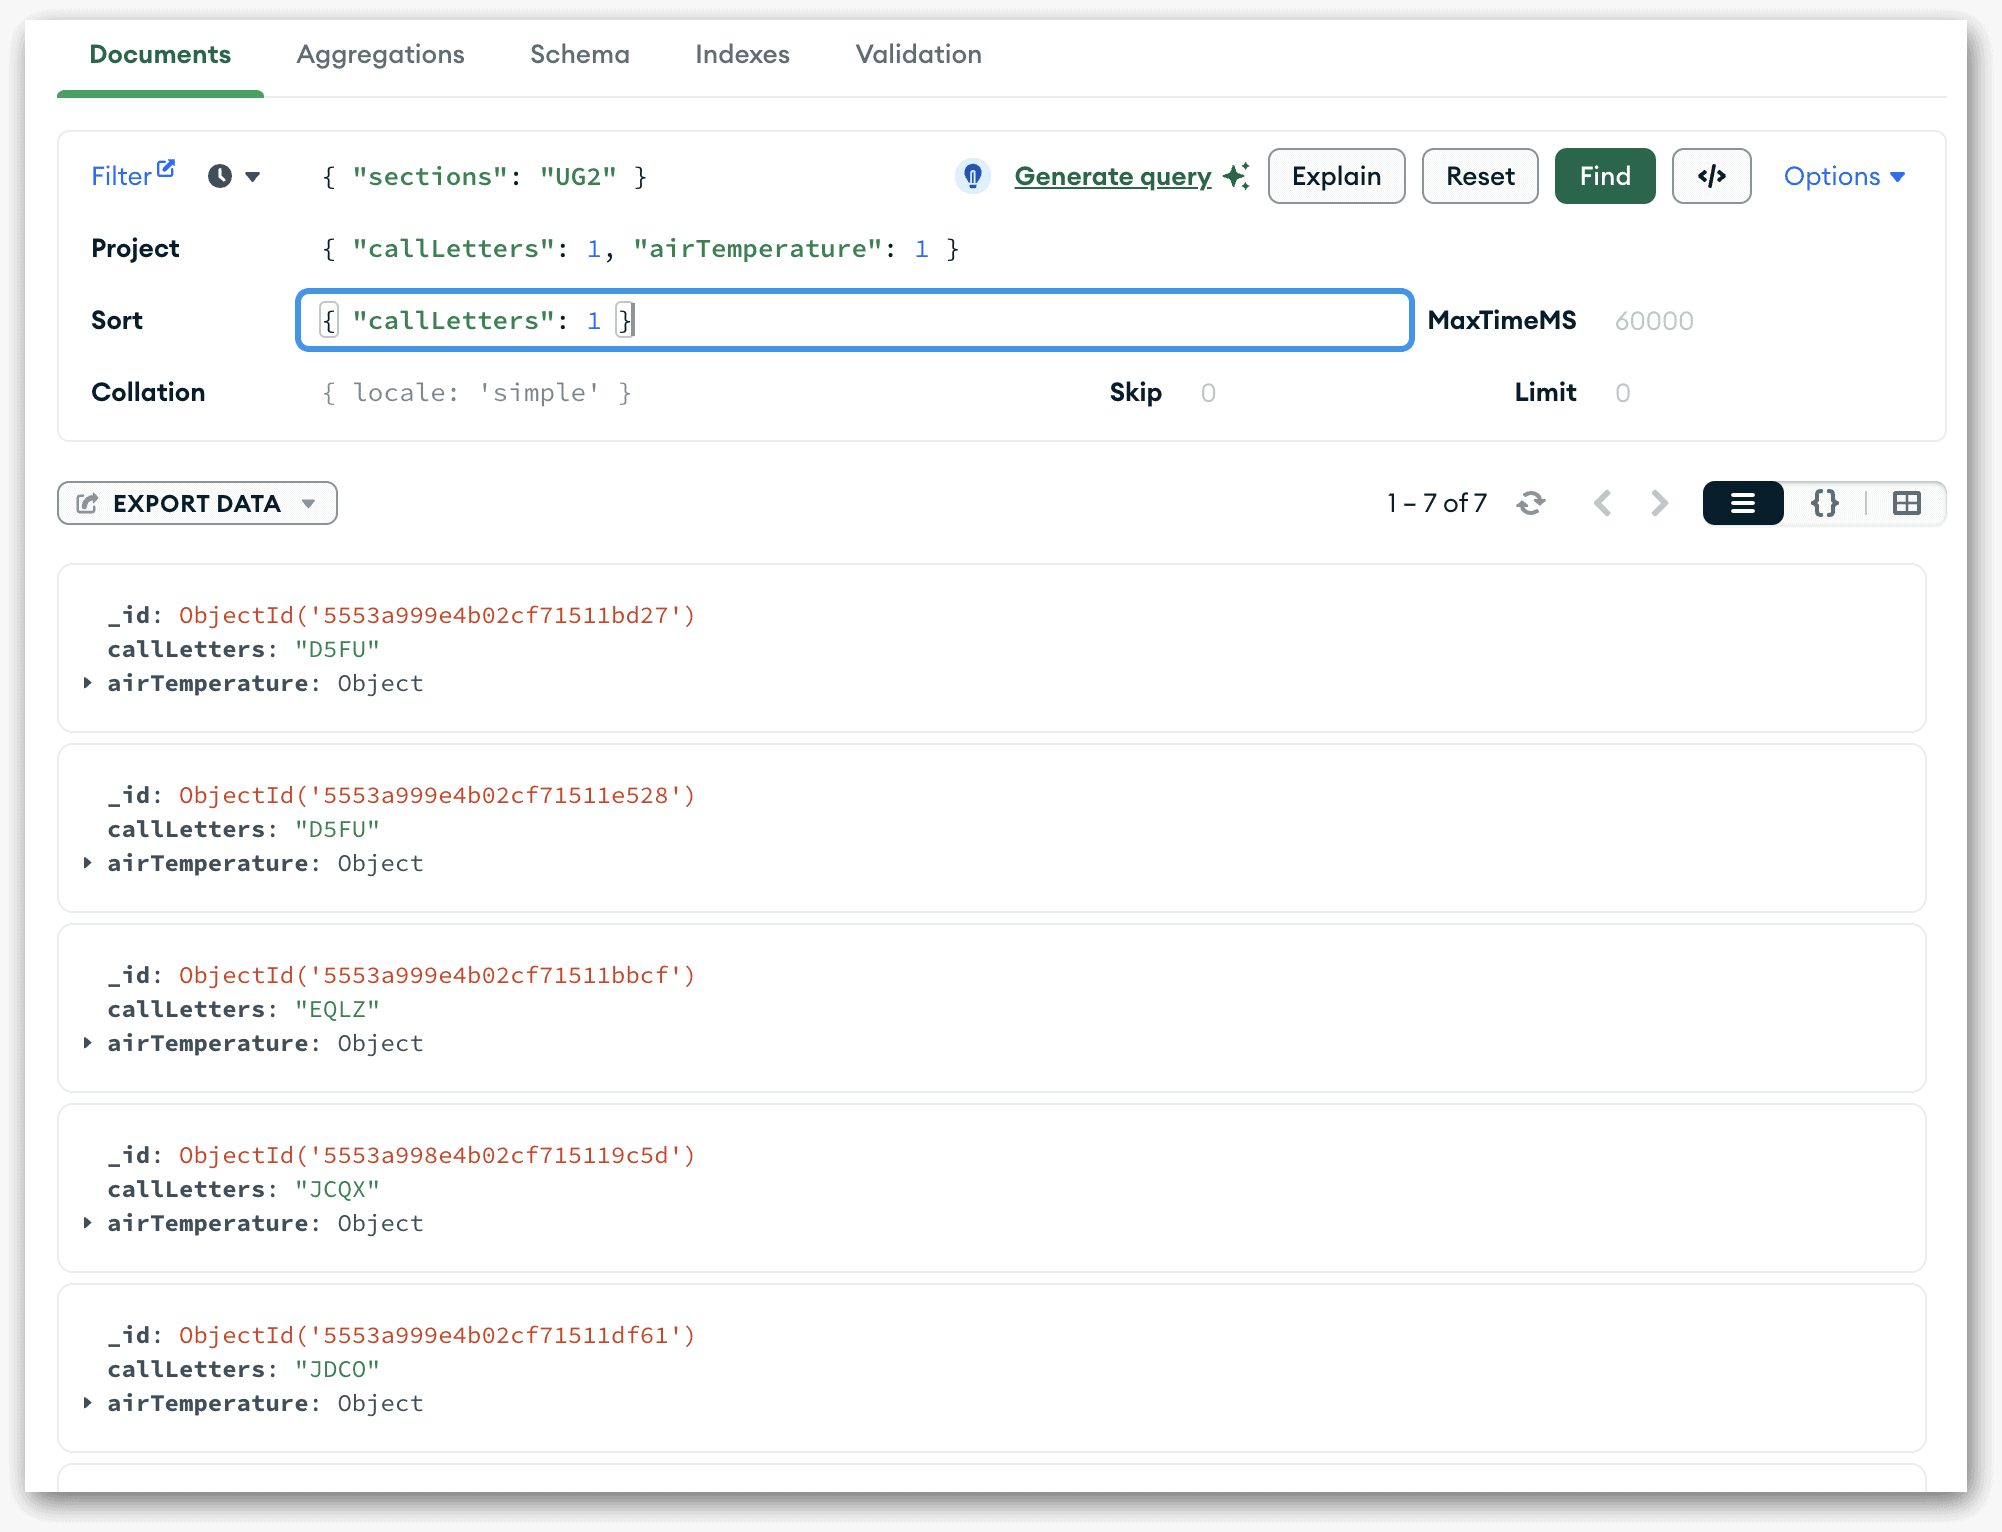
You can duplicate this statement in the Compass GUI, as you saw with other examples. Once again, expand the query form and enter the filter and projection in the Filter and Project text boxes, respectively. Then, in the Sort text box, enter the following snippet and click Find:
|
1 |
{ "callLetters": 1 } |
The following figure shows the filled-out query form and part of the results returned by the query.
When defining the sort option, you can specify multiple fields with different sort orders. For example, the following find statement sorts first on the visibility.distance.value field, in ascending order, and then on the airTemperature.value field, in descending order:
|
1 2 3 4 |
db.reports.find( { "sections": "UG2" }, { "callLetters": 1, "visibility": 1, "airTemperature": 1 } ).sort( { "visibility.distance.value": 1, "airTemperature.value": -1 } ); |
The find statement returns seven documents. You can achieve the same results in the Compass GUI by entering the following code snippet in the query form’s Sort box:
|
1 |
{ "visibility.distance.value": 1, "airTemperature.value": -1 } |
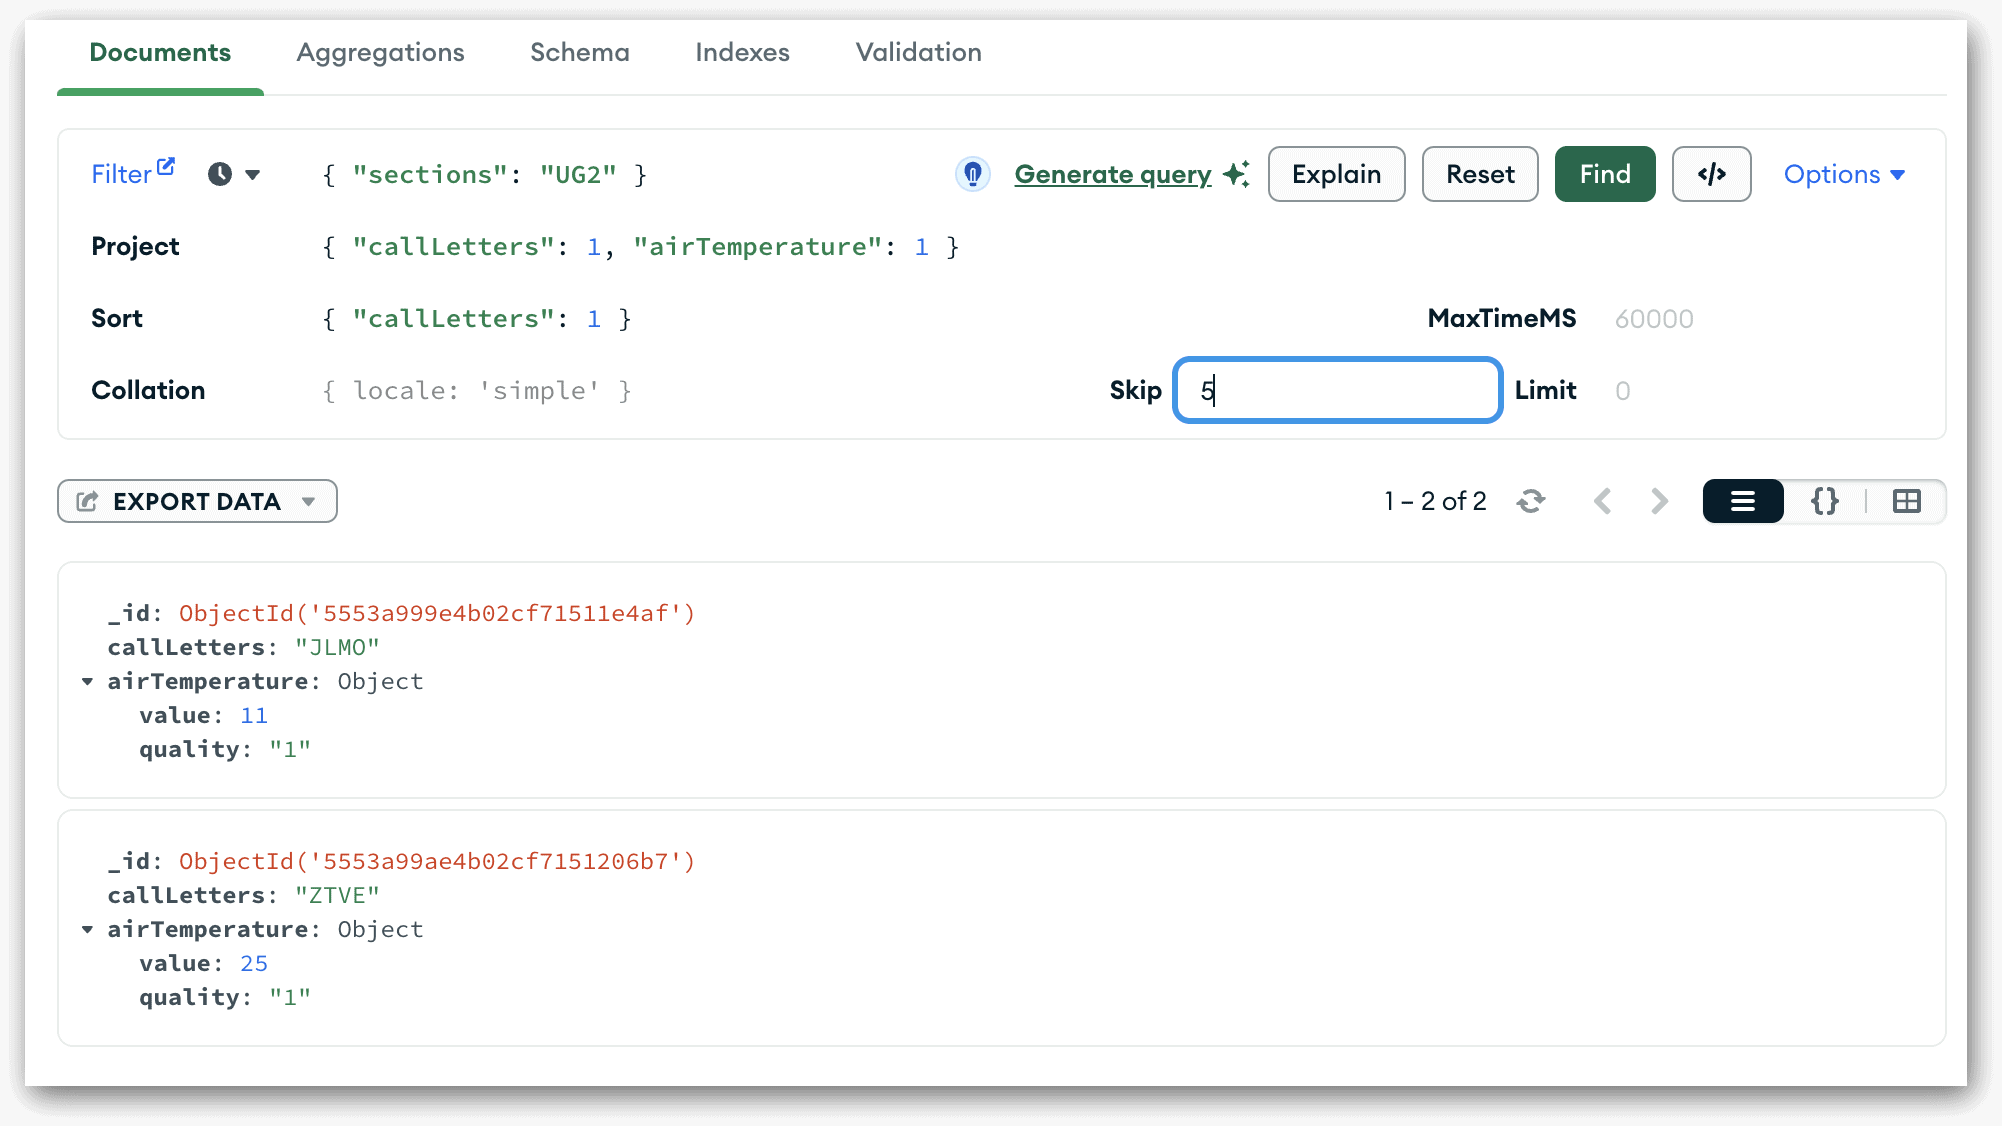
Another available option is skip, which lets you specify the number of rows to skip when returning documents. According to MongoDB documentation, this capability can be useful when you want to paginate your results. The following find statement provides an example of the skip option, which specifies that five documents should be skipped:
|
1 2 3 4 |
db.reports.find( { "sections": "UG2" }, { "callLetters": 1, "airTemperature": 1 } ).sort( { "callLetters": 1 } ).skip(5); |
Normally, this statement would return seven documents, but now it returns only the last two. If you want to get these same results in the Compass GUI, you must specify the number of documents to bypass in the Skip text box in the query form, as shown in the following figure.
MongoDB also lets you stack options at the end of a find statement. For instance, the following find statement includes both the skip option and the collation option, which specifies en as the locale value:
|
1 2 3 4 |
db.reports.find( { "sections": "UG2" }, { "callLetters": 1, "airTemperature": 1 } ).sort( { "callLetters": 1 } ).skip(5).collation( { locale: "en" } ); |
The collation option, which is tagged onto the statement after the skip option, lets you choose which collation to use for the documents returned by the find statement. In this case, the en collation is specified, which represents English.
You can also define the collation in the Compass query form. For instance, to achieve the same results as those in the previous example, you would enter the following snippet in the Collation text box, along with the other code.
|
1 |
{ locale: "en" } |
The following figure shows the query form after all the text boxes have been filled out, including the Collation text box. The figure also shows the two documents retuned by the query.

There are plenty of other options from which to choose when building your queries. You can learn more about the available options in the MongoDB article Cursor Methods. The options are referred to as cursor methods because the find statement returns a cursor object, and the methods build off that object, which is why you can call them in your find statements.
Working with operators in a MongoDB query
MongoDB also supports the use of operators to help you better refine your queries. For example, you can use comparison operators in your filters as part of the field values, as in the following find statement:
|
1 2 3 4 |
db.reports.find( { "airTemperature.value": { $lte: 0 } }, { "callLetters": 1, "airTemperature": 1 } ).sort( { "callLetters": 1 } ); |
The statement includes the $lte (less than or equal to) operator and specifies 0 as the operator’s value. When you include an operator in your filter parameter, you add it as an embedded document in which the operator is the field name and its value is the target comparison value. In this case, the statement returns all documents whose airTemperature.value field has a value less than or equal to 0. Seven documents meet this search condition.
Another useful operator is $in, which you’ve already seen in action. The operator matches any of the values included in the embedded array. For instance, the following find statement returns any document whose airTemperature.value field has a value of 5, 10, 15, or 20:
|
1 2 3 4 |
db.reports.find( { "airTemperature.value": { $in: [ 5, 10, 15, 20 ] } }, { "callLetters": 1, "airTemperature": 1 } ).sort( { "callLetters": 1 } ); |
You can also include multiple operators in your queries. The following find statement contains both the $gt (greater than) operator and the $lt (less than) operator:
|
1 2 3 4 |
db.reports.find( { "airTemperature.value": { $gt: -1, $lt: 1 } }, { "callLetters": 1, "airTemperature": 1 } ).sort( { "callLetters": 1 } ); |
The statement returns only those documents whose airTemperature.value field has a value between -1 and 1. Only seven documents match this search condition.
Not all operators are comparison operators. For instance, MongoDB also supports element operators. One such operator is $exists, which returns documents that either have or don’t have the specified field. The following example demonstrates how this works:
|
1 2 3 4 5 6 7 |
db.reports.find( { "airTemperature.value": { $gt: 5 }, "skyConditionObservation": { $exists: false } }, { "callLetters": 1, "airTemperature": 1 } ).sort( { "airTemperature.value": -1 } ); |
The filter parameter defines two search conditions, which are separated by a comma. The first uses the $gt (greater than) operator to return only those documents whose airTemperature.value field has a value greater than 5. The second condition uses the $exists operator to check whether the skyConditionObservation field exists. Because the operator’s value is set to false, the results will include only those documents that do not contain this field. Only two documents meet both conditions.
Getting started with MongoDB queries
I’ve covered a lot of territory in this article, yet what I’ve shown you here represents only a small sampling of the many ways you can query a MongoDB collection. Not surprisingly, there is much more that you can do with your queries, especially when it comes to defining the filters, whether using MongoDB Shell or the Compass GUI.
I highly recommend that you check out the MongoDB documentation to learn more about each aspect of building a query. A good place to start is with the topic db.collection.find(). The better you understand how the find statement works, the more equipped you’ll be to move onto to other aspects of querying MongoDB data.
Appendix: Preparing your MongoDB environment
For the examples in this article, I used MongoDB Atlas for storing the data and MongoDB Compass to work with that data. This is the same approach I used for the previous articles in this series. The first of these articles explains how to set up the environments.
The examples in this article are based on a collection that I created from the sample_weatherdata database available through MongoDB Atlas. If you want to try out these examples for yourself, you’ll need to download the document from this site and save as weather.json file to a folder that you can access from within MongoDB Compass. You’ll then need to take the following steps to import the data into your collection:
- In MongoDB Compass, connect to your cluster on MongoDB Atlas, if you’re not already connected.
- In the left panel, click the Create database button (plus sign), which is located to the right of the Databases node.
- In the Create Database dialog box, type weather in the Database Name text box, type reports in the Collection Name text box, and click Create Database.
- After the database and collection have been created, select the reports collection node in the left panel if it’s not already selected.
- In the main window, click the Add Data drop-down arrow and click Import JSON or CSV file.
- When your system’s file manager window appears, navigate to the folder that contains the
weather.jsonfile, select the file, and click Select. Compass will load the data into thereportscollection.
That’s all you need to do to try out the examples in this article. I plan to go into more detail about both importing and exporting data later in the series.
This document contains proprietary information and is protected by copyright law.
Copyright © 2026 Red Gate Software Limited. All rights reserved


Load comments