
One of the most significant advantages of developing SPAs (Single-page applications) is the simplicity of deploying them to the cloud. Whether it is Angular, Vue, or React-based, you simply need to load an initial index.html file and point your hosting solution to it. All the rest of the work is automatically performed by the SPA framework along with the power of JavaScript.
However, for many developers out there, the chances are that once in a while they’d want to host a single application that is entirely static, i.e., doesn’t perform any HTTP call to a back-end API; like with a business website, or a portfolio page, for example.
If this is your case, then Microsoft is equipped with the right solution: Azure Blob Storage along with Azure CDN (Azure Content Delivery Network).
They’re all about static hosting. While Azure CDN is a global CDN solution for delivering high-bandwidth content, it also uses cached static objects loaded from Azure Blob storage, which, in turn, allows users to store large amounts of data on Microsoft’s storage solution.
This tutorial explores these two great tools by creating an Angular SPA application and deploying it statically to Azure in just a few steps. Come with me!
Setup
For this piece, you’ll be making use of a fully working example provided by the official Angular docs. It is an SPA app that loads an in-memory list of heroes, allowing the users to perform CRUD operations over it as shown in Figure 1.
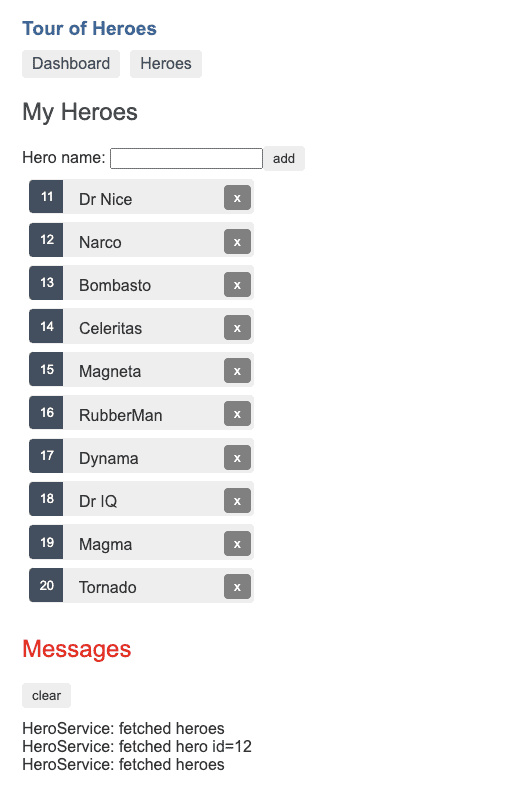
Figure 1. Official Angular example app
Please, feel free to use any other Angular (or another SPA framework as well) app you desire. Go to this link and find the Download example link within it. Download the app, unzip it, and access its root folder via command line.
You’ll also need to have the latest version of Node.js installed on your machine. Then, open a command window and navigate to the app folder. Run the following commands:
|
1 2 |
npm install npm start |
They will download the required Node dependencies and start the app right after. Feel free to play around with it. The focus, however, is with the dist folder; so, run the following command:
|
1 |
npm run build |
This command will generate a bunch of files under the dist/ folder that, together, represent the SPA as a whole. Save them for later.
Azure Configs
Now, on to the Azure configurations. First, log in to your Azure account here. If you don’t have one already, please go ahead and make sure to complete the checkout until the end. For this example, you need a subscription. Azure subscriptions are paid, but you can make use of the free initial trial to test it out.
You can access the Subscriptions option through the home page of your Azure account. Please, make sure to complete the subscription setup until the end before proceeding to the next steps. It’s a straightforward process, so don’t worry.
Once you’ve logged in, go to the home page and search for Storage account in the top search bar. Click it, and you’ll be redirected to the listing of storage accounts.
You may not have any yet, so click the Add button in the top bar and once redirected to the form page, fill in the fields according to the Figure 2 shown below.

Figure 2. Filling in storage account details
Note that you’ve got to inform a Resource group name. If you don’t have any, click the Create new link and give it a name like shown in Figure 3:
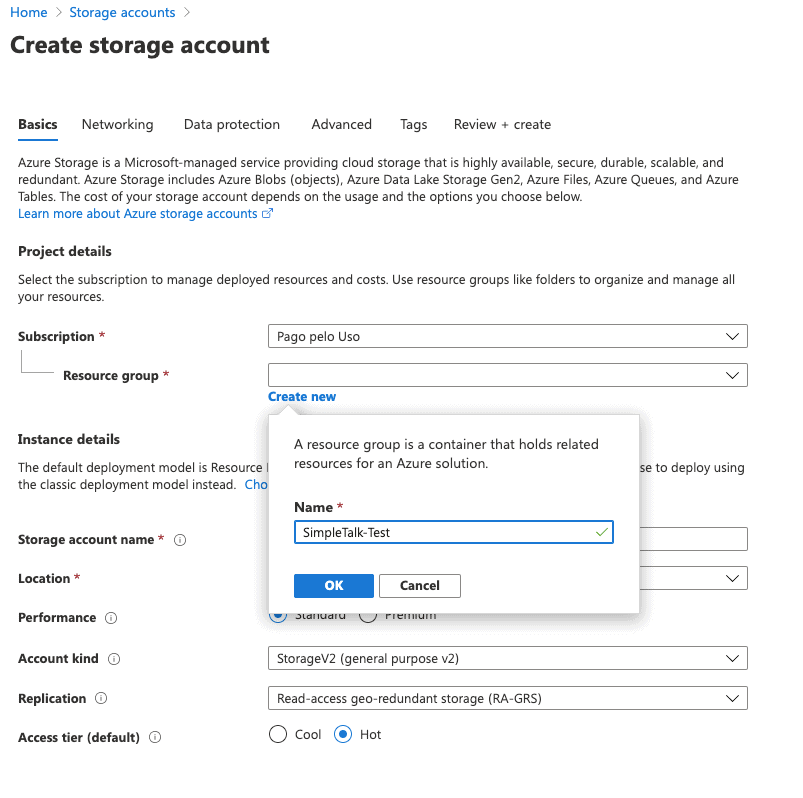
Figure 3. Creating a new resource group
These groups are responsible for integrating all the common resources under the same subscription, which is good for organizational means. If you dedicate a resource group for one purpose, it’s easy just to delete the resource group when you are done to clean up everything.
Your storage account name is also important. It defines how your blob account will be called through all the other Azure services and services of users across the globe. It has to be unique.
After you finish, click the button Review + create at the bottom of the page as shown in Figure 4. Then, you’ll be redirected to the review page with a summary of the configs.

Figure 4. Click Review + create button
Finally, click the Create button. This is it, for now, you have your first storage account!
Whenever you go back to the home page, your newly created Storage account will be exhibited there:

Figure 5. Recently created resources
When you click it, the Overview dashboard will display summarized and important information about this resource, like its location (datacenter), the subscription details, as well as some graphs with usage data.
Now, at the left-side panel, click the Static website menu option (under the Settings section) and enable it by clicking the Enabled toggle button. This is the option to allow the deploy of static websites to your Azure account.
Once you enable it, you must provide two main endpoints: the index file (where the app starts) and the error path, just as shown in Figure 6.
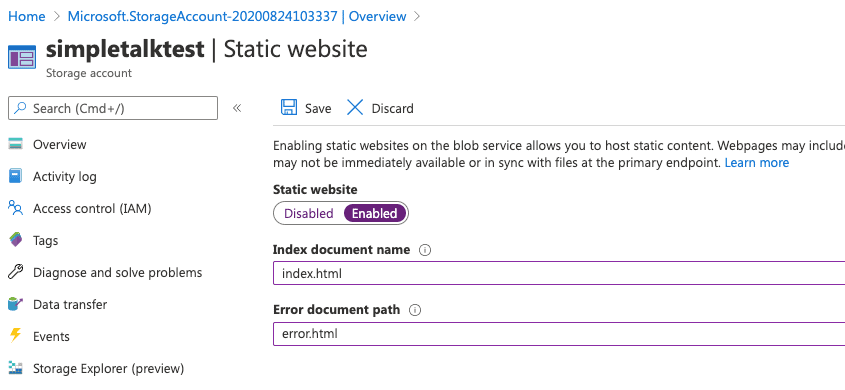
Figure 6. Providing document paths data
Once you’ve filled in the values, click the Save button. Then, the same page will be automatically updated with the public endpoints you may use to access them as shown in Figure 7.
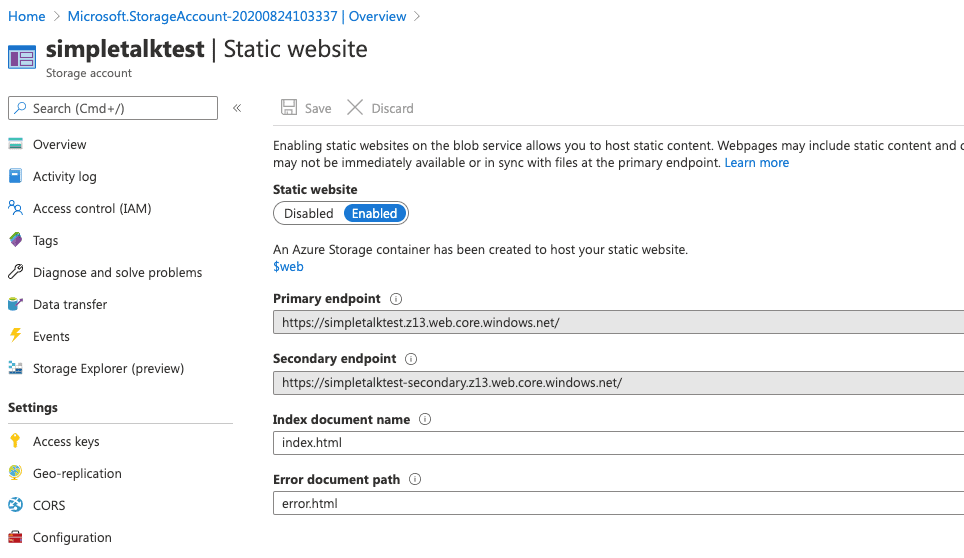
Figure 7. Static website endpoints
However, this is still not enough to host the Angular files within Azure. You need a Blob container for that. Go back to the Storage account and click the Containers menu option (on the left-side panel), under the Blob service section as shown in Figure 8.
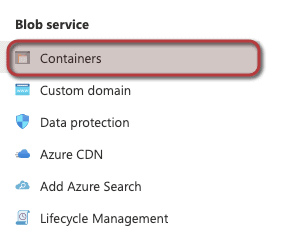
Figure 8. Click the Containers menu option
There you’ll get to see the list of containers among which there are two available ones: the $logs and $web containers. The second one is just what we need since it is well-suited for website content.
You can create as many containers as you want to organize your applications.
Click the $web container, and you’ll be redirected to the Overview page in which you get to upload your app files. That’s an effortless task to do. Click the Upload button at the top bar, and the right-sided panel shown in Figure 9 will appear.
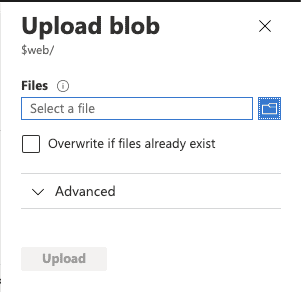
Figure 9. Uploading files to your blob
Click the browse button and search for the dist folder that you built before in your local Angular app. Select all the files under the folder and click Ok. Then, click the Upload button. Wait until all the files are uploaded and watch each of them appear in the same Overview page.
That’s it! How do you access the application? Remember the Primary endpoint that was autogenerated under the Static website page? This is the final endpoint you may access to see your Angular app up and running. Enter it directly to your browser and have fun!
Azure CDN
Like all other CDNs, Azure CDN offers a faster way to cache your static website contents hosted in your Azure storage to enhance the speed and provide a better experience to the users. For this, you need to access your storage account once more and click the menu option Azure CDN (under the Blob service section of the left-side panel).
The screen shown in Figure 10 will appear. Make sure to fill in the New endpoint form fields accordingly. Note that the CDN endpoint name must be unique across Azure, so try again with a new name if there is a failure when creating the resource.
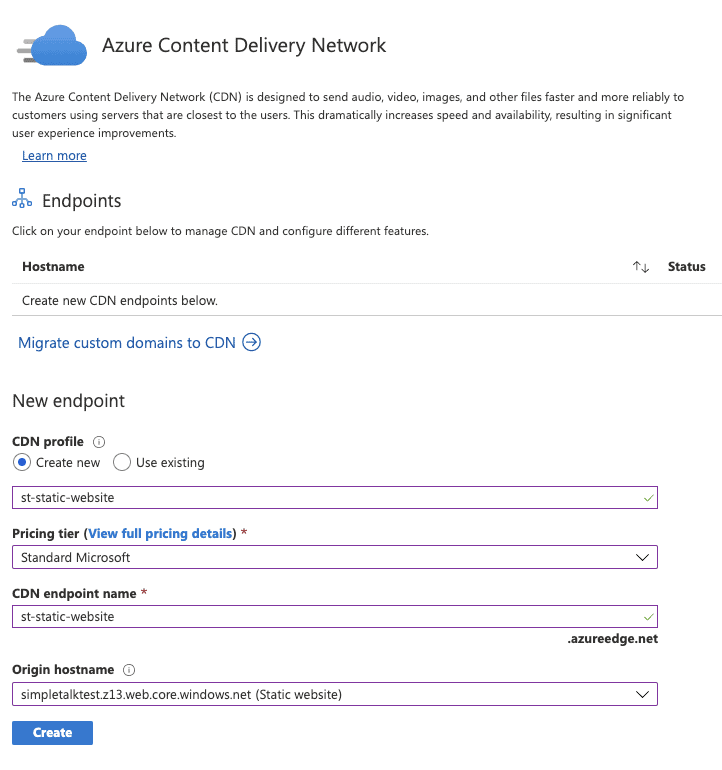
Figure 10. Creating a new CDN endpoint
Notice also that it’s targeting to cache the static website, not the blob, so be sure to select the proper option in the Origin hostname combo box. The CDN endpoint name is the prefix you want your hostname to have simplified at the end of the process.
When you’re done, click the Create button. This will take some time, so you’ll get to see a loading section at the notifications menu (Figure 11).
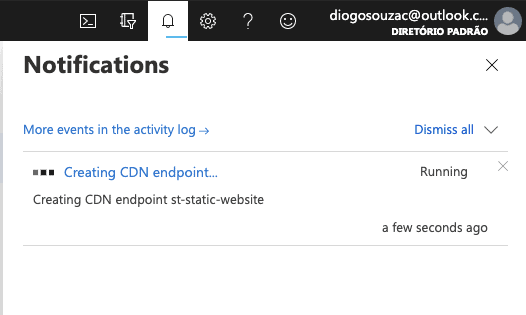
Figure 11. Processing the CDN creation
Once it’s done, you’ll remain on the same page and the Endpoints section is going to be refreshed to receive the newly created endpoint:

Figure 12. List of created endpoints
When you click it, Azure will redirect you to the details page. There, you may see more information about the CDN like its location, the supported protocols, and the Endpoint hostname (the one we must use to access the referred CDN).
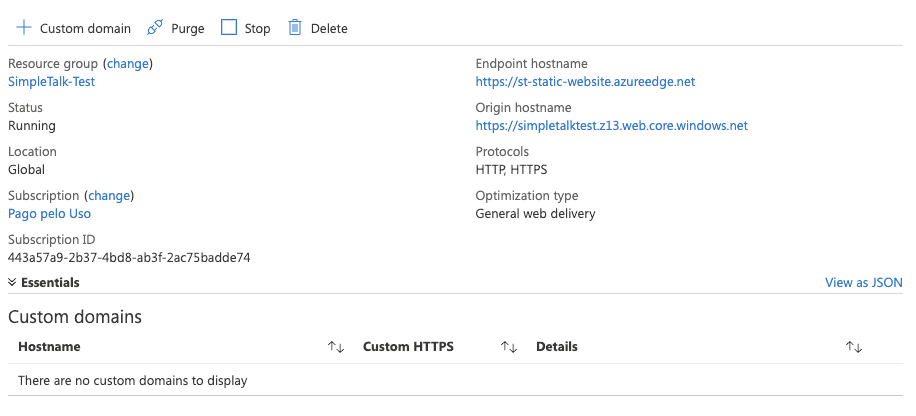
Figure 13. Detailed information about the created CDN
If you try to access the created CDN through the provided Endpoint hostname, chances are that you may see the error screen shown in Figure 14. This happens because Azure takes some time to process the creation and propagate the new CDN through the web.
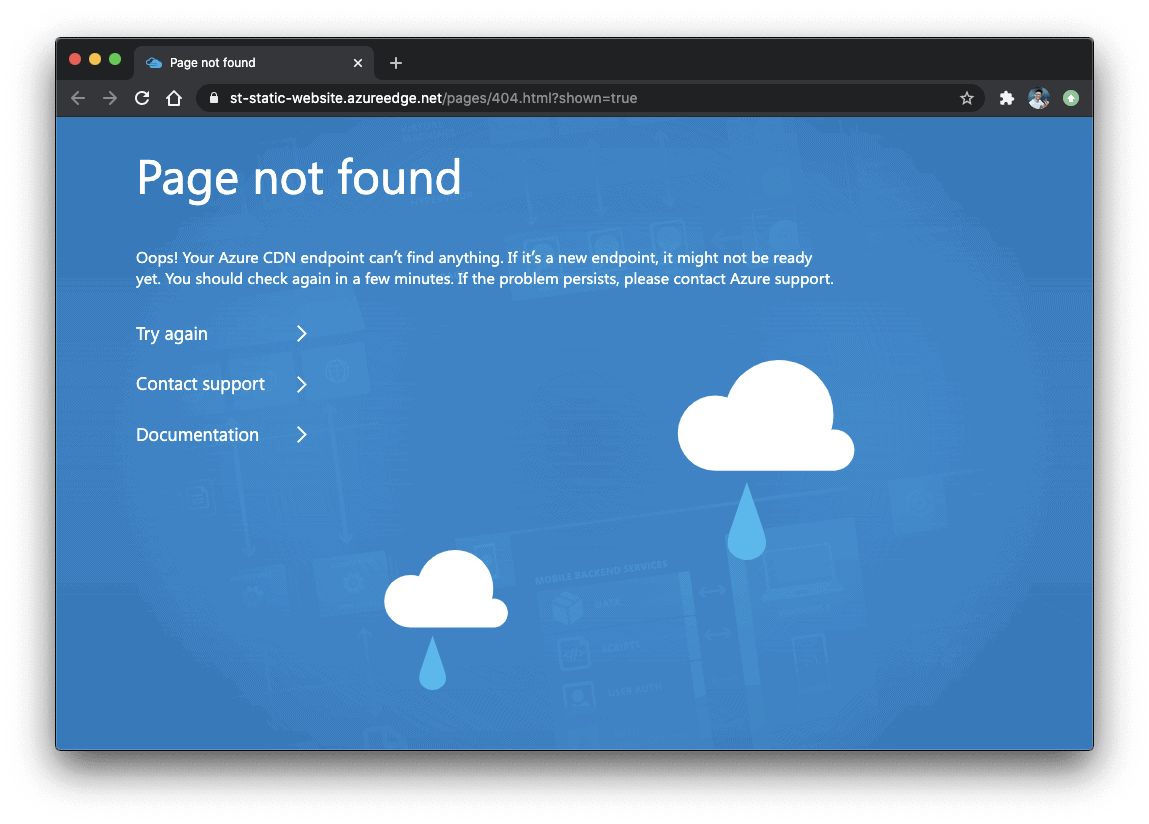
Figure 14. Page not found
Once you wait a bit more, you get to see the fully working app in action shown in Figure 15.
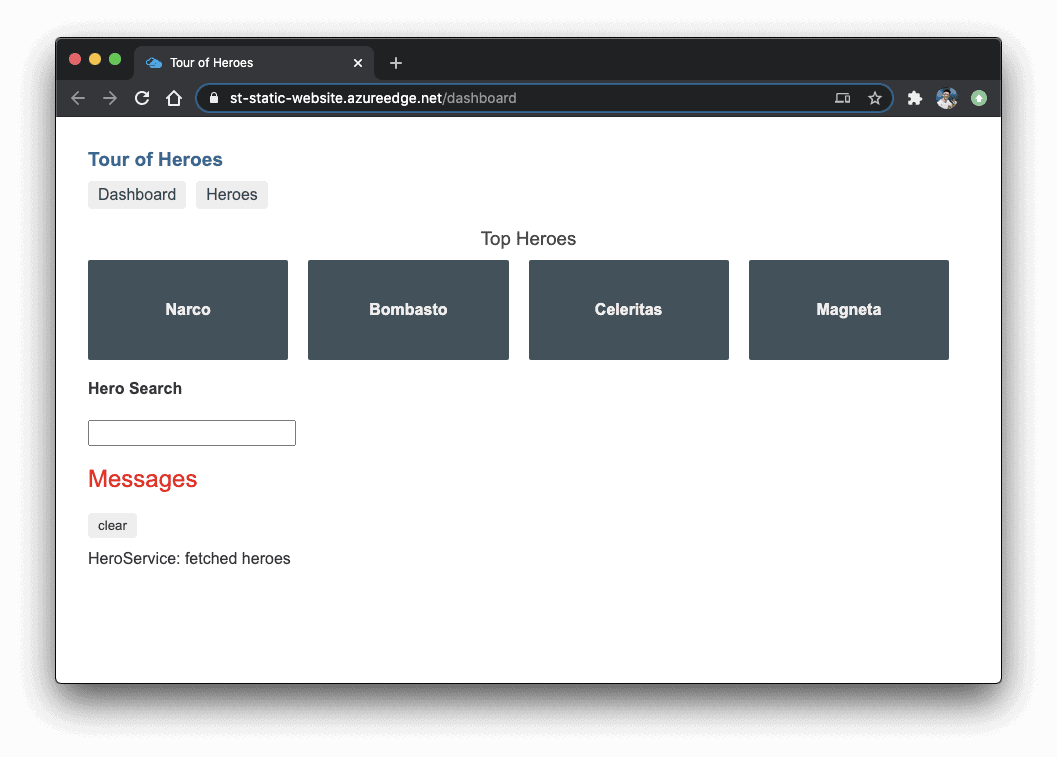
Figure 15. Angular app running under Azure CDN hostname
Conclusion
The solution explored over this article is also focused on the cost-benefit. On Azure, you pay only for what you use; that means that it’s a very cheap solution to host static websites that may be accessed rarely over time. Rather than paying for a fixed-priced solution, Azure CDN along with Azure Blob Containers offers a flexible and easy-to-use way to approach your needs.
And you can go beyond that. With an Azure Storage account in hand, you can store files, queues, disks, and many types of data, in a fast and straightforward manner. Best of luck!
This document contains proprietary information and is protected by copyright law.
Copyright © 2026 Red Gate Software Limited. All rights reserved
Load comments