


User-defined functions (UDFs) in Power BI let you build reusable, automated tests for your semantic models — so you catch broken measures, duplicate rows, and faulty relationships before they reach your reports. This article walks through how to use UDFs alongside PQL.Assert to standardize testing across your team, and how to automate those tests with Power Automate or a Fabric Notebook.
Reuse is a very important term in DataOps. It is defined as the practice of leveraging existing components, code, or processes across multiple projects to reduce redundancy and improve consistency.
However, when it comes to Power BI, reusing DAX measures across projects was a difficult ‘copy and paste’ job. For my teams, we used DAX measures to help with testing our semantic models, but ensuring consistent testing conventions (and standard schemas of the tests) required lots of manual review.
Thankfully, that changed in late 2025 when Microsoft introduced User Defined Functions (UDFs) for Power BI. In this article, I’ll demonstrate how to use UDFs for testing, plus how to standardize the way teams test their models.
Why is it important to test semantic models?
Many folks ask me, “why would you test your model?” Humans are fallible, so the semantic models we build are fallible as well. It’s easy to write a DAX measure that doesn’t properly handle filter context and results in inaccurate summations when a slicer filters the model.
It’s also easy to leave a filter in a step in Power Query when debugging your transformations, resulting in rows being accidentally removed from the model (not that I have ever done that!)
We should not only test to avoid repeating past mistakes, but for parts of the model we anticipate would have detrimental effects on reports. For example, columns used in relationships, often-used DAX measures, etc.
From a technical perspective, DAX and Power Query are code. Yes, they are maybe somewhat abstracted by low-code tools, but code should be tested nonetheless.
How to use user-defined functions for testing in Power BI
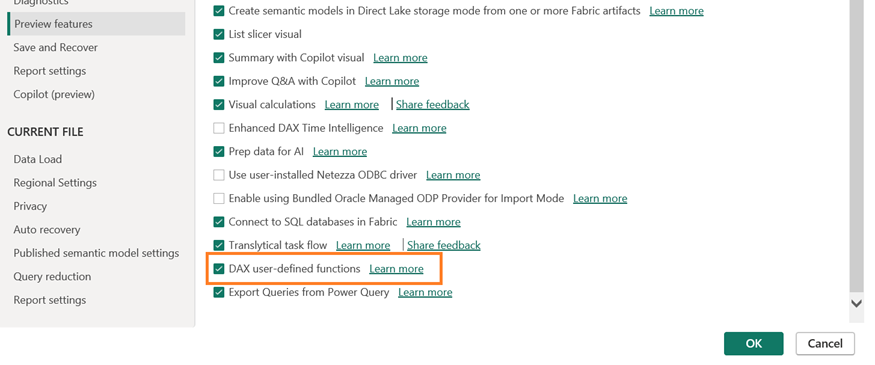
I’ll run through the process step-by-step. First, the setup. You’ll need to specifically turn on UDFs, since it’s currently (as of March 2026), a preview feature:
- Open Power BI Desktop.
- Go to File > Options and Settings > Options.
- Select Preview Features from the left-hand menu.
- Check the box for User Defined Functions and click OK.
- Restart Power BI Desktop for the change to take effect.
How to import PQL.Assert
While UDFs are a new concept to Power BI, the idea behind them exists in many other programming languages to share and reuse code. C# has NuGet, JavaScript has npm, and Python has PyPI.
Thankfully, the team at SQLBI introduced DAXLib. This site has a catalog of UDFs organized into packages which serve different purposes. There are ones that help build SVGs for visuals and others that help with calculating industry metrics.
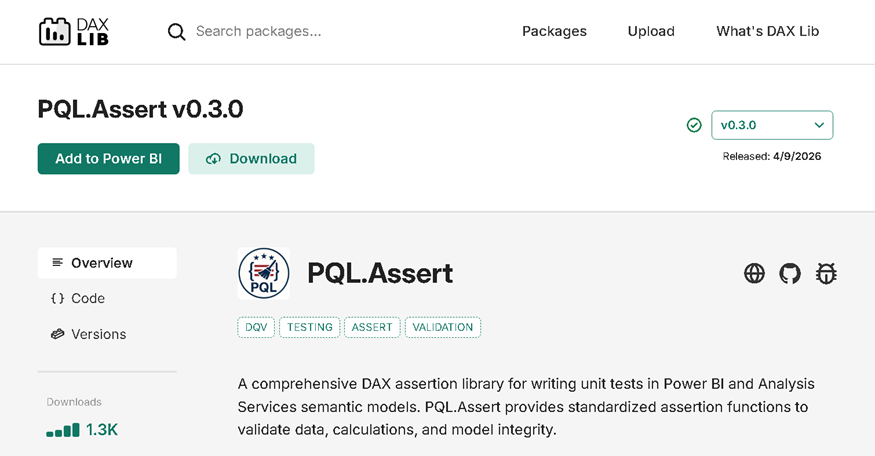
The one that assists with building tests, however, is PQL.Assert. It’s an open-source library I helped develop.
Here’s how to import PQL.Assert:
- Navigate to the PQL.Assert package page on DAXLib.
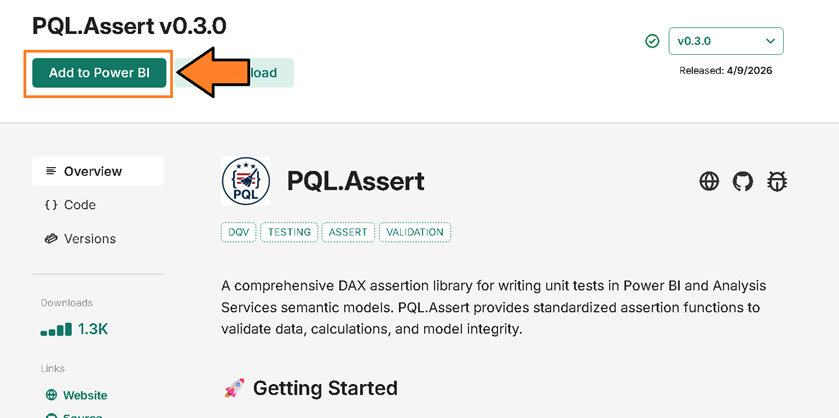
- Click the Add to Power BI button.
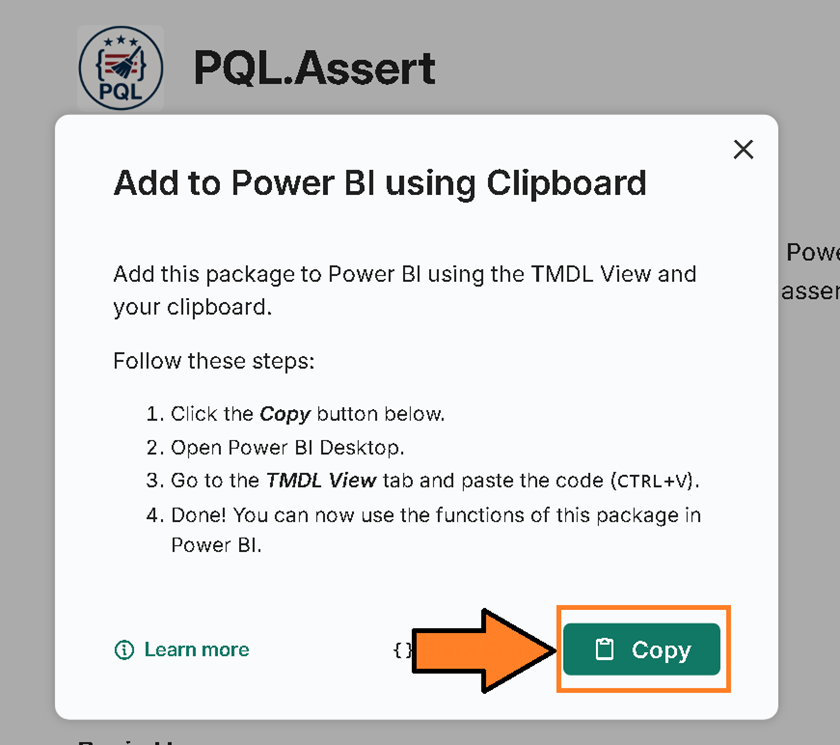
- Select the Copy button to copy the TMDL script to your clipboard.
Now, open your model in Power BI Desktop.
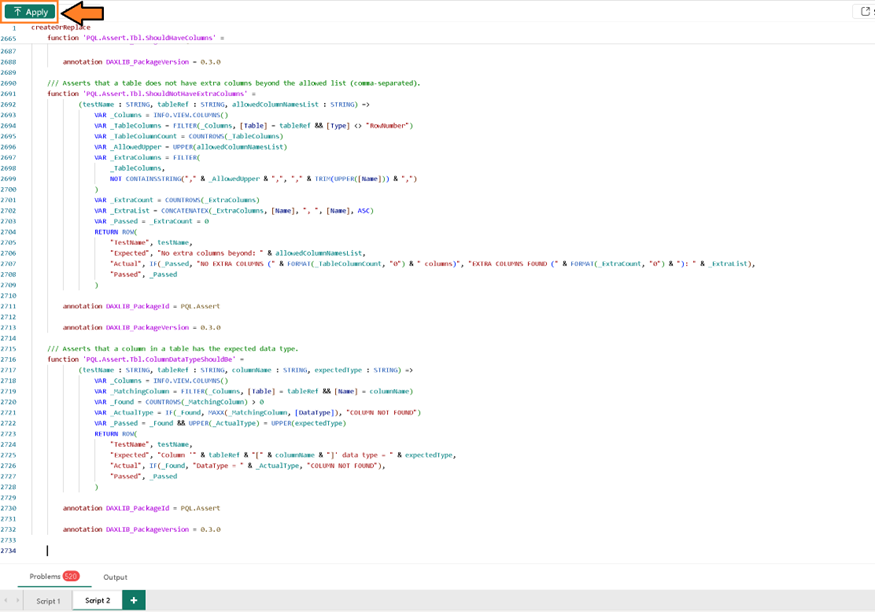
- Navigate to the TMDL View.
- Create a new tab by clicking the “+” icon.
- Paste the script (Ctrl+V).
- Then hit the “Apply” button.
PQL.Assert provides a comprehensive set of assertion functions organized into several categories:
- Basic Assertions: Validate simple conditions such as
PQL.Assert.ShouldBeTrue,PQL.Assert.ShouldEqual, andPQL.Assert.ShouldBeNull. - Column Assertions: Validate column-level properties such as
PQL.Assert.Col.ShouldBeDistinct,PQL.Assert.Col.ShouldNotBeNull, andPQL.Assert.Col.ShouldBeInRange. - Table Assertions: Validate table-level properties such as
PQL.Assert.Tbl.ShouldHaveRows,PQL.Assert.Tbl.ShouldExist, andPQL.Assert.Tbl.ShouldHaveColumns. - Relationship Assertions: Validate model relationships with
PQL.Assert.Relationship.ShouldExist.
Subscribe to the Simple Talk newsletter
How to build your first test with Power BI user-defined functions
Let’s say you depend on an upstream SQL provider to provide you data for part of your model. From time to time they truncate the tables to hydrate them with the most up-to-date data.
However, their routines sometimes hydrate data with duplicates. This led to inaccurate calculations, so you had to put Power Query in place to remove duplicate rows.
Of course, you’d now like to ensure that those columns stay distinct, and avoid getting calls about calculations looking wrong. How would you write that test? Let’s find out.
First, open your model in Power BI Desktop and go to DAX Query View:
- Create a new tab. Click the “+” icon in DAX Query View to add a new query tab.
- Name the tab following the naming convention
[name].[environment].test(s). For example, name itDataQuality.ANY.Testsso it applies to all environments. - Enter the template for defining your test. Start with a
DEFINEblock and aFUNCTIONdeclaration:
|
1 2 3 4 5 |
DEFINE FUNCTION DataQuality.ANY.Tests = () => PQL.Assert.Col.ShouldBeDistinct("Verify AlignmentID is distinct", 'AlignmentDim'[AlignmentID]) EVALUATE DataQuality.ANY.Tests() |
Enter PQL.Assert and the IntelliSense will display a wide array of functions for testing. You can see all of them listed here. But, for now, we will use PQL.Assert.Col.ShouldBeDistinct (in turn, ensuring that all column values are unique.)
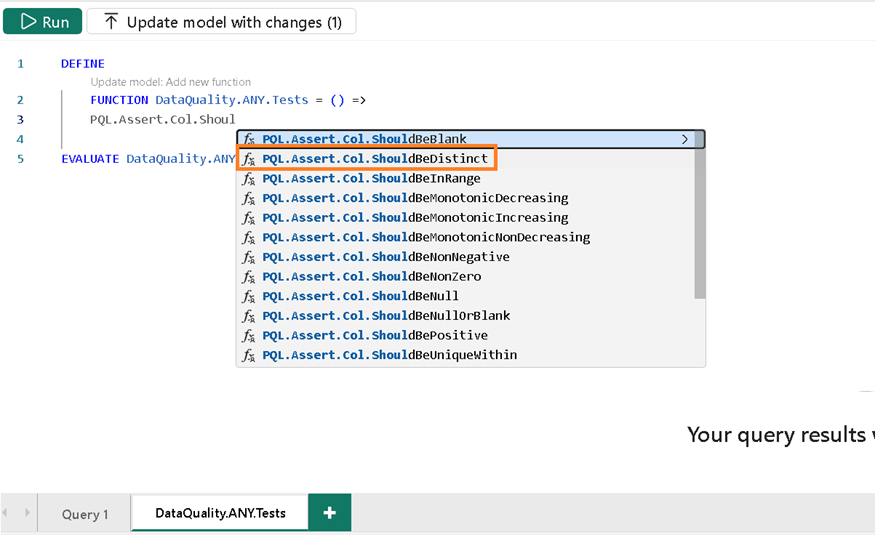
- Define the test name in the first parameter. I like to give it a brief assertion, such as “Verify AlignmentID is distinct.”
- Identify the column. The beauty of UDFs is that they allow you to pass in columns or tables as parameters. In this case, we pass
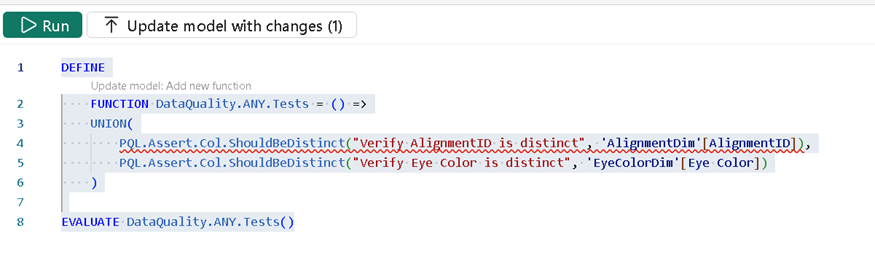
AlignmentDim[AlignmentID]as the column reference. - For two columns, wrap them in a
UNIONfunction. For example, if you also need to verify thatEyeIDis distinct:
|
1 2 3 4 5 6 7 8 |
DEFINE FUNCTION DataQuality.ANY.Tests = () => UNION( PQL.Assert.Col.ShouldBeDistinct("Verify AlignmentID is distinct", 'AlignmentDim'[AlignmentID]), PQL.Assert.Col.ShouldBeDistinct("Verify Eye Color is distinct", 'EyeColorDim'[EyeID]) ) EVALUATE DataQuality.ANY.Tests() |
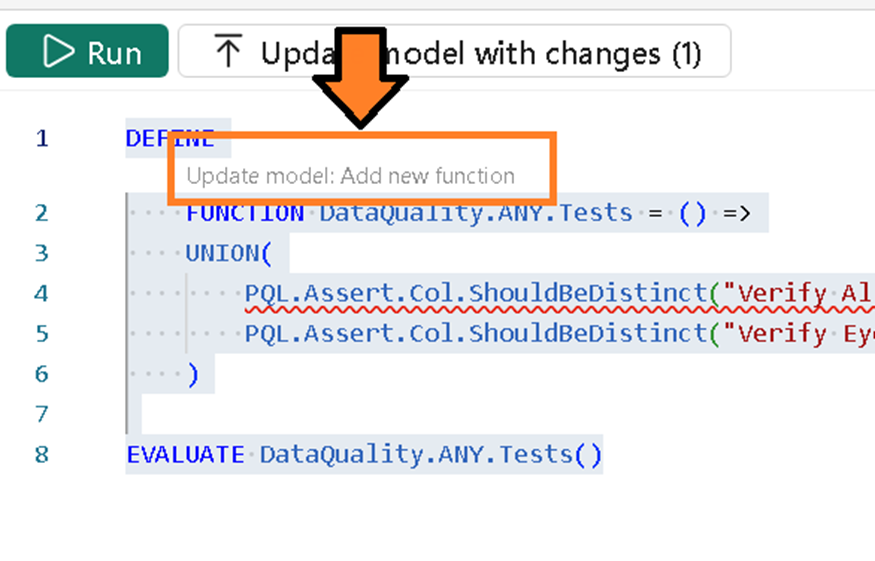
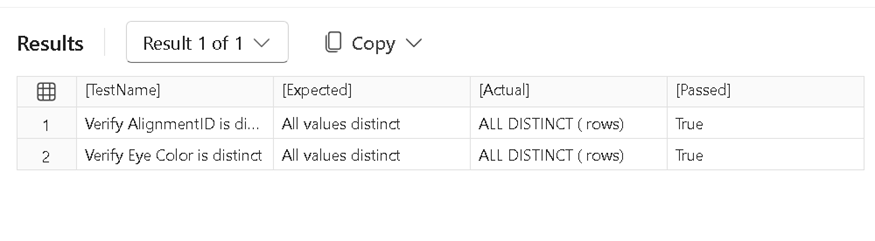
Click the Run button, check the results, and then you can click “Add to Model”:
All test functions return results following a standard schema:
| Column Name | Type | Description |
| TestName | String | Description of the test being conducted |
| Expected | Any | What the test should result in |
| Actual | Any | The result of the test under the current dataset |
| Passed | Boolean | True if expected matches actual, otherwise false |
This test now stays with the model, so it can be validated any time the model is opened.
How to automate testing with user-defined functions in PowerBI
Manual testing is fine, but what about running these tests in the service? Can we automate them? Well, yes. There are two easy options:
The Power Automate approach to testing (step-by-step instructions)
The PQL.Assert repository includes a ready-made Power Automate solution you can import directly. You can download it from the examples/power-automate folder in the PQL.Assert GitHub repository.
The solution ZIP file (named PQLAssertviaPowerAutomate_x_x_x_x.zip, where x_x_x_x will be a version number) contains a pre-built flow that handles test discovery, execution, and result evaluation for you.
Here’s how to set up automated testing with Power Automate, step-by-step:
- Download the solution from examples/power-automate in the PQL.Assert repository. The file is named
PQLAssertviaPowerAutomate_x_x_x_x.zip, wherex_x_x_xwill be a version number. - Navigate to Power Automate or Power Apps.
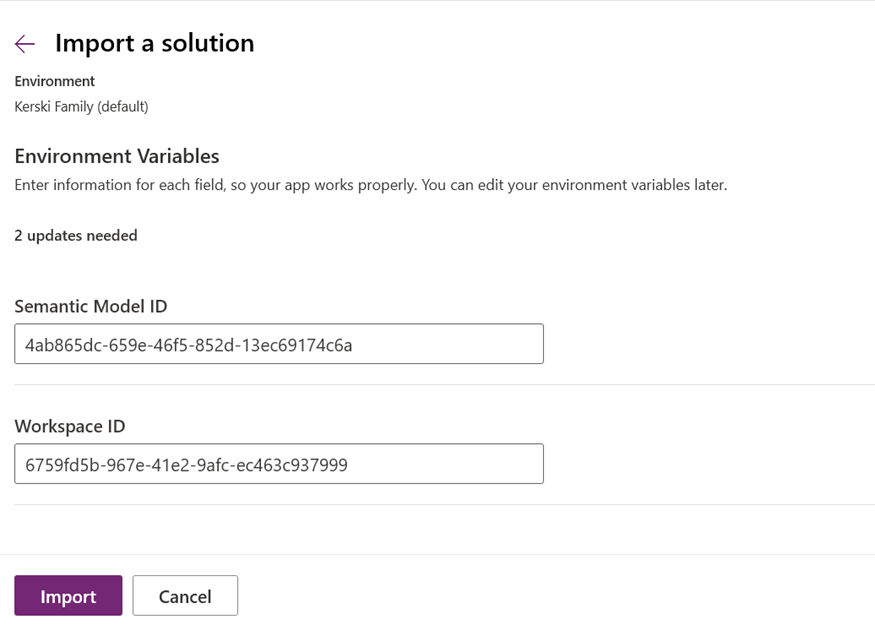
- Import the solution following Microsoft’s guide: Import solutions.
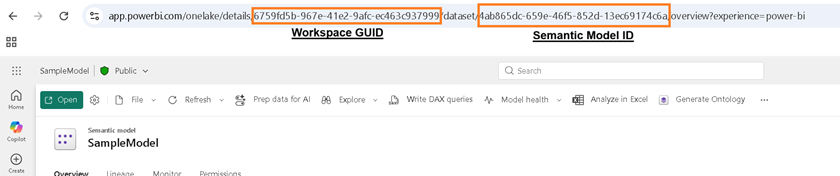
- Set environment variables when prompted during import. You will need to provide two values:
- Workspace GUID: The unique identifier of your Power BI workspace. You can find this in the workspace URL:
https://app.powerbi.com/groups/{workspace-guid}/...
- Semantic Model ID: The unique identifier of your semantic model. You can find this in the dataset URL:
https://app.powerbi.com/groups/{workspace-guid}/datasets/{semantic-model-id}/...
- Workspace GUID: The unique identifier of your Power BI workspace. You can find this in the workspace URL:
Once imported, the flow does the following:
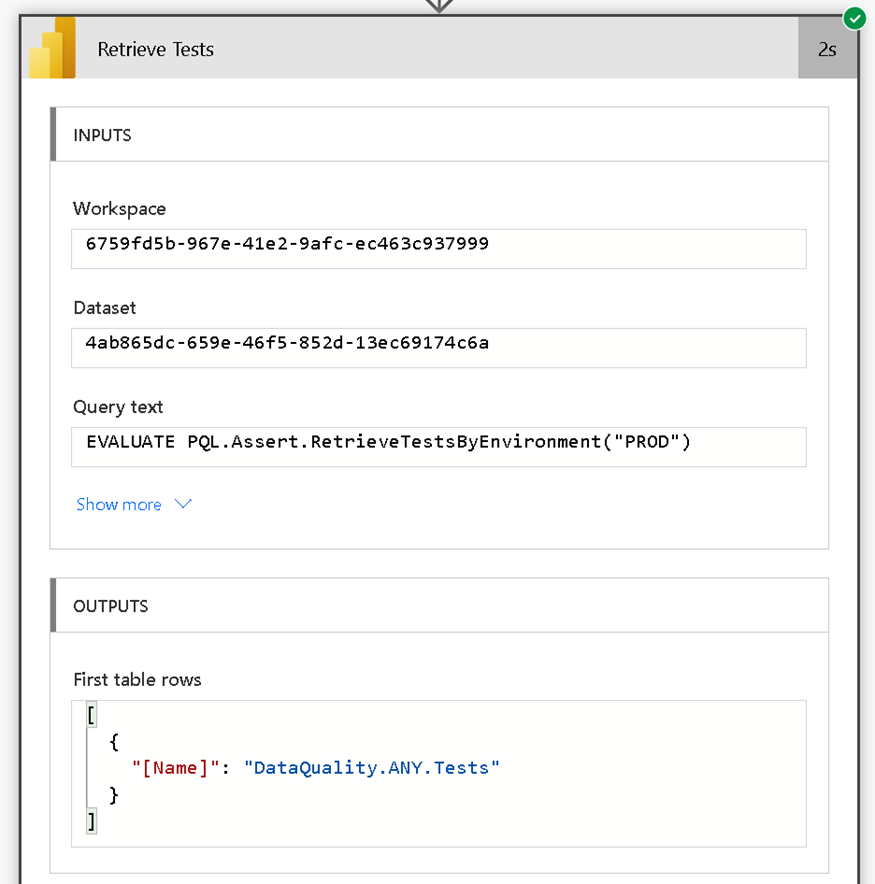
Retrieves tests by executing PQL.Assert.RetrieveTestsByEnvironment against your semantic model. This is the V1 function, which uses only INFO.FUNCTIONS and is compatible with the Power Automate “Execute Dataset Query” action.
It returns a table of all functions ending with .Test or .Tests that match your target environment (e.g., .PROD. or .ANY.):
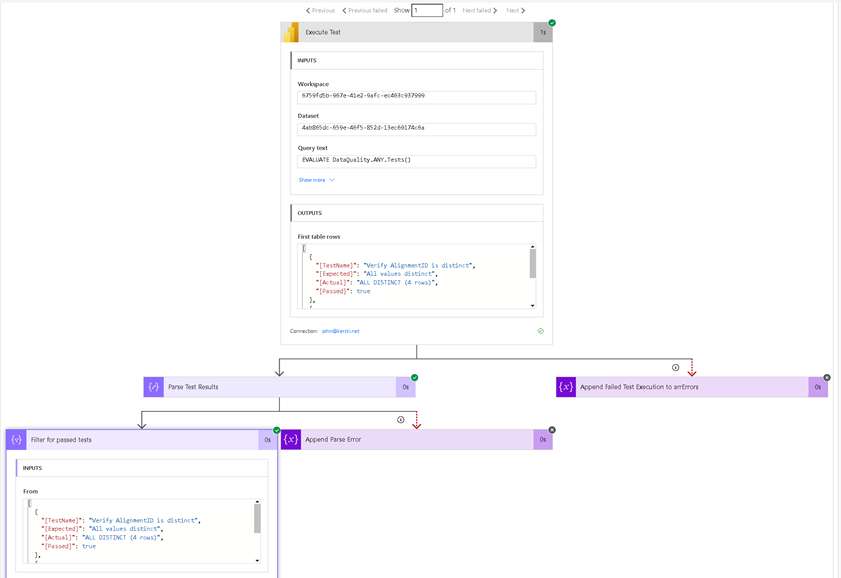
Parses the results to extract the list of test function names from the response:
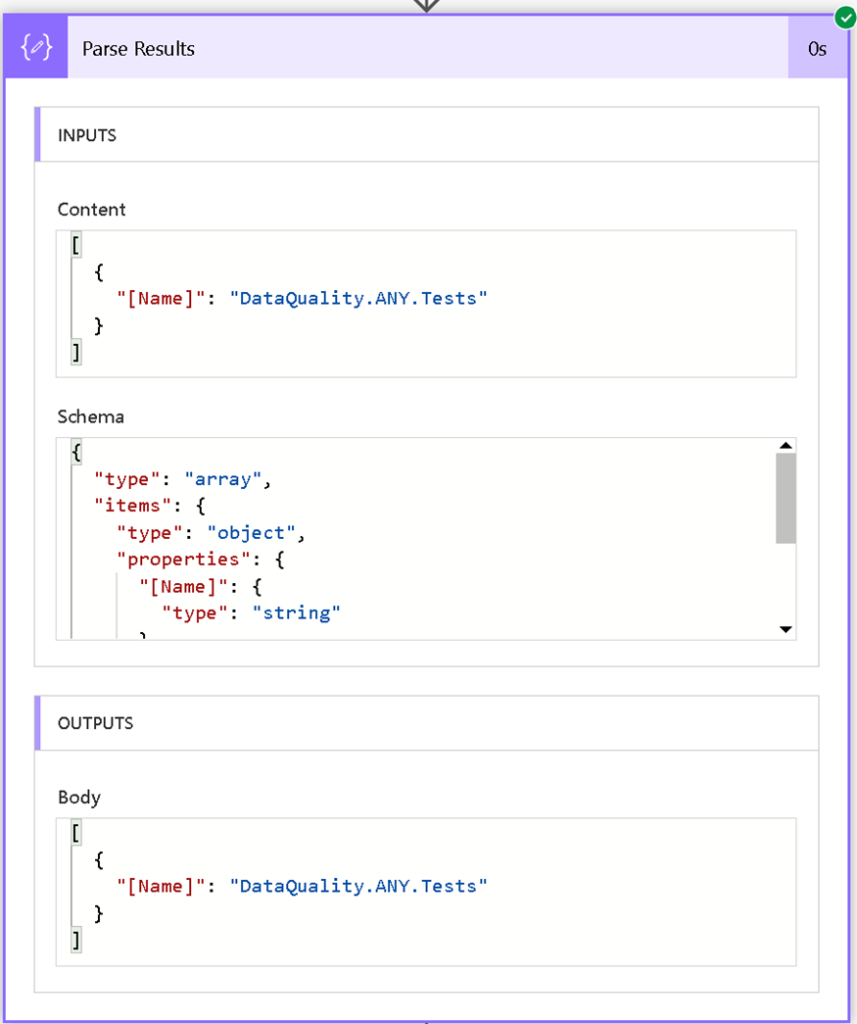
Executes each test by running a “Run a query against a dataset” action for each discovered test function. For example:
EVALUATE DataQuality.ANY.Tests()
Evaluates the Passed column and checks for any rows where Passed = FALSE:
This template allows you to handle test results however you see fit. The flow can be extended to do things like save results to SharePoint, post failed test results to a Microsoft Teams channel for immediate action, or send an email notification. The options are nearly endless.
Important note: The Power Automate approach uses the V1 functions (PQL.Assert.RetrieveTests / PQL.Assert.RetrieveTestsByEnvironment). The V2 functions use INFO.USERDEFINEDFUNCTIONS and INFO.ANNOTATIONS, which are not supported in the Power Automate Execute Dataset Query action.
This also means the Power Automate approach does not support Row-Level Security (RLS) testing via user impersonation. If you need RLS testing, use the Fabric Notebook approach below.
How to use the Fabric Notebook approach for testing (step-by-step)
The PQL.Assert repository also includes a ready-made Fabric Notebook you can upload directly to your workspace. You can download it from the examples/fabric-notebook folder in the PQL.Assert GitHub repository.
The notebook (RunPQLAssertTests.ipynb) is a multi-workspace test runner that discovers all semantic models in each workspace, retrieves PQL.Assert test functions, and executes every test.
It also includes support for Row-Level Security (RLS) impersonation, which is a key advantage of this approach versus the Power Automate approach.
This support of RLS testing works as so: when a test function has the PQLAssert_ImpersonatedUserName annotation, the notebook will execute the test as that user using the semantic-link-labs impersonation API.
This lets you validate that your RLS rules are working correctly – something the Power Automate approach cannot do.
How to add annotations in the TMDL view
To enable RLS impersonation for a test, you need to add a PQLAssert_ImpersonatedUserName annotation to the test function in the TMDL view.
When you save your model in Power BI project format (.pbip), each DAX Query View tab’s test function is stored as a TMDL file. You can add the annotation directly in the TMDL source. For example, in the PQL.Assert test suite, there is an RLS test defined in the DAX Query View:
|
1 2 3 4 5 6 7 8 9 |
DEFINE FUNCTION RLS.ANY.Tests = () => PQL.Assert.ShouldEqualExactly( "West Security Group Should Not See Other Groups", 0, COUNTROWS(FILTER('Groups', Groups[Group Name] <> "West")) + 0 ) EVALUATE RLS.ANY.Tests() |
When this test is added to the model via “Add to Model,” the corresponding TMDL file (found in the TMDLScripts folder of your .pbip project), will look like this:
|
1 2 3 4 5 6 7 8 |
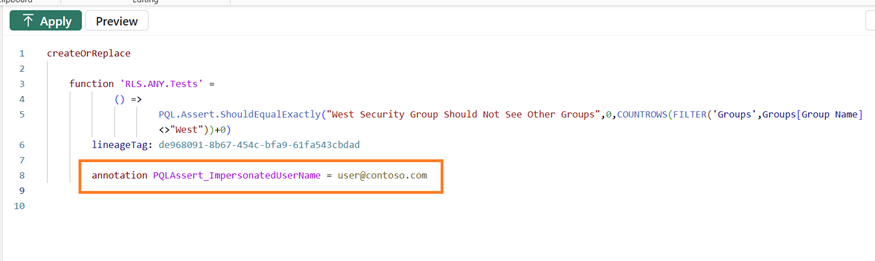
createOrReplace function 'RLS.ANY.Tests' = () => PQL.Assert.ShouldEqualExactly("West Security Group Should Not See Other Groups",0,COUNTROWS(FILTER('Groups',Groups[Group Name]<>"West"))+0) lineageTag: de968091-8b67-454c-bfa9-61fa543cbdad annotation PQLAssert_ImpersonatedUserName = user@contoso.com |
The annotation PQLAssert_ImpersonatedUserName = user@contoso.com line tells the notebook to execute this test function as that user. When the notebook calls PQL.Assert.RetrieveTestsByEnvironmentV2, it reads this annotation and applies impersonation automatically:
PQLAssert_ImpersonatedUserName annotation in the TMDL viewHow to set up automated testing with the Fabric Notebook (step-by-step)
Here is a walkthrough to set up automated testing with the Fabric Notebook:
- Download the notebook (
RunPQLAssertTests.ipynb) from examples/fabric-notebook in the PQL.Assert repository. - Upload the notebook to your Microsoft Fabric workspace. Navigate to your workspace in the Fabric portal and use the Import option to upload the
.ipynbfile. - Update the workspace GUIDs in Step 3 of the notebook. Replace the placeholder GUIDs with the real workspace GUIDs you want to scan:
|
1 2 3 4 5 |
WORKSPACE_GUIDS: list[str] = [ "00000000-0000-0000-0000-000000000002" # Replace with your workspace GUID ] ENVIRONMENT: str = "ANY" # Options: "DEV" | "TEST" | "PROD" | "ANY" | "" |
- Run Step 1 to install dependencies. The notebook uses the
semantic-link-labspackage, which provides the impersonation capabilities on top of the standardsempy.fabriclibrary. - Run Step 2 to import the libraries (
sempy.fabric,sempy_labs, andpandas).
The Fabric Notebook then handles the rest automatically:
- Discovers all semantic models in each workspace using
fabric.list_datasets. - Retrieves tests for each model by calling
PQL.Assert.RetrieveTestsByEnvironmentV2, which returns full metadata including the[Name],[Description], and[PQLAssert_ImpersonatedUserName]columns.
- Executes each test, checking for impersonation. If
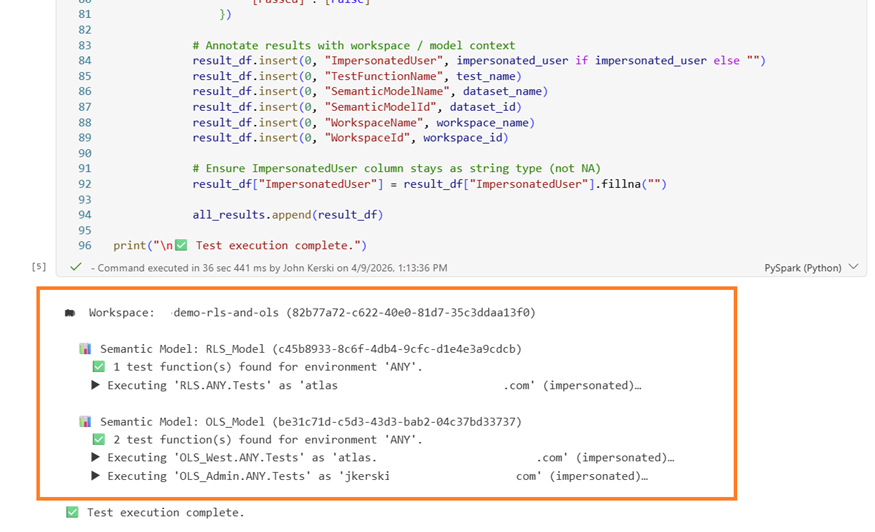
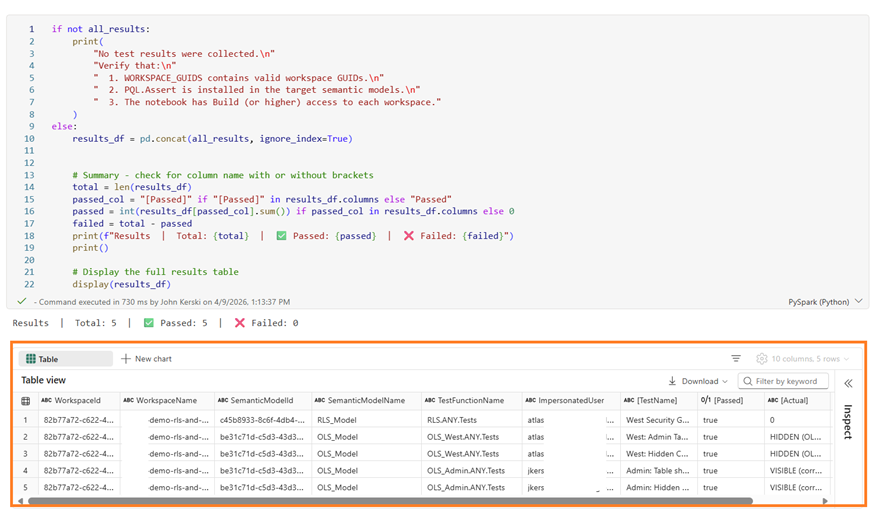
PQLAssert_ImpersonatedUserNameis populated, it callssempy_labs.evaluate_dax_impersonationto run the test as that user, validating your RLS rules. If the annotation is blank, it executes the test normally viafabric.evaluate_dax. - Collects all results into a single output table annotated with workspace name, semantic model name, test function name, impersonated user, and the standard PQL.Assert columns (
TestName,Expected,Actual,Passed). - Displays a summary showing totals for passed and failed tests across all workspaces and models.
- Schedule the notebook to run on a regular cadence using Fabric’s built-in scheduling, such as after each data refresh.
- Optionally, log the results to a Lakehouse table (or Eventhouse) for near real-time monitoring and historical tracking.
Important tip: the notebook identity (or the capacity admin token) must have Build access (at a minimum) on each target workspace. For impersonated tests, the workspace must use RLS, and the target user must exist in the tenant, with the appropriate role for the semantic model.
These steps are the same for other models, too
The great news is, these steps are the same for other models as well. You just have to alter the tests for your specific requirements. By following this approach, we are effectively reusing the testing framework with PQL.Assert across all of our semantic models.
And, by bringing tests into the model itself, they can be executed locally in Power BI Desktop during development, and remotely in the Power BI service through Power Automate or Fabric Notebooks.
Better still, the automated testing behaves the same regardless of where it runs, simply because we’re reusing PQL.Assert functions across models to identify tests and execute tests consistently. That is the power of reuse.
Any thoughts or feedback? I’d love to hear from you. Feel free to drop a comment below.
Simple Talk is brought to you by Redgate Software
FAQs: How to test in Power BI with user-defined functions
1. What are user-defined functions in Power BI?
User-defined functions are reusable DAX functions introduced in Power BI in late 2025. They let you write logic once and share it across multiple models or projects, similar to how NuGet works in C# or npm in JavaScript.
2. What is PQL.Assert?
PQL.Assert is an open-source DAX library available through DAXLib that provides a standard set of assertion functions for testing Power BI semantic models, covering columns, tables, relationships, and basic conditions.
3. Can Power BI semantic model tests be automated?
Yes. Tests built with PQL.Assert can be automated using either a pre-built Power Automate flow or a Fabric Notebook, both available in the PQL.Assert GitHub repository.
4. Does automated testing support Row-Level Security?
The Fabric Notebook approach supports RLS testing via user impersonation. The Power Automate approach does not.
This document contains proprietary information and is protected by copyright law.
Copyright © 2026 Red Gate Software Limited. All rights reserved


Load comments