
Are you providing adequate protection to your sensitive and confidential data? I’m sure we all do our best to protect our confidential data in a production environment by allowing only approved methods to access production data. But how are you protecting your development and testing environments when they contain copies of production databases?
Generating good development and test data is a tough job. Not only that but sometimes it is tough to reproduce production data issues in generated test data. Because of these two issues and a slew of other issues, many DBAs and developers fall into the simple method of generating test data by just copying production data down to non-production environments. By definition, non-production environments are typically less secure than production environments. Developers have different, normally more elevated, rights in these lower environments which means they can see data they are not able to see in production. Because of this, it is a bad idea to copy production data to non-production environments without cleansing the data first. This is where Static Data Masking can help.
What is Static Data Masking?
Static data masking is the process of permanently replacing sensitive data in your database with meaningless values. These meaningless values can be created by obfuscating part of or the complete column value with a generated value. Diagram 1 shows how static data masking replaces the complete CreditCardNum column value with a single generated value for all credit card numbers.
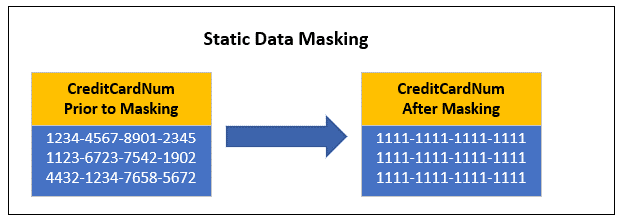
Diagram 1: Example of Single Value Static Data Masking
Performing Static Data Masking
Obscuring your sensitive data when copying your production data to non-production environments is one way to protect your confidential/sensitive production data. To help with performing static data masking, the Microsoft Security team incorporates static data masking as a new feature in SQL Server Management Studio (SSMS) 18.0 preview 5, or above. With the introduction of this new feature, you are now able to create a cloned copy of an on premises SQL Server database, where the confidential/sensitive data is statically masked in the cloned copy of the database.
Preview 5 and above of SSMS allows you to identify which columns are to be masked, and the functions that will be used in the masking operations. These masking definitions are then used to create a copy of your database that contains cleansed, statically masked data, where defined. The static data masking feature works on SQL Server 2012, or newer databases, as well as Azure SQL Database (DTU and vCore-based hosting options, excluding Hyperscale), and SQL Server on an Azure Virtual machine.
How to Get the Latest Version of SSMS
In order to learn how to perform static data masking, you first need to obtain the bits for SSMS 18.0 preview 5 or higher. To download the bits that have the static data masking feature, look at this page to find the latest download that supports Static Data Masking (at the time of the writing of this article, that was preview 6).
Run the exe to install the preview 6 bits, and you may have to reboot your machine. With the installation of the newest version of SSMS, you are ready to test out this new static data masking feature.
Methods of Masking Data
Before I can demonstrate how to mask data using SSMS Preview 6, I’ll first review the static data masking functions that are available in this new version. There are five static masking options available: NULL, single-value, shuffle, group shuffle, and string composite. The masking requirements will dictate which one of these masking functions will be used. Here’s a closer look at each of these functions.
NULL masking:
The NULL masking function will replace the original column value with a null in the cloned database. Note the masked column needs to support null columns in order to use this masking option.
Single-Value masking:
The single-value masking function replaces the original column values with a single value of your choice. Keep in mind the single value needs to be convertible to the column data type of the column being masked.
Shuffle masking:
With shuffle masking, the original column values are shuffled around. These shuffled values are then used to replace the original value in a row, with one of the shuffled values. If your original data has NULL values, you have the option of not replacing the NULL value or shuffling the NULL values around.
Group Shuffle masking:
The group shuffle masking binds multiple columns together for the shuffle operation. This function is useful when there is a relationship that you want to maintain between the multiple columns like, city, state and postal code.
String Composite masking:
String composite masking allows randomly generating masked data using a pattern. This pattern can replace and format the entire column value or only a portion of the column value. Patterns are provided using Regex-like expressions.
Sample Database for Testing Static Data Masking
In order to demonstrate creating a statically masked database, create a demo database named StaticMaskingDemo, using the T-SQL code in Script 1.
|
1 2 3 4 5 6 7 8 9 10 11 12 13 14 15 16 17 18 19 20 21 22 23 24 25 26 27 28 29 30 31 32 33 34 35 |
USE master; GO -- Drop Database DROP DATABASE IF EXISTS StaticMaskingDemo GO -- Create Sample DB CREATE DATABASE StaticMaskingDemo; GO USE StaticMaskingDemo; GO -- Create Sample Tables CREATE TABLE CreditCard ( ID int, CreditCardNum varchar(16), SecurityCode int); CREATE TABLE Client ( ID int, CreditCardID varchar(16), ClientName varchar (50), BirthDate date, EmailAddr varchar(100), AddrLine varchar(60), City varchar (30), PostalCode varchar(15)); -- Populate with data INSERT INTO CreditCard VALUES (1, 1000100010001000,100), (2, 1234123412341234,123), (3, 1111222233334444,333), (4, 1234567890123456,456); INSERT INTO Client VALUES (1, 1, 'John A. Smith','12-23-1954','JSmith@SmithWorks.com','1000 Smith Ave.','Portland','97035'), (2, 2, 'Sally Johnson','07-12-1974','SallyJ@WLTS.gov','1234 Marine View Dr.','San Francisco','94016'), (3, 3, 'Mary Sullivan','09-01-1972','MSS@InsComp.org','1111 Soundview Dr.','Bellingham','98225'), (4, 4, 'Thomas J. Storm','11-17-1959','TJStorm@SutterSmith.com','2345 Water Street','Bloomington','47401'); |
Script 1: Create Sample Database
The script created two tables: Client and CreditCard. Table 1 contains the masking specification in to mask the sample database.
|
Table.Column |
Masking Specifications |
|
CreditCard.CreditCardNum |
String Composite (replace first 10 digits with X’s). |
|
CreditCard.SecurityCode |
Single Value (replace all values with 123) |
|
Client.ClientName |
Shuffle |
|
Client.BirthDate |
Null |
|
Client.EmailAddr |
String Composite (keep domain, but replace portion prior to @ sign with a random value) |
|
Client.AddrLine |
Group Shuffle |
|
Client.City |
Group Shuffle |
|
Client.PostalCode |
Group Shuffle |
Table 1: Masking Specification
Identifying Masking Criteria using SSMS
Once the database is created, make sure you are running the new version of SSMS. The new task named Mask Database… (Preview) is used to identify the masking criteria. To bring up this new task, connect to your local instance of SQL Server. Right-click on the StaticMaskingDemo database in Object Explorer. In the drop-down display, hover over the Tasks item and then finally select the Mask Database… (Preview) task from the second drop down, as pointed to by the red arrow in Figure 1.
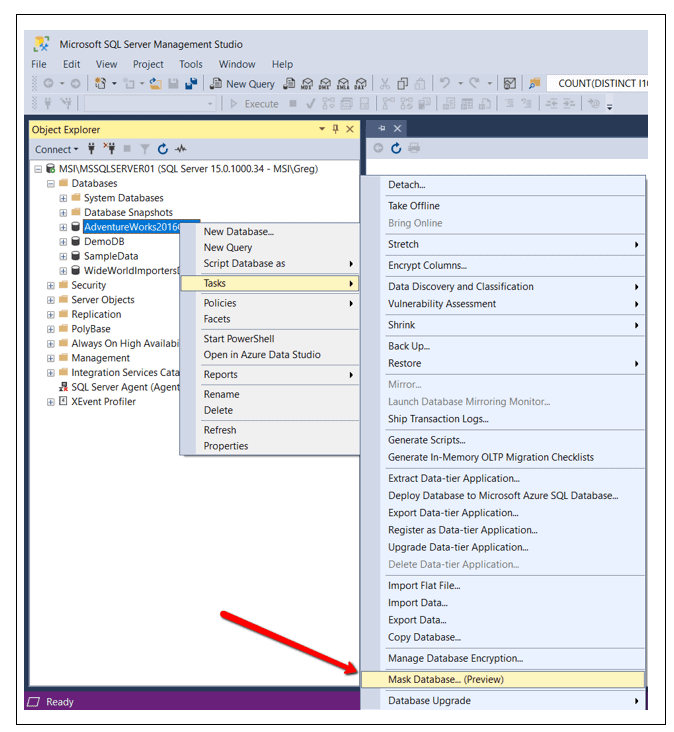
Figure 1: Selecting the Mask Database Task
After selecting the task, the window shown in Figure 2 is displayed.
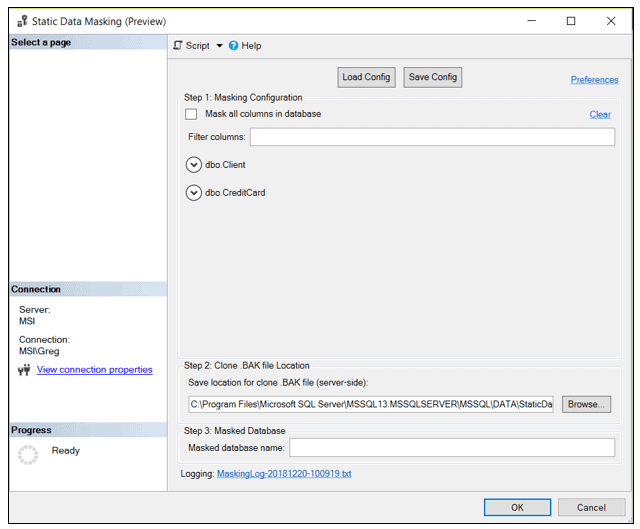
Figure 2: Static Masking Steps
Figure 2 shows that there are three steps to perform in order to identify the masking requirements for the database.
Step 1: Masking Configuration
By looking in the Masking Configuration step (Step 1), you can see there are two tables contained in the database: Client and CreditCard. To specify the static data masking, start by specifying the masking configuration for the CreditCardNum column in the CreditCard table. To show the columns within CreditCard table, click on the down arrow icon, next to the table name. Upon doing this, Figure 3 is displayed.

Figure 3: Columns in CreditCard table.
Use the String Composite masking function for the CreditCardNum column and the Single Value masking function for the SecurityCode column.
The String Composite masking function is used for the CreditCardNum column in order to show the last 6 digits of the credit card number with the first 10 digits replaced with X’s. The “advanced” masking option is needed to specify this complex masking criteria. First click on the checkbox next to the CreditCardNum column to indicate that you want to mask this column. Then select the String Composite item from the drop down. Then, finally, click on the Configure… hyperlink option as shown in Figure 4.
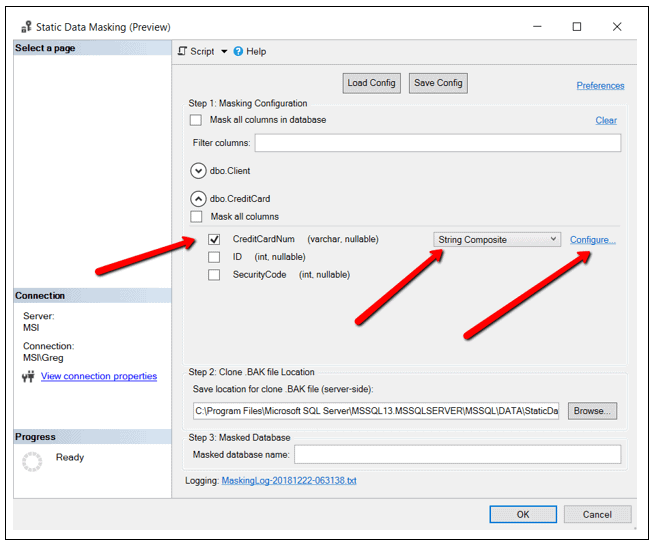
Figure 4: Masking criteria for CreditCardNum column
After clicking on the Configure… hyperlink, the pattern specifications window appears which is shown in Figure 5.
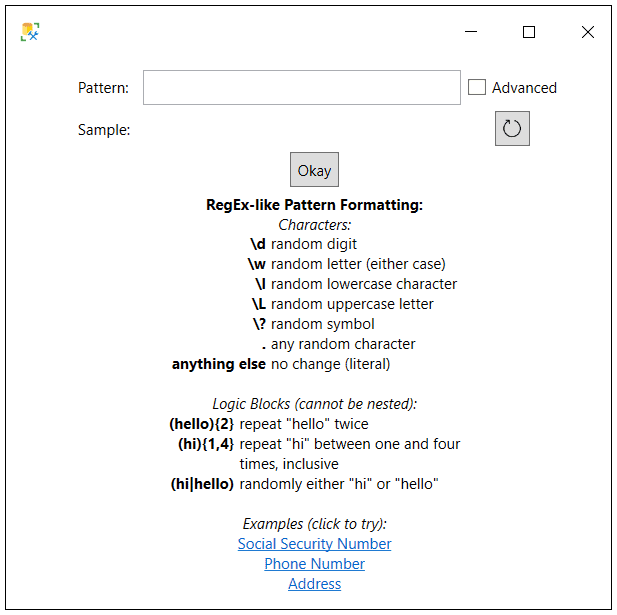
Figure 5: Pattern Specifications
The pattern specifications window can be used to define a random value criteria based on a pattern expression. To mask part of the CreditCardNum column using a complex masking criteria, click the Advanced check box to configure more complex masking requirement.
The advanced masking specification allows you to specify the complex masking requirements. As previously stated, just the first ten characters of the CreditCardNum should be replaced with X’s. Therefore, on Figure 6 shows a Pattern of ten X’s (XXXXXXXXXX) which identifies the pattern that will be used to masked the first ten characters of the credit card number column. To identify which characters in the source will be replaced with the ten X’s, specify a Source Regex pattern value of (\d{10}). This pattern identifies the first 10 digits of the CreditCard column will be the characters replaced with the ten X’s. Figure 6 shows the window once it’s configured.
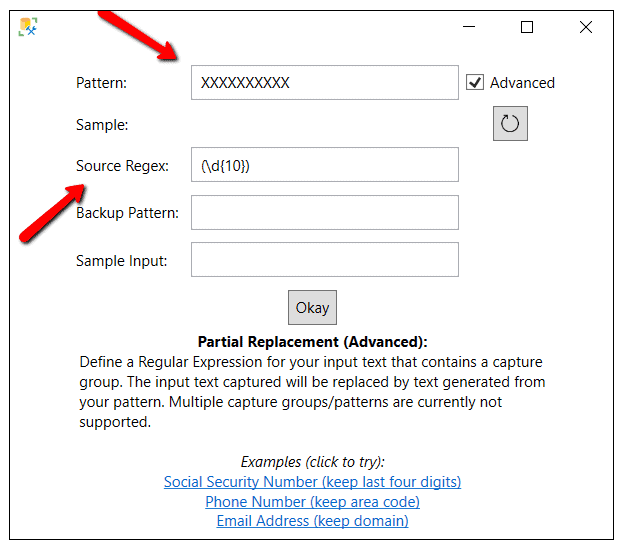
Figure 6: Advanced Masking Specifications
The other column to mask in the CreditCard table is SecurityCode. This column will be masked with a single value of 123 in all rows. To select this column to be masked, select the checkbox next to this column and pick the Single Value masking function. Then click on the Configure… hyperlink.
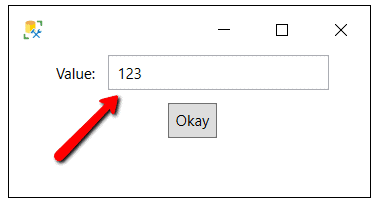
Figure 7: Single Value Specification
On the single value specification screen, enter 123 for the value. By specifying this, the SecurityCode column will be replaced with the static value of 123 on every row in the CreditCard table. Now that the static masking criteria for the CreditCard table is defined, it’s time to move on and specify the masking criteria for the Client table.
To mask the Client table, first display the columns. Figure 8 shows what is displayed.
Figure 8: Client table columns
In Figure 8, you can see all the columns in the Client table. Click on the checkbox next to each column that must be masked, as identified in Table 1, and then select the appropriate masking criteria for each column as shown in Figure 9.
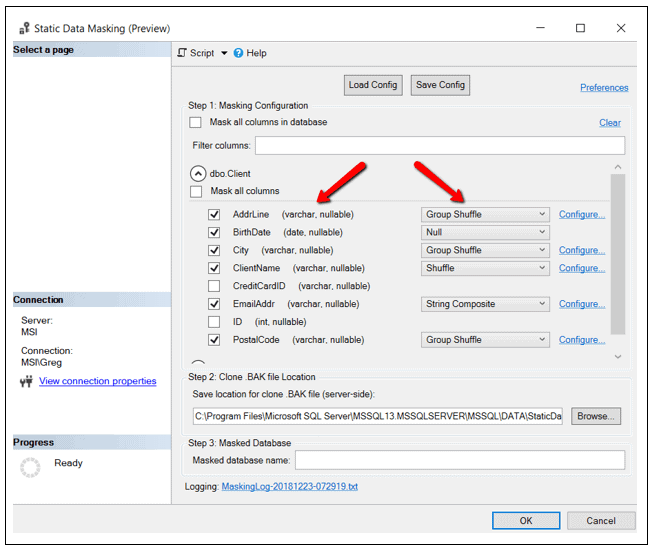
Figure 9: Identifying masking criteria for Client table
Figure 9 identifies all the columns and the type of masking to be performed for each column. As you can see, the Shuffle and the String Composite items support providing additional masking specifications.
To configure the Shuffle masking configuration specification for the Name column, click on the Configure… hyperlink. After clicking, the window in Figure 10 is displayed.

Figure 10: Masking Configuration for Name column.
As you can see the Shuffle masking criteria only has one configuration option that can be specified, and that is to Maintain NULL positions or not. Remember the Shuffle criteria will use all the column values for masking but will shuffle the values around randomly amongst the rows. Therefore, when selecting Maintain NULL positions, any NULL values in the Name column will not be moved to different rows. When the box is not selected, then the NULL values can be moved around. For this column, leave the box unchecked.
The BirthDate column will be masked using the NULL masking specification. This specification will replace all the BirthDate column values with NULL in the cloned database.
The Group Shuffle masking criteria will be used for the AddrLine, ZipCode and City columns. The group shuffle is like the shuffle option, but instead of shuffling each column value independently of the others, it randomly shuffles all the grouped column values together in the cloned database rows. Group Shuffle has a Configure… option, as well. Figure 11 shows the option when this is clicked.
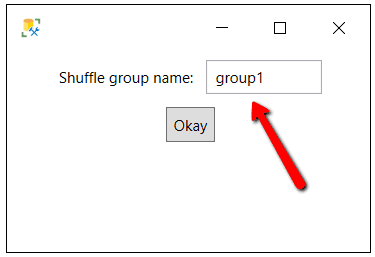
Figure 11: AddrLine group shuffle configure option
The only configuration option is to name the shuffle group which is group1 by default. This shuffle group name will be used to identify all the columns that will be shuffled together. The Shuffle Group masking criteria is set on the three address columns in the Client table. By default, all three of these columns were defined with a Shuffle group name of group1. Therefore, the address attributes on each row will be shuffled together, thus making sure the address attributes stay together when they are shuffled and randomly associated with new rows. If you want to have different sets for columns grouped and shuffled together, all you would have to do is define more than one Shuffle group name.
The last column to mask is the EmailAddr column. For this column, select the String Composite masking criteria. This masking criteria is used to create a masking rule where the email domain stays the same, but the address portion prior to the @ sign is set to a random pattern. To create this masking rule, click on the Configure… hyperlink next to the email address column. Then check the Advanced checkbox, and, finally, select the Email Address (keep domain) hyperlink at the bottom of the pattern window, as shown in Figure 12.
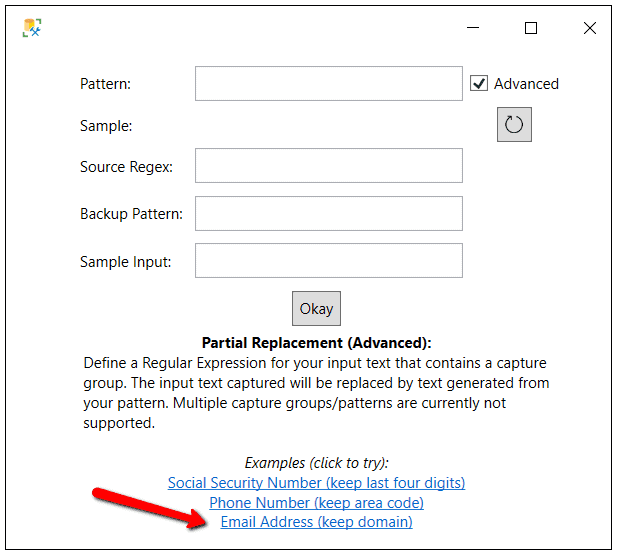
Figure 12: Email Address masking configuration
Figure 13 shows that the Pattern and Source Regex fields were populated with expressions after clicking on the email example hyperlink. These expressions define that the email address domain will be kept when this column is masked, but the email address portion prior to the @ sign will be replaced with a generated value.
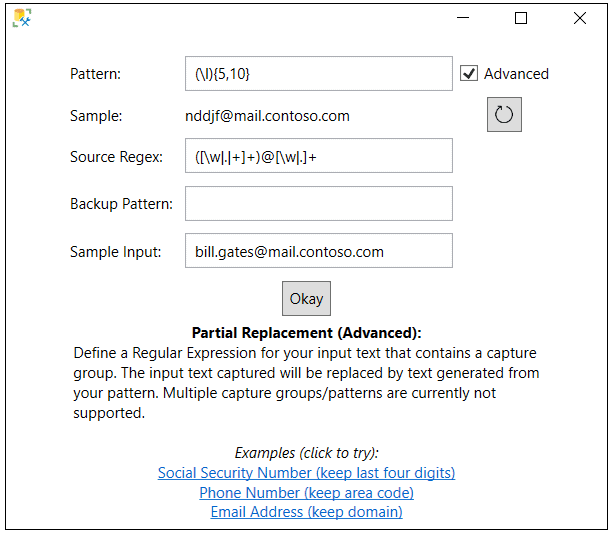
Figure 13: Email masking rule
At this point, all of the masking requirements have been defined and you can move on to Step 2.
Step 2: Identify Clone Backup Location
In this step, you must identify the location where you want SQL Server to save a backup the database you are trying to mask. This database backup will be used in the cloning process but does not contain masked data. In my case, I will store my backup in the C:\temp directory as shown in Figure 14.
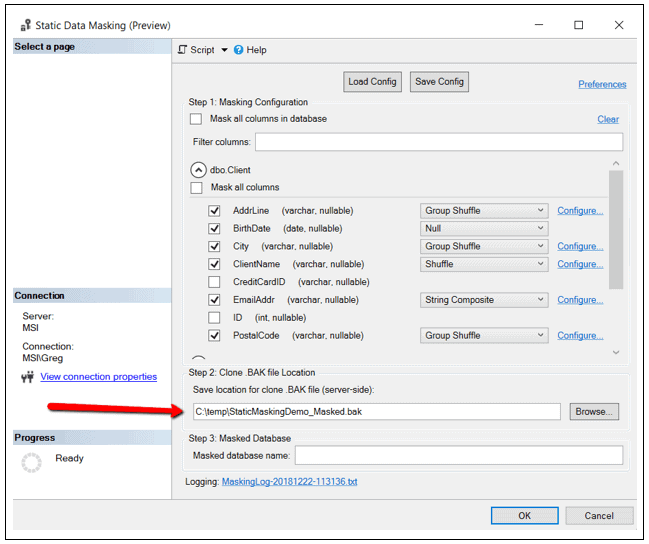
Figure 14: Clone Backup File Location
Step 3: Identify Masked Database name
In this step, you must identify the name of the cloned database. In Figure 15, you can see I named my cloned database StaticMaskingDemo_Masked.
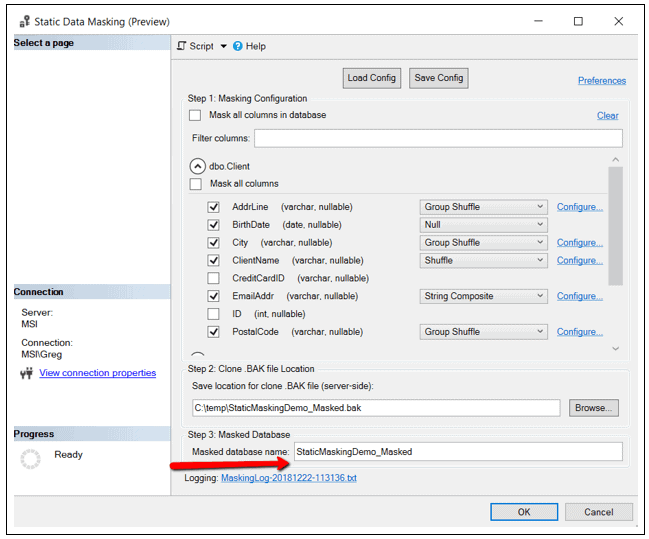
Figure 15: Masked database name
At this point the following has been configured:
- Database and columns that will be masked.
- The masking rules for each column to be masked.
- A location and name of where to store a backup copy of the database being masked.
- The name of the masked database.
This was a lot of point, click and typing just to identify a few masking specifications. Suppose you had a bunch of tables and columns that needed to be masked. If this were the case, it would take a very long time to use the GUI method of identifying masking requirement. At this point you can save the masking configuration by click on the Save Config button as show in Figure 16.
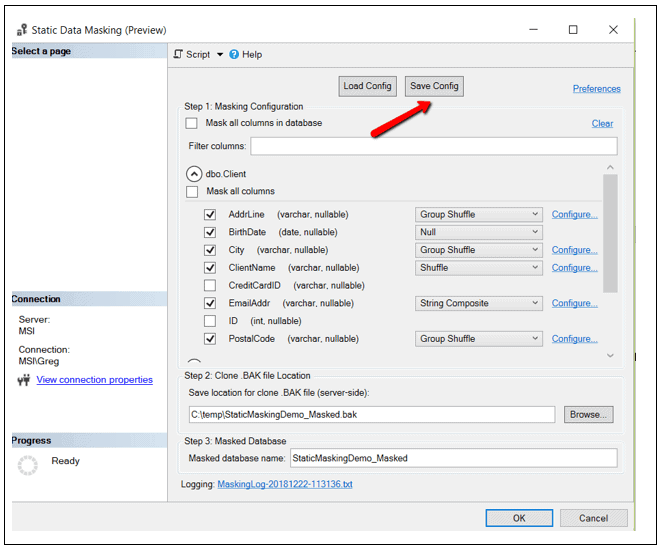
Figure 16: Save masking configuration.
When you click on this button, you’ll be promoted for a location to store the XML that makes up the masking configuration. In this case, I stored the XML in C:\temp\StaticMaskingDemo_Masked.xml. Saving the configuration will make it easy to change the masking criteria in the future if you need to.
At this point, everything is in place to clone the database by clicking on the OK button. When the masking and cloning process is completed, the window in Figure 17 is displayed.
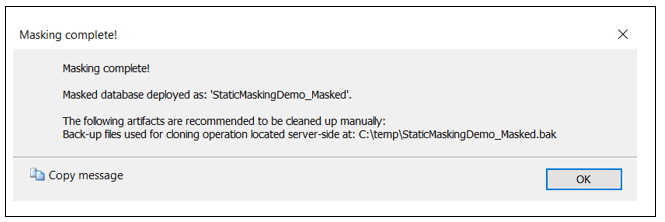
Figure 17: Masking completed!
By looking at the text in Figure 17, you can see that the cloning process actually deployed a masked database. My cloned database was stored on the same instance as the databases being cloned. In addition, a backup file that contains the masked database was created in the location that previously identified. This backup could be used to restore the masked database to another instance of SQL Server.
Validation of the Masked Database
To verify that static data masking feature actually masked the data based on the masking specification, compare the original data in database StaticMaskingDemo with the cloned database named StaticMaskingDemo_Masked. To compare the data in the two databases, use the TSQL code in Script 2.
|
1 2 3 4 5 6 7 8 9 10 11 12 13 14 |
-- Original Client Data SELECT [ID],[CreditCardID],[ClientName],[BirthDate] ,[EmailAddr],[AddrLine],[City],[PostalCode] FROM [StaticMaskingDemo].[dbo].[Client]; -- Cloned Client Data SELECT [ID],[CreditCardID],[ClientName],[BirthDate] ,[EmailAddr],[AddrLine],[City],[PostalCode] FROM [StaticMaskingDemo_Masked].[dbo].[Client]; -- Original CreditCard Data SELECT [ID],[CreditCardNum],[SecurityCode] FROM [StaticMaskingDemo].[dbo].[CreditCard]; -- Cloned Cloned CreditCard Data SELECT [ID],[CreditCardNum],[SecurityCode] FROM [StaticMaskingDemo_Masked].[dbo].[CreditCard]; |
Script 2: TSQL code to display data from both databases
The code in Script 2 returns output similar to Figure 8.
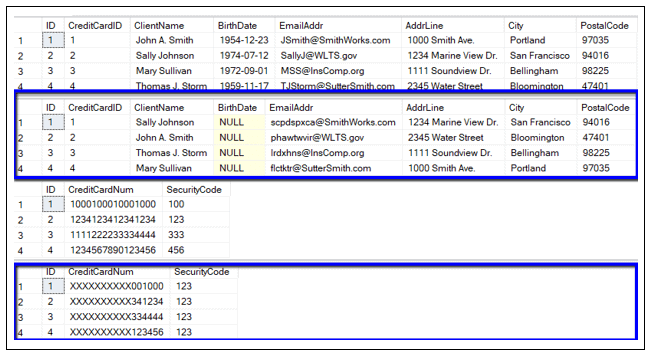
Figure 18: Review Original and Cloned data
If you look at the masked data (outlined in blued) in Figure 18 and compare it against the original data (not outlined), you can tell the data was masked in the cloned database just as specified.
XML to Support Static Data Masking
In a prior section you saved the XML configuration for the masking requirements. The configuration was stored in an XML file named: C:\temp\StaticMaskingDemo_Masked.xml. When you open that file up it looks like the text in Script 3.
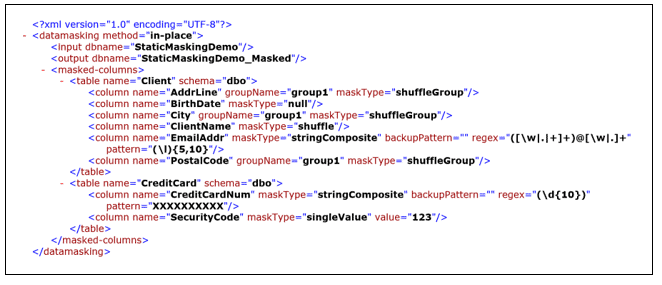
Script 3: Static Data Masking XML
By reviewing this XML file, you can see that all the columns masked are identified in the XML. Each column contains the masking requirements that were identified.
If you had a really big list of tables and columns you needed to mask, you can imagine how long it might take to identify the masking requirement using the GUI interface. Not only that, if you made a mistake, re-identifying all the masking requirements manually a second time would be a real pain. Being able to identify masking requirements in an XML file will make it much easier to identify all the masking requirements manually than using the SSMS GUI.
After creating or modifying this XML, you can load into SSMS. To load this XML file, just click on the Load Config button as shown in Figure 19.
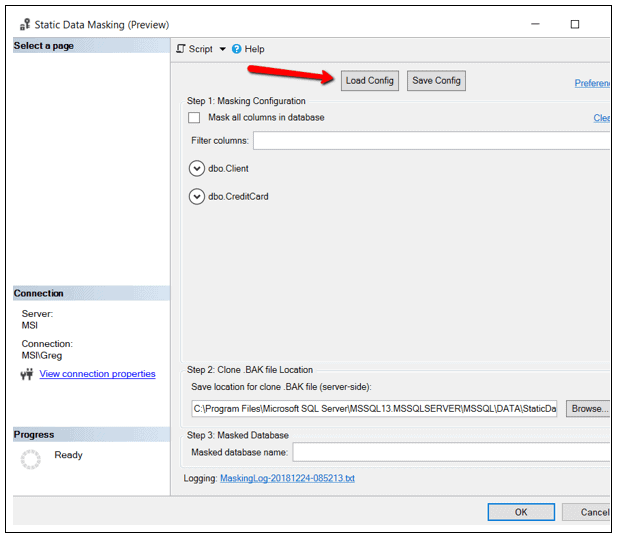
Figure 19: Loading masking criteria for XML file
Limitations
Not all database/columns can be masked using the new Static Data Masking feature. Here is a list of limitations that will keep you from masking your database/column using this new Static Data Masking feature:
- Does not support databases with temporal tables.
- Does not mask memory optimized tables.
- Does not mask computed columns or identity columns.
- Does not support geometry or geography data types.
- Does not update histogram statistics, so cloned database may still contain your confidential data in the statistics. To resolve this issue all you need to do is run the update statistic function in the new database once the masking process is completed.
- When a masking operation fails, a masked database might be created and contain unmasked data.
- Unmasked data could still be stored in unallocated data pages for on-premises SQL Server databases, and therefore someone could use a hex editor to view these unmasked values.
If you are interested in having a process that can be automated and that can use more complex rules, such as keeping certain columns synchronized across tables, take a look at Redgate’s Data Masker.
Observations
While exploring and testing out Static Database Masking, I made the following observations:
- It is great you don’t need to have your database on SQL Server 2019 to use the static data masking feature. The only requirement is to have SSMS 18 preview 5 or above available, and your database needs to be on SQL Server 2012 or above.
- When you clone/mask a database, the cloned database is created on the same instance as the source database. I can see times when you will not be able to clone your production database on the instance where it lives. Therefore, I would have preferred a dialog box that would allow me to place this database on an instance other than the instance where the original database lives.
- A FULL backup of your original database is created during the cloning/masking process. This backup is not a copy only backup, therefore it might impact your normal backup chain. I think I would have preferred this backup to be a copy only backup so it doesn’t interfere with your normal backup routine of the database being cloned/masked. I’ve reported this to Microsoft and they have informed me that this will be changed in a future release.It is easy to create complex masking rules if you are familiar with Regex expressions. Even if you are not versed in Regex expressions, the tool has examples to help you start and build your Regex expressions. Having these examples make it somewhat easier to develop masking criteria even if a person that doesn’t speak Regex fluently.
- Using the GUI tool to specify masking requirements might be a bit cumbersome. Therefore, it might be worthwhile to consider creating masking requirement using an XML file. Using XML files to identify the masking requirements makes the cloning/Masking process much more repeatable and will make it easier when entering lots of masking requirements.
- At the time this article was written, I could not find a way to automate the static masking process. Hopefully by the time this feature is fully baked, the static data masking team will provide you a way to automate the masking process via a script.
Obscuring Confidential Data Easily
It has always been a challenge to cleanse production data when moving a database to a non-production environment. With the new Static Data Masking feature introduction in SSMS version 18 Preview 5, a DBA or developer can now easily cleanse their confidential data, by clone production databases in non-production environments. All it takes is to specify some masking criteria manually or with an XML file, and then running your source database through the masking/cloning process. This new feature in SSMS supports masking a database provided the database is on SQL Server 2012 or above. All DBA’s and developers that are concerned about security should be looking at using this the Static Data Masking feature every time they clone a production database for a non-production environment.
Load comments