

If you’re a SQL Server DBA or developer looking to harness AI for your everyday scripting workflows, this article will walk you through building an AI-powered T-SQL assistant using Python and SQL Server.
We’ll cover how to index your scripts with embeddings, store and search them semantically in SQL, and then build a chat-style interface that delivers context-aware script recommendations.
Whether you’re already familiar with AI or just starting out, this walkthrough shows how to apply cutting-edge features in a practical, real-world DBA scenario.
To Start: A Bit of Background
A very strong memory I have is of my father and his toolbox, with all kinds of tools for the varied repairs that were needed at home. Sometimes, he would spend several minutes looking for a specific screw for something he needed to fix. Over the years, he collected more and more tools – exactly as I have done after many years of being a SQL Server DBA.
Over time I’ve gathered numerous SQL scripts that have helped me in various situations, but quickly discovered that finding the right script for the right situation often took far too long, just as my father experienced with his toolbox.
Thanks to AI, that pain can finally be eased: I’ve made a tool to easily and quickly find the best script for any given need, using new AI features from SQL Server 2025 (which are already available in Azure SQL Database) and Python code that loads an AI model on a GPU to generate and search through data.
In this article I’ll give you a detailed look at how it all works. If you’re a DBA who has never touched AI beyond ChatGPT, this is a great opportunity to explore a real-world example in a context you already know: finding the right T-SQL script for your needs. And, if you’re not a DBA, you’ll still get an understanding of how to integrate AI into your own solutions and see how it can be used for much more than just text generation.
Before continuing, I recommend reading this article about embeddings.
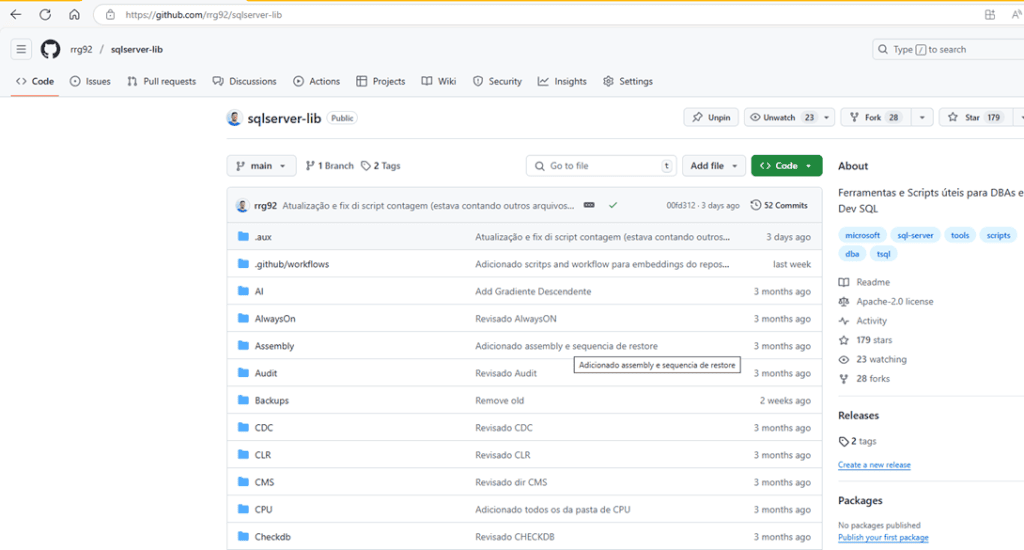
Introducing my Git Repository: SQL Server Lib
So before we get started, here’s a quick introduction to my Git repository, SQL Server Lib. The names and comments are in Portuguese but should be pretty obvious for the most part, plus the search function works in any language.
This repository is the result of a personal project I started this year to review the many useful scripts I’ve saved in my time as a DBA and share them – for free – with the whole world:
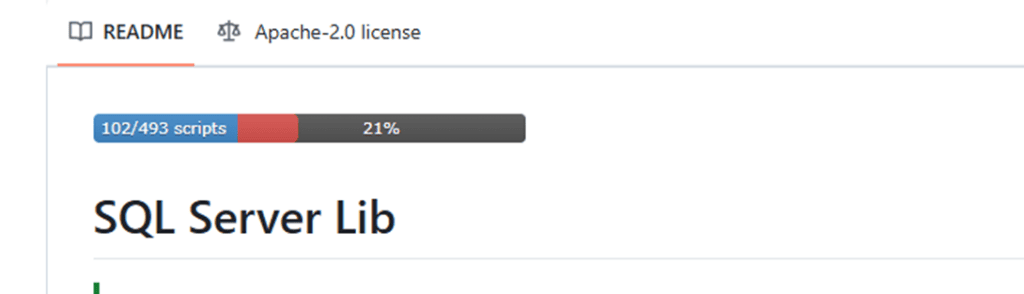
So far, I’ve saved more than 490 scripts to my local folder (started with a free Dropbox, later migrated to OneDrive), ranging from simple scripts to identify queries causing CPU usage, to utilities like finding a string in every column that contains text. This number keeps increasing as I keep adding new scripts or enhancing existing ones.
At the time of writing, 102 scripts have been added to the repo, as seen by the progress bar on the repo so everyone can keep track of how many are left to add:
Another advantage of doing this is that anyone can help me enhance these scripts by coming up with new ideas, or just by fixing something. Simply submit a PR via Git and then I (or future maintainers) can review it. In doing so, we can build a free SQL Server script library reviewed by the community itself.
AI to the Rescue: Ask For a Script Naturally
As mentioned in the introduction, even after publishing the scripts I was still spending a significant amount of time trying to find the right script (or the right “tool”, just like my father with his toolbox). Depending on the script, it was sometimes faster to recreate it than to search for it – but the main issue with that was that some trick or detail I had learned while writing the script could be forgotten.
For years, I found the script I needed just by memory (knowing which folder it was in), or with PowerShell code like this (to find it by part of code that I vaguely remembered):
|
1 |
gci -rec *.sql | sls ‘dm_exec_query_stats’ |
Then I did a visual check on the results to find the script. But it wasn’t always simple – and I didn’t always find the correct one.
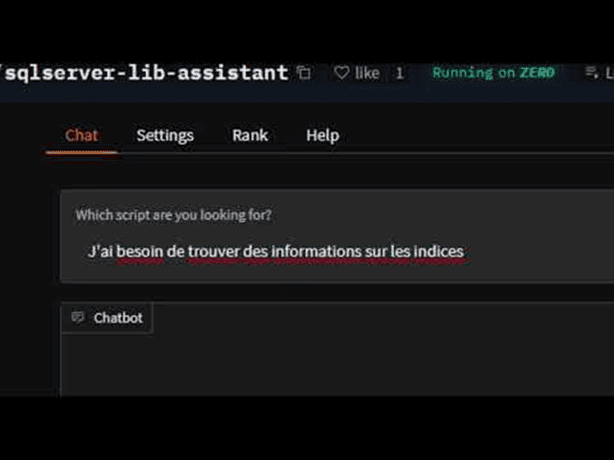
But now we live in an AI-powered world, and if there’s one thing language models are great at, it’s text processing. And SQL scripts are just text – so this is a perfect use case. That’s why I created a web tool that lets you search for scripts from the Git repo. Just type what you need, and the tool will handle the magic. You can access it here.
Following is a video that shows how you can use the tool. The first four examples are in Portuguese, but later I demonstrate how the tool can handle other languages including Japanese, French, and even Hindi.
In the rest of this post, I’ll explain the code and services I used to build the tool, so by the end, you’ll have a better understanding of how SQL Server can be used for AI – and how some AI models work beyond just generating text. Don’t worry if you’re not familiar with AI terms yet; I’ll only assume you have some basic experience with programming logic and a bit of experience with SQL.
The fast and easy way to write, format and debug SQL
Divide and Conquer
Using AI to assist in search involves two main phases: indexing the content and the search itself.
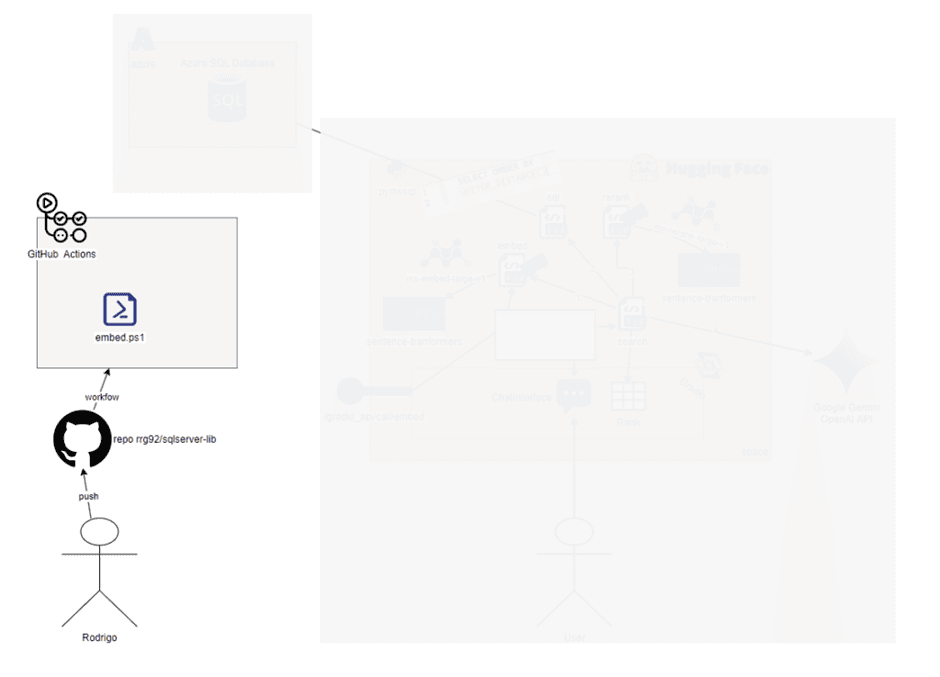
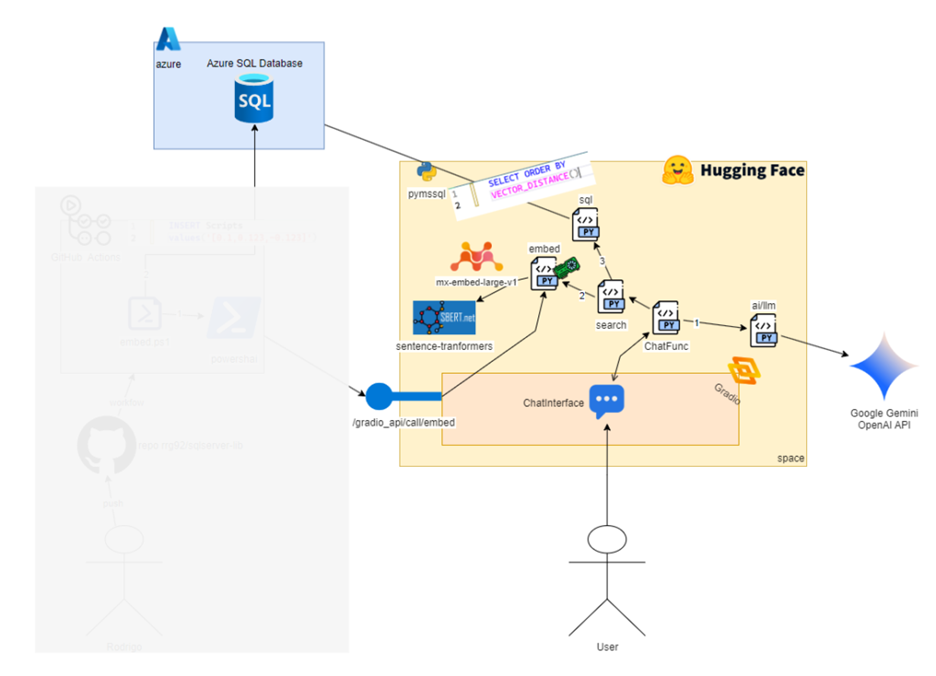
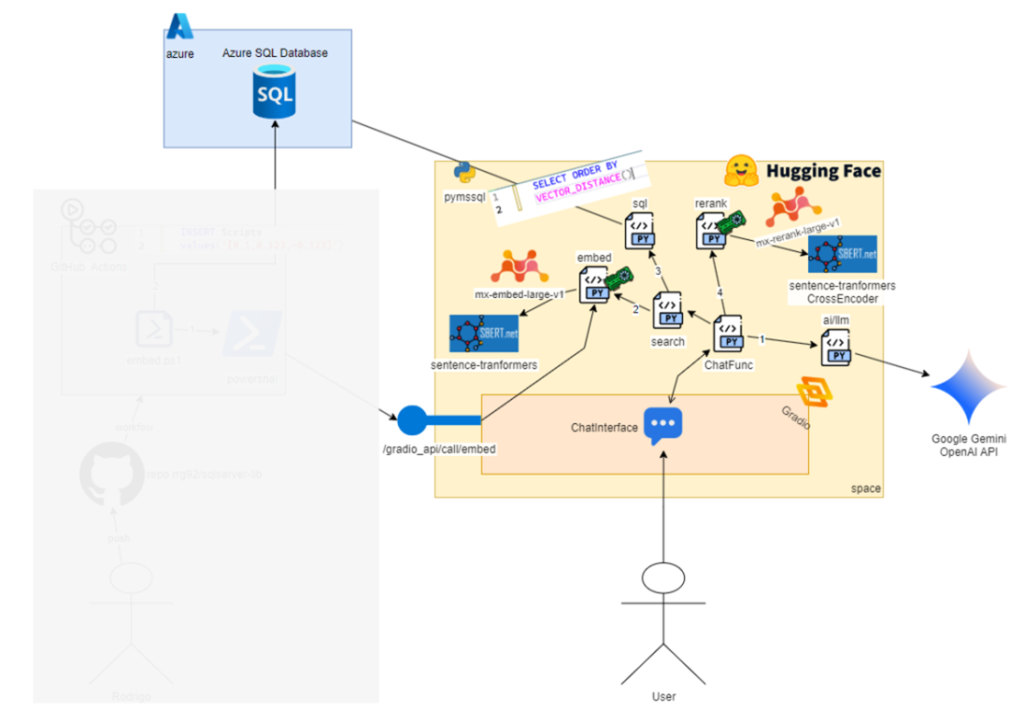
To start smoothly, let me show you a diagram with all the technologies I used to build this project and how they relate to these two phases:
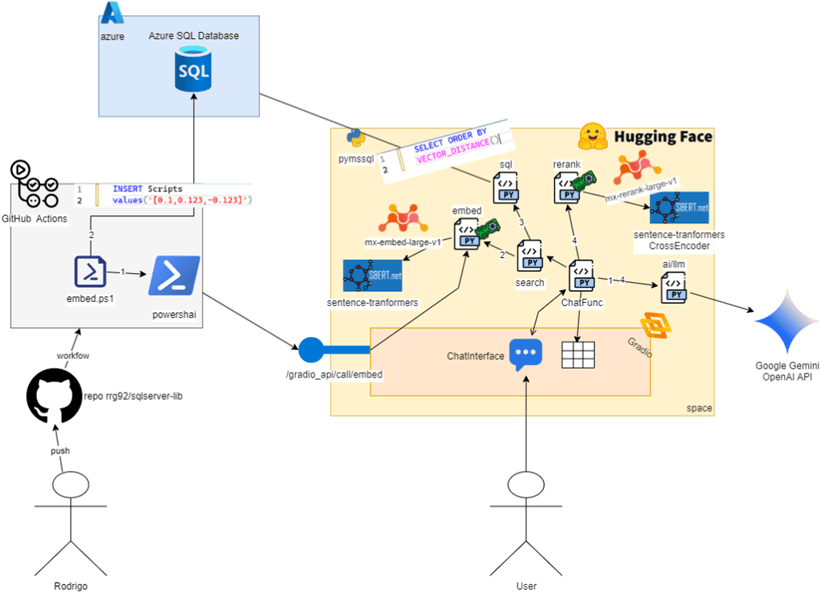
This diagram might look a bit intimidating at first glance but don’t worry, we’ll break it down throughout the post. After reading, you can come back and see how many new things you’ve learned about AI. You’ll notice that the architecture is actually very simple and includes common elements from a traditional ETL (Extract, Transform, Load) project – although I’ve seen plenty of ETL pipelines out there that are far more complex and don’t use any AI at all.
The left side of the image, where you see the stick figure labeled Rodrigo, represents the part that inserts data into SQL Server – in other words, the indexing phase. The yellow area on the right is the phase where we interact with the chatbot, starting from the stick figure labeled User, which represents anyone in the world. A small part of this yellow area is also used during the indexing phase.
What we’re doing here is known as RAG: Retrieval-Augmented Generation. That’s just a fancy name for something simple: take data related to the user’s question and provide it to the AI chatbot to improve the answer. But here’s the real challenge: how do we find the relevant data for the question?
To do that, we need to index the content so we can efficiently retrieve what’s relevant to the user’s text. In other words, we need to search by meaning, or do a semantic search. For example, if the user searches for “performance problem,” we want to return scripts that check CPU usage, validate what’s currently running, etc. We don’t want to return a script that recreates constraints as it’s not relevant in this case.
So, once all the content is stored in a database, and a user sends a query, we go to that database, retrieve the most relevant entries, and use a Large Language Model (LLM) to present and explain those results as if an expert were responding.
Note: LLM stands for Large Language Model, the type of AI that generates text. It’s the core behind tools like ChatGPT, DeepSeek or Google Gemini. Maybe your experience with it so far has been through a nice web interface, but there are also APIs and services we can call programmatically. You’ll see an example of that in this project: we’ll use Google Gemini to generate the final response text.
And thanks to the LLM, we can guide it to read the relevant scripts we’ve found and present them in any language we want – for example, matching the user’s original input language. Even if I wrote or commented my scripts in Brazilian Portuguese or English, AI helps make my experience accessible to the entire world, in their own native language.
It’s important to remember that in this project, we’re not only using the type of AI that generates text (the LLM), but also two other types of AI models that don’t generate text – they generate numbers (that can be used to do some other operations) based on text.
Throughout the examples, you’ll understand why the new vector support in SQL is so important and truly game-changing in the moment we’re living in.
In this article, I’ll point out whenever the code is interacting or loading an AI model. So, let’s dive into each of these phases separately to see how the code works to make all the magic happen!
Phase 1: Indexing the Data
The first thing needed for a project like this is to index my scripts. But it’s not just taking the content of the file and throwing it into a database to do a LIKE or a Full-Text search. Remember that we need to support searching by meaning. If I search for the text performance problem, then the search should find all the scripts that talk about requests, locks, waits, identifying CPU usage, etc.
In the world of AI, there is a concept called embeddings. They are a numerical representation of text. The post I recommended earlier provides a more complete introduction, but here’s a quick summary:
- You need an AI model that can generate that embeddings.
- You input a text into that AI model.
- It outputs an array of numbers that represent the text and its meaning.
- You can repeat that process for another text and compare this array with another using a simple math operation called Cosine Distance. A result closer to 0 means that the two texts have similar meanings.
Basically, I need to generate the embeddings of my scripts and store them in a database table. Since I’m using GitHub, I chose to use GitHub Actions, so whenever I update the repository, it automatically triggers a script that generates the embeddings.
GitHub Actions
Think of GitHub Actions as a “trigger” that runs when something happens in my repository. A YAML file called embed.yml defines all of that for me. This is called workflow. To better control when this process starts, I configured an action that runs a PowerShell script whenever I push a tag with the prefix embed-*.
This gives me control over when I want to start the process and even lets me do a bit of version control for the indexing phase. For example, I can choose not to trigger the process if I’ve only changed files that I don’t consider important to index right now.
But if you don’t know what a Git tag is, no problem! Just imagine this: whenever I make a change in my repo, something automatically runs a PowerShell script for me on GitHub’s servers.
If you’d like to learn more about GitHub Actions, check out this great series on Simple Talk by Kathi Kellenberger: Introduction to GitHub Actions Part 1: Getting Started – Simple Talk
The script responsible for this is called embed.ps1. Yes, it’s a PowerShell script. Let’s now rebuild our initial diagram to show the components we’ve covered so far:
First AI Use: Generating Script Embeddings
If you thought we would only use AI to generate text, here is the first surprise. AI goes far beyond generating text, and in our project, the first use is to generate the numerical representation of our scripts content, the famous embeddings. This will allow us to search for meaning later in SQL Server (thanks to the new AI support).
For each repository file, I will generate its embeddings using a Hugging Face Space that I created.
About Hugging Face 🤗 and Gradio
Hugging Face (yes, the same name as the emoji) is an online service where anyone can upload AI models and build demo applications that use those AI models. Hugging Face provides the infrastructure to host them, including hardware resources like GPUs to showcase projects like the one I’m presenting to you. It’s known as the “GitHub of AI” and there you’ll find lots of resources related to the AI world! So, it will be common to hear about Hugging Face (or just 🤗) when talking about AI.
The Hugging Face Space is where we create the demo application. Think of it like this: anyone can create a space which simply contains Python code that runs a web interface, load AI models, invoke APIs, etc. Each space has its own unique URL for access.
There’s a cool Python library developed specifically for AI/Machine Learning demos: Gradio. Thanks to that library, it’s super easy to develop complex UI interfaces like chats, tabs, etc. And because it’s made for Machine Learning, it includes lots of components from the AI world. So, it’s common to see many spaces on Hugging Face using Gradio, which handles all the HTML, JavaScript, and APIs. I don’t need to worry about that – I can just focus on the code that does solves my problem!
The tool you see in the video at the start of this article is the Space I created to showcase this project, and it uses that library, Gradio, to provide the UI interface and API. We’ll look at the code soon.
If you look at the embed.ps1 file, you will see that I use a function called GetEmbeddings. This function is defined in the file util.ps1. It uses a PowerShell module the I created called PowershAI, which has one of the features I like the most: I can invoke the Gradio API as if it were a PowerShell function. Thanks to that, I can integrate the AI services I exposed via Python directly into PowerShell, and, in this case, the embed function is available to me from that script:
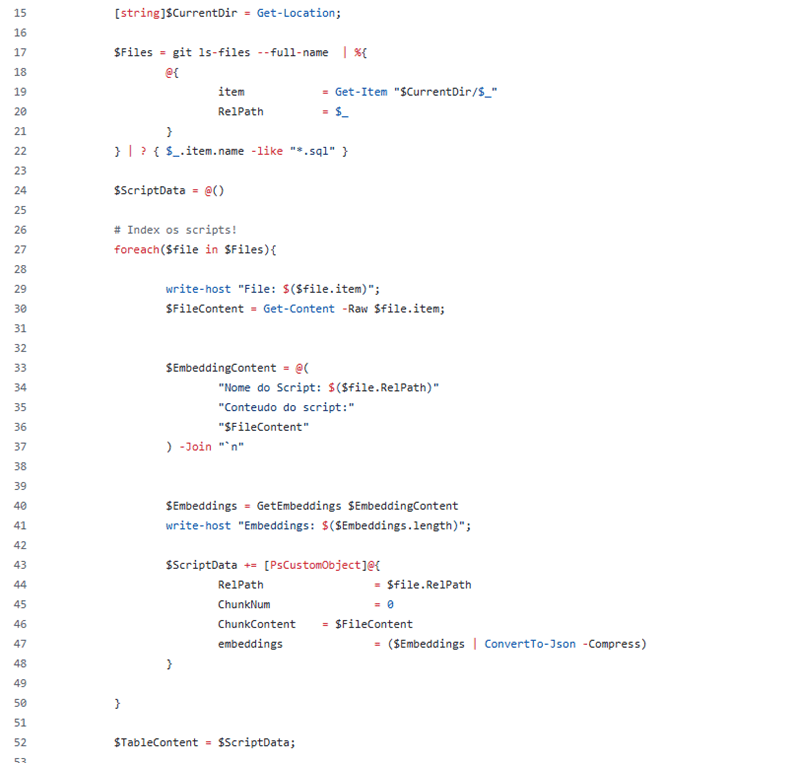
This part of the code is straightforward:
- Line 17: I read all SQL scripts. I could’ve used a simple command like gci *.sql -rec, which returns all .sql files in the current directory. But since I was testing on my machine and not every script had been committed to Git yet, I had to make it a bit more complex to get only the files already committed. In the future, once all files are committed, I can simplify this part.
- Now that I have a list of SQL scripts to index, I can iterate over them using a foreach loop. Line 27 starts that loop.
- For each file, I read its content (as shown in line 30). A future improvement here is to ensure the correct file encoding—this helps avoid common issues with special characters, especially since most of my files are documented in pt-BR.
- Then, I build the final string to be indexed, including the relative path and content of the script. In the image above, the text on line 34 is in pt-BR and means “Name of Script:” and “Script content:”, respectively. So in the end, $EmbeddingContent will hold the content I want to index.
- Next, I call the GetEmbeddings function, which generates the embeddings for the given text.
- Finally, I build a simple object containing all the data I want to insert into SQL Server—think of this object as a row. I keep adding these rows to an array called $ScriptData, so I can insert everything at once. There’s definitely room for optimization in the PowerShell code here, but since we’re only dealing with about 100 items, I’m not too worried for now. Future versions can improve this part.
Why PowerShell and PowershAI?
PowershAI is a new module that I’m developing and that allows us to access a lot of AI services from the command line, using the common PowerShell way of doing things. I could have used Python, JavaScript, etc., inside GitHub Actions, but I found it interesting to use PowerShell here for the following reasons:
- I find it simpler and easier to manipulate files with PowerShell.
- It was a great opportunity to put my project to a more real-world test.
- Connecting to SQL Server and doing things like BULK INSERT is easier with PowerShell (thanks to the .NET library support).
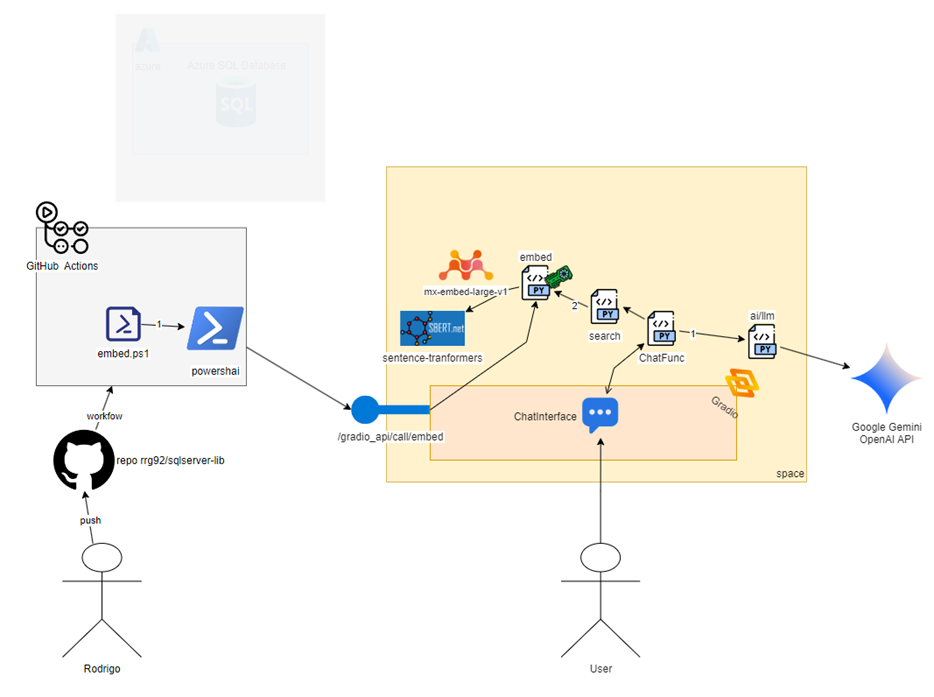
Here is our updated diagram with all that flow added:
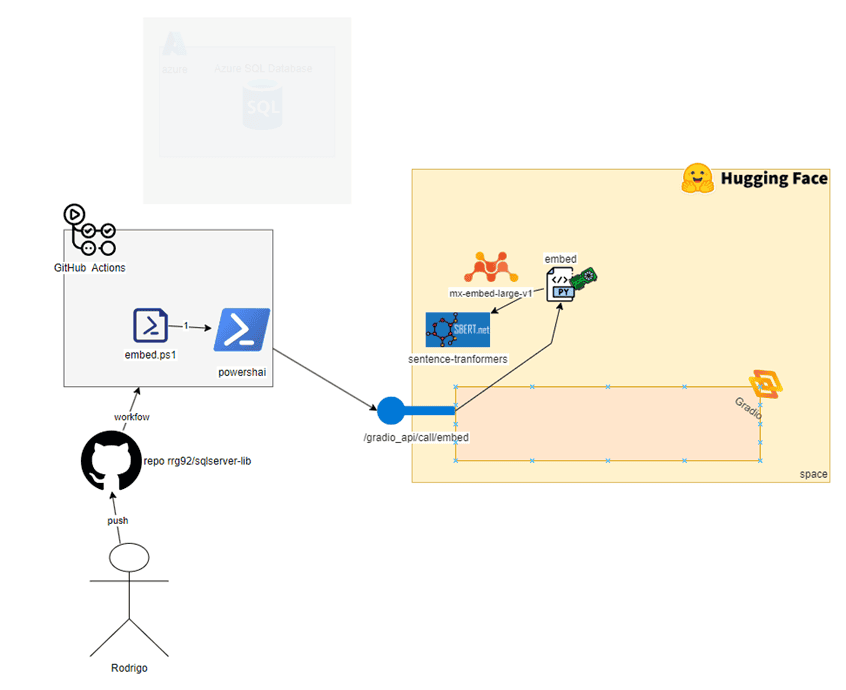
As seen in the diagram above, embed.ps1, which was triggered by my change to Git, iterates through each SQL file in my repository and generates embeddings for them using PowershAI to access an AI model that our Python code loaded there on Hugging Face, using GPU to be fast. Later, in the Phase 2 section, we’ll look at how the embed function works on the Python side. For now, just trust that this call produces—for each file—an array of 1024 positions, each being a float, representing the semantics of our script.
Now, we need to store the results in some database—and this is where SQL Server’s new features come into play.
Inserting the Data into SQL Server
Once I have calculated all the embeddings, I can now insert them into the database. Here I have several approaches that I could use: Insert each calculated embedding into the database, calculate everything at once and insert it into the database at the end, insert only what has changed from one commit to another, etc.
For this first version, I chose to loop, calculate all the embeddings of all the files, and in the end, do TRUNCATE TABLE and a BULK INSERT of all the embeddings. The main disadvantage of this is that if one of the embeddings fails, I lose everything else and have to start all over again. In future versions, I will improve this, but for a simple case like this, it works well. Therefore, after the loop, I do this:

dbulk is just a helper function defined in the util.ps1 script. It uses the native .NET libraries for connecting to SQL Server (yes, they are deprecated, but it still works fine. I may update it to use the new library in the future). This function performs a BULK INSERT (you’ll actually see INSERT BULK … in sys.dm_exec_requests when it runs). The first parameter is an array of objects that have the same columns as the target table where I want to load the data. It also accepts a parameter called -pre, which is a script that will be executed before the bulk insert happens.
As mentioned earlier, this part could be improved in the future by implementing incremental loads instead of truncating and re-inserting everything. The function gets the connection info from environment variables configured in GitHub—these are only accessible when the pipeline is running.
This is our updated diagram (note: in the diagram, I used an INSERT … VALUES statement just for layout/white-space reasons. In the code, the operation is TRUNCATE followed by a BULK INSERT):
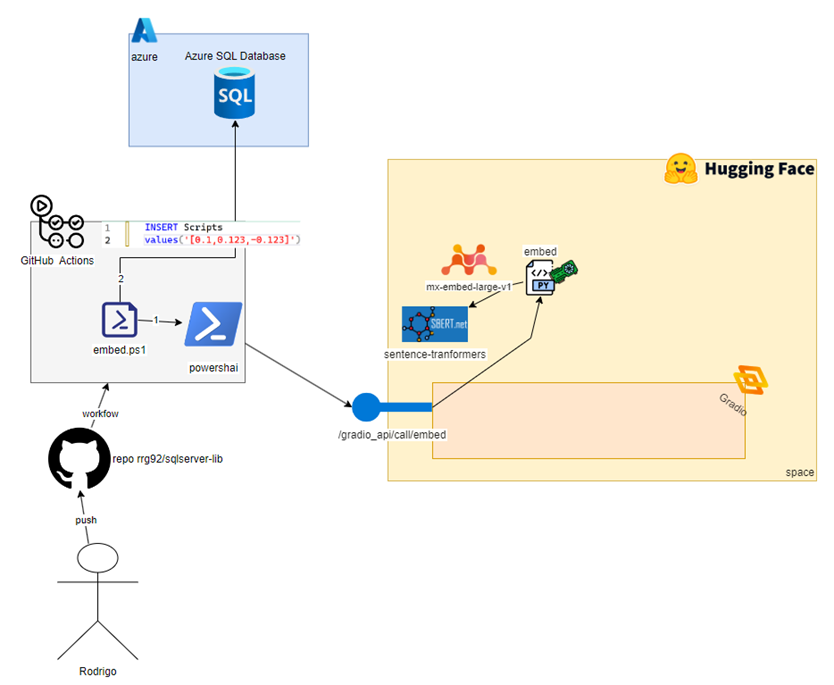
Looking at the diagram, we’ve added Step 2, flowing out from the embed.ps1 icon. It represents the next part of the data flow: retrieving the embeddings and script information (file name, content, etc.) and inserting them into a table on our SQL instance.
At the time I’m writing this post, SQL Server 2025 is already in public preview, but I will keep using an Azure SQL Database, which already supports the AI feature we need: the vector data type. Our database contains just a single table, which is defined in tab.Scripts.sql:
|
1 2 3 4 5 6 7 |
CREATE TABLE Scripts ( id int IDENTITY PRIMARY KEY WITH(DATA_COMPRESSION = PAGE) ,RelPath varchar(1000) NOT NULL ,ChunkNum int NOT NULL ,ChunkContent nvarchar(max) NOT NULL ,embeddings vector(1024) ) |
Some info about these columns:
- Id is just a unique sequential number for each script. I enabled data compression, but due to the large size of the columns involved, it won’t be very effective, so I’ll probably disable it.
- RelPath is the relative path of the script from the Git repo root.
- ChunkNum is a sequential number indicating the chunk of the script. I can split large scripts into chunks – AI models can have limits on the maximum text they can process for embeddings. So chunking is a common technique to deal with that. In this version, I’m not doing that yet because I want to keep it simple, but I plan to in the future. So, for now, this value is always 1.
- ChunkContent is the content of the respective chunk. Since I’m not doing any chunking yet, this ends up being the entire file content.
- Embeddings is the new one here: it defines a new type called VECTOR, which is the type SQL uses to represent these vectors. The 1024 is the size, so SQL will only accept embeddings with exactly 1024 positions, no more, no less. That means my AI model needs to support that size.
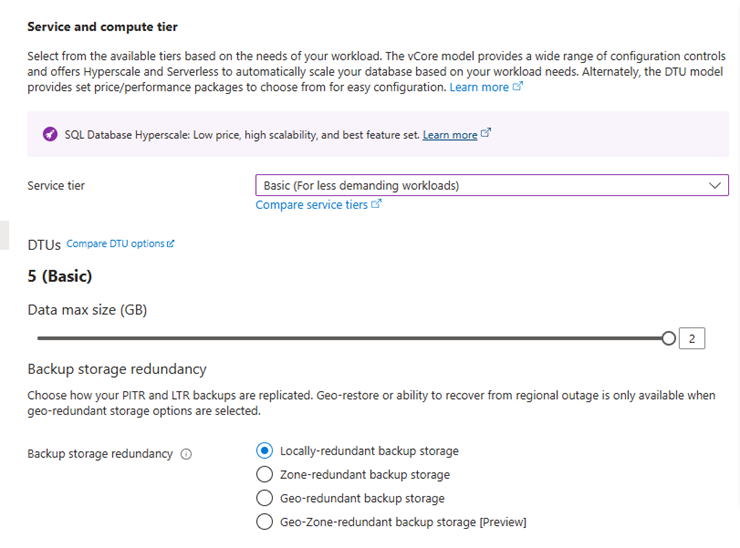
The Azure SQL Database setup is very simple. I initially tried to start with the Azure SQL Free Offer, but during my tests, the free seconds ran out, so I decided to upgrade to a basic 5 DTU server. If I need more processing, for example if there are more scripts involved or more users accessing, I can evaluate the various options for scaling that Azure SQL Database provides me, so it’s very easy and convenient to use SQL here.
This SQL database is exposed on the internet, so anyone with the address and credentials could connect to it. But for me, that’s not a big problem right now – the data is completely public, and someone would still need to guess the credentials, which are very strong. So, I decided to focus my efforts on more important parts of the project. An additional layer of security here would be to only allow requests from the GitHub and Hugging Face IP range. However, I didn’t do it for simplicity, but if necessary, you can explore more options.
Summary of Indexing Steps
Then we’ve covered the entire first phase. To summarize, here’s the full process:
- When I push scripts to my repo and add a Git tag that starts with embed-*, it triggers a workflow defined in the embed.yml file
- The workflow loads a PowerShell Docker image that runs embed.ps1.
- The embed.ps1 script uses the PowershAI module to connect to a Hugging Face Space I created, generating 1024-dimension embeddings for each SQL script file using GPU for fast process.
- After all embeddings are generated, the Scripts table is truncated, and I use BULK INSERT to insert the script data (filename, contents, embeddings) into the table.

Next, let’s see how the other phase – searching – is done. We’ll take a look at the Python code that runs the models and how SQL Server is used to help find data related to the user’s question!
Phase 2: The Search
Now you know how we index the scripts; it’s time for the most magical part: How do I do a semantic search and generate a response based on this data?! This part is almost entirely in the Hugging Face Space using Python and a part going to SQL Server.
Presenting the Hugging Face Space
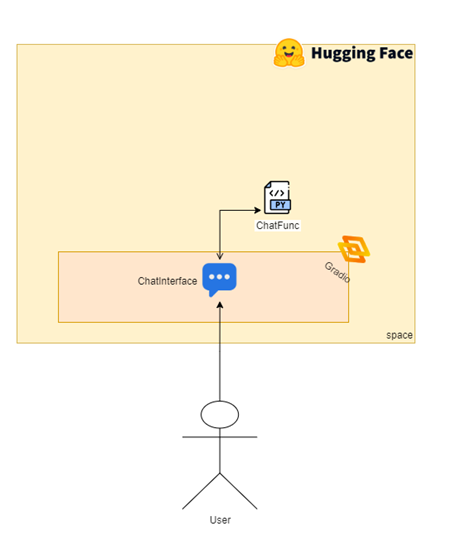
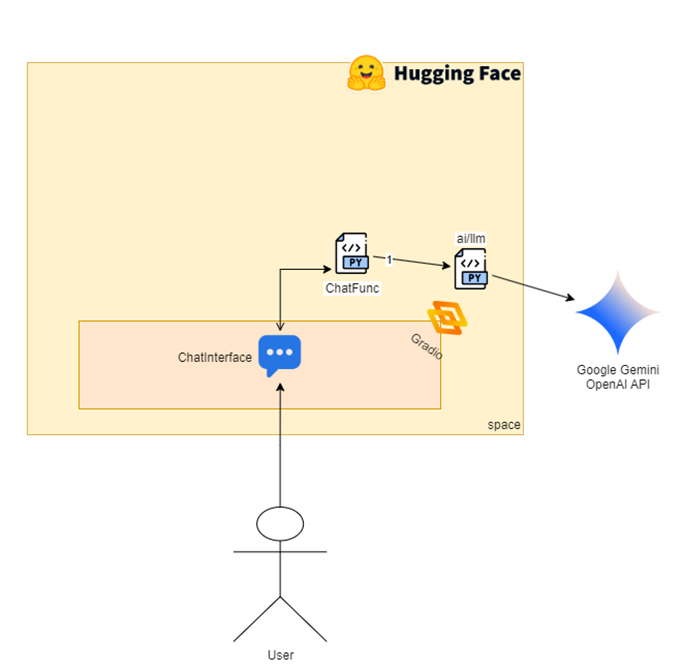
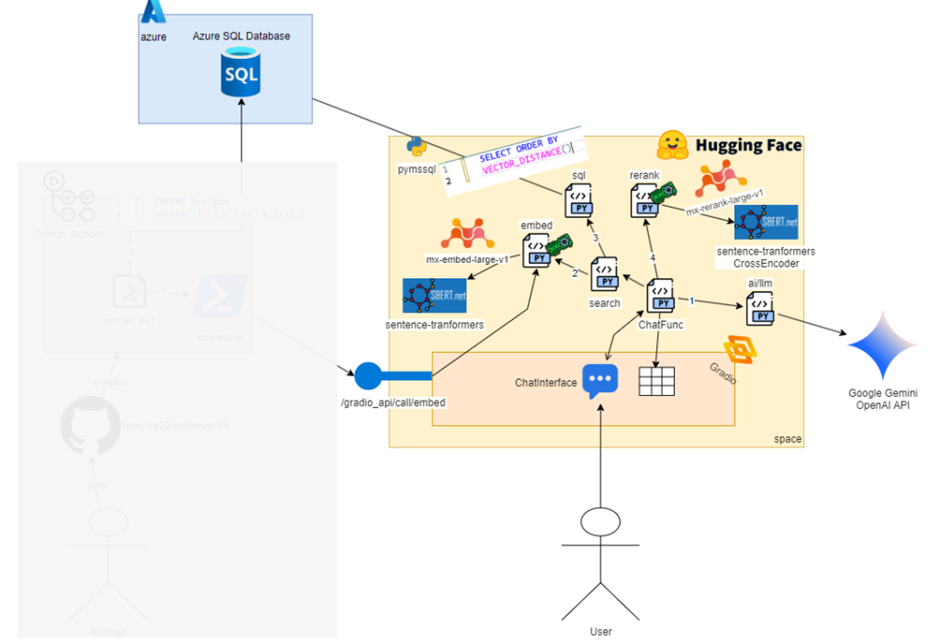
Everything starts when the user types a message in the chat interface. Now let’s look at the diagram with only what we need for phase 2:
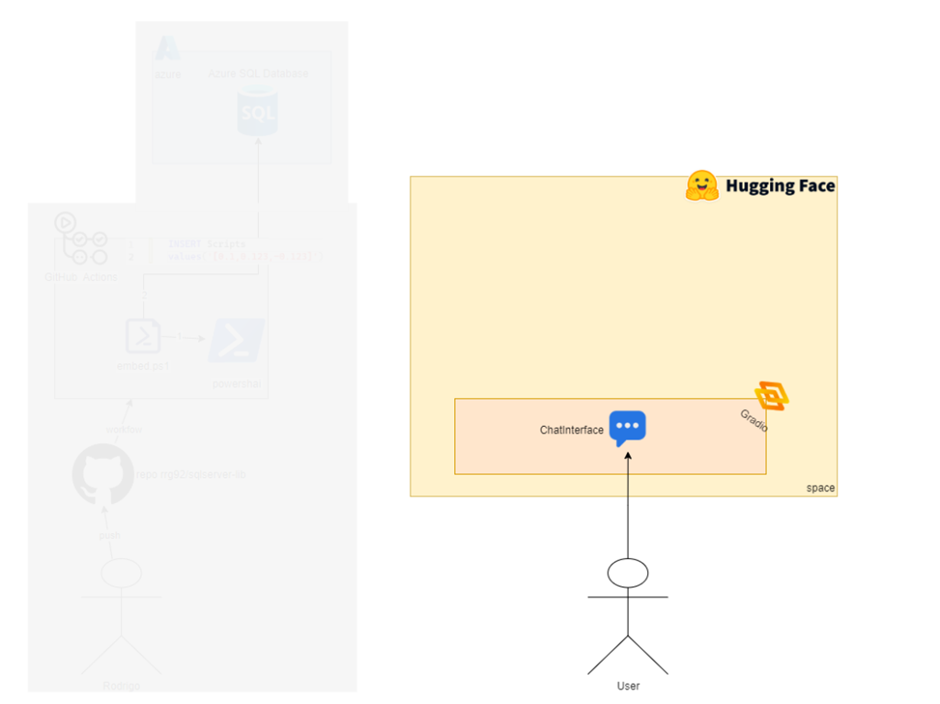
The yellow area represents the Hugging Face boundaries, showing that everything is hosted there. Up to this point, I hadn’t shared any details about the Space I created—so let’s check it out: https://huggingface.co/spaces/rrg92/sqlserver-lib-assistant
After click on link, go to the Files tab, you’ll see all the code I use to upload this Space (Hugging Face Spaces are also git repositories):

The file that gives life to the Space is app.py.. It’s the entry point, so when you access the demo (in the App tab), you’re seeing what that file outputs. In this case, it’s a web interface built using the Gradio Python library.
Just open the file and you’ll see a lot of Python code. Don’t worry if you’re not familiar with Python – I’ll explain the important parts. So, if you have experience with any programming language, that’s enough to understand what I’m going to show here.
Starting Point: Chat Interface
As mentioned previously, the Interface is built with the library Gradio. It is focused on building Machine Learning applications. It contains several elements common to the world of AI and is therefore widely integrated into Hugging Face who owns the Gradio startup. I quite like it because of how easy it is to integrate these common visual elements into the world of AI.
For example, creating the interface for the chat, and the table that receives the data is extremely simple. At the beginning of the script, I import the library:
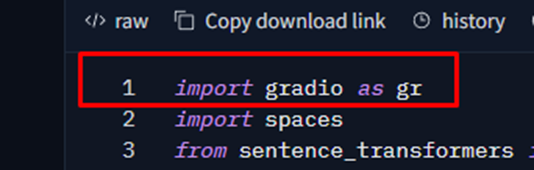
The gr is just an alias for the library, so I reference it using that shorter name.
Here is where I define the Chat interface: About 10 lines of code. Anyone who knows web programming knows how complex it is to create this from scratch. So, thank you Gradio team! This saves me a lot of time and allows me to focus more on AI models and solutions, rather than on visual elements.
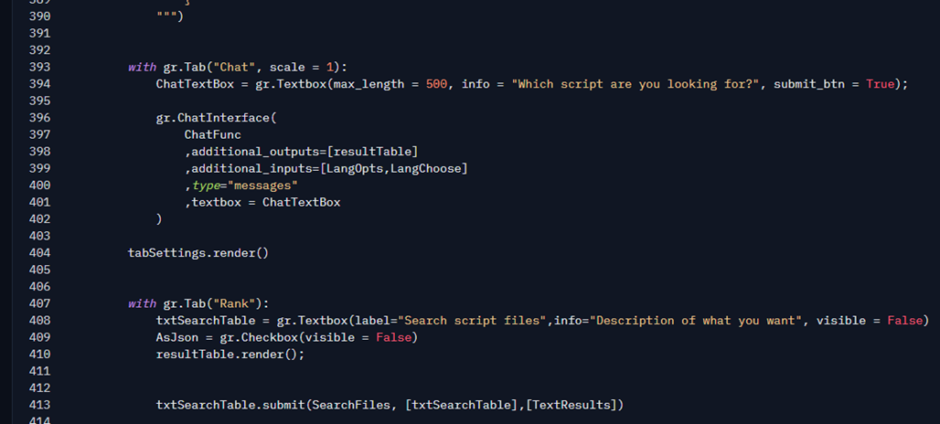
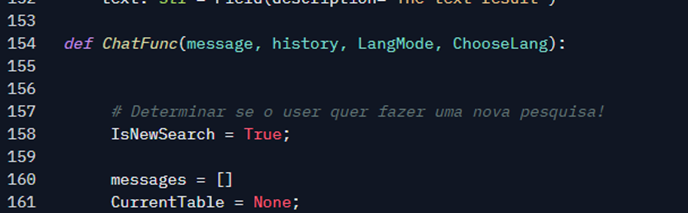
The gr.ChatInterface class is the main piece of this code. It handles everything needed to render the chat web interface. When you type a message and press Enter (or click the send button), it calls a function passed as its first parameter: ChatFunc. This is just a regular Python function that I defined earlier in the same file. Let’s take a look at it.
The ChatFunc Function
When you type the text in the interface and send the message, the Chatfunc function is invoked. This function defines some elements to interact with the chat interface, such as the current message, history, and other parameters that I can pass, in this case, the language detected or chosen by the user. It has a very complete guide from Gradio team. I highly recommend that you read it if you want to learn all the details of how to use it.
Here is our updated diagram up to here:
Before we move on to the next relevant piece of code, you’ll notice some auxiliary functions and classes in the code, like the BotMessage class, the Reply function, yield statement (it is just way to output content to caller in python) and others. These are just helpers I use to output data to the interface in real-time (while the process is running). Since this article is focused on how semantic search works, I won’t go into detail about those parts. But if you’d like more clarification, feel free to leave a comment – I’ll be happy to write a separate post just about how to display messages using Gradio’s ChatInterface. Also, the guide I shared earlier has some good examples if you want to explore that further.
Second Use of AI: Translating the User’s Message
Here is the second point in our project where we use an AI model (the first was generating embeddings during the indexing phase). Now, we’ll use an actual language model, but instead of running it directly in the code, I’ll invoke it through an API.
The function that do this is called ai. This function invokes an LLM using the OpenAI Python libraries.
In this case, the first execution of it asks for a translation of the user’s text into English.
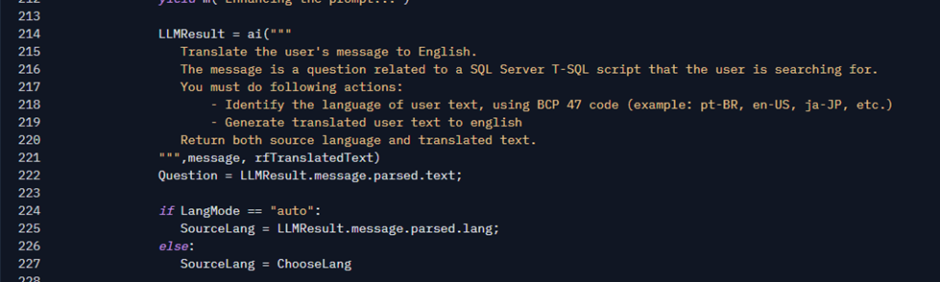
Why is that? After testing, I saw that the model I use for generating embeddings and comparing them performs very well in English. So, I decided to use the English text for the search. Thanks to LLMs, doing this is very easy and peaceful. This is the first use of the Google API that I have made in that project. Here I also take the opportunity to identify the language of the source text.
Finally, the Question variable will have the translated text and SourceLang the language chosen automatically (if automatic mode is enabled in the Settings tab). I could upload a smaller model in this script to do the translation, but I chose not to just to keep the code simpler. Maybe a future improvement here.
In case you’re curious, the ai function is just a convenience so I can call the OpenAI library in a more flexible way:
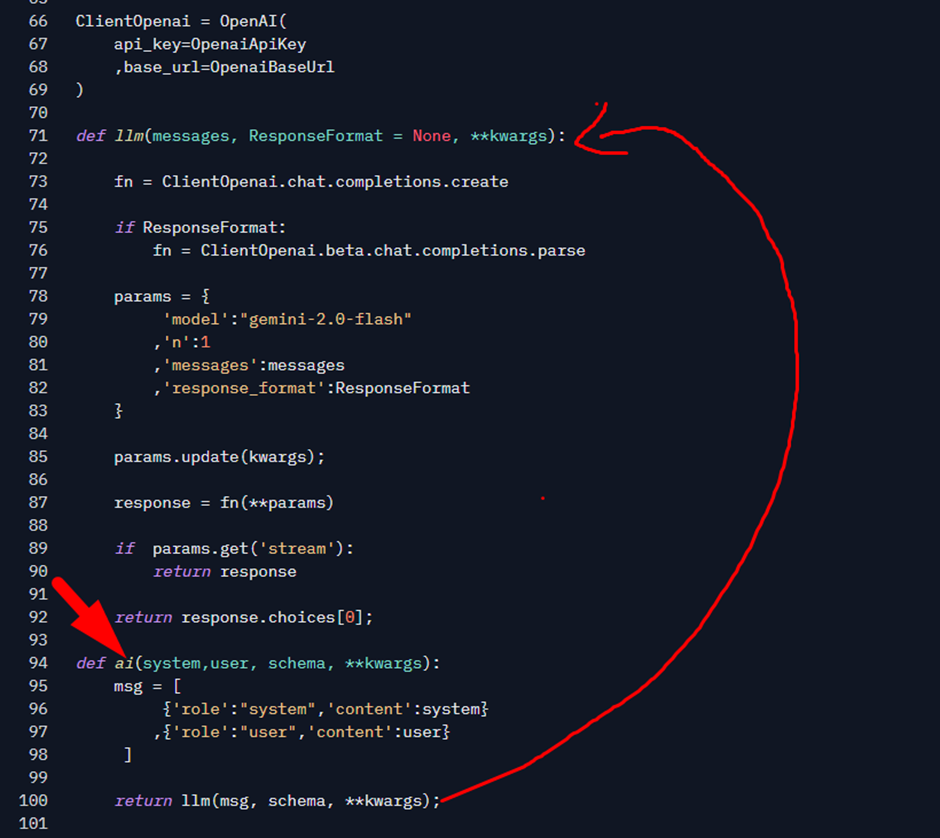
For simplicity, the ai function accepts two parameters: system and user. System is the system prompt. In LLMs, the system prompt is a special instruction message that defines how the model should behave when answering the user message, which is passed through the user parameter. The schema parameter accepts a class, allowing the model to generate a response using the structure of that class (i.e., matching its properties). The ai function internally calls another function named llm, which abstracts some of the calls to the underlying OpenAI library. If I want more advanced control over the parameters, you can simply use the llm function directly.
Here, it’s just some conveniences for me… All of this can be summarized as: I’m calling the OpenAI library, which sends the request to the Google Gemini API. Now, you might be wondering:
How are you using the OpenAI library if you’re using Google Gemini? This is confusing, Rodrigo!
Let me explain: OpenAI was the pioneer in popularizing LLMs, so most people started by learning and using its library to connect to its API. When other providers entered the scene, like Google or DeepSeek, they wanted to make adoption easy. So, many of them exposed their APIs using the same structure and conventions as OpenAI’s, making them compatible with the OpenAI library. This means that if someone wants to switch models or providers, they often just need to change the base URL of the API – everything else works as is.
If you look at my code, the ClientOpenai variable is defined on line 66. Notice how I change the base_url parameter to tell the library: “Hey, use this URL for your API calls, it’s compatible with how this library works.”
The values I pass to the function come from environment variables, which I can set in the Space Settings (I’ll show that later). If no value is passed for the base URL, I fall back to the default: Google’s API.

How do I know that? Simple, Google’s doc tells me: OpenAI compatibility | Gemini API | Google AI for Developers
By doing it this way, I can use any LLM that’s compatible with the OpenAI library just by changing the base URL. Simple and flexible!
Here is our updated diagram with a call to Google Gemini:
Third Use of AI: Generating Embeddings Again
Following the code, the next relevant snippet is the search function. This is where we will again use an AI model that is already our old friend.

The search function basically connects to SQL Server and obtains the most relevant scripts for a text passed as a parameter. Let’s explore it in detail:
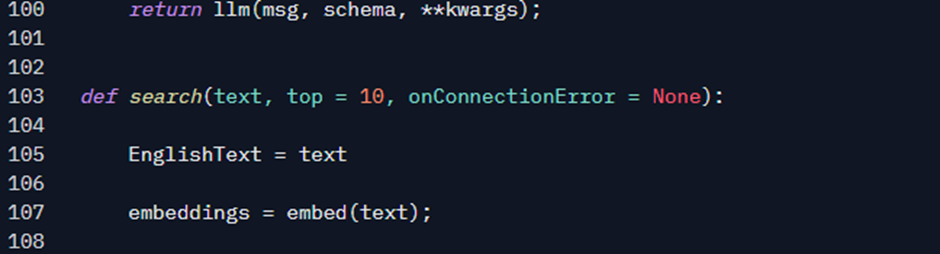
The first thing I need to do is get the text embeddings. Here I use the embed function that you learned about earlier. That it is exactly the same function that I use there in phase 1 for indexing. This is very important because for this whole process to work well (index and search), you need to generate the embeddings for user text using the same model and parameters that you used to index.
Generating embeddings with a different model or settings can lead to very poor results, bringing content that has absolutely nothing to do with the text. The difference here is that, when indexing, I call the function via API, using the powershai module and here, in the query, I call it directly, since it is loaded in the same code that generates the interface.
Let’s update the diagram so you can see where we are. This time, I’ll include the Phase 1 diagram as well, just to help you remember where we used it earlier:
Note that, on the Hugging Face side, the user reaches the embed function through the ChatFunction, which calls the search function, and then calls embed. On the GitHub Actions side, we also reach the embed function – but this time via the PowershAI module, which wraps the API calls to Gradio. That’s the point: we’re using the same code to generate embeddings in both phases!
It is time now to explain the embed function and finally learn how we load an AI model in my code!
10 tools for every stage of SQL Server development
The ‘Embed’ Function
The embed function is responsible for generating embeddings for a given text. Remember, embeddings are arrays of floating-point numbers that represent the meaning of the text. An AI model, based on its training, is able to generate that array. If we take two sentences and generate their embeddings, we can compare the two arrays to see how similar they are (we’ll look at that later). Now, let’s take a look at the body of the function, starting at line 56:

Yes, I know! Thanks to modularity and the open-source community, invoking AI can be as simple as calling a method. The actual “AI” magic happens on line 58. Look at the variable named Embedder – it holds an object from a super powerful library called Sentence Transformers. This object was defined on line 142:

A Little Background on Sentence Transformers, Neural Networks and AI Models
The Sentence Transformers library is an open-source Python library that abstracts away the complexity of using an AI model, like loading the model, moving it to the GPU, getting results, managing the math behind the scenes, and so on. Thanks to libraries like this, combined with the Hugging Face infrastructure, I only need to pass the name of the AI model I want to use. Actually, SentenceTransformers relies on several other libraries under the hood, like Transformers, PyTorch, and more. There’s a lot happening behind the scenes to make everything work seamlessly.
The AI model is stored as a binary file, which contains a huge set of numbers – these are the parameters learned during training. The Sentence Transformers library knows how to build the architecture of the neural network (like layers, connections, and operations). This structure is generally the same across many AI models of the same family. What actually makes one AI model different from another are the parameters it has learned during training. It’s like SentenceTransformers builds the shape of the brain and its neurons, and the parameters are what the brain has learned.
When the model is loaded, the library reads the binary file and sets the parameter values into the architecture, bringing the model to life and making it ready for inference (inference = execution). It’s like opening a PDF document. You have software that knows the PDF format and specifications – how to draw elements, fonts, etc. Any software that follows the PDF specification is able to open a binary file, with .PDF extension, containing the values that the software can interpret to know what to draw: colors, shapes, text, and more.
The AI Model we are Using – and How it’s Loaded and Used
We’re loading a model called mixedbread-ai/mxbai-embed-large-v1, which I pass as the first parameter to the SentenceTransformer class. This is an open-source AI model created by an organization called MixedBread.
When I do this, the library automatically downloads the files needed to load and run the model.
So, how does SentenceTransformers know where to find those files? Remember when I mentioned Hugging Face earlier? It doesn’t just host Spaces – it also hosts models. SentenceTransformers prepends the URL https://huggingface.co to the model name: https://huggingface.co/mixedbread-ai/mxbai-embed-large-v1
If you click the link above, you’ll land on the model’s main page on Hugging Face. There’s a tab called “Files and versions”, where you’ll see a list of all the files associated with the model. Based on default settings, SentenceTransformers knows exactly which files to download or read in order to prepare the model for use. All of that is happening behind the scenes in this moment, so I don’t need to worry about it.
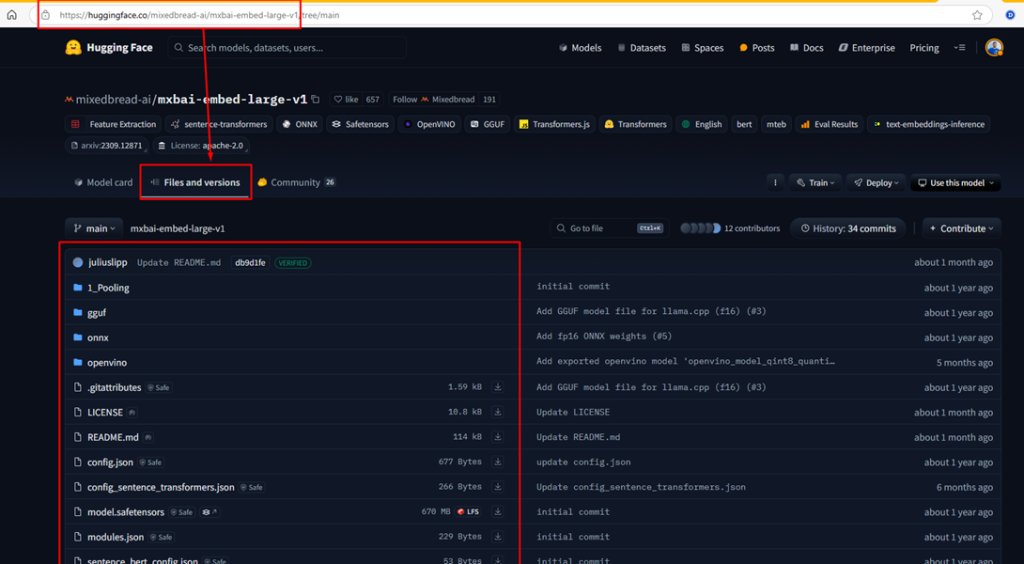
Who uploaded the files above? It was the MixedBread developers. After training the model, they uploaded it to Hugging Face, made it publicly available, and ensured it was compatible with the SentenceTransformers library.
Hugging Face hosts thousands of AI models, and many of them can be used in exactly the same way, with just a few lines of code.

Good question! You noticed earlier that I said invoking the AI is as simple as calling a method, right? Yes – invoking is easy. The hard part is deciding which AI model to use among thousands of available options. I ran several tests with different models and came to the conclusion that this one worked really well for my search use case, so I decided to go with it. The decision on which model to use depends on several factors: results, cost, performance, and more. Testing different models and relying on past experience – like reading papers, blog posts, and community discussions – helps a lot in finding the best one for each case.
Know the Model
For that task of generating embeddings, one of the most important pieces of information to know about a model is the number of dimensions it generates. From the model’s main page (linked earlier), I found out how many dimensions this particular model outputs by following another link that they documented: https://www.mixedbread.com/docs/embeddings/models
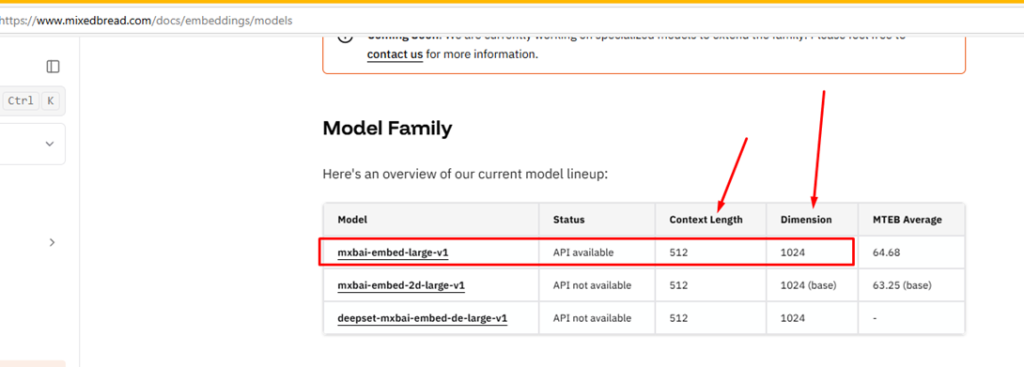
This is important because when creating my database table to store the embeddings, I need to specify the a length in vector data type. Embeddings are just arrays of numbers, and the length of that array depends on the model being used. In the case of this model – mxbai-embed-large-v1 – it generates embeddings with 1024 positions. That’s why, in the tab.Scripts.sql file, we use the data type vector(1024). The larger the number of dimensions, the more storage space it requires – but it can also mean a more precise representation of the text, which may lead to better results in comparisons and searches. That said, more dimensions don’t always mean better quality. But based on my tests, I found that 1024 strikes a good balance and works well for my use case.
This also means: if I decide to change the model later, I may need to change the table structure and reindex all rows to match the new embedding size. So, this choose is very very very very SUPER VERY important! If you are planning to use AI, you must test thoroughly before going to production with your table of TB of data.
Context Size and Chunking
Another important thing to consider is the Context Length. This defines how much data the model can process at once. The value is measured in tokens, not characters. Each model uses a thing called tokenizer, which is like a class or function that takes input text and outputs a sequence of tokens, that are just unique pieces of text that have a unique Id (a number). Multiple models can use the same tokenizer. SentenceTransformers knows which tokenizer to use by checking the model’s downloaded files – there’s metadata that specifies which tokenizer the model was built with. So you need to know how many tokens your data corresponds to.
In my case, I didn’t worry about that for now, since most of my scripts are short and don’t reach the limit. So, for this first version, I decided to keep things simple. I could either choose a model with a larger context length or use a technique called chunking, where I split the data into smaller parts that fit within the model’s context window. As I mentioned earlier, the table is already prepared for chunking – it’s just not implemented yet.
So, choosing the right model is an important decision. Before I got this solution up and running for you – bringing this model as the best choice – I ran tests with several others. I generated embeddings for a subset of files and tested queries against them. After evaluating the results, I ultimately chose this model based on its precision, cost and performance. Some other options I tried were: Jina, Nomic Embed Code and OpenAI.
In the future I might replace the model I’m using if a better one becomes available. So, this is a continuous process – something I’ll keep updating and reviewing as new models and improvements come out. But, this also requires planning which, like I said before, can be a costly operation!
Using GPU
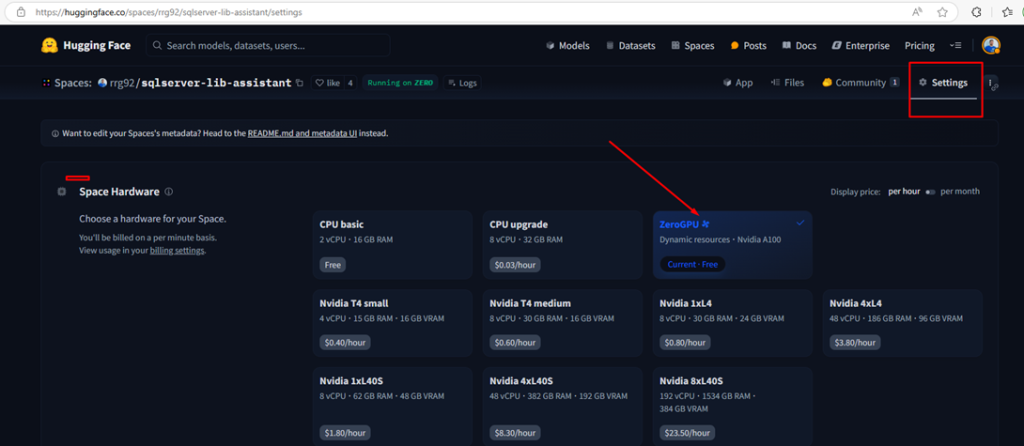
Going back to the embed function, notice it has the decorator @spaces.GPU. With this, I’m telling Hugging Face that this function should run on a GPU if it’s available:

This is part of the ZeroGPU feature, where Hugging Face allows us to use powerful GPUs to run our Spaces. Technically, it’s not “free” since I need a PRO account to create a space that uses it but, compared to paying separately for GPU usage, it’s much more cost-effective. Thanks to this, I don’t need to pay for GPU hours to keep the Space running, and anyone can use it and benefit from the GPU, without me or the user being charged per usage.
However, there’s a drawback: Hugging Face enforces a limited GPU usage time per user. If you’re not logged in, Hugging Face uses your IP address to track usage and apply limits. So, if you try to use my tool and encounter an error related to GPU availability (or even a generic error), feel free to let me know in comments here or there in space (Community Tab). I can evaluate upgrading the Space to use paid GPUs, so everyone can enjoy full access without those limitations.
But, thanks to this, my embed function runs very fast. Even though the function itself looks simple, it’s running a full AI model with lots of math under the hood, so having a GPU helps a lot when generating embeddings!
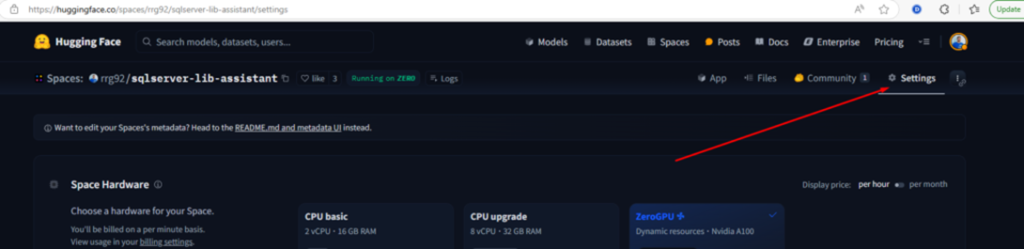
If ZeroGPU is not available (for example, if I choose CPU-only hardware in the Space settings), then this decorator has no effect. To help you understand what that setting looks like, here it is:
To understand the difference between using a GPU and a CPU, you can check out the version of the Space that use only CPU: https://huggingface.co/spaces/rrg92/sqlserver-lib-assistant-cpu. The advantage of this version is that you’re not affected by the rate limits imposed on GPU usage. The disadvantage is that can be slower (much slower). You’ll notice that most of the difference lies in the rerank function, which we’ll discuss later in this article.
One last important thing before we move on, remember that powershell code that runs in GitHub actions is calling that function? How is this possible? This is another facility of Gradio: It automatically exposes that function as API REST endpoint, thanks to that line:
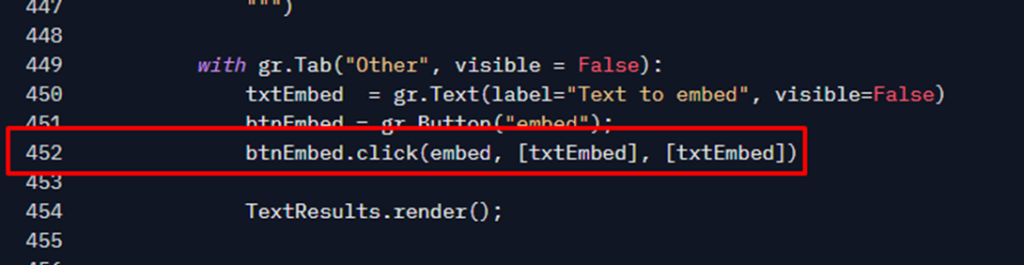
So, I can use the powershai to invoke that as was a simple powershell function. This is an example:
|
1 2 3 4 5 6 7 8 9 10 11 12 13 14 15 16 17 18 19 |
# install module if not installed install-module powershai -Scope CurrentUser import-module PowershAI # Activate Hugging Face integration Set-AiProvider HuggingFace # Open a connection with the Space. This will be the default in this powershell session # Let's use the CPU version of the Space. slower, but you're not affected by GPU rate limits. Get-HfSpace rrg92/sqlserver-lib-assistant-cpu # Create PowerShell function wrappers for the Gradio API. # This will create one function for each exposed API endpoint. # You can specify a function name prefix. let's use "SimpleTalk". New-GradioSessionApiProxyFunction -Prefix SimpleTalk # From here, just call the desired function. The 'data' property contains the result. SimpleTalkEmbed 'Simple Talk is my favorite SQL blog' |
Searching by Embeddings
Now that we have the embeddings of the user’s text, and we have the embeddings of the scripts saved in a database, we can do the famous semantic search, that is, search by meaning. Unlike a LIKE or Full Text search, where you pass a text to be searched in a Where filter, the approach we’re going to use here is a bit different:
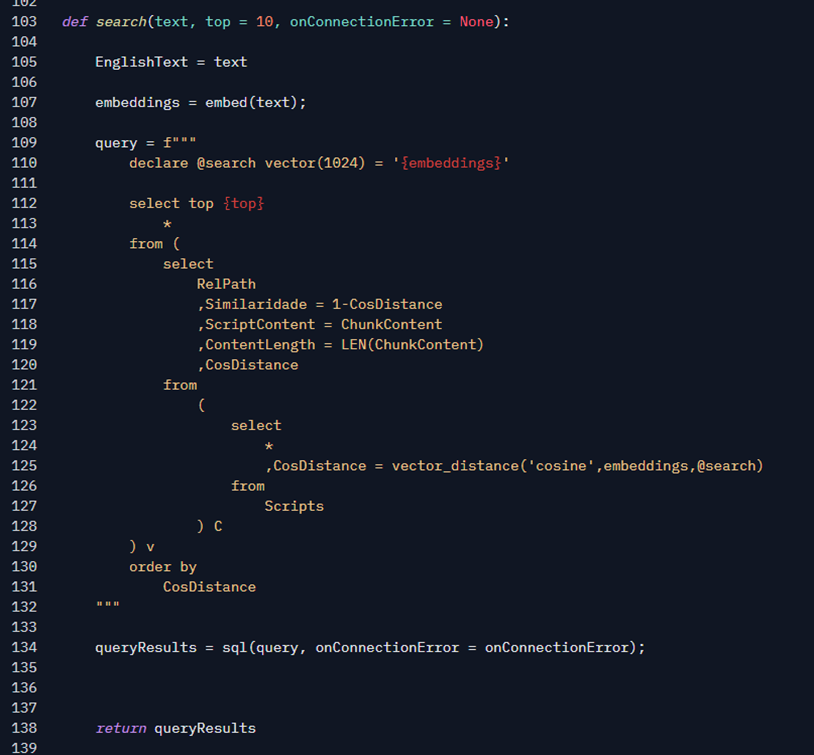
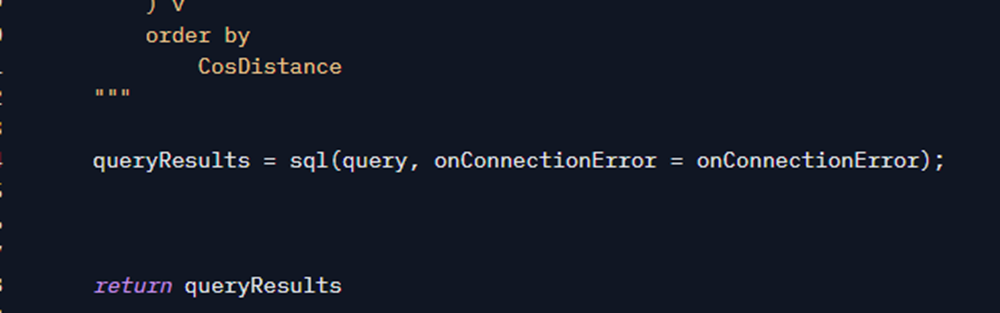
Note in line 109 that we’re building a T-SQL query using the embedding values returned by the embed function. This could be implemented as a stored procedure, but once again, I prefer to use an ad-hoc query. That query will be invoked by a SQL function, which is a wrapper around some calls to the pymssql library – a Python library used to connect to SQL Server. Here’s the updated diagram with step 3 added:
The SQL Function
Following the script, the sql function was created to encapsulate the logic to connect to SQL and return the results. First, I define these values, at beginning of app.py:
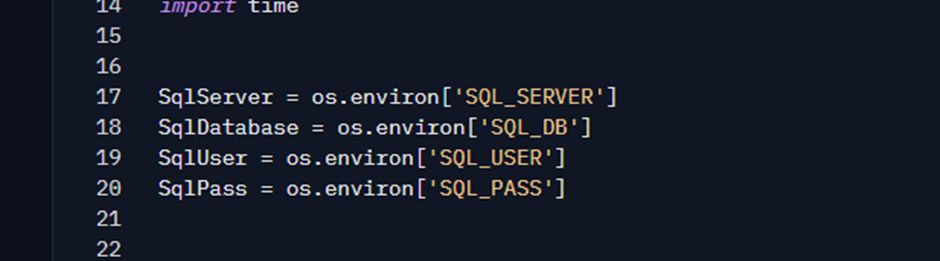
I use them whenever the sql function is called:
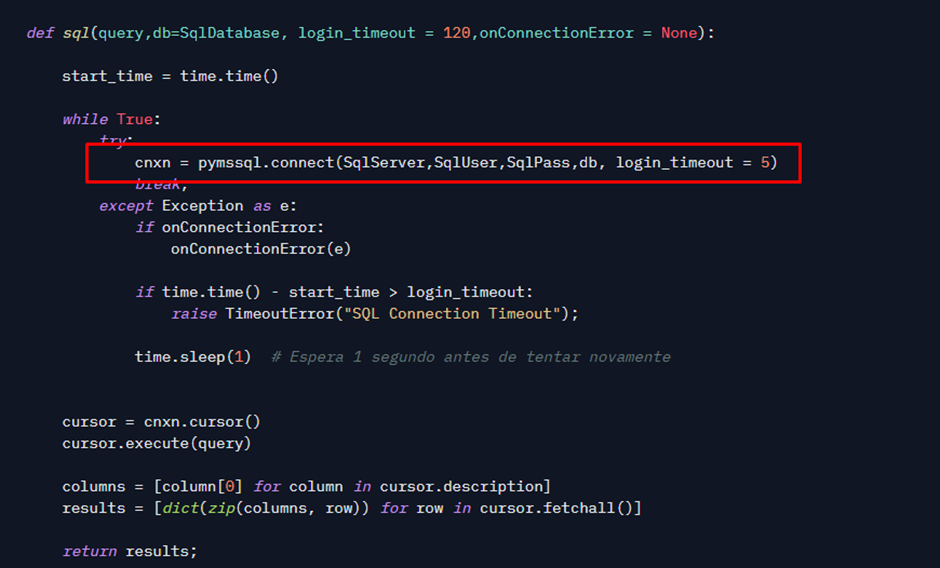
I chose to use pymssql, a library that is maintained by the community to connect to SQL. I could also use pyodbc (official Microsoft), but since the installation and configuration process has a few more steps, I stuck with pymssql.
I implemented a small timeout logic because in my initial tests I was using the Azure SQL Database Free Offer, which is a free SQL Database. However, it has an auto-pause feature where it turns off after a period of inactivity and turns on automatically when trying to connect. However, this can take a while, so this timeout scheme allowed me to try again without completely freezing while waiting.
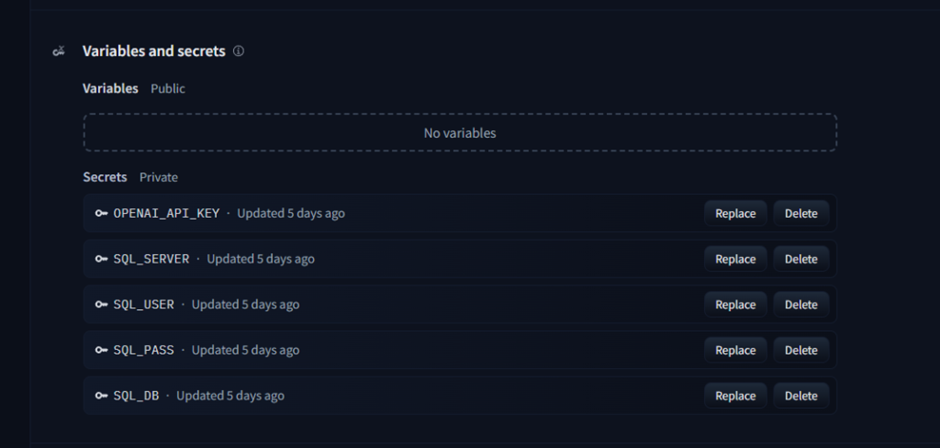
Important: Similar to GitHub, my SQL connection information is stored in environment variables, which I configure in the Space settings. In this case, I left a SQL Database open for internet access, created a user with permissions on the Script table, and put that information in the Space’s environment variables.
The Secrets section is where I define the environment variables with sensitive information (and that hugging face will not show the value in logs, etc).
The T-SQL Script for Search
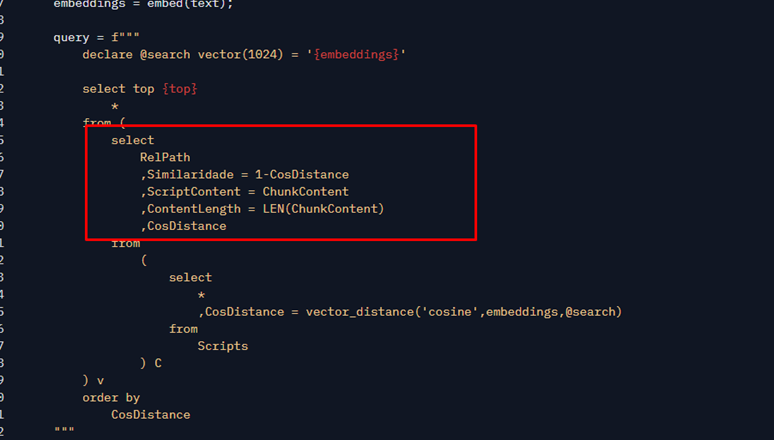
Let’s break down our SELECT to understand it better. Note that at the beginning of the Script I declare a variable with the vector type. This is the new data type in Azure SQL Database that allows me to store embeddings (and it will be in SQL 2025 as well) as announced. The value of this SQL variable comes from the Python variable containing the embeddings, which is the result of the embed function. When I concatenate in the string, it automatically converts to the JSON representation of an array of floats, which is the literal format that SQL Server expects for this type of data.
Would it be the same as if I did it like this:

Returning to the script query, note that I declared it as 1024, exactly the same size declared in the column. And here I reinforce: the embeddings need to be generated in the same way as they were for indexing, which includes being the same model and SIZE.
Let’s isolate each part of the SELECT statement, starting with the innermost select.
TIP: If you would like to try these examples on your own local SQL Server 2025 instance, follow the instructions in this script: https://github.com/rrg92/sqlserver-lib/blob/main/SqlLibEmbeddings/IndexData2025.sql. It will guide you on how to create a local copy of my repo in your SQL Server, index it using the AI functions of SQL Server 2025, and perform searches using the same queries shown here.
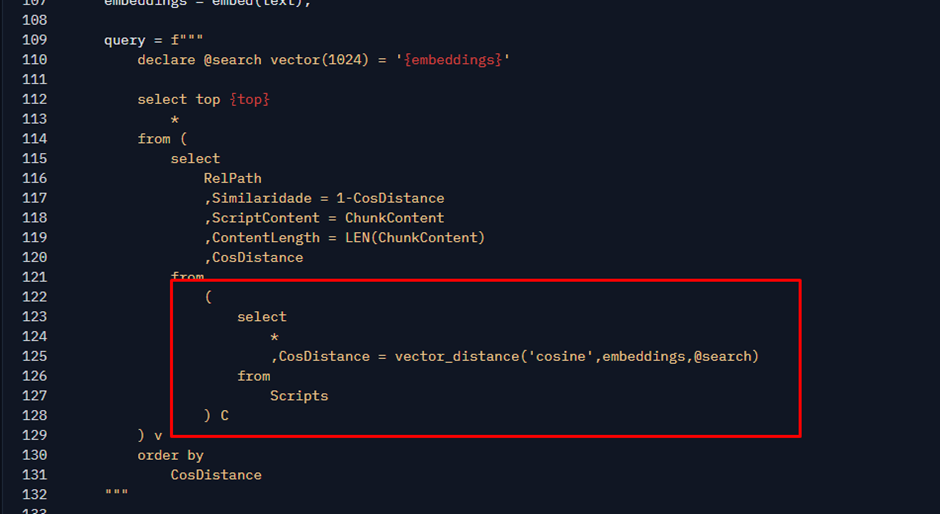
Here I am performing a SELECT query on the scripts table and generating a column named CosDistance.
VECTOR_DISTANCE is a function that accepts 2 embeddings and returns a value between 0 and 2. The closer to 0, the more semantically similar the two texts corresponding to these embeddings are. This metric is called Cosine Distance.
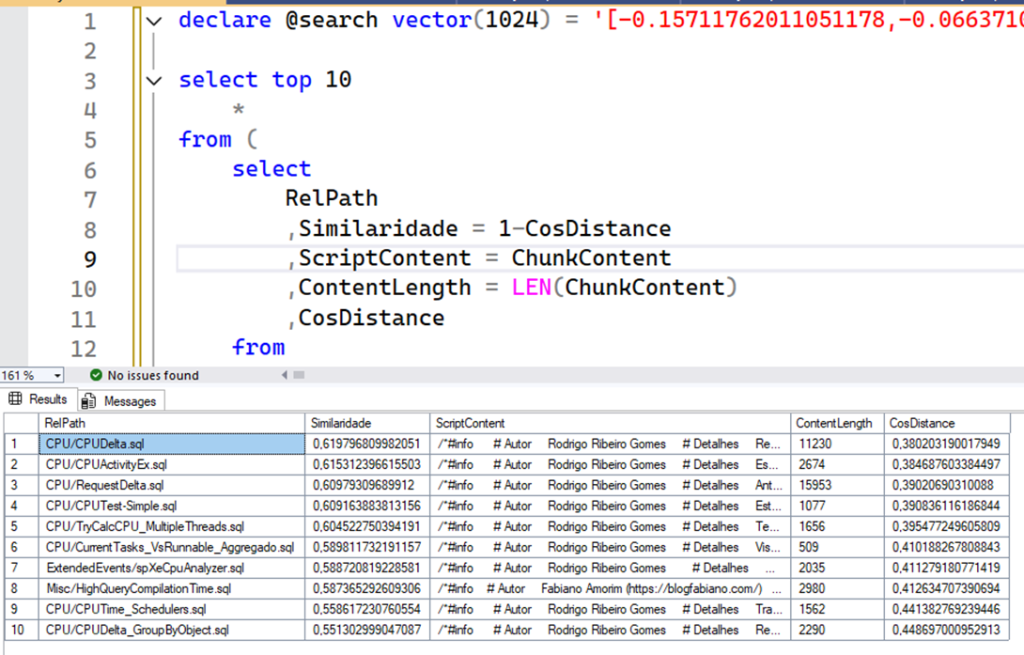
Let’s see a sample result of this piece of code when searching for the text “cpu performance”. I will paste the embeddings directly into the code, as Python would send to SQL after replacing the variables in the script of image above:
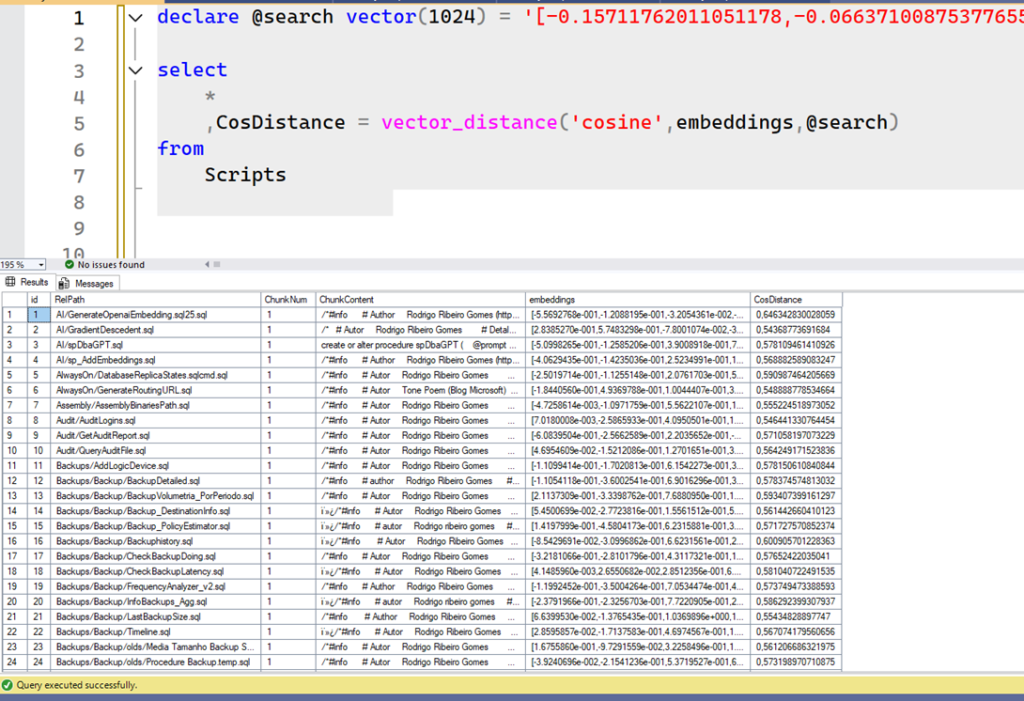
The result above is from a sample SQL Server 2025 Public Preview, where I loaded my repo. Without any further work, we don’t have anything particularly useful here. Note that CosDistance contains different values, and some rows are closer to 0 than others. This is why we need to order the results by CosDistance, which is done by the outermost query. Remember that the closer the Cosine Distance is to 0, the more similar the results are. So, we want the most similar results possible. If I just order that piece of code and get the top 10, we get the best scripts related to CPU performance at the top:
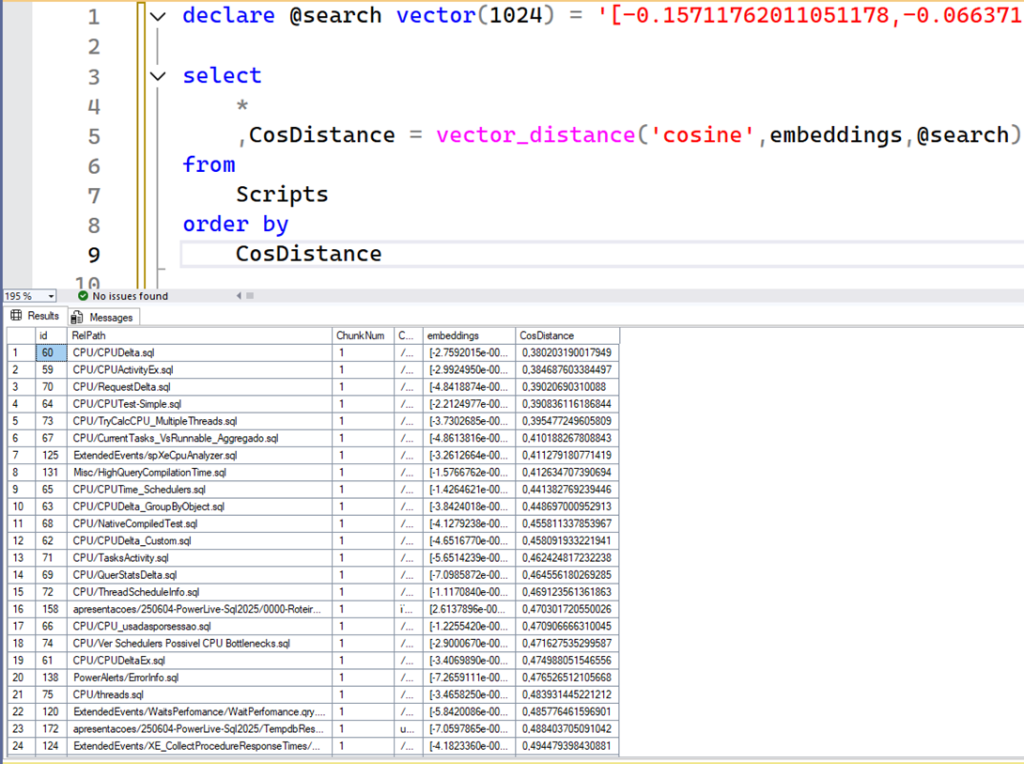
Now, note that after sorting, we get the rows that are as close to 0 as possible. These are our best embedding matches for “cpu performance” that our AI models can provide. If you compare with the previous result, without ordering, you will see that most of the queries don’t have a direct relation, like backup, audit, or Always On. So, this is proof of how important ordering is here.
Notice that in the outermost script, I use TOP X ORDER BY CosDistance because I only want to return the top X most similar rows. This is a completely different approach from what we’re usually accustomed to when it comes to filtering in SQL. Normally, you might think of using a WHERE clause. But remember in SQL, WHERE is not the only way to filter rows. Using TOP with ORDER BY can be very helpful in scenarios like this.
Here, we’re not filtering based on the absolute values of the embeddings—we’re interested in retrieving the rows that are most similar to the user question, which is represented by our vector in variable @search. Some other optimizations could fit, but I didn’t implement them for simplicity: I could set a minimum threshold (e.g., only CosDistance <= 0.2 for example), I could try to incorporate a fulltext to check for some term, etc. Davide Mauri, from Azure SQL Team, has an excellent article showing that: Hybrid Search in SQL Server and Azure SQL Database
Another important point is that if my Scripts table had 1 million rows, the way I did it would be extremely inefficient, because the SQL would have to read all the rows, calculate the VECTOR_DISTANCE of all of them, sort all of that (probably causing disk usage) and in the end bring me a small portion. It would be a resource-destroying query.
Here is where an INCREDIBLE feature comes in, which was also announced and we will probably have soon in Azure SQL and SQL 2025: VECTOR INDEX. We will be able to create a special index in this embeddings column that would optimize this search, and it would not need to read the 1 million. But, for now, for my data set which is extremely small, doing the scan does not yet represent a significant problem.
Another highlight is this:
Here is where I calculate some interesting things, such as the number of characters in my script and the Similarity (Cosine Similarity). This is a value between -1 and 1, and the closer to 1, the more similar the values are. It is just a calculation derived from Cosine Distance. This excerpt will be used for display and as input so that another AI can analyze the results.
This is a sample result using the same previous example of “cpu performance” (This script contains a sample way to do that test directly from a SQL Server 2025):
Here we just get the top X results, which is 10 by default, and return them to Python. But Rodrigo, what if there are more scripts related to CPU? Simple: they will not be shown to the user. We found the 10 best options to show the user, and probably one of them is what they need. Our table is still small – less than 500 rows – but each row is a script file, which can contain a lot of text, so returning all results is not a good option due to common problems with large data sets.
However, since the top 10 is configurable, the user can try to ask for more results if they think the initial ones are not sufficient, or even enhance the prompt to be more precise and bring other relevant scripts to the top. In the future, our app can also help the user in this process by enhancing the search or performing multiple searches and combining the results for different terms or variations, to help find more relevant options. There is a world of creativity that can be used to help SQL find more relevant results.
Now, we just need a text, generate embeddings from it, and let SQL do the work of searching for us.
After the query runs, the queryResults variable will contain the top 10 scripts that best match our input text, sorted from the closest to the farthest match, essentially creating a ranked list of the most relevant results. Then, the search function returns this result to the ChatFunc, allowing the process to continue.
However, you’ll notice that the initial ranking may not be ideal, as some of the best matches could appear lower in the list. So, it’s time to do some extra processing to re-rank the results.
Fourth AI Use: Rerank
So far, our search function has done the main job: finding the scripts that are most related to the user’s text.
However, embeddings are not perfect. They may find more things than they should. And this is completely normal, as it depends on the training of each model, which obviously does not cover all cases. It could find that Script A is closer to my text than Script B, when in fact, Script B might be the most suitable script.
For this case, we have a second very important and effective technique: RERANK. Rerank uses an AI model to calculate a score that indicates how similar two texts are.
Up to this point, we’ve done this through embeddings: We generated the embeddings separately and compared them to get a proximity value. Rerank is a similar process, but instead of computing numbers for each text and then comparing that numbers, you input the texts directly and get a number representing how much that text are similar. This significantly improves the results. This is the snippet that does it:
Follow now path 4 in our diagram:
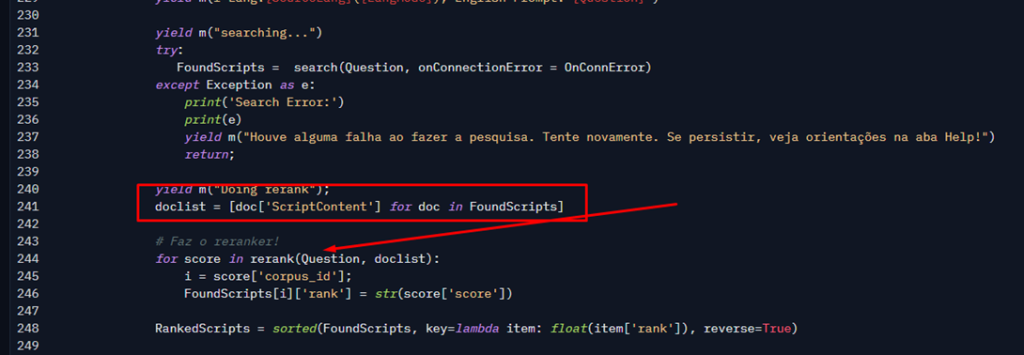
First, I need to build a list with only the script contents. The variable doclist (line 241) is an array of strings, where each item is the content of the script that our query found with the embeddings search. Then, I call the rerank function (line 244), which is the one that actually calculates the score. Note that I pass the text (in English) and the list with the content of the scripts. The result of the function will have the index of the document and the score, which I use back to add to our FoundScripts variable (line 233). That score represents how much the user question is similar to respective script content. Higher value means more similar.
The Rerank Function
Like embed function, the definition of rerank is quite simple:

I put this simple snippet in a separate function for one very simple reason: To use the GPU! I don’t need a GPU to call database APIs, etc., but I only need it for this snippet (and for embedding), which is where I run the AI model in my Python code. So, only that needs to be separated, which saves me unnecessary use of ZeroGPU’s GPUs, which are limited.
Here, again, the Sentence Transformers library is making use of AI child’s play. Many thanks to the Sentence Transformers team, especially Tom Aarsen who is a core maintainer of this library and has been evolving it a lot!
The Rerank variable is an instance of SentenceTransformers.CrossEncoder. This class represents the models that perform the operation I explained above, which is to compare 2 texts and return a score. They are called “Cross Encoders” due to the neural network used (which accepts 2 texts and generates a score), as opposed to embeddings where the network used is known as Bi-Encoder, which processes each text separately and generates embeddings that can then be compared.
Here is where it is defined:

Here again is a model from mixedbread-ai, but it is a specific model for this rerank task. Like the other one, you can see more details about it at: https://huggingface.co/mixedbread-ai/mxbai-rerank-large-v1. And, just like I did with the embedding model, I ran some tests with other models and found one that works perfectly for this case. In the future, I can always switch to a better one if needed.
The CrossEncoder class has several methods that facilitate its use…The rank method allows me to pass a query text and a list of documents, then the model will return a score for each string in the second parameter. An important detail is that it returns negative values by default, which is why, when creating the object, I passed the activation_fn parameter, where I pass the Sigmoid function, which converts the values to a range between 0 and 1, which I find more intuitive to display in the end (thanks for this GitHub issue).
Rodrigo, what is the difference between the CrossEncoder class and the SentenceTransformer class?
Maybe you might be confused about these classes when creating AI model instances. With embeddings, we used a class called SentenceTransformer, and for reranking, another class called CrossEncoder. How do I know that? And why is it different?
Basically, each class implements an architecture that involves some type of neural network. The CrossEncoder is just the implementation of another architecture, which uses a neural network designed specifically to accept two texts and generate a score. Meanwhile, the SentenceTransformer class implements the bi-encoder neural network, where the main objective is to generate an array of numbers (an embedding) from an input text.
Also, CrossEncoder models are slower, but they produce results that are much better and more precise (I’ll show that later). I know this thanks to some research and study. If you want to know more, I recommend reading the getting started guide directly from the SentenceTransformers site, so you can dive a little deeper: https://www.sbert.net/docs/quickstart.html
The higher the Score, the more related the texts are. So, I need to sort the result by Score. Python’s sorted function does that for me:
At the end of this process, the RankedScripts variable will have the following:
- All scripts that were found similar to the user’s text
- A score indicating how similar this text is, and it is sorted in descending order by this score.
- The content of each script and its relative path in my GitHub repo.
- Cosine similarity for conference purposes only
Now, I have real data that I can use to present to the user.
Up to here, it would be sufficient to display it in a table, the next snippet does exactly that:
The function m() also returns the CurrentTable variable, and since it now contains our table, the yield causes it to be updated.
Our diagram follows with a small change, representing the updated table in the user interface:
At this moment, the user can already see what their query found on Rank tab. For example, this is the result when I searched for “search for a string”:
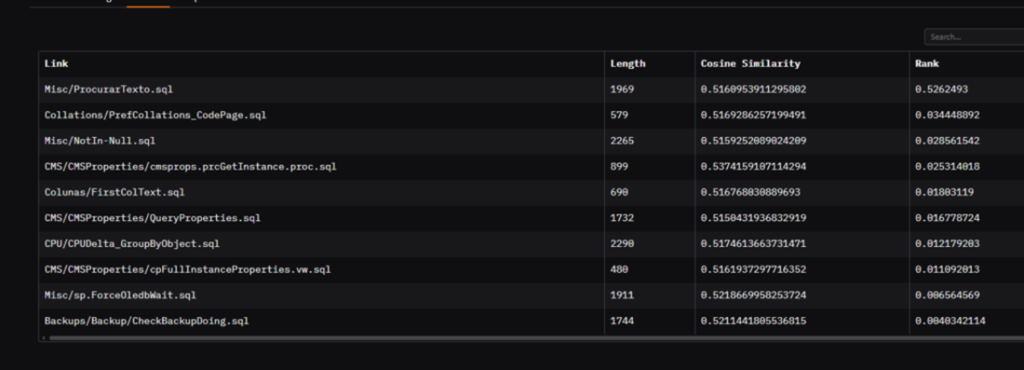
This result contains a very cool example of how rerank was important. Notice the “Cosine Similarity” column. The first script contains a value of 0.51, while the last one contains a value of 0.52. If I didn’t have rerank, a script that talks about backup would have come first, because according to the definition above (remember, cosine similarity = the closer to 1, the more equal) it would be more similar than the ProcurarTexto.sql script (Procurar Texto = Search Text in pt-BR).
Now, look at the Rank column. Notice how the game has completely changed. The score of ProcurarTexto.sql is much higher than the others, which reinforces how well the model got the relationship between the text “search for a string” and the script. That’s why reranking is extremely important here.
Ah, Rodrigo, so why don’t you always use rerank and remove VECTOR_DISTANCE from the middle? And the answer is simple: performance. Rerank is effective but is not efficient for lot of data. I only needed to compare with 10 results, comparing with 100 is 10x more work. And, the table will increase, as I still have 400 scripts to put there (and growing). And, despite being a small number of lines, the content can be a lot: Remember that rerank acts on top of the text to generate the score, so the more text, the more work it will have. Different from VECTOR_DISTANCE, which compares an array of numbers, and therefore, is much more efficient.
You can see that difference using the CPU version of space that I created: https://huggingface.co/spaces/rrg92/sqlserver-lib-assistant-cpu. Note how the most time of process is spent in status ‘Doing Rerank’.
That’s why in the RAG process, it’s common to combine these two operations: with embeddings, you efficiently find a small set of relevant candidates, and with reranking, applied to this small set, you better classify the result. Several variations of RAG exist, always aiming to add operations to further improve the accuracy of this result. Reranking is just one of them.
Fifth Use of AI: Generating a Response
At this point, we have already presented the user with the most relevant scripts related to their query. Up to here, this is quite impressive as we utilized several AI models to assist, which is indeed fascinating.
But, the fun doesn’t stop here, as we can still use the power of an LLM to summarize and explain the content of these scripts. Now that we have the data, I can ask an LLM to use this information to generate a better elaborated response to the user, reading script content, highlighting important parts and best: answering in the same language as user.
After updating the table, I ask an LLM to generate a waiting message. The goal here is to provide a personalized message on the screen so that the user knows that something is still being done. I could have left a fixed message or used a smaller model, but, again, I opted for practicality:
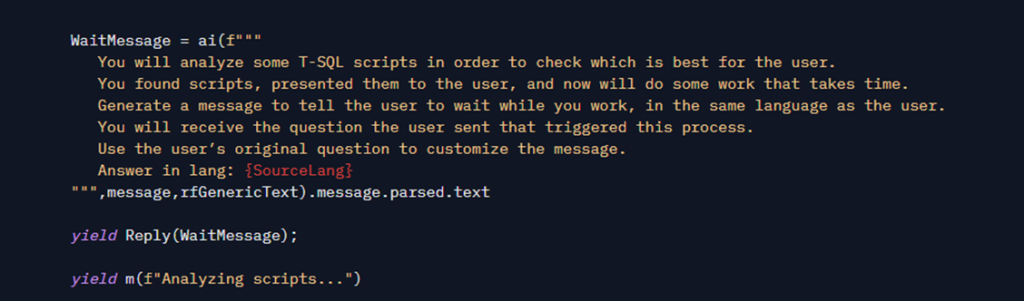
Another improvement I could make is to have triggered this message in a separate thread, at the beginning of ChatFunc function. That way, while I was searching for the scripts and doing the rerank, it would already be preparing this message. Maybe in future versions I’ll do that, because then I wouldn’t have to wait long just to generate a wait message…
And finally, we get to the part where I ask the LLM to elaborate on an answer:
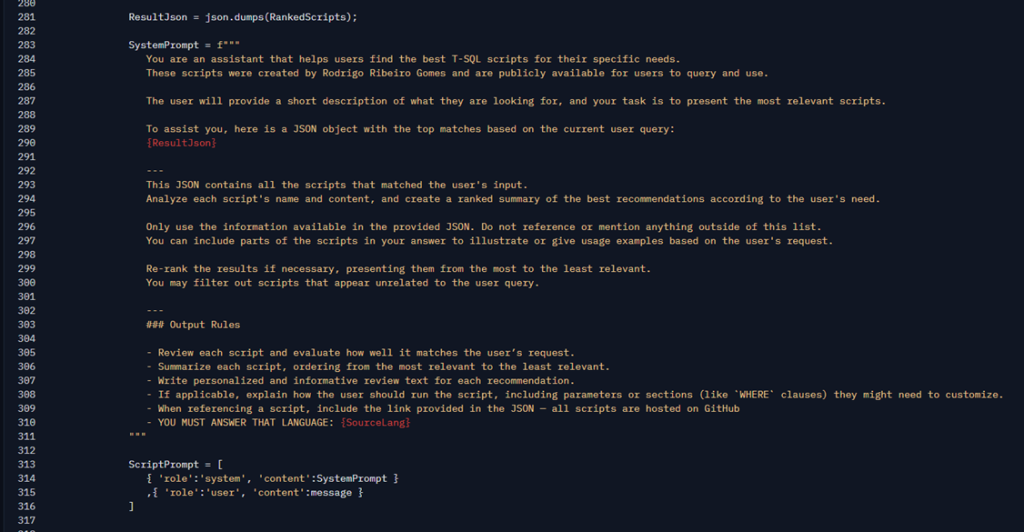
Here, I created a prompt using some best practices (the famous prompt engineering) to provide context explaining what it is about and how to use the results. I pass our table directly, as JSON, so that it uses this as context. Nowadays, models can understand this mixture very well. I also give some guidance reinforcing that he should analyze the script and the language in which he should respond.
Everything goes in the SystemPrompt, and as a user message, I pass the exact text that the user typed (not the translated text). Thus, I leave all responsibility and creativity to the LLM to use all of this and generate a very personalized response based on what it asked for and what we found, including giving it the freedom to reorder the results if it deems necessary. Once I present the table ordered by Rerank to the user, then I don’t need to ensure that the response follows that order. Here is the pure creativity of AI in action, and the better the model, the better the response will be.
Very important note: LLMs are probabilistic, so nothing I put there is guaranteed to work 100% of the time or follow all rules exactly. However, the more detailed and well-explained my prompt is, the higher the chance of getting a good response. Also, the better the model, the better it will follow my prompts. But again, this is not the same as writing code it’s not deterministic. I need to expect some errors or unexpected behavior (and so does the user).
Here, there could be more interesting things. For example, if there were no results, instead of concatenating this empty result, I could just change the prompt saying that there were no relevant results and have the LLM generate a generic response. But I chose to leave it as it is so that it always generates something. This will cause cases where the scripts are not so relevant to generate some forced response … But there is a lot of room to improve this.
The rest of the function is just it getting the result, as it arrives, and sending it into the chat. Note that at this point, I’m calling the llm function directly – not ai – because I want to use the streaming feature (using the for…in… statement). This allows me to access chunks of the LLM’s response as soon as the server sends them, giving the effect of live typing.
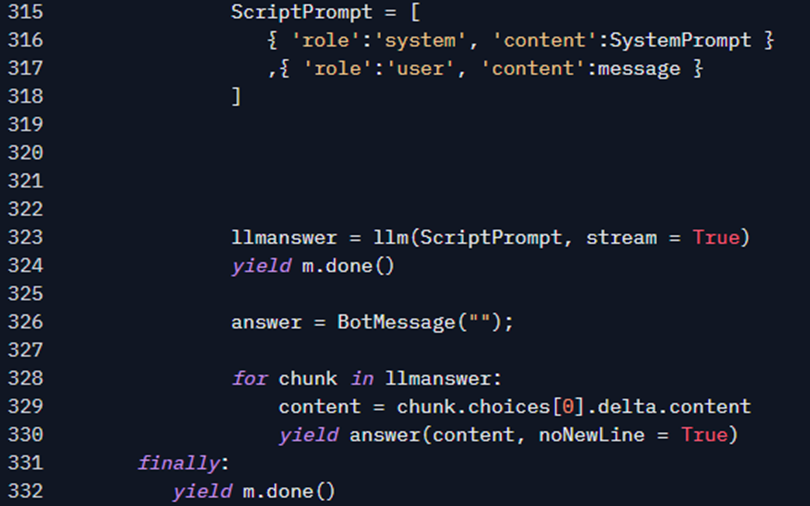
At this point, you already know the result: each time a chunk arrives, you see the chat interface being updated with the content. No big secret here — the answer function simply appends the chunk to a string variable and outputs it using yield statement. Then, Gradio captures that and updates the interface.
Next Steps & Conclusion
As you may have noticed, this is a very simple project, and my intention in doing it was more to study and apply a lot of things that I have studied throughout the year 2024.
Certainly, we have a lot of room for code improvements, tools we could use, libraries, etc.
I have been a SQL Server DBA for over 10 years, and in the last year I have dedicated myself to studying a lot about Machine Learning and AI. And, I am really happy to see that SQL will come with this strong support for AI.
I think we will still see a lot of new things, and as demonstrated here, I think they are features that have everything to be widely used, especially those that already use searches like FullText Search.
Some future improvements that I hope to bring:
- When SQL Server 2025 is released, I will redo the demo with it, and with that, we will be able to test with the features that will come and that I am very excited to see!
- There’s still a lot of script to add, so the answers tend to get better.
- I want to try using an AI model running directly in the code, instead of calling an external API, using the GPU. Maybe it might even be an SLM (Small Language Model), that is smaller model but maybe can be sufficient to that simple task.
- Unintentionally, I’m creating a T-SQL dataset, thanks to the comments I’m making in the review, so I hope one day I can train an AI model with this data and use this model to generate the summaries. I believe the answers could be much better this way. But training a model is more complex and costly task, so, I need some time and exp to do that.
I think the main insight of this post is to show how much technology already exists and how accessible it is for you to create AI solutions that solve real problems in your daily life. In addition, you can check how databases still will play important role in this new age.
Thank you very much for reading this far, I hope you enjoyed it, and if you have any questions about any code snippet or any explanation, just leave it in the comments and I will answer as soon as possible!
Subscribe to the Simple Talk newsletter
This document contains proprietary information and is protected by copyright law.
Copyright © 2026 Red Gate Software Limited. All rights reserved


Load comments