
The series so far:
- Creating Your First SQL Server Docker Container in macOS
- Managing SQL Server Docker containers in macOS
- Connecting to a SQL Server Docker Container Running in macOS
In the second part of this article series, you learned about the container’s nature (ephemeral) and a few details about its life cycle. More importantly, I provided you with a detailed explanation on how to use the Docker client to list and delete container images, check the container’s state filtering by name, and specific status (started | stopped). To finally close, the article explained what happens inside a container when it is ended, started, and deleted.
In this third part, you will learn about the container’s network connectivity, starting from the creation of an interactive bash shell session to remotely connect within the container and ending with an understanding of how containers interact with your local network. And finally, connecting to your SQL Server instance running an in a Docker container by using your favorite database management tool.
Connecting within a container
Before providing examples on how to connect to SQL Server to execute queries and scripts, create database objects, or start any database development, I would like to show you how to connect within the actual (Linux) container through the macOS terminal.
Getting started with docker exec
The docker exec command allows you to execute any type of shell-based commands within a running container. This command is an excellent tool for debugging, monitoring, and also to perform administrative level tasks like the creation of directories, files, and more.
Here is the docker exec syntax:
|
1 |
docker exec [options] <container name> <command> |
As you can see, this command is very straightforward. As the syntax above describes, you have to pass one or more options and then just provide the container name followed with the actual command to execute within the container.
You may wonder what options to use. That’s a very fair question, and let me tell you there a few of them. You can start by taking a look at the official definition from Docker docs here, in case you want to read further. However, I will make use of a couple of them in the next section.
Creating a Bash session
Based on the explanation from the previous section. You can leverage the docker exec command to perform any kind of Linux based command inside a container, like creating a remote terminal session.
In Ubuntu’s case, the default shell is bash. However, it won’t be just a matter of passing bash as the second parameter. Remember, you still have to provide one or more options for this command to work.
In the specific case to connect to your container using an interactive bash terminal, you have to use the -i with -t options before the bash command. I know this sounds a little bit complex, but trust me, this is the right way you want to do it.
The following table explains each one of the parameters I will use for this command:
|
Option |
Description |
|
-i |
It means you want to connect using an interactive method |
|
-t |
It means tty as any devices that act like teletype in a terminal |
|
bash |
Starts a bash session inside the container |
Putting all these options and parameters together, you will execute the following instruction. In this case, SimpleTalk is my SQL Server’s name:
|
1 |
docker exec -it SimpleTalk "bash" |

The context of your macOS terminal will switch immediately, from your localhost to the container’s interactive bash session you just created. You can also confirm, you are within the container executing the hostname command as follows:

As you can see, SimpleTalk is the string value I defined as the container hostname at the time of its creation. In case you get an alpha-numeric combination returned, do not worry; that is fine. That happens to be the actual container ID (As described in the docker ps section in the second part of this article series).
Now that you confirmed the connection works within the container, it’s time to perform more interesting like exploring all SQL Server binaries and data files.
Exploring your SQL Server container
As it occurs on any Windows installation, SQL Server on Linux uses a default location to store all its binaries, libraries, dumps, and another for the actual database files (MDF, NDF, and LDF) and error logs. There are no changes in this regard when running SQL Server on Docker. In the end, SQL Server will use the same binaries and libraries when running in a Docker container on Linux.
You can find the SQL Server binaries, libraries, and configuration files all in the /opt/mssql location, as any other regular SQL Server on Linux installation. Take a look at the folder structure for a moment:
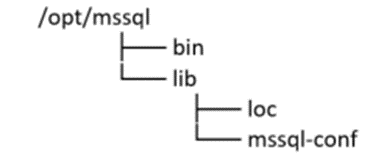
All these directories and files within are pretty much the heart and soul of SQL Server on Linux. I recommend not making any changes to the existing files in this location as any mistake there can compromise your SQL Server instance availability and operationality.
Now it is the time to get familiar with the datafile and logs location. First, get familiar with the folder structure:
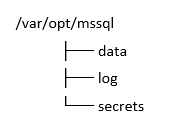
As you can see, there is a folder called data. That is the location where you will find all the system and user database files (MDF, NDF, and LDF); of course, you can change this location to a customized path as you are used to doing in Windows. However, modifying the SQL Server default data path for a container is outside the scope of this article.
Do not get confused by the log folder; this is where the error log and dump files are stored. As described before, the data folder holds both MDF (data) and LDF (transaction log) files.
It is time to put what you have learned into practice, starting from listing the existing database files in your container. The first thing you want to do is to navigate towards /var/opt/mssql/data as follows:
|
1 |
cd /var/opt/mssql/data |

Now that you are positioned in the data file directory, it will be easy to list all files under this folder to identify which databases exist in this container. You can use the ls -ll command for that purpose; it will return the complete list of existing files under the current directory using the “long list format”.
Here you have the example, starting from the docker exec command:
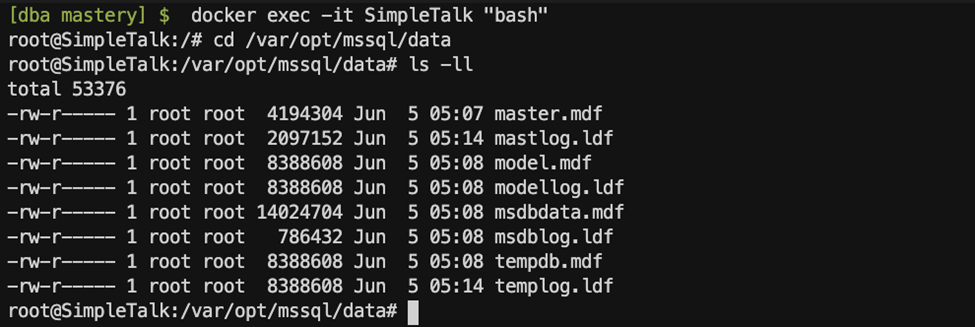
As you can see above, the long list format that includes the file type (simple file | directory), owner, group, file size, creation date, and file name. This information is pretty good; moreover, it helps you to understand better who, when, and what kind of files was created under a specific directory.
Network connectivity
Docker desktop uses a bridge-type network by default. A network bridge is a communication device that provides a way to communicate two or more network segments allowing them to work as a single network.
You can use the docker network ls client command to list all existing networks in your Docker desktop implementation. Like the previous examples, all the Docker client commands should be executed using the macOS terminal. Once you execute the docker network ls command, you will see some information returned that will include the internal network ID, name, driver, and scope.
Here is an example of the information returned in my Docker desktop implementation:

As you can see from the output above, three networks were listed instead of the default bridge. According to Docker’s documentation, the host and none networks under the name column are not fully developed at this time. However, Docker uses them to manage the internal connectivity from a container when the same is started locally from the Docker daemon or when no network devices are required.
In my specific case, using a local docker daemon, there is no need to specify the container IP address to connect. Because all my containers are running on my laptop, Docker uses the network bridge device, allowing me to connect like it was running on my local machine.
This topic will become more evident in the next section when connecting to the SQL Server container using SQLCMD.
SQLCMD
SQLCMD is a command line-based utility you can use to connect to any SQL Server instance. One of the significant characteristics of this utility is that it works the same regardless of the platform (Windows, Linux, macOS, Azure Cloud shell). The installation process is quick and straightforward; you can follow the steps on how to install it for macOS here.
From now on, I will assume you already have SQLCMD installed. The following section will focus on the connectivity aspect; thus, it is crucial to have this command line-based utility for you to follow the steps.
Getting back to the main point, SQLCMD requires a few parameters to work. The information required to connect a SQL Server instance using this tool is just the hostname or IP address followed by the port number, user name, and password. Here you have the syntax of the SQLCMD to connect to a SQL Server instance:
|
1 |
sqlcmd -S <hostname | port number> -U <Login> -P <Password> |
Of course, there are many more options like database name, query, input file, output file, etc. in case you are interested to learn more about this utility; you can check more details at Microsoft docs. My goal, for now, is just to get you started with SQLCMD.
What is essential to understand, though, is how to port redirection works for containers. Each container must have a unique port number, exposed at the creation time. That means you can have only one container listening to port 1433 or 1434, and so on. It’s pretty much the same concept of default and named instances on Windows that you are probably familiar with as a SQL Server Database administrator or developer.
Therefore, be mindful of the ports already in use in the macOS. You don’t want to end up using a port that is already used by other critical applications.
There are many ways to get the port exposed for a container; however, I will re-use one of the previous examples in this article. To be specific, I will use the docker ps -a -f command to get all the information related to my SimpleTalk container, including the exposed port:
|
1 |
docker ps -a -f "name=SimpleTalk" --format "table {{.Names}}\t{{.Image}}\t{{.Ports}}\t{{.Status}}" |

Looking at the output returned, I can conclude that the SimpleTalk container is listening through port 1433. At this point, I know two of the required parameter values to connect to the SQL Server instance using the SQCMD utility.
The next two parameters are the user name and password. You will probably realize that you already have this information. If you recall from the previous article, the docker container run command for SQL Server requires setting an environment variable as the SA password at creation time. Therefore, you can re-use all this information to connect your SQL Server container.
Here is the visual representation of the parameters and its values:
|
Parameter name |
Value |
|
Server name (-S) |
localhost |
|
Port |
1433 |
|
User (-U) |
SA |
|
Password (-S) |
MyP@ssw0rd# |
Now it’s time to put all these parameters together using the SQLCMD utility. Here is how it looks in action:
|
1 2 3 |
sqlcmd -S localhost -U SA -P "MyP@ssw0rd#" SELECT @@SERVERNAME; GO |

Note, I didn’t have to specify the port number. There is a simple explanation for this; remember, I’m connecting to a SQL Server instance listening thought the port 1433, which is the default for SQL Server. Thus, there is no need to specify that port number as part of the parameters in the SQCMD utility when using the default port.
As you can see from the output, the connection was successful, and I was even able to run a query to get the SQL Server instance name, which returned the container ID (hostname).
Here’s a second example using a SQL Server container listening through a non-default port —different than 1433. I will start by creating a second container (see this article) called DBA-Mastery. This time the container will listen through port 1401. Once again, I will make use of the docker ps -a -f command to get all the information for this other container, as I did previously for the SimpleTalk container:
|
1 |
docker ps -a -f "name=DBA-Mastery" --format "table {{.Names}}\t{{.Image}}\t{{.Ports}}\t{{.Status}}" |

As you can see from the returned output above, the PORTS column shows the mapping between the port 1401 and 1433. Being the first port (1401), the one from my local machine, and the second port (1433) belongs to the one within the container.
Based on the information for this new SQL Server container environment called DBA-Mastery, the connection parameters will be something like this:
|
Parameter name |
Value |
|
Server name (-S) |
localhost |
|
Port |
1401 |
|
User (-U) |
SA |
|
Password (-S) |
MyP@ssw0rd# |
This is how you should connect using SQLCMD:
|
1 |
sqlcmd -S localhost,1401 -U SA -P "MyP@ssw0rd#" |

Please note the server name (-S) parameter is a little bit different this time. It is using a combination of the localhost, followed by a comma, then specifying the 1401 port. This port parameter is required whenever you want to connect to a SQL Server instance mapped to the non-default port.
Azure Data Studio
As the title of this article states, I’m using macOS to host my SQL Server containers. In the previous section, I gave you an example of how to use SQLCMD, a command line-based utility used to manage databases or just simply to execute T-SQL queries.
However, sometimes we need a complete solution with a rich editor experience, let me tell you that Azure Data Studio is the perfect tool for the job. Azure Data Studio is a modern cross-platform tool focused on the coding experience that also provides you with a user-friendly solution to managing SQL Server databases regardless of its environment (on-premises, cloud, containers).
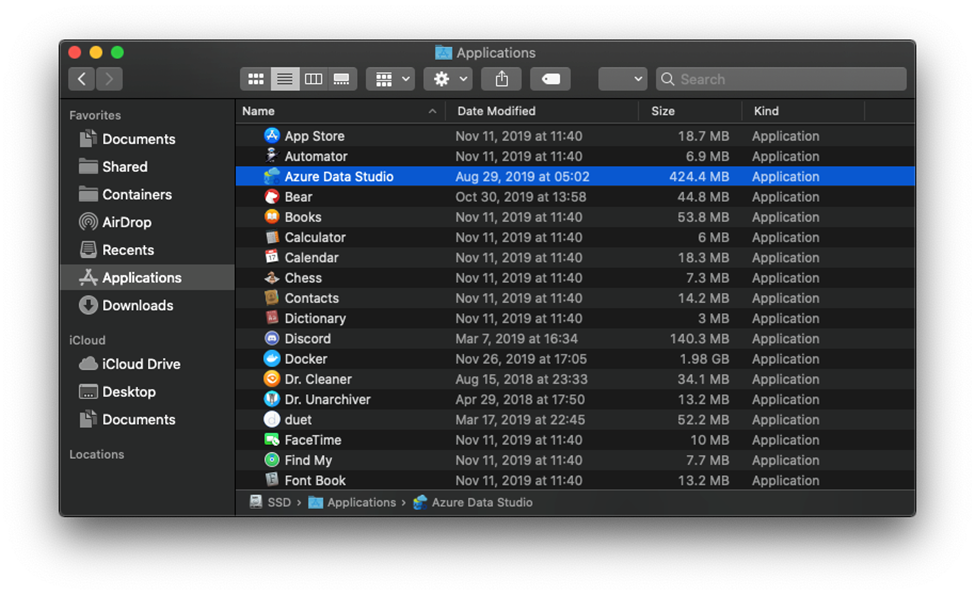
Installing Azure Data Studio in macOS is easy; just download the application file from here. You don’t need to extract or run anything, just grab the downloaded file to your applications folder:
For more information about this tool, you can always take a look at the Microsoft docs.
To get started, open Azure Data Studio, then go to your welcome page and click on Create a connection:

Do not worry if you don’t see the Welcome page, just navigate through the macOS top menu and click on Help. You can open the Welcome page from there:

A new section called Connection Details will open on the right-hand side of Azure Data Studio. Here is where you must specify the connection details as follow:
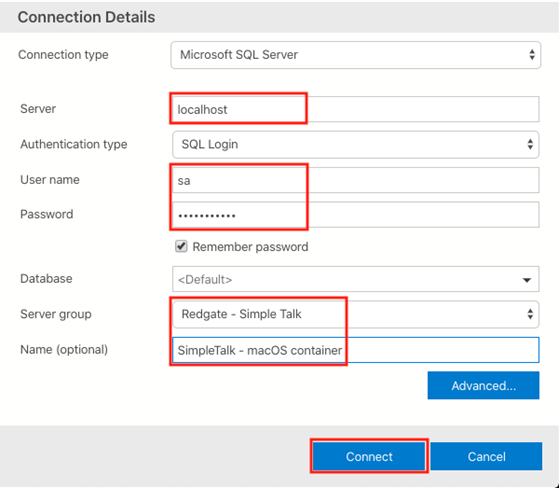
I just went through all the fields completing the information I already know:
- server name,
- user name and
- password
Please note the Server Group and Name fields are optional. I just decided to call this server group Redgate – Simple Talk, and of course, I want this SQL Server container to be part of this server group. Then the Name field simply refers to the SQL Server connection, kind of a label or alias. I will use SimpleTalk – macOS containers for demo purposes.
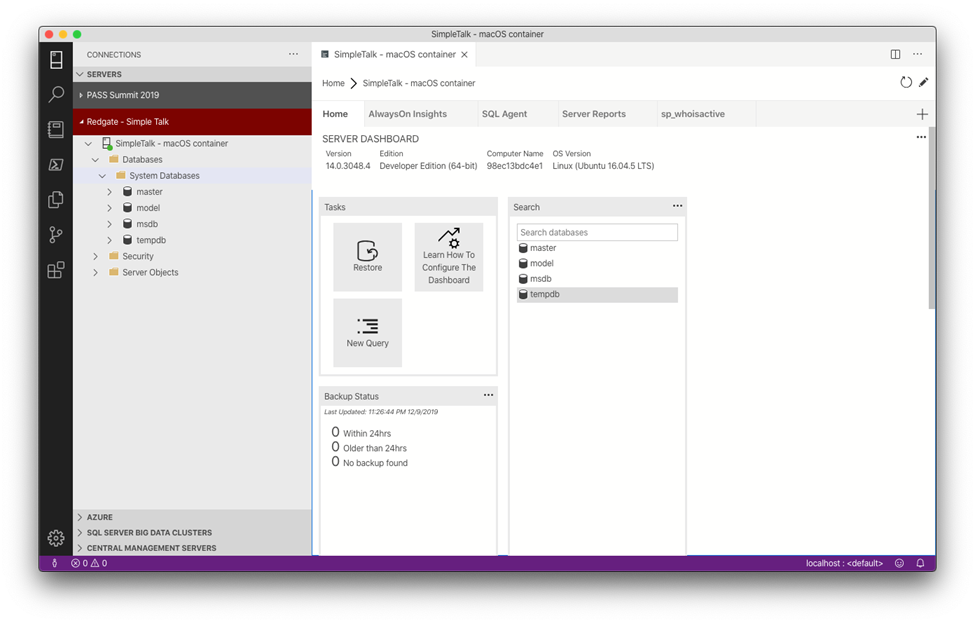
I am all set! I should be able to connect to my SQL Server container to start any new development or simply to manage my existing databases:
Conclusion
Understanding containers basic networking and connectivity terms is vital to get you started with any kind of development using a SQL Server instance running on Docker. Docker provides a very straightforward way to initialize a remote terminal session through the docker exec command.
Later, I explained the few options available when choosing a database management tool for macOS. You can leverage a command line-based tool like SQLCMD, to get you started executing queries fast and easy. Or either, choose a graphical user interface tool like Azure Data Studio, which provides a modern cross-platform rich editor experience to focus on your database development needs.
Please join me in this series of articles where I will be talking about the following topics related to Docker containers for SQL Server:
- Persistent storage \ Docker volumes
- Transferring files from the host machine to Docker and vice versa
- Restoring databases from any source to a SQL Server instance running in a container
- Upgrading a SQL Server instance running in a container
- Creating a custom SQL Server container
- Automating the deployment of custom SQL Server containers
- Configuring an Availability group for a SQL Server instance running in a container
- More …
Thanks for reading!
This document contains proprietary information and is protected by copyright law.
Copyright © 2026 Red Gate Software Limited. All rights reserved
Load comments