
One of the common requests we receive is how to quickly install the SQL Backup 5 server components remotely on a large number of servers. While the SQL Backup 5 User Interface supports remote installation, this can only be performed on a single server at a time, which can be time consuming when working with tens or even hundreds of servers.
Using the script provided in this article, the techniques utilised by the SQL Backup 5 User Interface, and SQL Multi Script, it is possible to perform an ‘unattended’ remote installation. This will allow you to install or upgrade your SQL Backup server components across the network in one go, rather than installing the components manually. Furthermore, these techniques can be used to collate versioning, licensing and installation information about the SQL Backup server component installations into one easy-to-read grid.
The Script
You can download the complete script from the box above, to the right of the article title. The following sections describe what is going on “under the hood” of the script, and how SQL Backup provides the information to automate this task.
1) Information Gathering
To be able to install the SQL Backup server components successfully, we first need to check that the machine meets the necessary criteria, namely that it is running SQL Server 2000 or 2005 in a non-clustered environment. While SQL Backup does support clustering, installation on a cluster is beyond the scope of this script.
The script performs a couple of preliminary checks to ensure that these criteria are met:
|
1 2 3 4 5 6 7 8 9 |
-- Establish the current SQL Server major version (e.g. 8, 9, 10). SET @SqlProductVersion = CAST(SERVERPROPERTY('ProductVersion') AS NVARCHAR); SET @SqlMajorVersion = CAST(SUBSTRING(@SqlProductVersion, 1, CHARINDEX('.', @SqlProductVersion) - 1) AS INT); -- Establish the clustering status ('1' means clustered, '0' means non-clustered, NULL means unknown) SET @SqlIsClustered = CAST(SERVERPROPERTY('IsClustered') AS VARCHAR(1)); IF @SqlMajorVersion >= 8 AND @SqlMajorVersion <=9 AND (@SqlIsClustered = '0') BEGIN |
We also gather the server and instance names, for the purpose of reporting and installation:
|
1 2 3 4 5 6 7 8 |
SET @MachineName = CAST(SERVERPROPERTY('MachineName') AS VARCHAR(128)); IF @MachineName IS NULL SET @MachineName = ''; SET @InstanceName = CAST(SERVERPROPERTY('InstanceName') AS VARCHAR(128)); IF @InstanceName IS NULL SET @InstanceName = ''; SET @CombinedName = CAST(SERVERPROPERTY('ServerName') AS VARCHAR(128)); IF @CombinedName IS NULL SET @CombinedName = ''; |
2) Gathering Existing Server Component Status
Once it has been established that the installation is allowed, the script gathers some benchmark information, by which it can ensure that the install or upgrade was successful.
The following three commands use the utility function ‘sqbutility’ to extract version information for xp_sqlbackup.dll (the extended stored procedure) and SQBCoreService.exe (the SQL Backup Agent Service), as well as the current license type and key.
These are inserted into a temporary table called #SqbOutput in order to eliminate the result grid that would otherwise be returned to the caller (and would then clutter up the SQL Multi Script output).
|
1 2 3 4 5 6 7 8 9 10 11 |
INSERT #SqbOutput EXECUTE master..sqbutility 30, @OldDllVersion OUTPUT; INSERT #SqbOutput EXECUTE master..sqbutility 1030, @OldExeVersion OUTPUT; INSERT #SqbOutput EXECUTE master..sqbutility 1021, @OldLicenseVersionId OUTPUT, NULL, @SerialNumber OUTPUT; The @OldLicenseVersionId doesn't have any meaning as-is so, using a CASE statement, this is converted into a human readable form: SELECT @OldLicenseVersionText = CASE WHEN @OldLicenseVersionId = '0' THEN 'Trial: Expired' WHEN @OldLicenseVersionId = '1' THEN 'Trial' WHEN @OldLicenseVersionId = '2' THEN 'Standard' WHEN @OldLicenseVersionId = '3' THEN 'Professional' WHEN @OldLicenseVersionId = '6' THEN 'Lite' END |
3) Application Installation
The next part of the script attempts the actual installation. To do this we need to use the xp_cmdshell extended stored procedure, which must explicitly be turned on in SQL Server 2005 or later.
Once this has been done, we can perform a check to see if the installer file exists; if it doesn’t then it will be impossible to proceed. This check is performed using the shell syntax “IF EXIST <file> <command>”.
|
1 2 |
SET @SqbFileExistsExec = 'if exist ' + @DownloadDirectory + '\SqbServerSetup.exe time'; INSERT #SqbOutput EXECUTE master..xp_cmdshell @SqbFileExistsExec; |
We return the value of ‘time’ as a single line output, rather than using ‘echo’ which returns a newline character (and hence two lines of output).
The installation needs to be performed silently, using the /VERYSILENT and /SUPPRESSMSGBOXES flags discussed below. We can supply other flags to configure the installer as necessary:
|
Flag |
Action |
|
/VERYSILENT |
Performs a silent installation |
|
/SUPPRESSMSGBOXES |
Suppresses any message boxes; used in conjunction with /VERYSILENT |
|
/I <instance> |
Install to a named instance (not required for the default instance) |
|
/SVCUSER <username> /SVCPW <password> |
The username and password used by the SQL Backup Agent Service. This account must be valid for the service to be able to start up. |
|
/SQLUSER <username> /SQLPW <password> |
The SQL Authenticated username and password used by the SQL Backup Agent Service to connect to SQL Server. This account must be valid for the service to connect to the SQL Server instance. |
|
/CLUSTERINSTALL /CLUSTERUSER <username> /CLUSTERPW <password> |
Perform a clustered install, with the specified username and password for the cluster administrator (required). |
|
/EXITCODEFILE <file> |
The installation status – 0 denotes success, non-zero denotes a problem has occurred (discussed in more detail later). |
We add any optional flags, such as the service parameters (/SVCUSER and /SVCPW), the SQL Authentication parameters (/SQLUSER and /SQLPW) and the instance name (/I). This is then passed to xp_cmdshell for execution.
4) Status Processing
Once the installation has completed, we need to establish whether or not it was successful. This is achieved using the /EXITCODEFILE flag, described above, which generates a text file in the shared directory. A second xp_cmdshell invocation uses the ‘type’ shell syntax to get the contents of this file – which contains the exit code from the installer:
|
1 2 |
SET @TypeExitCodeFileExec = 'type ' + @DownloadDirectory + '\exitcode_' + @MachineName + '_' + @InstanceName + '.txt'; INSERT #SqbOutput EXECUTE master..xp_cmdshell @TypeExitCodeFileExec; |
If a value of 5 has been returned, this indicates that another installer was running. It makes sense to retry this, so the script waits 10 seconds before doing so.
Otherwise, the error code is parsed and turned into a readable format. A substantial section of the script is responsible for converting the exit code. Values less than 8912 denote pre-installation issues:
|
Value |
Installation Status |
|
0 |
Successful |
|
5 |
Another Installation is currently running, try again later |
|
6000 |
Current user has insufficient permissions to modify Windows Services |
|
6010 |
Windows 2003 Itanium Edition requires SP1 to be installed first |
|
6020 |
Service account username could not be validated |
|
6030 |
Service account username was ambiguous, fully qualify it |
|
6040 |
Service account password is invalid |
|
6100 |
Current user is denied “Log On As A Service” rights |
|
6110 |
Unable to grant “Log On As A Service” rights |
|
6200 |
SQL Authenticated Username or Password is incorrect |
|
6210 |
SQL Authenticated Account is not a member of the sysadmin role |
Values of 8192 or above are combined to denote post-installation issues:
|
Value |
Installation Status |
|
8192 |
The SQL Backup Agent service executable was not installed |
|
16384 |
The version of the SQL Backup Agent service is incorrect |
|
32768 |
The SQL Backup Agent service could not be registered correctly |
|
65536 |
The SQL Backup Agent service was unable to start within 1 minute |
|
131072 |
The file xp_sqlbackup.dll was not installed correctly |
|
262144 |
The version of xp_sqlbackup.dll is incorrect |
For example, a value of 139,264 would mean that the SQL Backup Agent service executable was not installed (8192) and the xp_sqlbackup.dll file was not installed (131,072).
5) Gathering New Server Component Status
The fifth section of the script performs exactly the same function as the second section of the script – gathering the server components status. If the install was successful these should reflect the new version that has been installed. If unsuccessful these will likely match the old version information.
6) Clean-up and Returning the results
The final step of the script is to clean up – the xp_cmdshell functionality is reverted back to its previous state (which should be off), the temporary table is deleted and the results are returned. In the case of an install or upgrade attempt we return the ‘before’ and ‘after’ scenarios, as well as the licensing details:
|
1 2 3 4 |
SELECT @CombinedName AS SqlServerName, @OldDllVersion AS PreviousVersion, @OldLicenseVersionText AS PreviousLicense, @NewDllVersion AS NewVersion, @NewLicenseVersionText AS NewLicense, @SerialNumber AS SerialNumber, @SqbExecutionResultText AS InstallStatus; |
If no install or upgrade was attempted, we return the current status and licensing details:
|
1 2 |
SELECT @CombinedName AS SqlServerName, @OldDllVersion AS CurrentVersion, @OldLicenseVersionText AS CurrentLicense, @SerialNumber AS SerialNumber; |
When you run this script using SQL Multi Script, as described in the second half of this article, it takes each row from each instance, and combines them into the final list that is displayed in the client.
Executing the script using SQL Multi Script
Before you can run the script, a few pieces of information first need to be established:
- The availability of a read-writeable network location, with a copy of the SQL Backup server components installer (SQBServerSetup.exe).
- The details of the windows account the SQL Backup Agent Service will run as (either the LocalSystem account, or a named user).
- The authentication used by the SQL Backup Agent Service to connect to the SQL Server (either Windows Authentication or a specified SQL Authenticated user).
- Which SQL Server instances the components will be installed on with the above account details (if different servers require different accounts, the script can be run again).
When opening the script in SQL Multi Script, something similar to the following will be displayed:
Image: Screenshot of Script
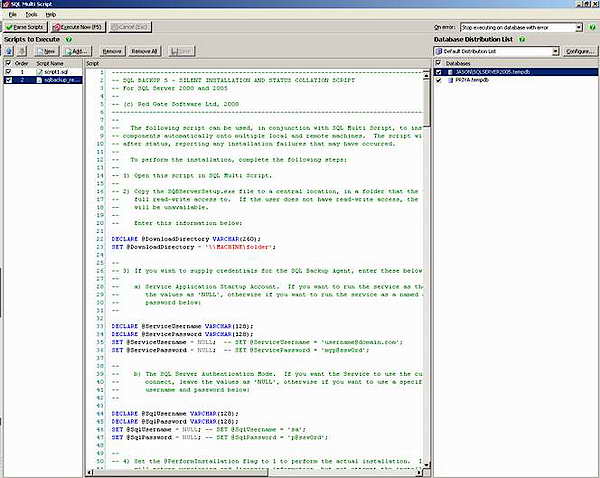
The first step is to add the above information into the script, so that it has enough information to run successfully:
- The @DownloadDirectory value describes which folder the SQBServerSetup.exe file exists in, and which folder the installer can write its results to (which are parsed by the script). If the file is not in this folder, or the installer cannot write to this folder, the script will return an error.
- The @ServiceUsername and @ServicePassword values describe the windows account that will be used by the SQL Backup Agent Service.
- If these are left as NULL values, the LocalSystem account will be used.
- The @SqlUsername and @SqlPassword values describe the SQL Authenticated account that will be used by the SQL Backup Agent Service to connect to the SQL Server instance.
- If these are left as NULL values, Windows Authentication will be used.
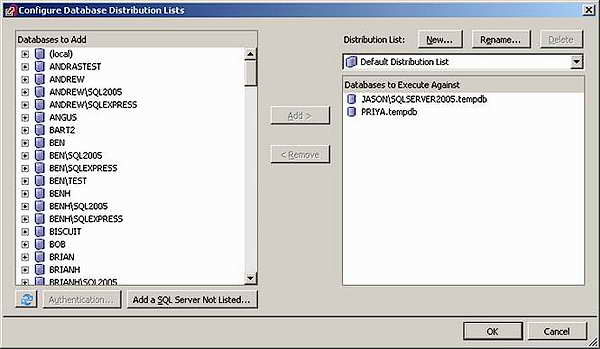
Once the script has been configured, the next step is to select which servers to run the script against (that is, install the SQL Backup server components on).
This can be done using the ‘Database Distribution List’, on the right hand side of the SQL Multi Script UI – either by selecting an existing distribution list and checking or unchecking servers, or by clicking the “Configure” button and selecting the server from the list shown in the dialog box. When prompted for a database, select the tempdb database.
Image: Screenshot of Dialog Servers
Once you are happy with the configuration, in the script scroll down to the value called @PerformInstallation (listed under “step 5” of the comments). The value of this parameter defaults to 0 as a safety catch to prevent accidental installations; by setting it to 1 and running the script, you will perform the installation.
Finally, click “Execute Now” (or press F5) and the installation will take place.
Once the installations have completed (which should take less than a couple of minutes), the results pane will appear with a number of columns (including the ‘Server Name’ and ‘Database Name’ columns, if included by SQL Multi Script). SQL Multi Script returns one row per instance on which the script was executed:
Image: Screenshot of Results
![]()
- SqlServerName – the full name of the SQL Server instance
- PreviousVersion – the previous version or build number of the SQL Backup server components, for example ‘5.3.0.178’. If the components were not installed, this will return a ‘Not Installed’ value.
- PreviousLicense – the license status of the previously installed version, such as a ‘Professional’, ‘Lite’ or ‘Trial’ license.
- NewVersion – the updated version or build number of the SQL Backup server components.
- NewLicense – the license status of the newly installed version. If upgrading from SQL Backup 4 to 5, this may appear as ‘Trial’ even though a valid license exists. To resolve this, re-active the server using either the SQL Backup User Interface, or through the ProductActivation.exe application.
- SerialNumber – the serial number for SQL Backup recorded on the machine.
- InstallStatus – information about the installation. If this was unsuccessful for any reason (for example, the account credentials were incorrect) then this information will be displayed.
If a problem does arise, the script can be re-run with any corrections – just check the relevant servers in the ‘Database Distribution List’ and execute the script again.
And that should be it… all the server components should be installed or upgraded to the latest version of SQL Backup, and the summary should indicate the current state of your SQL Backup server components on the network.
Collating Licensing and Versioning Information
An added bonus to this script is that it collates the licensing and versioning information that is discussed in Brad McGehee’s article ‘Using SQL Multi Script to identify SQL Backup versions‘. Running the script with the @PerformInstallation value set to 0 will display the current information for each installation of the SQL Backup server components – the current version or build number, the license type, and the serial number used.
Image: Screenshot of Results (2)

Summary
The resources and techniques demonstrated here can be used to maintain and upgrade your SQL Backup installations, and keep track of licensing and versioning activity across your network. Rather than spending hours manually installing and checking the components, this method provides a quick way to do the same task.
We would also appreciate your thoughts and feedback on the script; you can post any comments here
Load comments