
You’ve Been Doing Source Control Wrong… and How to Fix It
Introduction
I will explain the rather incendiary heading at the start of this article in just a moment, but first….
It might, at first, seem strange to want to put your database in source control. Why on earth would you want your database in source control? How is it possible to put gigabytes or more in source control? How does it mesh with your codebase?
As to the first question, databases should be in source control for many of the same reasons as application code:
- Protect production systems from uncontrolled changes.
Ensures that the code that you have tested is exactly what gets deployed; eliminating manual steps eliminates room for inadvertent deployment errors. - Track changes.
All code and script changes are itemized and documented (with commit messages) allowing for easier bug diagnosis, rollbacks, and code reviews. Furthermore, you can see how individual objects evolve over time and why, as well as identify who made changes. - Support team work.
Ensures that each developer is always working on the latest code (scripts). - Manage code complexity.
Branches allow parallel development on different features and bug fixes. - Facilitate testing.
Easier to release code for testing in a continuous integration environment where code and database elements must be coordinated. - Make it easy to undo changes.
Whether you just made a change and realized it was wrong, or found a bug from some time back and need to undo a change, revision history allows you to go back to earlier versions quickly and easily. - Provide a safe sandboxing environment.
To test out a change, you can work on a branch so as not to affect mainline code being worked by other developers. - Enhance good programming practices.
You should review all your changes before committing; you can formulate a more accurate summary for the commit message as well as make sure typos or other stray artifacts did not sneak into your code inadvertently.
Beyond my own experiences, this summary is synthesized from Simple-Talk’s Database Source Control- The Crib Sheet, and BetterExplained’s A Visual Guide to Version Control.
As to how to put a database in source control: you are not storing the data contained in the database only the structure of the data, the schema that describes the tables, triggers, views, etc. Your data does not belong in source control just as, for example, certain files in Visual Studio that store your personal preferences do not belong in source control. In the latter case, those settings belong exclusively to you. In the database case, it is irrelevant to the current version of your software whether you have 1000 records or 1001 records in your customer table. That said, there is a useful exception to consider: static (or lookup or reference) data, i.e. data that is non-transactional that your application depends on. A simple example of this might be a table of US area codes, which went through a major “rewrite” a few years ago but before that they were probably invariant for fifty years or more. So it might be useful to have the data in this lookup table under source control because your code might actually be hard-coded for specific values.
Now back to what you have been doing wrong.
|
Source control best practice |
Each commit should be for a single reason. |
When you decide that a database should be source-controlled, this has ramifications for the way you develop software. While there are always exceptions, the following principles of source control are worth following:
Even if you are working on several bug fixes simultaneously, it is much cleaner if you separate those changes and commit each change individually, whether that change involves one file or a dozen files. If you follow this guideline you then have the ability to back out a specific bug fix should the need arise. Also, on the occasion where you need to review your history (i.e. commit log) to find something it is much easier to do this when each commit is done for a single reason.
The converse of that principle is:
|
Source control best practice |
A single reason should be committed atomically. |
That is, once you decide on the reason you are making a commit, everything connected to that reason should be included. If, for example, you are fixing Defect 134A923-123, then all the changes for it-user interface code, application code, help text, and database schema-should be committed together. This again aids clarity when reviewing history, investigating introduced defects, etc., but most importantly it supports this final, important principle:
|
Source control best practice |
A commit should never break the build. |
It follows that if you are not source controlling your database or you are not committing schema changes together with code changes you cannot help but violate this principle. And that is the justification for the first half of the title of this article, “You’ve Been Doing Source Control Wrong…” The remainder of this series addresses the second half of the title, “…and How to Fix It,” giving you the wherewithal to put in practice the source control best practices just shown.
This article is in three parts:
Part 1 goes in-depth regarding the missing link for getting started with source control from SQL Server Management Studio using SQL Source Control.
In Part 2 I’ll walk through the basic commit and update actions familiar to any source control user but described in the context of SQL Source Control. I’ll then tackle the practical steps for rolling back a database to a previous revision as well as deploying a database from source control, including the vital mechanism of migration scripts provided by SQL Compare.
Part 3 takes you from SSMS to Visual Studio, when I’ll introduce SQL Connect, the key to bringing your database into your project so that your source control plugin can handle them both. The last section of part 3 then zooms back out from the trees to look at the forest, explaining what I call the grand unified field theory for source control: connecting your database, your source control, and your project, and using them harmoniously.
To be honest, the most interesting part is that last half of part 3-how everything fits together. But you’ll appreciate that much more once you have a feel for the mechanics of all the components.
Logistics and Setup
Getting the Tools
SQL Source Control allows you to source-control your database within SQL Server Management Studio (SSMS); but to really make effective use of SQL Source Control you also need SQL Compare, which is the component that does source control rollbacks and database deployments. You’ll need SQL Connectas well if you need to connect your database to Visual Studio. Fairly soon, as a developer, it will cost you less if you purchase one of the two packaged suites from Red Gate, itemized in the table below.
|
Product |
|||
 |
SQL Compare Pro |
|
|
 |
SQL Data Compare Pro |
|
|
 |
SQL Source Control |
|
|
 |
SQL Prompt Pro |
|
|
 |
SQL Connect |
|
|
 |
SQL Test |
|
|
 |
SQL Data Generator |
|
|
 |
SQL Packager |
|
|
|
SQL Dependency Tracker |
|
|
|
 |
SQL Doc |
|
|
 |
SQL Multi Script Unlimited |
|
|
 |
SQL Backup Pro |
|
|
 |
SQL Monitor |
|
|
 |
SQL Comparison SDK |
|
|
 |
SQL Object Level Recovery Native |
|
|
 |
SQL Search |
|
|

Installing
The SQL Toolbelt installer operates similarly to the Microsoft Office installer in that it allows you to select or deselect any of the individual products and install them together. The installer displays just a few products at a time, so there are four screens of choices to walk through for SQL Toolbelt.
For all the products that require prerequisites, the installer will list the prerequisites if you do not have them already installed. For some products, where this dependency is straightforward, the installer can automatically install the prerequisite (e.g. SQL Dependency Tracker requires Visual J#). For other products, you will not be able to select them for installation until you first install the prerequisite. SQL Source Control and a few others, for example, require SQL Server Management Studio, as shown in Figure 1.
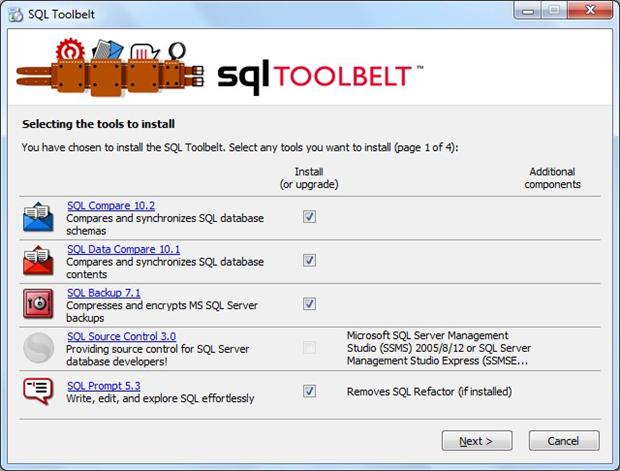
Figure 1: The Red Gate installer handles simple dependencies automatically; ones that you need to do manually are clearly indicated, such as SQL Source Control’s dependency on SQL Server Management Studio.
Updating
Once you have installed SQL Source Control, you can manually check for product updates via the help menu, as with most programs; the system presents the dialog shown in Figure 2. Here, you will also find the option to check for updates automatically, if you prefer. When an update is available you get all the information you need to decide whether the update is something you will find immediately useful or not: the version you currently have installed; the version of the update; the size of the download; and a link to what the update contains.
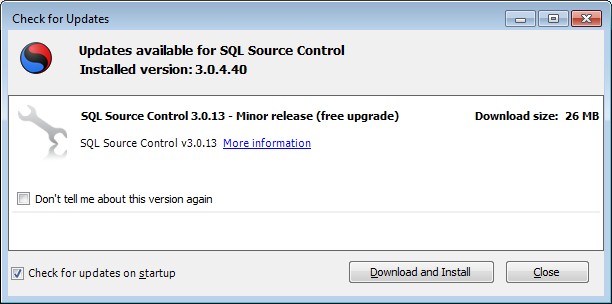
Figure 2: Update notification from SQL Source Control, letting you know what you have vs. what is now available.
As an alternative update mechanism, you might prefer to download the entire SQL Toolbelt (or SQL Developer Bundle); this allows you to update several products at the same time. The SQL Toolbelt installer is almost as informative as the in-program update check-for products that you have installed previously it tells you the version you have and the version it can update to-see Figure 3.
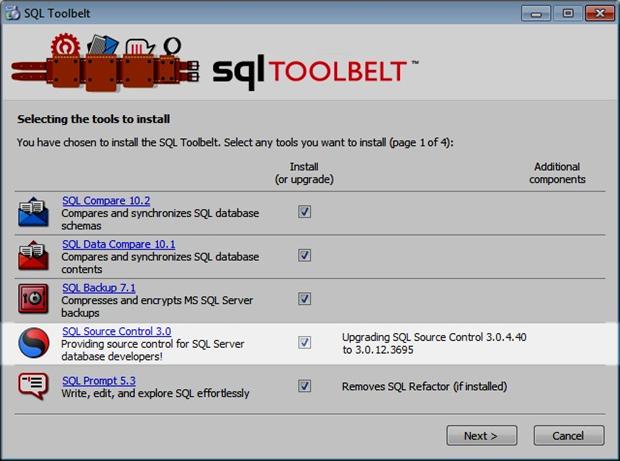
Figure 3: The installer lets you install new tools as well as updates, again letting you know what you already have installed and what the latest version is.
Getting Started
If you have used “ordinary” source control for project files, you may have used TortoiseSVN or a similar GUI client to interface to your source control repository. TortoiseSVN is not a standalone application; it integrates into Windows Explorer to provide source control support for your routine file operations. Similarly, SQL Source Control integrates into SQL Server Management Studio (SSMS) to provide source control support for your routine database operations.
You expose a portion of TortoiseSVN’s GUI by opening the context menu on one or more files or folders and selecting an operation on the TortoiseSVN sub-menu. In SSMS, on the other hand, all of the SQL Source Control functionality is clustered into a single interface that you can open in several different ways-just look for the SQL Source Control taijitu icon scattered about the SSMS interface (Figure 4).
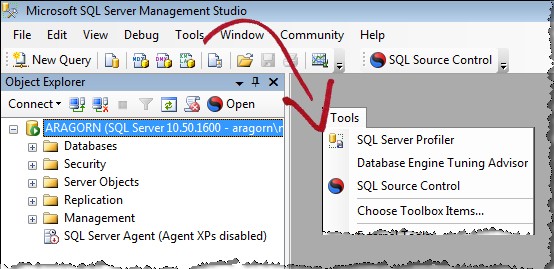
Figure 4: Look for the stylized taijitu symbol to access SQL Source: on a toolbar, in the Tools menu, or in the Object Explorer.
Opening SQL Source Control
when you activate any of these controls, SQL Source Control opens a single new tab in SSMS alongside any other tabs you may have open for queries, table designers, etc. This single tab, however, contains four sub-tabs (Figure 5).
- Commit Changes: equivalent to TortoiseSVN’s SVN Commit… command, this takes your local changes and publishes them to the source control repository.
- Get Latest: equivalent to TortoiseSVN’s SVN Update command, this brings down any published changes into your working copy.
- Migrations: Unique to SQL Source Control, this provides a mechanism to avoid data loss during deployment and to avoid manually making configuration changes with each deployment.
- Setup: This manages the connection between your database and your source control repository.
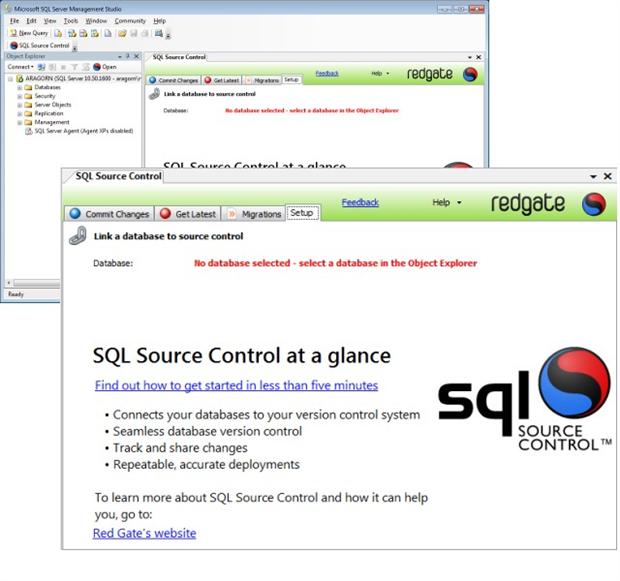
Figure 5: SQL Source Control opens as a normal tab in SQL Server Management Studio (background). Its tab contains 4 sub-tabs (foreground). The Setup tab comes to the fore upon opening; with nothing selected in the object explorer its contents provide basic explanatory material.
Typically, the Setup tab opens automatically the first time that you use SQL Source Control because you must first specify a connection to source control before you can use it. Figure 5 shows the panel when you have nothing selected in the object explorer. It changes to Figure 6 once you select a database that you have not yet connected to source control, giving you the ability to establish the connection, and explaining the two available models of database use. This latter point is especially useful, providing the flexibility for you to work the way you prefer. You might be adamant about all developers sharing the same database or just as adamant about each one using a private copy of the database. A simple selection lets you pick the model that is right for you.
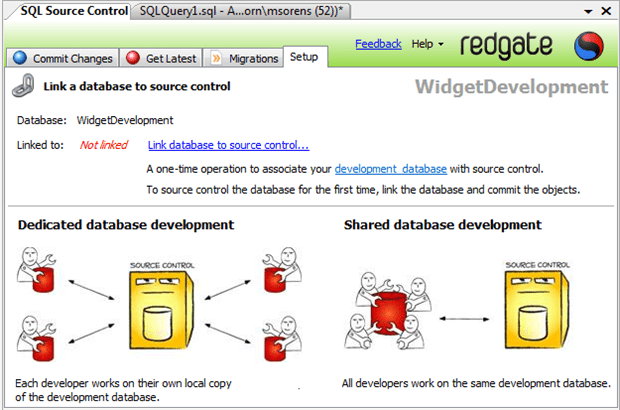
Figure 6: Once you select a database not connected to source control, SQL Source Control provides a link to establish a connection (top) and explains the two data models from which you will need to select (bottom).
The third and final variation of the Setup sub-tab (Figure 7) shows what you get when you select a connected database in the object explorer.
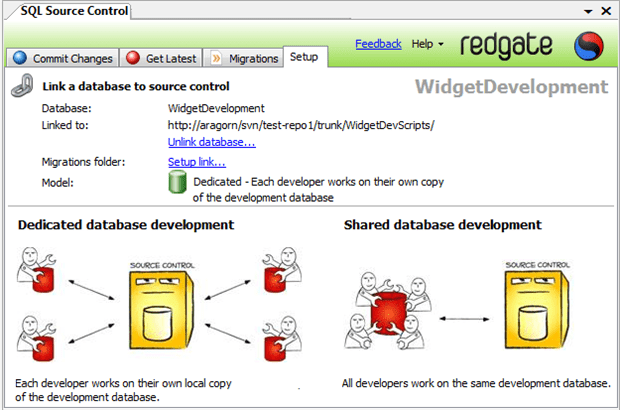
Figure 7: When you select a connected database, SQL Source Control displays the details of that connection (top). Because it is so crucial, it retains the description of the two available data models (bottom).
Getting Help
Before continuing with using SQL Source Control, this section provides a brief interlude on your help options, available from the pull-down menu at the upper right (Figure 8)
- Help Contents: This takes you to the Getting Started section on the Red Gate website for published material.
- Support Forum: This opens the SQL Source Control forum where you may browse existing questions or ask your own.
- Feedback: Unique to Red Gate products, the Feedback forum has some overlap with the support forum above in that you can ask questions, but the main focus of the feedback page is to tabulate customer interest in proposed features.
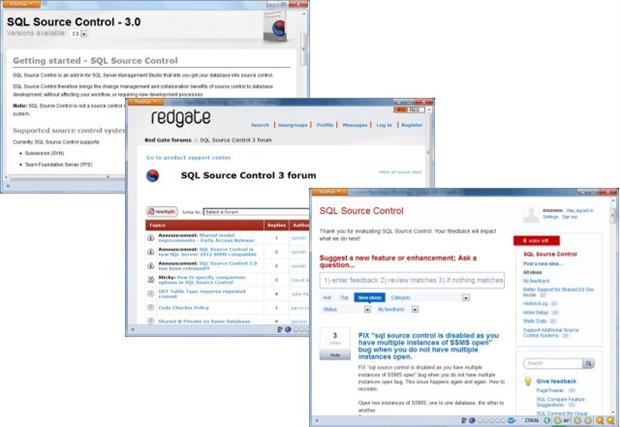
Figure 8: Available choices from the help menu of SQL Source Control.
Linking a Database to Source Control
To link a database to source control, select the link shown in Figure 6 on the Setup tab. This opens the linking dialog shown in Figure 9, allowing you to select your source control system and specify its parameters, and to select your database model. SQL Source Control explicitly provides support for Subversion, Team Foundation Server, and Vault, but it can also connect to other source control systems as indicated under the More choice: Git, Mercurial, Perforce, and, in fact, any source control system that has a command line interface.
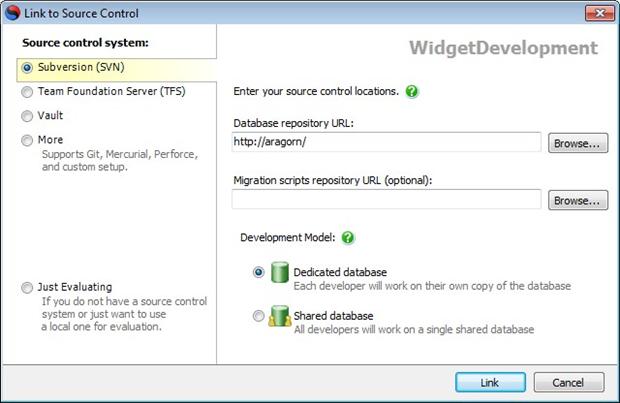
Figure 9: Select your source control system then enter appropriate parameters to link your database to it; here Subversion is selected, which requires just a database repository address.
Note that, for Subversion, the URL must point to the actual Subversion repository, not just the server upon which it resides, even though that is the default value for the field. If you just select Browse with the default, that invalid repository address yields an error (Figure 10).
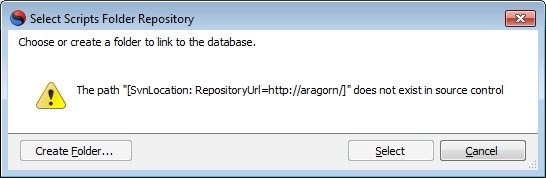
Figure 10: For Subversion the repository URL must really specify the repository, not just the server upon which it resides.
Once you supply a URL that correctly points into your Subversion repository (in my example, http://aragorn/svn/test-repo1), selecting Browse then opens a dialog to allow you to select a specific node in your repository source tree (Figure 11, background).
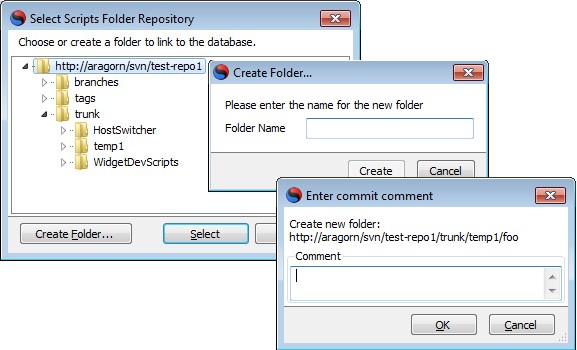
Figure 11: Select an existing folder or opt to add a new folder for maintaining your database objects in source control.
Typically you will want to drill down under the trunk node to an appropriate location. Unless you have already done so in advance, you should then create a dedicated subfolder for the database so use the Create Folder… button to open the create folder dialog (mid-ground), specify a folder name, and select Create. That opens just one final dialog (foreground) asking for a commit comment. You are actually operating in repository-space rather than filesystem space here (equivalent to operating in TortoiseSVN’s repo-browser). That is, the folder being created is in the repository itself. Every action in the repository creates a new revision, and every revision should have an associated comment so that when you or another member of your team later review the commit log you can have some idea as to why each and every change was committed to the repository.
The other choices in Figure 9 follow analogous steps to associate your source control system of choice with your database. The team at Red Gate realized that this is a big step that you might approach warily at first. They therefore offer one more choice in Figure 9 to let you “have you cake and eat it too”. If you select Just Evaluating, you can try out SQL Source Control by connecting your database to an isolated, sandbox source control system (Figure 12). As the figure shows, this choice is useful if either you do not yet have a source control system, or you prefer not to connect to it until you have made the decision to go ahead with SQL Source Control after you have evaluated it.
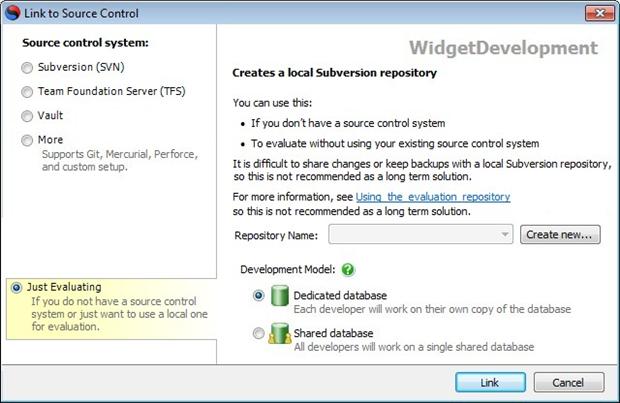
Figure 12 You can leave your source control system untouched unless and until you decide to go ahead with SQL Source Control with the handy evaluation option in the link setup dialog.
Examining Your New World
Once you have connected your database to your source control system, your world within SSMS will change subtlely. If you look at the object explorer in SSMS, you now have icon overlays indicating objects that have changed with respect to the source control repository (Figure 13).
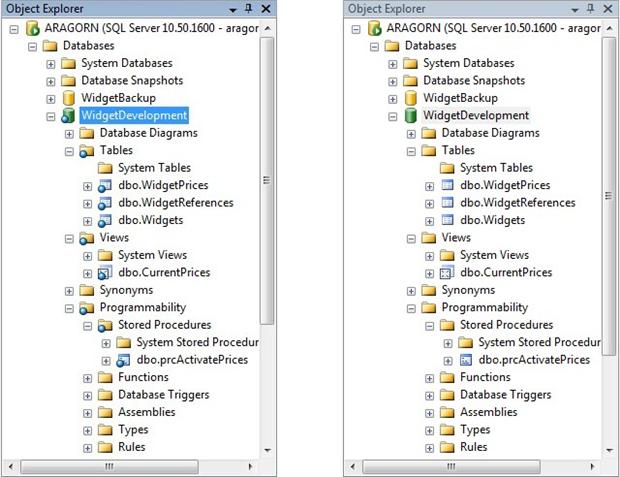
Figure 13 The object explorer in SSMS shows a change marker on each object (left) upon initial linkage, indicating they need to be committed to the source control repository. After commit, the change markers vanish (right).
At this initial stage, every object in the database shows a change indicator because you have linked the database but have not yet committed anything to it.
Note that the change indicators are likely different from those you see from your other source control clients, e.g. TortoiseSVN. SQL Source Control supports many flavors of source control systems and for simplicity they chose to use a single set of icons independent of the source control system you are using.
Once you have linked your database to source control and committed it, you now also have access to your source-controlled database directly from your file system. Figure 14 illustrates using TortoiseSVN to checkout your database just as you would any other source code. Open the context menu on an empty folder (top pane) and select Checkout. In the Checkout dialog, specify the folder within the repository where you stored your database from SSMS (middle pane). Proceed with the checkout and you will see all the objects in your database in script form (bottom pane). You can then, if you so choose, work on database modifications from the file system: edit a script file, commit it to the database, then within SSMS you perform the canonical Update action (called Get Latest by SQL Source Control) to realize the changes you made in source control into your actual database.
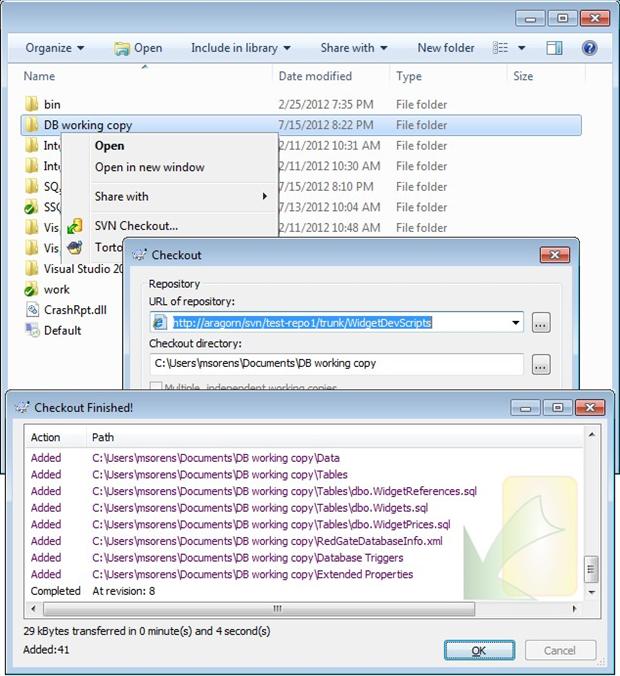
Figure 14 Once your database is in source control you can access it not just from SSMS but also from the file system. Here TortoiseSVN is used to checkout the database files; several tables are visible in the checkout log.
That concludes part 1, covering the basic logistics to let you try out SQL Source Control. In the next part, we’ll demonstrate how to do the fundamental commit and update actions in SQL Source Control and then quickly move to the practicalities of rolling back a database to a previous revision, one of the major benefits of source control taken for granted with “regular” code. We’ll also show how to deploy a database from source control, including the important use of migration scripts provided by SQL Compare.
Load comments