
The series so far:
- How to Create an Ubuntu PowerShell Development Environment – Part 1
- How to Create an Ubuntu PowerShell Development Environment – Part 2
- How to Create an Ubuntu PowerShell Development Environment – Part 3
Over the last few years, Microsoft has made great strides in making their software products available on a wider range of platforms beyond Windows. Many of their products will now run on a variety of Linux distributions (often referred to as “distros”), as well as Apple’s macOS platform. This includes their database product, SQL Server.
One way in which Microsoft achieved cross-platform compatibility is through containers. If you aren’t familiar with containers, you can think of them as a stripped-down virtual machine. Only the components necessary to run the application, in this case, SQL Server, are included. The leading tool to manage containers is called Docker. Docker is an application that will allow you to download, create, start and stop, and run containers. If you want a more detailed explanation of containers, please see the article What is a Container on Docker’s website.
Assumptions
For this article, you should understand the concepts of a container, although no experience is required. See the article from Docker referenced in the previous section if you desire more enlightenment on containers. Additionally, this article assumes you are familiar with the SQL language, as well as some basics of PowerShell. Note that throughout this article, when referencing PowerShell, it’s referring to the PowerShell Core product.
The Platform
The previous articles, How to Create an Ubuntu PowerShell Development Environment Part 1 and Part 2, walked through the steps of creating a virtual machine for Linux development and learning. That VM is the basis for this article. All the code demos in this article were created and run in that specific virtual computer. For best results, you should first follow the steps in that article to create a VM. From there, you will be in a good place to follow along with this article. However, they have been tested on other variations of Ubuntu, CentOS, as well as on macOS.
In those articles, I showed not just the creation of the virtual machine, but the steps to install PowerShell and Visual Studio Code (VSCode), tools you will need in order to complete the demos in this article should you wish to follow along.
For the demo, I am assuming you have download the demo files and opened them in Visual Studio Code within the virtual machine, and are executing individual samples by highlighting the code sample and using the F8 key, or by right-clicking on the selected text and picking run.
The Demo
The code samples in this article are part of a bigger sample I provide on my GitHub site. You’ll find the entire project here. There is a zip file included that contains everything in one easy download, or you can look through GitHub and pick and choose the files you want. GitHub also displays Markdown correctly, so you may find it easier to view the project documentation via GitHub rather than in VSCode.
This article uses two specific files, located in the Demo folder: m11-cool-things-1-docker.ps1 and m11-install-docker.sh. While this article will extract the relevant pieces and explain them, you will find it helpful to review the entire script in order to understand the overall flow of the code.
The Beginning
The first thing the PowerShell script does is use the Set-Location cmdlet to set the current location to the folder where you extracted the demo code. This location should have the Demo, Notes, and Extras folders under it.
Next, make sure Docker is installed, and if not, install it. The command to do this is rather interesting.
|
1 |
bash ./Demo/m11-install-docker.sh |
bash is very similar to PowerShell; it is both a terminal and a scripting language. It is native to many Linux distros, including the Ubuntu-based ones. This code uses PowerShell to start a bash session and then executes the bash script m11-install-docker.sh. When the script finishes executing, the bash session ends.
Take a look inside that bash script.
|
1 2 3 4 5 6 |
if [ -x "$(command -v docker)" ]; then echo "Docker is already installed" else echo "Installing Docker" sudo snap install docker fi |
The first line attempts to run a command that will complete successfully if Docker is installed. If so, it simply displays that information to the screen via the echo command.
If Docker is not installed, then the script will attempt to install Docker using the snap utility. Snap is a package manager introduced in the Ubuntu line of distros; other distros use a manager known as flat packs. On macOS, brew is the package manager of choice. This is one part of the demo you may need to alter depending on your distro. See the documentation for your specific Linux install for more details.
Of course, there are other ways to install Docker. The point of these few lines was to demonstrate how easy it is to run bash scripts from inside your PowerShell script.
Pulling Your Image
A Docker image is like an ISO. Just as you would use an ISO image to create a virtual machine, a Docker image file can be used to generate one or more containers. Docker has a vast library of images, built by itself and by many companies, such as Microsoft. These images are available to download and use in your own environments.
For this demo, you are going to pull the image for SQL Server 2017 using the following command.
|
1 |
sudo docker pull mcr.microsoft.com/mssql/server:2017-latest |
The sudo command executes the following docker program with administrative privileges. Docker, as stated earlier, is the application which manages the containers. Then you give the instruction to Docker, pull. Pull is the directive to download a container from Docker’s repositories.
The final piece is the image to pull. The first part, mcr.microsoft.com, indicates this image is stored in the Microsoft area of the Docker repositories. As you might guess, mssql indicates the subfolders containing SQL Server images, and server:2017-latest indicates the version of SQL Server to pull, 2017. The -latest indicates this should be the most currently patched version; however, it is possible to specify a specific version.
Once downloaded, it is a good idea to query your local image cache to ensure the download was successful. You can do so using this simple command.
|
1 |
sudo docker image ls |
image tells Docker you want to work with images, and ls is a simple listing command, similar to using ls to list files in the bash shell.
![]()
Running the Container
Now that the image is in place, you need to create a container to run the SQL Server. Unlike traditional SQL Server configuration, this turns out to be quite simple. The following command is used to not only create the container but run it. Note the backslash at the end of each line is the line continuation character for bash, the interpreter that will run this command (even though you’re in PowerShell). You could also choose to remove the backslashes and just type the command all on one line.
|
1 |
sudo docker run -e 'ACCEPT_EULA=Y' -e 'SA_PASSWORD=passW0rd!' -p 1433:1433 --name arcanesql -d mcr.microsoft.com/mssql/server:2017-latest |
The first part of the line starts by passing the run command into Docker, telling it to create and run a new container. In the first -e parameter you are accepting the end user license agreement. In the second -e parameter, you create the SA (system administrator) password. As you can see, I’ve used a rather simple password, you should definitely use something much more secure.
Next, we need to map a port number for the container using the -p parameter. The first port number will be used to listen on the local computer, the second port number is used in the container. SQL Server listens on port 1433 by default, so we’ll use that for both parts of the mapping.
The next parameter, --name, provides the name for the container; here I’m calling it arcanesql.
In the final parameter, -d, you need to indicate what image file should be used to generate the container. As you can see, the command is using the SQL Server image downloaded in the previous step.

You can verify the container is indeed running using the following command.
|
1 |
sudo docker container ls |
As with the other commands, the third parameter indicates what type of Docker object to work with, here containers. Like with image, the ls will produce a list of running containers.

Installing the SQL Server Module
Now that SQL Server is up and running, it’s time to start interacting with it from PowerShell Core. First, though, install the PowerShell Core SQL Server module.
|
1 |
Install-Module SqlServer |
It won’t hurt to run this if the SQL Server module is already installed. If it is PowerShell will simply provide a warning message to that effect.
If you’ve already installed it, and simply want to make sure it is up to date, you can use the cmdlet to update an already installed module.
|
1 |
Update-Module SqlServer |
Do note that normally you would not want to include these in every script you write. You would just need to ensure the computer you are running on has the SQL Server module installed, and that you update it on a regular basis, testing your scripts of course after an update. (For more about testing PowerShell code, see my three-part article on Pester, the PowerShell testing framework, beginning with Introduction to Testing Your PowerShell Code with Pester here on SimpleTalk.)
Running Your First Query
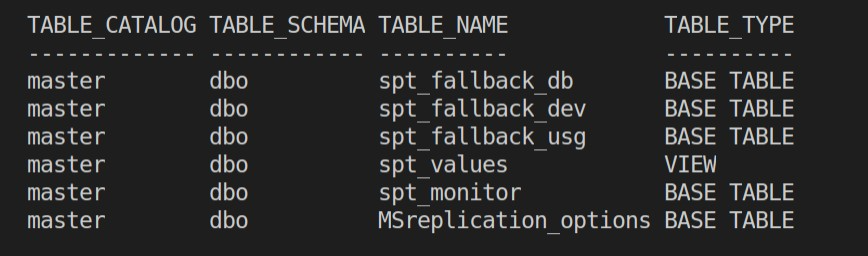
The first query will be very simple; it will return a listing of all tables in the master database so you can see how easy it is to interact with SQL Server and learn the basic set of parameters.
The basic cmdlet to work with SQL Server is Invoke-SqlCmd. It requires a set of parameters, so you’ll place those in variables for easy reference.
|
1 2 3 4 5 6 |
$serverName = 'localhost,1433' $dbName = 'master' $userName = 'sa' $pw = 'passW0rd!' $queryTimeout = 50000 $sql = 'SELECT * FROM master.INFORMATION_SCHEMA.Tables' |
For this exercise, you are running the Docker container on the same computer as your PowerShell session, so you can just use localhost for the server name. Obviously, you’ll replace this with the name of your server when working in other environments. Note that you must append the port number after the server name.
Next, you have the database name you’ll be working with, and for this example, it will be master.
The next two parameters are the username and password. In a real-world environment, you’d be setting up real usernames and passwords, but this demo will be simple and just use the SA (system administrator) account built into SQL Server. The password is the same one used when you created and ran the container using the docker run command.
Next up is the query timeout. How long do should PowerShell wait before realizing no one is answering and give up? The timeout is measured in terms of seconds.
The last parameter is the query to run. Here you are running a simple SELECT statement to list the tables in the master database.
Now that the parameters are established in variables, you are ready to call the Invoke-SqlCmd cmdlet to run the query.
|
1 2 3 4 5 6 |
Invoke-Sqlcmd -Query $sql ` -ServerInstance $serverName ` -Database $dbName ` -Username $userName ` -Password $pw ` -QueryTimeout $queryTimeout |
Here you pass in the variables to each named parameter. Note the backtick symbol at the end of each line except the last. This is the line continuation character; it allows you to spread out lengthy commands across multiple lines to make them easier to read.
In the output, you see a list of each table in the master database.
Splatting
As you can see, Invoke-SqlCmd has a fairly lengthy parameter set. It will get tiresome to have to repeat this over and over each time you call Invoke-SqlCmd, especially as the bulk of these will not change between calls.
To handle this, PowerShell includes a technique called splatting. With splatting, you create a hash table, using the names of the parameters for the hash table keys, and the values for each parameter as the hash table values.
|
1 2 3 4 5 6 |
$sqlParams = @{ "ServerInstance" = $serverName "Database" = $dbName "Username" = $userName "Password" = $pw "QueryTimeout" = $queryTimeout } |
If you look at the syntax in the previous code example, you’ll see that the key values on the left of the hash table above match the parameter names. For this example, load the values from the variables you created, but you could also have hardcoded the values.
So how do you use splatting when calling a cmdlet? Well, that’s pretty simple. In this next example, you’ll load the $sql variable with a query to create a new database named TeenyTinyDB, and then execute the Invoke-SqlCmd.
|
1 2 |
$sql = 'CREATE DATABASE TeenyTinyDB' Invoke-Sqlcmd -Query $sql @sqlParams |
Here you call Invoke-SqlCmd, then pass in the query as a named parameter. After that, you pass in the hash table variable sqlParams, but with an important distinction. To make splatting work, you use the @ symbol instead of the normal $ for a variable. When PowerShell sees the @ symbol, it knows to deconstruct the hash table and use the key/values as named parameters and their corresponding values.
There are two things to note. I could have included the $sql as another value in the hash table. It would have looked like “Query” = $sql (or the actual query as a hard-coded value). In the demo, I made them separate to demonstrate that it is possible to mix named parameters with splatting. On a personal note, I also think it makes the code cleaner if the values that change on each call are passed as named parameters and the values that remain fairly static to become part of the splat.
Second, the technique of splatting applies to all cmdlets in PowerShell, not just Invoke-SqlCmd. Feel free to implement this technique in your own projects.
When you execute the command, you don’t get anything in return. On the SQL Server, the new database was created, but because you didn’t request anything back, PowerShell simply returns to the command line.
Creating Tables
For the next task, create a table to store the names and URLs of some favorite YouTube channels. Because you’ll be working with the new TeenyTinyDB instead of master, you will need to update the Database key/value pair in the hash table.
|
1 2 |
$dbName = 'TeenyTinyDB' $sqlParams["Database"] = $dbName |
Technically I could have assigned the database name without the need for the $dbName variable. However, I often find myself using these values in other places, such as an informational message. Perhaps a Write-Debug “Populating $dbName” message in my code. Placing items like the database name in a variable makes these tasks easy.
With the database value updated, you can now craft a SQL statement to create a table then execute the command by once again using Invoke-SqlCmd.
|
1 2 3 4 5 6 7 8 9 |
$sql = @' CREATE TABLE [dbo].[FavoriteYouTubers] ( [FYTID] INT NOT NULL PRIMARY KEY , [YouTubeName] NVARCHAR(200) NOT NULL , [YouTubeURL] NVARCHAR(1000) NOT NULL ) '@ Invoke-Sqlcmd -Query $sql @sqlParams |
In this script, you take advantage of PowerShell’s here string capability to spread the create statement over multiple lines. If you are not familiar with here strings, it is the ability to assign a multi-line string to a variable. To start a here string, you declare the variable then make @ followed by a quotation mark, either single quote or double quote, the last thing on the line. Do note it has to be last; you cannot have anything after it such as a comment.
The next one or more lines are what you want the variable to contain. As you can see, here strings make it easy to paste in SQL statements of all types.
To close out a here string, simply put the closing quotation mark followed by the @ sign in the first two positions of a line. This has to be in the first two characters if you attempt to indent the here string won’t work.
With the here string setup, call Invoke-SqlCmd to create the table. As with the previous statement, it doesn’t produce any output, and it simply returns us to the command line.
Loading Data
In this example, create a variable with a SQL query to load multiple rows via an INSERT statement and execute it.
|
1 2 3 4 5 6 7 8 9 10 11 |
$sql = @' INSERT INTO [dbo].[FavoriteYouTubers] ([FYTID], [YouTubeName], [YouTubeURL]) VALUES (1, 'AnnaKatMeow', 'https://www.youtube.com/channel/UCmErtDPkJe3cjPPhOw6wPGw') , (2, 'AdultsOnlyMinecraft', 'https://www.youtube.com/user/AdultsOnlyMinecraft') , (3, 'Arcane Training and Consulting', 'https://www.youtube.com/channel/UCTH58i-Gl1bZeATOeC4f25g') , (4, 'Arcane Tube', 'https://www.youtube.com/channel/UCkR0kwYjQ_gngZ8jE3ki7xw') , (5, 'PowerShell Virtual Chapter', 'https://www.youtube.com/channel/UCFX97evt_7Akx_R9ovfiSwQ') '@ Invoke-Sqlcmd -Query $sql @sqlParams |
For simplicity, I’ve used a single statement. There are, in fact, many options you could employ. Reading data from a file in a foreach loop and inserting rows as needed, for example.
Like the previous statements, nothing is returned after the query executes, and you are returned to the command prompt.
Reading Data
People are funny. They love putting their data into databases. But then they actually expect to get it back! Pesky humans.
Fortunately, PowerShell makes it easy to return data from SQL Server. Follow the same pattern as before–set up a query and store it in a variable, then use Invoke-SqlCmd to execute it.
|
1 2 3 4 5 6 7 |
$sql = @' SELECT [FYTID] , [YouTubeName] , [YouTubeURL] FROM dbo.FavoriteYouTubers '@ Invoke-Sqlcmd -Query $sql @sqlParams |
Unlike the previous queries, this actually generates output.

Here you can see each row of data, and the values for each column. I want to be very precise about what PowerShell returns.
This is a collection of data row objects. Each data row has properties and methods. The sqlserver module converts each column into a property of the data row object.
The majority of the time, you will want to work with the data returned to PowerShell, not just display it to the screen. To do so, first assign the output of Invoke-SqlCmd to a variable.
|
1 |
$data = Invoke-Sqlcmd -Query $sql @sqlParams |
If you want to see the contents of the variable, simply run just the variable name.
|
1 |
$data |
This will display the contents of the collection variable $data, displaying each row object, and the properties for each row.

You can also iterate over the $data collection, here’s a simple example.
|
1 2 3 4 |
foreach($rowObject in $data) { "$($rowObject.YouTubeName) is a favorite YouTuber!" } |
This sample produces the following output:
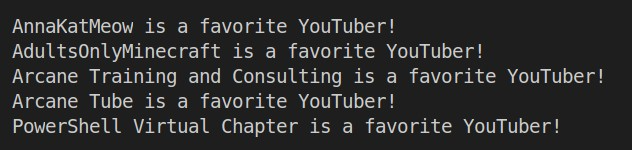
In this code, I just display a formatted text string, but you could do anything you want to with it, such as writing to an output file.
Cleanup
When I was a kid, mom always taught me to put my toys away. There are many reasons why you would want to remove containers you are no longer using. Testing is one, and you may wish to write a script to spin up a new container, load it with data, then let the testers do their thing. When done, you may wish to stop the container or delete it altogether.
Stopping and Starting Containers
For a first step, use Docker to see what containers are currently running.
|
1 |
sudo docker container ls |
The output shows that on the system only one container is running.

Take the scenario of wanting to shut down the container, but not removing it. Perhaps you want to turn it off when the testers aren’t using it to save money and resources. To do this, simply use the stop command.
After issuing a stop, you should do another listing to ensure it is, in fact, stopped. You might think you could do another container ls, but note I said it lists currently running containers. If you want to see all containers, running or not, you must use a slightly different Docker command.
|
1 2 |
sudo docker stop arcanesql sudo docker ps -a |
The stop command will stop the container with the name passed in. The ps -a command will list all containers running or not.

If you look at the STATUS column, on the very right side of the output, you’ll see the word Exited, along with how long in the past it exited. This is the indicator the container is stopped.
In this example, say it is the next morning. The testers are ready to get to work, so start the container back up.
|
1 |
sudo docker container start arcanesql |
All that is needed is to issue the start command, specifying container, and provide the name of the container to start.

As you can see, the status column now begins with Up and indicates the length of time this container has been running.
Deleting a Container
At some point, you will be done with a container. Perhaps testing is completed, or you want to recreate the container, resetting it for the next round of testing.
Removing a container is even easier than creating it. First, you’ll need to reissue the stop command, then follow it with the Docker command to remove (rm) the named container.
|
1 2 |
sudo docker stop arcanesql sudo docker rm arcanesql |
If you want to be conservative with you keystrokes, you can do this with a single command.
|
1 |
sudo docker rm --force arcanesql |
The –force switch will make Docker stop the container if it is still running, then remove it.
You can verify it is gone by running or Docker listing command.
|
1 |
sudo docker ps -a |

As you can see, nothing is returned. Of course, if you had other containers, they would be listed, but the arcanesql container would be gone.
Removing the Image
Removing the container does not remove the image the container was based on. Keeping the image can be useful for when you are ready to spin up a new container based on the image. Re-run the Docker listing command to see what images are on the system.
|
1 |
sudo docker image ls |
The output shows the image downloaded earlier in this article.

As you can see, 1.3 GB is quite a bit of space to take up. In addition, you can see that the image was created 2 months ago. Perhaps a new one has come out, and you want to update to the latest—all valid reasons for removing the image.
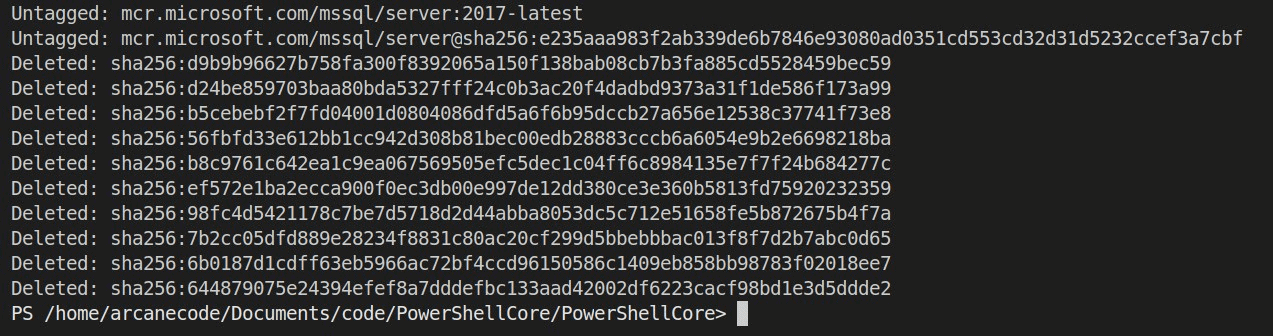
To do so, use a similar pattern as the one for the container. You’ll again use rm, but specify it is an image to remove and specify the exact name of the image.
|
1 |
sudo docker image rm mcr.microsoft.com/mssql/server:2017-latest |
When you do so, Docker will show us what it is deleting.
With that done, you can run another image listing using the image ls command to verify it is gone.

The image no longer appears. Of course, if you had other images you had downloaded, they would appear here, but the one for the latest version of SQL Server would be absent.
Conclusion
In this article, you saw how to use Docker, from within PowerShell Core, to download an image holding SQL Server 2017. You then created a container from that image.
For the next step, you installed the PowerShell SqlServer module, ran some queries to create a table and populate it with data. You then read the data back out of the database so you could work with it. Along the way, you learned the valuable concept of splatting.
Once finishing the work, you learned how to start and stop a container as well as remove it and the image on which it was based.
This article just scratched the service of what you can do when you combine Docker, SQL Server, and PowerShell Core. As you continue to learn, you’ll find even more ways to combine PowerShell Core, SQL Server and Docker.
This document contains proprietary information and is protected by copyright law.
Copyright © 2026 Red Gate Software Limited. All rights reserved
Load comments