
The series so far:
- How to Create an Ubuntu PowerShell Development Environment – Part 1
- How to Create an Ubuntu PowerShell Development Environment – Part 2
- How to Create an Ubuntu PowerShell Development Environment – Part 3
Part 1 of this series covered the need for creating a Linux development environment for testing and learning. It demonstrated how to install VirtualBox and generate an Ubuntu 19.10 virtual machine.
In this article, you’ll finish setting up your development environment by installing PowerShell, Visual Studio Code, and other tools into the Ubuntu VM.
This will create a foundation for a future article, in which you’ll see how to install Docker, then SQL Server into your VM. You’ll then see how to use PowerShell to work with SQL Server as it runs in the Docker container.
Installing PowerShell
Now you’re finally ready to install PowerShell. There are two methods for doing the install. The first is via the Ubuntu Software store. In Ubuntu, click on the big orange briefcase icon in the left-side toolbar. This will launch the Ubuntu Software store. At the top, next to the Updates button, is the search icon; it looks like a magnifying glass. Click in and enter the word PowerShell. You’ll come up with a couple of hits.
The first item, powershell, will install the most current version of PowerShell, 6.2.3 as of this writing. The powershell-preview item will install the next version of PowerShell, the version still in beta. As of this writing, that will be 7.0.0. There may be other items listed, but they aren’t relevant to this exercise.
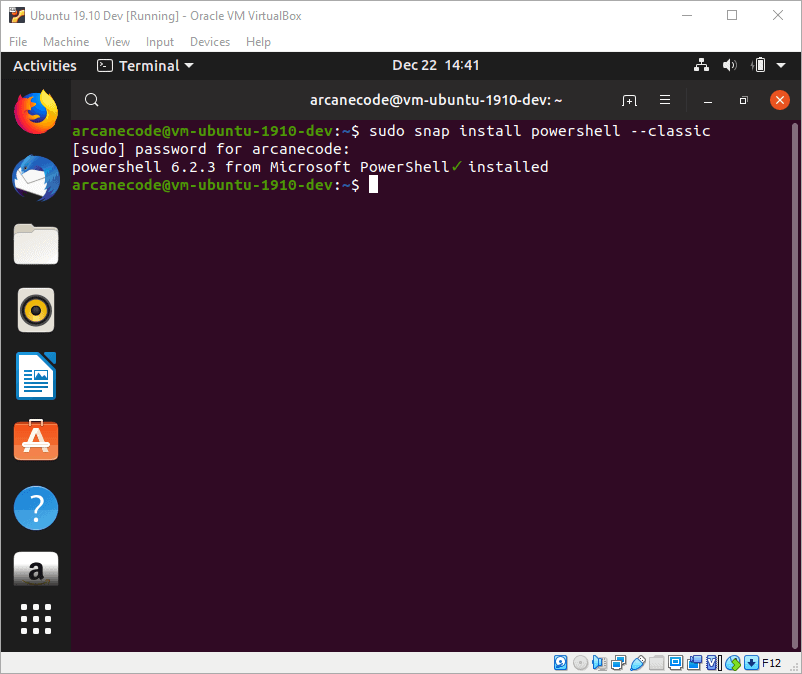
Using the software store via the GUI may seem easy, but PowerShell lovers are supposed to be command-line geeks! So, close the software store and return to the terminal. Once there enter the following command.
|
1 |
sudo snap install powershell --classic |
The basics of the snap command are straight forward. You will want to install a snap, and the name of the snap is powershell. The last part of the command, --classic, is quite important. Most snaps install with restrictions that prevent them from diving into system data or execute system-level tasks. PowerShell, however, is meant to do exactly those things. By adding --classic to the end of the snap command, you are permitting PowerShell to have access to system-level data and commands.
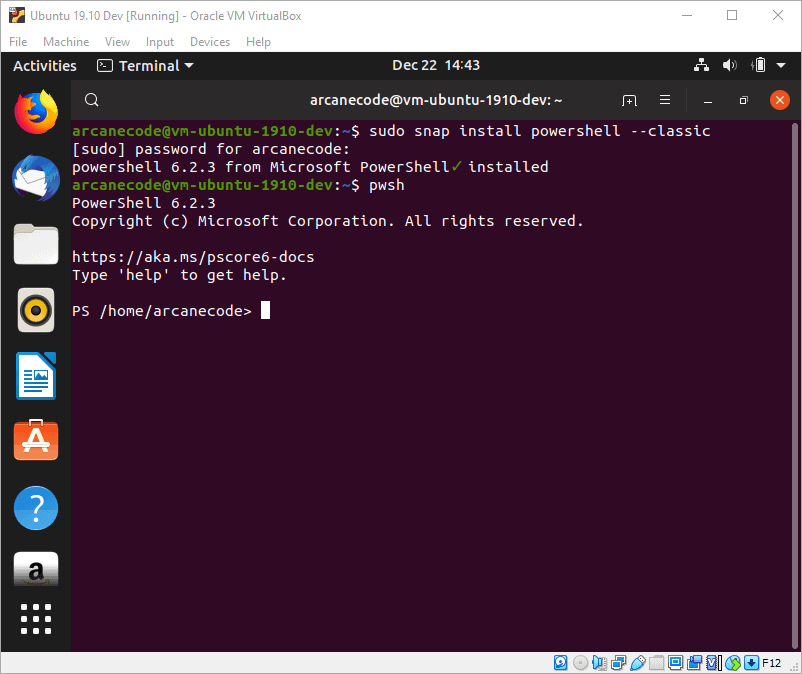
Now that it is installed, you can launch PowerShell in one of two ways. First, you can go to the Ubuntu start menu, find the PowerShell icon, and launch it.
Alternatively, from in the terminal window, you can enter pwsh and launch the PowerShell command line.
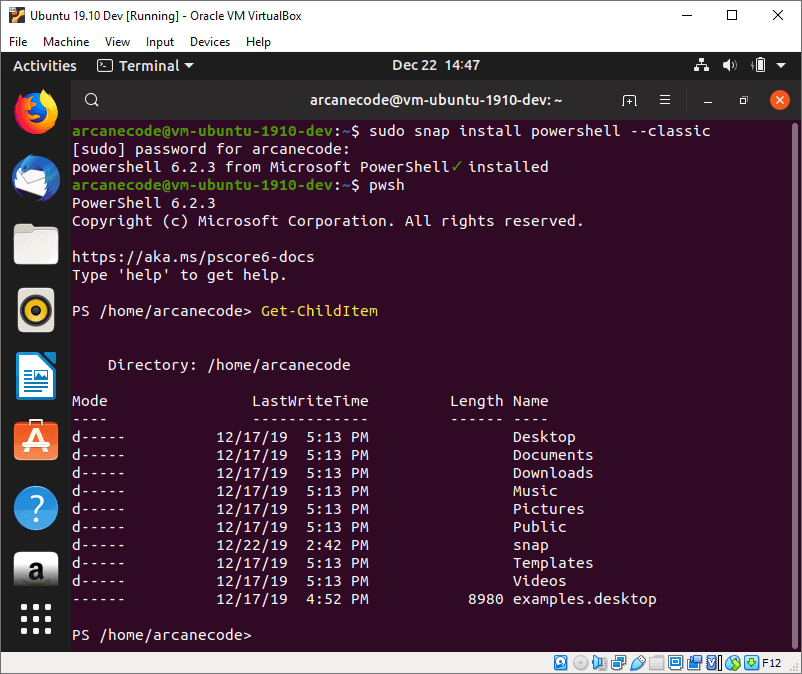
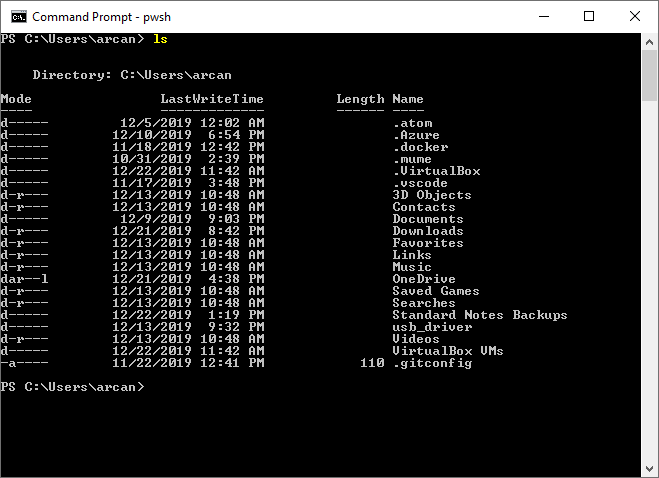
From here, you can enter the majority of PowerShell commands you’ve come to know and love. For example, enter Get-ChildItem to get a list of the files in the directory.
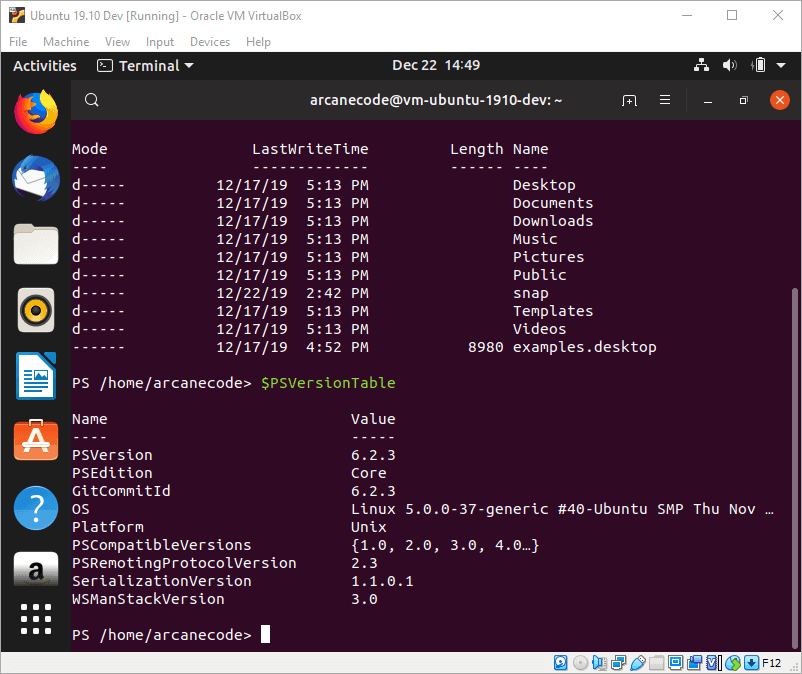
PowerShell also has its built-in $PSVersionTable variable. Simply enter $PSVersionTable on the command line and press enter to return the version number and other info for your current PowerShell session.
I would assume you are following along setting up PowerShell on an Ubuntu based distro that supports snaps. However, if you want more info and download links you can go here. This takes you to the most current production version of PowerShell as of this writing, version 6.
PowerShell Core on Linux vs PowerShell Core on Windows
I want to take a moment to divert from the instructions to mention a subtle but important difference in running PowerShell Core on Linux versus on Windows. In the Windows install of PowerShell Core, many native Linux commands are aliased.
Say you’ve installed PowerShell Core on Windows. You can open a CMD (command) window and launch PowerShell Core by entering pwsh, just like you did on Linux. Once open, if you enter the command ls, you get the same information as if you’d entered Get-ChildItem.
This is because the Windows version uses the alias abilities of PowerShell to remap most Linux commands to PowerShell cmdlets. You can see this for yourself using the Get-Alias cmdlet.
|
1 |
Get-Alias -Definition Get-ChildItem |
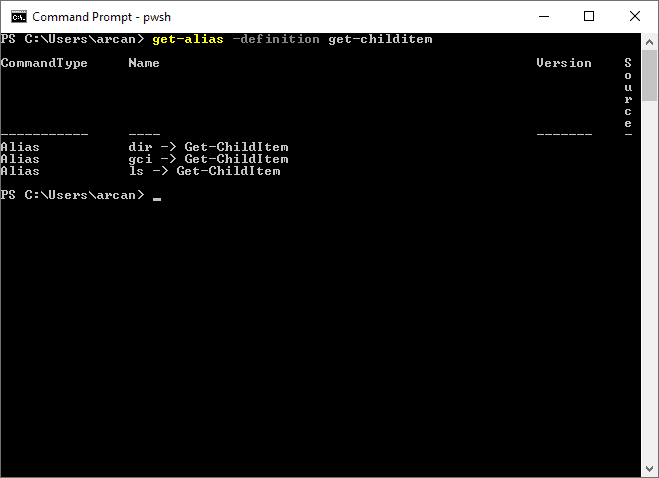
In this output, you see three different commands all map to the Get-ChildItem cmdlet, including the ls command.
Return to the terminal in the Ubuntu virtual machine. If you enter the command ls, instead of the output of Get-ChildItem, you get the standard output from ls you would expect in Linux, not the output from Get-ChildItem. Indeed, if you run the same Get-Alias -Definition Get-ChildItem cmdlet, you’ll see it is missing the mapping from ls that Windows has.
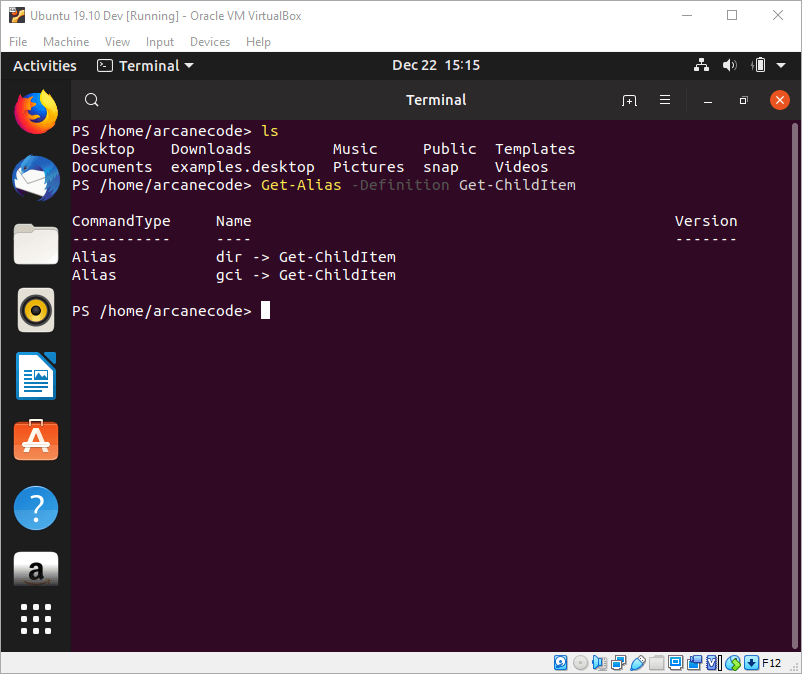
It’s important to understand and remember when you enter Linux native commands in PowerShell Core running on Windows; they are remapped to PowerShell Core cmdlets. However, when running native Linux commands in PowerShell Core on Linux, the commands are passed through to the operating system.
Installing VSCode
You now have the ability to run PowerShell. Next you want to have a good editor for developing and debugging your PowerShell scripts. While you could use even a simple editor like the previously installed VIM, the editor of choice is VSCode, also referred to as Visual Studio Code. While VSCode is available in the Ubuntu Software store, it is even easier to install via a snap.
|
1 |
sudo snap install --classic code |
Note, you may find older articles on the web stating you should install using vscode, not code. In the beginning days of VSCode, the snap was done and maintained by people in the community. At some point, Microsoft took over maintenance of the snap, and when they did, renamed it to just code to distinguish it from the older community-based snap.
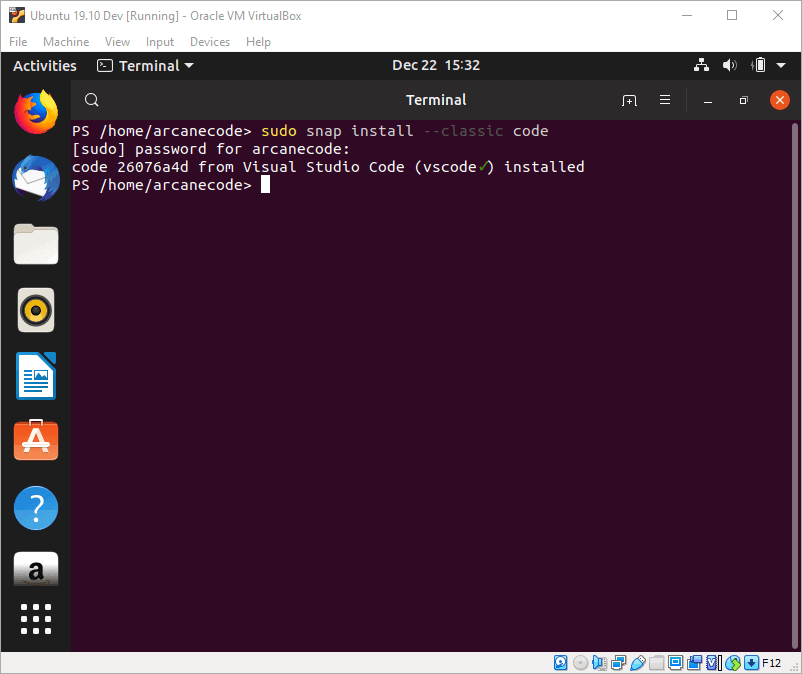
Here you can see you’ve successfully installed VSCode. You can launch it by either going to the Ubuntu start menu and launching it or simply entering code on the command line.
As long as VSCode is open, configure it with a few extensions you’ll need. VSCode gets its flexibility by using extensions. Extensions provide a variety of useful features. Most notably the ability to use various languages, including syntax highlighting, compilation, and more. Other extensions extend the capabilities of VSCode by adding new components, such as toolbars, to VSCode.
Over on the left, the lower most icon will open the extensions pane (pointed to by the big arrow), click on it to open the extensions pane.
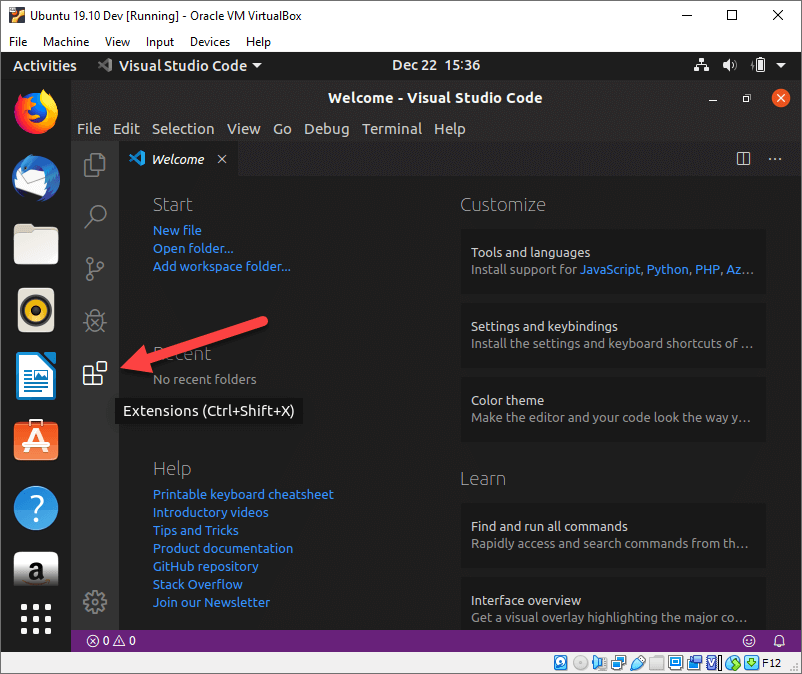
In the search pane at the top of the extensions enter powershell. When you do a list of PowerShell related extensions. The very top one is the one you need to provide syntax highlighting as well as adding a PowerShell terminal to VSCode. Click on the entry, and to the right, the details for the extension are shown. Just click on the green Install button to install the PowerShell extension. Note that you will need to have PowerShell installed already for the extension to work.
After installation, you’ll note the color scheme of VSCode has been updated.
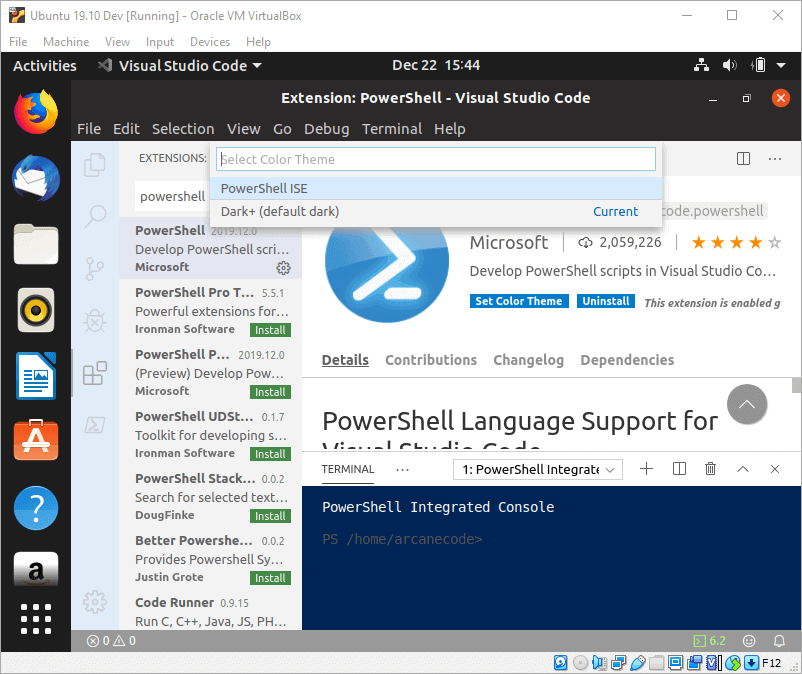
The PowerShell extension updates the colors of VSCode to look like the original PowerShell ISE from Windows. If you only use PowerShell and like the original color scheme, then you can leave it alone. I prefer the dark scheme, so if you do as well click on the Dark+ (default dark) option to return to the original color scheme.
There are a few more extensions you’ll want if you’ll be working with tools like SQL Server (which the next article covers), or bash scripts. In addition, many projects are including documentation right within their VSCode projects using markdown. Markdown provides a simple syntax for formatting your documents. It’s much simpler than using HTML but being entirely text-based is not quite as simple as Microsoft Word.
Return to the extension search box, then search for and install the following extensions:
- SQL Server (mssql)
- Bash Debug
- Markdown All in One
- Markdown Preview Enhanced
Note there are several versions of Markdown Preview Enhanced, you’ll want the one from developer Yiyi Wang.
You can confirm everything installed by clicking on the … menu to the right of the word Extensions at the top of the pane. It brings up a menu, from it, select Show Installed Extensions.
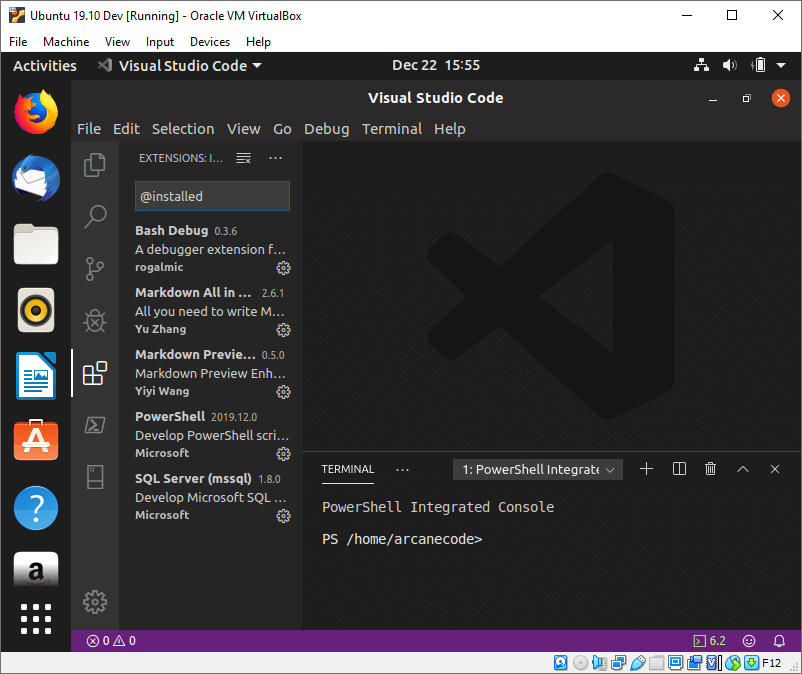
Here you can see the base set of extensions you’ll want for a PowerShell / SQL Server development box.
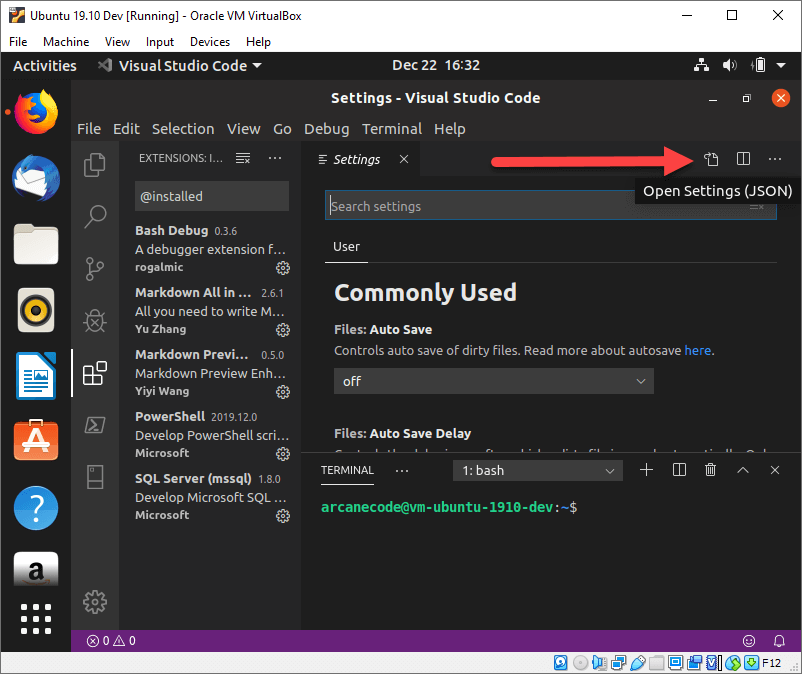
There is one last “tweak” I like to make to my VSCode installations. This is an optional step, and you may wish to alter it based on your preferences. I like to use a tab size of two characters, and always insert spaces instead of using the tab character. To make these settings the default, In the VSCode menu, select File, Preferences, then Settings.
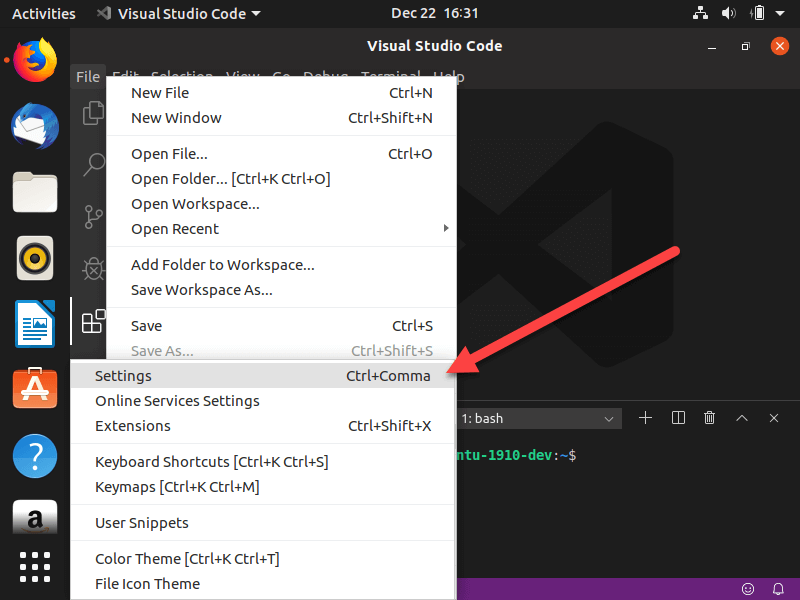
The settings will now appear in a new tab. While you could hunt through the huge list of settings and update them via the GUI, it is much faster to edit the json settings file directly. To do so, click on the Open Settings (JSON) icon in the upper right (pointed to by the big arrow).
If this is a fresh install, your settings file should just be a pair of curly braces. Insert these lines between them:
|
1 2 3 4 5 6 7 |
// The number of spaces a tab is equal to "editor.tabSize": 2, // Insert spaces when pressing tab "editor.insertSpaces": true, // When opening a file, tabsize and insert spaces will be detected //based on the file type "editor.detectIndentation": true |
When you do, your settings file should resemble the following:

Be sure to save this using the File, Save menu or using Ctrl+S. If you had other settings in the file, be sure it follows proper json syntax, and that there is a comma between each setting, excluding a comma at the end of each line.
From here, your new files will be saved with these settings. If you have an existing file you want to change over, you can use Ctrl+Shift+P to open up the command pallet then use the following command to update the file:
|
1 |
Convert Indentation to Spaces |
I want to emphasize these last few steps of updating the settings file is entirely optional. You may prefer tabs, or you may wish to set your tab size to 3, for example. This is a personal preference of mine, and I’ve included it so you can see how to update your settings file to suit your personal preferences.
This concludes the installation and configuration of VSCode. There’s one last item you will want to install, and you’ll do that in the next section.
Installing Azure Data Studio
Azure Data Studio is the open source, a multiplatform tool for interacting with SQL Server, as well as other databases. You can think of this as the new version of SQL Server Management Studio. Like VSCode and PowerShell Core, it will run on Linux, Windows, and macOS.
Unfortunately, Azure Data Studio is not yet available via a snap. You’ll have to combine a manual download with some command line work. Before you install, some pre-requisites need to be installed on Ubuntu based systems. The following command, entered at the terminal, will install the three libraries you need.
|
1 |
sudo apt-get -y install libxss1 libgconf-2-4 libunwind8 |
For clarity, the first library, libxss1, ends in the number one, not the letter L.
Next, you’ll have to open Firefox (built into Ubuntu by default, although you can pick a different web browser if you want to install one) and go here.
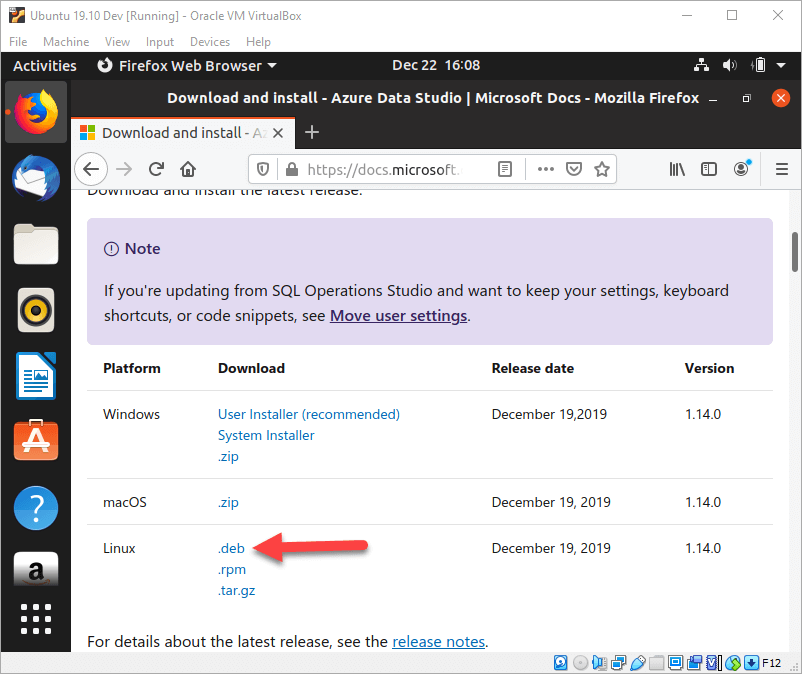
Scroll down just a little and find the .deb link. Click on the link, pick Save file, and save to your downloads directory. (Note, don’t use the default of Open with Software Install, you’ll need to do some extra things after downloading that the default software installer doesn’t handle).
Once the download is complete, return to the terminal and get a listing of the downloaded file by entering the following command:
|
1 |
ls ./Downloads |
A reminder, case is very important. The D in Downloads must be capitalized; there is no folder called downloads.
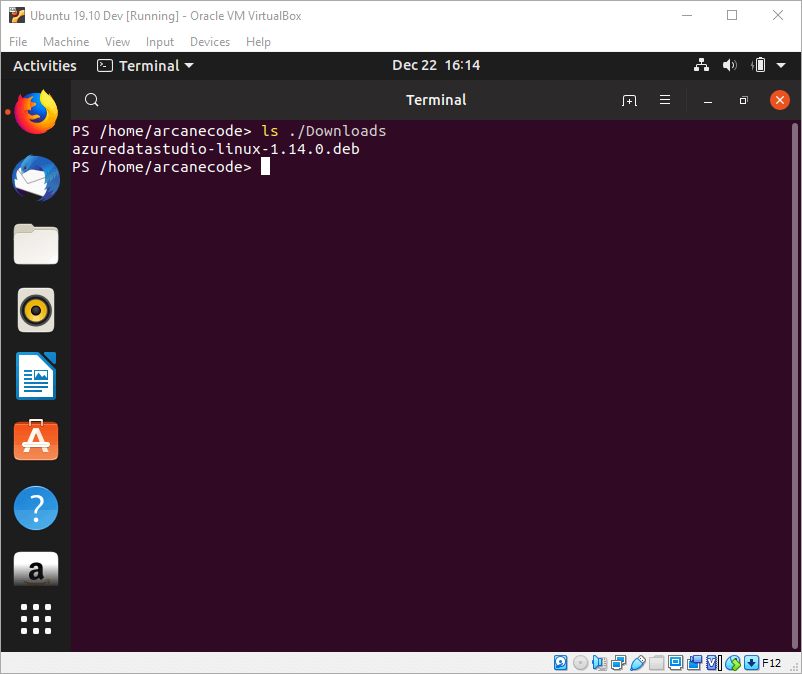
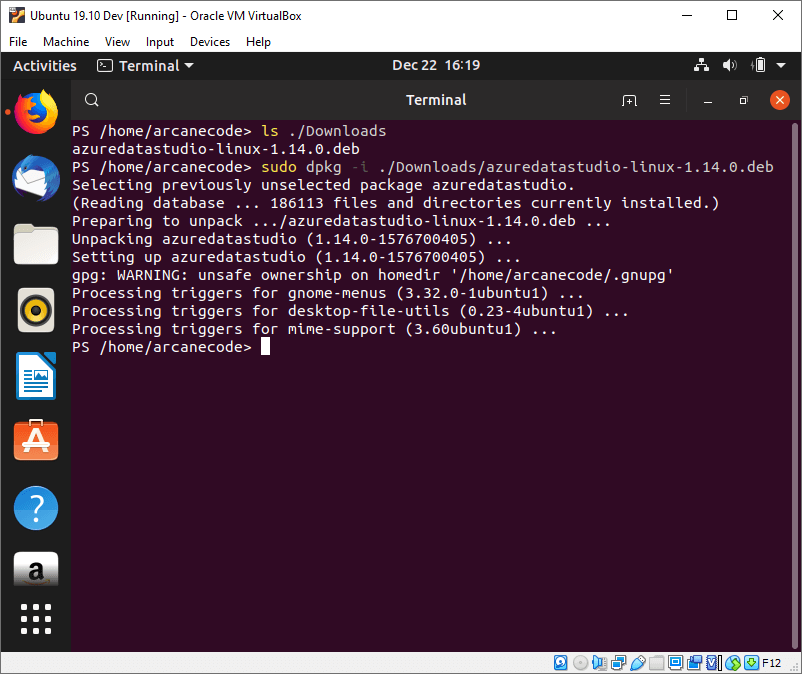
Here you can see you have one file, the .deb file you just downloaded. You can now extract the contents with the following command.
|
1 |
sudo dpkg -i ./Downloads/azuredatastudio-linux-1.14.0.deb |
Note, Azure Data Studio is being updated on a fast and regular basis, so the version number (here, 1.14.0) may not match the version you get. That’s OK, it’s why you list out the files in the download folder. Just replace the file name with the one you downloaded.
To launch it the first time, type in azuredatastudio and hit enter. Alternatively, you can go to the Ubuntu start menu and launch it from the list of applications there.
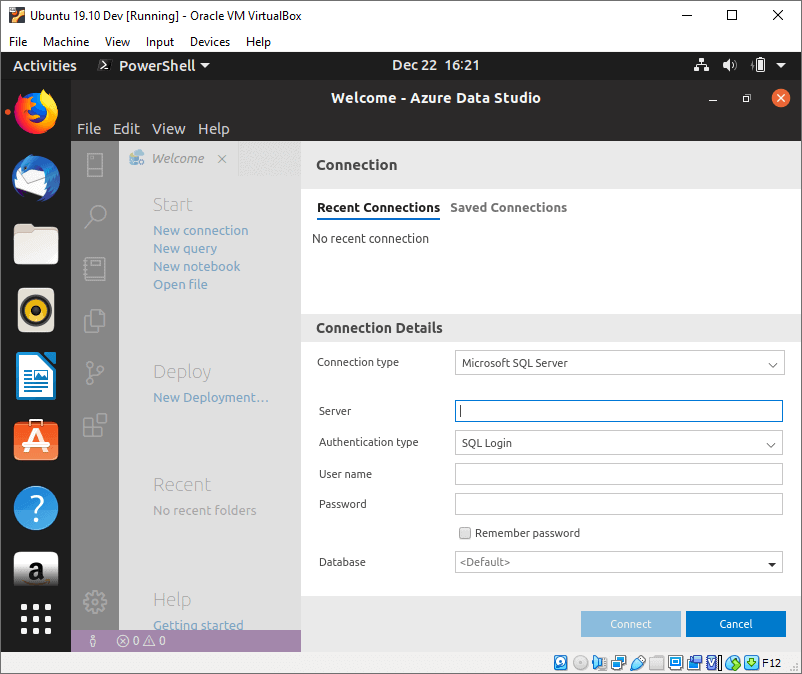
Here you can see Azure Data Studio is running and is prompting to connect to a database. For now, just hit the cancel button the exit Azure Data Studio.
Configuring Ubuntu Favorites
By default, the favorites toolbar on the left side of Ubuntu is configured for the average desktop user. Most developers like to have their development tools in the favorites for quick and easy access. Sure, you could right-click on each one in the favorites bar, pick the remove from favorites option. Then you would open up the start menu, and for each application you want, right-click and choose the add to favorites menu item. But there’s a much faster, quicker way to go about this.
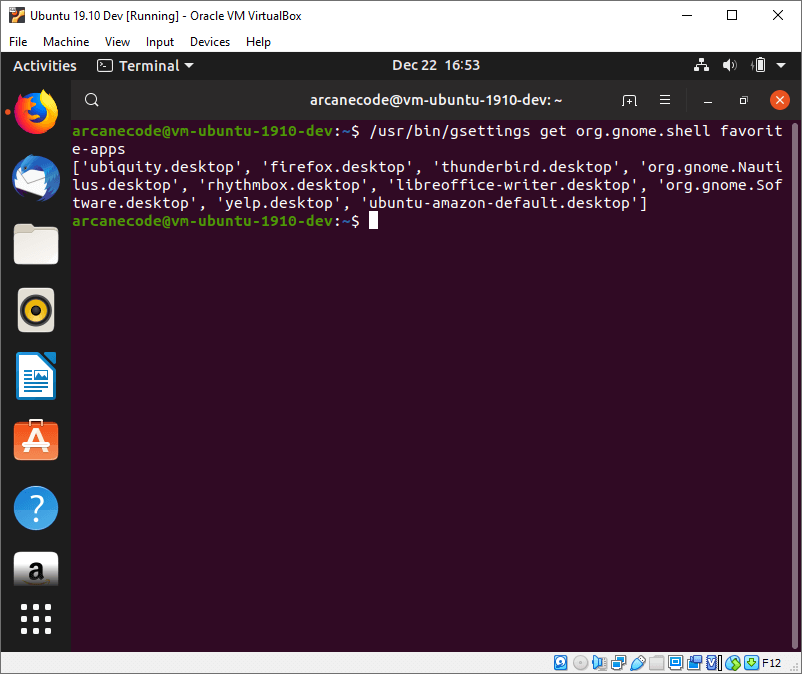
To customize it, you first have to understand where the favorites are stored. Open up a terminal, and enter the following command:
|
1 |
/usr/bin/gsettings get org.gnome.shell favorite-apps |
The command returns to you an array of applications, listed in the order they appear in the favorites bar.
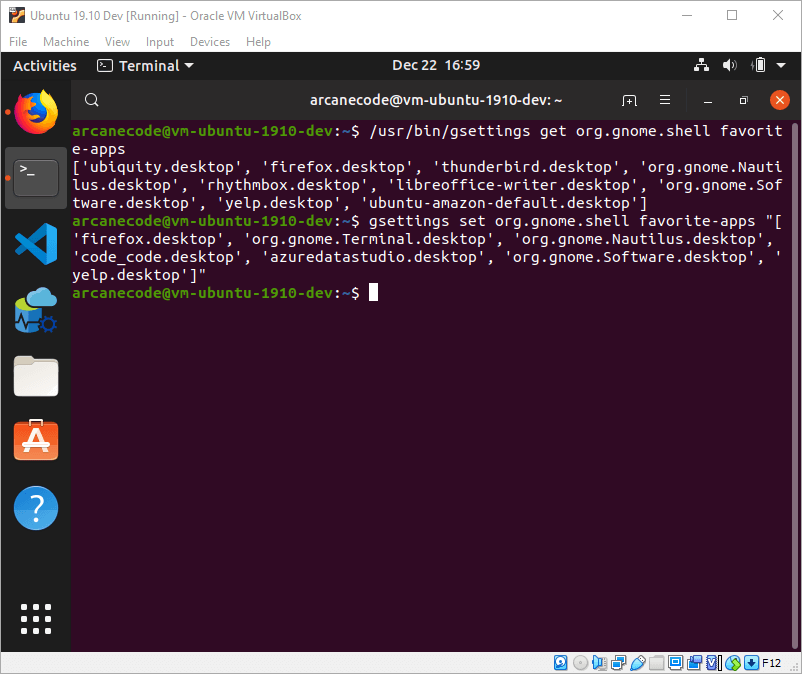
To get the list of my favorites, I did a one time remove and add of my apps manually. This way I’d be assured of getting my list in the order I wanted. Once that was done, I used the gsettings get command again, to get my personalized list.
Here is the command for my list, yours of course may vary based on your preferences. Enter all of this in a single command.
|
1 |
gsettings set org.gnome.shell favorite-apps "['firefox.desktop', 'org.gnome.Terminal.desktop', 'org.gnome.Nautilus.desktop', 'code_code.desktop', 'azuredatastudio.desktop', 'org.gnome.Software.desktop', 'yelp.desktop']" |
A side note, the yelp does not refer to the restaurant review website; it’s the Ubuntu help system. After updating, my new set of favorites appear.
Here you can see my favorites bar has been updated, with the icons that I will use most of the time in a development world. Having this as a single command means I can quickly setup and configure new virtual machines as I need them.
Conclusion
In this article you continued your work from part 1. You installed PowerShell Core, then installed and configured Visual Studio Code. You added on the installation of Azure Data Studio to prepare for future database work.
The article wrapped up by automating the update to the favorites bar, configuring it for a development centric environment. This will make it easier to set up new development VMs in the future.
This puts you in a good position for growth. Future articles will expand on this base, including one on installing SQL Server in a Docker container on Linux.
This document contains proprietary information and is protected by copyright law.
Copyright © 2026 Red Gate Software Limited. All rights reserved
Load comments