
Ola Hallengren’s SQL Server Maintenance Solution is a free, widely-adopted set of T-SQL stored procedures that automates the three core SQL Server database maintenance tasks: backups (DatabaseBackup), integrity checks (DatabaseIntegrityCheck), and index optimisation (IndexOptimize). The solution is downloaded as a single script (MaintenanceSolution.sql), configured with a handful of settings at the top, and run once to create the stored procedures, a CommandLog logging table, and a set of pre-configured SQL Server Agent maintenance jobs. It is the de facto standard for SQL Server database maintenance automation, used by thousands of DBAs as a replacement for the native Maintenance Plans wizard.
This article is a complete guide to downloading, configuring, and deploying the solution, covering all three stored procedures, the essential settings, the CommandLog table, and the Agent jobs created.
updated: February 21 2013
After a new SQL Server instance is created, one of the first tasks the DBA must undertake is to create a database maintenance plan. If implemented correctly, a database maintenance plan can help ensure that a SQL Server’s databases perform optimally and, if there should be a problem, provide the necessary backups to minimize the loss of any data. Another benefit of implementing a database maintenance plan is that it helps to prevent, or at least to catch early, many different kinds of database-related problems. By being proactive with a good maintenance plan, time spent troubleshooting problems after the fact is often reduced.
One of the most common ways that DBAs (especially accidental or novice DBAs) create database maintenance plans is to use the Maintenance Plan Wizard from within Management Studio (SSMS). While it is possible to create a decent database maintenance plan using the Maintenance Plan Wizard (see my free eBook: Brad’s Sure Guide to SQL Server Maintenance Plans), the tool is not very flexible, and if it isn’t properly used, it can result in poor database maintenance.
Another common way for more experienced DBAs to create database maintenance plans is to create custom T-SQL or PowerShell scripts to perform database maintenance. These, often carefully-crafted and fine-tuned scripts, are often the ideal way to perform database maintenance because they can be customized to meet particular needs. Given these choices, which option should the DBA pick to create their database maintenance plans? If you are an experienced DBA with a lot of Transact-SQL development experience, and you have spare time, then creating your own custom database maintenance plan is a common solution. On the other hand, there are a lot of experienced DBAs who lack the time, and there are many novice DBAs who don’t have the knowledge or experience, to create their own custom scripts.
So does this mean that if you can’t create your own custom scripts that your only option is to use the Maintenance Plan Wizard? Fortunately, this is not the case, because there are many DBAs who have written generic database maintenance scripts that are much more flexible and powerful than those created with the Maintenance Wizard. In this article, we are going to take a look at a Transact-SQL database maintenance script written by Ola Hallengren, which not only offers great flexibility to meet the needs of most any database (SQL Server 2005 and newer), it is easy to implement, even by inexperienced DBAs.
Note: I am assuming that the readers of this article understand the basics of database maintenance, so the focus of this article is strictly on how the script works, not on explaining database maintenance best practices.
Who Is Ola Hallengren
Ola Hallengren is a DBA and database developer who is currently working with a large financial company in Sweden. He has been working with SQL Server since 2001.
Back in 2007, Ola began a project to improve the database maintenance within a large SQL Server environment. At that time, a combination of database maintenance jobs created using the SQL Server Maintenance Wizard, along with a collection of custom Transact-SQL scripts, were used throughout the organization. His goal was to remove the hodgepodge collection of jobs and to create an easy-to-deploy solution that could be easily rolled out across a large environment of mission critical servers.
After the project was completed, Ola realized that his solution would be useful to other DBAs, so starting January 1, 2008, Ola released his first version of his database maintenance script, offering it free to any organization who wants to use it. Since then, he has improved his script on a regular basis, and it is now being used by some of the largest organizations in the world.
His current version was released July 29th, 2012, and you can download and read the documentation, at his website ola.hallengren.com.
Overview
Ola’s script is designed to cover the most common database maintenance tasks, which include:
- The ability to performing full, differential, or log backups (as appropriate) of any system and user databases, using either the native SQL Server backup command, or some third-party backup products, such as SQL Backup, or SQL HyperBac. The script also has the ability to automatically remove older backup files from disk that are no longer needed.
- The ability to perform dynamic index optimization by rebuilding indexes online or offline (depending on the edition of SQL Server you have), reorganizing indexes, updating statistics, or doing nothing at all, based on an index’s size and fragmentation level.
- The ability to perform database integrity checks using DBCC CHECKDB, DBCC CHECKFILEGROUP, DBCC CHECKTABLE, DBCC CHECKALLOC and/or DBCC CHECKCATALOG. .
- The ability to delete old job and backup history, including the removal of log files created by maintenance jobs as they run.
- The ability to automatically create jobs that implement each of the above tasks. All you have to do is to decide when to run them and schedule them appropriately. Alternatively, you can specify that jobs are not automatically created, so you can create your own.
Each of the above features can be run with default settings, or various parameters can be changed to customize how the maintenance tasks run on your SQL Server instances. As each job is run, the results are logged immediately to log files and/or log tables so you can see exactly what maintenance is being performed (even as it is happening). In addition, Ola’s script includes extensive error-checking to make it easier to troubleshoot any potential problems.
How to Use Ola’s Maintenance Script: The Simple Explanation
If you are a novice DBA, or maybe you are just in a hurry to get a maintenance plan running on your SQL Server instances, you can quickly get Ola’s maintenance plan implemented. Here’s how:
- Download the MaintenanceSolution.sql script from Ola’s website and open it up in a query window inside of SSMS.
- Near the top of the script, around line 32, you will see a line of Transact-SQL code that looks like this:
1SET @BackupDirectory = N'C:\Backup' -- <== Change this to your backup directory.
Replace C:\Backup’ with the pathname of the location where your backups are to be stored.
- Run the script. At this point, one table, one function and four stored procedures are created in the master database, along with 11 new jobs pre-created to perform all the maintenance tasks described earlier.
- Manually schedule the pre-configured jobs to run at appropriate times.
- You are now done.
As you can see, Ola’s maintenance tasks can be very simple and quick to implement. But like most DBAs, I don’t like to run scripts, even professionally polished and written scripts such as Ola’s, without taking some time to fully understand how the script works. In the next section, we dissect Ola’s script so that we better understand how it works. At the same time, we will learn how it can be customized for your specific environment.
How to Use Ola’s Maintenance Script: The Complete Explanation
The best way to understand how the MaintenanceSolutions.sql script works is to take a detailed look at it. To do this, download the script and open it up in a query window of SSMS, and follow along as I discuss it.
Note: The examples provided in this article refer to the MaintenanceSolution.sql script that was released on February 17th 2013. If you have a different version, be aware that some things I describe in this article might be slightly different, as Ola regularly releases new versions of his script.
When you take a closer look at MaintenanceSolution.sql script, you will see that it is divided into essentially seven different sections (I have arbitrarily divided the script into seven sections to make it easier to describe), which include:
- Essential settings
- Creating the CommandLog table
- Creating the CommandExecute stored procedure
- Creating the DatabaseBackup stored procedure
- Creating the DatabaseIntegrityCheck stored procedure
- Creating the IndexOptimize stored procedure
- Creating the Maintenance Jobs
In order to get a better understanding of how the script works, let’s take a look at what each of these sections do.
Essential Settings
Towards the top of the MaintenanceSolutions.sql script are five settings that affect how the script will run, and can be optionally changed by directly modifying the script before you run it. I described one of the options in the previous section, but there are some other settings that you may want to change.
|
1 2 3 4 5 6 |
USE [master] -- Specify the database in which the objects will be created. SET @CreateJobs = 'Y' -- Specify whether jobs should be created. SET @BackupDirectory = N'C:\Backup' -- Specify the backup root directory. SET @OutputFileDirectory = NULL -- Specify the output file directory. If no directory is specified, then the SQL Server error log directory is used. SET @LogToTable = 'Y' -- Log commands to a table. |
Figure 1: These are the settings in MaintenanceSolutions.sql that you can change
This first option is used to specify in which database the table, the function and the stored procedures will be created. Default they are created in the master database, but you can change it to the msdb database, or to a dba utility database if you prefer that.
The second option is used to tell the script if you want it to automatically create SQL Server Agent jobs for you that are pre-configured, and ready to run, although they still need to be scheduled. The default is ‘Y’, or yes. If you don’t want the script to automatically create the jobs for you, then replace ‘Y’ with ‘N’. Personally, I prefer to create my own jobs manually in order to have more control over how they work, and that’s how I have implemented Ola’s script in the past. If you are like me, and prefer to create your own custom jobs, I still suggest that you have the script create the maintenance jobs for you, as they act as great templates you can follow when you create your own customized jobs. Once you are done looking at the jobs created by the script, you can later delete them and create your own.
In the third option, you can enter the location where you want your backups to be stored. As I previously mentioned, all you have to do is to replace the C:\Backup’ with the appropriate path. This setting is only required if you are also having the script create the maintenance jobs for you as this path is used as the location of the backup files for the backup jobs that are created. If you don’t intend to use the jobs created by the script, then this setting is irrelevant, as you can add a backup location as a parameter of the DatabaseBackup stored procedure. More on this later.
The forth option is used to enter the location for the log – files. Default the SQL Server error log directory is used.
The fifth option is used to tell the script if you want to log to a table, in addition to the log – files. The default is ‘Y’, or yes. If you don’t want the script to log to a table, then replace ‘Y’ with ‘N’..
Note: The backup path that you enter above (or specify as a parameter of the DatabaseBackup stored procedure) is actually the root level of where the backups will be stored. When a backup is performed, a folder hierarchy is created in this root folder that starts with the server name, followed by the database name, and then the type of backup created.
Other than these five potential changes, the script does not have to be modified (although you have that option if you want to customize the script). After you have made any changes to the script, you can run the script, at which point the CommandLog table; along with the CommandExecute, DatabaseBackup, DatabaseIntegrityCheck, and IndexOptimize stored procedures are created in the master database (or in the database that you choose). In addition, if you chose to have the script create them, the pre-configured maintenance jobs will be created as well. Let’s take a deeper look at each of these objects.
CommandLog Table
This section of the script creates a table called CommandLog, that is used for logging.
DatabaseName, Command, CommandType and StartTime are always logged when the command is started. SchemaName, ObjectName, ObjectType, StatisticsName, PartitionNumber and ExtendedInfo are only logged for some commands.
EndTime, ErrorNumber and ErrorMessage (only if there was an error) are logged when the command is completed.
|
1 2 3 4 5 6 7 8 9 10 11 12 13 14 15 16 17 18 |
CREATE TABLE [dbo].[CommandLog]( [ID] int IDENTITY(1,1) NOT NULL CONSTRAINT [PK_CommandLog] PRIMARY KEY CLUSTERED, [DatabaseName] sysname NULL, [SchemaName] sysname NULL, [ObjectName] sysname NULL, [ObjectType] char(2) NULL, [IndexName] sysname NULL, [IndexType] tinyint NULL, [StatisticsName] sysname NULL, [PartitionNumber] int NULL, [ExtendedInfo] xml NULL, [Command] nvarchar(max) NOT NULL, [CommandType] nvarchar(60) NOT NULL, [StartTime] datetime NOT NULL, [EndTime] datetime NULL, [ErrorNumber] int NULL, [ErrorMessage] nvarchar(max) NULL ) |
Figure 2: The CommandLog table is used for logging.
CommandExecute Stored Procedure
This stored procedure is used internally by the three main maintenance task stored procedures, which are discussed next. Think of this stored procedure as a subroutine that is required for the other stored procedures to work. Its purpose is to ensure consistent error handling and logging across the DatabaseBackup, DatabaseIntegrityCheck, and IndexOptimize stored procedures. CommandExecute is actually a useful general way of executing strings of TSQL commands. It records each call, together with the time it was done, to the SQL Server log, and, once the command is executed, it logs whether it was successful and how long it took.
|
1 |
CREATE PROCEDURE [dbo].[CommandExecute] |
Figure 4: The CommandExecute stored procedure is for internal use only.
DatabaseBackup Stored Procedure
Now we get to the stored procedure that is designed to perform backup-related maintenance tasks. This stored procedure accepts up to 24 different parameters that affect the stored procedure’s behavior. In figure 5 and 6 below, you see the available parameters..
|
1 2 3 4 5 6 7 8 9 10 11 12 13 14 15 16 17 18 19 20 21 22 23 24 25 26 |
CREATE PROCEDURE [dbo].[DatabaseBackup] @Databases nvarchar(max), @Directory nvarchar(max) = NULL, @BackupType nvarchar(max), @Verify nvarchar(max) = 'N', @CleanupTime int = NULL, @Compress nvarchar(max) = NULL, @CopyOnly nvarchar(max) = 'N', @ChangeBackupType nvarchar(max) = 'N', @BackupSoftware nvarchar(max) = NULL, @CheckSum nvarchar(max) = 'N', @BlockSize int = NULL, @BufferCount int = NULL, @MaxTransferSize int = NULL, @NumberOfFiles int = NULL, @CompressionLevel int = NULL, @Description nvarchar(max) = NULL, @Threads int = NULL, @Throttle int = NULL, @Encrypt nvarchar(max) = 'N', @EncryptionType nvarchar(max) = NULL, @EncryptionKey nvarchar(max) = NULL, @ReadWriteFileGroups nvarchar(max) = 'N', @LogToTable nvarchar(max) = 'N', @Execute nvarchar(max) = 'Y' |
Figure 5: The DatabaseBackup stored procedure offers many options to control how backups are made.
| Name | Description |
|---|---|
| Databases | Select databases. |
| Directory | Specify the backup root directory, which can be a local directory or a network share. |
| BackupType | Specify the type of backup: full, differential, or transaction log. |
| Verify | Verify the backup. |
| CleanupTime | Specify the time, in hours, after which the backup files are deleted. |
| Compress | Compress the backup. |
| CopyOnly | Perform a copy-only backup. |
| ChangeBackupType | Change the backup type if a differential or transaction-log backup cannot be performed. |
| BackupSoftware | Specify third-party backup software; otherwise, SQL Server native backup is performed. |
| CheckSum | Enable backup checksums. |
| BlockSize | Specify the physical blocksize in bytes. |
| BufferCount | Specify the number of I/O buffers to be used for the backup operation. |
| MaxTransferSize | Specify the largest unit of transfer, in bytes, to be used between SQL Server and the backup media. |
| NumberOfFiles | Specify the number of backup files. |
| CompressionLevel | Set the Quest LiteSpeed for SQL Server, Red Gate SQL Backup, or Idera SQL safe backup compression level. |
| Description | Enter a description for the backup. |
| Threads | Specify the Quest LiteSpeed for SQL Server, Red Gate SQL Backup, or Idera SQL safe backup number of threads. |
| Throttle | Specify the Quest LiteSpeed for SQL Server maximum CPU usage, as a percentage. |
| Encrypt | Encrypt the backup. |
| EncryptionType | Specify the type of encryption. |
| EncryptionKey | Enter the key that is used to encrypt the backup. |
| ReadWriteFileGroups | Perform a backup of the primary filegroup and any read/write filegroups. |
| LogToTable | Log commands to the table CommandLog. |
| Execute | Execute commands. |
Figure 6: This table explains all of the backup options you can set.
To implement any of the 24 options, you provide the appropriate parameters when the stored procedure is executed as a job. We will see an example of this later in the article. One key thing to remember about these parameters is that most of them have default values, so you don’t have to provide every parameter. For example, only the first three parameters are required for the DatabaseBackup stored procedure, although you may want to use more than just the three required parameters. You can find more details at http://ola.hallengren.com/sql-server-backup.html.
DatabaseIntegrityCheck Stored Procedure
As you have probably guessed, this stored procedure is designed to check the integrity of your databases. This stored procedure only has ten options, making it easier to configure than the previous one. In figure 7 and 8 below, you see the available parameters..
|
1 2 3 4 5 6 7 8 9 10 11 |
CREATE PROCEDURE [dbo].[DatabaseIntegrityCheck] @Databases nvarchar(max), @CheckCommands nvarchar(max) = 'CHECKDB', @PhysicalOnly nvarchar(max) = 'N', @NoIndex nvarchar(max) = 'N', @ExtendedLogicalChecks nvarchar(max) = 'N', @TabLock nvarchar(max) = 'N', @FileGroups nvarchar(max) = NULL, @Objects nvarchar(max) = NULL, @LogToTable nvarchar(max) = 'N', @Execute nvarchar(max) = 'Y' |
Figure 7: The DatabaseIntegrityCheck stored procedure offers ten different ways to control how database integrity checks are performed.
| Name | Description |
|---|---|
| Databases | Select databases. |
| CheckCommands | Specify the integrity check commands to be performed: checkdb, checkfilegroup, checktable, checkalloc and/or checkcatalog. |
| PhysicalOnly | Limit the checks to the physical structures of the database. |
| NoIndex | Do not check nonclustered indexes. |
| ExtendedLogicalChecks | Perform extended logical checks. |
| TabLock | Use locks instead of an internal database snapshot. |
| FileGroups | Select filegroups. |
| Objects | Select objects. |
| LogToTable | Log commands to the table CommandLog. |
| Execute | Execute commands. |
Figure 8: This table explains all of the database integrity checking options.
As with the previous stored procedure, to implement any of the ten options, you provide the appropriate parameters when the stored procedure is executed as a job. For this stored procedure, only the first parameter is required. You can find more details at http://ola.hallengren.com/sql-server-integrity-check.html.
IndexOptimize Stored Procedure
Of all the maintenance stored procedures, the IndexOptimize is the most complex to configure with a total of 22 different parameters. In figure 9 and 10 below, you see the available parameters.
|
1 2 3 4 5 6 7 8 9 10 11 12 13 14 15 16 17 18 19 20 21 22 23 |
CREATE PROCEDURE [dbo].[IndexOptimize] @Databases nvarchar(max), @FragmentationLow nvarchar(max) = NULL, @FragmentationMedium nvarchar(max) = 'INDEX_REORGANIZE,INDEX_REBUILD_ONLINE,INDEX_REBUILD_OFFLINE', @FragmentationHigh nvarchar(max) = 'INDEX_REBUILD_ONLINE,INDEX_REBUILD_OFFLINE', @FragmentationLevel1 int = 5, @FragmentationLevel2 int = 30, @PageCountLevel int = 1000, @SortInTempdb nvarchar(max) = 'N', @MaxDOP int = NULL, @FillFactor int = NULL, @PadIndex nvarchar(max) = NULL, @LOBCompaction nvarchar(max) = 'Y', @UpdateStatistics nvarchar(max) = NULL, @OnlyModifiedStatistics nvarchar(max) = 'N', @StatisticsSample int = NULL, @StatisticsResample nvarchar(max) = 'N', @PartitionLevel nvarchar(max) = 'N', @TimeLimit int = NULL, @Indexes nvarchar(max) = NULL, @Delay int = NULL, @LogToTable nvarchar(max) = 'N', @Execute nvarchar(max) = 'Y' |
Figure 9: The IndexOptimize stored procedure offers many options to control how your database’s indexes are optimized.
| Name | Description |
|---|---|
| Databases | Select databases. |
| FragmentationLow | Specify index maintenance operations to be performed on a low-fragmented index. |
| FragmentationMedium | Specify index maintenance operations to be performed on a medium-fragmented index. |
| FragmentationHigh | Specify index maintenance operations to be performed on a high-fragmented index. |
| FragmentationLevel1 | Set the lower limit, as a percentage, for medium fragmentation. |
| FragmentationLevel2 | Set the lower limit, as a percentage, for high fragmentation. |
| PageCountLevel | Set a size, in pages; indexes with fewer pages are skipped for index maintenance. |
| SortInTempdb | Use tempdb for sort operations when rebuilding indexes. |
| MaxDOP | Specify the number of CPUs to use when rebuilding indexes. |
| FillFactor | Indicate, as a percentage, how full the pages should be made when rebuilding indexes. |
| PadIndex | Apply the percentage of free space that the FillFactor parameter specifies to the intermediate-level pages of the index. |
| LOBCompaction | Compact pages that contain large object (LOB) columns, when reorganizing indexes. |
| UpdateStatistics | Update statistics. |
| OnlyModifiedStatistics | Update statistics only if any rows have been modified since the most recent statistics update. |
| StatisticsSample | Indicate, as a percentage, how much of a table is gathered when updating statistics. |
| StatisticsResample | Update statistics with the most recent sample. |
| PartitionLevel | Maintain partitioned indexes on the partition level. |
| TimeLimit | Set the time, in seconds, after which no commands are executed. |
| Indexes | Select indexes. |
| Delay | Set the delay, in seconds, between index commands. |
| LogToTable | Log commands to the table CommandLog. |
| Execute | Execute commands. |
Figure 10: This table explains all of the index and statistics options.
To implement any of the 22 options, you provide the appropriate parameters when the stored procedure is executed as a job. For this stored procedure, only the first parameter is required, while all of the rest have default values. You can find more details at http://ola.hallengren.com/sql-server-index-and-statistics-maintenance.html.
While most of the parameters should be familiar to many DBAs, the following parameters and their settings may need some more explanation.
|
1 2 3 4 5 |
@FragmentationLow nvarchar(max) = NULL, @FragmentationMedium nvarchar(max) = 'INDEX_REORGANIZE,INDEX_REBUILD_ONLINE,INDEX_REBUILD_OFFLINE', @FragmentationHigh nvarchar(max) = 'INDEX_REBUILD_ONLINE,INDEX_REBUILD_OFFLINE', @FragmentationLevel1 int = 5, @FragmentationLevel2 int = 30 |
Figure 11: The most important parameters in IndexOptimize.
The first three parameters listed in figure 11 defines what index operations that should be performed on indexes that have Low, Medium and High fragmentation.
Low, Medium and High fragmentation are defined by two of the other available parameters: Fragmentationlevel1 and FragmentationLevel2. By default, the value for FragmentationLevel1 is set to 5 (5%). This means that any index that has index fragmentation below 5% is considered to have Low fragmentation. The default value for FragmentationLevel2 is 30 (30%) and means that any index that has a fragmentation level of 30% or more is considered to have High fragmentation. This leaves us with the level of fragmentation that is 5% and above and below 30%. This is considered Medium fragmentation. So Low, Medium, and High fragmentation levels are defined by other parameters, and can be changed if you like.
Now that you have a better understanding of what the various parameters in figure 11 represent, let’s now discuss what the values for the parameters mean. While it is easy to understand that INDEX_REBUILD_ONLINE means rebuild indexes online, INDEX_REBUILD_OFFLINE means rebuild indexes offline, and INDEX_REORGANIZE means reorganize indexes, you may wonder why you can specify multiple index operations for a fragmentation group; e.g. ‘INDEX_REBUILD_ONLINE,INDEX_REBUILD_OFFLINE’. That is because it is not always possible to rebuild an index online in SQL Server. So ‘INDEX_REBUILD_ONLINE,INDEX_REBUILD_OFFLINE’ tells the script to rebuilt the index online if possible, otherwize offline.
So what’s the point of all the complexity? The point is that the IndexOptimize stored procedure has the ability to view the fragmentation level of every index in a database and to classify it as any of the parameters in figure 11. Once this classification is done, then, on an index-by-index basis, the appropriate action is taken on the index so that it is optimized using the fewest amount of server resources possible. For example, if index fragmentation is High, then it might be rebuilt. If the index fragmentation is Medium, then it might be reorganized. If the index fragmentation is Low, then nothing may be done to the index.
The ability of the IndexOptimize stored procedure to treat each index differently is a great benefit as it helps to achieve a good balance between the level of index optimization performed and the amount of resources needed to perform the optimization, and at the same time helping to minimize the size of the transaction log, which is affected whenever indexes are defragmented. This is also a lot more resource efficient that treating all indexes the same when they are optimized.
The only required parameter for the IndexOptimize stored procedure is the first one, which specifies which database(s) you want the maintenance performed on. All of the other settings have default values and should meet the needs of most database environments.
Note: Many of the default values found in this script, such as what defines Low, Medium, and High fragmentation, come from recommendations from Microsoft. I suggest you only change these default values if you fully understand the implications of doing so.
Creating the Maintenance Jobs (and Cleanup Jobs)
Assuming that you specified at the beginning of the Maintenance Solution.sql script that you want it to create maintenance jobs, running the script will create a series of eleven jobs, which include:
- CommandLog Cleanup
- DatabaseBackup – USER_DATABASES – FULL
- DatabaseBackup – USER_DATABASES – DIFF
- DatabaseBackup – USER_DATABASES – LOG
- DatabaseBackup – SYSTEM_DATABASES – FULL
- DatabaseIntegrityCheck – USER_DATABASES
- DatabaseIntegrityCheck – SYSTEM_DATABASES
- IndexOptimize – USER_DATABASES
- Output File Cleanup
- sp_delete_backuphistory
- sp_purge_jobhistory
All of these jobs have been created with default parameters from the script, but you can change the parameters, if you want to, directly from within the jobs themselves. In addition, none of the jobs have been scheduled, because you, as the DBA, must decide what jobs you want to run, and when, in order to minimize the performance impact these jobs can have when they execute. While these eleven jobs have been created, they all may or may not need to be used, depending on your SQL Server environment. This means that you may end up modifying or deleting some of these jobs.
Before we take a quick look at each of the jobs, we first need to briefly discuss how Ola’s script creates jobs. Once we have this basic understanding, then we will be better prepared to understand how they execute.
All of the jobs created by Ola’s scripts run use the sqlcmd utility, which allows Transact-SQL scripts to be executed from the command line. This makes it easy to create and schedule your jobs. On the other hand, if you have not used the sqlcmd utility before, it may take you a little time before you fully understand how it works. Since this is not an article on how to use the sqlcmd utility, I suggest you look it up on Books Online if you are not familiar with it.
Another feature that Ola uses in his jobs are tokens, another topic that many DBAs may not be familiar with. In short, a token is similar to an @@function in SQL Server. When you place a pre-defined token inside a job step script, when the script is executed, SQL Server Agent replaces the token at run time. For example, the token $(ESCAPE_SQUOTE(JOBID)), at runtime, will insert the value of the jobid of the job into the script. To learn more about tokens, look up “Using Token in Job Steps” in Books Online.
For the moment, if you are not familiar with the sqlcmd utility or tokens, don’t worry, as I will be showing an example of how they are used as I explain how the first maintenance job works. While you won’t become an expert on using these from this one example, you should learn enough from it to understand what is going on.
Note: In my first job example, I will spend extra time explaining how the sqlcmd utility and tokens are used, along with an explanation of how the job works. Since all the jobs are similar (except for the stored procedure name and the parameters used), this will be the only job I explain in depth.
Let’s take a quick look at each of the jobs and see how they work. Once you have done so, you can decide if you want to use them as is, modify them, or ignore then altogether and create your own custom jobs.
|
1 |
DatabaseBackup - USER_DATABASES - FULL |
As you can guess from the name of this job, this job’s purpose is to create full backups of user databases. Generally speaking, I like to make full backups of all my databases nightly. This job includes a single job step, as you can see below.
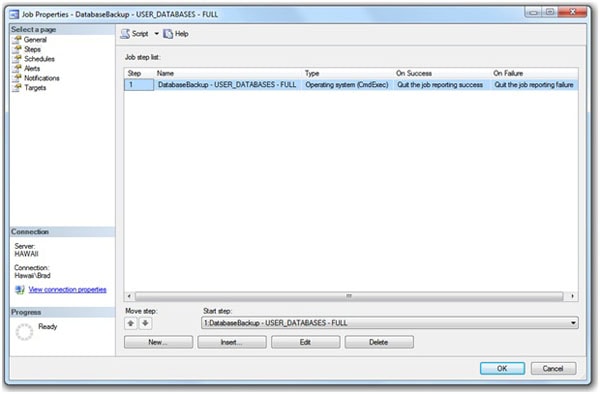
Figure 12: Each job created by the script creates a single step.
When I click on the Edit button, we can view the job script for this particular job.
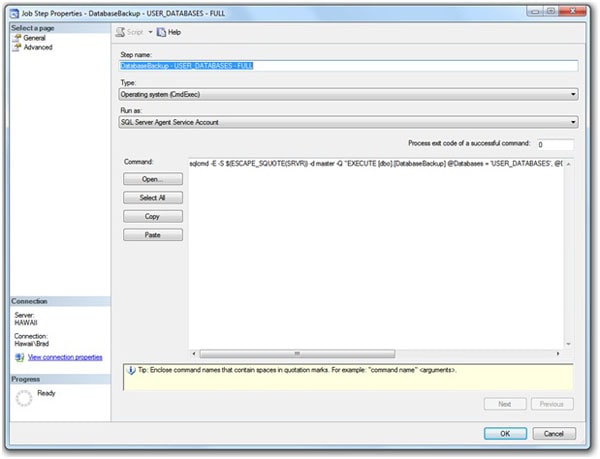
Figure 13: Every job created by the script is executed as an operating system (CmdExec) job.
Each of the jobs created by the MaintenanceSolution.sql script creates a single step, and that step executes as an operating system (CmdExec) job. The command is too small to read in figure 14 above, so here is the text of the command for this job.
|
1 |
sqlcmd -E -S $(ESCAPE_SQUOTE(SRVR)) -d master -Q "EXECUTE [dbo].[DatabaseBackup] @Databases = 'USER_DATABASES', @Directory = N'C:\Backup', @BackupType = 'FULL', @Verify = 'Y', @CleanupTime = 24, @CheckSum = 'Y'" -b |
The above command combines both sqlcmd utility and job token syntax. Let’s break down this command into its constituent parts.
|
1 |
sqlcmd: This is the operating system command to start the sqlcmd utility. |
|
1 |
-E: This is the sqlcmd syntax that specifies that a trusted connection will be made to the server. |
|
1 |
-S: This is the sqlcmd syntax that specifies the name of the server to connect to. Normally, you would see the actual name of the server follow immediately after this option, but in this case, there is a job token. |
|
1 |
$(ESCAPE_SQUOTE(SRVR)): This job token, when the job script is executed, will substitute the name of the server. The "SRVR" portion of the token should be a clue of this. |
|
1 |
-d: This is the sqlcmd syntax that is used to refer to the database that is being connected to. |
|
1 |
master: This is the name of the database that is being connected to. Master is being connected to because this is where the database maintenance stored procedures are located. |
|
1 |
-Q: This is the sqlcmd syntax that says that the following quoted content (Transact-SQL code) is to be executed. |
|
1 |
"EXECUTE [dbo].[DatabaseBackup] @Databases = 'USER_DATABASES', @Directory = N'C:\Backup', @BackupType = 'FULL', @Verify = 'Y', @CleanupTime = 24, @CheckSum = 'Y'": This is the Transact-SQL command that is to be executed. Notice that several of the 24 available parameters have been specified, but not all of them. The parameters that are not specified will use their default values. If you want to change or add a parameter to the stored procedure, this is where you would make this modification to the Transact-SQL statement. |
|
1 |
-b: This is the sqlcmd syntax to "on error batch abort". If an error should occur, sqlcmd exits and returns to a command prompt and returns an ERRORLEVEL value, which is recorded in the log file. If an error does happens, the stored procedure will continue to execute until it is done. For example, if the backup of one database fails, the fact that it failed is recorded in the log file, and the stored procedure will continue to back up the remaining databases. |
At first glance, this appears complicated. But once you spend some time reviewing this code, and the code found in the other jobs, it should start to make sense.
Now that the job code has been reviewed, we now need to take a look at one more part of the job, and that is the Output File option of the Advanced Tab, which is shown below.
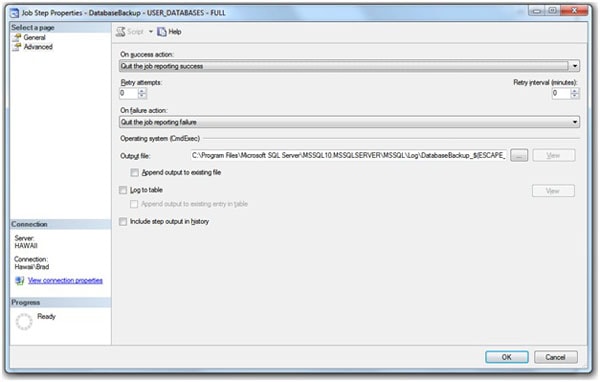
Figure 14: The Output File option is where the maintenance job’s log file goes.
The output file for a job is important because it shows you exactly what the job did (which I suggest you regularly review), which can be useful for troubleshooting. I want to talk about it here because the script uses a lot of tokens in the output file path. Since we can’t read the path in figure 14, here is what it look like.
|
1 |
C:\Program Files\Microsoft SQL Server\MSSQL10.MSSQLSERVER\MSSQL\Log\DatabaseBackup_$(ESCAPE_SQUOTE(JOBID))_$(ESCAPE_SQUOTE(STEPID))_$(ESCAPE_SQUOTE(STRTDT))_$(ESCAPE_SQUOTE(STRTTM)).txt |
As with the job code, this output path may seem overly complicated, but is actually quite clever as it uses tokens to create a unique log filename for every job that runs, which makes it very easy to find the log files of any jobs you are interested in viewing.
Here’s a breakdown of the output path’s constituent parts:
|
1 |
C:\Program Files\Microsoft SQL Server\MSSQL10.MSSQLSERVER\MSSQL\Log\: This is the default location of where all SQL Server log files are located. When Ola's script is run, it finds this location and automatically inserts it here as the job is created. |
|
1 |
DatabaseBackup_$(ESCAPE_SQUOTE(JOBID))_:Each output file begins with the name of the job, which in this case is "DatabaseBackup". Next is a token for the job id, which becomes a part of the output file's name. An underline "_" is also added to make the filename easier to read. |
|
1 |
$(ESCAPE_SQUOTE(STEPID))_: Next, another token is used to include the step id as part of the output file's name. Another underline is also included. |
|
1 |
$(ESCAPE_SQUOTE(STRTDT))_: Next, another token is used to include the date (YYYMMDD format) as part of the output file's name. Another underline is also included. |
|
1 |
$(ESCAPE_SQUOTE(STRTTM))_: Next, another token is used to include the time (HHMMSS format) as part of the output file's name. Another underline is also included. |
|
1 |
.txt: And finally, an extension of ".txt" is added to the output's file name. |
When the above job is executed, the output path may create a result like this:
|
1 |
DatabaseBackup_0x524D34D2F9A6F94BA347806E52810D4_1_20100707_130527.txt |
While the job id and the step id are obscure, they help to make the filename unique. When I look at output files, what I focus on is the “DatabaseBackup” part, which tells me what job was run, and the date and time, so I know when it ran.
If you plan to use this job, you still have one mandatory step you must take, and several optional steps. The mandatory step is that you must schedule this job, as this is not done for you. The optional steps are to set up Alerts and Notifications, which I highly recommend, so that you are notified in case a job fails. Of course, you may also want to modify the job in other ways by changing the stored procedure’s parameters, but I’ll leave that up to you.
Of course, you don’t have to use this job. As I mentioned earlier, I prefer to create my own jobs, but I have used the jobs created by the script as a template for my own jobs.
Now that we have a reasonably good knowledge of how jobs created with the script work, now let’s take a brief look at the remaining jobs, but without all the detail.
CommandLog Cleanup
This job deletes rows from the CommandLog table that are over 30 days. If you want to change the 30 day value, you can do so by directly editing the command line for the job, changing it from 30 to whatever number of days works best for you. You may choose to run this job daily, weekly, or monthly.
DatabaseBackup – USER_DATABASES – DIFF
This job is designed to create differential backups of your user databases. If you do create differential backups, be sure that you schedule this job to run after a full backup of your databases, and schedule the backups appropriately. On the other hand, if you don’t create differential backups, you can delete this job.
DatabaseBackup – USER_DATABASES – LOG
This job is designed to create log backups of all user databases that use the full or bulk logged recovery models. Be sure to schedule this job so that it runs after a full backup. Generally speaking, I schedule my log backups to occur every hour (or more often), depending on my needs.
DatabaseBackup – SYSTEM_DATABASES – FULL
This job creates full backups of the system databases, and generally speaking, this job should be scheduled to run nightly. There is no transaction log backup job created by the script for system databases because they use the simple recovery model, and transaction log backups cannot be taken of them. Some DBAs prefer to create a single job to perform full backups of user and system databases at the same time. You can do this if you want, but you will have to modify the jobs accordingly, as the script does not provide this option.
DatabaseIntegrityCheck – USER_DATABASES
This job performs a DBCC CHECKDB on all the user databases, looking for potential database corruption. Be aware that this job could be time and resource consuming, so schedule it during less busy time of the day.
DatabaseIntegrityCheck – SYSTEM_DATABASES
This job performs a DBCC CHECKDB on all the system databases, looking for potential database corruption. Because the system databases are generally small, running this job should not take long. Some DBAs prefer to create a single job that runs DBCC CHECKDB on both user and system databases at the same time. You can do this if you want, but you will have to modify the jobs accordingly, as the script does not provide this option.
IndexOptimize – USER_DATABASES
This job analyzes all of the indexes in all of your user databases, and based on the size of the indexes, and the fragmentation level of the databases, determines if the index should be ignored, reorganized, or rebuilt. Of all the jobs created by the script, this is one that you may want to alter, changing some of the IndexOptimize stored procedure parameters so you have better control over how this job runs. Of course, the default options will work well for most SQL Server instances if you don’t have the time or knowledge to tweak the parameters. Notice that there is no job created for index optimization for the system databases. This is because index optimization for system databases seldom is beneficial, although you can create a job to perform this task if you like.
Output File Cleanup
This job simply deletes log files created by the various database maintenance jobs that are over 30 days old. If you want to change the 30 day value, you can do so by directly editing the command line for the job, changing it from 30 to whatever number of days works best for you. You may choose to run this job daily, weekly, or monthly.
sp_delete_backuphistory
This job deletes backup history from the msdb database that is over 30 days old using the system stored procedure sp_delete_backuphistory. If you want to change the 30 day value, you can do so by directly editing the command line for the job, changing it from 30 to whatever number of days works best for you. You may choose to run this job daily, weekly, or monthly.
sp_purge_jobhistory
This job deletes job (SQL Server Agent jobs) history from the msdb database that is over 30 days old using the system stored procedure sp_purge_jobhistory. If you want to change the 30 day value, you can do so by directly editing the command line for the job, changing it from 30 to whatever number of days works best for you. You may choose to run this job daily, weekly, or monthly. While the script creates separate jobs for the CommandLog Cleanup, sp_purge_jobhistory, sp_delete_backuphistory, and the Output File Cleanup jobs (as we have just seen), I prefer to combine all four of these maintenance tasks into a single job, as all four jobs are closely related and can easily be scheduled to run at the same time. If you want to do this, you will have to alter one of the four jobs so that it performs all four tasks, and then delete the remaining three you don’t need, as the script does not provide this option.
Job Summary
Now that you have had a chance to review the jobs that have been created by the script, and have learned how they work, you should be in a better position to determine if you want to use these jobs as is, to modify them, or to create your own. Each of these options work, and it is up to you as the DBA to make the choice that will work best for your environment.
Keeping Up-To-Date
Periodically, Ola updates his scripts, fixing small bugs or adding new features. If the current version of Ola’s script you are using works great for you, then you probably don’t need to upgrade when he updates his script. On the other hand, if he introduces a new feature you want to use, then upgrading is easy. Assuming you have not customized his original script, you can run the new script as if it was a new install.
When you run the new script, Ola guarantees backward compatibility. If you modified any of the jobs created by his script, they are left alone by the upgrade process. If you have created your own custom jobs, they will also continue to work without modification.
If you have modified his script directly (other than the five essential settings), you might want to consider contacting Ola to find out if the customizations you have made are still needed in the new version.
Summary
Although this has been a long article, it still does not cover every option in great depth. I have made the assumption that you understand what the various parameters do, or at least that you can look them up. I have also assumed that you understand how to properly schedule your database maintenance jobs. So at this point, if this article has sparked an interest in Ola’s script, then download it and install it on a test server and try it out. Once you are satisfied that it works as you expect, then roll it out to your SQL Server instances and begin to immediately reap the benefits Ola’s script provides. If you have specific questions about how Ola’s script runs, or want to suggest new features, contact him through his website and ask him directly, as he is the expert on the script.
FAQs: Automate and Improve Your Database Maintenance Using Ola Hallengren’s Free Script
1. What is Ola Hallengren's SQL Server Maintenance Solution?
It is a free, open-source set of T-SQL stored procedures for automating SQL Server database maintenance. The solution includes DatabaseBackup (full, differential, and log backups with extensive configuration options), DatabaseIntegrityCheck (DBCC CHECKDB automation), and IndexOptimize (index fragmentation analysis and rebuild/reorganise decisions). It deploys via a single T-SQL script and integrates with SQL Server Agent to create scheduled maintenance jobs. Download from ola.hallengren.com.
2. How do I install Ola Hallengren's maintenance scripts on SQL Server?
Download MaintenanceSolution.sql from ola.hallengren.com. Open the script in SSMS and review the five essential settings at the top: CreateJobs (whether to automatically create SQL Agent jobs), BackupDirectory, CleanupTime, OutputFileDirectory, and LogToTable. Set BackupDirectory to your backup location, then execute the script against each SQL Server instance where you want the solution deployed. The script creates the stored procedures and (if CreateJobs = ‘Y’) the SQL Agent jobs automatically.
3. What does Ola Hallengren's IndexOptimize procedure do?
IndexOptimize analyses every index in the specified databases, checks fragmentation using sys.dm_db_index_physical_stats, and applies the appropriate maintenance action: REORGANIZE for fragmentation between 5% and 30% (configurable), REBUILD for fragmentation above 30% (configurable), or no action for fragmentation below 5%. It supports filtering by database, table, and fragmentation threshold, logs all actions to the CommandLog table, and can be configured to update statistics separately from index operations.
4. Is Ola Hallengren's maintenance solution better than SQL Server Maintenance Plans?
For most production environments, yes. The built-in Maintenance Plans wizard is limited in configurability, error handling, and logging. Ola’s solution provides: granular control over backup compression, encryption, and retention; intelligent index maintenance that adjusts per-index based on actual fragmentation levels; consistent logging to the CommandLog table; and a text-based configuration that can be source-controlled. Maintenance Plans are a simpler starting point for non-production or low-complexity environments.
This document contains proprietary information and is protected by copyright law.
Copyright © 2026 Red Gate Software Limited. All rights reserved
Load comments