
Second in a series on Visual Studio setup. This article describes the kinds of custom actions that can be used in your Visual Studio setup project.
Introduction
It’s often necessary to add your own code to a Visual Studio setup project, which is accomplished using custom actions. Custom actions are in contrast to the standard actions that Windows Installer performs during an installation. Examples of standard actions include copying files and registering COM servers.
(You can download the code examples to go with this article using the link to the right of the title.)
Properties and CustomActionData
To understand the use of custom actions, it’s important to know how to use Windows Installer properties, and in particular the CustomActionData property. To pass data into your custom-action code in Visual Studio setup projects, for example, you set the CustomActionData property to the data you want to pass into the custom action, and in your code you retrieve the CustomActionData property that contains the data. This is a common theme in the examples that follow.
Remember that the properties can be standard Windows Installer properties (TARGETDIR, VersionNT and so on), or properties that you created yourself, perhaps by using Search Target Machine as we saw in the previous article.
We’ll illustrate this CustomActionData idea with a simple VBScript custom action. This custom-action script will display the value of the CustomActionData property:
|
1 |
msgbox Session.Property("CustomActionData") |
In the Visual Studio IDE for the properties of that custom action, you specify the value of your CustomActionData. In this example you’ll do this:
|
1 |
[OriginalDatabase]<>[TARGETDIR]<>[ComputerName] |
You’re passing the value of this string to the CustomActionData property, and then in the custom-action code you get the value from the CustomActionData property. That is, you’re passing this data indirectly via the CustomActionData property.
The data consists of three Windows Installer properties. TARGETDIR is the primary installation folder, OriginalDatabase is the full path to the current MSI file being installed, and ComputerName is the name of the computer. Since angle brackets are not allowed in file names, they can serve as separators for parsing the combined properties and separating them out. So angle brackets are used for passing multiple property values into a custom action. Square brackets indicate that the actual value will be resolved at run time.
One caveat: Anti-virus software sometimes intercepts VBScript code and could prevent your custom action from working properly.
With the basics in place with regard to properties and CustomActionData, we’ll look at other types of custom actions.
C++ custom action DLL
You can write custom actions as C++ function calls in a DLL. These function calls must be exported and have a signature like this:
|
1 |
UINT __stdcall SomeCA (MSIHANDLE hInstall) |
The MSIHANDLE parameter is similar in concept to the Session value used in the earlier VBScript custom action. The MSIHANDLE enables you to access properties using the Win32 MsiGetProperty API call, so we can code a complete custom action call like this:
|
1 2 3 4 5 6 7 8 9 10 11 |
UINT __stdcall SomeCA (MSIHANDLE hInstall) { WCHAR vbuff [500] = {0}; DWORD vlen = 500; UINT gp = MsiGetPropertyW(hInstall, L"CustomActionData", vbuff, &vlen); WCHAR msg [500] = {0}; wsprintfW (msg, L"gp = %d vlen = %d vbuff = %s", gp, vlen, vbuff ); LogMessage (hInstall, msg); MessageBoxW (NULL, msg, L"Result", MB_OK); return 0; } |
You can do much more than just get properties. There is an MsiSetProperty API, for example, that can set a property you can use later in the install or in another custom action. If the property name you specify does not exist, Windows Installer will create it for you. I’ll describe what that LogMessage call does in a moment.
You’ll need to include msiquery.h and link to msi.lib to use C++ custom actions. Use of an explicit .def file that names the exported functions will save you from potential name-mangling issues.
One of the useful features of these direct call custom actions (in which your code is called directly from Windows Installer) is the ability to write your own entries to the Windows Installer log. The LogMessage function below shows how to do this fairly easily in your C++ custom-action DLL, especially if you ignore error checking as I’ve done here:
|
1 2 3 4 5 6 7 8 |
UINT LogMessage (MSIHANDLE hInstall, LPCWSTR szMsg) { PMSIHANDLE hRecord = MsiCreateRecord(1); MsiRecordSetStringW(hRecord, 0, szMsg); MsiProcessMessage(hInstall, INSTALLMESSAGE(INSTALLMESSAGE_INFO), hRecord); return ERROR_SUCCESS; } |
You don’t get the logging output by default. You have to enable it at install time with a command line like this:
|
1 2 |
Msiexec /I /l*v myinstall.log |
You would see a few lines like this in the log file:
|
1 2 3 4 5 |
MSI (s) (A0:80) [10:48:48:049]: Invoking remote custom action. DLL: C:\WINDOWS\Installer\MSI15E.tmp, Entrypoint: SomeCA gp = 0 vlen = 35 vbuff = C:\Program Files\PhilW\InstWinForm\ |
The first line is a standard logging entry reporting that the custom action is being called; the second line is the output from the call to LogMessage in the custom action. This is a useful debugging technique for tracing the path of your custom-action DLL calls.
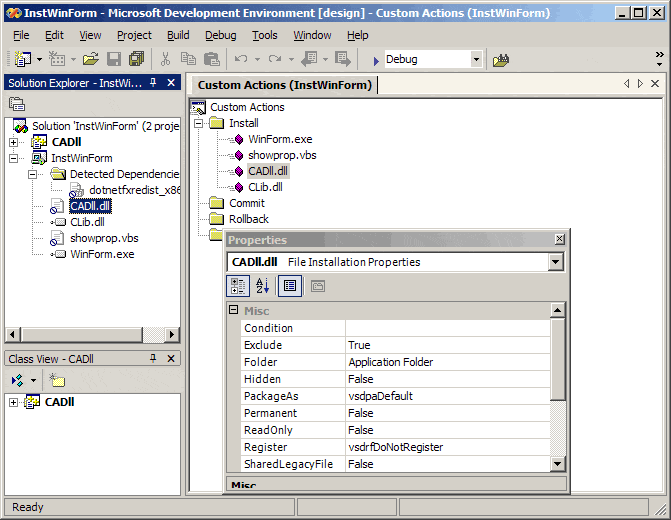
Figure 1
But why does it say that the custom-action DLL is called MSI15E.tmp? Look at Figure 1, which shows the properties of the custom-action DLL in Solution Explorer. It has an Exclude property value of True. This means that the DLL isn’t being installed. Rather, the DLL is stored in the MSI file and streamed out when the custom action is called, so that unusual name is your custom-action DLL.
Calling an executable as a custom action
Visual Studio also lets you use an executable as a custom action. You can’t use CustomActionData to pass values to the program, because you’re not passing properties via a call directly from the Windows Installer Service. Instead you can use the arguments value shown in Figure 2, the properties window of a custom action, to call the forms program executable in the sample Visual Studio solution. The argument string is surrounded by quotes so that it gets passed as a single string into the main of the receiving program.
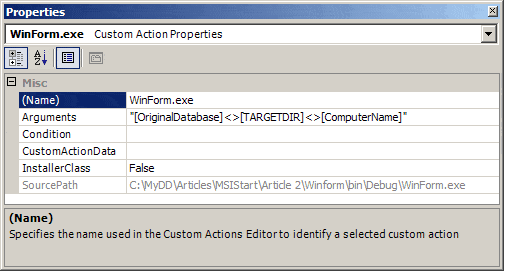
Figure 2
Because this call is synchronous, you can’t use it to launch your application after the install: While the custom-action program is running, the install process waits for it to finish.
Installer classes
.NET assemblies can contain installer classes, and Visual Studio .NET lets you call methods in these installer classes as custom actions. If you select a .NET project in the Solution Explorer, a right-click lets you add a component, one of which is an installer class. The boilerplate code generated for you includes an attributed class with [RunInstaller(true)], which is what makes it an installer class. To add code of your own, override the existing class methods and use the install method shown here:
|
1 2 3 4 5 |
public override void Install(IDictionary savedState) { base.Install(savedState); // Add your code here } |
This is where you add your install code. You should also add a corresponding uninstall method that reverses whatever your install code does to the system.
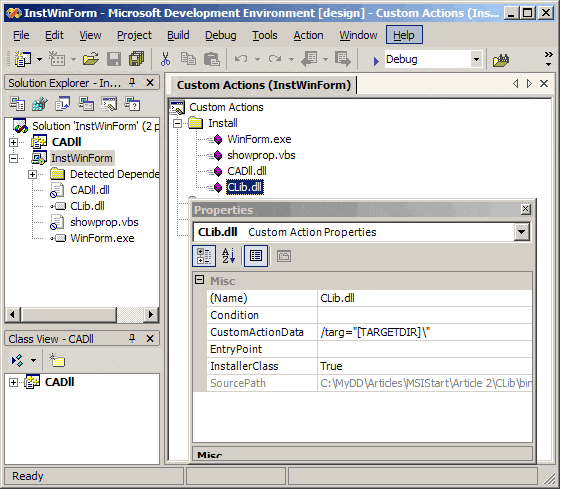
Figure 3
By adding a custom action in the same general way as described earlier, you add these calls as custom actions in your setup project. Figure 3 shows the properties for the custom action. Note that the InstallerClass property is set to True. Figure 3 also shows how to pass CustomActionData into your installer class methods, but it’s not the same format as other custom actions. Here’s a sample CustomActionData string:
|
1 |
/targ="[TARGETDIR]\" |
This is the general format required for passing data into installer classes. You must put quotes around Windows Installer folder properties so that the internal parsing works correctly. The parameter string ends up in Context.Parameters of the installer class, an IDictionary object with keys and values, and there will be a key corresponding to your CustomActionData key (targ in the example). This means that there will be a this.Context.Parameters[“targ”] key with a value of TARGETDIR resolved to the run-time value.
You can enumerate through these context parameters with the following code, which is intended to be called as a debug method passing “Install” as the string parameter if it’s being called from an install custom action:
|
1 2 3 4 5 6 7 8 9 10 11 12 13 14 15 |
private void ShowContext(string where) { StringBuilder sb = new StringBuilder(); StringDictionary myStringDictionary = this.Context.Parameters; sb.Append("From " + where + "\n"); if (this.Context.Parameters.Count > 0) { foreach (string myString in this.Context.Parameters.Keys) { sb.AppendFormat("String={0} Value= {1}\n", myString, this.Context.Parameters[myString]); } } MessageBox.Show(sb.ToString()); } |
This will give you a message display as shown in Figure 4. There is a “targ” key where the value is the install folder TARGETDIR, and there is an assemblypath key with the install path of the assembly. This is a useful alternative to passing TARGETDIR because it tells you the path to the assembly. This is not documented anywhere, so I do not recommend that you rely on it in different versions of Visual Studio, because it’s being passed in as part of the internal implementation of installer classes.
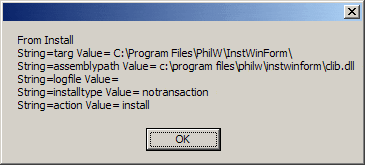
Figure 4
The installer class mechanism isn’t native to Windows Installer – there’s no support for calling installer classes directly from the Windows Installer Service. Visual Studio packages a shim DLL into your setup and generates a call to the ManagedInstall function in this DLL, passing parameters via CustomActionData in the same way as the custom action call into a C++ DLL that you saw earlier. This shim DLL is then responsible for finding and calling your installer class methods, and ultimately .NET reflection is used to locate your installer class with its [RunInstaller(true)] value. This is why assemblypath is passed in, as we just saw in Context.Parameters.
The installer class mechanism isn’t as versatile as writing your own C++ custom-action method because you are a calling layer away from the install process and you don’t have access to the MSIHANDLE in your installer classes like you do in a C++ function. So you can’t set installer properties, only pass them one way into your class methods.
Installer classes prompt you to install Windows Services using the ServiceInstaller class, although installing services using custom actions is rather unusual in the Windows Installer world. Most third-party install tools provide IDE support for the ServiceInstall and ServiceControl tables that are standard features of Windows Installer and are provided for the very purpose of installing services.
(Important note about the installer: As detailed on the Microsoft support site, Visual Studio .NET setup projects execute the custom action of the previous version when upgrading. See http://support.microsoft.com/default.aspx?scid=kb;en-us;555184 for more information.)
When is my custom action called?
There are no clues in a Visual Studio setup project that tell you when your custom action is called. Before explaining that, however, I’ll describe the three stages of a Windows Installer setup:
- A user interface sequence during which data is gathered (file locations, choices and so on) and the system is not being changed.
- An auditing sequence in which the actions that will be done are written to an audit file, and the system typically is not yet changed.
- An updating sequence in which the audit script is processed and changes are made to the target system.
The reason for the audited nature of the process is apparent if you’ve seen a Windows Installer setup fail and roll back. What’s happening is that the changes made to the system are backed out with the help of that audit script. It’s a feature of a Windows Installer setup that a failure will restore the system as if the install had never started.
Visual Studio custom actions are called during the third stage of the setup. It should be apparent that you can’t use install custom actions in Visual Studio to make significant changes to your setup, because by the time your custom action is called, the install is almost finished and it’s far too late to change something like TARGETDIR. On the other hand, install custom actions are called toward the end of stage 3, and that means that your files, program executables, and data are installed on the target system and you can use them.
If you want to run one of your programs or make modifications to a configuration file, it’s helpful that these files have been installed by the time your install custom action runs. Also, the user interface can be suppressed in a command line install, so it wouldn’t work well to call the custom actions from the user interface sequence.
Custom actions that are called during stage 3 are known as deferred custom actions in Windows Installer, and it’s the internal handling of these custom actions that requires use of CustomActionData to pass data to them. The installation process is actually a client/server environment in which the user interface runs on a user-mode Msiexec.exe and the server installation process runs on the Windows Installer Service Msiexec.exe.
It’s normal to see two or more copies of Msiexec.exe running at the same time because of the client/server architecture, among other factors. During the service part of the installation process, there is limited access to installer properties, and this is why properties are passed to our deferred custom actions using the CustomActionData property.
During stage 2 the CustomActionData values are prepared so they can be used in stage 3. This client/server architecture is also related to property naming. When Visual Studio prompts you for a property name, the names are uppercase. Because Windows Installer properties can be private or public, public properties are denoted with uppercase names. There are two main attributes of public properties that concern us here: They can be passed from the UI sequence to the execution sequences, and they can be specified on a command-line install.
The first attribute is critical when properties are created during something like a Search Target Machine (see the first article in this series). Because Search Target Machine is implemented as a Windows Installer AppSearch action, it will be processed early in the UI sequence (stage 1) or the execute sequence (stage 2), but not in both. So a property that the search creates is public so it can be passed from the UI sequence to the execute sequence.
When you want to do a command-line install and pass in a value for TARGETDIR, for example, use something like this:
|
1 2 |
Msiexec /i TARGETDIR=c:\MyFolder |
You can’t get a property in VBScript with Session.Property(“TARGETDIR”) because of the behavior of Visual Studio’s deferred custom actions and CustomActionData. If Visual Studio custom actions were called during stage 2, you would be able to use properties like the one mentioned above, known as immediate custom actions in Windows Installer, but your files wouldn’t yet be installed on the system.
In other words, the Visual Studio design restricts you to custom actions that are called when your files are on the system (deferred custom actions), which means that you must use the CustomActionData property. Other tools that generate MSI files are often more flexible, so if you anticipate complex setups, investigate those tools.
It’s important to understand where your Visual Studio custom actions fit into the installation process and how that affects the kind of thing you can do with them. You should think of Visual Studio install custom actions as occurring after the install.
It’s worth noting that Windows Installer doesn’t know whether a custom action is an install or an uninstall, which is how custom actions appear in the Visual Studio IDE. Visual Studio adds a condition to the custom actions that is true on an install or an uninstall, but you can’t see it in the IDE. If you add your own condition, it’s added to the existing condition with an “and.” The importance of this will become apparent when we look at repair in the next section.
Beware of repair
Visual Studio creates a Windows Installer component for each file being installed. When the component is installed, the file is installed. It’s crucial to understand that your custom-action call is internally conditioned on that component being marked for installation, because when a repair occurs the component may be marked for reinstallation. That is, a repair can call your custom action again.
This is easy to see if you install an executable that is the target of a shortcut as well as the subject of an install custom action. If you remove the executable and then use the shortcut, a repair will kick in. The repair will install the component, your custom action will be called, and you’ll see your executable run as a custom action. When you close it down you’ll see it start again as a result of your original shortcut request.
The key point is that your file is reinstalled by the repair. Your custom action, conditioned on the Windows Installer component containing that file, is also being called. You probably expected your custom action to be called only once when your product was installed, but as you see it may be called again. I’ll explain how to fix that in a moment.
Take another look at Figure 1. It shows the CADll custom-action DLL and the VBScript custom action with the Exclude property True in the properties pane in the Solution Explorer pane (note the circle with a line through it in both cases). So the file won’t be installed, as we described in the C++ custom-action DLL. The DLL and the VBScript are packaged separately in the MSI file, streamed out into a temporary location, and run from there.
I just mentioned that an install custom action is conditioned on the component being installed, which is why it also gets called during a repair. But CADll and showprop.vbs aren’t being installed because they’re excluded! So what makes this an install custom action? The internal condition is that the custom action is called if this is not a complete uninstall of the product.
The last key piece of information is that a repair ensures that the entire feature is installed, and Visual Studio setup projects have a single feature. If you look at Figure 1, during a repair the WinForm.exe custom action is called if it is reinstalled, because it’s conditioned on the file/component being marked for installation. Showprop.vbs (and CADll.dll) will also be called because their conditions are based on “this is not an uninstall.” So all your custom actions might be called during a repair.
I’ve spent a lot of time on this because it can cause awful problems. You might do a repair from the context menu of an MSI file and your custom actions will run again. If you were creating a database from scratch, that’s a big problem!
The solution is to add an extra condition to the custom actions to prevent them from being called during a repair. The condition is “Not Installed,” where “Installed” is a case-sensitive Windows Installer property that’s set if your product is already installed. In other words, during a repair your product is installed and it’s just being repaired, so “Not Installed” ensures that you run your custom actions once during the first install. Figure 5 shows this condition in the custom-action properties.
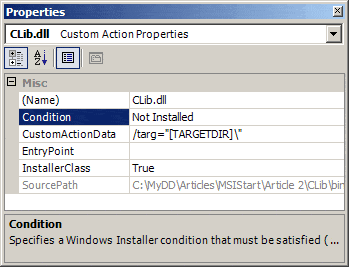
Figure 5
Conclusion
Custom actions are a useful way to add functionality to your Visual Studio setup projects, so it’s important to understand how to use them and their capabilities. I hope this article will help you to use them successfully.
This document contains proprietary information and is protected by copyright law.
Copyright © 2026 Red Gate Software Limited. All rights reserved
Load comments