
Third in a series on Visual Studio setup
This article explains how to install a new version of your setup project using the Windows Installer update mechanism.
Introduction
When you need to build a new version of your setup project or ship fixes to it, it’s tempting to rebuild the project and try to install the MSI file. Doing so, however, typically launches a message box indicating that another version of the product is already installed and directing you to the control panel to uninstall it.
The primary reason for this is that the ProductCode Guid identifies the product to Windows (see the setup project properties in Figure 1). Since you have already installed the product identified by that Guid, you must use a Windows Installer update mechanism to install a new version of your product.
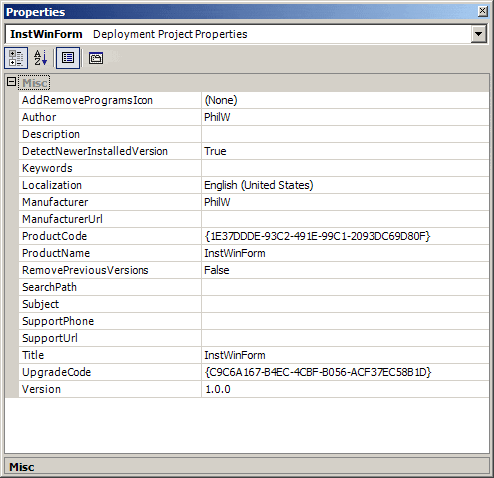
Figure 1
How to update your product
Visual Studio supports the RemovePreviousVersions project property mechanism in its IDE. Figure 1 shows that the value is false. When you’re ready to build a new version of your product to replace an older one, follow these steps:
- Increment the version property (see Figure 1). Visual Studio displays a message box that prompts you to change the ProductCode and PackageCode. Select yes.
- Set the RemovePreviousVersions property to true.
Setting the RemovePreviousVersions property to true removes previous versions of the product from the system as you install the new version. Since products are identified by the ProductCode Guid, changing the ProductCode creates a new product. That is, the old product is uninstalled as you install a new one. Note that the version property, which becomes the Windows Installer ProductVersion property, is a key piece of data that relates to updating your product. It is not simply a descriptive string.
Figure 1 also shows a DetectNewerInstalledVersion property that checks, at install time, to see that you’re not trying to upgrade an existing installed version with an older version.
Before describing how RemovePreviousVersions works, I’ll explain how PackageCode and ProductCode interact.
PackageCode, ProductCode and repair
The PackageCode is a Guid that uniquely identifies the MSI file from which a product was installed. When you install an MSI file, the PackageCode and ProductCode are recorded on the system. When you attempt to install another MSI file, the PackageCode and ProductCode interact in two ways:
- If the new MSI file has the same ProductCode and PackageCode as a product that’s already installed, Windows indicates that you must repair or remove the product (see Figure 2) Remove uninstalls the product, but repair can be more confusing.
Repair does not use your new MSI file to repair the product, nor does it update what you previously installed. Instead, it repairs the existing installed product. That is, it behaves as if you went to the original MSI file used to install the existing product, selected the context menu, and chose repair. (Note: Repair can also be initiated from Add/Remove programs.)
- If the new MSI file has the same ProductCode as an installed product but a different PackageCode, you’ll receive a message indicating that another version of the product is already installed.
You cannot set the PackageCode property (Figure 1). Instead, Visual Studio generates a new one when required.
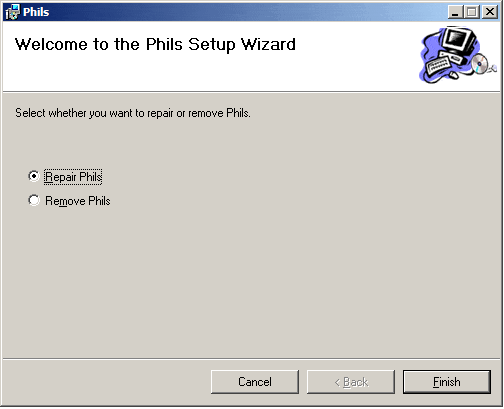
Figure 2
When a product is installed, Windows caches a copy of the MSI file in the Windows\installer folder and records the location from which the MSI was originally installed. The cached MSI file contains the data from the original MSI file but does not contain the actual files, so it can be used to check that the product is installed properly. If there are any missing files, Windows will go to the recorded install location to retrieve the installation MSI file. If a repair is triggered, Windows may ask for the original CD or network location.
The product upgrade
Another Guid, the UpgradeCode, recognizes that a previous version is installed (see Figure 1). When RemovePreviousVersions is set to true, Visual Studio builds an MSI file that checks for other installed products with the same UpgradeCode and uninstalls them. This is known as a Windows Installer major upgrade.
The upgrade uninstalls the older product and then installs the new one, so everything that was installed in the older version will be uninstalled. It does not update files with newer versions. If data files were installed that the user may have updated, they will be uninstalled.
You may need to take this behavior into account when you build the first version of your installation package. It may be better to have your application produce data files at run time, for example, rather than adding them to the setup. This ensures that RemovePreviousVersions will not uninstall them, and they will carry over into the next version of the product.
Everyone or just me?
At install time, the dialog box in which you choose the installation folder is also where you set the “Everyone” or “Just me” radio-button choices (see Figure 3). In Windows Installer terms, it’s a choice between a per-machine install (for all users of the system) or a per-user install (for the installing user). An Everyone install does not upgrade a Just me install, and vice versa.
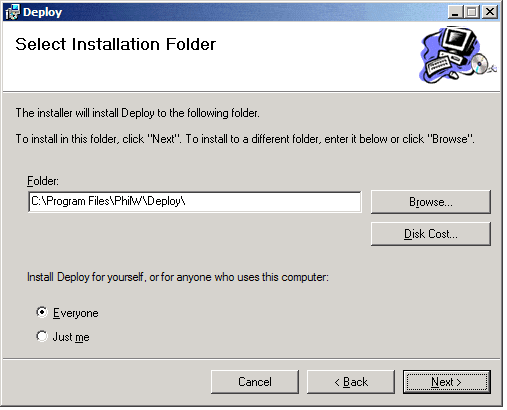
Figure 3
There is no way to preset the Everyone/Just me setting in Visual Studio 2003’s IDE. Figure 4 shows the properties of a setup project in the Beta 1 version of Visual Studio 2005. Note that there is an InstallAllUsers property to set the default behavior.
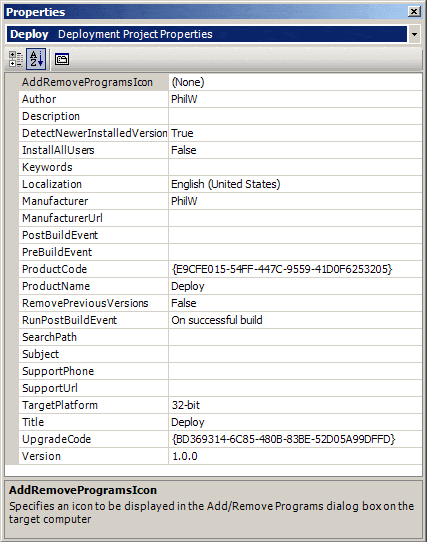
Figure 4
Be mindful of the issues
The internal logic that uses UpgradeCode to search for other versions of the product allows a range of version values to be used. A tool called Orca in the Windows Installer section of the Platform SDK can be used to view and edit MSI files. More on this later.
Figure 5shows the values in the Upgrade table in the MSI file. The VersionMin and VersionMax values show the range of values for which to search, but Visual Studio does not allow you to specify this version range, which starts at 1.0.0. If you are partial to versions before 1.0-0.5, for example-your RemovePreviousVersions will fail.
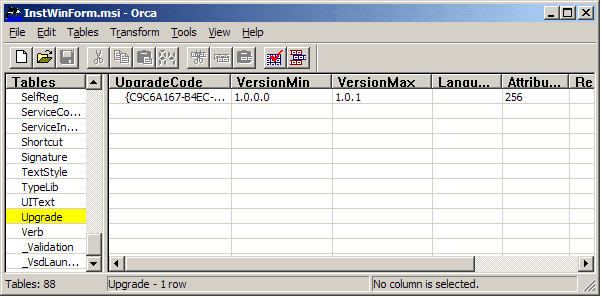
Figure 5
Recall that a Just me install will not upgrade an Everyone install. In Visual Studio .NET, the internal search for a matching UpgradeCode occurs before the per-machine/per-user value is resolved. In Visual Studio setups the default install is per user, so a RemovePreviousVersions upgrade will not upgrade an Everyone per-machine install because it is still in the default per-user mode when it searches for the previously installed versions. Visual Studio 2003 does not have this issue.
Custom actions in RemovePreviousVersions upgrades may also give unexpected results. In a Windows Installer major upgrade, custom actions are called in the same process space.
Let’s walk through the scenario with a DLL, including .NET assemblies. The first custom action called will be the uninstall custom action from the older, already installed version. Windows loads the associated DLL and calls the custom action. Later, the install custom action from the new product is called. If this DLL has the same name as the DLL in the older product, Windows assumes that the DLL is loaded and it will not load the version of the DLL from your new setup.
This has some interesting effects. The install method from your old custom-action DLL is called instead of the one from the DLL in the new setup. Similar problems have been reported with COM DLLs. So although it might be awkward, I recommend that you change the name of your DLL in these cases. See http://support.microsoft.com/default.aspx?scid=kb;en-us;555184 for additional information.
Other types of updates
Products can be updated using Windows Installer patches, or MSP files. The main advantage of such patches is that they are small. The patches function as a delta between one version of an MSI file and another-the difference between the MSI tables-and new versions of the updated files. In the optimizations that produce the smallest patches, the patches contain binary patches to individual files. In cases that are less optimized for size, patches contain the entire file that has changed.
Patches can be built using PCP files, described in the Windows Installer SDK documentation. I don’t recommend that you build patches based on setups that were generated by Visual Studio setups, however, because you don’t have enough control over the way Visual Studio generates MSI files. In particular, the generation of patches is sensitive to the name of the internal CAB file and associated streams embedded in the MSI file. A mismatch between old and new versions will give you error 2356 when you apply the patch.
Expert mode
The great thing about Visual Studio setup projects is that they isolate you from the complexities of Windows Installer: You don’t need to worry about what’s going on internally. There are other tools that enable you to control more of the internals of MSI setups and give you the proverbial rope with which to hang yourself (see http://installsite.org/pages/en/msi/authoring.htm for a good summary).
The reason that setup programs require extra care in design and implementation is best illustrated by comparing them with other programs. A typical application program processes input data and produces some result for consumption by humans or other programs. If it breaks, you replace it on the system by putting a new copy out there.
An installation program isn’t like that. It makes changes to the system, many of which are in sensitive areas such as the Windows registry. Once those changes have occurred, it’s too late to replace the setup program with a new one because the changes, and the damage they may have done, are already on the system.
Perhaps the closest analogy to a setup program is an application program that updates a critical database. If the program breaks, the database is corrupted and you need to restore a previous version of the database or find a way to undo the damage.
If you want to learn more about what goes on inside MSI files, take a look at a tool called Orca from the Windows Installer section of the Platform SDK. If you install from Orca.msi in the \bin folder, you will see the tables and their contents in the MSI file.
I use the word tables because the MSI file is a database, and the tables and their uses are documented in the Platform SDK. MSI files are transparent-you can see everything except for the content of binary files used in the custom actions that Visual Studio generates. To see what happens, take a look at the InstallExecuteSequence table of an MSI file in conjunction with a log from installing that MSI file with this type of command line:
|
1 |
Msiexec /I <path to your MSI file> /l*v nameoflogfile.log |
Conclusion
Visual Studio setup projects offer a limited but capable introduction to Windows Installer-based setups. They give you the basic functionality of a Windows Installer setup with MSI files, but to do so they hide some of the more complex functionality of Windows Installer. Hopefully, this series of articles will help you use setup projects successfully.
Load comments