
Introduction
Reflector does a wonderful job translating an Assembly into higher level languages. When you select “Disassemble”, this is what is happening in the background. The Metadata in the Assembly in translated to an appropriate representation in C# or VB or whatever languages you have installed. Reflector takes things a step further than this marvel, providing the mechanisms needed to add virtually any functionality that you find missing. This includes creating your own “language” to disassemble to.
For our purposes, we will define a “Reflector Language” as a piece of code that converts an object from the Reflector object model into useful text. For C#, VB.Net, etc, these objects are translated into the textual representation that will produce the same metadata that was converted.
Here we will step through creating a “Reflector Language” that will result in the CodeDom code needed to generate the code that was parsed.
Anatomy of a Reflector Language
When creating a language from scratch you have to create the lexical analyzer and the parser. The lexical analyzer will separate a character string into valid tokens for your language. The parser assembles these tokens into something meaningful, based on the grammar for your language.
We won’t have to worry about most of this. Reflector will present us with meaningful objects from the Reflector.CodeModel namespace based on the meta data from the Assembly being parsed. To build our “language”, we need to write code explaining what to do when each of these objects are encountered. We don’t really care about how Reflector determined that we have a ConditionStatement,; we simply focus on what our language needs to do when a ConditionStatement is found.
There are a handful of objects that you will need to implement in order to define a language. Remember that an Add-in is just a class library. In our class library, we must provide an object implementing the Reflector.IPackage interface, the Reflector.CodeModel.ILanguage Interface, and the Reflector.CodeModel.ILanguageWriter interface. By themselves none of these are too difficult to implement.
The IPackage object will provide the details needed to register our language with Reflector. Specifically, we need to provide a Load and Unload method that will register our language with the LanguageManagerService
|
1 2 3 4 5 6 7 8 9 10 11 12 13 14 15 16 17 18 19 20 21 22 23 24 25 |
public class CodeDomLanguagePackage : IPackage { // Fields private CodeDomLanguage language; private ILanguageManager languageManager; // Methods #region IPackage Members public void Load(IServiceProvider serviceProvider) { language = new CodeDomLanguage(); languageManager = (ILanguageManager) serviceProvider.GetService(typeof (ILanguageManager)); languageManager.RegisterLanguage(language); } } public void Unload() { languageManager.UnregisterLanguage(language); } #endregion } |
The ILanguage object has one method of interest. GetWriter will be called by Reflector as needed and allow us to associate an IFormatter and an ILanguageWriterConfiguration to our writer.
|
1 2 3 4 5 6 |
public ILanguageWriter GetWriter(IFormatter formatter, ILanguageWriterConfiguration configuration) { return new CodeDomLanguageWriter (formatter, configuration); } |
The ILanguageWriter provides various methods that will be called by Reflector when different types of code are to be processed.
|
WriteAssembly |
Called when you disassemble an Assembly |
|
WriteAssemblyReference |
Called when you disassemble the Assembly references |
|
WriteEventDeclaration |
Called when you disassemble an Event Declaration |
|
WriteExpression |
Called when you disassemble an Expression |
|
WriteFieldDeclaration |
Called when you disassemble a Field declaration |
|
WriteMethodDeclaration |
Called when you disassemble a Method declaration |
|
WriteModule |
Called when you disassemble a Module |
|
WriteModuleReference |
Called when you disassemble an embedded reference at a module level |
|
WriteNamespace |
Called when you disassemble a Namespace |
|
WritePropertyDeclaration |
Called when you disassemble a Property Declaration |
|
WriteResource |
Called when you disassemble an embedded Resource |
|
WriteStatement |
Called when you disassemble a Statement in isolation |
|
WriteTypeDeclaration |
Called when you disassemble a Type Declaration |
These various methods allow you to customize what gets displayed in the Disassembler window as the user clicks on the various levels in the TreeView. When you leave a blank implementation then nothing will be displayed at that level in the TreeView. At a minimum, you should display an informative message about what is being viewed. For example, this may be all that you need for a minimal implementation of VisitNameSpace
|
1 2 3 4 5 6 7 8 |
public void WriteNamespace(INamespace value) { formatter.Write ("Visiting the " + value.Name + " namespace"); formatter.WriteLine (); formatter.Write("It has " + value.Types.Count + " types"); formatter.WriteLine(); } |
As in life, the devil is in the details. Providing the details for how to process the various language structures is where the complexities come in.
Languages are Recursive
Language components are defined in terms of themselves. This is true for natural languages like English, French, and Spanish. It is also true for programming languages like C#, VB, and Java. This makes their definitions recursive.
A simple example in English is illustrated through the following series of phrases:
- My car
- My father’s car
- My father’s brother’s car
- My father’s brother’s wife’s car etc.
As prevalent as this is with Natural Languages, it is even more widespread with computer programming languages. There are two main base Interfaces in the Reflector.CodeModel namespace, IStatement and IExpression. These show up widely in recursive definitions. For example, an IBinaryExpression is an IExpression with two properties, Left and Right. Both of these properties, are of type IExpression and can implement any interface derived from IExpression, including IBinaryExpression. This makes the definition recursive. This also means that while parsing nearly every language structure, you may also encounter nearly any language structure.
The Visitor pattern makes it easier to deal with some of the complexities that can arise from the recursive nature of the language definitions. Instead of having to keep in mind every possibility when we encounter an IExpression, we can defer that responsibility to a more generalized VisitExpression and let it figure out the specific derived interface the object being visited implements.
Instead of adding code to support the various types that you can encounter in each type, we can write the code for each type in its own method and then call the Visitor to “visit” every possibility for the derived types.
A Sample Visitor
The VisitBinaryExpression may have an implementation similar to this:
|
1 2 3 4 5 6 7 8 9 10 11 12 13 14 15 16 17 18 19 20 21 22 23 24 25 26 27 28 |
public override void VisitBinaryExpression(IBinaryExpression value) { if (value != null) { System.CodeDom.CodeBinaryOperatorExpression exp = new System.CodeDom.CodeBinaryOperatorExpression(); string name = "binaryExpression";// +value.ToString(); formatter.Write("System.CodeDom.CodeBinaryOperatorExpression " + name +" = new System.CodeDom.CodeBinaryOperatorExpression();"); formatter.Write (MethodTarget.BuildCodeString(name)); formatter.WriteLine(); codeStack.Push(new CodeStackItem(name, "Left", false)); VisitExpression(value.Left); codeStack.Pop(); formatter.WriteLine (); switch (value.Operator) { . . . } formatter.WriteLine(); codeStack.Push(new CodeStackItem(name, "Right", false)); VisitExpression(value.Right); codeStack.Pop(); formatter.WriteLine(); } } |
Inside the switch statement, we handle the various values in the BinaryOperator enumeration. The key things to note here are the two calls to VisitExpression, the use of codeStack, and the call to MethodTarget BuildCodeString. The code stack allows us track context for what we are visiting. The CodeStackItem includes the name of the object that triggered the visitation (the ActiveBlock), the name of the property that we are visiting (the ActiveCollection), and an indicator for whether or not this is to be a collection or a single item (IsCollection).
VisitExpression, is a long but simple method blindly calling every visitor derived from IExpression looking for matches:
|
1 2 3 4 5 6 7 8 9 10 11 12 13 14 15 16 17 18 19 20 21 22 23 24 25 26 27 28 29 |
public void VisitExpression (IExpression value) { if (value != null) { VisitAddressOfExpression(value as IAddressOfExpression); VisitAddressOutExpression(value as IAddressOutExpression); VisitAddressReferenceExpression(value as IAddressReferenceExpression); VisitAnonymousMethodExpression(value as IAnonymousMethodExpression); VisitArgumentListExpression(value as IArgumentListExpression); VisitArgumentReferenceExpression(value as IArgumentReferenceExpression); VisitArrayCreateExpression(value as IArrayCreateExpression); VisitArrayIndexerExpression(value as IArrayIndexerExpression); VisitAssignExpression(value as IAssignExpression); VisitBaseReferenceExpression(value as IBaseReferenceExpression); VisitBinaryExpression(value as IBinaryExpression); VisitBlockExpression(value as IBlockExpression); VisitCanCastExpression(value as ICanCastExpression); VisitCastExpression(value as ICastExpression); VisitConditionExpression(value as IConditionExpression); VisitDelegateCreateExpression(value as IDelegateCreateExpression); VisitDelegateInvokeExpression(value as IDelegateInvokeExpression); VisitEventReferenceExpression(value as IEventReferenceExpression); VisitExpressionCollection(value as IExpressionCollection); . . . . } } |
If value is not of the correct type, the as operator will return null. Each method will verify that null was not passed in adding marginal extra complexity to each method, but dramatically lowering the complexity of the VisitExpression. We use a similar method for VisitStatement and VisitType.
MethodTarget is a property of type CodeStackItem that standardizes accessing the top item in the CodeStack.
|
1 2 3 4 5 6 7 8 9 10 11 12 13 14 15 |
public CodeStackItem MethodTarget { get { CodeStackItem returnValue = null; if (codeStack.Count > 0) { returnValue = codeStack.Peek(); } else throw new System.Exception("No code items in the stack"); return returnValue; } } |
The BuildCodeString method from the CodeStackItem class handles the interpretation of a CodeStackItem and produces a string suitable for adding to our code:
|
1 2 3 4 5 6 7 8 9 10 11 12 13 14 15 16 |
public string BuildCodeString(string value) { string returnValue = ""; if (isCollection) { returnValue = ActiveBlock + "." + ActiveCollection + ".Add(" + value + ");"; } else { returnValue = activeBlock + "." + ActiveCollection + " = " + value + ";"; } return returnValue; } |
Pulling it All Together
The visitor pattern makes our code easier to structure. It also allows us to have a nice structure to produce a usable language even as we are adding support for more features. We can provide visitor methods for features that we have not yet implemented that will simply announce that a given feature is not yet supported and then have a convenient place to add the missing functionality as we are ready. When you get started writing a language, many of the visitor methods may be as simple as this:
|
1 2 3 4 5 6 7 8 9 10 11 12 13 14 15 16 17 18 19 20 21 |
public override void VisitAddressDereferenceExpression (IAddressDereferenceExpression value) { if (value != null) { WriteUnsupported(value); } } The WriteUnsupported method could be similar to this. private void WriteUnsupported(IExpression value) { if (value != null) { formatter.WriteLiteral("// Unsupported expression " + value.GetType().Name + ":"); formatter.WriteLine(); formatter.WriteLiteral("//" + value); formatter.WriteLine(); } } |
Now you are free to implement the language features that are important to you.
One important language feature to implement is a property declaration. Our property declaration visitor may look similar to this:
|
1 2 3 4 5 6 7 8 9 10 11 12 13 14 15 16 17 18 19 20 21 22 23 24 25 26 27 28 29 30 31 32 33 34 35 |
public override void VisitPropertyDeclaration(IPropertyDeclaration value) { formatter.WriteKeyword("public void"); WriteWhitespace(); formatter.WriteDeclaration("CreateProperty" + value.Name+"()"); formatter.WriteLine(); using (new IndentedCodeBlock(formatter)) { formatter.Write("System.CodeDom.CodeMemberProperty " + value.Name + " = new System.CodeDom.CodeMemberProperty();"); codeStack.Push(new CodeStackItem(value.Name, "Type", false)); VisitType(value.PropertyType); codeStack.Pop(); formatter.WriteLine(); formatter.Write(value.Name + ".Name = \"" + value.Name + "\";"); formatter.WriteLine(); if (value.GetMethod != null) { codeStack.Push(new CodeStackItem(value.Name, "GetStatements", true)); VisitMethodReference(value.GetMethod, false); codeStack.Pop(); } if (value.SetMethod != null) { codeStack.Push(new CodeStackItem(value.Name, "SetStatements", true)); VisitMethodReference(value.SetMethod, false); codeStack.Pop(); } formatter.WriteLine(); } } |
There are a couple of key things to note here, the use of a new class IndentedCodeBlock, the declaration of CodeDomTypes, and the call to VisitType to create the code necessary to initialize the data type for the property.
VisitType is a function similar to the VisitExpression that we saw earlier. This method will be able to process type specification in all its forms.
When dealing with one of the Declaration methods, we will be outputting a method that will produce the CodeDom code to create the corresponding object. In this case, we output the method CreateProperty<PropertyName>. We call VisitType passing in the context of the CodeMemberProperty and the Type property specifying that this is not a collection. We then call VisitMethodReference passing in the context of the CodeMemberProperty and the GetStatements and SetStatements specifying that these are collections. This will handle generating the details for the property implementation.
The IndentedCodeBlock is a class that I borrowed from the implementation of the PowerShell language. It is a very simple class consisting of only a constructor and the Dispose method, but simplifies formatting our code. We use this class whenever our outputted code adds a level of indention.
|
1 2 3 4 5 6 7 8 9 10 11 12 13 14 15 16 17 18 19 20 |
private class IndentedCodeBlock : IDisposable { private readonly IFormatter formatter; public IndentedCodeBlock(IFormatter formatter) { this.formatter = formatter; formatter.Write("{"); formatter.WriteLine(); formatter.WriteIndent(); } public void Dispose() { formatter.WriteOutdent(); formatter.Write("}"); formatter.WriteLine(); } } |
By declaring the IndentedCodeBlock in a using statement, we don’t have to worry about explicitly calling the dispose. The IndentedCodeBlock will go out of scope as soon as the using statement is out of context and the Dispose method will be called automatically.
There are a couple of lines worth noting here. We call some new functions from the formatter to control the layout of the code. There are various methods that we can call to facilitate color coding and make our outputted code more visually engaging. The actual results will depend on the implementation of the IFormatter object. Providing your own IFormatter is yet another way to customize Reflector. Here are the important methods in the IFormatter interface:
|
Write |
Called to write out a string with no special formatting. |
|
WriteComment |
Called to write out a string formatted as a comment. This will generally be a light gray. These are not the comments from the original code but comments that the language added while translating. |
|
WriteDeclaration |
Called to write out the keywords in a declaration. |
|
WriteIndent |
Called to write out a new level of indentation in your code. |
|
WriteKeyword |
Called to write out a Keyword. |
|
WriteLine |
Called to write out a new line. This signals to the formatter that this is the end of one line and that futures calls should display text on a new line. |
|
WriteLiteral |
Called when you need to write out a literal value such as a string, a number, a Boolean value, etc. |
|
WriteOutdent |
Called to end the most recent level of indentation in your code. |
|
WriteProperty |
Called to write out a property reference |
|
WriteReference |
Called to write out a function reference |
Taking this Further
Here we showed how to create a language that will produce the CodeDom code to represent the code being disassembled. Other possibilities may include using this framework to create a language to provide static code analysis. You have the pieces needed to build a rules engine similar to FxCop. You could complain about methods with too many parameters. Warn about methods with too many conditional branches. Raise red flags when a switch statement does not include a “default”.
You could also use this approach to build a language that would write stubs for your unit testing. As your language visits language structures such as an IConditionStatement, ISwitchCase, or IForEachStatement that would indicate the need for a new unit test, your language could output a comment describing the new test that would be needed.
In the approach outlined here, we mainly used the Write and WriteLine methods. The other methods provided by IFormatter can be used to provide syntax highlighting for your language output. Using these methods will not add any functionality to our language or change its implementation, but it will improve the readability and look of your generated code.
Also WriteComment can be used to add critiques of the code being parsed.
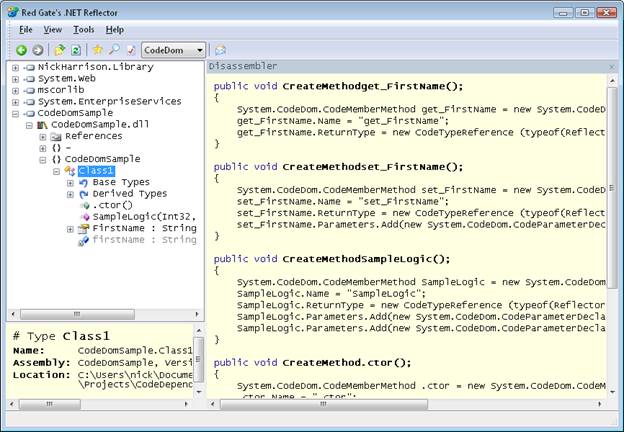
Screen Shots
Here is how our new language looks in Reflector. We load this add-in like we would an add-in. Once added, our “language” shows up in the language drop down.

Conclusion
Creating your own Reflector language should not be seen as daunting task. The goal is not to create a new industrial grade language and compete with C# and VB. The goal is to provide a new way to translate IL into something useful. Here we discussed examples of what you may do with your own language. As you get comfortable with these techniques, you will find more uses and new ways to have fun with a remarkable tool: .NET Reflector.
Load comments