
Introduction
Scaffolding was first made popular with Ruby on Rails and has since been a popular feature in most MVC frameworks. Here we will explore how it is used with the ASP.Net MVC and Web API Frameworks.
Developers can be a great deal more productive with Scaffolding because they can describe part of the solution, the Model, and the scaffolding system will fill in the rest from a Data Access perspective. This means that there is a lot of work that you no longer have to do to create a functional web application or to expose an interface based on Web API.
We will look at the built- in support for Scaffolding that Visual Studio 2013 provides out of the box. You’ll find that this is different than the support provided in Visual Studio 2012. If you are still using Visual Studio 2012, you still have scaffolding, it is just a bit different than what I’ll be describing here.
Why Do We Care
We are all busy and web applications have lots of moving pieces. We need to worry about their performance, security, scalability and accessibility; on top of ensuring that it actually does what the end user wants.
Users also have high expectations for web applications. They expect them to be fast, engaging, interactive, and responsive. They expect them to work on everything from the smallest smart phones to wide-screen high-definition desktops.
We have to jump over all of these hurdles and still finish the race in an ever-decreasing time.
We care about anything that can safely and reliably handle some of these complexities for us. Scaffolding does just that. With Scaffolding we won’t have to worry about wiring up to the database yet we still get a well-structured web application that still adheres to the MVC design pattern.
Scaffolding a Controller
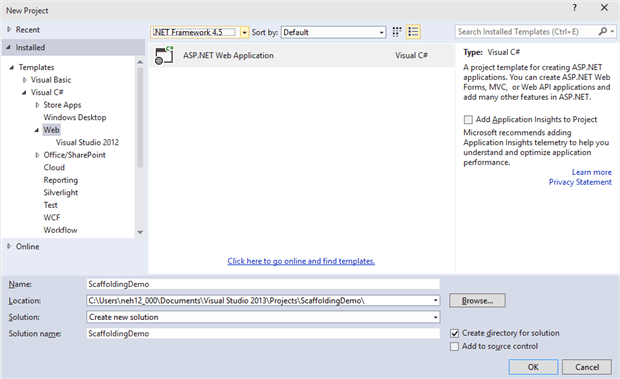
Start by creating a new MVC Web Application in Visual Studio 2013.
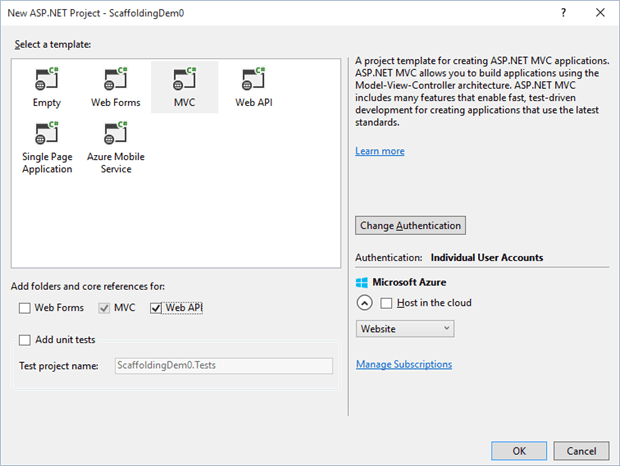
You now need to specify that you want to support both MVC and WebAPI
In this project, create a new Model and call it TimeTrackingItem.
|
1 2 3 4 5 6 7 |
public class TimeTrackingItem { public int Id { get; set; } public DateTime StartTime { get; set; } public DateTime EndTime { get; set; } public string Comment { get; set; } } |
Once you have the Model added, compile your project. The Scaffolding system uses Reflection to get the needed Meta Data so it relies on a compiled Assembly. Now that we have our Model, we are ready to add a Controller.
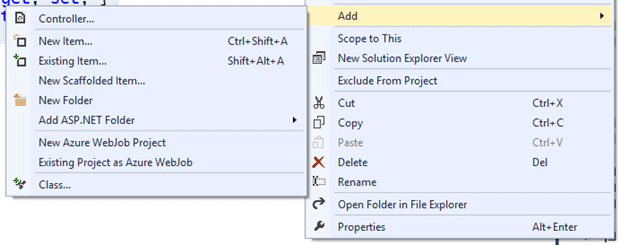
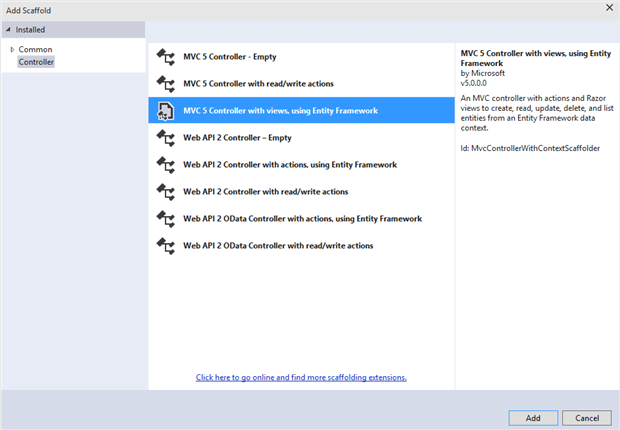
Right-mouse-click on the ‘ Controller ‘ folder in ‘ Solution Explorer ‘ and select ‘ Add ‘ followed by -> ‘ Controller … ‘
Select ‘ MVC 5 Controller with views, using Entity Framework ‘.
Select the TimeTrackingItem Model that we just created. Click the + button by the DataContextClass to tell the Scaffolding system to create a new database context class. Specify that you want to generate Views and name the Controller TimeTrackingItemController.
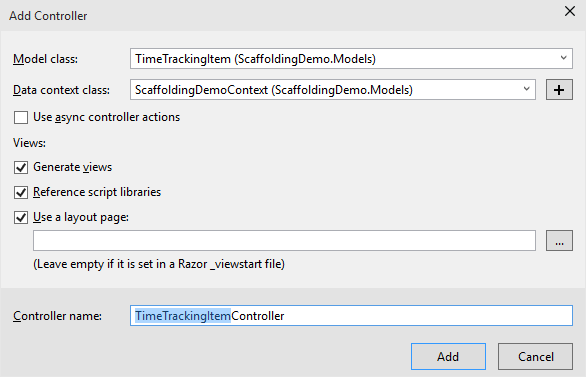
When you click ‘ Add ‘, the Scaffolding will work its magic. Once Visual Studio has finished Scaffolding, let’s run the application and look at the results.
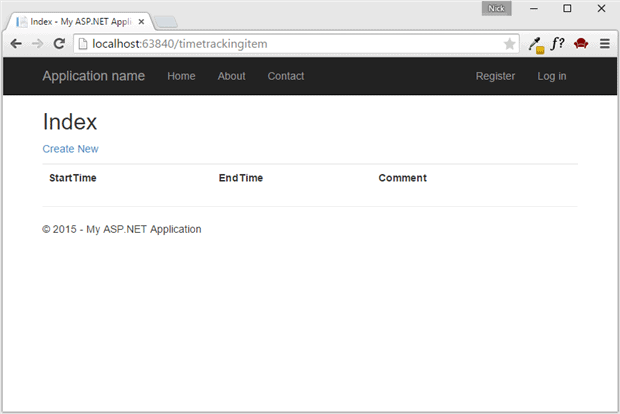
Once you start the Web Application, navigate to the TimeTrackingItem Controller.
Click on ‘ Create New ‘ and fill out the form.
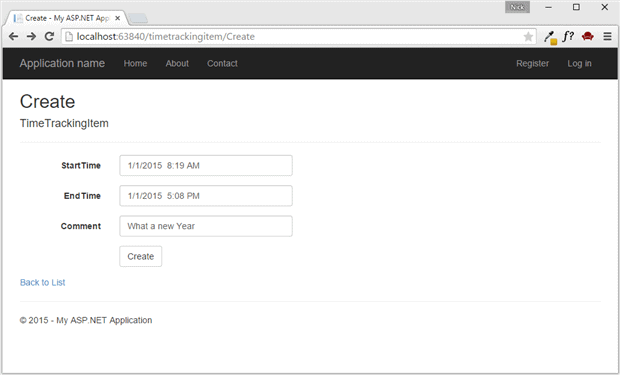
When you click on ‘ Create‘, we will be taken back to the Index showing the newly Created Time Tracking Entry. Don’t worry about validations yet. We will get to that shortly.
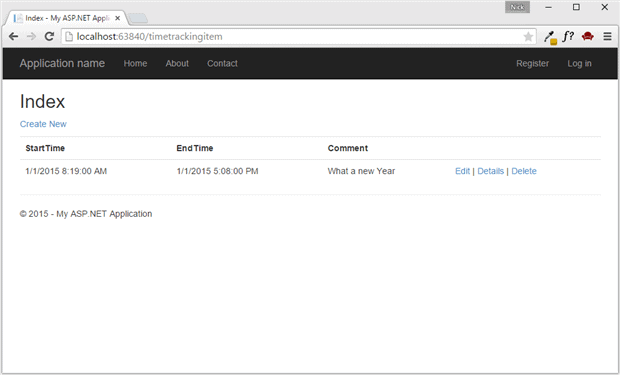
Play around with it. You will see that the ‘ Edit‘, ‘ Details‘, and ‘ Delete‘ all work as expected.
Not bad. So far we have not written any code beyond the very simply Model.
But behind the scenes, the Scaffolder has done a lot of work for us.
DBContext
The scaffolder set it up for our initial database to be created for us, based on the Model that we specified.
The MDF file for a SQL database was created in the AppData folder on the project. Right now, there is only the one table for the one Model that we have specified.
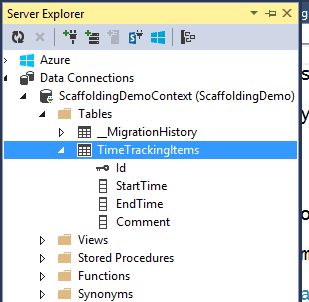
This database was created based on conventions from ‘Code-First’ Entity Framework.
The dbcontext at this point is very simple:
|
1 2 3 4 5 6 7 |
public ScaffoldingDemoContext() : base("name=ScaffoldingDemoContext") { } public System.Data.Entity.DbSet TimeTrackingItems { get; set; } |
This will get expanded as you add more Models and more Controllers.
TimeTrackingItemController
Now let’s turn our attention to the Controller that was created for us. The Controller created some standard Actions for us:
- Index
- Details
- Create as a Get Action
- Create as a Post Action
- Edit as a Get Action
- Edit as a Post Action
- Delete as a Get Action
- Delete as a Post Action
In addition to these standard Actions, we also have a local member variable db that will be used by all of the Actions. This is a direct reference to the DBContext that was created for us.
The basic pattern for the Get Actions look like this:
|
1 2 3 4 5 6 7 8 9 10 11 12 13 |
public ActionResult Details(int? id) { if (id == null) { return new HttpStatusCodeResult(HttpStatusCode.BadRequest); } TimeTrackingItem timeTrackingItem = db.TimeTrackingItems.Find(id); if (timeTrackingItem == null) { return HttpNotFound(); } return View(timeTrackingItem); } |
The basic pattern for the Post Actions look like this:
|
1 2 3 4 5 6 7 8 9 10 11 12 13 14 |
[HttpPost] [ValidateAntiForgeryToken] public ActionResult Edit([Bind(Include = "Id,StartTime,EndTime,Comment")] TimeTrackingItem timeTrackingItem) { if (ModelState.IsValid) { db.Entry(timeTrackingItem).State = EntityState.Modified; db.SaveChanges(); return RedirectToAction("Index"); } return View(timeTrackingItem); } |
The Bind attribute on the input parameter helps protect against over-binding and under-binding security vulnerabilities. This attribute explicitly states the properties that we expect the binder to be able to bind for us.
Finally the Controller overrides the Dispose method to handle disposing of the DBContext.
In the end, we get a pretty good implementations for the basic CRUD operations on the Model that we specified.
Views
In addition to creating the Controller and DBContext, we also get the various Views needed to support these Actions. Even before we decide to change anything, they don’t look too bad.
These Views are all created under the TimeTrackingItem folder in the Views folder

Looking at the HTML included in these Views, we see that it is well structured and set up to leverage any Attributes added to the properties in the Model.
|
1 2 3 4 5 6 7 8 9 10 11 12 13 14 15 16 17 18 19 20 21 22 23 24 25 26 27 28 29 30 31 32 33 34 35 36 37 38 39 40 |
@model ScaffoldingDemo.Models.TimeTrackingItem @{ ViewBag.Title = "Edit"; } <h2>Edit</h2> @using (Html.BeginForm()) { @Html.AntiForgeryToken() <div class="form-horizontal"> <h4>TimeTrackingItem</h4> <hr /> @Html.ValidationSummary(true, "", new { @class = "text-danger" }) @Html.HiddenFor(model => model.Id) <div class="form-group"> @Html.LabelFor(model => model.StartTime, htmlAttributes: new { @class = "control-label col-md-2" }) <div class="col-md-10"> @Html.EditorFor(model => model.StartTime, new { htmlAttributes = new { @class = "form-control" } }) @Html.ValidationMessageFor(model => model.StartTime, "", new { @class = "text-danger" }) </div> </div> <div> @Html.ActionLink("Back to List", "Index") </div> @section Scripts { @Scripts.Render("~/bundles/jqueryval") } |
Using LabelFor and EditorFor ensures that the markup will take into account any attributes that we add to the Model, such as Display or UIHint or any of the Validation Attributes.
We also see that these Views are, upon initial set up, already configured to use the Bootstrap Stylesheet framework. But as we saw, the input controls are not the most intuitive for dealing with more complex data entry such as dates.
Customizing the View
We’d like to start by changing the input controls to give better labels. We can add attributes to the Model to specify more human-readable labels.
|
1 2 3 4 5 6 7 8 9 |
public class TimeTrackingItem { public int Id { get; set; } [Display(Name = "Start Time")] public DateTime StartTime { get; set; } [Display(Name = "End Time")] public DateTime EndTime { get; set; } public string Comment { get; set; } } |
Each of the Views will honor these DisplayAttributes .
For this particular project, we need the data entry input controls to prompt for not just the date but also the time. This makes it all the more important to have a good editor for prompting for this data. A simple text box will not do.
Let’s start by adding a couple of nuget packages to help with these prompts.
From the package management console, run the following command:
|
1 |
PM> Install-Package Bootstrap.v3.Datetimepicker |
This will also install Moment.js which is needed by the date time picker.
Once this has been added to your project, you will need to update the bundles to ensure that these new scripts are available to your application. Modify the code in BundleConfig.cs to look like:
|
1 2 3 4 5 6 7 8 9 10 11 12 13 14 15 16 17 18 19 20 21 22 |
public static void RegisterBundles(BundleCollection bundles) { bundles.Add(new ScriptBundle("~/bundles/jquery").Include( "~/Scripts/jquery-{version}.js")); bundles.Add(new ScriptBundle("~/bundles/jqueryval").Include( "~/Scripts/jquery.validate*")); bundles.Add(new ScriptBundle("~/bundles/modernizr").Include( "~/Scripts/modernizr-*")); bundles.Add(new ScriptBundle("~/bundles/bootstrap").Include( "~/Scripts/bootstrap.js", "~/Scripts/respond.js", "~/Scripts/moment.min.js", "~/Scripts/bootstrap-datetimepicker.js", "~/Scripts/app.js")); bundles.Add(new StyleBundle("~/Content/css").Include( "~/Content/bootstrap.css", "~/Content/site.css")); } |
This will add the two new script files to the bootstrap bundle so that we can reference their code in our page. The new lines are marked in bold.
Now we can exploit what we learned earlier about Extending Editor Templates for ASP.NET MVC. We will create a new editor template for DateTime that will use these two scripts.
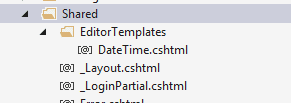
We will need to add a new Partial View to the Shared\EditorTemplates folder. Name the partial view DateTime.cshtml
The markup for this partial view is relatively straight forward.
|
1 2 3 4 5 6 7 8 9 10 11 12 13 14 15 16 17 18 19 20 |
@model DateTime? <div class="container"> <div class="row"> <div class='col-sm-4'> <div class="form-group"> <div class='input-group date' > @Html.TextBox("", (Model.HasValue ? Model.Value.ToShortDateString() : string.Empty), new { @class = "form-control" }) <span class="input-group-addon"> <span class="glyphicon glyphicon-calendar"></span> </span> </div> </div> </div> </div> </div> |
Most of the complexity here is working with the Bootstrap stylesheet framework. The mechanics of the Editor Template are fairly straightforward.
In addition to this, we will need a little bit of JavaScript to activate the libraries that we just installed.
|
1 2 3 |
$(document).ready(function () { $(".date").datetimepicker(); }); |
We can add this snippet of JavaScript to the bottom of the _ Layout.cshtml.
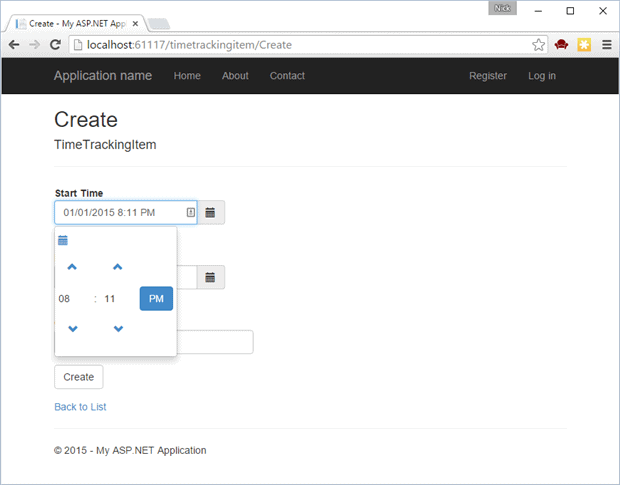
We see the effect of these changes when we re-run the application.
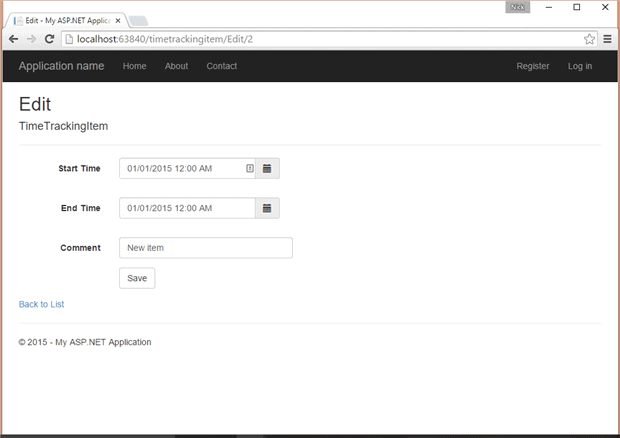
And with the calendar activated…
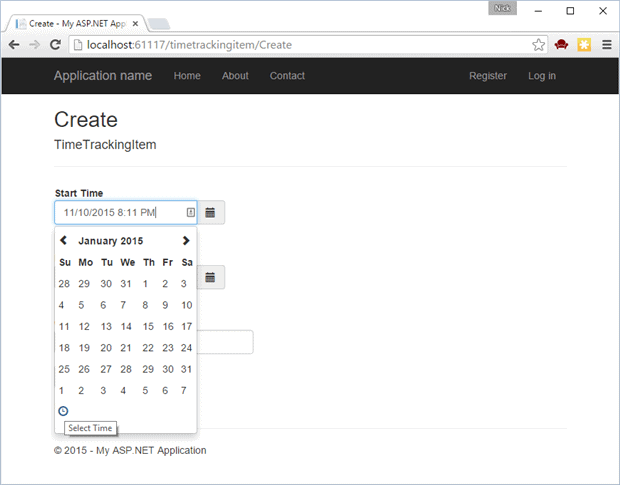
We can also select time by clicking on the clock:
Because we created the Editor Template, any time we call EditorFor on a property of type DateTime, we will get this same feature-rich editor for editing the value.
Web API
We can also create a Web API controller based on the same Model using Scaffolding. This allows us to easily expose the Web API interface, as well as see the best practices for structuring a Web API.
Add ‘ New Controller ‘ from the context menu of the ‘ Controllers‘ folder in ‘ Solution Explorer’.
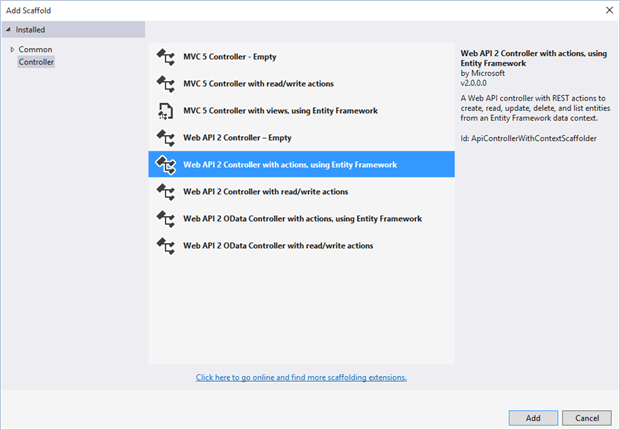
This time select ‘ Web API 2 Controller with actions using Entity Framework ‘.
Select the same ‘ Model class ‘ and the same ‘ Data context class ‘ that was used earlier.
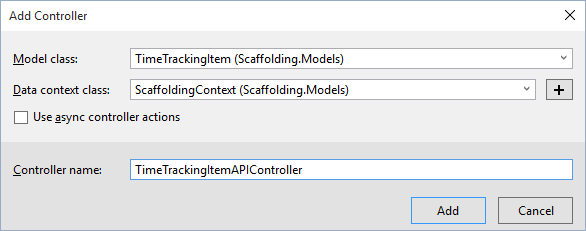
We just need to make sure that we give it a unique name.
Once the scaffolding has finished working its magic, we are ready to rerun the application.
The result of the ‘ get all ‘ method looks like this:
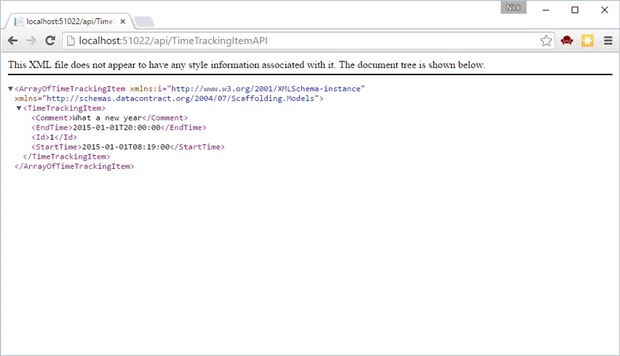
Note that the URL is prefaced with api. This is the hallmark of Web API.
The result of the ‘ Get By Id ‘ method looks like this:
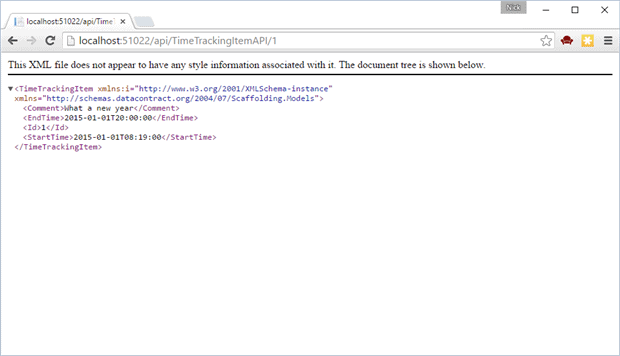
Note that the URL includes the Id of the item that we want to get.
To see the other methods in Action, let’s look first at the code that the scaffolder created for us.
Web API is different from MVC in the way that Actions are selected. With Web API, Actions are selected based on the HTTP V erb used to call the Action . The Verb is matched against the name of the Action (method) but is not reflected in the URL. Let’s look at the method signatures for these Actions.
|
1 2 3 4 5 6 7 |
public IQueryable GetTimeTrackingItems() public IHttpActionResult GetTimeTrackingItem(int id) public IHttpActionResult PutTimeTrackingItem(int id, TimeTrackingItem timeTrackingItem) public IHttpActionResult PostTimeTrackingItem( TimeTrackingItem timeTrackingItem) public IHttpActionResult DeleteTimeTrackingItem(int id) |
We have already seen the first two in action from the perspective of the Web Browser. To see the rest, we will switch from our favorite web browser to a handy app called Postman. You can get Postman here. Postman is a Chrome application so it is installed as a Chrome extension and launched from the Chrome launcher.
Once launched, simply specify the URL for our Web API:
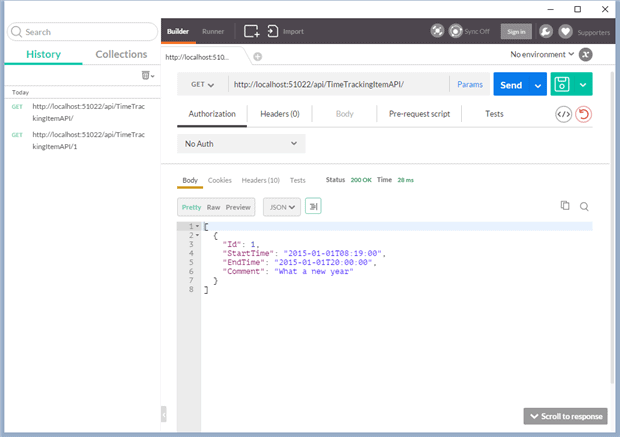
Notice that when you used this URL from Chrome, the data came back as XML. In Postman it comes back as JSON. This is another core feature of Web API. If you look at the implementation of the Get method, we don’t specify a format. The framework determines the format to use based on how the request was made:
|
1 2 3 4 5 6 7 8 9 10 11 12 |
// GET: api/TimeTrackingItemAPI/5 [ResponseType(typeof(TimeTrackingItem))] public IHttpActionResult GetTimeTrackingItem(int id) { TimeTrackingItem timeTrackingItem = rackingItems.Find(id); if (timeTrackingItem == null) { return NotFound(); } return Ok(timeTrackingItem); } |
If you want XML returned to Postman, simply specify an Accepts header:
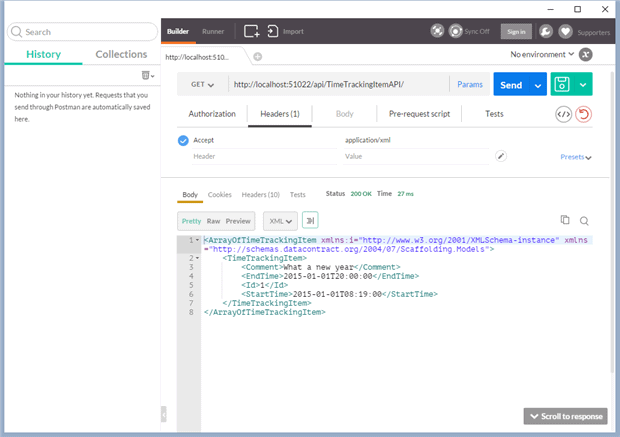
Web API will attempt to return the data in the format the requester specified that it can accept.
To invoke the Post action and create a new Entry, change the V erb to Post and fill in the parameters in the body:
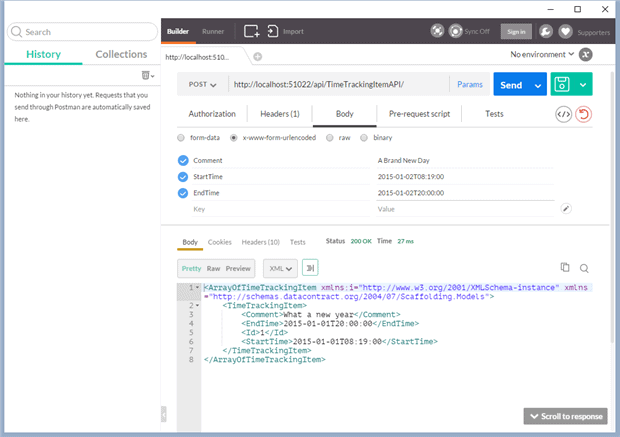
When you click ‘ Send ‘, the Action will be invoked and a new record created. This new record will be returned from the Controller.
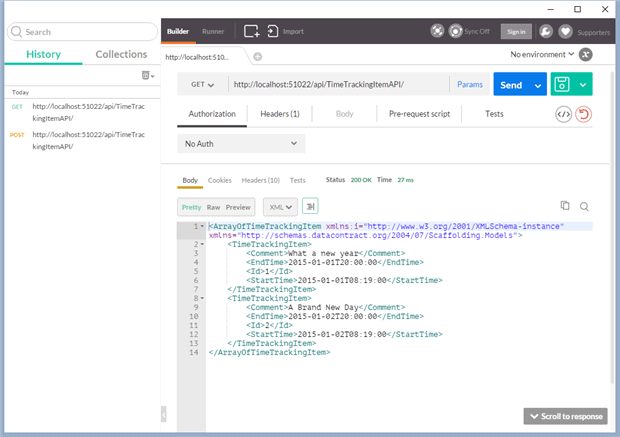
We can see the results of this insert by calling the ‘ Get All ‘ action again.
To update one of these records, switch the Verb of the action to ‘ PUT‘
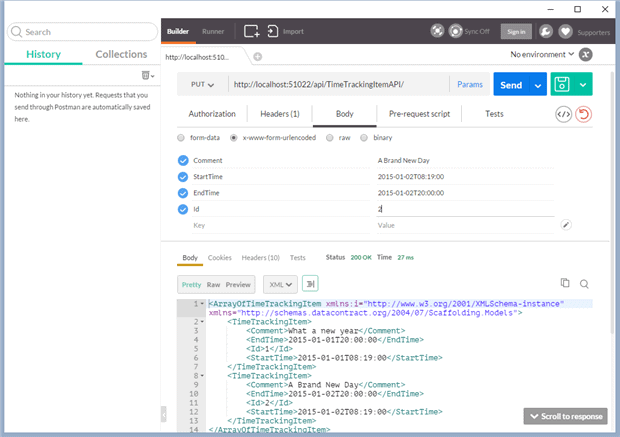
You will promptly get an error message.
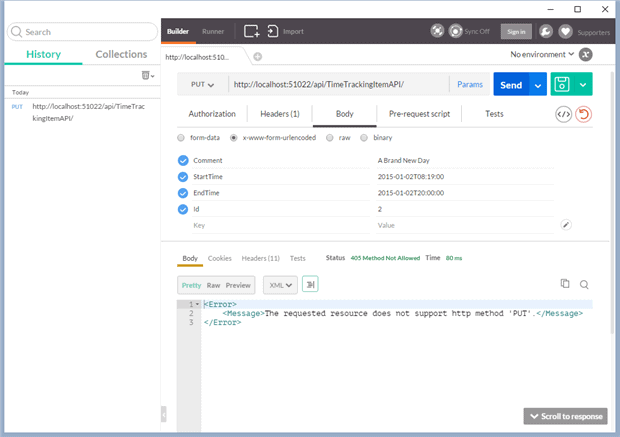
Unfortunately this is a very confusing error message because the PUT action is supported. The problem is with the URL that we are using. This is a subtle problem, but we need to specify the Id in the query string.
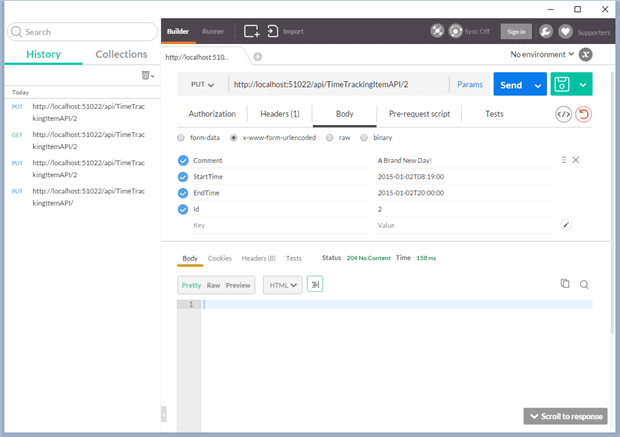
Note that the value of the Id property must be specified in both the body and the URL. The generated code includes a rudimentary check to ensure that these two values match
|
1 2 3 4 5 6 7 8 9 10 11 12 13 14 15 16 17 18 19 20 21 22 23 24 25 26 27 28 29 30 31 32 33 34 35 |
// PUT: api/TimeTrackingItemAPI/5 [ResponseType(typeof(void))] public IHttpActionResult PutTimeTrackingItem(int id, TimeTrackingItem timeTrackingItem) { if (!ModelState.IsValid) { return BadRequest(ModelState); } if (id != timeTrackingItem.Id) { return BadRequest(); } db.Entry(timeTrackingItem).State = EntityState.Modified; try { db.SaveChanges(); } catch (DbUpdateConcurrencyException) { if (!TimeTrackingItemExists(id)) { return NotFound(); } else { throw; } } return StatusCode(HttpStatusCode.NoContent); } |
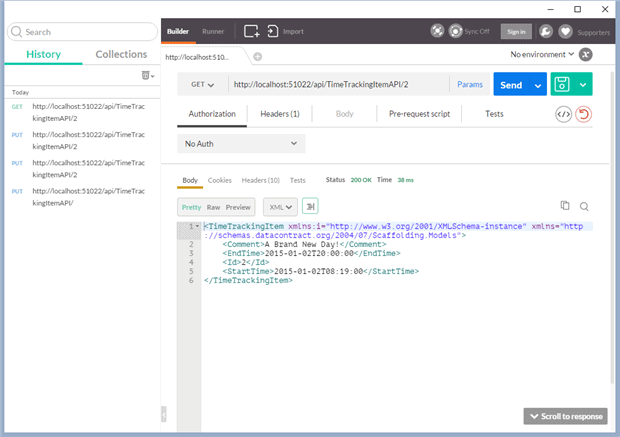
Now we can successfully call the put Action and have the update made. Unfortunately nothing is returned from the update method, aside from a 200 response, but we can see the results by calling the ‘ Get All ‘ action again or the ‘ Get‘ Action and passing in the ID.
Finally, we can switch the verb of the action to ‘ Delete ‘ and delete the specified TimeTrackingItem
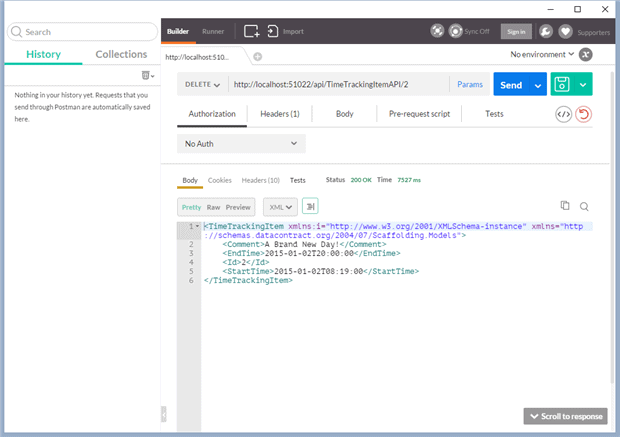
Note that the deleted item is returned back to the caller.
We see the results of the delete by once again calling the ‘ get all ‘ action.

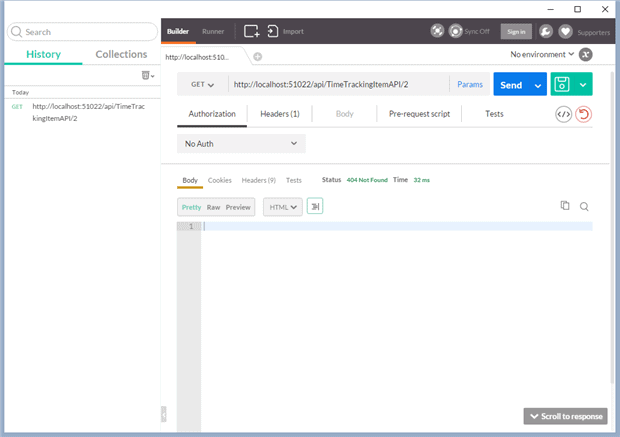
If you try to call the ‘ get‘ by id and pass in the Id that was just deleted we will get a 404 response because the requested item cannot be found.
Conclusion
Scaffolding provides a substantial productivity boost for developers. Using scaffolding, we don’t have to worry about many of the subtle details for wiring up the Controllers for either an MVC application or a Web API interface. We also get a nice looking UI without having to write any HTML on our own.
Remember that this is a one-time code generation that is intended to jump-start your development. As your Models change, you will need to manually update the Controllers and Views, but this also frees you from having to worry about preserving the generated code or losing any code changes that you do make.
This document contains proprietary information and is protected by copyright law.
Copyright © 2026 Red Gate Software Limited. All rights reserved
Load comments