
Executive Summary
This article walks through creating a PowerShell cmdlet in C# from scratch using Visual Studio. The finished cmdlet follows the PowerShell verb-noun naming convention (e.g., Get-NetworkAdapter), inherits from System.Management.Automation.Cmdlet, reads input from command-line parameters or the pipeline, and writes strongly-typed objects to the pipeline output. The 15 steps cover everything: Visual Studio project setup, NuGet reference to PowerShell assemblies, class naming and inheritance, CmdletAttribute, output type declaration, parameter decoration with ParameterAttribute, single and multiple pipeline inputs, positional parameters, and parameter aliases. By the end you have a fully functional, importable .dll that PowerShell can load as a module.
- Part 1: How to Document your PowerShell Library
- Part 2: Using C# to Create PowerShell Cmdlets: The Basics
- Part 3: Documenting Your PowerShell Binary Cmdlets
- Part 4: Unified Approach to Generating Documentation for PowerShell Cmdlets
Contents
- Step 1: Create a Visual Studio project
- Step 2: Provide a reference to .NET PowerShell resources
- Step 3: Rename the default Class1 class to reflect your cmdlet
- Step 4: Inherit from Cmdlet
- Step 5: Decorate your class with CmdletAttribute
- Step 6: Create your output container
- Step 7: Decorate your class with OutputTypeAttribute
- Step 8: Create your inputs
- Step 9: Decorate your parameters with the ParameterAttribute
- Step 10: Setup a single pipeline input
- Step 11: Setup multiple pipeline-able properties
- Step 12: Setup multiple inputs without the pipeline
- Step 13: Setup inputs without accompanying parameter names
- Step 14: Provide parameter aliases
- Step 15: Write some production code
- Conclusion
So you really enjoy the power and flexibility you get from using PowerShell cmdlets. You have played around with writing some functions and perhaps some cmdlets in PowerShell. Now your organization wants to include a PowerShell front-end to the .NET libraries it produces, which are all developed in C#. Thus, it makes sense to write the cmdlets in C# as well, giving better integration with your build tools and unit tests… not to mention that the rest of your development team is not as versed in writing in PowerShell. This is not difficult to do; in fact, the hardest part is finding the information on how to do it… a task which you have just accomplished!
There are different ways to accomplish most significant development tasks. This one is no different. This guide presents one way but it is certainly not the only way. In fact, you can take a short-cut around some of the things I will present: The ‘best practices’ I will describe herein are just that, but don’t discard them lightly.
The following is a complete recipe for creating a simple cmdlet, Get-NetworkAdapter, which reports on all the network adapters on your computer, with some filtering capabilities on different properties. Attached to this article is a complete, working solution with the implementation of the cmdlet. All the bits of code you see here come from that sample.
Step 1: Create a Visual Studio project
Within your Visual Studio solution, you will house your cmdlets in a project, just as you would any other component you are building. For PowerShell, create a Class Library project so that once you have built the project, you have a DLL that comprises your PowerShell cmdlets.
Step 2: Provide a reference to .NET PowerShell resources
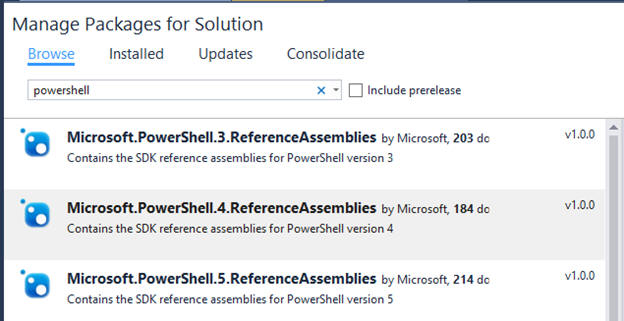
Until recently (December, 2015) this step was tedious, vague, and wishy-washy. Now it is clean and streamlined-thanks, Microsoft, for “nuget-izing” PowerShell’s reference assemblies! Here the goal is to add a reference to System.Management.Automation-the core of PowerShell-but you won’t find it if you just browse .NET assemblies. You need to use the NuGet Package Manager in Visual Studio to install the PowerShell reference assemblies first. They are available for PowerShell versions 3, 4, or 5, so choose the appropriate one for your environment. You can easily find it in the package manager by searching for “PowerShell”, as shown.
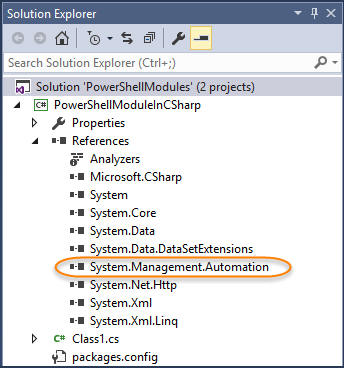
Then just select your PowerShell project created in step 1 to attach it to. Once installed, it will not only make the reference assemblies available, but it will also add just the reference you need in the project.
Step 3: Rename the default Class1 class to reflect your cmdlet
Rename the default Class1 class, or create a new class if you are adding another cmdlet to the project, so that its name conforms to this format:
<verb><noun>Cmdlet.cs
For this walkthrough, the cmdlet will be Get-NetworkAdapter so rename Class1 to GetNetworkAdapterCmdlet.cs.
Step 4: Inherit from Cmdlet
Instantly make your class into a cmdlet by inheriting from System.Management.Automation.Cmdlet:
|
1 2 3 |
public class GetNetworkAdapterCmdlet: Cmdlet { } |
There are times that you may need to inherit from PSCmdlet instead of Cmdlet, but for this article Cmdlet will suffice.
Step 5: Decorate your class with CmdletAttribute
Sadly, step 4 did not really make it a cmdlet. You also need to use System.Management.Automation.CmdletAttribute with appropriate arguments, namely the same verb and noun used in the class name defined in step 3. Verbs, by the way, should always come from the list of approved verbs, and you should use the predefined value for it here, rather than a string constant. Nouns, on the other hand, are unconstrained, so you must supply your own string (or put it in a constant).
|
1 2 3 4 |
[Cmdlet(VerbsCommon.Get, "NetworkAdapter")] public class GetNetworkAdapterCmdlet: Cmdlet { } |
At this point, you have a cmdlet, though it does not yet do anything. To confirm that it is really a cmdlet, first build your project, then load and examine what is in your module:
|
1 2 3 4 5 6 |
PS> Import-Module .\bin\Debug\PowerShellModuleInCSharp.dll PS> Get-Command -module PowerShellModuleInCSharp CommandType Name ModuleName ----------- ---- ---------- Cmdlet Get-NetworkAdapter PowerShellModuleInCSharp |
Note that the exposed name of the cmdlet comes from the Cmdlet, not from the class name!
Step 6: Create your output container
Inputs and outputs for your cmdlet need to be properly managed. You do not, for example, read from or write to the console as you would in a typical interactive program. Let’s consider outputs first. And let’s assume your cmdlet will have just one kind of output. (You can certainly have more: Get-ChildItem, for example, returns both FileInfo and DirectoryInfo objects.) For the sample cmdlet we are returning information about network adapters so we will simply call the output object a NetworkAdapter. Windows Management Instrumentation, or WMI, is the library to explore your system’s resources. It returns quite a lot of properties about a network adapter; for this exercise we will just use these select few:
|
1 2 3 4 5 6 7 8 9 |
public class NetworkAdapter { public string Name { get; set; } public string Description { get; set; } public int DeviceId { get; set; } public string Manufacturer { get; set; } public string NetConnectionId { get; set; } public bool PhysicalAdapter { get; set; } } |
Step 7: Decorate your class with OutputTypeAttribute
With your output object defined, you can now tell PowerShell what your cmdlet emits to the pipeline with the System.Management.Automation.OutputType attribute. I have highlighted the new code in yellow here:
|
1 2 3 4 5 |
[Cmdlet(VerbsCommon.Get, "NetworkAdapter")] [OutputType(typeof(NetworkAdapter))] public class GetNetworkAdapterCmdlet: Cmdlet { } |
This is important for two reasons. First, it contributes to your cmdlet’s auto-generated help text. Here is what Get-Help provides before and after applying the OutputType attribute (note the use of the -Full switch). Everything is the same except for the OUTPUTS section, highlighted below:
|
1 2 3 4 5 6 7 8 9 10 11 12 13 14 15 16 17 |
PS> Import-Module .\bin\Debug\PowerShellModuleInCSharp.dll -Force PS> Get-Help Get-NetworkAdapter -full NAME Get-NetworkAdapter SYNTAX Get-NetworkAdapter [<CommonParameters>] INPUTS None OUTPUTS # <<BEFORE>> System.Object OUTPUTS # <<AFTER>> PowerShellModuleInCSharp.Containers.NetworkAdapter |
Second, and perhaps more importantly, using the OutputType provides tab completion! Before you add the OutputType attribute, if you type this (the last part is “Select-Object“, then a space, then a tab)…
|
1 2 |
PS> Import-Module .\bin\Debug\PowerShellModuleInCSharp.dll -Force PS> Get-NetworkAdapter | Select-Object<space><tab> |
… nothing happens. But after you apply the OutputType attribute, here is what happens. (As this is not a video, you need to imagine the time-lapse nature of this figure.) When you type the first line of each pair, PowerShell turns it into the second line. I have added the highlighting to draw your attention to the iteration through the list of NetworkAdapter‘s properties as defined above.
|
1 2 3 4 5 6 7 8 9 10 11 12 13 14 15 16 17 18 19 20 21 22 |
PS> Import-Module .\bin\Debug\PowerShellModuleInCSharp.dll -Force PS> Get-NetworkAdapter | Select-Object<space><tab> PS> Get-NetworkAdapter | Select-Object Description PS> Get-NetworkAdapter | Select-Object Description<tab> PS> Get-NetworkAdapter | Select-Object DeviceId PS> Get-NetworkAdapter | Select-Object DeviceId<tab> PS> Get-NetworkAdapter | Select-Object Manufacturer PS> Get-NetworkAdapter | Select-Object Manufacturer<tab> PS> Get-NetworkAdapter | Select-Object Name PS> Get-NetworkAdapter | Select-Object Name<tab> PS> Get-NetworkAdapter | Select-Object NetConnectionId PS> Get-NetworkAdapter | Select-Object NetConnectionId<tab> PS> Get-NetworkAdapter | Select-Object PhysicalAdapter PS> Get-NetworkAdapter | Select-Object PhysicalAdapter<tab> PS> Get-NetworkAdapter | Select-Object Description |
The first <tab> activated the tab-completion, filling in the remaining portion of the first available choice lexicographically (from the set of NetworkAdapter‘s properties), i.e. Description.
By immediately pressing <tab> again, you will cycle through to the next choice, DeviceId. If you keep pressing <tab> it will eventually circle back to the start of the list, as shown. Note that I said the “remaining portion” just above. So if you had typed, say, “Select-Object De<tab>” then it will just fill in the first available choice beginning with “De”, namely, Description and cycle between Description and DeviceId.
Step 8: Create your inputs
Now let’s turn our attention to the input side of things. Inputs to your cmdlet come from command-line parameters or from the pipeline or both. To provide parameters, you start with standard C# public properties. For this exercise, we will use three parameters whose names correspond to properties of the NetworkAdapter object defined earlier. These will be used as filters by the cmdlet. That is, if for example the Name parameter is supplied, the cmdlet will only return NetworkAdapter objects whose name matches that Name parameter. We will also define a fourth parameter, MaxEntries, which lets us throttle the number of output records we receive from the cmdlet.
|
1 2 3 4 5 6 7 |
public string Name { get; set; } public string Manufacturer { get; set; } public bool PhysicalAdapter { get; set; } public int MaxEntries { get; set; } = 100; |
Step 9: Decorate your parameters with the ParameterAttribute
For PowerShell to know that you want certain properties to be exposed as parameters of your cmdlet, you must add the System.Management.Automation.ParameterAttribute:
|
1 2 3 4 5 6 7 8 9 10 11 |
[Parameter] public string Name { get; set; } [Parameter] public string Manufacturer { get; set; } [Parameter] public bool PhysicalAdapter { get; set; } [Parameter] public int MaxEntries { get; set; } |
Each property decorated with the Parameter attribute becomes able to accept input as a command-line parameter. Examples:
|
1 2 |
PS> Get-NetworkAdapter -Manufacturer Microsoft | Format-Table PS> Get-NetworkAdapter -Manufacturer Microsoft -Name WAN |
But this does not support obtaining input from the pipeline. You can accept pipeline input in two different ways, covered in the next two steps.
Step 10: Setup a single pipeline input
Say you want to be able to list all the NetworkAdapter objects for one or more specific manufacturers by feeding them from the pipeline:
|
1 |
PS> 'Intel', 'Microsoft' | Get-NetworkAdapter |
You want to direct that pipeline input into the appropriate parameter-in this case, the Manufacturer parameter. To do this, you add the ValueFromPipeline argument to the Parameter attribute for that parameter:
|
1 2 |
[Parameter(ValueFromPipeline = true)] public string Manufacturer { get; set; } |
There’s nothing technically stopping you from applying the ValueFromPipeline argument to more than one parameter (say, for example, if you wanted to see whether the manufacturer or the name of the network adapter contained Intel or Microsoft). But in practice, ValueFromPipeline is typically attached to only one parameter because there is really no need to have two parameters receiving identical values. When you do want to get multiple different inputs from the pipeline, set up multiple properties as described next.
Step 11: Setup multiple pipeline-able properties
Say you have a NetworkAdapter object at hand; let’s call it $adapter1. You want to feed $adapter1 to Get-NetworkAdapter as a template, so that Get-NetworkAdapter only returns objects that match the Name, Manufacturer, and PhysicalAdapter values of $adapter1; we will choose to ignore the other properties of $adapter1 for filtering purposes.
|
1 |
PS> $adapter1 | Get-NetworkAdapter |
Each property that we want to treat as significant must use the ValueFromPipelineByPropertyName argument to the Parameter attribute:
|
1 2 3 4 5 6 7 8 9 10 11 |
[Parameter(ValueFromPipelineByPropertyName = true)] public string Name { get; set; } [Parameter(ValueFromPipelineByPropertyName = true, ValueFromPipeline = true)] public string Manufacturer { get; set; } [Parameter(ValueFromPipelineByPropertyName = true)] public bool PhysicalAdapter { get; set; } [Parameter] public int MaxEntries { get; set; } |
Notice that Manufacturer now has two arguments on its Parameter attribute so you can still feed it an array of strings, as was done in the previous step, or you can feed an array of objects containing appropriate properties.
Let’s check our work so far. Recompile, re-import and examine the help. I’ve reduced the output to just the relevant parts here:
|
1 2 3 4 5 6 7 8 9 10 11 12 13 14 15 16 17 18 19 20 21 22 23 24 25 26 27 |
PS> Import-Module .\bin\Debug\PowerShellModuleInCSharp.dll -Force PS> Get-Help Get-NetworkAdapter -full NAME Get-NetworkAdapter SYNTAX Get-NetworkAdapter [-Name <string>] [-Manufacturer <string>] [-PhysicalAdapter <bool>] [-MaxEntries <int>] PARAMETERS -Manufacturer <string> Accept pipeline input? true (ByValue, ByPropertyName) -MaxEntries <int> Accept pipeline input? false -Name <string> Accept pipeline input? true (ByPropertyName) -PhysicalAdapter <bool> Accept pipeline input? true (ByPropertyName) INPUTS System.String System.Boolean |
Note that each parameter shows up in the SYNTAX section, indicating its name and type. Then in the PARAMETERS section, you again see the name and type of each parameter along with additional properties of the parameters-notably whether it accepts pipeline input. Finally, the INPUTS section is there; not to be redundant, but to show-along with the OUTPUTS section you have already seen-what data comes and goes in the pipeline. It seems to be telling you that it accepts one string and one Boolean from the pipeline as inputs, but it really means that this cmdlet will accept one or more strings and one or more Booleans from the pipeline as input. It does not reveal, as with this particular cmdlet, that, two strings and one Boolean may come from the pipeline.
Note: This is an appropriate time to mention that you have about reached the limit of the documentation PowerShell can generate from your code alone, i.e. without you having decorated your code with documentation-comments. While this documentation is useful, it is but a mere skeleton of what your documentation should be. For a practical guide to easily instrumenting your code with doc-comments, see my recent article, Documenting Your PowerShell Binary Cmdlets.
Step 12: Setup multiple inputs without the pipeline
You have seen that you can feed multiple inputs to the cmdlet like this:
|
1 |
PS> 'Intel', 'Microsoft' | Get-NetworkAdapter |
That works even though the receiving parameter, Manufacturer, is just a simple string, not a list or array!
|
1 2 |
[Parameter(ValueFromPipelineByPropertyName = true, ValueFromPipeline = true)] public string Manufacturer { get; set; } |
It works because of the nature of the pipeline: the pipeline itself handles feeding multiple values one at a time, so Manufacturer ever only gets asked to accept a single string at a time. But it would seem very reasonable to be able to specify multiple values to a parameter via direct parameters as well (i.e. not through the pipeline):
|
1 |
PS> Get-NetworkAdapter -Manufacturer Intel, Microsoft |
To do that, though, you must specify that Manufacturer is an array-the only change here is using string[] in place of string:
|
1 2 |
[Parameter(ValueFromPipelineByPropertyName = true, ValueFromPipeline = true)] public string[] Manufacturer { get; set; } |
Thus, while the commands typed by the user seem very similar, just inverted in a sense…
|
1 2 |
PS> 'Intel', 'Microsoft' | Get-NetworkAdapter PS> Get-NetworkAdapter -Manufacturer Intel, Microsoft |
…internally they are handled quite differently. With the pipeline inputs, they are processed individually; the cardinality of the Manufacturer array is always one. With direct inputs, the cardinality of Manufacturer is the length of the array that you pass in.
Step 13: Setup inputs without accompanying parameter names
Revisiting the last examples, we can make the parallel between pipeline and direct inputs even closer by not forcing the user to specify the name of the parameter in the latter case (i.e. “-Manufacturer” has been omitted):
|
1 2 |
PS> 'Intel', 'Microsoft' | Get-NetworkAdapter PS> Get-NetworkAdapter Intel, Microsoft |
To accomplish this, you need to map your cmdlet parameters to positions on the command line, so that PowerShell will know-by position alone-which parameters you are filling with values. In this case, because we assume Manufacturer will be wanted the most, we give that the first position, position zero. It is good practice to give all your parameters position values, though, to allow the user to decide whether they want to use names at all.
|
1 2 3 4 5 6 7 8 9 10 11 |
[Parameter(Position=1,ValueFromPipelineByPropertyName = true)] public string Name { get; set; } [Parameter(Position=0,ValueFromPipelineByPropertyName = true, ValueFromPipeline = true)] public string[] Manufacturer { get; set; } [Parameter(Position=2,ValueFromPipelineByPropertyName = true)] public bool? PhysicalAdapter { get; set; } [Parameter(Position=3)] public int MaxEntries { get; set; } = 100; |
With these positions specified, as I’ve just demonstrated, any of the commands below achieve precisely the same result. If you use parameter names, you can put them in any order you please, but if you want to omit names you must honor the order based on the Position argument to each Parameter attribute:
|
1 2 3 4 |
PS> Get-NetworkAdapter -Name WAN -PhysicalAdapter true -Manufacturer Intel PS> Get-NetworkAdapter -PhysicalAdapter true -Name WAN -Manufacturer Intel PS> Get-NetworkAdapter -Manufacturer Intel -Name WAN -PhysicalAdapter true PS> Get-NetworkAdapter Intel WAN true |
Step 14: Provide parameter aliases
PowerShell automatically provides prefix-parameter recognition, which is a great convenience feature: you may type the entire name of a given parameter, but you are only required to type enough to make it unambiguous. For example, for the Manufacturer parameter all of these are equivalent:
|
1 2 3 4 |
PS> Get-NetworkAdapter -Manufacturer Intel PS> Get-NetworkAdapter -Manufacture Intel PS> Get-NetworkAdapter -Manufac Intel PS> Get-NetworkAdapter -M Intel |
That’s fine, you say, but everyone in your shop abbreviates ‘manufacturer’ as ‘mfg’. This is actually short for manufacturing, but let’s run with it! Of course, ‘mfg’ is not a proper prefix of ‘manufacturer’ so that will not work by default. However, you can easily define an alias to accept an alternative name or several alternative names. This example shows two aliases being defined.
|
1 2 3 4 5 6 |
[Parameter( Position=0, ValueFromPipelineByPropertyName = true, ValueFromPipeline = true)] [Alias("mfg", "vendor")] public string[] Manufacturer { get; set; } |
And PowerShell provides prefix-parameter recognition on the aliases as well! So all of these are equivalent:
|
1 2 3 4 5 |
PS> Get-NetworkAdapter -Manufacturer Intel PS> Get-NetworkAdapter -Manufac Intel PS> Get-NetworkAdapter -mfg Intel PS> Get-NetworkAdapter -mf Intel PS> Get-NetworkAdapter -vend Intel |
Step 15: Write some production code
To wrap up this short and simple (!) 15-step process to create PowerShell cmdlets in C#, let’s add just one more little detail-actual production code to do the work! To do this in your cmdlet skeleton, there are four principal methods you need to override:
BeginProcessing(to do initialization),ProcessRecord(to process each item in the pipeline),EndProcessing(to do finalization), andStopProcessing(to handle abnormal termination).
Without further ado, here is the complete code for the Get-NetworkAdapter cmdlet. Note that this uses a bit of syntactic C# 6.0 (e.g. the amazingly useful nameof operator) so if you are using a Visual Studio edition prior to 2015 you will just need to substitute constant strings for those expressions. In the interests of brevity-and the fact that you are reading this article to understand how to build cmdlets, not how to report network adapter statistics!-I present the code without commentary. Take a look at the sample project attached to this article to load it up in Visual Studio and experiment with it!
|
1 2 3 4 5 6 7 8 9 10 11 12 13 14 15 16 17 18 19 20 21 22 23 24 25 26 27 28 29 30 31 32 33 34 35 36 37 38 39 40 41 42 43 44 45 46 47 48 49 50 51 52 53 54 55 56 57 58 59 60 61 62 63 64 65 66 67 68 69 70 71 72 73 74 75 76 77 78 79 80 81 82 83 84 85 86 87 88 89 90 91 92 93 94 95 96 97 98 99 |
using System.Collections.Generic; using System.Linq; using System.Management; using System.Management.Automation; using System.Text.RegularExpressions; using PowerShellModuleInCSharp.Containers; namespace PowerShellModuleInCSharp.CSharpCmdlets { [Cmdlet(VerbsCommon.Get, nameof(NetworkAdapter))] [OutputType(typeof(NetworkAdapter))] public class GetNetworkAdapterCmdlet : Cmdlet { [Parameter(Position=1,ValueFromPipelineByPropertyName = true)] public string Name { get; set; } [Parameter( Position=0, ValueFromPipelineByPropertyName = true, ValueFromPipeline = true)] [Alias("mfg", "vendor")] public string[] Manufacturer { get; set; } [Parameter(Position=2,ValueFromPipelineByPropertyName = true)] public bool? PhysicalAdapter { get; set; } [Parameter(Position=3)] public int MaxEntries { get; set; } = 100; private IEnumerable<NetworkAdapter> _wmiResults; protected override void BeginProcessing() { base.BeginProcessing(); _wmiResults = GetWmiResults(); } protected override void ProcessRecord() { var query = _wmiResults; if (Name != null) { query = query.Where(adapter => adapter.Name != null && adapter.Name.StartsWith(Name)); } // Just like "Name" above, this checks for prefix matches // but on multiple values instead of just a single value. if (Manufacturer != null) { query = query.Where( adapter => adapter.Manufacturer != null && Regex.IsMatch(adapter.Manufacturer, string.Format("^(?:{0})", string.Join("|", Manufacturer)))); } // Being a Boolean, an exact match is used here. if (PhysicalAdapter != null) { query = query.Where(adapter => adapter.PhysicalAdapter == PhysicalAdapter); } query.Take(MaxEntries).ToList().ForEach(WriteObject); } private static IEnumerable<NetworkAdapter> GetWmiResults() { const string wmiQuery = "Select * from Win32_NetworkAdapter"; return new ManagementObjectSearcher(wmiQuery).Get() .Cast<ManagementObject>() .Select(BuildOutputObject); } private static NetworkAdapter BuildOutputObject(ManagementBaseObject item) { return new NetworkAdapter { Name = (string) item[nameof(NetworkAdapter.Name)], Description = (string) item[nameof(NetworkAdapter.Description)], DeviceId = int.Parse((string)item[nameof(NetworkAdapter.DeviceId)]), Manufacturer = (string) item[nameof(NetworkAdapter.Manufacturer)], NetConnectionId = (string) item[nameof(NetworkAdapter.NetConnectionId)], PhysicalAdapter = (bool) item[nameof(NetworkAdapter.PhysicalAdapter)] }; } } } namespace PowerShellModuleInCSharp.Containers { public class NetworkAdapter { public string Name { get; set; } public string Description { get; set; } public int DeviceId { get; set; } public string Manufacturer { get; set; } public string NetConnectionId { get; set; } public bool PhysicalAdapter { get; set; } } } |
Conclusion
The process of writing a PowerShell cmdlet is actually quite straightforward, though it may seem daunting the first time you go through it. Jump right in to the sample project and play with it. Use it as a model as you start on your own cmdlets. By carefully following the recipe provided in this article, you should be able to achieve what you were likely looking to do: writing a cmdlet that works in a way that a user would reasonably expect a cmdlet to work.
Update – April 2016
Since this article, I’ve created a wallchart putting both XmlDoc2Cmdlet and DocTreeGenerator in context, showing you how to do a complete documentation solution for your PowerShell work in both C# and PowerShell. Click here for more details. 
FAQs: Using C# to Create PowerShell Cmdlets: The Basics
1. How do I create a PowerShell cmdlet in C#?
Create a C# Class Library project in Visual Studio. Add the PowerShellStandard.Library NuGet package. Create a class that inherits from System.Management.Automation.Cmdlet and decorate it with [Cmdlet(VerbsCommon.Get, “YourNoun”)]. Override ProcessRecord() to write output with WriteObject(). Add properties decorated with [Parameter] for cmdlet parameters. Build the project to produce a .dll, then import it in PowerShell with Import-Module. The cmdlet name is automatically the verb-noun combination from the CmdletAttribute.
2. What is the difference between inheriting from Cmdlet and PSCmdlet in C#?
Cmdlet is the base class for all cmdlets and provides the core pipeline infrastructure (WriteObject, WriteError, ShouldProcess, etc.). PSCmdlet inherits from Cmdlet and adds access to the PowerShell runspace through the SessionState property – giving the cmdlet access to variables, drives, and providers in the current session. Use Cmdlet when your cmdlet only needs to process input and produce output. Use PSCmdlet when you need to interact with the PowerShell session context, invoke scripts, or access providers.
3. How do I accept pipeline input in a C# PowerShell cmdlet?
Decorate the property with [Parameter(ValueFromPipeline = true)]. Override ProcessRecord() – this method is called once per pipeline input object. To accept input from specific property names on piped objects, use [Parameter(ValueFromPipelineByPropertyName = true)] and name your property to match the property name on the incoming object (or use [Alias()] to map different names). For multiple pipeline-bindable properties, only one can use ValueFromPipeline = true; others should use ValueFromPipelineByPropertyName = true.
4. How do I load a C# PowerShell cmdlet into a PowerShell session?
Build the C# class library project to produce a .dll assembly. In a PowerShell session, run Import-Module ‘C:pathtoYourModule.dll’. The cmdlets defined in the assembly become immediately available. To make the module persistent across sessions, place the .dll in a folder under $env:PSModulePath (typically %USERPROFILE%DocumentsPowerShellModulesYourModule) and PowerShell will find it automatically. For distribution, package the .dll and an optional .psd1 manifest file as a module directory.
This document contains proprietary information and is protected by copyright law.
Copyright © 2026 Red Gate Software Limited. All rights reserved
Load comments