
There will be many times when you desire to make the Unity engine look and feel better to use. While you can certainly make your own extensions for your project, there are some simpler ways to get a better feeling editor. That method comes from attributes, which allow you to perform tasks such as assigning a slider to float variable or create additional context menu items. Attributes are markers that can be applied to variables, functions, or even an entire class. All it takes to use them is knowing what attribute you want and placing it in square brackets.
Several attributes will be looked at here, providing examples of where you may wish to use them. The project accompanying this will be a simple one with the focus being placed on the attributes and what effects they have. First, variable attributes will be examined, implemented, and explained. Then a quick look will be given to a function attribute, followed by class attributes. As a final note, rather than have a section dedicated to final touches and testing things out, this article will instead test out the attributes as they are implemented.
The Setup
As always, the first thing to do is create the project as shown in Figure 1.

Figure 1: Creating a new project
This project will be named UnityAttributes. Select the location and set it as a 3D project. Once finished, go ahead and create the project as shown in Figure 2.
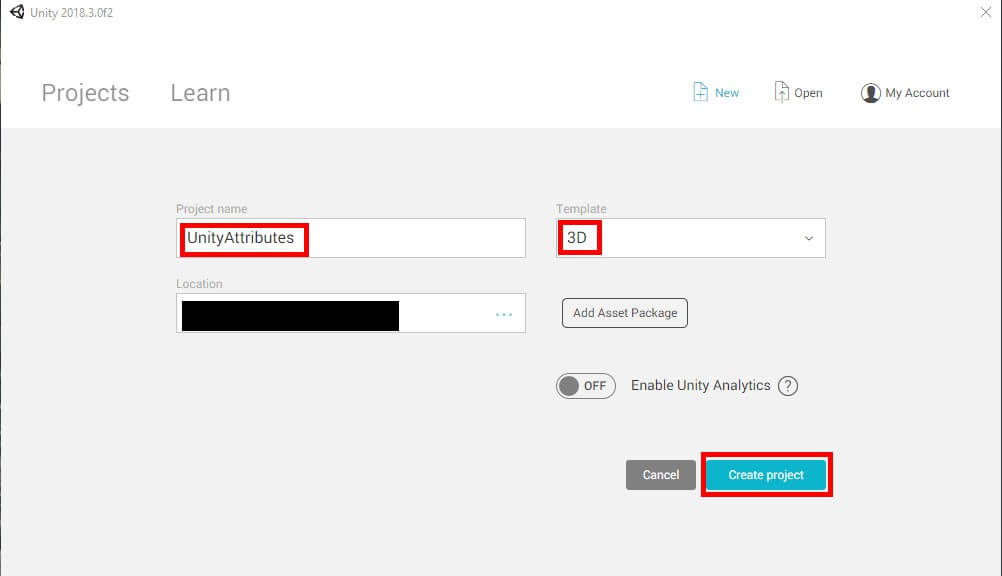
Figure 2: Naming the project and assigning its location
All that’s needed here is to create an object in the world. A child object will also be created and assigned the first object as its parent. Figure 3 shows how to create a Cube.
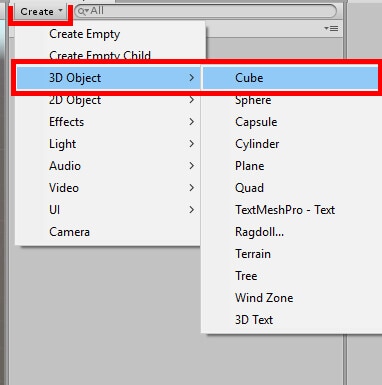
Figure 3: Creating a cube
The kind of objects these will be is up to you. The example below will make the parent object a cube and the child object a sphere as shown in Figure 4. The child object will need to be given a Y position value of 1 in the inspector.
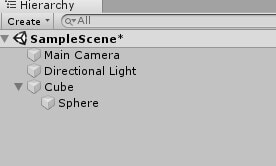
Figure 4: Setting the Sphere object as Cube’s parent.
Now it’s time to create the script and start trying out some attributes. Go to the Assets window and right click. Navigate to Create->C# Script to create a new script as shown in Figure 5. This script will be called Attributes.
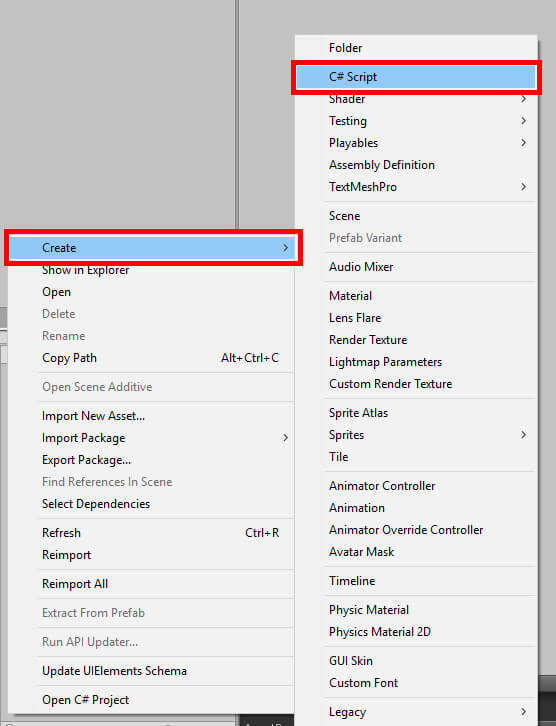
Figure 5: Creating a C# Script
Once ready, double click this script which opens the Visual Studio project to begin seeing what attributes can do for you.
Variable Attributes
To begin, the Update function can be deleted as it will not be used for this project. From there, the first attribute that will be looked at is Header. All you need is to feed it a string that will then display in the Inspector window. This attribute is often used the same way you might comment your code. It can also help separate categories of variables. For instance, you may have a game that asks the player to make multiple choices throughout the game, which is split into multiple days. Header would be a great way to distinguish which choices go with which in-game day. Add this code inside the class definition:
|
1 2 |
[Header("These variables will be changed a lot")] public bool change; |
After saving the script, return to the editor, and then attach the script to the parent game object, you can see this header display in the component followed by the newly created Boolean as shown in Figure 6. Note: it may take Unity a few seconds to update the component to show this. You may also need to select a different game object then select Cube again.
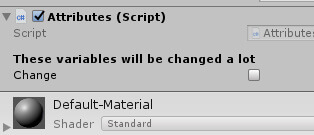
Figure 6: The Header attribute in action
Similar in function, the Tooltip attribute displays a message when hovering over the variable.
|
1 2 |
[Tooltip("This is an integer. Wow!")] public int number; |
Like before, the only requirements are to assign it to a variable and give it a string. The string will be the message you wish for the tooltip to display shown in Figure 7.
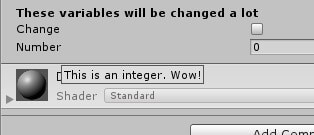
Figure 7: The Tooltip attribute in action
It should be pointed out that attributes can be stacked. For instance, you can assign both a header and a tooltip to the same variable. There’s no limit to the number of attributes you can use either. In the below example, both Header and a new attribute called SerializeField are being used on the same variable.
|
1 2 3 4 |
[Header( "This is a private variable that will be made available in the editor")] [SerializeField] private string firstSentence; |
As the Header attribute points out, this private variable will be made available to edit in the inspector while maintaining its private status. Ordinarily one must make a variable public to be edited from within the Unity editor. Thanks to SerializeField, the variable firstSentence can be edited in Unity as shown in Figure 8 while also making sure no other script can touch this variable. This can be especially helpful if your project has several scripts to work with. You may still wish to change these variables outside of Visual Studio but maintain proper encapsulation, resulting in a new friend in SerializeField.
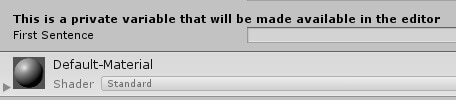
Figure 8: Demonstration of SerializeField
When using Unity, you may wish for a little room between variables. Whether this is to make the Inspector look better to you or make it harder to click the wrong thing accidentally, the Space attribute has your back. You can simply enter Space and be done, or you can enter a number to specify how many pixels of space you want.
|
1 2 3 |
[Space] [SerializeField] private string secondSentence; |
Next comes an attribute perfect for variables that relate to health and other character stats or percentages that you may use. Range takes the variable it’s attributed to and gives it a slider that you can use in the Inspector. Instead of clicking inside the text box and typing a number, just take the slider and move it where you want with the mouse. But don’t think Range is exchanging anything. You still have the option to type in the variable yourself for precision.
|
1 2 3 4 |
[Space(5)] [Header("A slider for your convenience")] [Range(0.0f, 25.0f)] public float newFloat; |
You need only specify the minimum and maximum range for the slider. In the code above the float is given the minimum value of 0.0 and a maximum of 25.0 (the .0s specify that decimals are allowed). This also prevents you from entering a value higher than the maximum you set as shown in Figure 9.

Figure 9: Making space in Inspector and demonstrating Range
In the Inspector window, string variables are given a single line by default. You can continue typing as much as you want, but you’ll only be able to see very little of your string at once. Suppose you have a longer string you want to put in. This string could be for character dialogue or to fill in a page of an in-game book. It’s natural to want to see more than a few words. This is where TextArea comes in.
|
1 2 3 4 5 |
[Space] [SerializeField] [Tooltip("Lots of space to write")] [TextArea] private string longMessage; |
TextArea takes the box that you normally use to type in string values in the Inspector and gives it a lot more room. You can type out long strings and still see what you’re writing. As mentioned above, something like this would be extremely helpful for moments where you have a lot of words on the screen. This has the power to make your text heavy games easier to manage.
There’s another attribute specifically used for strings. Enter Multiline, an attribute that operates similarly to TextArea.
|
1 2 3 4 5 |
[Space(5)] [SerializeField] [Tooltip("Make yourself a list")] [Multiline] private string listMessage; |
Though the functionality is very similar to TextArea, there is one key difference. When inputting something into a TextArea, the string will continue to the next line if it reaches the end of the box. Multiline, on the other hand, will continue as if it was a normal string input field. Thus, it encourages you to use Multiline for things like the list shown in Figure 10.
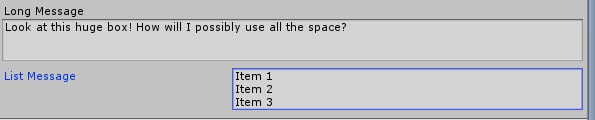
Figure 10: TextArea and Multiline
This next attribute has been used in previous Unity articles before but has never been given a lot of detail. HideInInspector will make your public variable hidden from the Inspector, which means you won’t be editing this value from the Unity editor. Why would you use this? In most cases, you may want a variable to be public so that other scripts can access it but don’t want any accidental edits from the editor. And of course, making it private won’t solve that problem either. So HideInInspector comes in to give you the best of both worlds.
|
1 2 |
[HideInInspector] public bool hiddenBoolean; |
The final variable attribute covered here is ContextMenuItem. Assign this attribute to a variable to add a menu option when right-clicking the variable in the Inspector. Typically, you’ll tie this menu option to a function in your script. What you’ll do in this function is up to you. In this case, the function will change the float variable to a random number between 0.0 and 5.0.
|
1 2 3 4 |
[Header("Right click this variable name!")] [SerializeField] [ContextMenuItem("Get a random number", "RandomNumber")] private float randomNumber; |
As you can see, the menu item is also given some text. The first string is the menu option that will appear after right-clicking the variable. Your second string is the function to perform when selecting this menu option. Speaking of which, here’s the function that this menu item will use:
|
1 2 3 4 |
void RandomNumber() { randomNumber = Random.Range(0.0f, 5.0f); } |
After saving the script, you can try out the new menu option by right-clicking the variable name in the Inspector and selecting Get a random number as shown in Figure 11.

Figure 11: A user created ContextMenuItem
Function Attribute
There’s only one function attribute to discuss here, and it is similar in function to ContextMenuItem. This attribute, ContextMenu, will create a menu item when right-clicking the component instead of a specific variable. After selecting the menu option, the corresponding function will perform its task.
|
1 2 3 4 5 |
[ContextMenu("Do your thing")] void NewThing() { Debug.Log("I did the thing"); } |
In the above example, the NewThing method is assigned the ContextMenu attribute and given a single task. You’ll see Do your thing in the menu as shown in Figure 12. When you select it, the method will print “I did the thing” to the debug log in Unity.
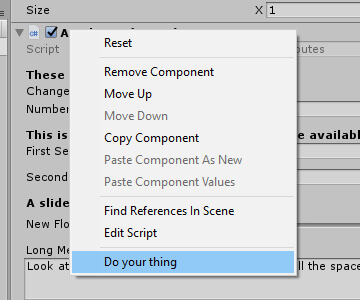
Figure 12: Addition made to Context menu for Attributes component
Class Attributes
Class attributes affect the entire component, not just individual variables or functions. Their functionality is quite diverse, ranging from automatically attaching additional components to the game object or making additions to Unity’s component menu. The first of these class attributes is HelpURL, which links the user to help documentation. Class attributes must be added above the class definition instead of inside the class.
|
1 2 3 4 5 |
[HelpURL("https://www.red-gate.com/simple-talk/dotnet/c-programming/introduction-game-development-unity-c/")] public class Attributes : MonoBehaviour { ... } |
You may notice the small book icon to the right of the component in the Inspector as shown in Figure 13 window when attaching any component such as a script. If you were to click this icon, a browser window would open taking you to the documentation for that specific component. But user created scripts aren’t going to have any documentation by default, thus clicking this icon will lead to a 404 error page. After all, how can Unity Technologies hope to know what your component is doing? This is where HelpURL comes in. Give it a path to the documentation of your choosing and your user will have something to reference if they need to know how your script works. The attribute is especially useful in team projects, allowing creators to give their teammates a helping hand if needed.
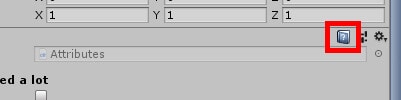
Figure 13: The documentation icon
Next comes RequireComponent, and as the name implies, it forces Unity to assign whichever component you ask for. If you know that a script is going to be using specific components on the game object, this can be a helpful way to save yourself a little effort and have the script attach the required component for you. Not only that, but it also prevents anyone from removing the component from the object.
|
1 |
[RequireComponent(typeof (Animator))] |
Unfortunately, you will have to either add the required component or reattach this script component to the object to see what RequireComponent can do. Once you’ve done either of those, try deleting the Animator component from the object’s Inspector and see how Unity reacts as shown in Figure 14.
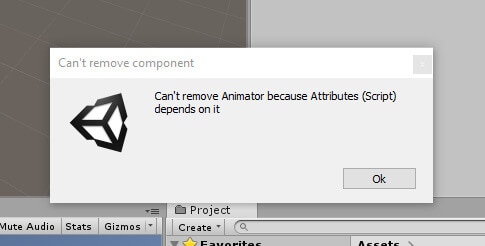
Figure 14: RequireComponent disallows the removal of the Animator component
SelectionBase is the next attribute. It’s a very easy to use attribute as it requires no parameters. All you need to do is simply assign it to the class. What does this attribute do? It might seem trivial at first. This attribute will assure the user that when selecting an object from the Scene window that it will select the parent object. Why does this matter? If you have objects with several child objects attached to it, SelectionBase prevents the frustration of selecting a child object when you meant to select the parent.
|
1 |
[SelectionBase] |
Take this very project as an example. If you were to click on the Sphere object in the Scene window, you’d find that the Sphere object is selected in the Hierarchy as shown in Figure 15.
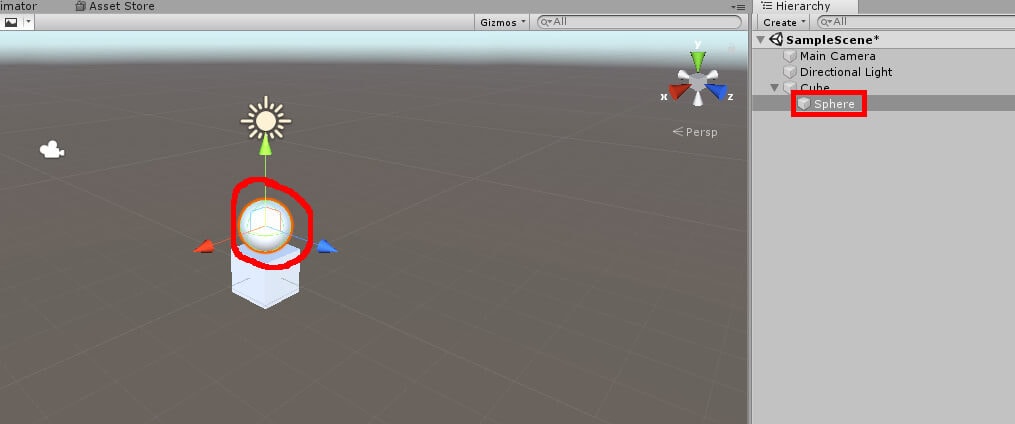
Figure 15: Selecting an object without SelectionBase
But if you attach SelectionBase to the class, the story changes. Add the attribute and save the script. Click anywhere in the Scene window to deselect the current object, then try clicking the Sphere object in the Scene window again as shown in Figure 16. Be careful not to accidentally click the movement widget as that will prevent selection of any object.
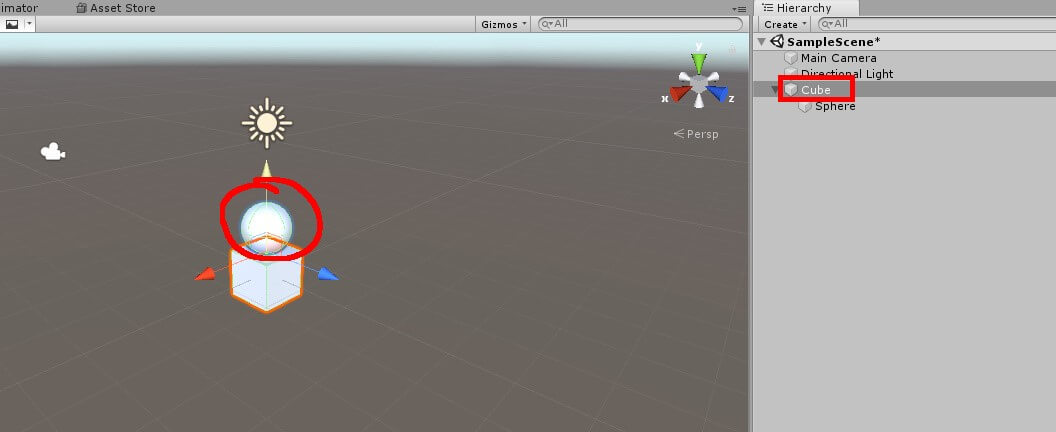
Figure 16: Selecting an object with SelectionBase. Despite clicking on the Sphere, it selected the Cube.
The Cube object was selected instead. It’s a small detail in a simpler project like this, but it can be quite the time saver in full games featuring objects with multiple child objects. Bear in mind that you can still click on the Sphere object in the Scene window and select the Sphere in the Hierarchy but only if you have the Cube object selected first. Since time-savers were mentioned, now would be a good time to look at AddComponentMenu. Once fed a path, this attribute adds to the Component menu find by selecting AddComponent in the Inspector and the Component menu in the top menu bar.
|
1 |
[AddComponentMenu("Your New Menu/Script with Attributes")] |
In this example, a new submenu is created that has Script with Attributes added. When you select this option from the Component menu, it will attach this script, Attributes, to the game object currently selected. You can also cut out the submenu and just have the component right there in the main Component menu shown in Figure 17.
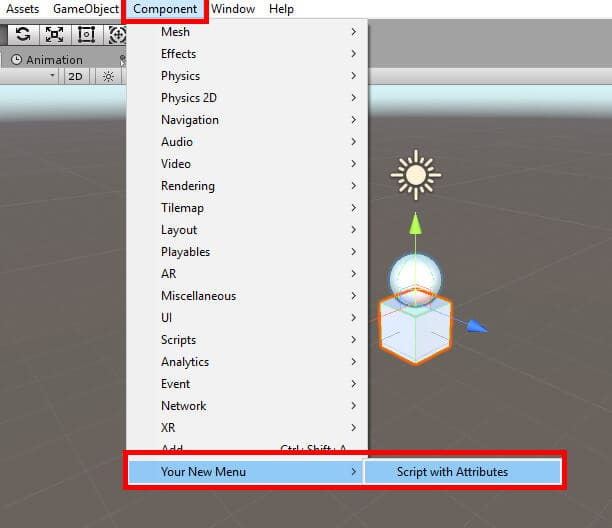
Figure 17: The AddComponentMenu attribute doing its work
The last attribute is ExecuteInEditMode, and like SelectionBase, it requires no parameters.
|
1 |
[ExecuteInEditMode] |
When applied to a class the script will perform whatever tasks it would normally do in play mode from edit mode. For example, you can have the object change its scale or colour. Replace the Start function with this code:
|
1 2 3 4 |
void Start() { GetComponent<Transform>().localScale = new Vector3(2, 2, 2); } |
There are a few things to be mindful of when using this attribute. For starters, it can add to the processing times while working in the editor. You may wish for your processor to be used towards other tasks. Also, any objects with this script will perform the actions specified. Therefore, in this example, any objects given the Attributes script component will automatically have their scale set to two as shown in Figure 18. This isn’t to say it doesn’t have any benefits of course. Some examples of good places to use ExecuteInEditMode include in editor custom warnings, position and scale constraint like in the example above, or creating required objects.
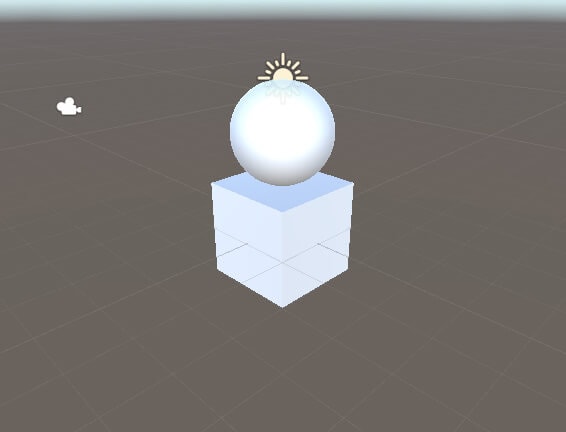
Figure 18: ExecuteInEditMode changed the scale of this object without needing to play the game
Conclusion
A lot of convenience and flexibility is offered to both you and your team when you apply attributes to your code. Variable attributes can make both your code and the Inspector window easier to manage and read. The single function attribute can do plenty to expand the editor without needing to complicated code. Finally, class attributes allow more convenience when working with objects within Unity and can even make your personal documentation easier to access for others. Before seeing the attributes in action, one may have wondered where Unity attributes would have come in handy during development. Now the question posed to developers is when they should not use attributes, and the list of reasons to not use attributes is very small indeed.
This document contains proprietary information and is protected by copyright law.
Copyright © 2026 Red Gate Software Limited. All rights reserved
Load comments