
Lately, software has leaned more towards component-based systems, such as SOA (service-oriented architecture), and more specifically microservices. While this approach is used to solve scalability and reusability issues in most systems, it also raises a few new challenges for the developers.
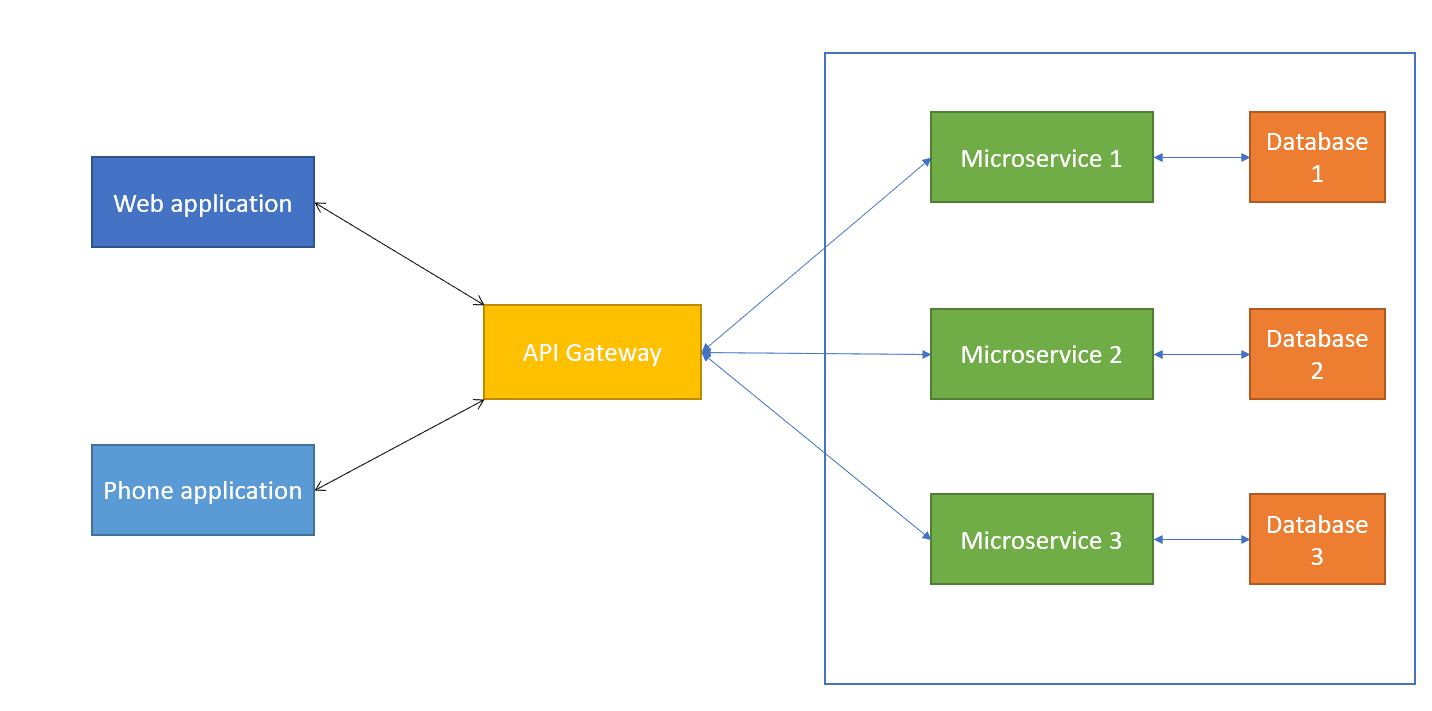 One of these challenges is verifying a user’s identity across multiple components. In an SOA or microservice architecture, each of the components might be deployed to a separate server, so the monolithic approach of creating a session for each user would not work anymore. Even if the applications with which the user interacts (the web and phone applications from the diagram) would use a session for validating the users’ identities, this validation would mean nothing in the other components.
To solve this problem, a filter should be placed between the front-end applications and the services. This filter, the API Gateway, would serve the purpose of redirecting each request to the component that is responsible for handling it, but only if the user has access to perform that specific action. And to keep the API Gateway light-weight, a specific component should be used for validating the users’ identities.
The normal workflow for such a system would be:
- The user logs in from a web/phone application; the credentials are sent through the API gateway to the responsible component.
- If the credentials are correct, a token is issued and returned to the user.
- Each further request will contain this token, which will be verified by the API gateway through the same component that issued it.
- If the token is valid, the request is allowed to be sent.
- If the token is not valid, the request is blocked.
In this article, I will focus on creating the service that is responsible for issuing and verifying the identity of the users. I will develop this with the ASP.NET WebAPI, but a similar approach can be used with any other technology, such as Node.JS, Java or Python.
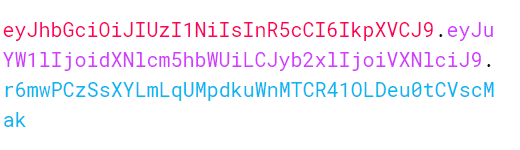
The tokens that I will use are JSON Web Tokens (JWT, which is “a compact, URL-safe means of representing claims to be transferred between two parties.”) Basically, a JWT is an encoded JSON object, which is then signed either with a secret key, or a public/private key pair.
A JWT is composed of three different parts: the header, the payload and the signature.
The header usually consists of two parts: the token’s type (JWT), and the hashing algorithm that is being used (e.g. HMAC SHA256).
The payload contains the ‘claims’ of the token, which represent statements about an entity (e.g. the user). There are three types of claims: registered, public and private. The most important of these are the private claims, which are used to share information between the parties that agreed on using the JWT. These could contain the name of the user or the roles (e.g. admin, publisher).
After the first two parts are encoded using Base64Url, the signature needs to be created. This consists of the header and the payload, which are hashed using the algorithm specified in the header. The purpose of the signature is to validate the identity of the sender and to ensure that the message was not changed.
Creating the service
As I said, the project in this article will be developed using the ASP.NET WebAPI. I am going to use the .NET Framework for this, but it should also work if you plan on using .NET Core.
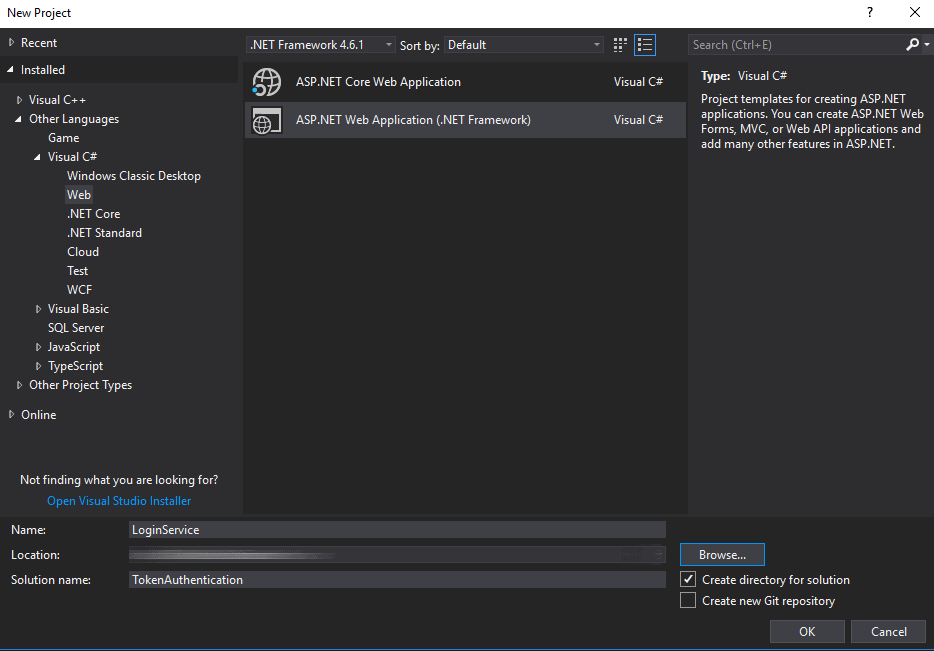
To start, open Visual Studio and create a new project. Go to Visual C# -> Web and choose ASP.NET Web Application.
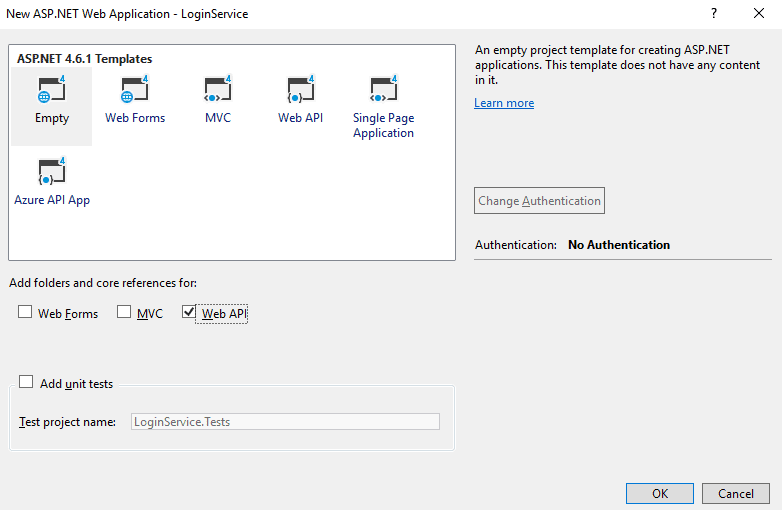
In the new window that opens, choose Empty from the list of project types, and then check the Web API box. Depending on the functionality that you plan on using in this project, you might also want to have access to the MVC package; for this tutorial, however, Web API will suffice.
The first thing to do is to create a very simple User class, consisting of a username and a password. Since this tutorial only focuses on the JWT aspect, I will not bother to access a database or hash the password, so I will just store it in plain text – this is not a good practice for a real application, though.
|
1 2 3 4 5 |
public class User { public string Username { get; set; } public string Password { get; set; } } |
One other property that you might add to the User is a role. The easiest way to do this would be to create an enum called UserRole, like this:
|
1 2 3 4 5 |
public enum UserRole { NORMAL, ADMIN } |
Just to have something to work with, I will create a UserRepository class in a new folder named Repositories, that emulates database access. This will just contain a list that I populate in the constructor, and a method that can retrieve data from that list based on a username.
|
1 2 3 4 5 6 7 8 9 10 11 12 13 14 15 16 17 18 19 |
public class UserRepository { public List<User> TestUsers; public UserRepository() { TestUsers = new List<User>(); TestUsers.Add(new User() { Username = "Test1", Password = "Pass1"}); TestUsers.Add(new User() { Username = "Test2", Password = "Pass2"}); } public User GetUser(string username) { try { return TestUsers.First(user => user.Username.Equals(username)); } catch { return null; } } |
Be sure to add a using statement referring to the namespace containing the User class.
To start with the actual token task, I will create a new class in the Models folder, called TokenManager. This will take care of both the creation and the validation of tokens. To use the JWT functionality, you must install a package that offers access to JWT. Just right click on the project in the solution explorer and choose Manage NuGet Packages. Make sure that Browse is selected. Then search for JWT in the search bar and install the System.IdentityModel.Tokens.Jwt package:

The first thing to create in the new TokenManager class is a field called Secret that is going to act as the secret key for the tokens. You could use an online generator to create a secret, or you can create it in C# by running the following code in a separate project and copying the result.
|
1 2 |
HMACSHA256 hmac = new HMACSHA256(); string key = Convert.ToBase64String(hmac.Key); |
Or, you could just copy the one that I am using for this:
|
1 |
private static string Secret = "XCAP05H6LoKvbRRa/QkqLNMI7cOHguaRyHzyg7n5qEkGjQmtBhz4SzYh4Fqwjyi3KJHlSXKPwVu2+bXr6CtpgQ=="; |
For this class, the following using statements will be needed:
|
1 2 3 4 |
using Microsoft.IdentityModel.Tokens; using System; using System.IdentityModel.Tokens.Jwt; using System.Security.Claims; |
The first method that will be part of the TokenManager class is the GenerateToken method. My version will take a username as a parameter, since the tokens are supposed to ensure the identity of users, but you can take any other parameters which are suitable in your case.
|
1 2 3 4 5 6 7 8 9 10 11 12 13 14 15 16 17 |
public static string GenerateToken(string username) { byte[] key = Convert.FromBase64String(Secret); SymmetricSecurityKey securityKey = new SymmetricSecurityKey(key); SecurityTokenDescriptor descriptor = new SecurityTokenDescriptor { Subject = new ClaimsIdentity(new[] { new Claim(ClaimTypes.Name, username)}), Expires = DateTime.UtcNow.AddMinutes(30), SigningCredentials = new SigningCredentials(securityKey, SecurityAlgorithms.HmacSha256Signature) }; JwtSecurityTokenHandler handler = new JwtSecurityTokenHandler(); JwtSecurityToken token = handler.CreateJwtSecurityToken(descriptor); return handler.WriteToken(token); } |
The first thing that the method does is to create a SymmetricSecurityKey object by using the HMACSHA256 secret that we created earlier. After that, it starts creating the descriptor object. This represents the main content of the JWT, such as the claims, the expiration date and the signing information. Then, the token is created and a string version of it is returned.
In the example, I only add a username claim, but the list of claim types that can be added is huge. It is also possible to add custom data to the token after you created it by accessing the Payload property, like this:
|
1 |
token.Payload["favouriteFood"] = "cheese"; |
To wrap up this part of the functionality, we will create the controller and an action that will generate tokens. Right click on the Controllers folder in the Solution Explorer and choose Add -> Controller. We don’t need any pattern for it, so just choose the empty Web API controller. I named it LoginController. (Note: The completed LoginController class may be downloaded at the bottom of this article)
This controller will contain two actions (or methods): one for the login process, and another one for the validation process. These are the using statements that will be needed in this class:
|
1 2 3 4 5 |
using LoginService.Models; using LoginService.Repositories; using System.Net; using System.Net.Http; using System.Web.Http; |
The first method will take in a username and a password, check if they are valid and then generate a token based on the username.
|
1 2 3 4 5 6 7 8 9 10 11 12 13 |
[HttpPost] public HttpResponseMessage Login(User user) { User u = new UserRepository().GetUser(user.Username); if (u == null) return Request.CreateResponse(HttpStatusCode.NotFound, "The user was not found."); bool credentials = u.Password.Equals(user.Password); if (!credentials) return Request.CreateResponse(HttpStatusCode.Forbidden, "The username/password combination was wrong."); return Request.CreateResponse(HttpStatusCode.OK, TokenManager.GenerateToken(user.Username)); } |
I marked the action as POST, so I can send the object data through the request’s body rather than URL parameters. Since we are dealing with passwords, it is better to hide such information since URL parameters would be saved in the browser’s history, for example. I am taking a User object as a parameter, because I only hold the username and password in that class. If your object is more complex, my suggestion is to create a separate class that only contains the data you want to be passed.
In the method, the first thing that I am doing is checking for the existence of the user. If it is null, I am returning a NotFound (404) response. If the user is indeed found, I am checking if the password is correct and returning a corresponding message if it is not. Finally, if everything is fine, I am returning an OK message that contains a new token based on the username that was provided.
Testing Authentication
Now that one half of the functionality is finished, it would be a good idea to test it at this point. I am going to use Postman for this purpose, but there are many alternatives that you could use, such as Fiddler.
Run the project, but do not worry if a 403-error message appears. Since the root folder is accessed and there is no resource available there, this is normal; but your project should be running fine. After you run it, copy the URL from the browser into the software you are using to test. In my case, it is http://localhost:61225/. To access the action that was created, add /api/login/ to the URL, so it looks like http://localhost:61225/api/login/. I marked the request as POST and set the content of the request as JSON data. In Postman, this is done by selecting the Raw option in the Body tab and then selecting the JSON option from the dropdown:
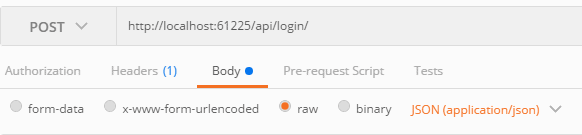
Then create a JSON object consisting of the username and password in the body of the request. The fields of the JSON object should be named the same as the class’ properties from C#, so that it can be mapped properly. This is what my object looks like:

Now send the request and check the response body. It should contain a string, consisting of a newly generated token. This is the token that I received:

Add Validation
With the token generation working, it is time to start the validation functionality. Back to the TokenManager class create a method called GetPrincipal, which is going to read, validate the token and create a ClaimsPrincipal object, which holds the user’s identity. (Note: The completed TokenManager class may be downloaded at the bottom of the article).
|
1 2 3 4 5 6 7 8 9 10 11 12 13 14 15 16 17 18 19 20 21 22 23 24 25 26 |
public static ClaimsPrincipal GetPrincipal(string token) { try { JwtSecurityTokenHandler tokenHandler = new JwtSecurityTokenHandler(); JwtSecurityToken jwtToken = (JwtSecurityToken)tokenHandler.ReadToken(token); if (jwtToken == null) return null; byte[] key = Convert.FromBase64String(Secret); TokenValidationParameters parameters = new TokenValidationParameters() { RequireExpirationTime = true, ValidateIssuer = false, ValidateAudience = false, IssuerSigningKey = new SymmetricSecurityKey(key) }; SecurityToken securityToken; ClaimsPrincipal principal = tokenHandler.ValidateToken(token, parameters, out securityToken); return principal; } catch (Exception e) { return null; } } |
The method reads the token in string format and converts it into a JwtSecurityToken, if possible. Afterwards, a list of parameters is created, which will be used during the validation process. This includes creating the key again, using the same secret as during the generation of the token. The ClaimsPrincipal object is then created and returned. The try-catch block handles the cases where the format of the token is wrong, and it cannot be validated.
Now create another method to extract the data from the Principal object. This method is where you will want to add or modify things, depending on the data that you send in the tokens.
|
1 2 3 4 5 6 7 8 9 10 11 12 13 14 15 16 17 18 19 |
public static string ValidateToken(string token) { string username = null; ClaimsPrincipal principal = GetPrincipal(token); if (principal == null) return null; ClaimsIdentity identity = null; try { identity = (ClaimsIdentity)principal.Identity; } catch (NullReferenceException) { return null; } Claim usernameClaim = identity.FindFirst(ClaimTypes.Name); username = usernameClaim.Value; return username; } |
This method creates the Principal object using the token and then extracts the Identity object out of it. This object contains all the claims from the token, based on the claim type.
Since the token only contains a username, I designed the method to return that username, and any further check will be performed in the controller. If you have more fields in the token that need further verification from your database, for example, you could do that in this method and change it to return a Boolean.
The action for the token validation in the same login controller is a GET action that takes in the username and the token. Add this to the LoginController class.
|
1 2 3 4 5 6 7 8 9 10 11 |
[HttpGet] public HttpResponseMessage Validate(string token, string username) { bool exists = new UserRepository().GetUser(username) != null; if (!exists) return Request.CreateResponse(HttpStatusCode.NotFound, "The user was not found."); string tokenUsername = TokenManager.ValidateToken(token); if (username.Equals(tokenUsername)) return Request.CreateResponse(HttpStatusCode.OK); return Request.CreateResponse(HttpStatusCode.BadRequest); } |
Firstly, it checks the existence of the username in the repository – since there is no reason to validate a token for a non-existing user. Then it validates the token using the previously created method and returns a proper HTTP response.
Testing Validation
The last task is to test this part of the functionality. Start debugging once more.
Since this is a GET request, I am filling in the token and the username as URL parameters. Click the Params button to the right of the URL to fill these in.
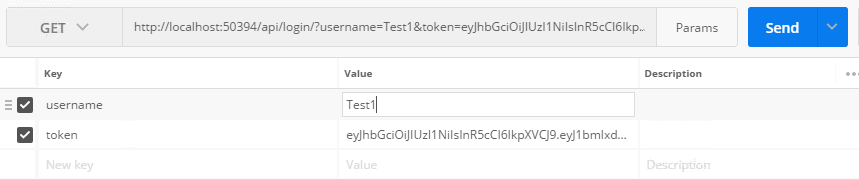
Since everything is in order, I am getting a 200 response.

For a wrong username or wrong token, a 400 response is returned instead.

Other scenarios
In this article, I only considered the case where a specific service is used for authentication purposes. However, the same technology could be used in a scenario where the token should be used to verify the user’s identity for access at the same component. In that case, an easier solution would be to create an authentication filter and use it to decorate the actions that require authentication. This is a scenario where the role claim would be helpful, since requests could be filtered by different permission levels. A tutorial about how to create authentication filters in Web API can be found here.
Load comments