
Any System Administrator worth their salt knows the importance of patching their systems. Whether it is to protect against a security vulnerability, enhance the stability of the system or provide enhanced features, software vendors will release updates for their products during their release lifecycle. High profile IT security incidents during the late 1990’s and early 2000 years, such as the Code Red worm, raised the awareness of the critical necessity of patching systems.
VMware is no different in that aspect for its vSphere ESX / ESXi software and regularly releases individual hotfixes for particular issues as well as bundles of hotfixes packaged up into large updates. To help the virtualisation administrator manage these updates across their environment, VMware provides the VMware vCenter Update Manager tool. This tool has the capability to manage updates for VMware vSphere ESX and ESXi as well as Windows and Linux guest OS’s. It can also take advantage of some of the native features of vCenter Server, such as VMotion, to patch host systems without any downtime to the virtual machines that reside on them. In this article we will concentrate on managing vSphere ESX / ESXi hosts, rather than guests and include some real world experiences of using the tool to manage patching.
Getting Started
Patching systems is potentially such a large task that within some organisations there are teams within IT departments who are dedicated solely to this task. Other organisations may not have the luxury of such resource so rely even more on software vendors to provide tools to make managing updates as simple as possible. As part of the deployment of VMware vCenter Server, the tool used to centrally manage vSphere host systems, it is possible to deploy VMware vCenter Update Manager to assist with your patching tasks. For those deployments without vCenter Server, VMware also offers the Host Update utility. However, we will be focusing on vCenter Update Manager here.
Assuming you have already deployed VMware vCenter Server to manage your ESX / ESXi hosts, you then have a decision to make on how best to deploy VMware vCenter Update Manager alongside it. This decision should be based on the number of hosts and virtual machines that will be managed by this vCenter Server. The Best Practises guide for VMware vCenter Update Manager 4.0 (www.vmware.com/pdf/Perf_UpdateManager40_Best-Practices.pdf ) presents the following guidelines for deployment:
- Fewer than 30 hosts or 300 virtual machines – use the same server and database as vCenter Server for vCenter Update Manager.
- Greater than 30 hosts or 300 virtual machines, but fewer than 100 hosts or 1000 virtual machines – use the same server as vCenter Server for vCenter Update Manager, but use a separate database for the two products.
- Greater than 100 hosts or 1000 virtual machines – use a separate server and a separate database for vCenter Server and vCenter Update Manager.
The Minimum Hardware Requirements for VMware vCenter Update Manager 4.0 are given in the administration guide (http://www.vmware.com/pdf/vsp_vum_40u1_admin_guide.pdf ) and are as follows:
- Processor – Intel or AMD x86 processor with two or more logical cores, each with a speed of 2GHz.
- Memory – 2GB RAM if Update Manager and vCenter Server are on different machines, 4GB if they are on the same machine.
- Network – 10/100 Mbps, although Gigabit Ethernet is recommended.
You will receive best performance if vCenter Update Manager is able to serve the updates from memory rather than disk. Since some of the updates can be significant in size, it is recommended the vCenter Update Manager server has 2GB RAM available to cache these updates. Consequently you may wish to consider using a 64bit Operating System as part of any of the above three mentioned deployment scenarios, both Windows Server 2003 64bit and Windows Server 2008 64bit are supported for this purpose.
On the database side you have the choices of SQL Server 2005, SQL Server 2008, Oracle 10g, or Oracle 11g. Similar to vCenter Server, this includes the option to use SQL Server 2005 Express edition if you have fewer than 5 hosts and 50 virtual machines. Note that if you made the choice to install on a 64bit Operating System you will need to use a 32bit DSN. By default any DSN created on a 64bit system will be a 64bit DSN, so you will need to use the 32bit ODBC Administrator application to create your DSN.
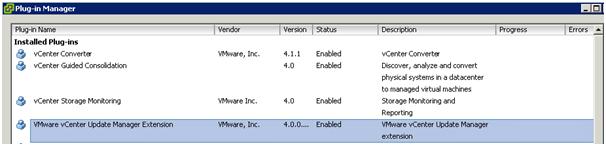
You can then begin the install of vCenter Update Manager from the install DVD or ISO. Once complete you will also need to install and enable the vCenter Update Manager Extension for your instance of the Virtual Infrastructure client – the GUI tool to manage your ESX servers and vCenter. Navigate to the Plug-ins menu of your installed VI Client, then Manage Plugins. Within Plug-in Manager you will see the option to install and enable the vCenter Update Manager Extension. Once complete it should have a status of Enabled.
Real World Advice
Downloaded Patches Location
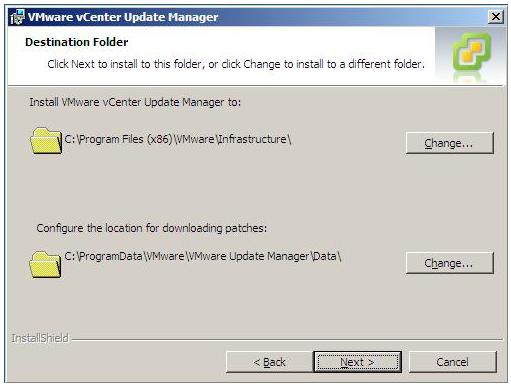
A potential common mistake to make during the installation of vCenter Update Manger, which I made myself the first time I used vCenter Update Manager, is to accept the default installation location for downloading patches. C:\Documents and Settings\All Users\Application Data\VMWare\VMWare Update Manager\Data is the path used on Windows Server 2003 and C:\ProgramData\VMware\VMware Update Manager\Data is the path used on Windows Server 2008 as in the below screenshot. Note: you can use the variable %ALLUSERSPROFILE% in either OS to get to the correct location.
The issue with this can be that you will run out of space on your system disk to store all of the patches for the various flavours and versions of ESX / ESXi software. Imagine a scenario where you install vCenter Update Manager whilst you only have version 3.5 ESX hosts, vCenter Update Manager will only download patches for that version. Now add ESXi into your environment and then upgrade to vSphere 4.0 and typically the amount of disk space required will increase from approximately 5GB to over 15GB – in addition this disk space requirement will always be growing as new patches are downloaded at regular intervals. Depending on the size of your system disk this may well become an issue.
Best practise is to provision a data drive for your vCenter Update Manager server with enough space for the foreseeable future to host all of the necessary patches. Typically data drives are also easier to increase in size should you need extra space in the future, although changes within Windows Server 2008 make it simpler to increase the size of a system drive over Windows Server 2003.
If you have already configured vCenter Update Manager to use the system disk and are running out of space, there is a straightforward process to transfer the location for storing patches to another drive with more diskspace.
- Stop the VMWare Update Manager Service
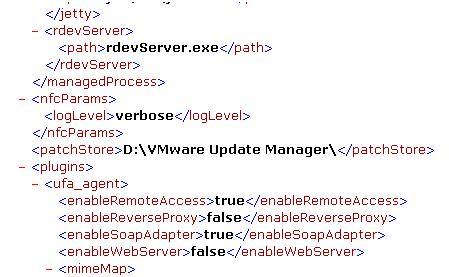
- For rollback purposes take a copy of the XML file C:\Program Files\VMWare\Infrastructure\Update Manager\vci-integrity.xml, then update the live versions to point to the new location for downloading patches; specifically, update the following entry in that XML file:
Change the <patchstore> setting to point to the new location, e.g. D:\VMware Update Manager\Data\
- Move all of the existing patches from C:\ %ALLUSERSPROFILE% \Application Data\VMWare\VMWare Update Manager\Data to the new location
- Start the VMware Update Manager Service
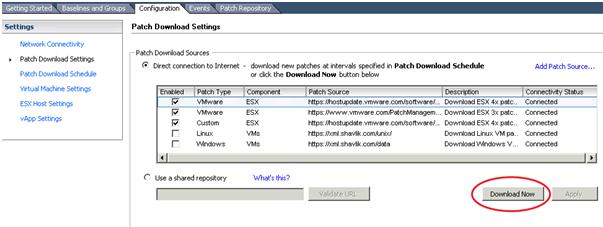
Any patches downloaded from now on will be stored in the new location; you can test this in version 4 of Update Manager by navigating to Update Manager within the VI Client, Configuration and Patch Download Settings. The Download Now button will initiate a connection for each of the sources of patches that have been selected and download any newly available patches since the last successful download.
Creating Baselines
To deploy groups of patches you will create Baselines which allow you to bundle patches together for installation. Hosts will then be scanned against a baseline and can install those updates which they require. Baselines can be of two types; either Fixed or Dynamic. Use Fixed Baselines when you wish to manually specify a patch or list of patches to be scanned against, this will not change when new patches are downloaded to the repository, unless the administrator amends the Baseline. Dynamic Baselines are based on specific criteria such as containing particular text or during a date range, these will up dynamically updated if newly downloaded patches meet the criteria.
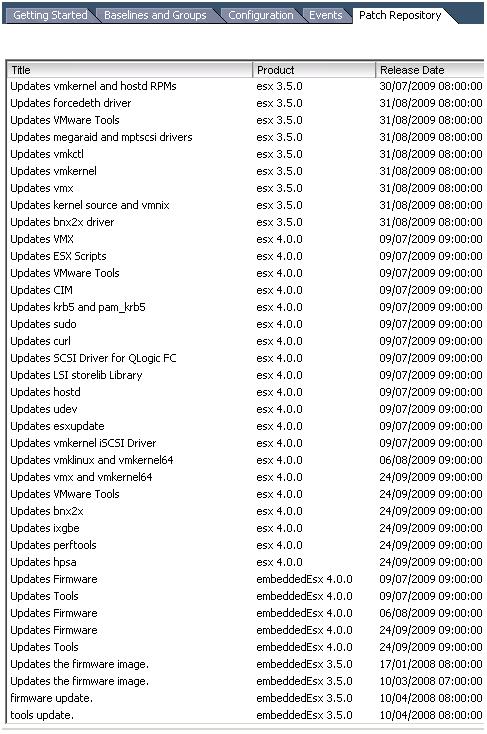
As previously mentioned you will only see patches within your repository which correspond to the version and type of VMware hosts you have in your vCenter Server, e.g. if you only have ESX servers you will not have ESXi patches downloaded into your repository. A fully loaded vCenter with both ESX and ESXi of versions 3.5 and 4.0 will have patches for all systems, the Product column shows which patches are for which OS. Note that ESXi is affectionately known as embeddedEsx within vCenter Update Manager; this applies whether you have the true embedded version of ESXi or the installable version. This is worth bearing in mind when creating your Baselines since you may otherwise spend some time looking for the patches of the installable version of ESXi.
Another point you may need to look out for is the naming of the patches themselves. Take a scenario where you wish to upgrade all of your 3.5 versions of ESX and ESXi to the same patch release. (It should go without saying that making all of your hosts consistent across the same patch level will keep the management of your environment more straightforward).
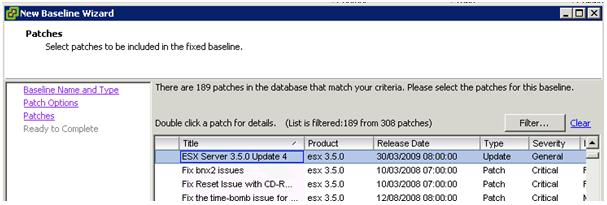
In this situation you might wish to create a Fixed Baseline which contains the 3.5 Update 4 package. Finding this for ESX is very straightforward since it is named as you would expect. When using the New Baseline Wizard to create a fixed baseline select the patch named ESX Server 3.5.0 Update 4 as below.
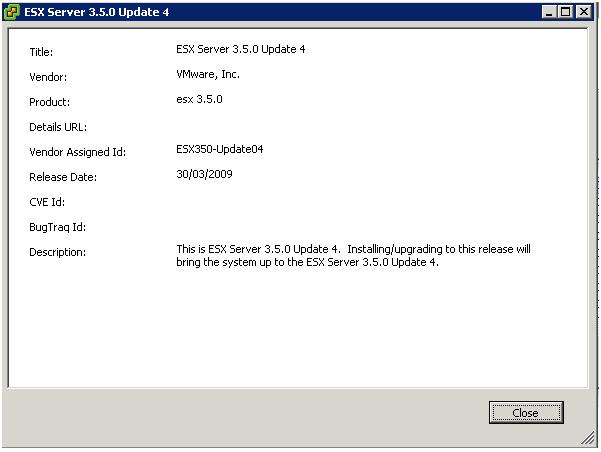
Double-clicking the patch will bring up more details about the patch, in this case confirming that we have the correct patch we are looking for.
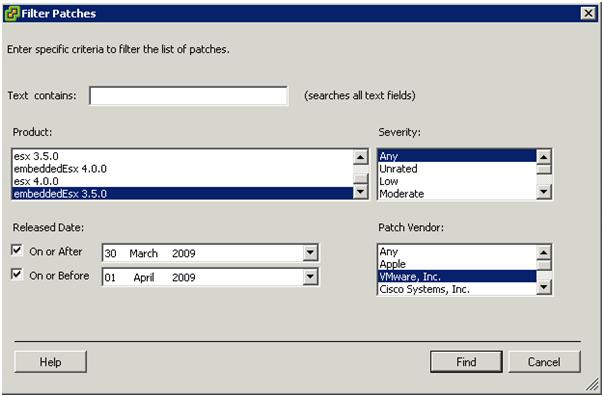
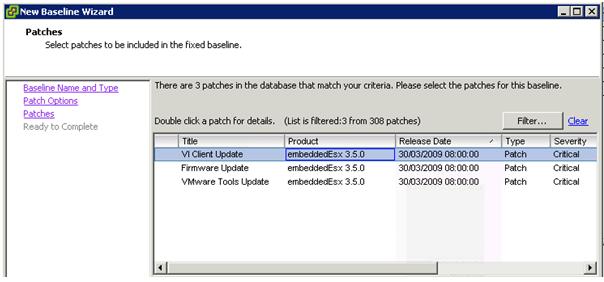
However, if we now wish to create a Baseline for our ESXi hosts there is no patch named ESXi Server 3.5.0 Update 4 , instead we must use another method to track down what we need. In the above example we know that Update 4 was released on 30/03/2009, when creating the ESXi baseline we can use a Filter to narrow down the list of available patches to select from.
By specifying that we only wish to look for embeddedEsx 3.5.0 patches from VMware, Inc. between the date of 30 March 2009 and 01 April 2009 we should be able to return only the patches that we need.
The results of the filter when applied show the below patches, from which you will observe that the patches’ titles are not particularly helpful when differentiating from other similar patches. For instance the equivalent patches for 3.5 Update 3 have exactly the same titles. You will also notice that different from ESX 3.5 Update 4 which had one patch to select, for ESXi you need to select the VI Client, Firmware and VMware Tools Updates.
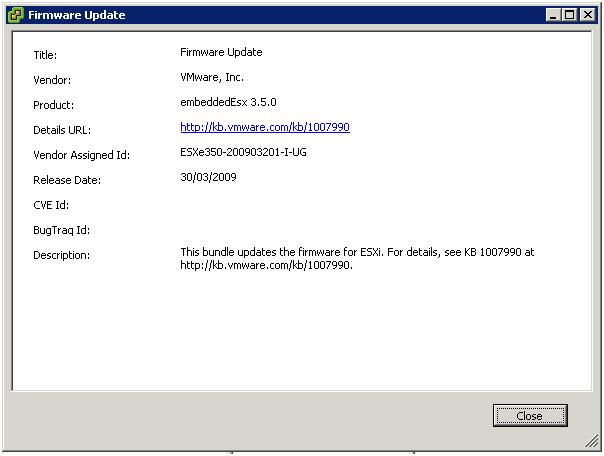
Again, double-clicking on a patch will bring up more details about it and following the link to the VMware Knowledge Base article will confirm that you have the correct patches for 3.5 Update 4.
Patch Deployment
Well run IT organisations typically have regularly scheduled maintenance windows when work such as installing essential patches can take place – if your place of work doesn’t then you should seriously consider organising them. Even if you do have these windows you may be limited by the amount of time they are open and the time it is going to take you to install all of the patches you need to implement. Consequently it is worth looking at some ways you can save yourself time with vCenter Update Manager before you get to your maintenance window.
Deploying the patches with vCenter Update Manager is a two or three step process:
- Scan
- Stage (optional)
- Remediate
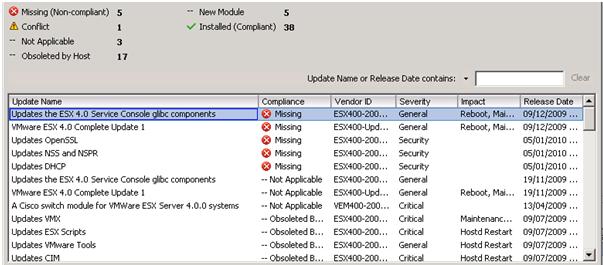
If you carry out the first two processes before your maintenance windows you may be able to save a considerable amount of time for those who are carrying out the patching. The first stage in deploying patches is scanning a VMware host against a baseline. Once complete you will be able to view which patches are required by that host (such as in the screenshot below) and then initiate a Stage or Remediate process.
On a recent engagement it took 10 minutes for a scan of a modern, high performance ESX host at 3.5 Update 1 to complete whilst comparing against a baseline of ESX 3.5 Update 4. This may not sound a lot, but if you have a significant number of hosts to patch during your maintenance window pre-scanning could add up to be a big time saver.
The optional step two of Staging allows the administrator to pre-copy the patch files from the vCenter Update Manager Server before applying them to the VMware host. Again this can save those carrying out the patching a significant amount of time from their maintenance window.
Finally, the Remediation stage deploys the patches to the hosts if they were not staged, installs the patches onto the server and reboots if necessary. On the same engagement mentioned above, it consistently took 1 hour 10 minutes to upgrade hosts from ESX 3.5 Update 1 to 3.5 Update 4 and whilst that is a fairly significant jump in terms of patch level it is worth considering when planning your maintenance window. A good practise is to deploy the patches to a small, select group of servers before the maintenance window so that a) you have a good idea of how long the process takes and b) deal with any resultant issues before rolling out to the whole server farm.
During that engagement it was also interesting to note that the same upgrade of ESXi 3.5 Update 1 to 3.5 Update 4 took only 20 minutes so a worthwhile consideration to add to any decision about whether to install ESX or ESXi in your environment. ESXi has a smaller footprint than its older brother ESX and as consequence requires less patching.
The document Configuration Maximums for VMware vSphere 4.0 (http://www.vmware.com/pdf/vsphere4/r40/vsp_40_config_max.pdf) details the supported limits for the number of concurrent scan and remediate processes which can be run per vCenter Update Manager Server, as well as other supported maximums.
72 is the maximum number of hosts which can be scanned concurrently and only 8 remediations at any one time, so bear these figures in mind again when planning for how long it is going to take to patch all of your hosts in the maintenance windows. Typically you may not be able to carry out more than 8 remediations at a time anyway since patching a VMware host requires first that it be in maintenance mode and an environment might not have the spare capacity to take out more than 8 hosts at a time.
Maintenance Mode
Before being able to remediate a VMware host it needs to be Maintenance Mode. This ensures that no live virtual machines are running on the system, they have either been VMotioned onto other hosts or powered down, and no other system processes are running which would prevent patch install.
The remediation task is able to put the host in maintenance mode for you; the screenshot below demonstrates the options you have for this when running the remediation wizard.
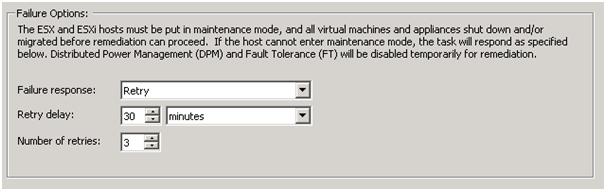
Alternatively you may wish to manually put the host in maintenance mode before running the remediation wizard. However this is carried out, the host needs to have successfully made it into maintenance mode before the update process will begin.
A common issue that may be experienced here is that the maintenance mode task will be kicked off, you will be able to see its initial progress in the VI Client and then it will sit at 2% and stay there. After patiently waiting a few minutes you will wonder why it is taking so long and look worryingly at the clock counting down on the time left in your maintenance window.
This is most likely occurring because one or more virtual machines will not VMotion off of the host in question. This can happen because of a number of reasons, some of the more common are:
- A local CD-Rom is connected to a virtual machine
- The virtual NIC of a virtual machine is connected to an internal only network or the names of the vSwitches on this host do not exactly match those of the other host
- The virtual machine is stored on a local disk, it needs to be on a shared disk for VMotion to be able to take place.
Remedying these or other issues will then permit the maintenance mode task to complete. Again the administrator can save themselves a lot of time before the maintenance window by checking their environment for these common issues and resolving them in advance.
A great, free and simple way to do this is to run the vCheck PowerShell script created by Alan Renouf (http://www.virtu-al.net/2009/11/04/vcheck-daily-report-v3/). This will give you a great view on these and many other potential issues within your environment.
Conclusion
Patching operating systems and applications is an essential part of everyday life for a system administrator and keeping VMware ESX and ESXi servers up-to-date is no exception. VMware provide a great tool in vCenter Update Manager to assist you with this task.
With good planning, testing and procedures your maintenance windows can be a great success in keeping your environment current and consistent.
This document contains proprietary information and is protected by copyright law.
Copyright © 2026 Red Gate Software Limited. All rights reserved
Load comments