
The series so far:
- Introduction to Game Development with Unity and C#
- Using C# Functions in Your Animations
- Procedural Generation with Unity and C#
- Pathfinding with Unity and C#
- Extending the Unity Editor with C#
- Using Unity UI and C# to Create a Tic-Tac-Toe Game
Creating a user interface (UI) is undeniably important for your video game projects. The UI is responsible for displaying information to the player like health, ammo, and score. Without easy access to that information, games can fall apart very quickly. Just as important as displaying that info is updating it as the player plays. If the player earns ten points, then the UI needs to reflect that and update the score currently present on the screen.
Here, you’ll be using Unity’s UI in a different way. Rather than display health and score, you will instead utilize the UI to create a playable game of Tic-Tac-Toe (also sometimes called noughts and crosses or Xs and Os), and of course you will use C# code to do it. The aim of this project is to demonstrate how, through code, you can manipulate UI elements to do whatever you desire. A grid will be layed out for the game, and from there buttons will be added to the grid. These buttons will act as the playable spaces for the Tic-Tac-Toe game.
Setting Up
As with all projects, the first thing you’ll have to do is create a new project. Click the New button at the top of Unity’s project management window as shown in Figure 1.

Figure 1: Creating a new project.
Name your project TicTacToe and be sure to set it as a 2D project. This project can just as easily work as a 3D project, but this example will be in 2D for the entire duration. After you’ve done this, set a path for your project and click Create project when you’re ready. Figure 2 shows the final project setup screen before clicking Create project.
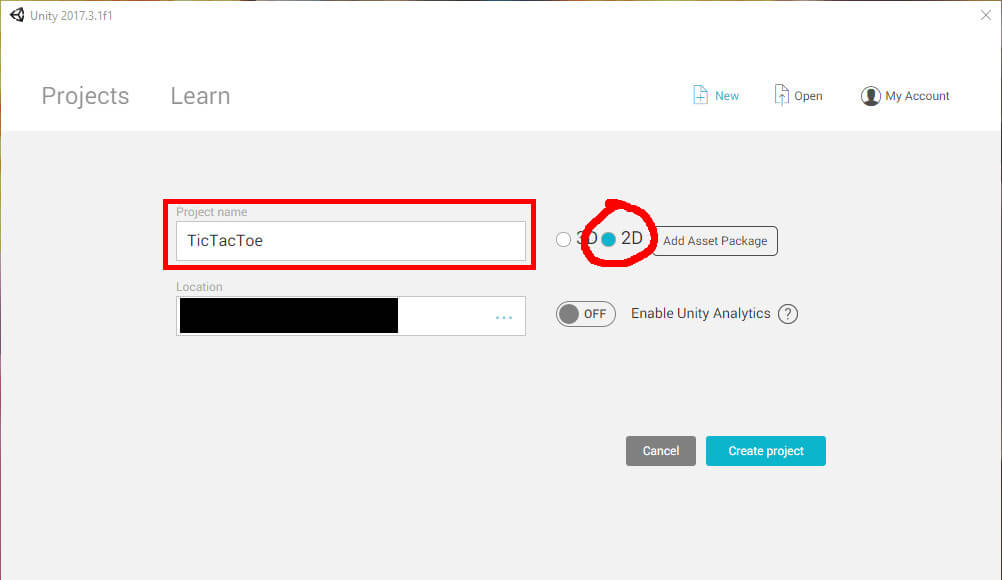
Figure 2: Project setup screen.
Once Unity has created the project, the very first thing you need to do is go to the Hierarchy window and select Create->UI->Panel to create a new panel. While you’re at it, double click the new Panel object to center the scene view on the panel. Figure 3 shows how to create a new panel.
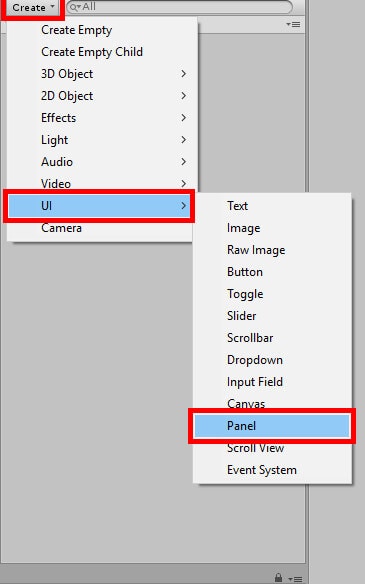
Figure 3: Creating a new UI panel.
Go ahead and name this object line then select the box to the far left of the Inspector window as shown in Figure 4.
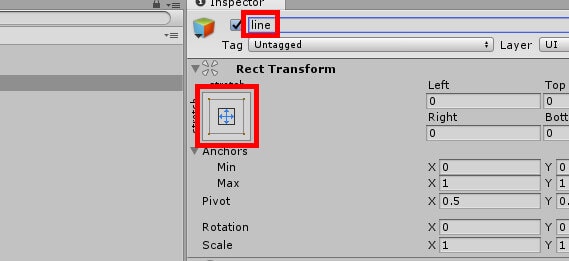
Figure 4: Naming the object and selecting the anchor selection box.
This is the object’s ‘anchor,’ which is responsible for keeping the UI element at a certain point on the screen regardless of the size of the user’s screen. It’s useful whenever you need to make sure the UI will look the same from one screen to the next. In this case, the line object is set to stretch both horizontally and vertically to the ends of the screen, but that’s not very useful for a game of Tic-Tac-Toe. Select the center anchor option to anchor the line object to its relative center as seen in Figure 5.

Figure 5: Setting an object’s anchor to center.
Next, the size of the line object needs to be set. Under the Inspector window in the Rect Transform component set the object’s Pos Y value to -5, its Width to 18, and its Height to 274. Figure 6 shows the different fields to change and their values.
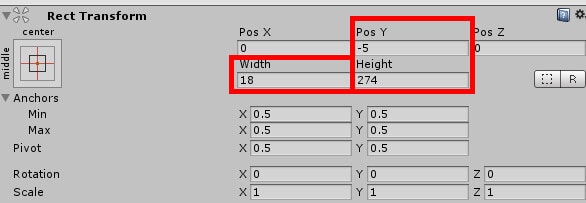
Figure 6: Setting the Pos Y, Width, and Height of the line object.
Duplicate the object three times to bring you to a total of four line objects. Once you have these objects created, you’ll need to adjust the position and sizes of each line object using its Rect Transform component to make a grid to play in. Table 1 shows each line object’s properties to set and what value to set them to.
ObjectPos XPos YWidthHeight
|
line |
0 |
-5 |
18 |
274 |
|---|---|---|---|---|
|
line (1) |
110 |
-5 |
18 |
274 |
|
line (2) |
56 |
52.5 |
296 |
19 |
|
line (3) |
56 |
-52.5 |
296 |
19 |
Table 1: The line objects size and coordinates.
With the grid created, create a UI button by using the Create menu from before, selecting UI and then Button. Figure 7 shows you where to find this option.
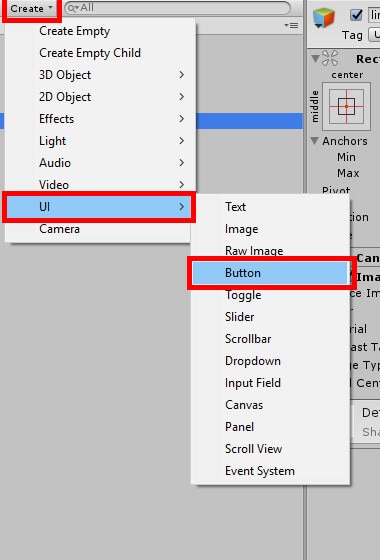
Figure 7: Creating a new button.
Name this button Space and then click the arrow next to the name of the object in the Hierarchy like in Figure 8.
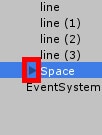
Figure 8: Expanding the Space object to reveal its child Text object.
This will reveal the Text object attached to the button. Select Text and then find the Text component under the Inspector window. Once found, clear all text in the Text field so that no text appears on the newly created button. Figure 9 shows where to find this.
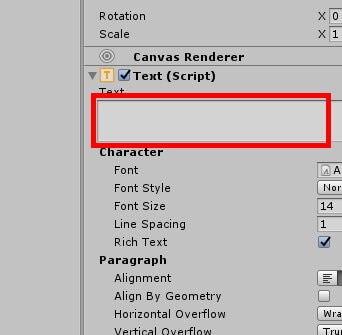
Figure 9: The Text field.
From there set the font size to 36 and make sure its alignment is set exactly in the center of the button like in Figure 10.
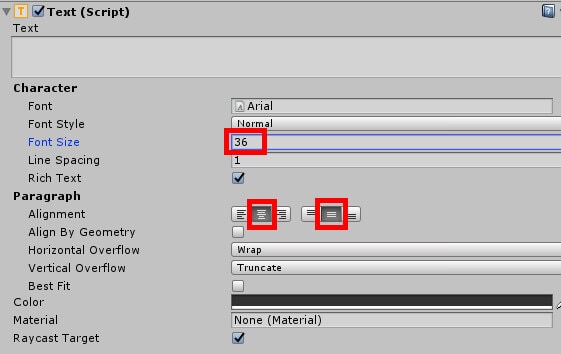
Figure 10: Setting different properties of the Text component.
With the Text object done, select the Space object from the Hierarchy and go to the Rect Transform component. Set the Pos X value to -50, Pos Y to 100, Width to 75, and Height to 70. The object’s Rect Transform should now look like the one shown in Figure 11.
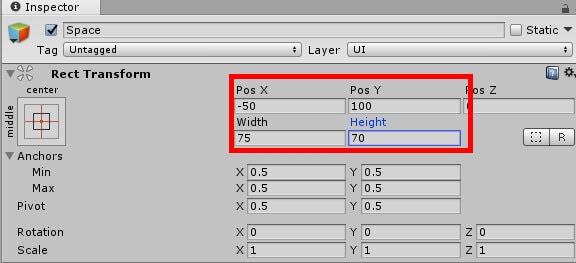
Figure 11: Space’s Rect Transform properties.
And your button should now also be set in the upper left corner of your grid like in Figure 12.
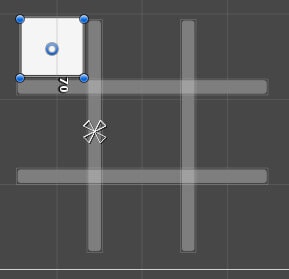
Figure 12: The scene so far.
Now is not quite the time to lay out the rest of the buttons, as there are things you’ll need to do first that will ultimately make development easier for you. You will come back to laying out the different spaces on the grid after the code is complete. For now, create a new panel using the same Create menu as before. Name this panel GameOver Panel and set its anchor to the center of the screen. Once that’s done, adjust its size and position according to Figure 13.
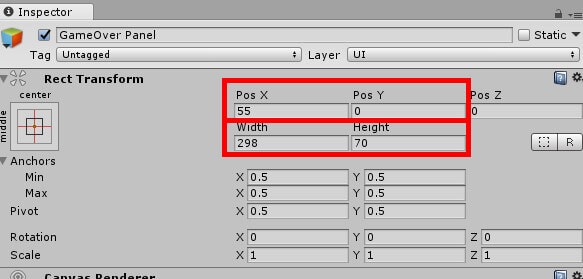
Figure 13: GameOver Panel’s Rect Transform properties.
After that’s done, you need to change its color a bit to help make it stand out from all the rest of the UI. Under the Image component select Color like in Figure 14.
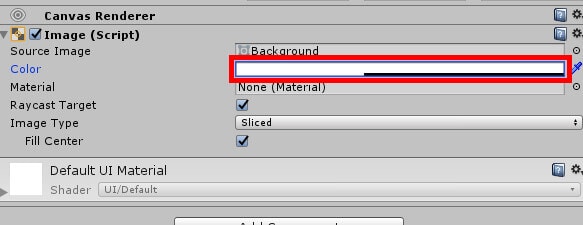
Figure 14: Setting a new color for the GameOver Panel
In Figure 15 a green color was chosen, but of course you may use whichever color you want. Keep in mind that if you use black as the color, you’ll need to later change the color of a text object you’ll be creating in a moment so that said text is actually visible.
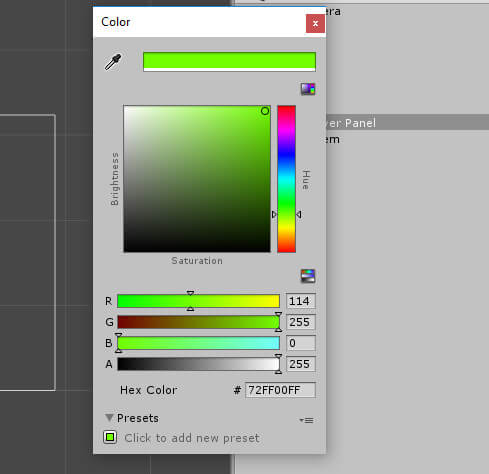
Figure 15: Picking a color.
Once your color is chosen, right click on the GameOver Panel object and select UI->Text to create a new Text object. Since you created the Text object in this way Unity will automatically assign the new object as a child of GameOver Panel, which is exactly what is needed. Figure 16 shows where to find the option to create the Text object.
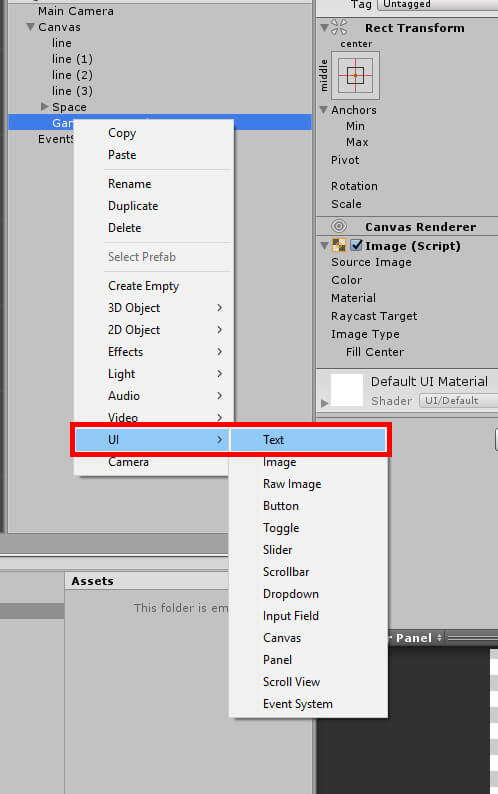
Figure 16: Creating a new Text object as a child of GameOver Panel.
With the new Text object selected, change the following values in the Rect Transform and Text components.
- Rect Transform->Pos Y: -3
- Rect Transform->Width: 295.5
- Rect Transform->Height: 68
- Text->Text: Victory Text
- Text->Font Size: 36
- Text->Alignment: Center
When you’re done the Text object should look like the one in Figure 17.
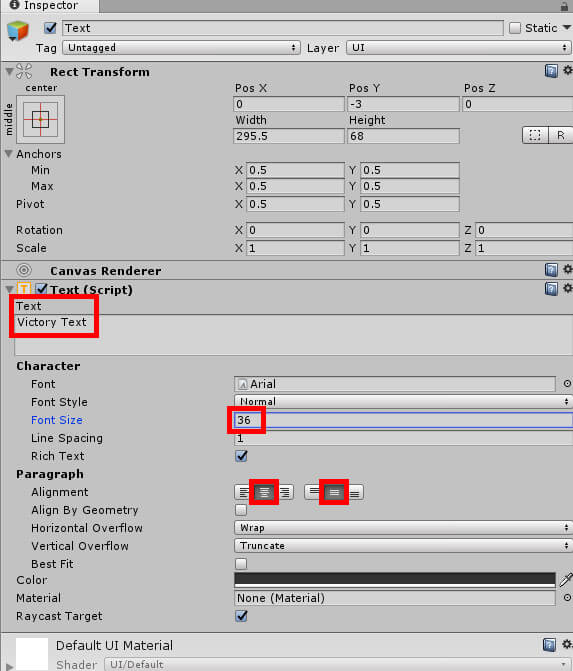
Figure 17: The finished Text object.
Next another button will be made. This button will restart the game whenever it is clicked on, but you’ll set it up so it will only appear once the game is done, whether there’s a winner or if it ends in a tie. Using the same Create menu as before, create a new button and call it RestartGame. Then, set the following Rect Transform values:
- Pos X: -250
- Pos Y: 70
- Width: 200
- Height: 70
After that, select RestartGame’s Text object and set the following properties in the Text component:
- Text: Play again?
- Font Size: 24
- Alignment: Center
Finally, create a new empty object by going to Create->Create Empty like in Figure 18.
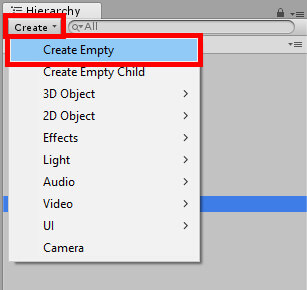
Figure 18: Creating the GameController object.
Name this object GameController. This object will be the one that takes care of almost all the code for the game. Speaking of the code, it’s now time to create some scripts. In your Assets window right click and select Create->C# Script like in Figure 19.
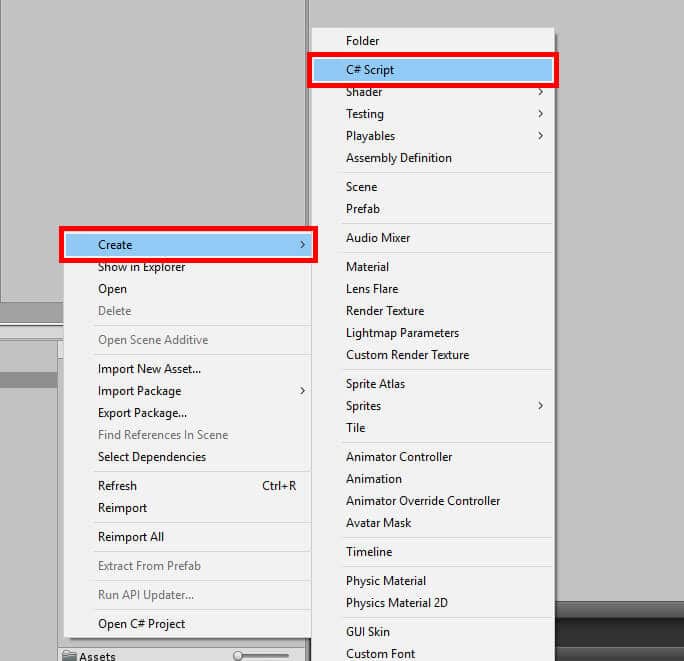
Figure 19: Creating a new C# script.
Name this script GameController. Remember that you must give it the GameController name immediately after creating the script. If you click away from the script without giving the script its name, the wrong class will be created in Visual Studio which can cause problems later. Immediately after creating that script, create another script and call it Space. Once this is done, your Assets window should look like the one in Figure 20.
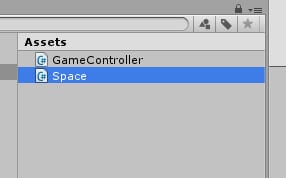
Figure 20: The current Assets window.
It’s now time to write the code that will make this game run! Begin in the GameController script by double clicking it in the Asset window.
The Code
The GameController script will be responsible for the majority of the game’s logic. There’s a couple tasks that need to be done before creating this script. First, comment out or delete the Update function as it will be of no use to you in this project. Next, at the top of the script just underneath the line that says using UnityEngine add the following line:
|
1 |
using UnityEngine.UI; |
After you’ve added this line in, declare the following variables above the Start function:
|
1 2 3 4 5 6 |
public Text[] spaceList; public GameObject gameOverPanel; public Text gameOverText; public GameObject restartButton; private string side; private int moves; |
How are these variables going to be used? The spaceList array at the top will hold all of the text that will be on our buttons in the game. You may be wondering why you wouldn’t have an array of buttons instead of text. This is because you want to check the text on the button when looking for a winner. There’s no information that the button object itself can directly tell you about as far as whether there’s an X or an O on the space. Thus, we want the text instead so you can check that information more directly.
Also declared is the gameOverPanel which will simply be activated whenever the game has ended. You will also have the gameOverText to display whenever a game has been finished. The restartButton will appear at the end of a game to simply ask if you wish to start a new game of Tic-tac-toe. After that are the private variables, which will simply keep track of whose turn it is and how many moves have been played so far. At this point, the GameController script will look similar to the one in Figure 21.

Figure 21: The GameController script so far.
Now it’s time to move on to the Start function, where you will set a few variables and deactivate certain objects. This is the code needed for Start:
|
1 2 3 4 5 |
SetGameControllerReferenceForButtons(); side = "X"; gameOverPanel.SetActive(false); moves = 0; restartButton.SetActive(false); |
All you’re doing is setting the side to ‘X’, setting the number of moves to zero, and deactivating the gameOverPanel and restartButton. After all, you probably don’t want the GameOver Panel object getting in the way of the game, and it would be all too easy for a sore loser to restart the game before it’s finished. So, you deactivate these objects from the start. There’s also one function being called here that you have not yet created, but are about to. Figure 22 shows the finished Start function.
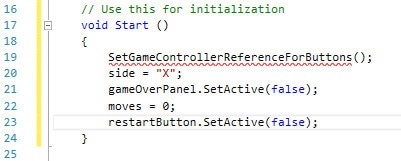
Figure 22: The complete Start function for the GameController script.
Underneath the commented out Update function (or just underneath the Start function if you chose to delete Update completely), create the SetGameControllerReferenceForButtons function:
|
1 2 3 4 5 |
void SetGameControllerReferenceForButtons() { for (int i = 0; i < spaceList.Length; i++) spaceList[i].GetComponentInParent<Space>().SetControllerReference(this); } |
Once this function is made, the compiler error in the Start function should go away. But you’ve created a new one instead! On the line that says spaceList[i].GetComponentInParent<Space>().SetControllerReference(this); there’s a new error. The compiler doesn’t know what SetControllerReference is. You’re trying to get a function from a different script that, like SetGameControllerReferenceForButtons, has not yet been created. Figure 23 shows the completed function in GameController.

Figure 23: The SetGameControllerReferenceForButtons function.
This is now a good time to switch over to the Space script. Odds are there will not be a tab at the top of Visual Studio that you can click to switch to the Space script. So instead, save your work and go back to Unity. In the Assets window double click the Space script you created earlier. Alternatively, you can also find the script in the Solution Explorer. Inside the Space script, you’ll need to begin similarly to the GameController script. Comment out or delete both the Start and Update functions, and be sure to add using UnityEngine.UI; near the top of the script like you did in GameController. Once you’ve done that, declare the following variables:
|
1 2 3 |
public Button button; public Text buttonText; private GameController gameController; |
When you’re finished the Space script should look like the one shown in Figure 24.
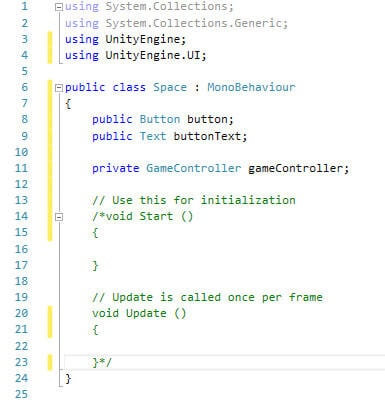
Figure 24: The beginning of the Space script.
This is now the point where you create the aformentioned SetControllerReference function. At the bottom of the script, add the following code:
|
1 2 3 4 |
public void SetControllerReference(GameController control) { gameController = control; } |
That’s all there is to this function. All it’s doing is getting a reference to the GameController script for later use. Note that it must be a public function for GameController to use this function. There’s not much else left to do with the Space script for the rest of the project, so you may as well finish it out since you’re here. Underneath SetControllerReference add another public function called SetSpace and give it the following code:
|
1 2 3 4 5 6 |
public void SetSpace() { buttonText.text = gameController.GetSide(); button.interactable = false; gameController.EndTurn(); } |
The GameController script will be putting this function to use. After the player makes a move, this function will be called to place an X or an O on the space and make sure the button object you click is no longer interactable. It will then call GameController’s EndTurn function to change whose turn it is. With this function finished, the Space script is finished. Figure 25 shows the finished script. Keep in mind that it’s okay for the errors in SetSpace to be there for now as you will be adding the needed functions momentarily to GameController, which will in turn remove those errors.
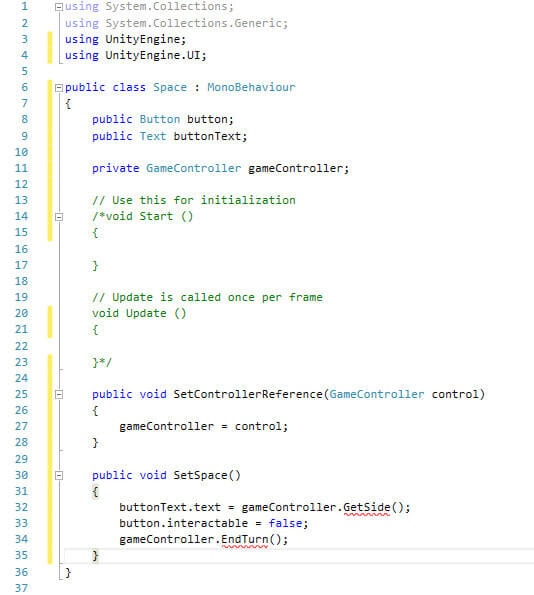
Figure 25: The finished Space script.
It’s now time to switch back over to the GameController script. You can either go back to Unity and double click the GameController script again or click the GameController tab near the top of your Visual Studio window like in Figure 26. Remember to save your work!
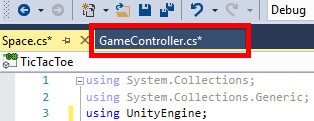
Figure 26: Switching to the GameController script.
Once you’ve returned to the GameController script, go to the bottom of the script and add the following code:
|
1 2 3 4 |
public string GetSide() { return side; } |
When the Space script calls this string function, all it’s effectively doing is getting the current player’s turn and setting an X or O on whichever space you clicked on. Next it’s time to create the ChangeSide function, which will control the changing of player turns. The code for this is as follows:
|
1 2 3 4 5 6 7 |
void ChangeSide() { if (side == "X") side = "O"; else side = "X"; } |
After this is complete, your GetSide and ChangeSide functions should look similar to what’s shown in Figure 27.
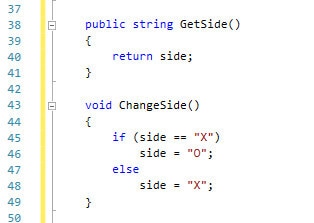
Figure 27: The GetSide and ChangeSide functions of GameController.
Now it’s time to create perhaps one of the most important functions in the whole project. This function, called EndTurn, will be handling the process of incrementing the moves variable as well as checking to see if any sort of game over state has been achieved. If a player has gained a victory, it will call a GameOver function which will be created momentarily. It will also check to see if the number of moves has reached a certain limit, and if it has, it will activate the gameOverPanel and restartButton. Here’s the code for the EndTurn function:
|
1 2 3 4 5 6 7 8 9 10 11 12 13 14 15 16 17 18 19 20 21 22 23 24 25 26 27 |
public void EndTurn() { moves++; if (spaceList[0].text == side && spaceList[1].text == side && spaceList[2].text == side) GameOver(); else if (spaceList[3].text == side && spaceList[4].text == side && spaceList[5].text == side) GameOver(); else if (spaceList[6].text == side && spaceList[7].text == side && spaceList[8].text == side) GameOver(); else if (spaceList[0].text == side && spaceList[3].text == side && spaceList[6].text == side) GameOver(); else if (spaceList[1].text == side && spaceList[4].text == side && spaceList[7].text == side) GameOver(); else if (spaceList[2].text == side && spaceList[5].text == side && spaceList[8].text == side) GameOver(); else if (spaceList[0].text == side && spaceList[4].text == side && spaceList[8].text == side) GameOver(); else if (spaceList[2].text == side && spaceList[4].text == side && spaceList[6].text == side) GameOver(); if (moves >= 9) { gameOverPanel.SetActive(true); gameOverText.text = "Tie!"; restartButton.SetActive(true); } ChangeSide(); } |
The way the EndTurn function checks for a victory is, admittedly, a little reliant on brute force. If, for example, you wanted to expand the board for any reason, then this solution would simply be no good and you’d have to either recode it to accomodate the different victory conditions or come up with an entirely different solution. For this project, the code above will work fine. All it’s doing is checking the text of each item in the spaceList array and seeing if there’s a three in a row combination. If there is, it calls GameOver and ends the game. In addition, if the number of moves played is equal to or greater than nine, it will also end the game.
You’re not calling the GameOver function here, and you may be wondering why. It’s primarily because of the gameOverText.text = ‘Tie!’; line. In the GameOver function you’ll soon make, the game is just getting the current player’s side (X or O) and concatinating wins! to the text. In a draw, that wouldn’t make very much sense, and thus the process is handled a little differently. Finally, if none of the above game over conditions are met, then the game simply changes the side to the next player. Figure 28 shows the full EndTurn function.
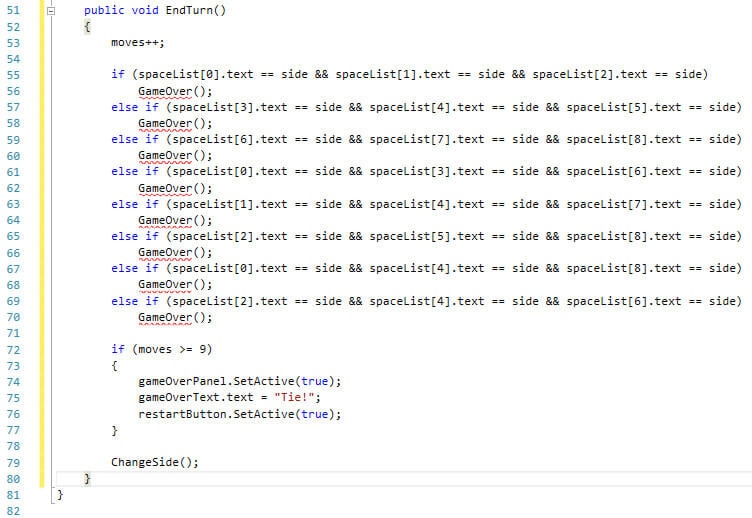
Figure 28: The EndTurn function in the GameController script.
With EndTurn complete you will now need to create the GameOver function as follows:
|
1 2 3 4 5 6 7 8 |
void GameOver() { gameOverPanel.SetActive(true); gameOverText.text = side + " wins!"; restartButton.SetActive(true); for (int i = 0; i < spaceList.Length; i++) SetInteractable(false); } |
This is similar to when you checked for how many moves had been played in the EndTurn function, but with a few extra steps. Immediately after this, create the SetInteractable function to remove the error in the GameOver function. Then, enter the following code:
|
1 2 3 4 5 |
void SetInteractable(bool setting) { for (int i = 0; i < spaceList.Length; i++) spaceList[i].GetComponentInParent<Button>().interactable = setting; } |
All this code is doing is gathering all the Button components in the parent object of each text object in spaceList and setting interactable to whatever you assign in the setting boolean. Once this is finished, your GameOver and SetInteractable code should look similar to Figure 29.
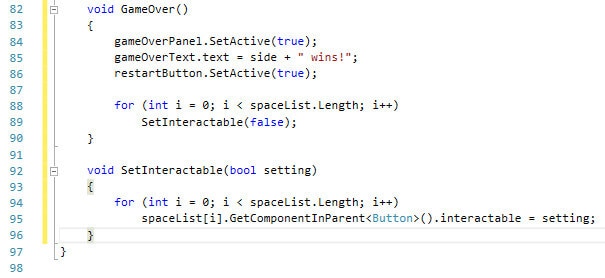
Figure 29: The GameOver and SetInteractable functions in GameController.
At this point, you may think the coding part of this project is done, but there is actually one last function that needs to be made. After a game over state is achieved, the user will need some way to restart the game. To that end, you will need to make the Restart function. It’s very similar to the GameOver function, but in reverse:
|
1 2 3 4 5 6 7 8 9 10 |
public void Restart() { side = "X"; moves = 0; gameOverPanel.SetActive(false); SetInteractable(true); restartButton.SetActive(false); for (int i = 0; i < spaceList.Length; i++) spaceList[i].text = ""; } |
Once completed, the Restart function should look like the one in Figure 30.
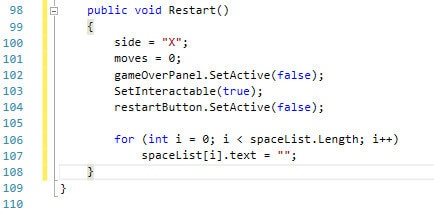
Figure 30: The Restart function.
Now that both the GameController and Space scripts are complete, make sure you’ve saved them both and return to the Unity editor.
Finishing the Project
First, before assigning scripts to any objects, you need to make a prefab of the Space object. You’ll use the prefab to edit the Space object’s settings and then you’ll make duplicates of the Space object. The duplicates will share all the properties of the prefab you create, thus saving time. With that said, drag the Space object into your Assets window as seen in Figure 31.
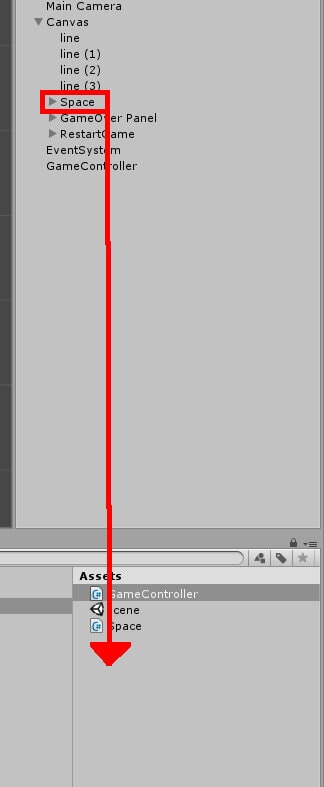
Figure 31: Creating a new prefab.
Select the Space prefab you just created and then move to the Inspector window. Scroll down until you see the Add Component button. Click the button and search for the Space script. Once found, click on the script to add it as a component to the prefab like in Figure 32.
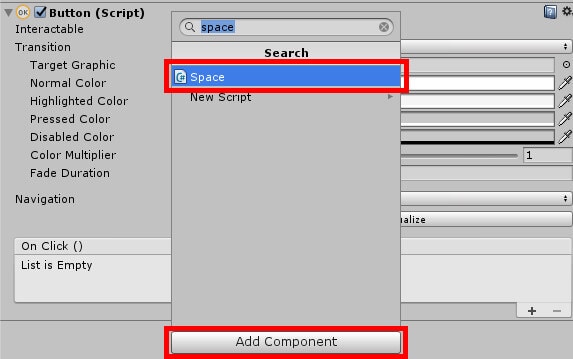
Figure 32: Attaching the Space script to the Space prefab.
You’ll need to assign the Space prefab itself as the value of the Button field as well as its child Text object to the Button Text field below like in Figure 33.
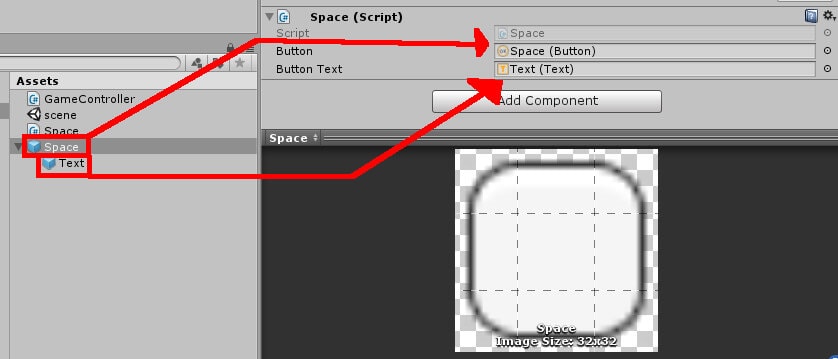
Figure 33: Setting the values of Button and Button Text.
Next, in the button component, set a new On Click event by clicking the + plus button near the bottom of the component, as seen in Figure 34.

Figure 34: Creating a new On Click event.
The On Click events exist for executing code whenever a button is clicked. In this case, you’ll be assign the Space script’s SetSpace function as the code to execute whenever a Space button is clicked on. After clicking the + button, select the object picker by clicking the small circle next to the field that should currently say None (Object) like in Figure 35.
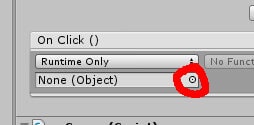
Figure 35: Picking a new object for the On Click event.
In the window that appears, search for Space. Remember that you’ll want the prefab and not the script here. Search for the Space object with the blue cube next to it like in Figure 36.
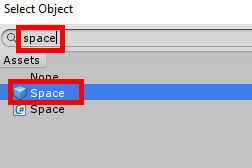
Figure 36: Selecting the Space prefab.
After you’ve selected the object, click on the field that says No Function. A menu will appear showing the different components currently attached to Space. Go to Space->SetSpace to set the SetSpace function as the code to execute whenever a Space button is clicked. Figure 37 shows where to find everything you need for this step.
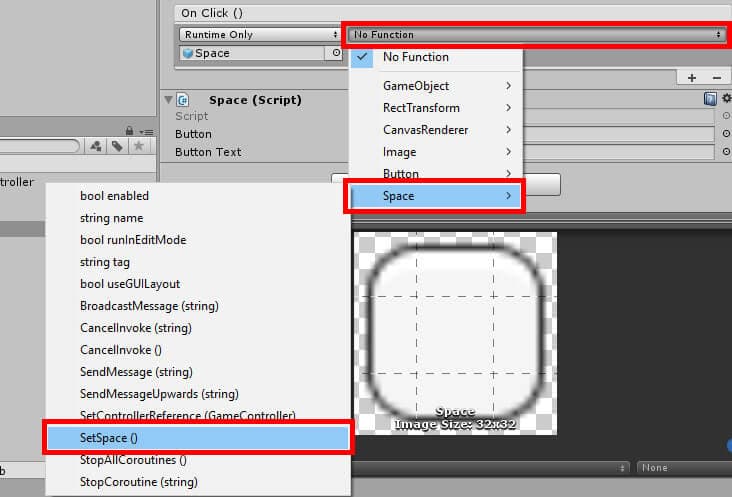
Figure 37: Setting SetSpace as the code to execute.
Your Space prefab is finally complete, which means you should now be able to select the Space object in the Hierarchy window and see the changes you just made applied to it. The prefab can come in handy in the future if you wanted to make additional boards or have the buttons used in different scenes. In this case, you’ve made it so that all buttons on this board will behave exactly the same way. With Space selected in the Hierarchy window, press Ctrl + D eight times to make a total of nine Space objects. Once you’ve done this, your Hierarchy will look similar to the one in Figure 38.
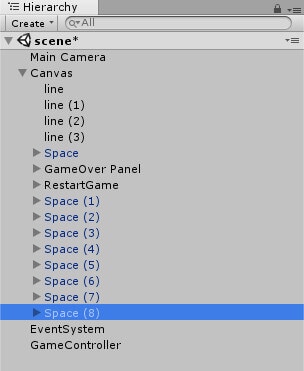
Figure 38: The Hierarchy with all the Space duplicates.
Of course, the buttons can’t all stay in one place. You’ll need to move them around the board using the Rect Transform component to have a proper Tic-Tac-Toe game board. Table 2 shows the needed coordinates for each object. It’s important to note that the right Space object is in its correct place. For example, you wouldn’t want the intended bottom right space to be in the position that upper middle space will be in.
Object Name
Position X
Position Y
|
Space |
-50 |
100 |
|---|---|---|
|
Space (1) |
55 |
100 |
|
Space (2) |
160 |
100 |
|
Space (3) |
-50 |
0 |
|
Space (4) |
55 |
0 |
|
Space (5) |
160 |
0 |
|
Space (6) |
-50 |
-100 |
|
Space (7) |
55 |
-100 |
|
Space (8) |
160 |
-100 |
Table 2: All Space objects and their coordinates.
If the new space button positions will not stick, be sure that you are running the latest version of Unity. It’s possible that your GameOver Panel object is sitting underneath the Space objects in the middle row. To fix this, you simply need to rearrange the order of the GameOver Panel in the Hierarchy like in Figure 39.
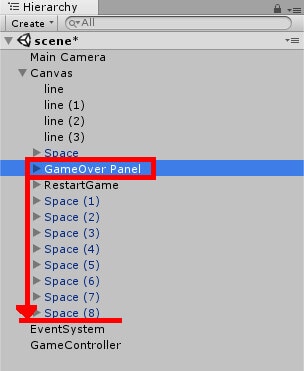
Figure 39: Rearranging the placement of the GameOver Panel in the Hierarchy.
Next you’ll need to select the GameController object in the Hierarchy and then attach the GameController script to it like you did with the Space prefab with the Add Component button. Once you’ve done that, you’ll need to fill in the list of text objects for the Space List array. Lock the Inspector window so it shows the GameController script by clicking the lock icon in the top right corner like in Figure 40.
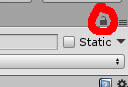
Figure 40: Locking the inspector.
Next, expand each Space object by clicking the arrow next to each Space object. This will reveal the child Text object. Make sure they’re all selected using Ctrl + Left Mouse Click, then drag them onto the Space List field in the GameController component. Figure 41 shows how this is done.
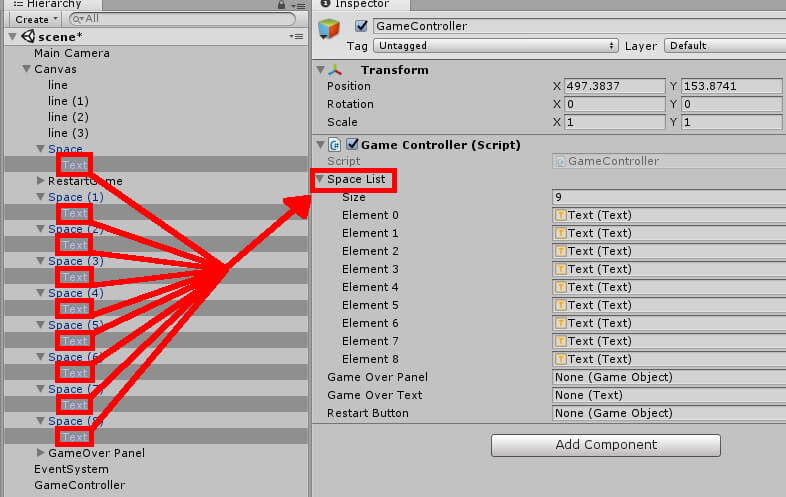
Figure 41: Setting up the Space List array.
At this point, you’ll want to make absolutely sure that the Text objects are in the right order in the Space List array. You can check this by simply clicking on an element field and seeing where the corresponding object lights up in the Hierarchy. Each object should be in order of its appearance in the Hierarchy.
Now, assign the GameOver Panel object to the Game Over Panel field. Expand the GameOver Panel object to reveal its Text object. Drag that object into the Game Over Text field in the GameController component. Finally, click and drag the RestartGame object into the Restart Button field. When you’re done, the Game Controller script should look like the one in Figure 42.
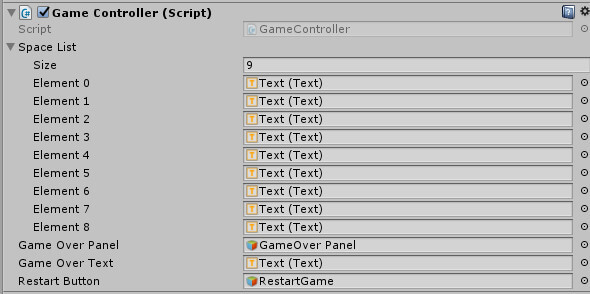
Figure 42: The finished GameController script.
Finally, unlock the Inspector window and select the RestartGame object. Scroll down until you see the On Click event like with the Space prefab earlier. This time, click and drag the GameController object from the Hierarchy into the Object field in the On Click event. After you’ve set the object you will then click the field that says No Function and navigate to GameController->Restart to set the Restart function as the code to execute when the RestartGame button is clicked. After you’re finished, save everything and give your game a try!
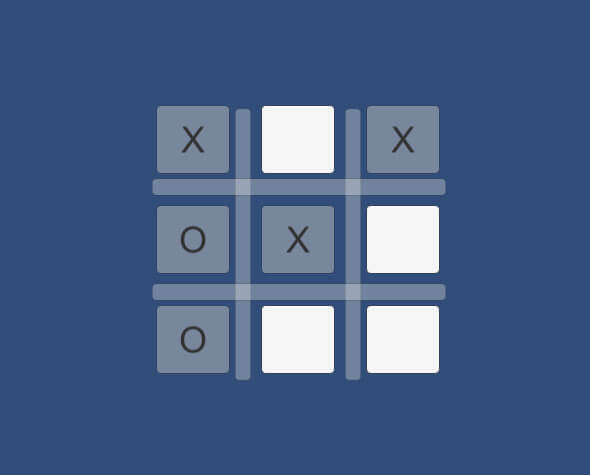
Figure 43: Tic-Tac-Toe in action!
Conclusion
Using only UI elements, you’ve made an entire game! The idea was to show you just a few things you can do with Unity’s built in UI systems. Typically, when creating any UI objects they are used to help inform the player of information like the current score or where they are on a map. However, UI can be used for almost any purpose you desire. The possibilities really are as endless as you can imagine.
This document contains proprietary information and is protected by copyright law.
Copyright © 2026 Red Gate Software Limited. All rights reserved
Load comments