
Social login is not appropriate for all web applications. In the business-to-business web segment, social login makes no sense at all. Social login is just what its constituent words say-it’s a login and it’s social. It is being able to use your Facebook, Google or Twitter identity to log in to a site. For this to be relevant, The application needs to have a strong social flavor in order to take advantage of allowing users to log on this way.
If your ASP.NET application falls into the ‘social’ category then having social login saves you from the burden of storing critical security data such as passwords. When users create an account on your site, you are compelled to use all available means to protect all password and personal data that they may be required to disclose. Agreed, hashing and salting passwords is no rocket science but if you can leverage someone else services for free, well, why not?
Another reason for using social login is that it makes users happier. There’s both a psychological and pragmatic factor in it. The application looks more open if it offers many ways to get in and get involved. It seems like the application is making any effort to have you as a user. Second, if you can login via your favorite social network you have one less set of credentials to handle and remember.
From the perspective of an ASP.NET application, a social login involves a bit of traffic to and from the backend interface of the social network, and the handling of a user name to identify the logged-in user for the purposes of the application. This latter task doesn’t require much effort to set up, so let’s start from here. We’ll use Facebook as a practical example.
Logging into Facebook via Script
Firstly, you’ll need to create a Facebook application on developers.facebook.com. This application will be the proxy between your application and the Facebook backend interface. Whatever you may need to do programmatically on the Facebook site will take place through the services of a Facebook-specific application. Each Facebook application is identified by an app-id. A Facebook account is sufficient to give you rights to create applications.
Next, following the instructions found on developers.facebook.com, you grab a piece of HTML and JavaScript and merge it within your home page or within any page where you intend to handle the login stuff. The code contains an empty placeholder DIV and some script. You should place it at the top of the body before everything else.
|
1 2 3 4 5 6 7 8 9 10 |
<div id="span" style="color:#A31515">"fb-root"></div> <script> window.fbAsyncInit = function () { FB.init({ appId: 'your-app-id', status: true, cookie: true, xfbml: true }); </script> |
When set totrue , the parameter status checks the login status to verify that the browser holds a Facebook session. The cookie parameter set to true enables the Facebook API to use cookies. Finally, the xfbml parameter enables the API to parse the Facebook markup language that might be found in the page. Next, you subscribe to the auth.authResponseChange JavaScript event. The event is fired any time an authentication-related event takes place such as Facebook login and logout. By registering an handler for this event, you can refresh the application status properly. Here’s some boilerplate code:
|
1 2 3 4 5 6 7 8 9 10 |
FB.Event.subscribe('auth.authResponseChange', function (response) { if (response.status === 'connected') { // Update the UI to reflect the connected user updateUI(); } else if (response.status === 'not_authorized') { // Connected to FB but not to the app } else { // Not connected to FB } } |
The person may be in one of three states:
- connected to Facebook and the app,
- connected to Facebook but not into the app,
- disconnected from Facebook.
In the last two cases, you just want to display some messages and make a button available to click to log in. If the user is connected, instead, you have a user name and can render the user interface accordingly. The following code shows how you grab the name of the current user.
|
1 2 3 4 5 |
function updateUI() { FB.api('/me', function (response) { $("#user").html(response.name); }); } |
Needless to say, you need the Facebook SDK loaded for all this code to run successfully. It is usual, for performance reasons, to link the JavaScript Facebook SDK asynchronously. The download then happens when the page is being rendered without blocking any further browser work on it. The simplest way consists in creating a SCRIPT element programmatically, as below:
|
1 2 3 4 5 6 7 |
(function (d) { var js, id = 'facebook-jssdk', ref = d.getElementsByTagName('script')[0]; if (d.getElementById(id)) { return; } js = d.createElement('script'); js.id = id; js.async = true; js.src = "//connect.facebook.net/en_US/all.js"; ref.parentNode.insertBefore(js, ref); }(document)); |
There are other ways to download scripts asynchronously. One method uses the getScript method of jQuery, possibly with the client caching disabled to reuse a relatively static and large chunk of JavaScript across pages. Finally, if you use require.js-a popular JavaScript file loader-you can use the instructions at https://developers.facebook.com/docs/javascript/howto/requirejs to configure it.
Email address and Other User Information
Sometimes when you log users in, you also want to know their email address. If you create your own login form then you just serve up some user interface with a required email input field. When authentication comes through Facebook, the email address may be requested programmatically. Email address is not the only extra information you can grab. Here’s some code to play with that grabs other attributes:
|
1 2 3 4 5 6 7 8 9 10 |
function update() { FB.api('/me', function (response) { $("#user").html(response.name); $("#email").html(response.email); $("#gender").html(response.gender); $("#born").html(response.hometown.name); $("#birthday").html(response.birthday); $("#birthday").html(response.education[0].school.name); }); } |
Full details can be found here: http://developers.facebook.com/docs/graph-api/reference/user. Facebook returns semi-structured data so it is essential to check the documentation before attempting to extract information correctly. Some information may be missing or not public (e.g., birthday). In this case, the API will return undefined .
Benefits of JavaScript
From a developer’s perspective, the fastest and lightest approach is to authenticate users via JavaScript. All you do is to link a bit of JavaScript and write the code that handles user data. There’s no need to be worried about authentication cookies and storage and checking of credentials. The JavaScript SDK does all of it for you. In this way, you just need to focus on what it means for your application to have an authenticated user.
The interesting thing here is that the Facebook SDK for JavaScript hides completely from applications the burden of dealing with the underlying OAuth protocol. Dealing with the intricacies of the OAuth protocol is necessary if you take the classic web route of authentication. In ASP.MVC this means dealing with account controllers and their methods. More importantly, it splits the social authentication process in two distinct steps. First you need the user to provide credentials in the social network login form. If all is OK, the social network redirects back to the return URL that you provided so you can then collect some user information and proceed with the classic ASP.NET authentication stuff such as creating the cookie.
ASP.NET MVC 5 provides some improved infrastructure that attempts to simplify the social login process as much as possible. Anyway, it’s never as easy and seamless as it is with the JavaScript SDK. However, it should also be noted that some of the extra burden in ASP.NET MVC is due to an attempt to unify multiple social networks under the same API.
Logging Into Facebook via ASP.NET MVC
The code you need for social login in ASP.NET MVC is almost the same code that you get out of the Visual Studio 2013 default project template when you enable authentication. The sample login page offers a couple of buttons to log in via Twitter or Facebook. In reality, you have more options than just Twitter and Facebook. The class OAuthWebSecurity actually exposes a variety of RegisterXxx methods that cover a long list of social networks, including Yahoo, Microsoft Live Services, LinkedIn and Google. You can enable as many authentication providers as you like as long as you have the app-id for each.
Next, you define clickable buttons in the user-interface of the home page for each social login you like. Each button ends up posting a request to the same endpoint. ExternalLogin is just an arbitrary name used in the default ASP.NET template.
|
1 2 3 4 5 |
public ActionResult ExternalLogin(string provider, string returnUrl) { return new ExternalLoginResult( provider, Url.Action("ExternalLoginCallback", new { ReturnUrl = returnUrl })); } |
The ExternalLoginResult class is a helper class defined in the AccountController.cs . The key thing that is going on in ExternalLoginResult is the action of contacting the authentication gateway:
|
1 |
OAuthWebSecurity.RequestAuthentication(Provider, ReturnUrl); |
Under the hood, the RequestAuthentication method sends a first request to the OAuth server of the social network of choice specifying the app-id. In return, the social network redirects to a proprietary page where the user can log in (if she’s not logged already in the social) and authorize the web site to use the account on her behalf. If the credentials match the social network redirects back to the specified return URL. At this point the control returns to the ASP.NET MVC application.
The status of the process at this point is “the user has been successfully recognized”. The client web application hardly finds this information useful. The client web application, in fact, needs some more data about the user; the account name at the very minimum and, more likely, an email address. This information must be requested separately and using an ad hoc access token. (See figure.)
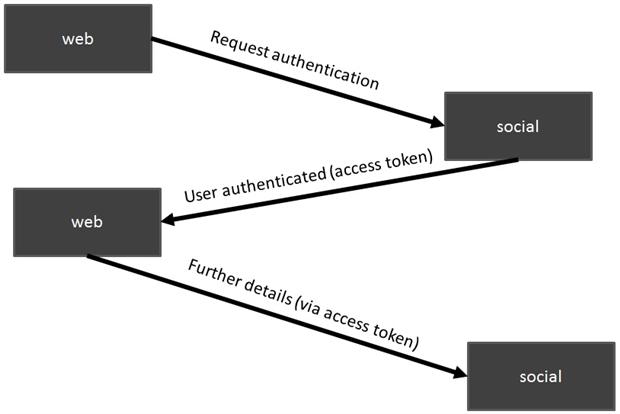
The access token to use for further requests is a sort of replacement for credentials and identifies a specific user connecting to the social through a particular proxy. In ASP.NET MVC, you get extra details about an account using the OAuthWebSecurity.GetOAuthClientData method. The method returns a class with a plain string property-DisplayName -that represents the display name of the user. Other information is returned in a string/value dictionary named ExtraData .
In ASP.NET MVC, however, all this work only delivers you some information about the user-essentially the user name for display purposes and an access token for further operations such as tweeting or posting on behalf of the user. You still to create the classic form authentication cookie if you want the application to behave like any other membership-based ASP.NET applications. You may also decide to create a custom principal and store in the authentication cookie more than just the name of the user. A useful piece of information to store would be the access token as it represents the key to operate on behalf of a user.
An access token may not last forever. For example, Facebook tokens tend to expire quickly; Twitter tokens last a lot longer. You decide how to deal with access tokens case by case, but in general a good strategy is to save the access token every time the user logs in. You can save it to the session state or, better yet, to a database.
Logging out
Within an ASP.NET application, persistence of a login only happens through ASP.NET authentication. So you use the FormsAuthentication API (or the newest ASP.NET Identity API) to sign users in and out. When a user that authenticated with your site through a social network logs out, she simply logs out your site and all that happens is that the ASP.NET cookie is deleted. Nothing happens to the underlying connection the user may have with the social network.
Weighing Out a Unified API for Social Login
When I first approached the topic of implementing social login and put my hands on the .NET implementation of the OAuth protocol-the DotNetOpenAuth library-the first I tried to do was just creating a sort of a unified API for signing in through a variety of social networks. In the end, a unified API is not trivial to write. What you get free of charge from ASP.NET MVC is good enough to let you log in and out and that’s fine. However, it was designed for use in a site that only needs authentication. More often than not, you need the OAuth access token for further interaction. This might include posting some data or capturing ad hoc pieces of information that exist in Facebook but not, say, in either Twitter or LinkedIn. The common ground is the initial task of getting a display name and access token. Both pieces of information must be stored and associated with the user. The best place I can think of is a custom IPrincipal object which returns that data right in the ASP.NET User object.
This document contains proprietary information and is protected by copyright law.
Copyright © 2026 Red Gate Software Limited. All rights reserved
Load comments