
The series so far:
- Introduction to Game Development with Unity and C#
- Using C# Functions in Your Animations
- Procedural Generation with Unity and C#
- Pathfinding with Unity and C#
- Extending the Unity Editor with C#
- Using Unity UI and C# to Create a Tic-Tac-Toe Game
Some time ago, if you wanted to make a video game, then you at least needed to know how to write code. You had to figure out how to program everything from player input to graphics rendering. Suffice it to say, you had to know a lot about programming in order to begin thinking about making your own games.
Thankfully, times have changed, and some companies have set out to remove many of the boundaries of video game development with the development of game engines like Unity. With the creation of these game engines, budding game developers no longer need to figure out how to program their own physics and animations. These game engines provided the tools necessary to begin working on your dream game without needing to spend hours learning how to build your own engine from the ground up. That option still exists for those who want it, but for many the allure of getting straight into game development overrides the desire to make your own engine from scratch. Engines such as Unity allow those who lack some of the more advanced programming skills to still create the game they envision in their minds.
However, it’s not quite as simple as downloading a program and making the next epic first person shooter from there. If you’ve never worked in game development, or indeed done any programming before, there are still a few items you have to learn ahead of time. Rest assured, these first few steps are nothing too complex, but you have to start somewhere. We’re going to start as basic as possible by drawing some text to the screen. Before we can even begin this, however, it’s helpful to know what a game engine is.
What is a Game Engine?
A game engine is simply defined as a software framework that is designed specifically for video game development. There are a lot of different game engines out there, ranging from beginner friendly programs like Game Maker Studio to large and complex engines like Unreal Engine 4. For the sake of this conversation, we’ll keep the focus on the Unity game engine. Video game engines have been used for a variety of different games from small indie games to large ‘AAA’ games created by well known companies like Epic Games and Capcom. Both individuals and teams have benefited greatly from the development of these engines, allowing them to save time, money, and resources and instead put all that where it really matters – the game itself. Figure 1 is the Unity Logo.

Figure 1: The Unity logo
Simply put, if these tools didn’t exist, there’s a large number of games that would not have seen the light of day. In a large team, game engines have helped speed up the creation of games and have allowed even more creativity to flow into a project. Game designers need to have some basic knowledge of programming to begin with, but before the development of modern game engines, designers could have often given a task like making a lever for the player to interact with to a programmer so they could save time and focus more on designing their game. But this took away time from the programmer to work on some of the bigger tasks that were needed like programming artificial intelligence. Now we have programs like Unity that simplify the process so much that even designers can work on making smaller objects for their project while a programmer can stay focused on more complex tasks.
Installing Unity
With the knowledge of what a game engine is, it’s time to download Unity and get started creating your first project. However, the installation may be a bit more involved than you think. You’ll first be downloading what’s called The Unity Download Assistant, a small program that lets you decide which components of the Unity game engine you wish to download and install. There’s the option to install Unity without the download assistant, but it’s generally simpler to use the download assistant. This is because the assistant will help you download and install various Unity components at once rather than installing different components individually. For first time users, having to seek out each individual component can be a chore, so it’s advised you use the download assistant.
After running the download assistant, you’ll be greeted with an introduction and a license agreement. Once you get past those, you’ll see several components that you can install shown in Figure 2. Most of the components available relate to building your projects for certain platforms like Android and WebGL. You can ignore those for the time being if you’d like and just focus on installing the base engine, the documentation, standard assets, and an example project if you want it. In addition, you’ll at least want to install the web player and windows build support components. If you have Visual Studio already installed on your machine, then you won’t need to worry about installing that now. However, if you do not have Microsoft’s Visual Studio on your computer, then you can still use Unity’s MonoDevelop to write the C# code that will be used in the later example. There is a setting you can change later to make Visual Studio the default code editor for your Unity projects. Figure 2 below shows the recommended components for this project.
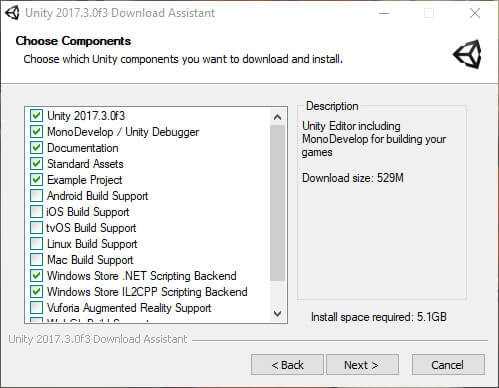
Figure 2: Selecting components to install with the help of Unity’s Download Assistant
The next screen asks you where you wish to download and install the engine and its components. You can leave everything as is here if you don’t have a specific location on your computer in mind. There’s also the option of having the download assistant put all the downloaded files into your downloads folder or somewhere different if you’d like. It’s doubtful you’ll need these again once the installation is done, so you can tell the program to download to a temporary location and delete the files when finished. After this, the download assistant will begin downloading the engine and whatever components you selected and then install everything onto your machine. Keep in mind that this process could take a while depending on how much you’re installing and what your internet connection is like.
Thankfully the final step before creating your project is pretty simple. Once the download assistant finishes installing the engine and you launch Unity, you’ll see a screen asking you to sign into your Unity account or create one. After this, you’ll need to enter a serial number if you decided to buy the engine, or if you’re using the free version you can simply select Personal Edition and move on from there. You’ll have one more license to agree to, then Unity will activate and you can begin working on your first Unity project. Now comes the fun and exciting part.
Getting Familiar with Unity
It’s finally time to create your first Unity project. Do this by clicking New as shown in Figure 3.
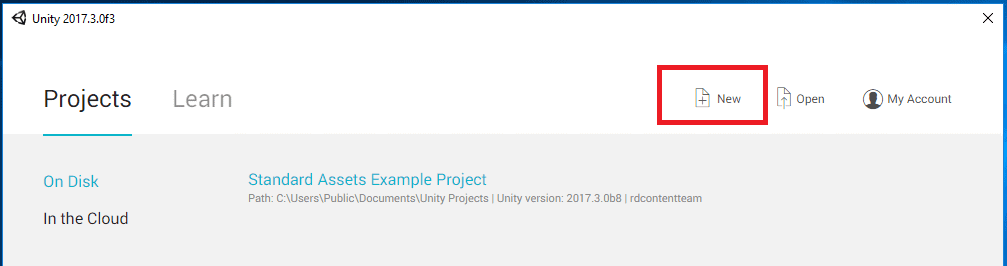
Figure 3: Create a new project
You’ll want to give the project a name and decide if it’s a 2D or 3D game. For right now, either option is fine for what you’ll be doing. It can always be changed midway through the project if you wish. A file location will also need to be set before you create the project. The default location will be sufficient for the project, or you can set it in a more convenient place in your computer. Figure 4 shows the screen.
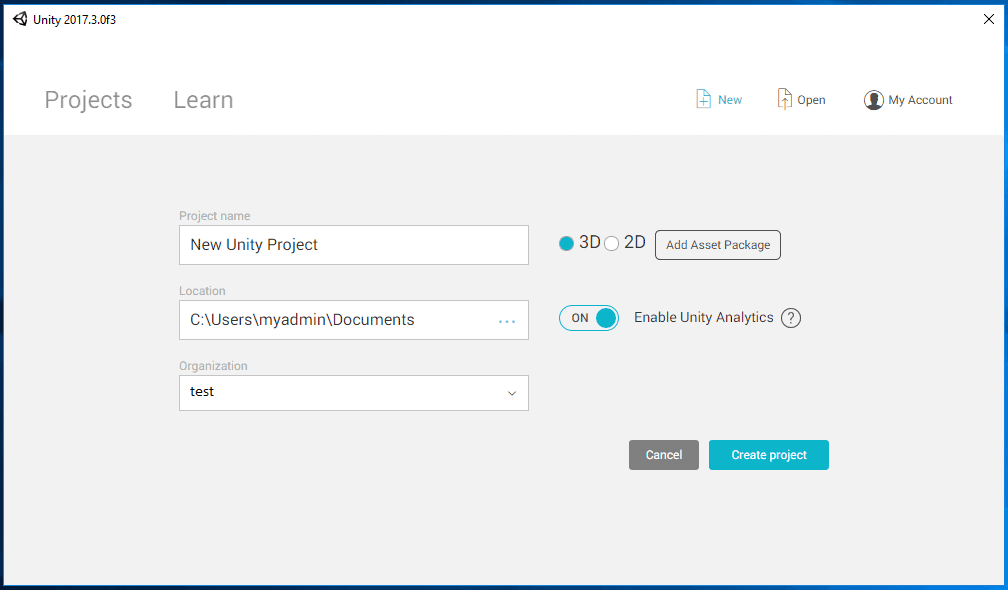
Figure 4: Project properties
Click Create Project. Unity will take a moment to create your project and then open to reveal an empty scene with a camera and a directional light. Figure 5 shows the project.
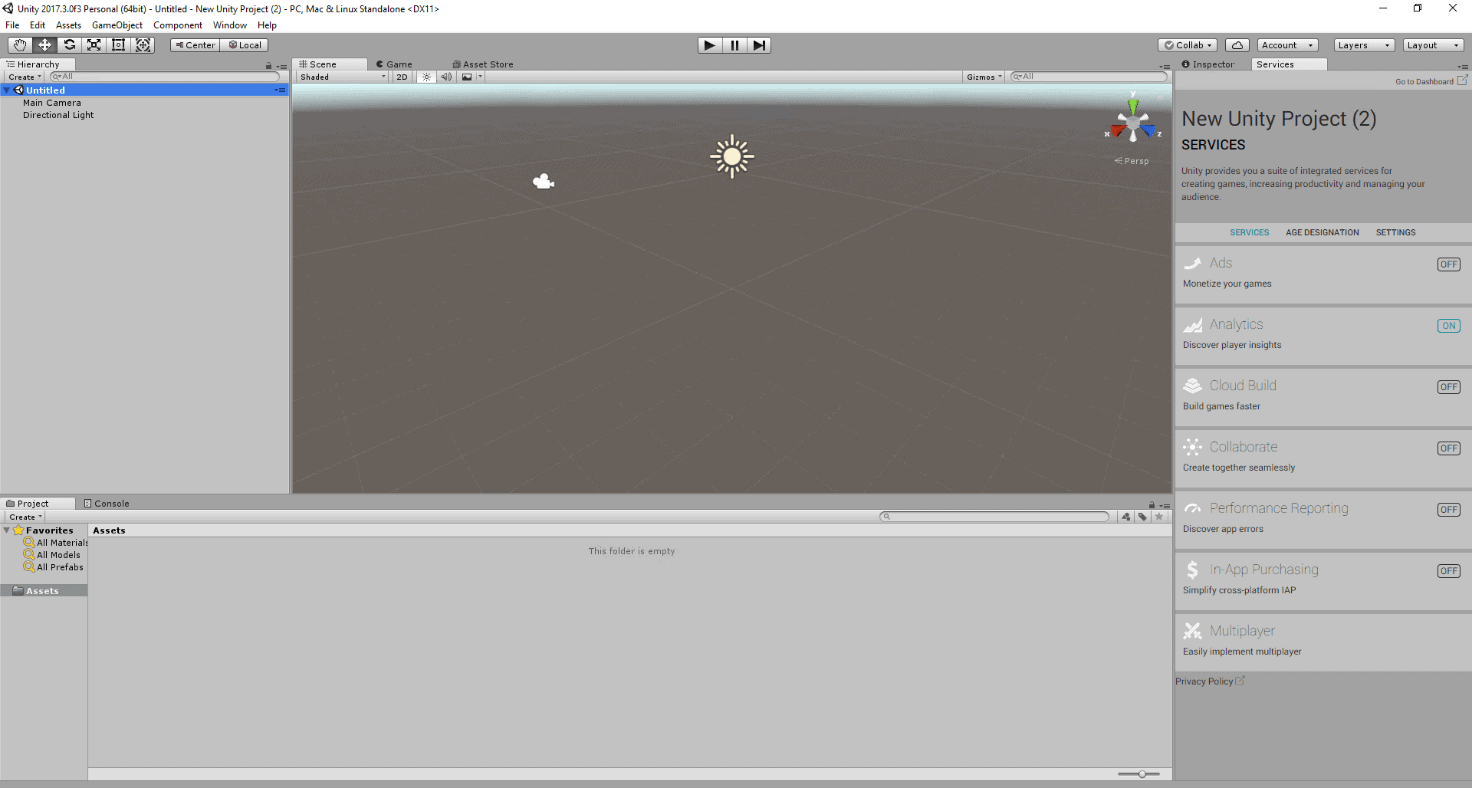
Figure 5: The Unity project
Let’s figure out what you’re going to do before you get started. The goal for the first Unity project is quite simple; make something happen. This can be a task like building a basic scene, creating a simple character, or having a sound play when the game starts. Perhaps the simplest task that will introduce one to both the Unity editor and how to have it and Visual Studio work together would be to put text on the screen.
You should first go over what is on the screen and understand the different windows you’ll be using.
Most likely, the first thing you’ll notice is what’s known as the Scene window. Here you’ll be able to select objects by simply clicking on them, or dragging objects from the assets window below into the scene window. You can right-click and drag anywhere in the Scene window to move the editor camera around your scene. For this project, you probably won’t be using this window too much. Just behind that you’ll see the Game window, which is the window where your game will be played whenever you’re ready to test anything. The more important items you’ll be using to make your project happen will most likely be on the right side of the editor.
The Hierarchy window and the Inspector window to the right shown in Figure 6 are perhaps the two most important windows you’ll be using during any given project. The Hierarchy shows a list of objects that currently exist in your game’s scene and allows you to select the objects by simply clicking the name. In doing so, you’ll see the current properties of the object and information about the components attached to it. Components give the object properties and behaviours in the game. You will be working in the Inspector window quite a lot as we make this project happen.
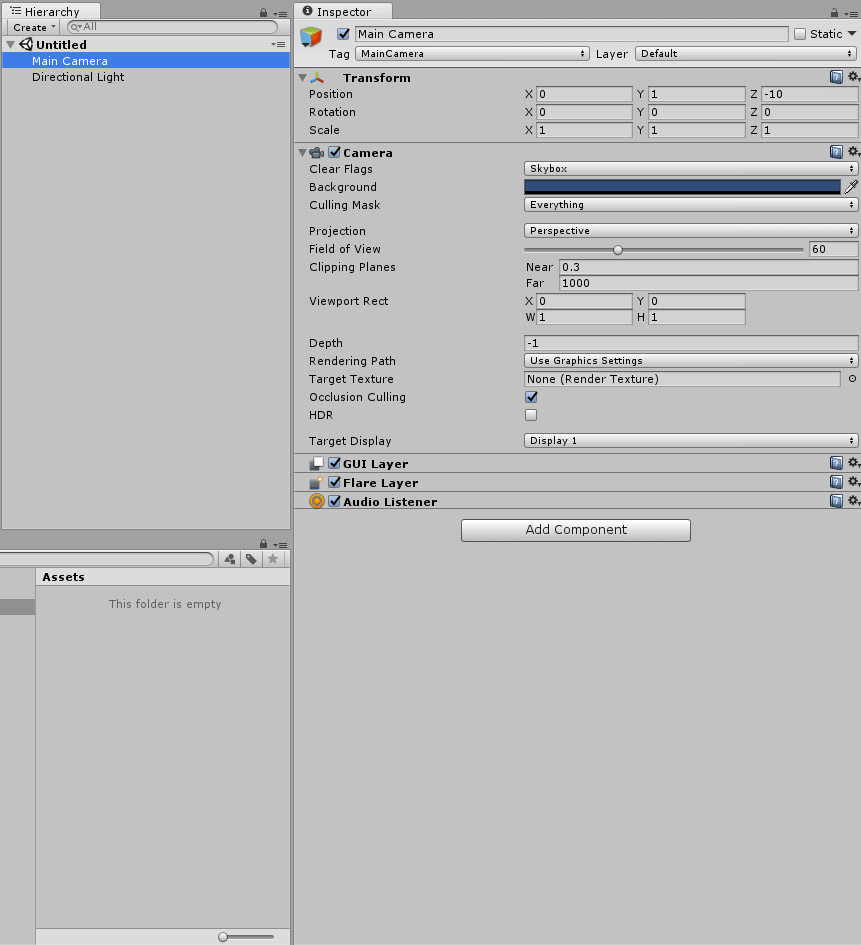
Figure 6: The Hierarchy window on the top left, the assets window in the bottom left, and the inspector window to the right
The First Program
Unity makes it incredibly easy to create what’s known as the GUI (Graphical User Interface) that you’ll need to make this first project. All you have to do is go to the hierarchy window and click the Create button near the top. From there you would go to UI, then select Text and right away you’ll have two new objects appear in your hierarchy. A Canvas object will appear that holds all GUI elements, and a Text object as a child of the canvas object shown in Figure 7.
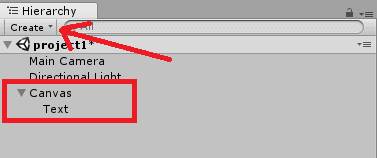
Figure 7: Create a Text object
It’s possible that you may need to move your text around a little before you can see it on the game window. You can do this by changing the Pos X and Pos Y fields in the text object’s Rect Transform component in the Inspector window. Another way to move an object is to click on it in the Scene window and move it around using the mouse. Should you move the object this way, it may be helpful to switch the scene window from a 3D view to a 2D view. In the top left corner of the scene window there’s a button that says 2D that you can press to accomplish this. Recommended Pos X and Pos Y values for this project are fifty for each field. You can get a good idea of how the text will look when playing the game by looking at the Game window. Figure 8 shows the Text object on the Game screen.
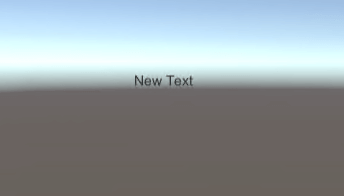
Figure 8: The Text object
The Text object will say ‘New Text’ by default. If you wanted to, you could go to the text object’s Text property in the inspector and change the text to anything you want such as ‘Hello World.’ However, changing the text in this way does not really demonstrate how Unity and Visual Studio can work together. What you should do instead is create a script that will change the text at the start of the program. To do this, you can select the text object and choose Add Component near the bottom of the inspector window. After clicking that button you may select New Script towards the bottom. You can also type ‘new script’ in the search bar that appears for easier access. Select C# as the language you wish to use, and give your new script the name ‘HelloWorld’. Figure 9 shows the dialog.
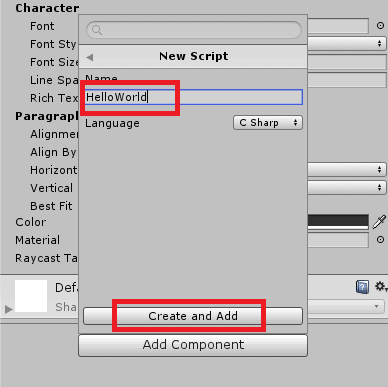
Figure 9: Create a new C# script
Click Create and Add and then Unity will create a script for you and attach it to the text object. You should now see the script in the Assets window as shown in Figure 10.
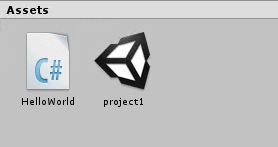
Figure 10: The new HelloWorld script
It’s also visible in the Inspector window shown in Figure 11.
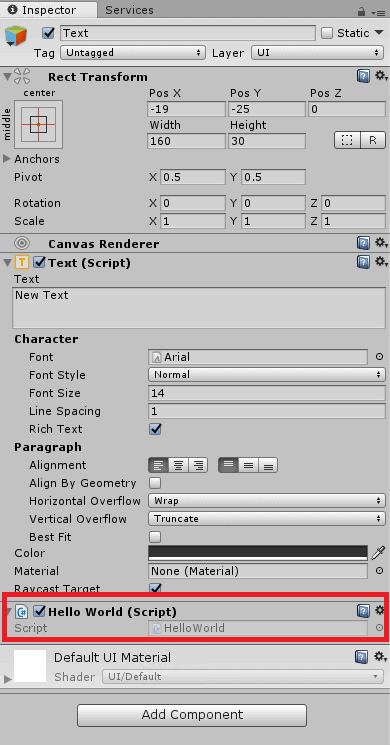
Figure 11: The HelloWorld script in the Inspector window
Now it’s time to open Visual Studio and write the code that will change the text. You can open Visual Studio by double clicking the script either in the Assets window or the Inspector window when the text object is selected. After Visual Studio finishes loading the project and file, you’ll see a few lines of code are already created. Two functions, Start and Update, will be in the body of the class, and above those a few libraries have been included. The function you want to look at today is the start function, so you can comment out the update function if you’d like. By this point your screen should look like Figure 12.
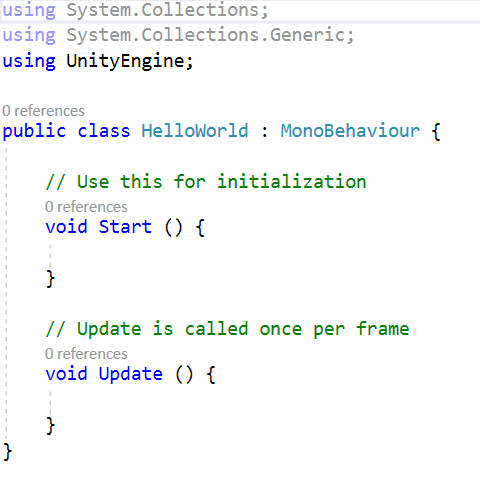
Figure 12: The initial code window
Just underneath the line that says using UnityEngine you’ll need to type in one more line, using UnityEngine.UI; . This library allows us to change via code different UI (User Interface) elements within the project such as the Text object’s text as well as health bars and UI images. You’ll then need to write a line of code just above the Start function, public Text gameText; in order to use the text object. You have to make the object public in order to make certain edits in the Unity editor, and it also must be a Text object since we’re specifically wanting to change text. The gameText part of the code is simply the name you’ve given this particular variable. It can be called whatever you want, so long as it makes sense to you.
There’s just a couple steps left to take before this project does what we want it to. Inside the Start function you must add a new line of code that says gameText.text = “Hello World!”; and then the program is complete! This line simply changes what the text will be in the Unity editor, and it will change this text the moment you begin playing the game. When it’s all finished the code should look like Listing 1.
Listing 1: The completed code
|
1 2 3 4 5 6 7 8 9 10 11 12 13 14 15 16 |
using System.Collections; using System.Collections.Generic; using UnityEngine; using UnityEngine.UI; public class HelloWorld : MonoBehaviour { // Use this for initialization public Text gameText; void Start () { gameText.text = "Hello World!"; } // Update is called once per frame void Update () { } } |
Now save the code and go back to Unity, so that Unity can use the code you have written. If you don’t, nothing will happen when you play the game.
The final step is a simple one. Select the Text object in the Hierarchy window and then scroll down in the Inspector window scroll as far down as you can. In the Hello World script component, you created earlier you may notice an empty field that wasn’t there before. This is the result of typing the public Text gameText line in your Visual Studio code. All you need to do is click and drag your Text object from the hierarchy into the Game Text field in the Hello World component. You can also click the small, circular button to the far right of the Game Text field. Doing this will bring up a window that you can select the Text object in. Once you have selected your Text object, the Inspector window should end up looking like Figure 13.
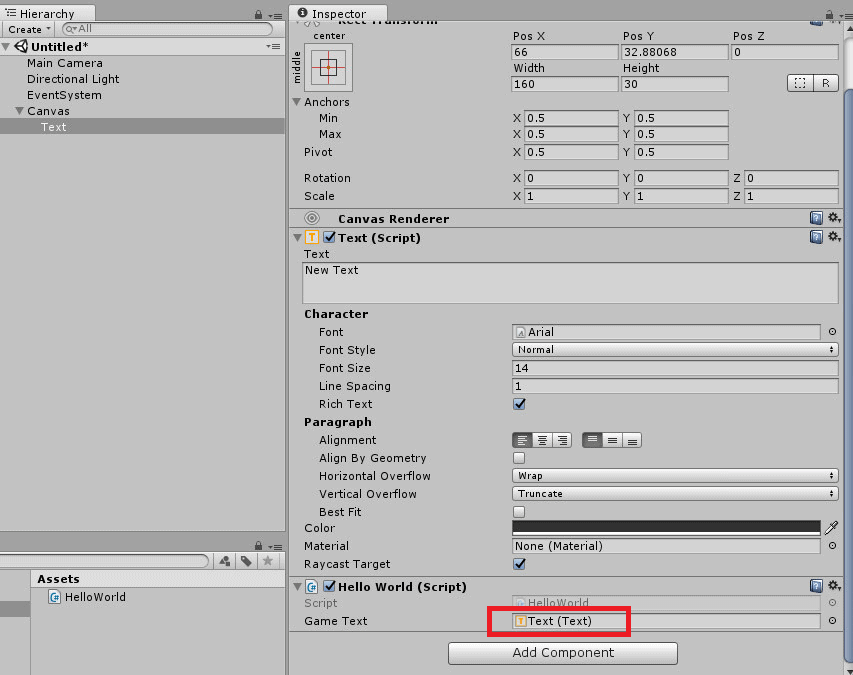
Figure 13: Configuring Game Text
Once that happens, go ahead and play your game by clicking the play button at the top of the Unity editor and watch your text change from ‘New Text’ to ‘Hello World.’
Conclusion
This is perhaps the simplest project one can make in Unity, but it’s our hope that it helps newcomers take that first step into learning the Unity engine and begin to understand what it’s all about. One of the nice aspects of Unity is how well documented it is, so it’s very easy to find tutorial videos and help on whatever kind of project you’d like to make. Unity Technologies themselves have created several tutorial videos to help you learn how to make a simple ‘Roll-a-ball’ game or even learn how to make your game create scenes procedurally. That’s before even mentioning the several hundred tutorial videos out on the internet that can help you with more specific tasks.
Both small teams and large developers have used Unity to create their video games, some of which you might have even heard of. It just takes time and some initiative to make your idea come to life. Thankfully, game engines like Unity are here to make it that much easier for you to accomplish your goals. With the help of tools like Unity, the only real limitation is your own imagination. Perhaps the engine can help you expand on your own ideas and see what you’re truly capable of.
This document contains proprietary information and is protected by copyright law.
Copyright © 2026 Red Gate Software Limited. All rights reserved
Load comments