
Editor Templates are one of the hidden gems in ASP.NET MVC. They greatly simplify the process of generating the Views by extending the separation between content and format. We can simply state that we want an Editor without having to stipulate exactly what form that editor should take. It’s a lot simpler to state that you want an Editor without having to say that you want a radio button or a drop down, or a plain text box. We may have a wide range of possibilities for an appropriate Editor. It is nice to hand that over to the framework to keep track of.
In this article, we will step through several examples. We will start with the built-in editor using a check box for a Boolean value, before trying a slightly more complex drop-down for a NULLable Boolean. We will then look at creating our own editor for dates before pushing the boundaries out a bit by creating a reusable editor for a complex type such as an Address model. Along the way, we also explore ways of using jQuery and JavaScript to add functionality to editors so as to improve usability for our sites.
A Simple Model
Throughout this article we will reference and build on a simple AddressModel.
|
1 2 3 4 5 6 7 8 9 10 11 |
public class AddressModel { public string Line1 { get; set; } public string Line2 { get; set; } public string City { get; set; } public string State { get; set; } public string Zip { get; set; } public bool IsVerified { get; set; } public DateTime DateLastVerified { get; set; } public bool? IsPrimary{get; set; } } |
A simple View for such a model may look like this, with some pieces excluded for brevity:
|
1 2 3 4 5 6 7 8 9 10 11 12 13 14 15 16 17 18 19 20 21 22 23 24 25 26 27 28 29 30 31 32 33 34 35 36 37 38 39 40 41 42 43 44 45 46 47 |
@using (Html.BeginForm()) { @Html.AntiForgeryToken() @Html.ValidationSummary(true) <fieldset> <legend>Address</legend> <div class="editor-label"> @Html.LabelFor(model => model.Line1) </div> <div class="editor-field"> @Html.EditorFor(model => model.Line1) @Html.ValidationMessageFor(model => model.Line1) </div> <div class="editor-label"> @Html.LabelFor(model => model.Line2) </div> <div class="editor-field"> @Html.EditorFor(model => model.Line2) @Html.ValidationMessageFor(model => model.Line2) </div> ... <div class="editor-label"> @Html.LabelFor(model =>model.DateLastVerified) </div> <div class="editor-field"> @Html.EditorFor(model =>model.DateLastVerified) @Html.ValidationMessageFor(model => model.DateLastVerified) </div> <div class="editor-label"> @Html.LabelFor(model =>model.IsPrimary) </div> <div class="editor-field"> @Html.EditorFor(model =>model.IsPrimary) @Html.ValidationMessageFor(model =>model.IsPrimary) </div> <p> <inputtype="submit"value="Save"/> </p> </fieldset> } |
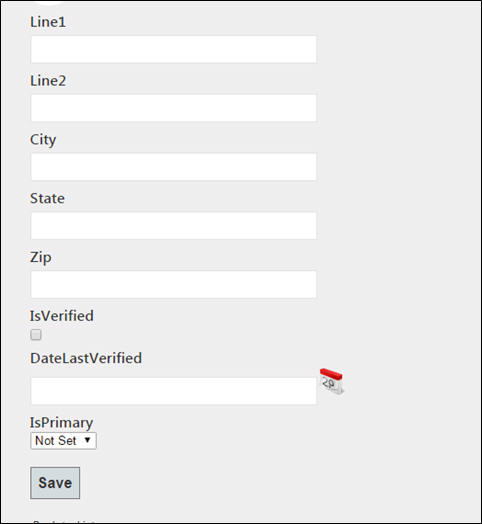
You will notice that we use the same markup for each property. We output a label, an editor directive, and a Validation message; but look what happens when we display the View
Because IsVerified is a Boolean property, MVC selected a check box for the editor and we get a drop-down with values of true,false , and not set for IsPrimary because it is a NULLable Boolean. These are two built-in editors that are native to MVC which we get without any extra effort.
Adding a Date Picker
We can make other data types such as DateTime get their own custom editor, just by placing a partial View in the EditorTemplates folder under the Sharedfolder and naming it after the target data type. You will need to create this folder yourself since it is not automatically added to the project.
A DateTime.cshtml might look like this …
|
1 2 3 4 5 |
@model DateTime? @Html.TextBox("", (Model.HasValue ? Model.Value.ToShortDateString() : string.Empty),new { @class = "datePicker" , @readonly = "readonly"}) |
… along with a snippet of jQuery code like this to associate the jQuery UI date picker to the class datePicker .
|
1 2 3 4 5 6 7 8 9 10 |
<script> $(function () { $(".datePicker").datepicker({ showOn: "button", buttonImage: "/images/calendar-icon.png", buttonImageOnly: true, buttonText: "Select date" }); }); </script> |
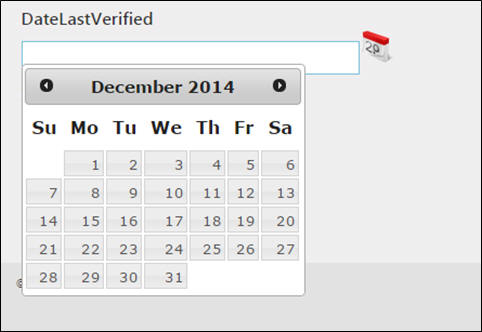
Now when we render our View, we get a nice date picker control for the DateLastVerified property …
… and when we click on the calendar icon we see the calendar.
Some More Interesting Editors
As we just saw, Visual Studio will use our date picker editor based on the data type. The framework matches the name of the data type to the name of the editor. Fortunately this is not the only matching that the framework does. Matching by data type alone would be too restrictive. Looking back at our model, we have a couple of properties of type string that could use a custom editor. We would like to have an editor for Zip Codes and one for specifying the State. A Zip Code editor would limit input to digits and limit it to only 5 digits. A State editor would be a drop-down that lists out the valid states that the user could select.
You can add an attribute to any property so as to give the framework a hint to point it in the direction of the correct editor. To find the right template name, it can not only base its match on the data type, the framework can also match on the value of the UIHint attribute that you add to a property.
We now want to extend our Model to include UIHints to specify better editors or these properties:
|
1 2 3 4 5 6 7 8 9 10 11 12 13 |
publicclassAddressModel { public string Line1 { get; set; } public string Line2 { get; set; } public string City { get; set; } [UIHint("State")] public string State { get; set; } [UIHint("ZipCode")] public string Zip { get; set; } public bool IsVerified { get; set; } public DateTime DateLastVerified { get; set; } public bool? IsPrimary{get; set; } } |
AZipCode.cshtml might look like this:
|
1 2 3 4 |
@model string @Html.TextBox("", (Model), new { @class = "zipCode" , maxlength="5"}) |
We set the maxLength attribute to limit it to 5 characters. If you support a zip plus 4, I recommend two text boxes; one with a max length of 5, and one with a max length of 4. We also specify the class to attach the JavaScript later.
We can add supporting JavaScript to limit input to only numbers and some navigational characters. We do it like this:
|
1 2 3 4 5 6 7 8 9 10 11 12 13 14 15 16 17 |
$(document).ready(function() { $(".zipCode").keydown(function (e) { // Allow: backspace, delete, tab, escape, enter if ($.inArray(e.keyCode, [46, 8, 9, 27, 13, 110]) !== -1 || // Allow: Ctrl+A (e.keyCode == 65 &&e.ctrlKey === true) || // Allow: navigation keys (e.keyCode>= 35 &&e.keyCode<= 39)) { // let these keys through return; } // Stop anything not a number if ((e.shiftKey || (e.keyCode< 48 || e.keyCode> 57)) && (e.keyCode< 96 || e.keyCode> 105)) { e.preventDefault(); } }); |
State.cshtml may look like this with no supporting JavaScript required.
|
1 2 3 4 5 6 7 8 9 |
@model string @{ ViewData ["states"] = new SelectList(new[] { " ", "GA", "NC", "SC", "VA" }.Select(x => new {value = x, text = x}), "value", "text", @Model); } @Html.DropDownList("states") |
With these editors in place our View looks a little different, but it will behave quite a bit differently.
The state is now a drop down with the values listed in the Editor template. This is the most obvious change. The changes to the Zip are not visible, but based on the template, we are now capped at 5 characters and only the navigation keys and numeric keys will be accepted.
The key thing to note with the Zip Editor is that we can easily attach whatever JavaScript we need to support the editing scenarios that we want. We can easily wire up blur and focus event handlers as well as the key-down event that you saw here. Had this been a currency field, we might want to wire up a blur event handler to format the inputted value as currency and a focus event handler to remove the formatting to make it easier to edit. You may also want to modify the key-down event handler to allow a decimal point as well as only 2 digits after the decimal. You have lots of possibilities.
Also with the State editor, you probably would not want to hard-code the values in the Editor. You would most likely retrieve them from the database. You may also want to make this data-access logic asynchronous. This is easily done by having the Editor add the script to make an AJAX call that will retrieve the list of valid values after the initial page load. This is a great way to handle all types of drop down lists.
Regardless of how simple or complex, you make your Editor, the View itself stays the same with a simple call to EditorFor().
Editors for Models
As we saw earlier, Visual Studio will use our date-picker editor simply because the name of the editor matches the data type of the property. The same can happen if the editor’s name matches a more complex name like AddressModel .
We don’t need to change anything in the markup for our View. We simply need to move most of it to the EditorTemplate folder and rename it to AddressModel.cshtml
Now our View can be simplified to this. Everything else is in the Editor Template
|
1 2 3 4 5 6 7 8 |
@using (Html.BeginForm()) { @Html.AntiForgeryToken() @Html.ValidationSummary(true) @Html.EditorFor(m => m) <p> <inputtype="submit"value="Save"/> </p> } |
… or if we have a more complex Model using AddressModel as one of the properties, it now fits right at home.
Consider a simple EmployeeModel that includes the AddressModel that we have been using.
|
1 2 3 4 5 6 7 |
publicclassEmployeeModel { public stringFirstName { get; set; } public stringLastName { get; set; } publicAddressModel Address { get; set; } publicDateTimeHireDate { get; set; } } |
Following the pattern we have used so far, our View will naturally flow:
|
1 2 3 4 5 6 7 8 9 10 11 12 13 14 15 16 17 18 19 20 21 22 23 24 25 26 27 28 29 30 31 32 33 34 35 36 37 38 39 40 |
<h2>Employee</h2> @using (Html.BeginForm()) { @Html.AntiForgeryToken() @Html.ValidationSummary(true) <fieldset> <legend>EmployeeModel</legend> <div class="editor-label"> @Html.LabelFor(model =>model.FirstName) </div> <div class="editor-field"> @Html.EditorFor(model =>model.FirstName) @Html.ValidationMessageFor(model =>model.FirstName) </div> <div class="editor-label"> @Html.LabelFor(model =>model.LastName) </div> <div class="editor-field"> @Html.EditorFor(model =>model.LastName) @Html.ValidationMessageFor(model =>model.LastName) </div> <div class="editor-field"> @Html.EditorFor(model =>model.Address) </div> <div class="editor-label"> @Html.LabelFor(model =>model.HireDate) </div> <div class="editor-field"> @Html.EditorFor(model =>model.HireDate) @Html.ValidationMessageFor(model =>model.HireDate) </div> <p> <inputtype="submit"value="Save"/> </p> </fieldset> } |
and we get a nice looking View:
The evaluation of our editor templates happens recursively. Even though the AddressModel.cshtml was already in the EditorTemplates folder, it gets evaluated for more editor templates.
Display Templates
Display Templates are similar to Editor Templates. Display Templates are intended just to display the value with no edit capabilities. Often this will take the form of a disabled control or a regular html label.
Switching the EditorFor to DisplayFor in our earlier View, you can see that we get a mix of disabled controls and labels.
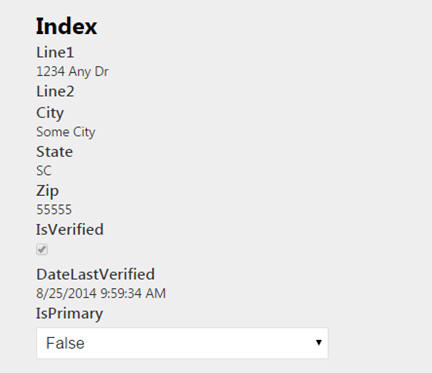
My personal preference is to forego the disabled controls. We will also apply some additional formatting on the date fields.
Let’s start with a Boolean Display Template. We will need to handle both NULLable and regular Boolean values in our template. So our Boolean.cshtml might look like this:
|
1 2 3 4 5 6 7 8 9 10 11 12 13 14 15 16 17 18 19 20 |
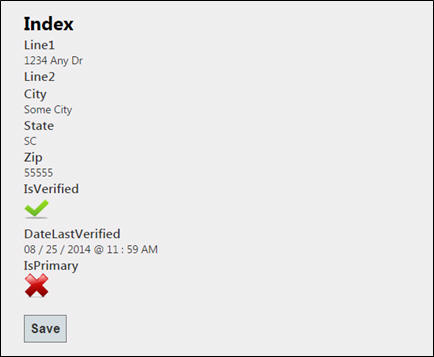
@model bool? @{ if (!Model.HasValue) { <imgsrc="/Images/question-icon.png"/> } else { if (Model.Value) { <imgsrc="/Images/true-icon.png"/> } if (Model.Value == false) { <imgsrc="/Images/false-icon.png"/> } } } |
Here we explicitly test the three possible states for the NULLable Boolean which will also cover the two possible states for the regular Boolean. Note that whether it is a NULLable or non NULLable value, it matches the filename Boolean . This works out well because none of the special characters used to specify a NULLable data type are valid for file names.
Now let’s turn our attention to the DateTime Display Template. Quite often we don’t really care about the time part of the date time. Even in cases where we do care, we still may want to format it a bit differently then we see by default. We also may want to draw attention to missing dates.
So our Display Template might look like this:
|
1 2 3 4 5 6 7 8 9 10 |
@model DateTime? @if (Model.HasValue) { <span>@Model.Value.ToString(" MM / dd / yyyy")</span> } else { <span>No date entered!</span> } |
Here we are only displaying the date part. We have spread it out a bit so that it doesn’t look so squished, and we explicitly draw attention to missing dates. If we needed to show the time as well, we might instead opt for something like this:
|
1 |
<span>@Model.Value.ToString(" MM / dd / yyyy @ hh : mm tt")</span> |
You may want to do something similar to format currency fields or percentages. You may chose to store phone numbers as just the numbers but want to include the formatting characters when you display them. You may want to explicitly strip out key pieces of personal identifiable information. There are many uses for being able to specify an alternate template for displaying values.
Conclusion
Editor Templates make it easy to add more functionality to our pages, thereby enhancing usability. At the same time, they make it easier to build up our Views. We merely specify that we want an Editor without having to get bogged down in the details of what form that Editor should take. Also, once in place, they help to make the web application look and behave more consistently. Because we are only specifying that we want an Editor and allowing the framework to fill in the rest, we have fewer places where inconsistencies can be introduced.
At the other end of the spectrum, we have Display templates to simplify displaying data with no edit capabilities. Display templates and Editor Templates follow the same matching rules for finding templates. Together they complement each other to bring consistency to both editing and displaying data in your web application.
Load comments