
A C++/CLI wrapper lets you call unmanaged (native) C++ code from .NET managed applications like C# or VB.NET. The wrapper project sits between a native C++ library and a .NET consumer, exposing managed classes that internally hold pointers to unmanaged objects. This guide walks through the complete three-project architecture – a native Core library, a C++/CLI Wrapper layer using a reusable ManagedObject<T> base class, and a C# client – with Visual Studio configuration steps and working code for properties, methods, constructors, and destructors.
Read also: Building a level editor in Unity
What is C++/CLI, and why use it?
C++/CLI is a programming language created by Microsoft as a substitute for the older Managed Extensions for C++, which is now deprecated. As the name suggests, this language offers support for the .NET managed components in a C++ context.
Many people are confused about why this language would be used, instead of the much more widespread and powerful C#. The main reason for this is that C++/CLI allows you to use both managed and unmanaged code, offering you the opportunity to control the memory that is used by your program, instead of leaving all the decisions to the Garbage Controller. It should be noted that C++/CLI is not usually used by itself to develop software, but rather as a middleware between .NET and C++.
While there are many ways to write C++/CLI programs, in this article I will focus on a particular architecture that I generally used when developing this kind of applications. The solution will contain 3 components: the core C++ project, the C++/CLI wrapper and a C# project that will use the functionality of the core through the wrapper.
A well-known usage of this type of technology is represented by the game engines that allow you to write scripts in C# – such as Unity3D or Xenko. Since game engines handle large quantities of data in a small amount of time, writing them in C# to begin with would not be a good idea regarding the performance of the engine. Thus, they are written in C++ and are made available to C# through a C++/CLI wrapper.
Preparations
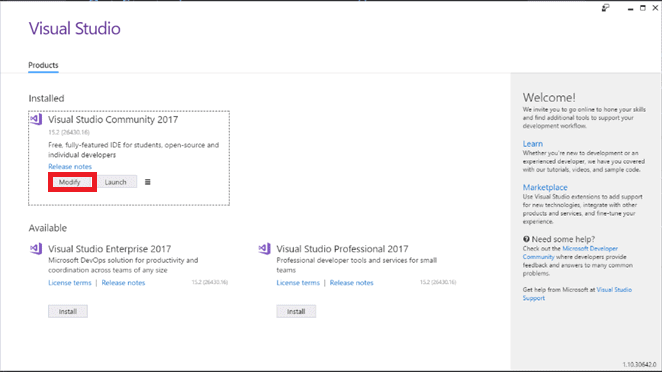
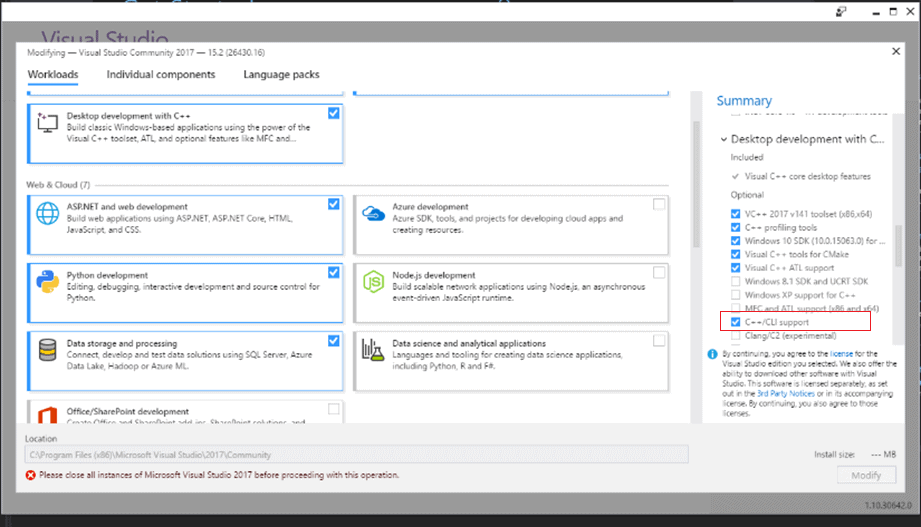
In order to start working with the C++/CLI technology, it is necessary to install the module into Visual Studio. The first step is to open the Visual Studio Installer and press the “Modify” button. After that, expand the “Desktop development with C++” section on the right side of the window and select “C++/CLI support”. Then press “Modify” button again.
Creating the Core project
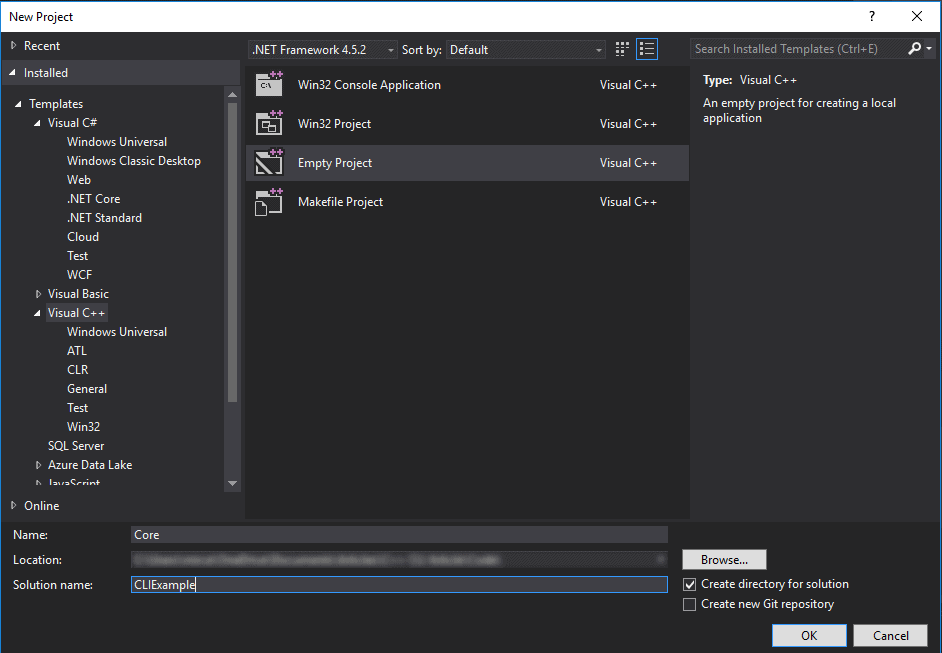
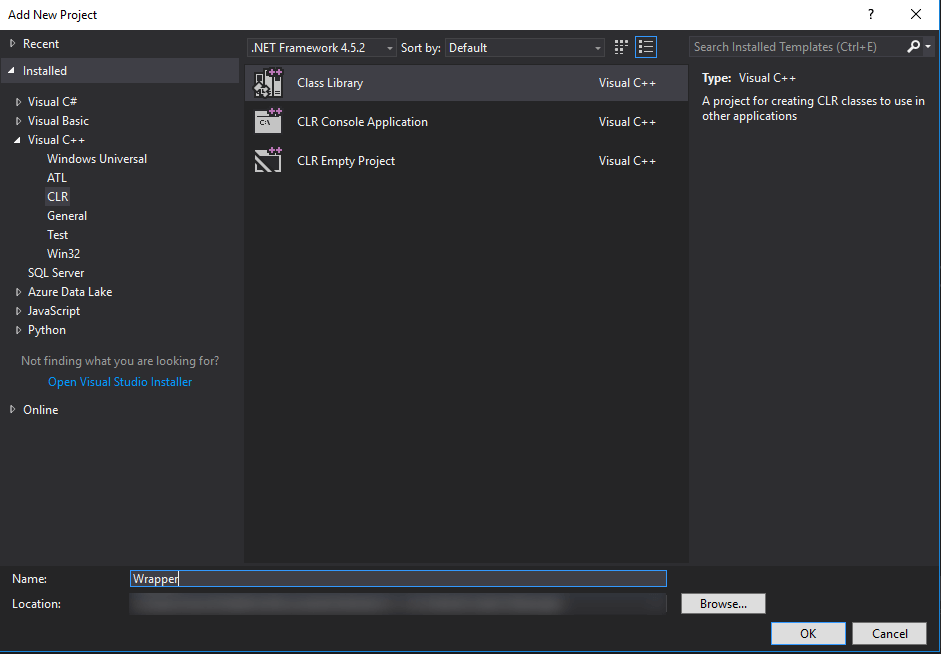
After the installation is done, open Visual Studio and create a new project. For its type, go to Visual C++ on the right menu and choose “Empty project”. I usually name this project “Core”, as it contains all the main functionality of the software; for the solution, you can choose any appropriate name.
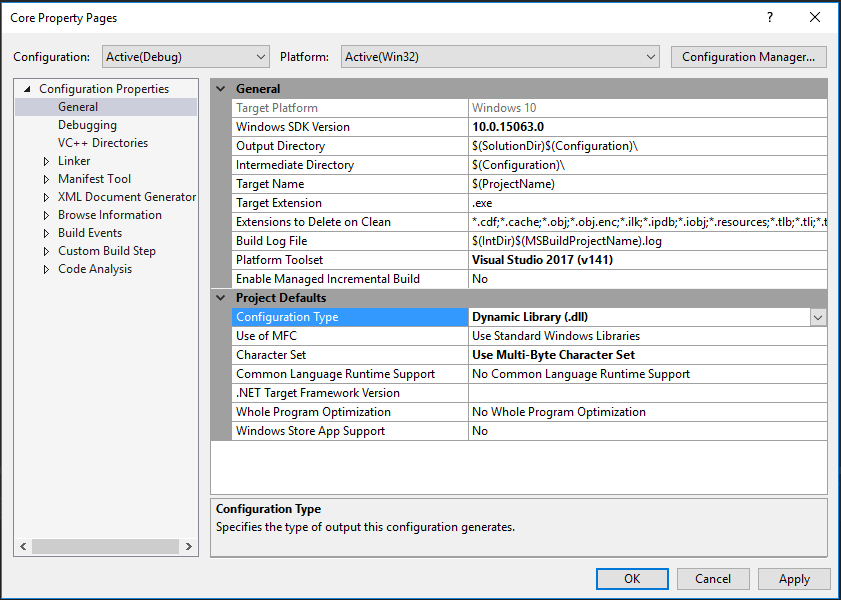
Before we start writing the actual code, we have to change the configuration of the project. Right-click on the project in the Solution Explorer and select “Properties”. Under “General”, select “Dynamic Library (.dll)” “Static Library (.lib)” as the configuration type. This will convert the project from an executable to a library that we can include in other projects. Select “Apply” and “OK”. This is all we have to do for now so we can start writing code.
As I mentioned in the introduction, this type of project architecture is common with game engines; therefore, I will create an “Entity” class for this example that would represent a game object in such an engine.
Right click on the project and select “Add->New item->Header file” and name the file
“Entity.h”. Repeat for a C++ file named “Entity.cpp”.
I chose to use a public field for the name as well as to get methods for the X and Y position so I can demonstrate how to use both of them in the wrapper. I have also added a void method that changes the position of the entity so that you can see how calling the method from the wrapper will have an effect upon the object from the core project.
|
1 2 3 4 5 6 7 8 9 10 11 12 13 14 15 16 17 18 |
//Entity.h #pragma once namespace Core { class Entity { public: const char* m_Name; private: float m_XPos, m_YPos; public: Entity(const char* name, float xPos, float yPos); void Move(float deltaX, float deltaY); inline float GetXPosition() const { return m_XPos; }; inline float GetYPosition() const { return m_YPos; }; }; } |
As you can see, I have named the namespace “Core”; this may or may not be appropriate for your project. In this example (and in many other projects that I worked on), the purpose of the core project is only to contain the functionality that is going to be accessed by the wrapper. However, if you intend to use the C++ .dll that will be generated in other C++ projects, the name “Core” might become confusing. In that case, I suggest changing the name to something like “Unity3D-Core”. You will understand why these names become a problem when we will start developing the wrapper.
As you can see, I also added some printing to the methods so you can clearly see the order of the operations when we execute the program. I have also tried to only include simple operations so that we can focus on the main point of the tutorial, which is accessing this code in a .NET context.
|
1 2 3 4 5 6 7 8 9 10 11 12 13 14 15 16 17 |
//Entity.cpp #include "Entity.h" #include <iostream> namespace Core { Entity::Entity(const char* name, float xPos, float yPos) : m_Name(name), m_XPos(xPos), m_YPos(yPos) { std::cout << "Created the Entity object!" << std::endl; } void Entity::Move(float deltaX, float deltaY) { m_XPos += deltaX; m_YPos += deltaY; std::cout << "Moved " << m_Name << " to (" << m_XPos << ", " << m_YPos << ")." << std::endl; } } |
The last thing that I would like to do in this Core project is to create another header file, called “Core.h”, which we will include in the files from the wrapper. This might seem unnecessary for a project of such small scale, but I highly suggest doing so for larger projects. The reason is that when trying to work with the Core library in other projects, it is easier to include the “Core.h” header file and just take what you need from there, than to go through the process of learning the architecture of the project and thinking about which files you might need.
|
1 2 3 |
//Core.h #pragma once #include "Entity.h" |
Creating the Wrapper project
Now that we are finished with the core code, we can move on to the wrapper project. Right-click the solution in the Solution Explorer, and select “Add->New project”. Go to “Visual C++->CLR” in the left menu, and select “Class Library”. I have called the project Wrapper in this case; other names you might use could have the form MyEngine-CLI.
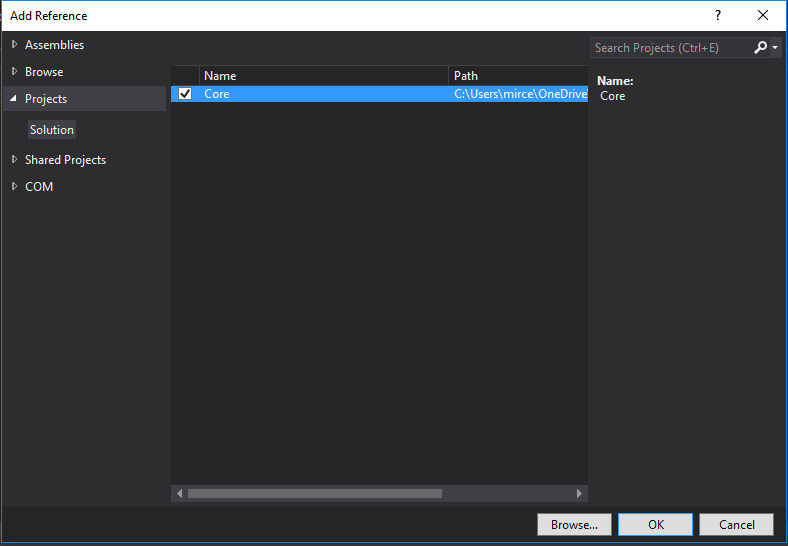
Before we start writing the wrapper code, we need to add a reference to the Core project, so that we can use the Entity class that we created there. Right-click the Wrapper project in the Solution Explorer, choose “Add-> Reference” and select the Core project.
After that, right click again on your project, go to Properties>C/C++>Precompiled Headers and change the first option to “Not Using Precompiled headers”.
Now that everything is set, we will begin with a class that you can use in all the C++/CLI projects that you will create in the future. I usually call this class ManagedObject. Let’s add a new header file called ManagedObject.h to the wrapper project.
|
1 2 3 4 5 6 7 8 9 10 11 12 13 14 15 16 17 18 19 20 21 22 23 24 25 26 27 28 29 30 31 32 33 34 35 |
//ManagedObject.h #pragma once using namespace System; namespace CLI { template<class T> public ref class ManagedObject { protected: T* m_Instance; public: ManagedObject(T* instance) : m_Instance(instance) { } virtual ~ManagedObject() { if (m_Instance != nullptr) { delete m_Instance; } } !ManagedObject() { if (m_Instance != nullptr) { delete m_Instance; } } T* GetInstance() { return m_Instance; } }; } |
Note: In this example, I created a namespace called CLI for the Wrapper project; this avoids any confusion between the wrapper and the core. However, if you intend to have a more recognizable name for your wrapper namespace (such as the name of your project), it is important to follow the advice that I left in the previous note.
ManagedObject will act as a superclass for all the wrapper classes that we will create in this project. Its sole purpose is to hold a pointer to an unmanaged object from the Core project. You can also notice that the class contains a destructor (~ManagedObject) – which will be called whenever you delete an object with the delete keyword – and a finalizer (!ManagedObject) which is called by the Garbage Collector whenever it destroys the wrapper object.
You can also notice that I have defined the ManagedObject class as a template. You will see why when we create our first wrapper class. Add a “Entity.h” file to the project, as well as a “Entity.cpp”.
|
1 2 3 4 5 6 7 8 9 10 11 12 13 14 15 16 17 18 19 20 21 22 23 24 25 26 27 28 29 30 31 32 33 34 35 36 37 38 39 |
//Entity.h #pragma once #include "ManagedObject.h" #include "../Core/Core.h" using namespace System; namespace CLI { public ref class Entity : public ManagedObject<Core::Entity> { public: Entity(String^ name, float xPos, float yPos); void Move(float deltaX, float deltaY); property float XPosition { public: float get() { return m_Instance->GetXPosition(); } private: void set(float value) { } } property float YPosition { public: float get() { return m_Instance->GetYPosition(); } private: void set(float value) { } } }; } |
As you can see, we include the “Core.h” file that we created in the Core project, so that we can access all the classes from there. Then we define the Entity wrapper class, which is a subclass of the ManagedObject; you can now see why ManagedObject was a template: so that we can specify the unmanaged class for each of our wrapper classes.
Read also: .NET debugging techniques
When creating a wrapper class, the idea that you need to follow is that you should declare all the members from the core class that you want to access from the .NET context. In this case, I created a constructor just as the one from the core Entity class – except that it takes a String for the name instead of a const char*, the Move methods and, instead of creating get-methods as I did in the core project, I made 2 properties just so you can see that you will be able to access them from C#.
Before moving further to the “Entity.cpp” file, I would like to add a function in “ManagedObject.h” that you will also use a lot in this type of project.
|
1 2 3 4 5 6 |
using namespace System::Runtime::InteropServices; static const char* string_to_char_array(String^ string) { const char* str = (const char*)(Marshal::StringToHGlobalAnsi(string)).ToPointer(); return str; } |
This function allows you to convert a .NET String to a const char* which you can further use in C++. If you want to do the conversion the other way around, things are not so complicated: the String class contains a constructor that accepts a const char* as a parameter.
Now, for the “Entity.cpp”, we only have to define the constructor and the Move method. I have again added some console printing, but this time I used the .NET Console class to do so. Other than that, the only thing that has to be done in each method is to call its counterpart from the core project.
|
1 2 3 4 5 6 7 8 9 10 11 12 13 14 15 |
//Entity.cpp #include "Entity.h" namespace CLI { Entity::Entity(String^ name, float xPos, float yPos) : ManagedObject(new Core::Entity(string_to_char_array(name), xPos, yPos)) { Console::WriteLine("Creating a new Entity-wrapper object!"); } void Entity::Move(float deltaX, float deltaY) { Console::WriteLine("The Move method from the Wrapper was called!"); m_Instance->Move(deltaX, deltaY); } } |
An important thing to notice about the data types is that all the primitive types from C++ are compatible with their C# counterparts and therefore need no conversion in order to pass them from one context to another.
Apart from the .NET String to a C++ const char* conversion, you might find yourself in the position where you need to convert a .NET array to a C++ one. Even though they might look the same, there is a big difference between them: a .NET array is an object, while a C++ array is simply a pointer to the first element. I did not include any arrays in this example, but I will give you an example of a function that does the conversion:
|
1 2 3 4 5 |
static void int_array_conversion(array<int>^ data) { pin_ptr<unsigned int> arrayPin = &data[0]; unsigned int size = data->Length; } |
I chose to create the example with an integer array, but you can replace int with any type that you need. However, I recommend writing the code for this conversion wherever you need it rather than using a function like this, since, as you can see, there are two components that you need to know for the unmanaged array: the pointer to the first element and the number of elements. You can, of course, create a struct to hold both of these elements, but it is a simpler and more elegant solution to just write these two lines of code for each separate case where you need to.
Creating a C# sandbox project
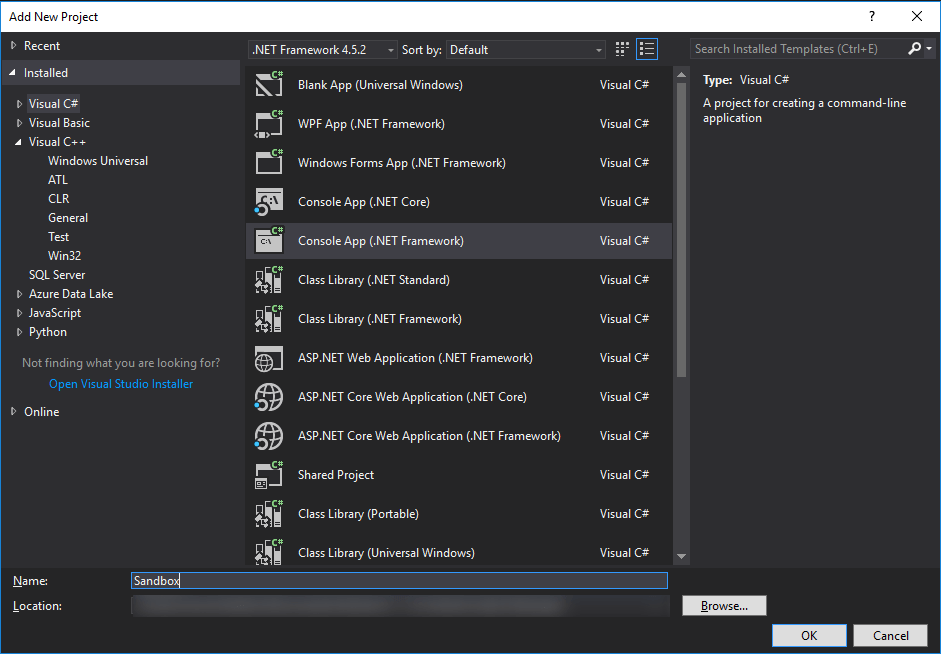
The last part of this tutorial is to create a C# project and test whether we are able to access the C++ functionality or not. Right-click the solution and add a new C# console application; I have called it Sandbox.
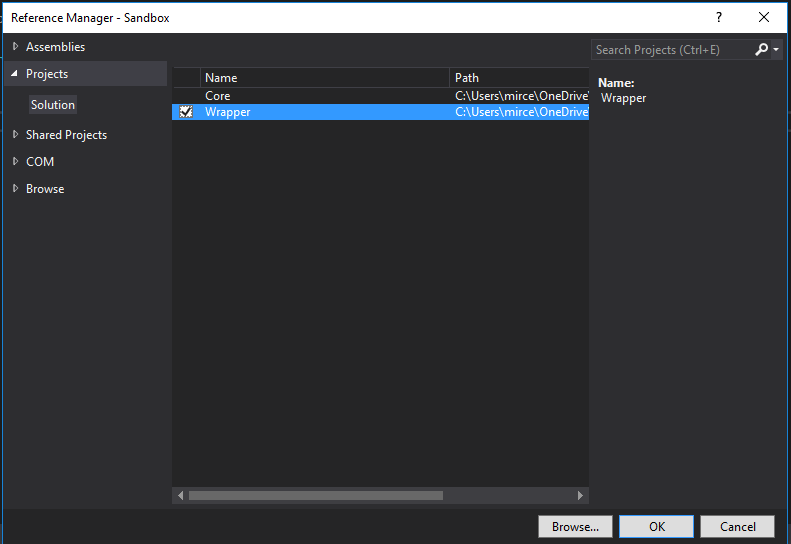
After that, add a reference from the Sandbox project to the Wrapper, the same way you did earlier.
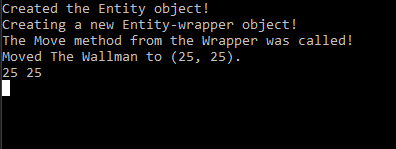
We are now ready to code a C# test; we can easily check the result by looking at the text that will be printed in the console.
|
1 2 3 4 5 6 7 8 9 10 11 12 13 14 15 |
using System; using CLI; namespace Sandbox { class Program { static void Main(string[] args) { Entity e = new Entity("The Wallman", 20, 35); e.Move(5, -10); Console.WriteLine(e.XPosition + " " + e.YPosition); Console.Read(); } } } |
We are able to easily create a new Entity object – which is the Entity from the Wrapper project, not the one from the Core – and access the methods and properties that is has to offer. Before running the project, make sure to right click on it in the Solution Explorer, and choose “Set as startup project”.
An interesting thing that you might notice in the console is that the core Entity object is created before the wrapper Entity object – this is actually an illusion created by the console-printing, since the superclass constructor from the wrapper Entity object is called before the Console::WriteLine method is called.
Conclusion
The example that I developed for this article is very basic, as the main purpose of the article was to show you the architecture that is involved in a C++/CLI wrapper. If you wonder why you would ever use this technology for something as simple as accessing and changing two variables, the answer is that you should not. I mentioned game engines as a main candidate for using a wrapper several times in this article, because this is the example that I am most familiar with, but it is not the only acceptable case. However, you should spend some time taking all the possible solutions into consideration before deciding to use C++/CLI instead of just C#: Does it really increase the performance of your software? Is the Garbage Controller really hurting the memory usage of your program so much that you need to handle it yourself? There are many such questions that may appear along the way, so I suggest documenting a lot about the technologies that you are using in your project before deciding to introduce a C++/CLI wrapper into it.
Further reading:
- 5 Tips for Understanding Managed-Unmanaged Interoperability in .NET
- .NET Programming with C++/CLI (Visual C++)
- How to: Define and Consume Classes and Structs (C++/CLI)
FAQs: Creating a C++/CLI Wrapper
1. How do you call unmanaged C++ code from C# using C++/CLI?
Create a C++/CLI Class Library project in Visual Studio that references your native C++ project. In the wrapper project, create managed ref classes that internally hold pointers to unmanaged objects using a ManagedObject<T> base class. Each wrapper class exposes .NET-compatible properties and methods that delegate to the underlying native C++ object. The C# client project then references the wrapper DLL and uses it like any other .NET library.
2. What is the ManagedObject pattern in C++/CLI?
ManagedObject<T> is a generic base class that holds a pointer to an unmanaged C++ object of type T. It provides a constructor that creates the unmanaged object, a GetInstance() method that returns the pointer, and a destructor/finalizer pair that handles memory cleanup. All your wrapper classes inherit from ManagedObject<YourNativeClass> and use GetInstance() to access the underlying native object.
3. What is the difference between C++/CLI and P/Invoke for .NET interop?
C++/CLI creates a managed wrapper layer that gives you full control over object lifetimes, complex type marshaling, and class hierarchies. P/Invoke is simpler for calling flat C-style functions from DLLs but becomes cumbersome with complex C++ objects, inheritance, or callback patterns. C++/CLI is the better choice when wrapping a full C++ class library; P/Invoke is better for one-off function calls to native DLLs.
This document contains proprietary information and is protected by copyright law.
Copyright © 2026 Red Gate Software Limited. All rights reserved
Load comments