
This is the seventh in a series on setting up a Data Science Laboratory server – the first is located here.
My plan is to set up a system that allows me to install and test various methods to store, process and deliver data. These systems range from simple text manipulation to Relational Databases and distributed file and compute environments. Where possible, I plan to install and configure the platforms and code locally. The outline of the series so far looks like this:
- Setting up the Data Lab
- Text Systems
- Testing the Tools
- Instrumentation
- Interactive Data Tools
- Programming and Scripting Languages
- Relational Database Management Systems (This article)
- Key/Value Pair Systems
- Document Store Databases
- Graph Databases
- Object-Oriented Databases
- Distributed File and Compute Data Handling Systems
I’ll repeat a disclaimer I’ve made in the previous articles – I do this in each one because it informs how you should read the series:
This information is not an endorsement or recommendation to use any particular vendor, software or platform; it is an explanation of the factors that influenced my choices. You can choose any other platform, cloud provider or other software that you like – the only requirement is that it fits your needs. As I always say – use what works for you. You can examine the choices I’ve made here, change the decisions to fit your needs and come up with your own system. The choices here are illustrative only, and not meant to sell you on a software package or vendor.
In this article, I’ll explain my choice for a Relational Database Management System – commonly abbreviated as “RDMBS”. I’ll briefly explain the concepts of a relational database, and then move on to the reasons a system is needed to manage one.
Concepts and Rationale
My assumption is that most of the readers of this series are familiar with an RDBMS. But you may have come into this series without a background, so I’ll briefly describe a few key concepts for an RDBMS in general, and in the rest of the article I’ll focus on my choice for an RDBMS for the lab system and the choices I made to configure it. For a more complete discussion, see this reference: http://archive.org/details/arsdigita_10_databases. If you’re a seasoned professional in this area, you can skip past the “Concepts” section below if you like.
Concepts
A “data base” (database) is nothing more than a set (possibly even an empty set) of data in persisted storage. In fact, the concept isn’t even unique to computing – any data recorded on paper or anything else could be described as a database. In computing, your program can write data out to a file, and that file serves as your database. When a program stores data in this way, it’s often called a “flat file”. In some cases the data is stored using a standard set of human-readable codes called ASCII (more here on that) and in others the developer might encode the data into a binary format that isn’t human readable.
This type of database works fine for many applications. But in some cases, especially where the data is queried and updated often, using a file to store data isn’t optimal. There are a few problems that arise when the file grows larger, or the sets of data within the file have more and more descriptors or attributes. To deal with the size and performance issue, the developer can break up the file into multiple parts, and then iterate over those files, linking them back together. But that process produces more code and more code means more chances for mistakes. Any changes to the layout of the data might case a re-write of the application. When there are many attributes, the developer either has to query the schema of the data in real time (which can be quite slow) or perhaps store the same data in multiple rows. If one row is updated and another is not, there is the danger that the data no longer agree, resulting in untrusted data.
One method to deal with these issues is to invoke the branch of mathematics called set theory. Dr. E.F. Codd suggested a calculus to use to solve the issues with monolithic data structures – you can read his article on that here: http://www.seas.upenn.edu/~zives/03f/cis550/codd.pdf. In this model, data is divided into rows (tuples) and columns (attributes) to form tables (relations) which can join to create more tables. The “relation” definition is where we get the Relational in Relational Database Management System.
Let’s take a concrete example. Assume you wish to track the names and addresses of those you know. One method might be to simply write down the names and addresses in columns and rows, like this:
| Name | Address | Address Type |
| Buck Woody | 123 Here Street, Tampa, FL 34677 | Home |
| Buck Woody | 234 There Avenue, Tampa, FL 34677 | Work |
| Buck Woody | 734 Fortress of Solitude Blvd, Tampa, FL 34677 | Secret Lair |
| Marjorie Woody | 123 Here Street, Tampa, FL 34677 | Home |
As mentioned, there are some issues with this layout. For one, what if you discover that Buck Woody’s real name is Clark Kent? You would have to update three rows or many more if there are many addresses. In this example that’s simple, but what if the list is not ordered and there are thousands of repeats?
Now assume you just want to search by the last name of the person. Once again, that’s an easy task with four rows of deterministic values, but what if there are middle names included?
How about when the zip code changes for the home address? Notice that Buck and Marjorie share an address – you need to ensure you get them all or your data will not be reliable.
Set theory breaks up the data into relations. You have the ability to determine the attributes you want to track, but you can also add a value that identifies the row within the set. This “key” value allows you to then join the relations – or tables – into data sets. Here’s one possible layout for the above data:
Person
| PersonID | PersonFirstName | PersonSecondName |
| 1 | Buck | Woody |
| 2 | Marjorie | Woody |
Address
| AddressID | Address Street | AddressCity | AddressState | AddressZip |
| 1 | 123 Here Street | Tampa | FL | 34677 |
| 2 | 234 There Ave. | Tampa | FL | 34677 |
| 3 | 734 Fortress of Solitude Blvd | Tampa | FL | 34677 |
AddressType
| AddressTypeID | AddressTypeDescription |
| 1 | Home |
| 2 | Work |
| 3 | Secret Lair |
PersonToAddress
| PersonID | AddressID | AddressType |
| 1 | 1 | 1 |
| 1 | 2 | 2 |
| 1 | 3 | 3 |
| 2 | 1 | 1 |
Now it’s a simple matter to change a last name, zip code or any other value. While there are more tables, they are smaller. And the primary value is in the “ID” attribute (or column) that has been added. The PersonToAddress table allows a lot of flexibility. Notice that PersonID 1 (Buck Woody in the Person table) has the AddressID value of 1 (123 Here Street, Tampa FL 34677 in the Address table) and that Address has an AddressTypeID of 1 (Home in the AddressType table). Notice also that PersonID 2 (Marjorie Woody in the Person table) shares those same values. In this layout simply updating the zip for Address value 1 doesn’t change any of the other tables or values – making the system quite safe for updates and so on.
It’s important to note that the software or “engine” to process the queries, updates, deletions and other operations is separate from the access language and even the storage. When we talk about a Relational Database Management System, it’s the “system” part that you install, configure and maintain.
The access language for this type of data is called the “Structured Query Language” or SQL. I won’t go into the concepts of that language here, but you can examine a full course on it at this reference (along with many others you can find with a simple search): http://www.sql-tutorial.net/ and more information on it here: http://msdn.microsoft.com/en-us/library/windows/desktop/ms714670%28v=vs.85%29.aspx
Why not just go with another storage and processing mechanism for data? An RDMBS has the following advantages:
- Data is strongly typed, with Unicode support
- It uses a design centric model – schema comes first, allows for flexible queries, unlike NoSQL where the queries are often well understood and the schema needs to be flexible
- It allows a declarative intent – you declare the design you want, and the data has to be in that data type, field name and so on, or it won’t insert or update
- The data is Atomic, Consistent, Isolated and Durable (ACID) – more here:
- The RDBMS paradigm has been highly studied, refined and documented
- It allows for server-side code repositories and mechanisms
- It re-interprets code using an algebrizer to tune the queries (somewhat – more on that later)
Rationale
There are many RDMBS vendors and software packages available – in fact, there’s a handy chart of the data processing options that you can review here: https://en.wikipedia.org/wiki/Comparison_of_relational_database_management_systems
I actually struggled a bit with this decision. I’ve been working with RDBMS systems since the early 1980’s, from mainframe-based systems to in-memory databases. I’ve chosen to use SQL Server (version 2012) from Microsoft on my laboratory system, but there are many other options. To make this choice, I focused on the purpose of this laboratory system – what I will use it for – as you should also do with your system.
In my case, I work a great deal with SQL Server, probably more so than with the other offerings I considered. I need a place to try new things, especially how I might leverage the various features. I also wanted to learn more about interaction with other systems, so this formed the basis of my choice. SQL Server is also a (mostly) standard SQL-RDBMS, which means it has the following features:
- It’s a complete system, with an engine, reporting system, business intelligence and import/export features in the same package
- It is highly used and well documented
- It has a good history
- There are multiple ways of writing code to use the system, both proprietary (from the same company) and open-source packages
But I did consider other systems, since another goal is to learn more about things I don’t know. The first option I thought about was PostgreSQL – if you’re an RDBMS professional and you haven’t taken a look at this open-source offering, you definitely should. I’ll use this in my next set of articles on creating an open-source test system, but in the meantime you can learn more about it here: http://www.postgresql.org/. If you haven’t used it in a while, you may be surprised to learn all that it can do, and do well. I used it years ago, and in my studies for this series I was pleasantly surprised at the way it’s been kept current.
For another standard RDBMS, again in the open-source vein, you may want to check out MySQL (http://www.mysql.com/) or the fork after Oracle purchased the rights to it, MariaDB (https://mariadb.org/) – and the list goes on.
Almost all of the major vendors offer a “compact” or “small” edition of their software (for free in most cases) and are useful in development work. But for me, the primary goal for my system is to explore all of the features of what I work with most, hence my decision to use SQL Server. If you choose another system, that’s fine. In fact, you may want to install more than one – but in my experience that eventually bogs down the system and in some cases caused conflicts among the libraries I installed.
To mitigate this issue, I’ll show you how I leave the RDBMS turned “off”, so you can run it when needed, freeing up memory and CPU if you do want to run multiple installations. Then the only constraint is how large the binaries get on your system.
References:
The main site for SQL Server is here: http://www.microsoft.com/en-us/sqlserver/default.aspx. It includes all the marketing stuff, documentation, training, community info and more.
System Preparation
For an installation, I’m going to use the Developer Edition (http://msdn.microsoft.com/en-us/library/ms144275.aspx) of SQL Server and do a complete install with all features. From the installation documentation you’ll learn that there are several “Editions” of SQL Server, each with its own set of features and abilities. There is a reference you can use here (http://msdn.microsoft.com/en-us/library/cc645993.aspx) to select the specific Edition you need, based on user requirements. The Developer Edition is well-suited to a laboratory system for two primary reasons: It’s essentially the same as the Enterprise Edition (which has most every feature and option), and it’s very inexpensive. It’s licensed for exactly this type of system – one developer, experimenting and writing code. You’re not allowed to use it for multiple users in a production environment.
As I mentioned, I’ll use the Developer Edition, and since I want to experiment with everything, I’ll install everything. Note that this is not the process to follow for a production system – in fact, even before I install SQL Server on a production system I follow a process like this one: http://www.informit.com/guides/content.aspx?g=sqlserver&seqNum=330 and then install SQL Server like this: http://www.informit.com/guides/content.aspx?g=sqlserver&seqNum=243.
But for a laboratory system I’m not testing absolute performance or allowing others to connect. I’m using the system to experiment and learn, so I take all of the defaults and install everything. Even so, there are a few things I do before the installation.
First, I ensure that I apply all Windows Server updates, and then I update third-party software like Cygwin, Java and even Notepad++, and from there I run system maintenance including a Virus scan. I want the system to be completely ready to accept the installation, not waiting to reboot to apply a patch or other maintenance.
Even though I plan to take a complete installation, I read the installation documentation located here: http://msdn.microsoft.com/en-us/library/bb500469.aspx. As part of the learning exercise this system is supposed to provide, I read what I’m supposed to know about before I do the installation – even though I’ll just take the full defaults. I learn about hardware and networking issues, security and more – and as a result, I decide to prepare my Windows environment a little even for this test machine. There are firewall issues I need to deal with (more here: http://msdn.microsoft.com/en-us/library/ms144228.aspx#firewalls) and I also decide to create a few users for the system.
I’ve learned that the Windows Services that run the components of SQL Server can be tied to a user account, or the system account itself. Using the system accounts has fairly serious drawbacks – even for a test system. So I’ll create some local Windows users for the Engine, SQL Agent, and two users for testing SQL Server access. From a command-line on my server, I type:
|
1 2 3 4 |
NET USER SQLServerService P@ssword1 /ADD NET USER SQLAgentService P@ssword1 /ADD NET USER SQLUser1 P@ssword1 /ADD NET USER SQLUser2 P@ssword1 /ADD |
No, they don’t need any special rights or permissions; the installation process handles all of that and gives them just the rights and permissions they need.
Note: In production, I wouldn’t use obvious names like these, and that isn’t the password I really used. Service accounts aren’t granted high rights in the OS, but they have a lot of ability to do mischief in the database. Read more here: http://msdn.microsoft.com/en-us/library/ms143504.aspx
Installation and Configuration
With the reading done and the accounts created, I’m ready to install SQL Server. Even within Editions, SQL Server provides various features that you can install on a server, or even install various features (from the same “install” of SQL Server) on multiple physical boxes.
In any case, the first step is to either load up the DVD installation media or “attach” the ISO image of the installation media.

From here you can see that you can perform many actions – even after the initial installation. If you haven’t read through the planning and installation documents, you have the option to do that here.
On the left-hand panel I select the Installation item, which brings up this panel:
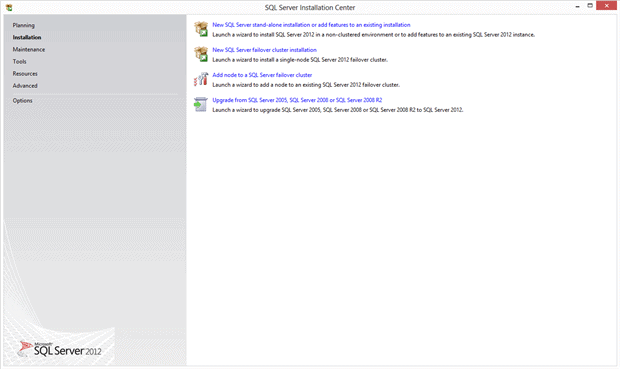
Here I have the ability to add another copy of SQL Server to the same system (called an “Instance”), add features, or perform an upgrade from a previous version. I click “New SQL Server stand-alone installation or add features to an existing installation” item in the right-hand pane to bring up this screen:
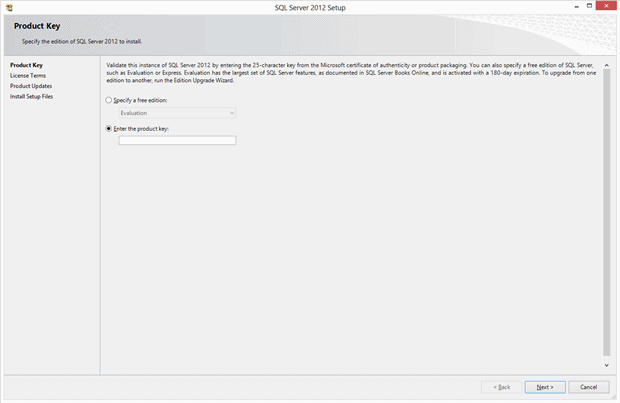
In this section you can enter the Product Key you purchased – in some cases this is already filled out for you, as in the case of my system. I’ve blanked that out in this screen shot. After I verify that number, I click the Next button to move to the following panel:

And this is where you normally choose the “Role” that this installation will perform. As I mentioned, I’ll select “All Features With Defaults” – again, not something I would normally do in production. After I make that selection, I click Next to move to the following panel:
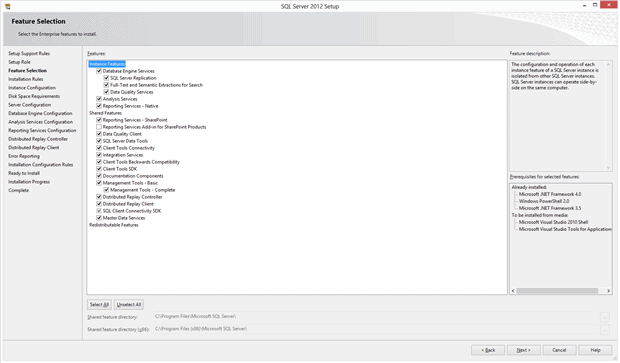
Even if you selected “All Features With Defaults”, you can still make changes to your selections all the way to the end of the process. In this panel you can select the features and components you want. Even if you just leave these selections, take a few moments to read them over.
I’ll leave these selections, and click Next to bring up the following panel:
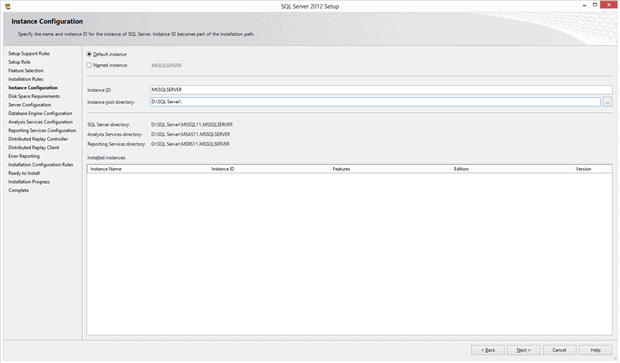
As I mentioned earlier, you can install SQL Server on a computer many times, using a specific name, which is called an Instance. If you specify a name for the installation process here, that’s called a “Named Instance”. If you don’t specify a name, the installation uses the name of the server itself, and it’s called a “Default Instance”. Since a server has only one name, there can be only one Default Instance. Leaving it set this way is a decision I made so that I don’t have to parse an instance name (in the format SERVER\INSTANCENAME) in my testing.
After selecting the Default Instance, I also set the “base” installation directory to a separate drive. There are many reasons to separate the various directories SQL Server uses into lots of different places, which the installation and planning documentation explain well. In this case, since I’m using a Virtual Machine for my system, I want to be able to control where the directories start. In my case I selected the “D:” drive letter. You can choose what makes sense for you.
From there I click the Next button to bring up the following panel:
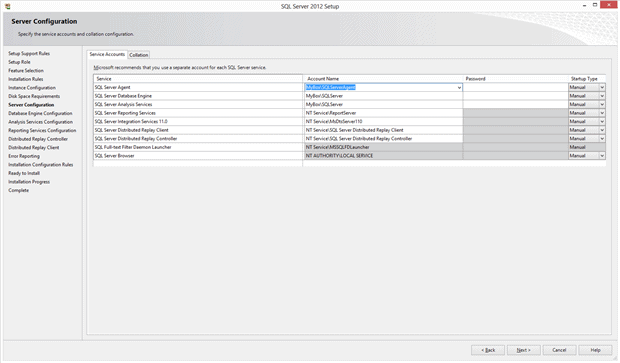
In this panel I can control the Windows Services that run various parts of SQL Server, and how they start. For testing I use different accounts for at least SQL Server Engine and the SQL Server Agent, so that I can track what each of these subsystems do in using the Windows Event Logs.
Some services are better suited for a Windows account, and others aren’t. Again, the installation documentation explains reasons for the choices you can make.
Notice that I’ve set each service to “Manual”. That’s because I’m using this system for lots of types of experimentation, so I may not want SQL Server running all the time. I’ll turn it on when I want it – with this batch file that I run with Administrator privileges in Windows:
|
1 2 3 4 5 6 7 8 9 10 11 12 13 |
@echo off cls color 2f NET START "World Wide Web Publishing Service" NET START "SQL Server (MSSQLSERVER)" NET START "SSDP Discovery" NET START "SQL Full-text Filter Daemon Launcher (MSSQLSERVER)" NET START "SQL Server Agent (MSSQLSERVER)" NET START "SQL Server Analysis Services (MSSQLSERVER)" NET START "SQL Server Integration Services 11.0" NET START "SQL Server Reporting Services (MSSQLSERVER)" NET START "SQL Server VSS Writer" NET START "SQL Server Browser" |
After I make those choices, I click Next to bring up the following panel:
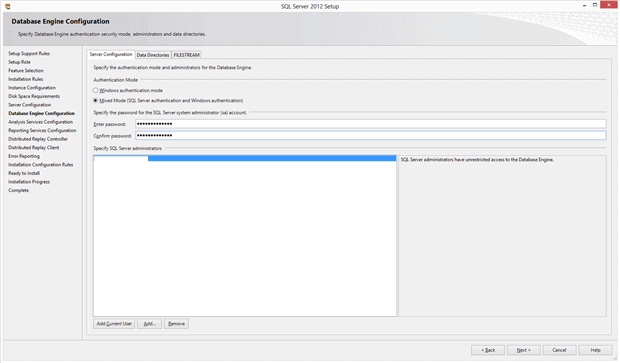
SQL Server has the ability to use Windows Accounts to let users into the Instance and databases. It can also create and track accounts on its own, called “Mixed Mode”. Since I might access this system from a process, a Linux account, or even a Service, I might need to specify a connection string that doesn’t use a Windows Account, so I set this system to Mixed Mode.
I also click the “Add Current User” button at the bottom of the screen to allow my Windows Account to administer the server.
There are two other tabs on this screen. The first lets you control the directories for databases, backups and other storage. I’ll leave mine alone since I changed the “root” location earlier so they are all going to “D:” at this point.
The other tab controls settings around the “Filestream” feature in SQL Server, which essentially allows the database to store a column of data on the file system in Windows, but control that data using the database engine. I’m not making any changes to that feature at this time.
I click Next to bring up the following panel:
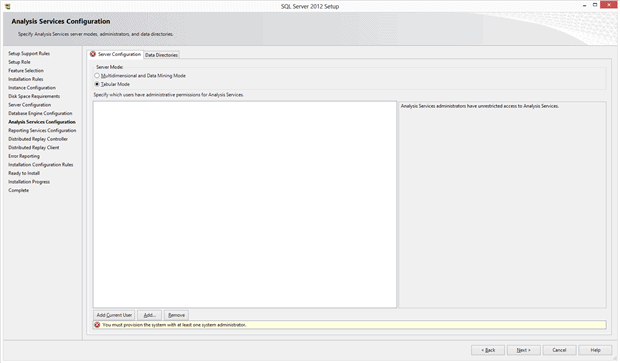
This panel controls some of the base methods that Analysis Services (the business intelligence feature in SQL Server) uses to process data. The “Tabular Mode” is new for SQL Server, so I’m using that one to experiment with. Once again, I also click the “Add Current User” to make my account an administrator for this feature. After I make those selections I click Next on each of the following panels to complete the installation – I’m making no further changes.
Initial Test and Sample Database Installation
As time goes on, I’ll make lots of databases and test data, but I’d like to have some testing data right away. I want something complete, fairly small, and well documented. Microsoft has just such a database, called AdventureWorks – a bicycle shop (Redmond, Washington, where Microsoft is located, is a very bicycle-friendly town). Here is the documentation to this database: http://msdn.microsoft.com/en-us/library/ms124659(v=sql.100).aspx and here is the location where you can read how to install it: http://msdn.microsoft.com/en-us/library/ms161556(v=sql.100).aspx. After you do that installation, you can follow the examples in the documentation, called “Books Online”, to learn more about the SQL Server. I’ll show some of those examples in future articles.
In the next installment, I’ll cover Key/Value pair data systems that I’ll work with on the laboratory.
Load comments