This is the final article in a series on setting up a Data Science Laboratory server – the first, which sets the scene, is located here.
My plan in writing these articles was to set up a system that allows me to install and test various methods to store, process and deliver data. These systems range from simple text manipulation to Relational Databases and distributed file and compute environments. Where possible, I have installed and configured the platforms and code locally. The outline of the series:
- Setting up the Data Lab
- Text Systems
- Testing the Tools
- Instrumentation
- Interactive Data Tools
- Programming and Scripting Languages
- Relational Database Management Systems
- Key/Value Pair Systems
- Document Store Databases
- Graph Databases
- Object-Oriented Databases
- Distributed File and Compute Data Handling Systems (This article)
I’ll repeat a disclaimer I’ve made in the previous articles – I do this in each one because it informs how you should read the series:
This information is not an endorsement or recommendation to use any particular vendor, software or platform; it is an explanation of the factors that influenced my choices. You can choose any other platform, cloud provider or other software that you like – the only requirement is that it fits your needs. As I always say – use what works for you. You can examine the choices I’ve made here, change the decisions to fit your needs and come up with your own system. The choices here are illustrative only, and not meant to sell you on a software package or vendor.
In this article, I’ll explain my choices for working with a Distributed File database system. I’ll briefly explain the concepts and then move on to the methods you can use to use and manage the one I’ve chosen.
Concepts and Rationale
The latest IT marketing buzzword, at least as of this writing, is “Big Data”. Different people have different definitions of “Big”, involving everything from how fast the data arrives to how much of it you store. My personal working definition of “Big Data” is “more data than you can process in a reasonable amount of time with the technology you have now.” For me, this definition works best, since it grows with the hardware and software that you have available at any one time. 
If you’ll allow that definition, then Big Data can be quite large indeed. Relational Database Management Systems (RDBMS), given the proper hardware and tuning, now routinely store and process over a Petabyte of data per system – which is quite a bit, and more than most shops deal with today. But regardless of the amount, structure, or speed of data arrival, there comes a point at which an RDBMS simply can’t process the data in a reasonable time – or sometimes not even deal with the amount of data at all. And then of course there is the structure that an RDBMS requires, which many file formats don’t have.
Enter the Distributed File Database – or more accurately, re-enter those systems. In the mainframe systems I worked on when I was younger (I powered my car with my feet, and had a pet dinosaur at home, yes, I’m old) a “data base” was simply a series of files we wrote on the storage system. The structure of these files was dictated by the programs we wrote to store and access them. When we had a lot of files, we stored them in multiple places throughout the system, and the code had pointers to where they were stored.
As you can imagine, this caused a few problems. If the pointers were not accurate, or the structure (or data) of the file changed to something the code couldn’t handle, the system became corrupt. This was actually quite common. So the RDBMS was invented to correct those issues. An RDBMS has a controlled, single storage system, an internal, defined structure, and a standard declarative programming language to access the data consistently. It solved the problems that a distributed file system created.
It is with a certain irony then that the distributed file system now returns to solve the problems an RDBMS creates – handling large amounts of unstructured or semi-structured data. There are a few such systems, and of course you could write your own. But all of them share a simple paradigm: Split up the data into multiple locations, and then place the code that processes each fragment close (or directly on) that location.
Once again, I’ll need to sacrifice some fidelity in this article to get the main concepts across – but I’ll provide several links to direct you to far more detail. When I first worked with these systems over a year ago, I found the documentation confusing because much of it was not connected to the simple concepts underlying the basic premise of placing code where the data lives. After you have this main concept down, you can then move on to the other concepts that have been tacked on to the system that might make it a little confusing if you try to understand it as a single entity.
There are a lot of distributed file database solutions available, but I’ll focus on one in particular that is in wide use, and available for Microsoft Windows. I’ll continue the concepts discussion in the following section, since each implementation has different concepts in the way it works with distributed files and processing.
Rationale and Examples
I’ve chose the Apache Foundation’s Open-Source Hadoop Framework for the Data Science Lab workstation. This framework, built in Java (you can look up the history and more detail on it here: http://hadoop.apache.org/ ) at its simplest implements two primary components you need to understand:
- HDFS – The Hadoop File System
- MapReduce – An HDFS-aware coding system that deploys the code you want to run on the data
HDFS
I’ll be brief in this section, but you can refer to the earlier link for more detail. HDFS is a distributed file system. What that means is that when you place a file in a location using HDFS, the system takes the data and stores it on multiple systems (kind of like a RAID-enabled hard drive does), and when you retrieve the data from that location, the HDFS system knows where it is to retrieve it. It does this through the use of two basic programs:
- The Name Node – This code runs on a computer, and knows where all of the computers are that it can store data on. In later releases, there can be more than one of these.
- The Data Nodes – This code runs on a computer and stores data. There can be one or more often several of these.
Again, there is quite a bit of simplicity in this description – you can find lots more information on HDFS details here: http://hadoop.apache.org/docs/current/hadoop-project-dist/hadoop-hdfs/HdfsUserGuide.html
MapReduce
The second major component within the Hadoop Framework is Map/Reduce, or its implementation known as MapReduce. This is the code that runs on the data, and it understands how to work with HDFS, so that it splits up the code that works on the data as closely as possible.
You might be able to understand this better with an example. Let’s assume you have a file with lots of words in it, and you’d like to count the number of times each word is used in the file. This is actually more common than it sounds – and you may recall the wc command I mentioned back in the text processing article in this series. That command was written early in the days of Unix’s creation, since it was such a common use-case.
In most files, you can simply use wc or PowerShell or any number of methods to count the number of times a word is used. However – assume that the file is huge, or more commonly that you have tens of thousands of these files to examine, such as a group of web server logs. In that case, you would have to use wc on each one, and then add each result together to get a combined count. That’s a lot of work, and take a lot of orchestration to know when each wc program completes to move on to the next step.
That’s where MapReduce comes in handy. You would store the files on HDFS with a copy command as if it were a single file system, and HDFS would spread the files out to each Data Node for you. Then you write the MapReduce code for counting the words as if it were operating on a single file. Deploy that code, and MapReduce creates various jobs that copy that code to where the files are. The files are processed with your code, and then the results are combined, and a single answer returns.
The Zoo
HDFS and MapReduce are only the core of the Hadoop Framework. Many more code sets live on and around Hadoop, some of which leverage only HDFS, some which use only MapReduce, and still others that use both. These projects include everything from a Data Warehouse to loading and exporting data, from programming languages to operations and security for the system. Many of these have animal-based names, so they are commonly referred to as “The Zoo”.
Those other components are beyond the scope of what I can cover here, but they are combined with the distribution I chose for my system.
Hortonworks Data Platform
Since Hadoop is an Open-Source framework, there are many distributions or packages for installing and managing it. I’ve chosen the Hortonworks Data Platform (2) for deployment on my system since it is made for Windows, contains the core programming and HDFS components, and several other components that allow me to manage and monitor the system. It includes a data warehouse, operational services, and the import and export features I need to test the system with. It includes all documentation and starter code, so this makes the most sense for my lab system.
There are three ways to use HDP: Installing it locally, using it from a cloud provider (Windows Azure HDInsight) or from a “sandbox” in the Hortonworks environment. In practical use I’m seeing a lot of companies use a cloud provider. Going that route means there is nothing to install, and the process only involves loading the data, clicking a few web links, and deploying code. When the process is complete, companies tear down the cluster using PowerShell, and leave the data in place for a subsequent run if needed. This allows a different cost-model than standing up physical servers on-premises.
But since I need to understand the components and how they are deployed, along with how to set them up and manage them, I’ll install locally on my Data Science Lab I have as a Virtual Machine in Windows Azure.
Installation
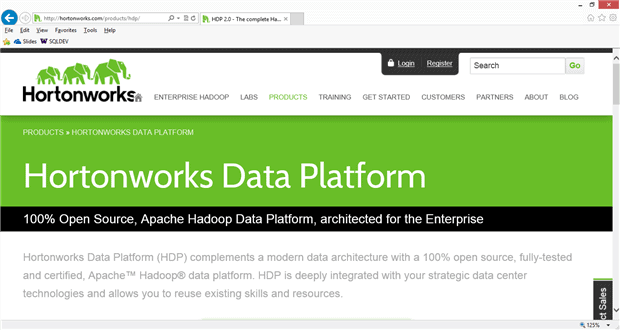
I started by accessing the Hortonworks location here: http://hortonworks.com/products/hdp/
I actually failed marvelously during the installation, for the first time in this series…for two reasons: The install is not a simple “Next, Next, Finish”, and I did not read the fine instructions at this location: http://docs.hortonworks.com/HDPDocuments/HDP2/HDP-2.0.6.0-Win/bk_installing_hdp_for_windows/content/win-chap2-singlenode.html
There are a few pre-requisites for the HDP platform to run, most notably an older version of Python (2.7x, I have 3.3 installed as you may recall) and a variable pointing to the Java home folder. You must set these, since even the installer will fail to write out a log until you do.
Also, ensure that the Java program is installed in a “direct” folder – by that I mean that there are no spaces in the name of the Java home folder. I had originally installed in S:\Program Files\Java – which it did not like at all. I moved Java to s:\java, changed the system variable as per the instructions, and all was well. There are not a lot of progress indicators for the process; just let it run and you should be fine.

Back at the install web site, scrolling down, I found the location for the HDP 2 (for Windows) platform, which leads to the “Download and Install” link, which drops me off at the Overview page. From there I selected the Download and Install link again from the top of the page, which leads to the MSI (Microsoft Installer) package. It’s about 900MB for the entire file.
The package is actually contained in a “ZIP” file, so once the download completes I opened that to fire off the installer.

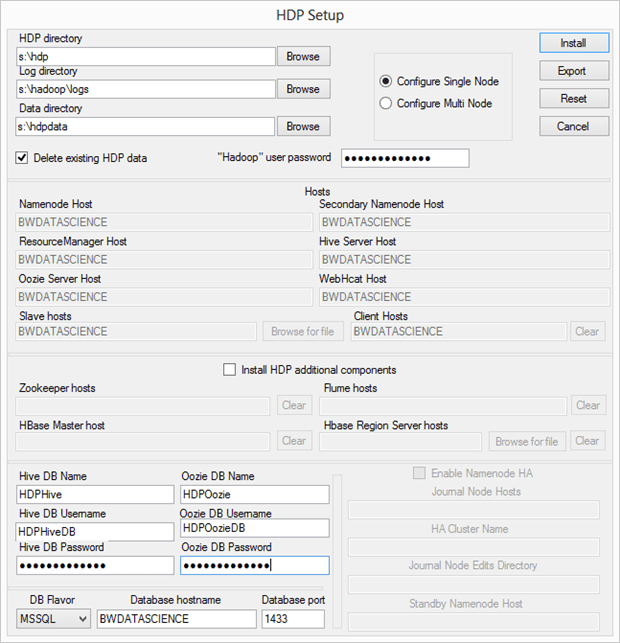
There are a few things going on here. First, I changed the locations to my “S:” drive since I’m using my Windows Azure IaaS virtual machine for this installation. I’ve covered this before, but the best practice for Windows Azure virtual machines is to leave the “C:” drive for Windows binaries, mount a separate storage location as a virtual hard disk (VHD) and assign that a letter, and then install other binaries there. In production you would normally also use another storage device (in fact several) to store data, but for this lab system, one drive extra will suffice.
After making those changes, I enter the password for the Hadoop user. I’m setting the installer to configure only one node, and since this is my first attempt, I’m not going to install any of the additional HDP components. I’ll come back in and do that at a later time, once I’ve gotten comfortable with the base product.
The system needs to use a database to track items that the system uses, so it wants me to enter the names for Hive and Oozie databases and database users – so I’ve made a couple of changes for those. You can either create those ahead of time as I did, or you can use the proprietary database engine from Hortonworks.
With those changes detailed, the installer completes the process. Again – read those instructions carefully.
System Check
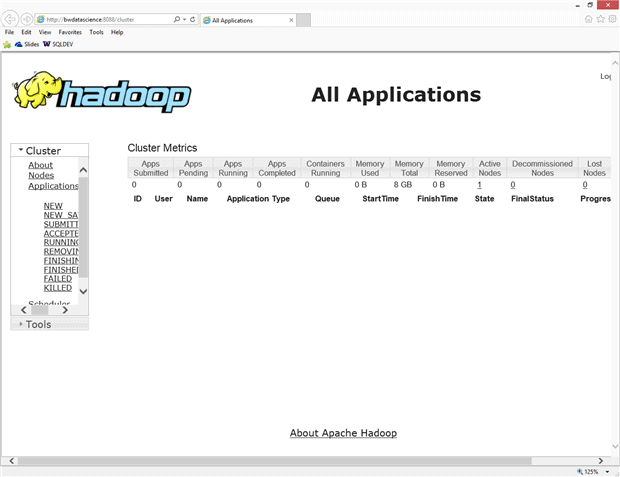
I ran the Run-SmokeTests.cmd as detailed in the article, but many parts of it failed with a “Deprecated Command” error. From there I used the standard hdfs commands for showing the current version, and then fired up the web-pages that the installer created, using the icons on my desktop:

Running a full example of even something trivial like analyzing a log file or a word-count (a common scenario) is beyond the length of this article, since it involves not just HDFS but also a discussion of the file structure, choosing Pig or Hive (or both), Java, and other concepts. Instead, I’ll direct you here for a good tutorial: http://www.windowsazure.com/en-us/documentation/articles/hdinsight-get-started-emulator
I honestly believe that the future of these types of systems is in “the cloud”, since setting them up at scale is a non-trivial effort, to be sure. However, I think the exercise of setting up a single-node system is definitely worth your time.
Series Wrap-up
I’ve enjoyed writing this series more than just about any other I’ve done. I trust that it inspires you to create your own lab system, using whatever software or vendor you find useful to explore. There is no substitute for creating a system where you can experiment with the configurations and deployments without fear of damaging anything in production.
I’ve made a few changes to the system over the course of this series. Originally I installed the Cygwin environment to get at the data tools I wanted from the Gnu set of packages, such as wc, sed, awk and grep, and others. I’ve now switched to GOW – Gnu on Windows, since it doesn’t require a switch to a different shell to use, and has all of the major packages I care about in a Windows environment.
I’ve also changed to using Vim for my text editor rather than Notepad++. Notepad++ is still an amazing text editor – but I have so much mental energy invested in vi from my Unix days that I just find it more intuitive. Again, your mileage may vary, so use what works for you.
And of course I’ll make other changes as time passes – that’s the point of a lab system. In fact, my next task will probably be to tear down the whole thing and rebuild it based on what I’ve learned – changing out certain packages, adding new drive layouts and so on. I’ve also been thinking about automating the install into “blocks” of PowerShell code that could download and install each component based on parameters I supply. I’m thinking that might make a good way to set up training machines for me to teach a class someday.
One final comment – although Hadoop supports a branch of computing science called “Machine Learning“, I have not covered it in this article, or even in this series. I debated that, but since Hadoop does provide that ability (with a package called Mahout, among others), I’ll leave it to you to play with that more on your own. My goal isn’t to teach you Data Science (hmm….sounds like another interesting series) with concepts like statistics, analysis and data management, but simply to explain how to build a system for you to work out those things on your own. I trust this series has done that – and I would love your comments and thoughts on how you’ve used the information in your professional career.


Load comments