
MySQL Data Compare can both compare the data in MYSQL databases and also synchronise them. It is handy for a number of tasks for which MySQL has no built-in tools. Although it is intuitive to use and has online help, there has never been a manual; until now!
In the previous article, you saw how MySQL Compare made it quite easy to keep track of your changes and keep your databases synchronized. That is crucial when you need to ensure that the schema changes you make in development propagate to test, staging, and production systems. Also important, though, is the ability to synchronize data. Needs vary in this regard. You may want to propagate small lookup tables directly from development through to production. With typical production data, though, you will typically only use a very small portion in development and test so you only need to synchronize a subset of your data. Or perhaps you are doing a system changeover, as was the case for one organization I worked with, where you really do want to synchronize large data tables. Regardless of your particular scenario, the task of data synchronization is essentially the same and MySQL Data Compare makes this as easy to do for your data as MySQL Compare did for your schemas.
In a nutshell, MySQL Data Compare lets you specify a source and a target database, then select what objects to analyze for differences, and finally deploy auto-generated change scripts to synchronize your source to your target (Figure 1). Data comparison actually has more dimensions to consider than schema comparison-compare this figure with Figure 1 in the previous article.
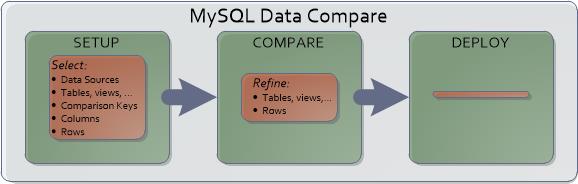
Figure 1 MySQL Data Compare’s process flow to synchronize data changes.
Setup: Configuring What and How to Compare Databases
MySQL Data Compare starts out with practically the same project definition window as MySQL Compare. Again, a project consists of specifying two complete database connections (server, credentials, transport mechanism, and database). Here I have selected two databases on my local machine, one that is the test version and one that is the live version, simulating a real-world scenario. MySQL Data Compare defaults to a standard TCP/IP transport mechanism but it also supports SSH and named pipes, as indicated by the other tabs. Note that the two databases are quite independent so each side may specify a different network transport.
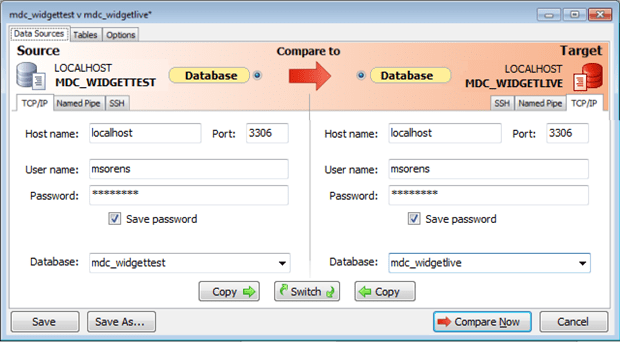
Figure 2 MySQL Data Compare’s new project dialog, Data Source tab.
There are additional notes on this Data Sources tab in Part 1; as they are identical with SQL Compare there is no need to repeat them here.
Moving off the Data Sources tab, however, the Tables tab is unique to MySQL Data Compare and the Options tab provides different options. Consider the Options tab first, containing just these two options:
| Option | Description |
| Trim trailing spaces | If the data in two columns differs only by the amount at white space at the end of the string, this option lets you consider them equal. |
| Include deployment script header | Includes a comment header at the top of deployment scripts, including the date and time of script creation and the MySQL Data Compare build number. |
Ostensibly the most useful tab, Tables, gives you much flexibility on exactly what to compare in MySQL Data Compare. This is equivalent to SQL Data Compare’s Tables & Views tab. Another significant tab from SQL Data Compare, Object Mapping (which allows comparing tables or columns with different names) is regrettably not (yet) available in MySQL Data Compare.
The Tables tab itemizes all of the tables from both data sources for your review. This dialog looks deceptively simple but it provides a number of ways to let you customize and specify the data that you are interested in.
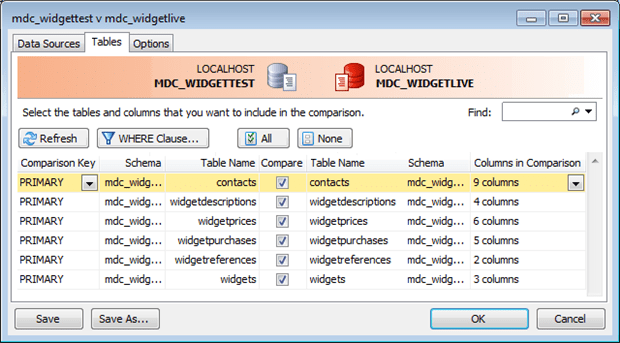
Figure 3 MySQL Data Compare’s new project dialog, Tables tab.
Step One: Select Tables
The first step is to select the tables to include. Starting near the middle, you have two buttons All and None to select or deselect all the tables in one click. This ticks or unticks all the boxes in the Compare column just below the two buttons. At first glance the All and None buttons might seem to be of limited use, but here are a few ways to leverage them:
- To include all columns, tick All and you are done.
- If you want most but not all, tick All then untick the ones you do not want to include.
- To select just a few tables tick None, then tick the few you want to include.
- To include all tables except those with “price” in the name, first tick All. Type “price” in the Find box in the upper right corner. As you type, the list of tables is auto-filtered by your text. Once you have all the “price” tables showing, now tick None to exclude just these visible tables. Finally, remove the Find filter (the X in the Find box), restoring the full list-but now, only those you want are ticked.
Note that what you type in the Find box matches text in both the table names and the schema names, which I would consider a bug. Thus, if your substring is contained in the schema name your list will not be filtered as you would expect.
For the next steps, Figure 4 shows another view of the same dialog with its selectable components exploded.
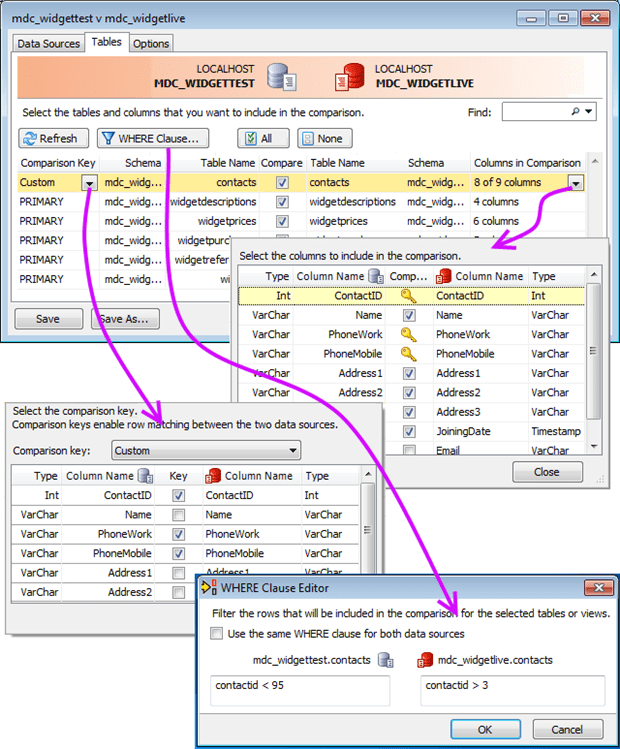
Figure 4 MySQL Data Compare’s new project dialog, Tables tab, exploded view.
Step Two: Select Row Matching Criteria
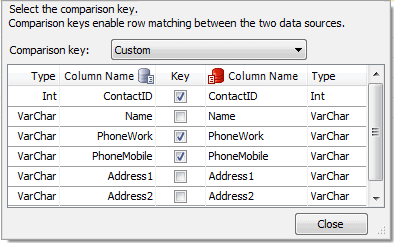 Once you have selected the tables to compare, tell MySQL Data Compare how to match rows in each table. By default, it uses the primary key for a table, a natural enough choice. But remember this is not for doing joins within a database; rather, here you want to match data between two copies of the same table. Thus, it may often be the case that you want to use either more or different criteria. MySQL Data Compare makes this simple to accomplish. Examine the first column in the main dialog (Figure 4, top), labeled Comparison Key. All entries are set to PRIMARY indicating, as stated, to use the primary key. But if you open the dropdown on a given entry, this opens up a sub-dialog itemizing all the columns in the selected table. At the top-where it says Comparison Key-change the default PRIMARY choice to Custom to reveal the set of checkboxes in the Key column. The primary key is checked by default (ContactID in this example). I have also ticked PhoneWork and PhoneMobile because in this example I am interested in making sure there are no phone number duplications. Close out of that sub-dialog to store your choices. Back in the main dialog (Figure 4) you will now see Custom instead of PRIMARY as your row-matching mode.
Step Three: Select Columns to Compare
 Now jump over to the rightmost column in the main dialog, Columns in Comparison (Figure 4, top). Here you select which columns to include in the comparison. This is where you typically improve your signal-to-noise ratio. Say, for example you follow the common practice of recording a time stamp with a trigger whenever data in a row is updated. Further, assume that between your development database and your test database the time stamps you do not care if the timestamps are different, even for the same data. In fact, if you considered the timestamps, that every row would be reported as different. So you want to exclude that column.
You start out with all columns selected for a given table. In the second row, for example, it indicates four columns for the WidgetDescriptions table. But if you activate the dropdown in the Columns in Comparison column this opens up a sub-dialog again itemizing all the columns in the selected table (see Figure 4). The first thing to note is that the columns that you selected in step 2 as your row-matching key are locked, displaying the key icon instead of a checkbox. Obviously if you are using those to match, they must be included. All the remaining columns have checkboxes, and upon entry all of them are ticked. Deselect any columns you wish to omit from the comparison and close out of the sub-dialog to store your choices. Back in the main dialog (Figure 4) the Columns in Comparison column now indicates how many out of the total number of available columns are going to be compared; because I unticked one column in the first table it reports 8 of 9 columns.
Step Four: Select Rows to Compare
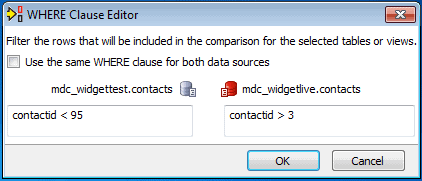 The final step is to select the rows you wish to include in your comparison. Unlike in the previous steps, this selection may be made separately for each of the two data sources. Open up the Where Clause Editor by selecting the Where Clause… button on the main dialog. This straightforward dialog lets you enter a freeform predicate to filter out undesired rows. In the example, I have entered a simple predicate but you can make it arbitrarily complex as needed. Here you also see that I am selecting different rows in the source and the target data sources.
Comparison Results
When setting up a new project, the New Project dialog presents the Compare Now button in the lower right to perform the actual comparison. If you come back in later (via the Edit Project button on the main window) this button will simply say OK unless and until you make some changes, then it will again say Compare Now.
Once you run the comparison, MySQL Data Compare closes the New Project dialog, returning you to the main window with the comparison results (Figure 5).
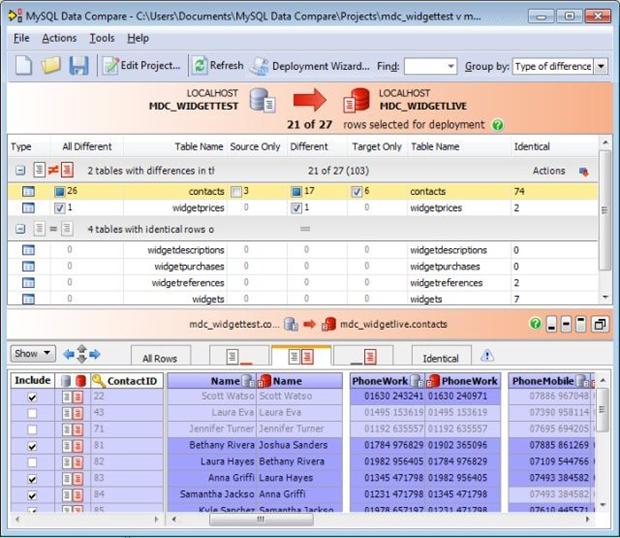
Figure 5 MySQL Data Compare’s comparison results.
This window is quite similar to MySQL Compare‘s comparison results (Part 1, Figure 3), but here MySQL Data Compare puts even more information at your fingertips.

From left to right, the toolbar includes:
- The familiar new, open, and save icons that operate on project files.
- Edit Project button lets you go back to the project dialog to modify the source or target databases or the specifics of just what to compare.
- Refresh analyzes the databases again in case things have changed.
- Deployment Wizard is the engine to synchronize your target with your source.
- Find lets you type in arbitrary text and it removes from the display any objects whose names do not contain your phrase as a substring.
- Group by lets you modify the display of the tables (middle of the window) to be either grouped by type of difference or not to be grouped at all; more details on this below.

This panel confirms the choice of servers and the databases for your source and target. It also gives you a count of how many data rows are included by your current comparison specifications.
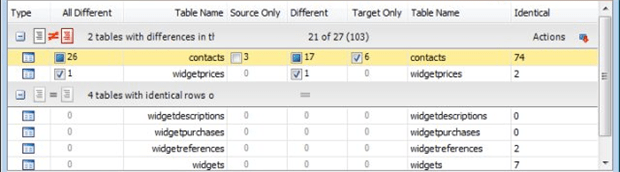
Next, with the Group By selector above set to Type of difference, you see from one to four optional sections showing the comparison results at an object level. The four sections correspond to the possible difference types: objects that are different, objects that are only in the source or only in the target, and objects that are identical in both databases. In this example, you see objects that exist in both databases but are different in the first group, and objects that have no differences in the second group. Where differences exist, you then have checkboxes on each item to allow you to individually select which objects to synchronize.
Set Group By to No Groups and you will just get one list containing all your database objects. Note that in either mode, you can sort within the displayed groups by clicking on a column header.
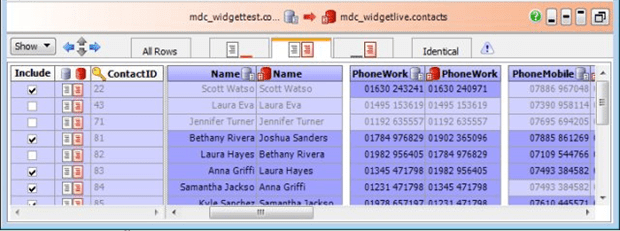
The bottom panel shows the actual field-by-field comparison results in a format that is clean and easy to interpret. Field values from both data sources are displayed side by side with differences highlighted. The fields comprising the comparison key are grouped together as the leftmost fields. (This particular sample just used the primary key, ContactID so it is shown as the sole field with a key icon.) Except for the comparison key-which by definition must be the same for both data sources-each field shows data from both sources, side by side, making it quite easy to see the differences.
Note also that this comparison panel, besides letting you view the differences, further lets you customize your impending synchronization with the checkboxes in the very first column.
This panel boasts a number of convenience features at the top:
- The first row, at the far right, offers some explanatory text if you select the help icon.
- The remaining controls on the first row provide sizing options for the difference panel. You can minimize it, restore it, or maximize it with the first three buttons (which have handy shortcut keys) and you can even expand it into a separate window with the rightmost button.
- In the second row, the Show button provides a Find capability to search your data for specific values.
- The Show button also offers a Pivot capability described below.
- Next to the Show button are four directional buttons that jump directly between differences, whether they are adjacent or separated by many rows or columns.
- You then have five tabs to filter the data display: all rows, rows only in source, differing rows, rows only in target, and matching rows.
- The final item on the header row looking like a grey caution or warning icon, is simply a flag to let you know that a filter has been applied via a WHERE clause in the project setup.
For those fields containing lengthy data, just double-click a cell to open a mini-text window that displays the datum in its entirety.
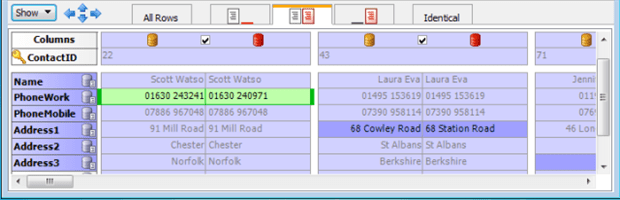
One final feature of the comparison results well worth mentioning: the Pivot capability. The bottom panel by default presents results row by row, with the fields (columns) going across each row, just like a SQL result table would present data. But if you switch to Pivot mode you can transpose the rows and columns, as you see in the fragment just above. This makes it much easier to see a record in its entirety since you could resize the panel to easily see 50 or more fields (now rows) at one time. (Of course, you will have a heck of a lot of horizontal scrolling to do in order to scan multiple records!)
Deploying/Synchronizing Changes
Once you have fully specified what you want to synchronize, and you’ve confirmed that the identified changes are all appropriate, the next step is to deploy those changes from your source to your target. The deployment wizard is a very simple 2-step process. First, choose whether to actually modify your target database or just to generate a script to do it. As Figure 6 shows, even if you choose to deploy directly you can still save a copy of the script for proper record keeping, putting in source control, etc.
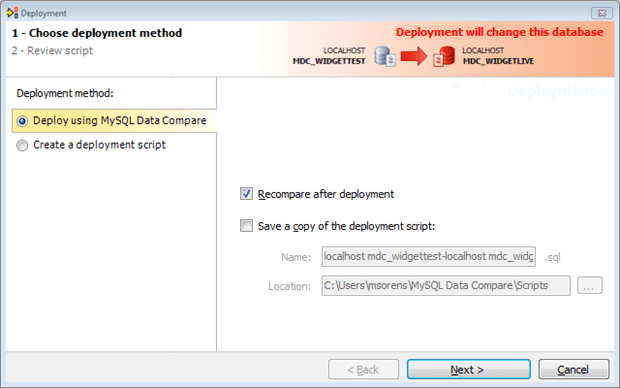
Figure 6 The deployment wizard, page 1.
The second page, Review Script, lets you examine the finished script before deployment-and gives you yet another chance to save it off to your file system (Figure 7). The page includes a search box to help you find things in the script. The principal action button will perform a different function depending on what you selected on the first page of the wizard. If you chose Deploy using MySQL Data Compare the button will be labeled Deploy Now, whereas if you chose Create a deployment script the button will read Open Script in Editor as the figure currently shows.
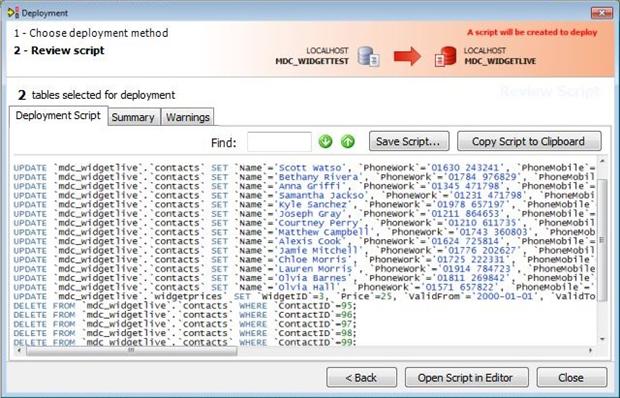
Figure 7 The deployment wizard, page 2a.
But wait! There are more tabs on this page, so the script is not quite your last line of defense. You have a Summary tab and a Warnings tab from which you might glean additional information. The Warnings tab, in my example, was empty, which is a good sign. The Summary tab for my example appears in Figure 8. Here it recapitulates what the deployment script will do. It is a nice abstraction of the script, giving you a functional view of what will change in your database.
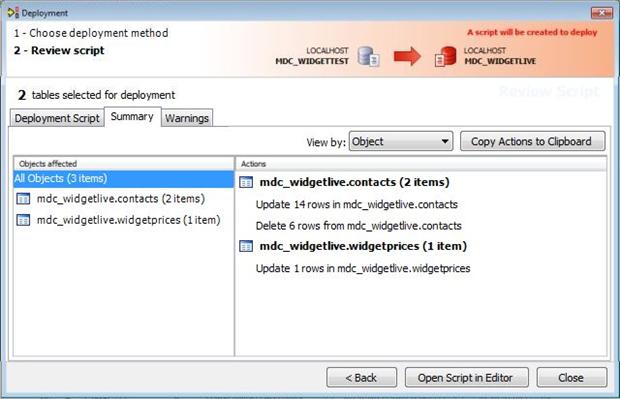
Figure 8 The deployment wizard, page 2b. The action button will differ depending on your selection from page 1 of the wizard.
As with MySQL Compare, a successful deployment is quite an anticlimax.
Automating the process
MySQL Data Compare is designed to be automated. This is particularly useful for routine jobs such as keeping changes in source control and for doing automated deployments. This allows MySQL Data Compare to be used in a batch job and in a PowerShell script. It can be called from any language capable of executing a command-line script. You can get all the switches from the command line.
MDC /? /v
Note that the installer does not automatically register the command line executable in your search path-you will find it under \Program Files (x86)\Redgate\MySQL Data Compare 1 (even though the installer claims it will be \Program Files\Redgate !).
It is from the command line that the value of having a project file becomes more obvious. There is no direct way to specify the server, database, objects, columns, and records to compare. Rather, store these together in an XML-based project file that you generate with the GUI. In order to do a particular job all you need is to specify the path to the project file using…
/project:<project> (Alias: /pr)
… and you get a consistent automated result.
If you merely want to find out if two databases are the same omit the /deploy option when you run the comparison and examine the application’s exit code: it returns 61 if differences were found during comparison or 0 if the databases are identical.
The switches are summarized here:
| Command-line Switch | Meaning |
| /help (Alias: /?) |
Displays this help message. Use in conjunction with … /verbose … for more detailed information. When you use /help all other switches (except for /verbose) are ignored. |
| /verbose (Alias: /v) |
Verbose mode. |
| /quiet (Alias: /q) |
Quiet mode; no output. |
| /project:<project> (Alias: /pr) |
Uses a MySQL Data Compare project file for comparison |
| /scriptfile:<scriptfile> (Alias: /sf) |
Writes a SQL change migration script to the specified file. This option allows you to generate an SQL script to migrate the changes which can be executed at a later time. If the file already exists an error will occur, unless you have also used the /force switch. |
| /SyncScriptEncoding:<encoding> (Alias: /senc) [Default: UTF8] |
Character encoding to use when writing the script file with /scriptfile. Values:
|
| /deploy (Alias: /dep) |
Synchronizes the databases after comparison. |
Conclusion
MySQL Data Compare is a bit more involved than MySQL Compare (see previous article) but still provides a convenient graphical user interface to alleviate a lot of the tedium in keeping data in your databases synchronized.
This document contains proprietary information and is protected by copyright law.
Copyright © 2026 Red Gate Software Limited. All rights reserved
Load comments