
First off, Microsoft’s Log Parser utility is not a SQL Server tool. Log Parser is a powerful Windows command-line utility that can extract data from a variety of sources-IIS logs, XML and CSV files, Active Directory objects, Network Monitor capture files, and the Windows registry, to name a few-and output the data to various files and systems, most notably SQL Server. In fact, Log Parser makes importing data into a SQL Server database so simple, you’ll wonder why you haven’t been using the tool all along.
At the core of the Log Parser utility is a “SQL-like” engine that processes data as it’s retrieved from the source and sent to the destination. You can think of Log Parser as a mini extract, transform, and load (ETL) application that uses input formats to extract data from its source and output formats to send the data to its destination.
An input format provides the source data to the engine as a record set, similar to the way rows are stored in a table. Each input format serves as a record provider specific to the source from which the data is retrieved. For example, you would use the xml input provider to retrieve data from an XML file.
Output formats also present the processed information as record data, with each output format specific to the target destination type. If you were sending data to a SQL Server database, for instance, you would use the sql output format.
For details about the available input and output formats supported by Log Parser, as well as information about other features, see the Log Parser help file (LogParser.chm). The file is added to the directory where Log Parser is installed when you do a complete installation or you include the documentation component as part of a custom installation. You can download Log Parser from the Microsoft Download Center. There you will also find installation instructions.
Using Log Parser to retrieve data
Log Parser comes in two versions: a command-line executable and a DLL containing COM objects that applications can use to run Log Parser operations. This article focuses on the command-line utility and how you can use it to import data into a SQL Server database.
After installing Log Parser, you’ll likely want to modify your operating system’s Path environmental variable to include the folder where Log Parser is installed. That way, you can run Log Parser at a command prompt without having to navigate to that folder.
The process you use to modify the Path system variable will vary from one Windows operating to the next. In Windows 7, for example, one way to access the Path variable is to open Control Panel, click System and Security, and then click System. In the left pane, select Advanced system settings, which launches the System Properties dialog box. On the Advanced tab, click the Environment Variables button. When the Environmental Variables dialog box appears, select the Path variable in the System variables list, and then click Edit. This launches the Edit System Variable dialog box. In the Variable value text box, append the current value by adding a semi-colon and the path to the Log Parser directory, as in ;C:\Program Files (x86)\Log Parser 2.2.
Once you’ve modified the Path variable, open a Windows command prompt and run the following command:
|
1 |
logparser /h |
The command returns basic help information about the Log Parser utility. It also provides an easy way to test whether Log Parser has been properly installed and the Path variable updated. Figure 1 shows the information returned by the command. Notice that it includes details about the command syntax, provides several examples, and describes how you can find additional help. You can refer back to this information at any time by rerunning the command.
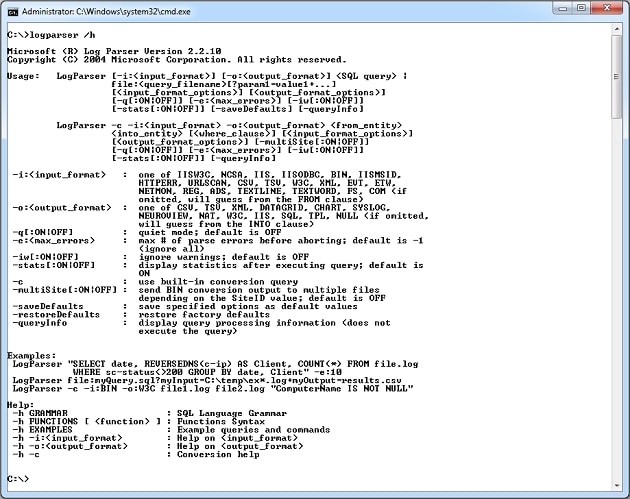
Figure 1: Viewing the basic help available to Log Parser
Much of the information in Figure 1 will make more sense after we work through a few examples. One thing to take out of this information, however, is that a basic Log Parser command normally requires four components: the utility’s filename (logparser), an input format, an output format, and a SQL query that tells the Log Parser engine how the inputted data should be outputted to the target file or system.
Let’s look at an example to better understand how this works. The following Log Parser command retrieves data from the System event log and outputs the data to the command prompt window:
|
1 |
logparser -i:evt -o:nat "select * into stdout from system" |
The first argument after the logparser filename is -i:evt, which specifies that the evt input format should be used. The evt input format provides the structure necessary to retrieve events from Windows event logs or event log backup files on local or remote computers. As the -i:evt argument shows, when you include an argument in your command, you generally specify the option name (preceded with a hyphen), a colon, and the option setting.
The next argument in the example command is -o:nat, which specifies that the nat output format should be used to output the data to the command prompt window. The nat output format is the default output format in Log Parser and is used when no other format is specified.
The final argument is the actual query, enclosed in double quotes. The query specifies what data to retrieve and where to send it. Notice that the query looks like a T-SQL SELECT statement. Although the SQL supported by the Log Parser engine is its own language, it is very similar to T-SQL, specifically with regard to creating a SELECT statement.
In our example, the query includes SELECT, INTO and FROM clauses. Log Parser requires the SELECT and FROM clauses and, in most cases, the INTO clause. The SELECT clause specifies what fields to return from the data source. If an asterisk is used, all fields are returned. The INTO clause determines where to send the data. When the destination is the command prompt window, the stdout value should be used. The FROM clause specifies what to retrieve from the source, in this case, the System event log.
Because the command outputs the data to the command window, you can see the information you’re retrieving as soon as you run the command, as shown in Figure 2. Not surprisingly, because the command retrieves all fields for all System events, the window is quiet cluttered.

Figure 2: Using Log Parser to retrieve data from the System event log
Notice the Press a key instruction at the bottom of the screen. By default, Log Parser returns only 10 records at a time. To move on to the next page of results, press any key. To view all the data, you must continue with this process until you loop through the entire result set, or you can stop the process and return to the command prompt by pressing Ctrl+C.
The preceding example demonstrates all the components that a command should include. However, in some cases, you don’t have to specify a command element if Log Parser can clearly tell what you’re trying to do. For example, if your query’s FROM clause specifies the System event log, you don’t need to specify the evt input format, and if you’re outputting the data to the command prompt, you don’t have to include the nat output format or include an INTO clause in your query. As a result, the following command will return the same results as the command in the previous example:
|
1 |
logparser "select * from system" |
Even though Log Parser lets you skip command elements, Microsoft recommends that you include all of them as part of coding best practices, which is the approach I take in the remaining examples.
Now let’s return to Figure 2. As you can see, the command dumps a lot of information on us when, in fact, we might need to retrieve only specific fields. For many of the input formats, you can view Log Parser’s help to learn what fields are available to a specific input format. You can find this information in the LogParser.chm file or by entering a help-related command at the command prompt. (You can use a second command prompt window to view help content, if that makes it easier for you.) For example, the following command retrieves data about the evt input format:
|
1 |
logparser /h -i:evt |
This is similar to the command we used to retrieve the basic help information, except that we’ve added the -i:evt argument. Now Log Parser help returns the information shown in Figure 3. As you can see, the data includes a list of fields available to the specified input format.
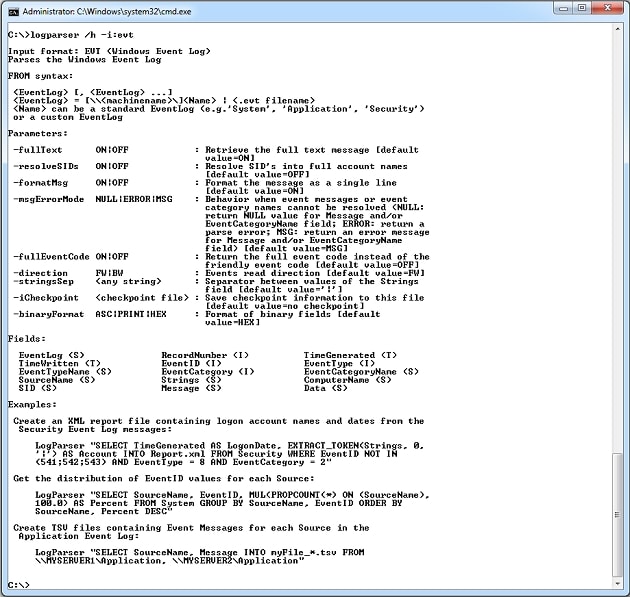
Figure 3: Viewing Log Parser help for the evt input format
Notice that a letter follows each field and is enclosed in parentheses. The letter indicates the field’s data type. Log parser supports the following data types:
- Integer (I): A whole number.
- Real (R): A floating-point numeric value (decimal).
- String (S): A variable length Unicode character value.
- Timestamp (T): A date and time value, with an accuracy up to one-hundredth of a nanosecond.
When returning data to the command prompt window, knowing the data types of the returned fields is normally not important, but later in the article, when we insert data into a SQL Server table, that information becomes far more valuable. In the meantime, let’s return to the fields themselves. Once we know the fields available to an input format, we can use that information to refine out command’s query. For example, the following command returns only the EventTypeName, TimeGenerated, and SID fields:
|
1 |
logparser -i:evt -o:nat "select EventTypeName, TimeGenerated, SID into stdout from system" |
Note that a Log Parser command is a single-line command. In this example and those to follow, the command might wrap across multiple lines because of margin limitations. However, do not press Enter until you’ve typed in the entire command.
Returning now to our example, you can see that we modified only the SELECT clause, replacing the wildcard (*) with the field names. Now when we run the command, the results are much more readable, as shown in Figure 4.
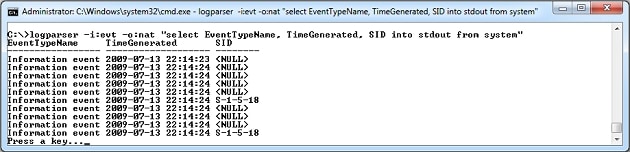
Figure 4: Retrieving specific fields from the System event log
If you return to Figure 3, you’ll notice that the help information on the evt input format also includes a list of supported parameters. Input and output formats support optional parameters that help you refine your command even further. In the following example, I’ve added the -resolveSIDs:on parameter after the -i:evt argument and the -rtp:20 parameter after the -o:nat argument:
|
1 |
logparser -i:evt -resolveSIDs:on -o:nat -rtp:20 "select EventTypeName, TimeGenerated, SID into stdout from system" |
The -resolveSIDs:on parameter tells Log Parser to convert the SID values (security IDs) to their full account names. By default, this setting is turned off, but the parameter in the command turns the option on. In addition, the -rtp:20 parameter after the nat output format tells Log Parser to return 20 rows at a time to the command prompt window, rather than the default 10 rows. Our example command now returns the results shown in Figure 5.
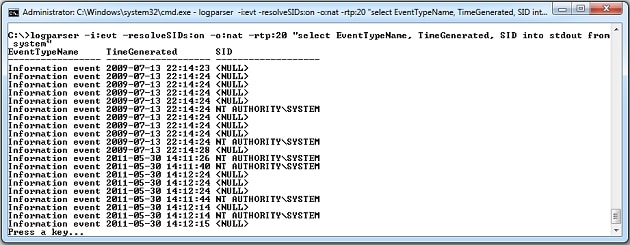
Figure 5: Adding input and output format parameters to your Log Parser command
As you can see, the non-null SID values have been converted to full names and 20 rows have been returned, rather than 10.
The SQL in Log Parser also supports an extensive set of built-in functions you can use within the command’s query. For example, the query in the following command uses the extract_token and to_date functions:
|
1 |
logparser -i:evt -resolveSIDs:on -o:nat -rtp:20 "select extract_token(EventTypeName, 0, ' '), to_date(TimeGenerated), SID into stdout from system" |
The extract_token function lets you extract a substring from a value. The function takes three arguments. The first is the original value, in this case, the EventTypeName field. The second argument is a 0-based index that indicates what part of the value to return. If 0 is specified, the function starts at the beginning of the value and returns all data up to the character specified in the third argument, in this case, a single space. For instance, the function as it is used in the example above will return word Information from the value Information event.
The to_date function returns only the date portion of a Timestamp value. Because I use the function on the TimeGenerated field, the query will return only the dates from that field’s values, rather then the date and time. Figure 6 shows the data now outputted by the query. Not surprisingly, the EventTypeName field returns only a single word and the TimeGenerated field returns only the date.
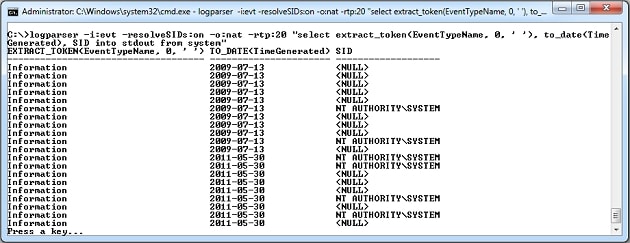
Figure 6: Adding functions to your Log Parser query
As you can see in Figure 6, the column names in the results use the entire field expression from our query. We can fix this by assigning aliases to our fields within the SELECT list. In the following command, I’ve assigned the TypeEvent alias to the EventTypeName field, the DateGenerated alias to the TimeGenerated field, and the SecurityID alias to the SID field:
|
1 |
logparser -i:evt -resolveSIDs:on -o:nat -rtp:20 "select extract_token(EventTypeName, 0, ' ') as TypeEvent, to_date(TimeGenerated) as DateGenerated, SID as SecurityID into stdout from system" |
As you can see, assigning an alias is simply a matter of adding the AS keyword, followed by the alias. You can use the alias anywhere in the query after the point it has been assigned. If the alias includes spaces or special characters, as in Customer's Address, you should enclose it in brackets, just like you do with column names. Once you’ve defined your aliases, you’ll find the results are even more readable, as shown in Figure 7.
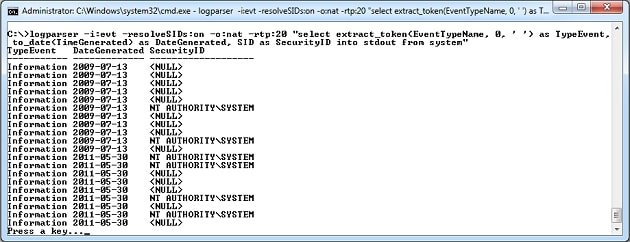
Figure 7: Adding column aliases to your Log Parser query
But we’re not done yet. Just like a SELECT statement in T-SQL, we can add a WHERE clause to the command’s query. For example, the SELECT statement in the following command limits the results to those whose SourceName value equals Service Control Manager:
|
1 |
logparser -i:evt -resolveSIDs:on -o:nat -rtp:20 "select extract_token(EventTypeName, 0, ' ') as TypeEvent, to_date(TimeGenerated) as DateGenerated, SID as SecurityID into stdout from system where SourceName = 'Service Control Manager'" |
In this case, we’ve simply added the WHERE keyword, following by the equal sign and the Service Control Manager value, enclosed in single quotes. However, we can qualify the WHERE clause even further by adding a second expression, connected to the first by the AND comparison operator:
|
1 |
logparser -i:evt -resolveSIDs:on -o:nat -rtp:20 "select extract_token(EventTypeName, 0, ' ') as TypeEvent, to_date(TimeGenerated) as DateGenerated, SID as SecurityID into stdout from system where SourceName = 'Service Control Manager' and SID is not null" |
As you can see, after the AND comparison operator, I’ve specified that the SID value must not be null. Figure 8 shows what the results now look like after running the command. Clearly, the result set is much more specific than before.
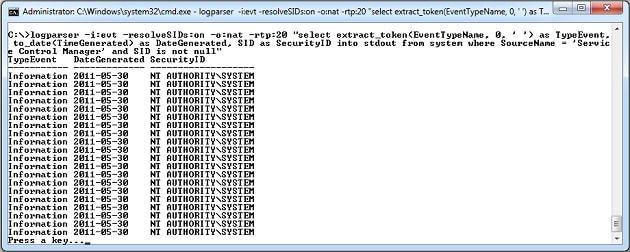
Figure 8: Adding a WHERE clause to your Log Parser query
If you already know how to build a SELECT statement in T-SQL, you should have no problem adjusting to the SQL in Log Parser. Basically, you want to build a query that retrieves exactly the data you need and sends it to the selected target.
Inserting data into SQL Server
Up to this point, the examples we’ve looked at have returned their results to the command prompt window. But in most cases, you’ll likely want to persist those results. Log Parser lets you output data to various types of text and image files or send the data to a SYSLOG server. In addition, you can output the data to a SQL Server database or another ODBC-compliant database.
When sending the data to SQL Server, you must take into account the field data types that Log Parser is outputting. The following table lists the Log Parser data types and how they correspond with SQL Server data types:
|
Log Parser data type |
Existing table in SQL Server |
New table in SQL Server |
|
integer |
bit, tinyint, smallint, int, bigint |
int |
|
real |
real, float, decimal |
real |
|
string |
char, varchar, nvarchar |
varchar |
|
timestamp |
date, time, smalldatetime, datetime |
datetime |
For example, if an input format returns a field with a string data type, you can insert the data from that field into an existing SQL Server column configured with the char, varchar, or nvarchar data type, as long as the data fits into the column’s size. On the other hand, if you let Log Parser create a table for the data, that target column is automatically configured with the varchar data type.
Let’s create a table for storing event data to demonstrate how importing data into SQL Server works. The following T-SQL creates the ScmEvents table in the AdventureWorks2012 database (though you can create the table in any database you choose):
|
1 2 3 4 5 6 7 8 9 10 11 12 |
USE AdventureWorks2012; GO IF OBJECT_ID('ScmEvents','U')IS NOT NULL DROP TABLEScmEvents; GO CREATETABLE dbo.ScmEvents ( TypeEventvarchar(25) NOT NULL, DateGenerateddatetime NOT NULL, SecurityIDvarchar(50) NULL ); GO |
The columns in the ScmEvents table correspond to the fields that we retrieved from the System event log in the Log Parser command in the preceding example. Now we’ll update that command to send the data to the ScmEvents table, as shown in the following example:
|
1 |
logparser -i:evt -resolveSIDs:on -o:sql -server:localhost\sqlsrv2012 -database:AdventureWorks2012 -driver:"sql server" "select extract_token(EventTypeName, 0, ' ') as TypeEvent, to_date(TimeGenerated) as DateGenerated, SID as SecurityID into ScmEvents from system where SourceName = 'Service Control Manager' and SID is not null" |
Notice that I first modified the -o argument to use the sql output format. I follow this with several parameters specific to that output format. The first is -server, which points to the SqlSrv2012 instance on my local system. Next, I use the -database argument to specify the AdventureWorks2012 database and then use the -driver argument to specify SQL Server. However, SQL Server is the default driver for the sql output format, so you can omit this parameter if you want. I then updated the query’s INTO clause so it points to the ScmEvents table.
Now when we run the command, the command prompt window displays only the number of source elements, the number of elements sent to SQL Server, and the time it took to run the query, as shown in Figure 9.
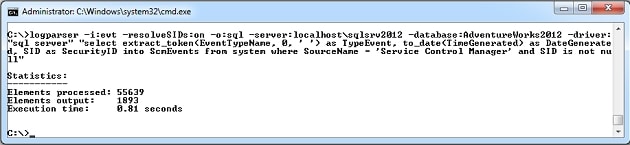
Figure 9: Inserting event data into a SQL Server database
To view the actual returned data, we must query the table within SQL Server. Figure 10 shows part of the results returned from running a query in SQL Server Management Studio (SSMS) that retrieved all rows and columns from the ScmEvents table.
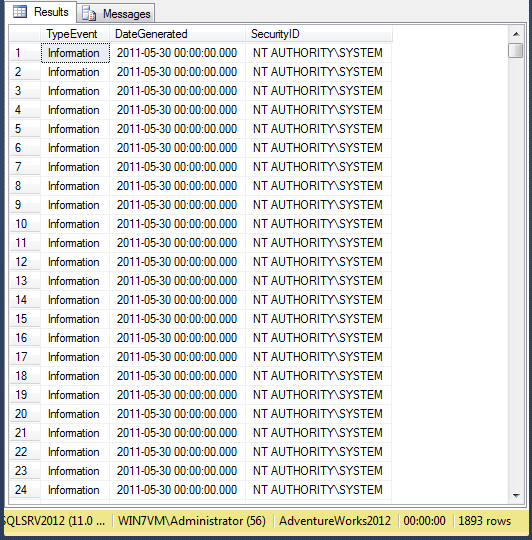
Figure 10: Viewing the data saved to the SQL Server database
If we were to rerun the command in the previous example, it would continue to add rows to the table, which in some cases might be fine. However, there might also be times when you want to delete the data in the target table before inserting the new information. To do so, you can use the -clearTable parameter with the sql output format, as shown in the following example:
|
1 |
logparser -i:evt -resolveSIDs:on -o:sql -server:localhost\sqlsrv2012 -database:AdventureWorks2012 -driver:"sql server" -clearTable:on "select extract_token(EventTypeName, 0, ' ') as TypeEvent, to_date(TimeGenerated) as DateGenerated, SID as SecurityID into ScmEvents from system where SourceName = 'Service Control Manager' and SID is not null" |
By default, the -clearTable parameter is set to off. In our example, we’ve switched it to on. Now when we run the command, the data is first deleted from the table and then the new data is inserted. Be aware, however, that using the -clearTable parameter is comparable to running a DELETE statement against the table. You might find it more efficient to run a TRUNCATE statement against the table from within SQL Server, especially against a large table in a production database.
For the most part, when you insert Log Parser data into a SQL Server table, the number and position of fields must match the target table, as was the case in the preceding two examples. However, there is one exception to the rule. If the target table includes a column configured with the IDENTITY property, you can specify that no data be inserted into that column. Let’s re-create our target table to demonstrate how this works. The following T-SQL again creates the ScmEvents table, but this time includes the EventID column, which is configured with the IDENTITY property:
|
1 2 3 4 5 6 7 8 9 10 11 12 13 |
USE AdventureWorks2012; GO IF OBJECT_ID('ScmEvents','U')IS NOT NULL DROP TABLEScmEvents; GO CREATETABLE dbo.ScmEvents ( EventIDint primarykey identity, TypeEventvarchar(25) NOT NULL, DateGenerateddatetime NOT NULL, SecurityIDvarchar(50) NULL ); GO |
When using Log Parser to insert data into a table with an IDENTITY column, we can use the -ignoreIdCols parameter with the sql output format to prevent the utility from trying to insert data into that column. The following example includes the -ignoreIdCols parameter with it set to on:
|
1 |
logparser -i:evt -resolveSIDs:on -o:sql -server:localhost\sqlsrv2012 -database:AdventureWorks2012 -driver:"sql server" -clearTable:on -ignoreIdCols:on "select extract_token(EventTypeName, 0, ' ') as TypeEvent, to_date(TimeGenerated) as DateGenerated, SID as SecurityID into ScmEvents from system where SourceName = 'Service Control Manager' and SID is not null" |
If you were to now query the table in SSMS, you would discover that the IDENTITY values have been added automatically and the rest of the values came from the System event log, as shown in Figure 11.
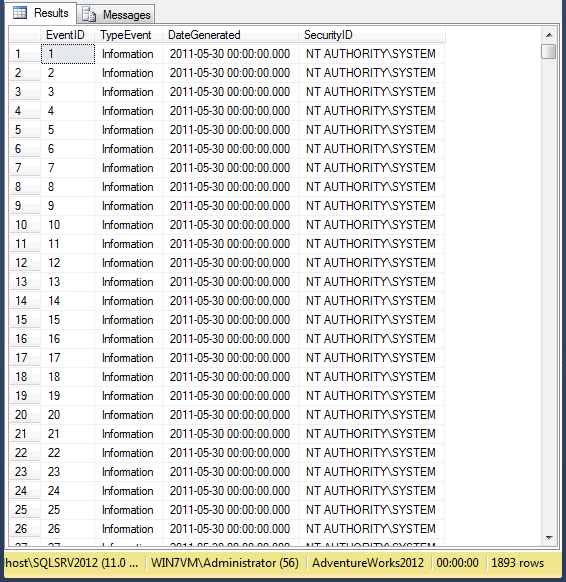
Figure 11: Inserting data into a table with an identity column
At times, you might want to insert data into a SQL Server database without having to first create the table. Log Parser will create the table for you. For example, suppose that we drop the ScmEvents table or have never created it. We can then add the -createTable parameter to the sql output format to specify that the table be created automatically, as shown in the following example:
|
1 |
logparser -i:evt -resolveSIDs:on -o:sql -server:localhost\sqlsrv2012 -database:AdventureWorks2012 -driver:"sql server" -clearTable:on -createTable:on "select extract_token(EventTypeName, 0, ' ') as TypeEvent, to_date(TimeGenerated) as DateGenerated, SID as SecurityID into ScmEvents from system where SourceName = 'Service Control Manager' and SID is not null" |
When you run the command, Log Parser will create the table in the target database if the table does not already exist. However, if you were to run this command without including the -createTable parameter and the table did not exist, Log Parser would return an error.
One other note about Log Parser. When your SQL query becomes too unwieldy, you can put the SQL in a separate file and call that file from your Log Parser command. For example, suppose we save the query in the previous example to the file C:\DataFiles\EvtQuery.sql, as shown in Figure 12.
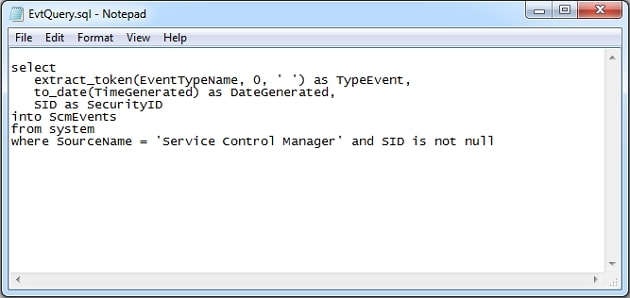
Figure 12: Creating a text file that contains the SQL query
When creating the file for the query, you’ll likely want to use a text editor such as Notepad because SSMS will show syntax errors in the code.
Once we’ve created the file for our query, we can modify our command as follows:
|
1 |
logparser -i:evt -resolveSIDs:on -o:sql -server:localhost\sqlsrv2012 -database:AdventureWorks2012 -driver:"sql server" -clearTable:on -createTable:on file:c:\datafiles\evtquery.sql |
As you can see, we’ve merely replaced the query with the file option, pointing to our new .sql file. Otherwise, everything else about our command is the same.
Working with Log Parser
The examples I’ve shown you in this article have all retrieved data from the System event log, but you’re certainly not limited to that log. You can retrieve data from other event logs, multiple logs, and a variety of other sources, such as Active Directory, the registry, IIS logs, text files, or information about the file directory itself. Log Parser is a flexible and powerful tool that can be useful in a variety of circumstances. And because of the utility’s “SQL-like” logic, most of the data you can retrieve through Log Parser can be saved to a SQL Server database. If you can write a T-SQL SELECT statement, you can use Log Parser to store all sorts of information in your SQL Server databases.
This document contains proprietary information and is protected by copyright law.
Copyright © 2026 Red Gate Software Limited. All rights reserved


Load comments