
Brad McGehee’s “How to Become an Exceptional DBA” is one of the more well-thumbed books in my library, right next to Kalen Delaney’s “Inside SQL Server 2000”. Brad’s book is an excellent example of recommended reading for changing the way you think and work. I admit that, the first time I read it, I thought many of Brad’s suggestions were, quite frankly, utopian. But it turns out that the ‘utopia’ is actually a realizable goal.
Like many of us, I have been guilty of not seeing beyond the little world of my immediate professional actions, and of being confident that nothing beyond those actions was needed for me to do my job well. With hindsight, I will say that every word Brad writes his sensational handbook is perfectly applicable to any organization, be it small or large. What makes a difference is the scale of your thinking: Big or Small.
Brad’s lessons influenced me so much that, when I learned what little I know of PowerShell, I decided to turn his DBA checklists into PowerShell scripts, and I’d like to share some of these scripts (which I use daily) with you. To make sure this is not tiresome reading, I’ve divided my scripts into 3 parts, and the first is: Check/Fix the Orphan Users.
I actually decided to start with this example because it was an almost daily procedure for me (due to the circumstances at the time), and it took a considerable amount of time. As we are lovers of PowerShell, I also want to share with you how this fantastic shell solved my problem with a uniform, repeatable and consistent solution. We’ll cover more usual situations in the future articles in this little series
A Little Background
John IDontKnow, Robert IDontknowEither and You work as DBAs for a major data center in 3 daily shifts, of which yours is from 7:00 AM to 16:00 PM. All three of you have sufficient autonomy to do what you need, and you are responsible for the center’s top client, who has a complex evolving OLTP and OLAP infrastructure, and a ton of SQL Servers.
You have a large security issue that affects your work: For contractual reasons, some of your client’s employees have access to production servers, and for their own internal reasons they drop logins almost daily. And just for fun, some logins are recreated again at later dates, but not with the same SID, making them Orphan Users. As a result, one of your main routines in the morning (and it takes a reasonable amount of time) is to check for these orphaned users.
Your manager, a senior DBA in the company (*gasp* a tech-savvy manager) asks you to search for all the orphaned users in the environment in order to implement an appropriate security policy and send it to the client. “At last!” you happily respond, “OK, I’ll do it today“. Surely it would have been better to have answered: “If you want to see that data now, I have a process that runs every night looking for orphaned users, logging the data in a table” After all, you are an Exceptional DBA and you use PowerShell.
Check/Fix the Orphan Users
In this script, we will work with PowerShell 2.0 and error handling (in case the SQL Servers are offline or some other problem occurs), and we will also be using a function module (.psm1) to contain the functions that we’ll use in our scripts and make them easily available; It contains:
Save-MSSQLMsg : This function generates a log file for scripts (Success, error , or simply an information message)
Map-MSSQLUser This function maps the user with their Login – It only maps Users and Logins with the same name.
Drop-MSSQLUser This function drops any users who don’t have a Login (it checks for Logins and Users with the same name, again)
Get-MSSQLUser This function Returns all an object with information about users :
        LineNumber, Date, ServerName, DatabaseName, UserName, CreateDate,

        DateLastModified, AsymMetricKey, DefaultSchema, HasDBAccess,ID, LoginType, Login,

        Orphan, LoginExists
The first thing to do is create the two folders for the server list file and the ps1 script files (and function.psm1 module) respectively. In this case:
- The servers list file is stored in C:\PS\servers\
- The log file is created in C:\TEMP, which is the default path from the Save-MSSQLMsg function. As this path is passed as a parameter, you can very simply change this to put in a new path where the function is called
- And ps1 scripts (and function.psm1 module) are in C:\PS\PSScripts
The flat file containing the list of servers will have to contain all SQL Servers in your environment, and if you have more than one instance that you want to monitor, each instance must also be listed. It should looks like this:
Server1

        Server2

        Server3\Instance1

        Server3\Instance2
If you do not have SQL Server 2008 but still want to use the 2008 PowerShell Provider, then Tim Benninghoff has an excellent guide on how to make that possible. However, you will have take ‘Profiles’ into account if that is the case.
PowerShell Profiles
When you add aliases, functions, and variables, you are actually adding them only to the current Windows PowerShell session. If you exit the session or close Windows PowerShell, the changes are lost. To retain these changes, you can create a Windows PowerShell profile and add the aliases, functions, and variables to the profiles. The profile is loaded every time that Windows PowerShell starts.” Windows PowerShell Profiles.
So how are we going to use a CmdExec job with the invoke-cmd cmdlet when the SQL Server 2008 Provider isn’t installed? Simply adjust all user profiles to load the appropriate Snapin and provider from SQL Server 2008, and avoid the problem. We also load our function module (.psm1) into the profile So that all the required functions will be available when we start the Shell.To do that, open this file (or create it if it doesn’t already exist): %windir%\system32\WindowsPowerShell\v1.0\Microsoft.PowerShell_profile.ps1 …and type:
|
1 2 3 4 5 6 7 |
if (!(Get-PSSnapin -registered | ?{$_.name -eq 'SqlServerProviderSnapin100'})) { add-pssnapin SqlServerProviderSnapin100 add-pssnapin SqlServerCmdletSnapin100 } Import-Module -Name'C:\PS\PSScripts\Functions.psm1' -WarningAction SilentlyContinue -ErrorAction Stop |
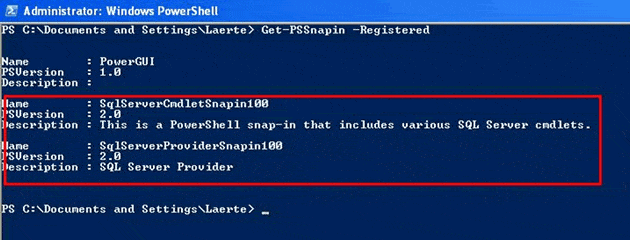
If you want to see the snap-ins registered, start a new PowerShell session, type:
|
1 |
Get-PSSnapin - Registered |
… And the SQL Server 2008 should be there, as shown below :
We can see our functions module in the same way; just type:
|
1 |
Get-Module |
And you should see this:

Now all shells and users will be able to use the SQL Server snap-in and our functions.
The Scripts
With that done, lets actually create that function script module (functions.psm1) that will do the work of generating logs and mapping or dropping logins.
|
1 2 3 4 5 6 7 8 9 10 11 12 13 14 15 16 17 18 19 20 21 22 23 24 25 26 27 28 29 30 31 32 33 34 35 36 37 38 39 40 41 42 43 44 45 46 47 48 49 50 51 52 53 54 55 56 57 58 59 60 61 62 63 64 65 66 67 68 69 70 71 72 73 74 75 76 77 78 79 80 81 82 83 84 85 86 87 88 89 90 91 92 93 94 95 96 97 98 99 100 101 102 103 104 105 106 107 108 109 110 111 112 113 114 115 116 117 118 119 120 121 122 123 124 125 126 127 128 129 130 131 132 133 134 135 136 137 138 139 140 141 142 143 144 145 146 147 148 149 150 151 152 153 154 155 156 157 158 159 160 161 162 163 164 165 166 167 168 169 170 171 172 173 174 175 176 177 178 179 180 181 182 183 184 185 186 187 188 189 190 191 192 193 194 195 196 197 198 199 200 201 202 203 204 205 206 207 208 209 210 211 212 213 214 215 216 217 218 219 220 221 222 223 224 225 226 227 228 229 230 231 232 233 234 235 236 237 238 239 240 241 242 243 244 245 246 247 248 249 250 251 252 253 254 255 256 257 258 259 260 261 262 263 264 265 266 267 268 269 270 271 272 273 274 275 |
Function Save-MSSQLMsg () <# ---------------------------------------------------------- Save log in file ---------------------------------------------------------- Requires POWERSHELL 2.0 File Name = $NamePS1 Server name = $Server DatabaseName = $databasename Message To Log = $Message Path to generate file = $PathFileLog Default = C:\temp Date to Log = $TodayDate #> { [CmdletBinding()] Param ( [Parameter(position=1,Mandatory = $true )][String] $NamePS1, [Parameter(position=2,Mandatory = $true )][String] $Server, [Parameter(position=3,Mandatory = $false )][String] $DatabaseName = "", [Parameter(position=4,Mandatory = $false )][String] $Message = "" , [Parameter(position=5,Mandatory = $false )][String] $PathFileLog = "C:\temp", [Parameter(position=6,Mandatory = $false )][String] $TodayDate = (Get-Date -Format "yyyyMMddhhmmss") ) process { #test if path wich will contains the error file exists. if not create if (!(Test-Path -path $PathFileLog)) { try { New-Item $PathFileLog -itemtype directory -ErrorAction Stop | Out-Null } catch { Write-Host "Can not create log file path" break; } } $NameFileFull = $PathFileLog + "\" + $NamePS1 + $TodayDate + ".log" $TDate = $TodayDate.Substring(0,4) + "-" + $TodayDate.Substring(4,2) + "-" + $TodayDate.Substring(6,2) "Server : " + $Server + " Database : " + $DatabaseName + " Date : " + $TDate + " Message: " + $Message | Out-file $NameFileFull -append } } Function Map-MSSQLUser() { <# ---------------------------------------------------------- Map USer and Logins ---------------------------------------------------------- Requires POWERSHELL 2.0 Server Name = $Server Database Name = $Database USer Name = $USer #> [CmdletBinding()] Param ( [Parameter(Mandatory = $true )][string] $Server, [Parameter(Mandatory = $true )][String] $Database, [Parameter(Mandatory = $true )][String] $USer ) process { $SqlConn = New-Object System.Data.SqlClient.SqlConnection $SqlCmd = New-Object System.Data.SqlClient.SqlCommand try{ $SqlConn.ConnectionString = "Server=" + $Server+ ";Database=" + $Database + ";Integrated Security=True" $sqlconn.Open() $SqlCmd.Connection = $SqlConn $SqlCmd.CommandText = "ALTER USER " + $USer + " WITH LOGIN = " + $USer $SqlCmd.ExecuteNonQuery() } catch { $msg = $error[0] Write-Warning $msg Save-MSSQLMsg "Map-MSSQLUser" "$svr" "$Database" "$msg" } finally { $SqlConn.Close() } } } Function Drop-MSSQLUser () { <# ---------------------------------------------------------- Drop USer without Login ---------------------------------------------------------- Requires POWERSHELL 2.0 Server Name = $Server Database Name = $Database USer Name = $USer #> [CmdletBinding()] Param ( [Parameter(Mandatory = $true )][string] $Server, [Parameter(Mandatory = $true )][String] $Database, [Parameter(Mandatory = $true )][String] $USer ) process { $SqlConn = New-Object System.Data.SqlClient.SqlConnection $SqlCmd = New-Object System.Data.SqlClient.SqlCommand try{ $SqlConn.ConnectionString = "Server=" + $Server+ ";Database=" + $Database + ";Integrated Security=True" $sqlconn.Open() $SqlCmd.Connection = $SqlConn $SqlCmd.CommandText = "Drop USER " + $USer $SqlCmd.ExecuteNonQuery() } catch { $msg = $error[0] Write-Warning $msg Save-MSSQLMsg "Drop-MSSQLUser" "$svr" "$Database" "$msg" } finally { $SqlConn.Close() } } } Function Get-MSSQLUser() { <# TXTServersList = File List (.txt) with the servers. Default is the current server #> [CmdletBinding()] PARAM( [Parameter(position=1,Mandatory=$false, ValueFromPipelineByPropertyName=$true, HelpMessage="File Servers List")] [Alias("FullNameTXT")] [String] $TXTServersList = $env:COMPUTERNAME ) begin { $verbosePreference="continue" [reflection.assembly]::LoadWithPartialName("Microsoft.SqlServer.Smo") | out-null } process { try { if ($TXTServersList.substring($TXTServersList.length -4,4) -eq ".TXT") { try { $ServersList = get-content $TXTServersList } catch { $msg = $error[0] Write-Warning $msg break; } } else { $ServersList = $TXTServersList } $LineNumber = 1 $FinalResult = @() foreach ($svr in $ServersList ) { try { $Server=New-Object "Microsoft.SqlServer.Management.Smo.Server" "$svr" $Server.Databases | where-object {$_.IsSystemObject -eq $FALSE -and $_.IsAccessible -eq $TRUE } | foreach { $Database = $_.name foreach ($user in $Server.Databases[$_.name].users ) { $Object = New-Object PSObject [datetime] $CreateDate = "{0:yyyy/MM/dd hh:mm:ss}" -f [datetime] $user.CreateDate if ($user.DateLastModified -ne $null) { [datetime] $DateLastModified = "{0:yyyy/MM/dd hh:mm:ss}" -f [datetime] $user.DateLastModified } $Object | add-member Noteproperty LineNumber $LineNumber $Object | add-member Noteproperty Date $TodayDate $Object | add-member Noteproperty ServerName $svr $Object | add-member Noteproperty DatabaseName $Database $Object | add-member Noteproperty UserName $user.name $Object | add-member Noteproperty CreateDate $CreateDate $Object | add-member Noteproperty DateLastModified $DateLastModified $Object | add-member Noteproperty AsymMetricKey $user.AsymMetricKey $Object | add-member Noteproperty DefaultSchema $user.DefaultSchema $Object | add-member Noteproperty HasDBAccess $user.HasDBAccess $Object | add-member Noteproperty ID $user.ID $Object | add-member Noteproperty LoginType $user.LoginType $Object | add-member Noteproperty Login $user.Login $Object | add-member Noteproperty Orphan ($user.Login -eq "") $ExistLogin = $Server.logins | where-object {$_.isdisabled -eq $False -and $_.IsSystemObject -eq $False -and $_.IsLocked -eq $False -and $_.name -eq $user.name } if (!$ExistLogin) { $Object | add-member Noteproperty LoginExists $False } else { $Object | add-member Noteproperty LoginExists $True } $FinalResult += $Object $LineNumber ++ } } } catch { $msg = $error[0] Write-Warning $msg Save-MSSQLMsg "Get-MSSQLUser" "$svr" "$Database" "$msg" } Finally { continue } } Write-Output $FinalResult }catch { $msg = $error[0] Write-Warning $msg Save-MSSQLMsg "Get-MSSQLUser" "" "$Database" "$msg" } } } |
This is saved in the Windows PowerShell Script Module format file (.psm1) under the file path for all of our scripts (C:\PS\PSScripts\Functions.psm1) . Some sample commands you could pass to this module include:
|
1 2 3 4 5 |
#Return All Users (current server - we do not pass .txt) and all Properties Get-MSSQLUser #Return All Users and all Properties by .txt Get-MSSQLUser C:\PS\servers\servers.txt |
Now it’s time to look for those Orphaned Users.
How to Return Orphaned Users
The Orphan property tells us if a given user has a associated Login. If not, it’s a orphaned user – it’s that simple. We use it in conjunction with the hasdbaccess property too, to list only users with access to the database in question.
|
1 2 3 4 5 6 7 8 |
#Return All Orphaned Users By .txt Get-MSSQLUser C:\PS\servers\servers.txt | Where-Object {$_.orphan -eq $true -and $_.hasdbaccess -eq $true } | format-table Date,ServerName,DatabaseName,UserName,Login,Orphan,LoginExists #Return All Orphaned Users current server Get-MSSQLUser | Where-Object {$_.orphan -eq $true -and $_.hasdbaccess -eq $true } | format-table Date,ServerName,DatabaseName,UserName,Login,Orphan,LoginExists |
We can also list all users who are orphaned but share their name with a Server Login; we just need to add the LoginExists property to the conditions.
|
1 2 3 4 |
#Return All Orphaned Users By .txt Get-MSSQLUser C:\PS\servers\servers.txt | Where-Object {$_.orphan -eq $true -and $_.hasdbaccess -eq $true -and $_.LoginExists -eq $true } | format-table Date,ServerName,DatabaseName,UserName,Login,Orphan,LoginExists |
Any users this returns just need to be mapped with their logins.
What about outputting this data to a SQL Server table?<
First, create the necessary tblOrphanedUsers table in the data repository…
|
1 2 |
CREATE TABLE tblOrphanedUsers ( Users XMLCol ) |
And then run this:
|
1 2 3 4 5 6 |
(Get-MSSQLUser | Where-Object {$_.orphan -eq $true -and $_.LoginExists -eq $true} | select Date,ServerName,DatabaseName,UserName,Login,Orphan,LoginExists | ConvertTo-Xml -NoTypeInformation).save("c:\temp\Users.xml") $XML = (Get-Content c:\temp\users.xml ) -replace "'", "''" $SQL = "insert into tblOrphanedUsers (XMLCol) values ('$XML')" invoke-sqlcmd -ServerInstance $env:COMPUTERNAME -database "tempdb" -query $sql |
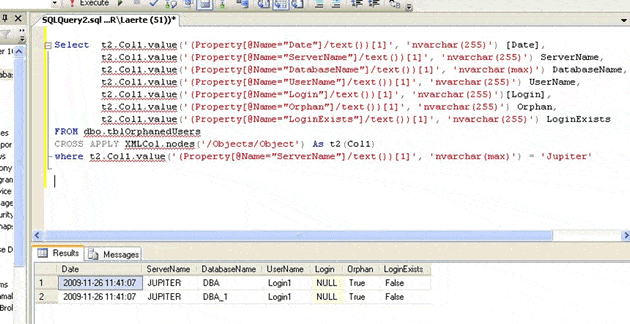
You can choose the properties, path and name of your XML File, and obviously you server and database repositories ( -ServerInstance and -database). But you want to get this information in a SQL table, yes? No problem, It’s a simple Xquery, and you can see the results below:
|
1 2 3 4 5 6 7 8 9 10 11 12 13 14 15 16 |
SELECT t2.Col1.value('(Property[@Name="Date"]/text())[1]', 'nvarchar(255)') [Date], t2.Col1.value('(Property[@Name="ServerName"]/text())[1]', 'nvarchar(255)') ServerName, t2.Col1.value('(Property[@Name="DatabaseName"]/text())[1]', 'nvarchar(max)') DatabaseName, t2.Col1.value('(Property[@Name="UserName"]/text())[1]', 'nvarchar(255)') UserName, t2.Col1.value('(Property[@Name="Login"]/text())[1]', 'nvarchar(255)') [Login], t2.Col1.value('(Property[@Name="Orphan"]/text())[1]', 'nvarchar(255)') Orphan, t2.Col1.value('(Property[@Name="LoginExists"]/text())[1]', 'nvarchar(255)' ) LoginExists FROM dbo.tblOrphanedUsers CROSS APPLY XMLCol.nodes('/Objects/Object') AS t2(Col1) WHERE t2.Col1.value('(Property[@Name="ServerName"]/text())[1]', 'nvarchar(max)') = 'Jupiter' |
How to Fix Orphaned Users with PowerShell
In this case, we can fix these orphaned users in two ways. One is by mapping them to their Login (which has the same name) and another is by dropping the users who don’t share their names with a Login. Let’s take a look at these processes now.
Mapping Users with their Login
Nothing could be simpler. First, filter the objects by the orphan and LoginExists properties (the latter being ‘true’), and then call the Map-MSSQLUser function:
|
1 2 3 4 5 |
#Mapping USers with Logins foreach ($user in Get-MSSQLUser c:\PS\Servers\servers.txt | Where-Object {$_.orphan -eq $true -and $_.LoginExists -eq $true} ) { Map-MSSQLUser $user.ServerName $user.DatabaseName $user.UserName } |
Dropping users without a Login
This is just as simple to do as the mapping; we just change the LoginExists filter to ‘false’, and the call the Drop-MSSQLUser function from our PowerShell module:
|
1 2 3 4 5 |
#Dropping users without login foreach ($change in Get-MSSQLUser c:\PS\Servers\servers.txt | Where-Object {$_.orphan -eq $true -and $_.LoginExists -eq $false} ) { Drop-MSSQLUser $change.ServerName $change.DatabaseName $change.UserName } |
Bear in mind that if we omit the server path in the Get-MSSQLUser function call, the current server is used.
As I said earlier, for the purposes of keeping track of what’s going on, the Save-MSSQLMsg () function generates a log file of errors ,successes and even just status messages in the $PathLogFile folder (in this case we use default value c:\temp). To identify each log, it uses the name of the running script (passed as a parameter) plus the date and time, as the figure below shows:
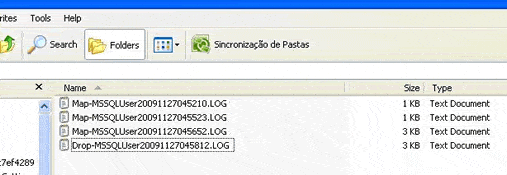
This will make tracking down the details for any particular scheduled job incredibly easy, and as you can see, the log contents themselves are fairly well formatted:

Scheduling the Check.
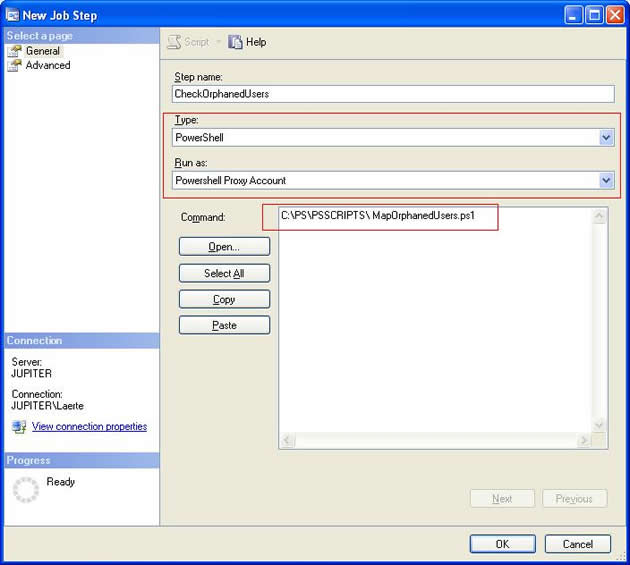
When scheduling, we can simply take the examples of mapping and dropping users above, save them into .ps1 file and run it. Let’s say we save script to Map users (as seen above) into a file called MapOrphanedUsers.ps1 . If you are using SQL Server 2008, you would just need to then create a PowerShell Job and run the .Ps1 script by entering the storage path of your scripts into the ‘command’ field:
|
1 |
c:\ps\psscripts\MapOrphanedUsers.ps1 |
Alternatively, you can run the script with a cmdexec-type job, ensuring the command field contains:
|
1 |
powershell -noprofile -Noninteractive -command c:\ps\psscripts\OrphanedUsers.ps1 |
After that, you just need to schedule the job, and you’re finished! Clearly, this is a very particular case where others users can drop logins behind your back, but let’s go to a more normal scenario:
Mapping Users after Restore
In this Datacenter, You have a Job that runs every Sunday and restores the production Databases to a development environment. So in this case, your production server X restores N databases to the development server D1, the production server Y restore N databases for development D2… Etc.
So , to make sure you can chose which file list the servers will be passing as parameters in your powershell script, you configure a flat ServersRestore.txt file especially for this scenario, and it looks like this :
|
1 |
Earth, DB1, DB2, DB3 Earth\Instance1. DB7, DB8 Sun, DB3, DB2, DB4 |
The list format is, fairly obviously, Server Instance followed by individual databases to be restored, all separated by commas. With that done, you configure one last job to run at 6:00 AM (after all the other restore jobs have finished) to fix the inevitable orphaned users in all the servers and databases listed in ServersRestore.txt. In this script, we load this flat file of servers and databases to check, and then the process proceeds in a very similar way to what I’ve outlined above.
The Orphan property tells us the relevant status of a user and LoginExists will let us decide which action needs to be taken; if LoginExists is false, we drop this user, and if it’s True we map them.
|
1 2 3 4 5 6 7 8 9 10 11 12 13 14 15 16 17 18 19 20 21 22 23 24 25 |
foreach($ServerList in Get-Content c:\TEMP\ServersRestore.txt) { [array]$ServerDBList = $ServerList.split(",") $TotalServerDBList = ($ServerDBList.count) -1 $ServerName = $serverdblist[0] for ($Count = 1;$Count -le $TotalServerDBList;$Count++) { $DatabaseName =$serverdblist[$count] foreach ($Db in Get-MSSQLUser | Where-Object {$_.orphan -eq $true -and $_.servername -eq $ServeraName -and $_.Databasename -eq $DatabaseName }) { if ($_.LoginExists -eq $false) { Drop-MSSQLUser $Db.ServerName $Db.DatabaseName $db.username } else { Map-MSSQLUser $Db.ServerName $Db.DatabaseName $db.username } } } } |
(This script as available for download at the top of this article.)
If you want to log all the completed transactions, you just need to add the Save-MSSQLMsg function after each action (drop or map), and then if some problem occurs when trying to Map or Drop, the error message is already logged and ready for inspection.
You can easily apply these functions to all databases in your environment, too. “Why would I want to do that?”, you ask. How about a migration of servers using backup and restore? Regardless of when and where you use these scripts, they can be scheduled in exactly the same way as I demonstrated earlier.
That’s everything for this first part of my script-sharing, and this is how I check and fix orphaned users. You can find a complete set of example scripts available for download at the top right of this article. Later on I will be showing you more daily checks, making you an Exceptional DBA, and using PowerShell.


Load comments