
The series so far:
- Creating Calculated Columns Using DAX
- Creating Measures Using DAX
- Using the DAX Calculate and Values Functions
- Using the FILTER Function in DAX
- Cracking DAX – the EARLIER and RANKX Functions
- Using Calendars and Dates in Power BI
- Creating Time-Intelligence Functions in DAX
If you really want to impress people at DAX dinner parties (you know the sort: where people stand around discussing row and filter context over glasses of wine and vol-au-vents?), you’ll need to learn about the EARLIER function (and to a lesser extent about the RANKX function). This article explains what the EARLIER function is and also gives examples of how to use it. Above all, the article provides further insight into how row and filter context work and the difference between the two concepts.
Loading the Sample Data for this Article
As for the other articles in this series, the sample dataset consists of four simple tables which you can download from this Excel workbook:
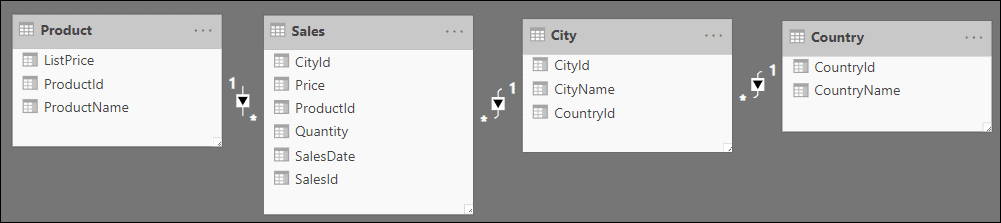
After importing the data, you should see this model diagram (I’ve used Power BI, but the formulae in this article would work equally well in PowerPivot or SSAS Tabular):
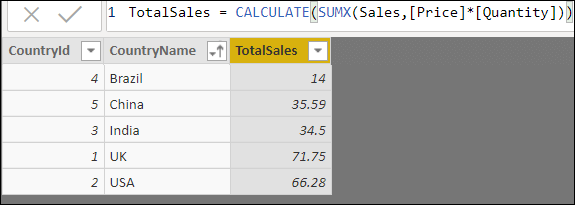
One more thing to do – add a calculated column to the country table, giving the total sales for each country:
|
1 |
TotalSales = CALCULATE(Sumx(Sales,[Price]*[Quantity])) |
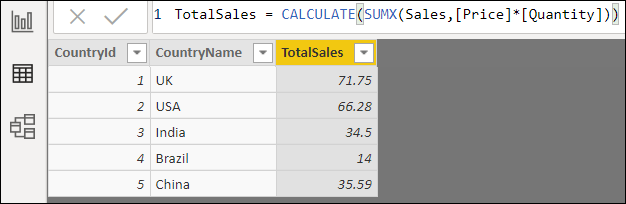
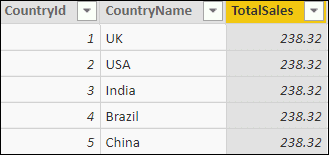
This formula iterates over the Sales table, calculating the sales for each row (the quantity of goods sold, multiplied by the price) and summing the figures obtained. The CALCULATE function is needed because you must create a filter context for each row so that you’re only considering sales for that country – without it, you would get this:
Example 1: Ranking the Countries
The first use case is very simple. The aim is to rank the countries by the total sales for each:
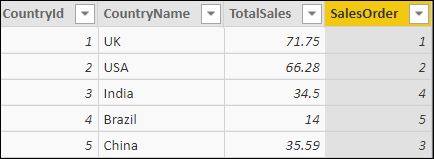
DAX doesn’t have an equivalent of the SQL ORDER BY clause, but you can rank data either by using the RANKX function (covered later in this article) or by using the EARLIER function creatively. Here’s what the function needs to do, using country number 3 – India – as an example. Firstly, it creates a row context for this row:
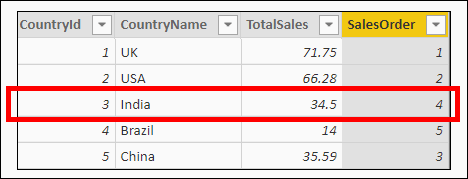
The sales for India are 34.5. What it now must do is to count how many rows there are in the table which have countries whose sales are greater than or equal to India’s sales:
This shows the filtered table of countries, including only those whose sales are at least equal to India’s. There are four rows in this filtered table.
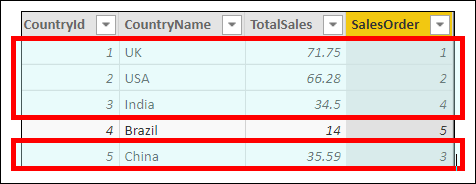
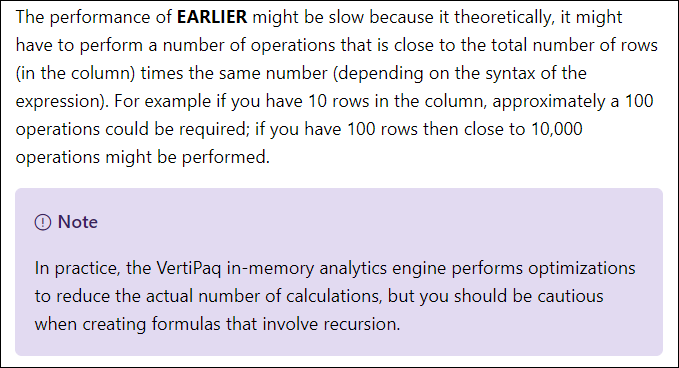
If you perform the same calculations for each of the other countries in the table, you’ll get the ranking order for each (that is, the number of countries whose sales match or exceed each country’s). For those who know SQL, this works in the same way as a correlated subquery. This would imply that it might run slowly, however, here’s what Microsoft have to say on the subject:
The problem: One Row Context Hides Another
Anyone who has driven much in France will have seen this sign at a level-crossing:

What it means is “one train can hide another” … and so it is with row contexts. The measure will open two row contexts, as the diagram below shows:
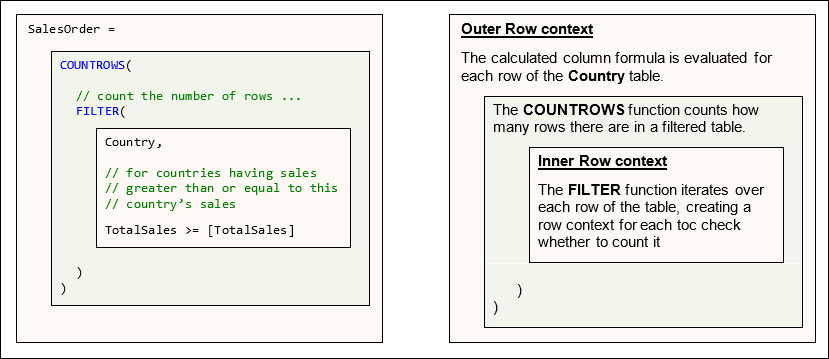
The problem is that when DAX gets to the inner row context for the FILTER function, it will no longer be able to see the outer row context (the country you’re currently considering) as this row context will be hidden unless you use the EARLIER function to refer to the first row context created in the formula.
What Would You Name this Function?
I’ve explained that the EARLIER function refers to the original row context created (nearly always for a calculated column). What would you have called this function? I’d be tempted by one of these names:
- OUTERROWCONTEXT
- PREVIOUSROWCONTEXT
- INITIALROWCONTEXT
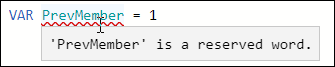
The multi-dimensional (cubes) version of Analysis Services gets it about right, using CURRENTMEMBER and PREVMEMBER depending on context. It’s interesting to see that you can’t use these words as names of variables in DAX as they are reserved words:
This is true even though they aren’t official DAX function names!
What I definitely wouldn’t use for the function name is something which implied the passage of time. To me, EARLIER means something which occurred chronologically before something else. I think this is one of the reasons it took me so long to understand the EARLIER function: it’s just got such an odd name.
The Final Formula Using EARLIER
Having got that off my chest, here’s the final formula:
|
1 2 3 4 5 6 |
SalesOrder = COUNTROWS( Filter( Country, [TotalSales] >= EARLIER([TotalSales]) ) ) |
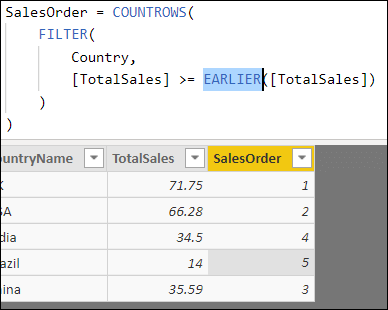
Here’s the English (!) translation of this …
“For each country in the countries table, create a row context (this happens automatically for any calculated column). For this row/country being considered, count the number of rows in a separate virtual copy of the table for which the total sales for the country are greater than or equal to the total sales for the country being considered in the original row context”.
What could possibly be confusing about that?
Other Forms of the EARLIER Function
Readers will be delighted to know that you don’t have to limit yourself to going back to the previous row context – you can specify how many previous row contexts to return to by varying the number used in the second argument to the EARLIER function:

You can even use the EARLIEST function to go to the earliest row context created for a formula. The formula could alternatively have been written like this:
|
1 2 3 4 5 6 |
SalesOrder = COUNTROWS( FILTER( Country, [TotalSales] >= EARLIEST([TotalSales]) ) ) |
I find it very hard to believe that anyone would need this function! It could only be useful where you:
- Create a row context (typically by creating a calculated column).
- Within this, create a filter context.
- Within this, create a row context (typically by using an iterator function like
FILTERorSUMX). - Within this, create another filter context.
- Within this, create a third-row context.
In this complicated case, the EARLIER function would refer to the row context created at step 3, but the EARLIEST function would refer to the original row context created at step 1.
Avoiding the EARLIER Function by Using Variables
One of the surprising things about the EARLIER function is that you often don’t need it. For this example, you could store the total sales for each country in a variable, and reference this instead. The calculated column would read instead:
|
1 2 3 4 5 6 7 8 9 10 11 |
Sales order using variables = // create a variable to hold each country's sales VAR TotalSalesThisCountry = [TotalSales] // now count how many countries have sales // which match or exceed this RETURN COUNTROWS( FILTER( Country, [TotalSales] >= TotalSalesThisCountry ) ) |
There’s not much doubt that this is easier to understand, but it won’t give you the same insight into how row context works!
Using the EARLIER function in a measure
The EARLIER function refers to the previous row context created in a DAX formula. But what happens if there isn’t a previous row context? This is why you will so rarely see the EARLIER function used in a measure. Here’s what you’ll get if you put the formula in a measure:

The yellow error message explains precisely what the problem is: measures use filter context, not row context, so no outer row context is created.
Example 2: Running Totals
Another common requirement is calculating the cumulative total sales for countries in alphabetical order:
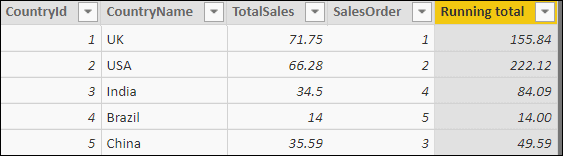
The above screenshot shows that this calculates the answer separately for each country, but it looks more sensible when you view it in alphabetical order by country name:
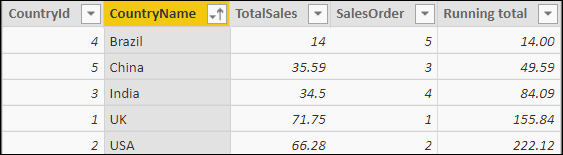
The formula for this column calculates for each country the total sales for all countries coming on or before it in alphabetical order:
|
1 2 3 4 5 6 7 |
Running total = SUMX( FILTER( Country, Country[CountryName] <= EARLIER(Country[CountryName]) ), [TotalSales] ) |
Again, you could have alternatively used a variable to hold each country’s name:
|
1 2 3 4 5 6 7 8 9 10 11 12 |
Running total using variables = // store this row's country name VAR ThisCountry = Country[CountryName] // return the sum of sales for all countries up to or // including this one RETURN SUMX( FILTER( Country, Country[CountryName] <= ThisCountry ), [TotalSales] ) |
Example 3: Group Totals
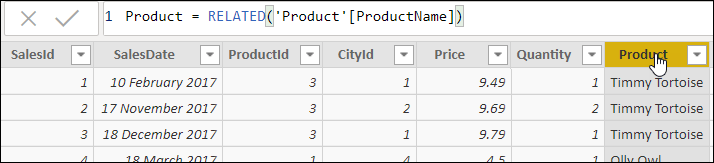
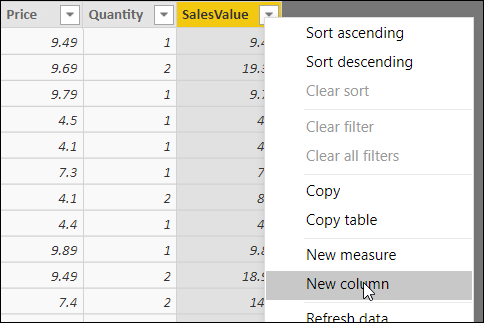
Here’s another use of the EARLIER function – to create group totals. To follow this example, first, add a calculated column in the Sales table to show the name of each product bought (you don’t have to do this, but it will make the example clearer if you use the product name rather than the product id to match sales rows to the product bought):
Product = RELATED(‘Product'[ProductName])
Here’s the column this should give:
You can now create a second calculated column:
|
1 2 3 4 5 6 7 8 9 |
Average product sales = AVERAGEX( // average over the table of sales records for the // same product as this one ... FILTER(Sales,[Product] = EARLIER(Sales[Product])), // ... the total value of the sale [Price]*[Quantity] ) |
Here’s what this will give for the first few roles in the SALES table. You may want to format the column as shown by modifying the decimal places on the Modeling tab.
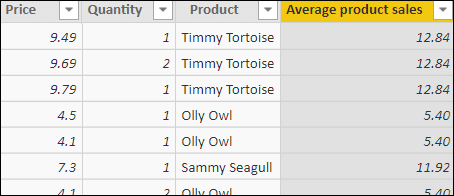
The group average for Olly Owl products is 5.40. For this example, for each sales row, the calculated column formula is averaging the value of all sales where the product matches the one for the current row.
Example 4: Creating Bands
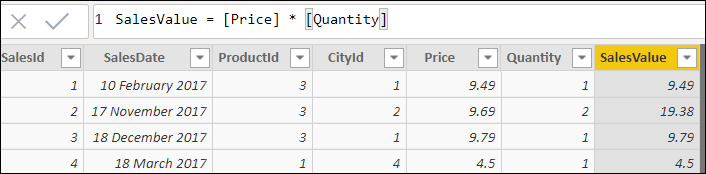
So far, you have seen three relatively simple uses of the EARLIER function – for the fourth example, I’ll demonstrate a more sophisticated one. Begin by adding a calculated column to the Sales table, giving the value of each transaction (which should equal the number of items bought, multiplied by the price paid for each):
It would be good to categorise the sales into different bands, to allow reporting on different customer bands separately. For example:
- Any purchase with value up to £10 is assigned to “Low value”
- Any purchase with value between £10 and £15 is assigned to “Medium value”
- Any purchase with value between £15 and £20 is “High value”
- Any purchase of more than £20 is “Premium customer”
One way to do this would be to create a calculated column using a SWITCH function like this:
|
1 2 3 4 5 6 7 8 9 10 11 12 |
Customer type = SWITCH( // try to find an expression which is true TRUE(), // first test - low value [SalesValue] <= 10, "Low value", // second test - medium value [SalesValue] <= 15, "Medium value", // third test - high value [SalesValue] <= 20, "High value", // otherwise, they are a premium customer "Premium customer" ) |
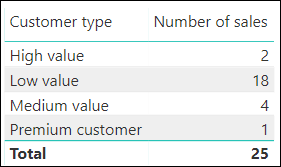
This would allow reporting on the different customer types (for example, using this table):
However, this hard-codes the thresholds into the calculated column. What would be much more helpful is if you could import the thresholds from another table, to make a dynamic system (similar to a lookup table in Excel, for those who know these things).
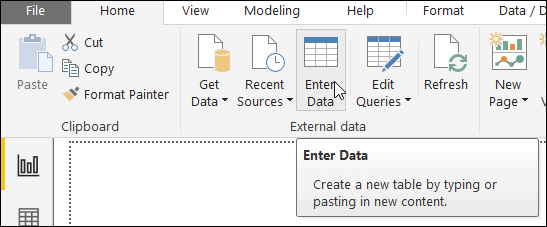
Creating the Table of Bands (Thresholds)
To create a suitable table, in Power BI Desktop choose to enter data in a new table (you could also type it into Excel and load the resulting workbook):
Type in the thresholds that you want to create, and give your table the name Categories:
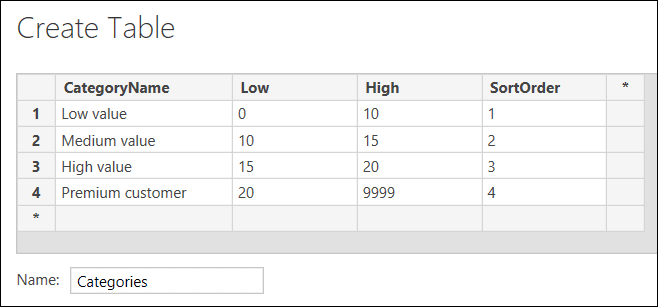
Note that in your model’s relationship diagram, you will now have a data island (a table not linked to any other). This is intentional:

Creating a Formula Assigning Each Sale Row to a Category
You can now go to the Sales table and create a calculated column assigning each row to the correct category:
For each row, what you want to do is find the set of rows in the Categories table where two conditions are true:
The lower band for the category is less than the sales for the row; and
The upper band for the category is greater than or equal to the sales for the row.
It should be reasonably obvious that this set of rows will always exist, and will always have exactly one row in it. Because of this, you can use the VALUES function to return the value of this single row, giving:
|
1 2 3 4 5 6 7 8 9 |
Category = CALCULATE( // return the only category which satisfies both of // the conditions given VALUES(Categories[CategoryName]), // this sales must be more than the lower band ... Categories[Low] < EARLIER(Sales[SalesValue]), // ... and less than or equal to the higher band Categories[High] >= EARLIER(Sales[SalesValue]) ) |
You might at this point wonder why you need the EARLIER function when you haven’t created a second row context. The answer is that the CALCULATE function creates a filter context, so you need to tell your formula to refer back to the original row context you first created in the formula.
Sorting the Categories
One problem remains: the categories aren’t in the right order (I’m well aware that one way to solve this would be to click on the column heading to change the sort order, but I’m after something more dynamic!):
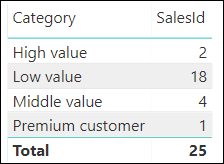
To get around this, it may at first appear that all you need to do is to designate a sort column:

You could do this by selecting the CategoryName column in the Categories table as above, and on the Modeling tab, setting this to be sorted by the SortOrder column. This looks promising – but doesn’t work (it actually creates an error if you’ve typed in the data for the categories table, which you’ll need to refresh your model to clear). The reason this doesn’t work is that the alternative sort column needs to be in the same table as the Category column.
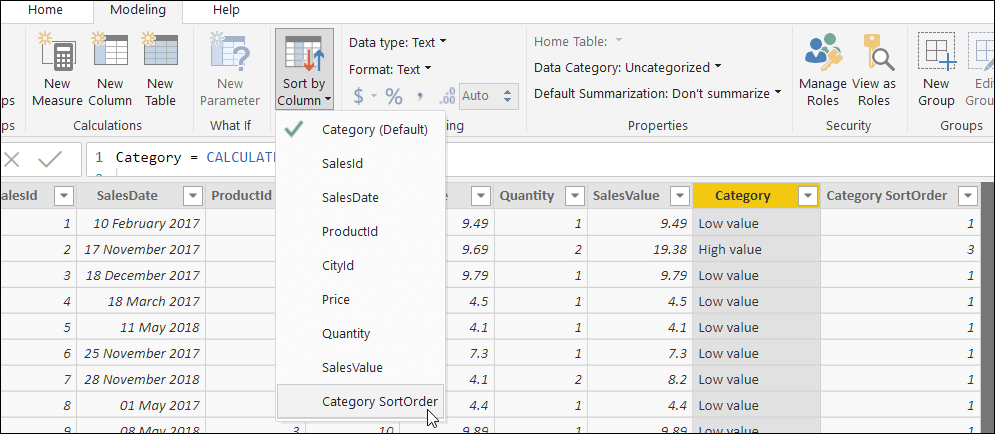
A solution is to create another calculated column in the Sales table:
|
1 2 3 4 5 6 7 8 |
Category SortOrder = CALCULATE( // return the sales order for the two conditons VALUES(Categories[SortOrder]), // this sales must be more than the lower band ... Categories[Low] < EARLIER(Sales[SalesValue]), // ... and less than or equal to the higher band Categories[High] >= EARLIER(Sales[SalesValue]) ) |
You now have two columns for each sale row – one giving the category, and one giving its corresponding sort order number. You can select the category column and choose to sort it using the sort order column instead (choosing the option shown below on the Power BI Modeling tab):
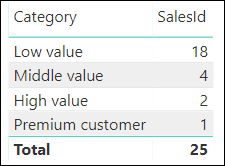
Bingo! The categories appear in the required order:
If after reading this far you’re still a bit fuzzy on the difference between row and filter context, practice makes perfect! I’ve found reading and re-reading articles like this helps, as each time you get closer to perfecting your understanding (for those in the UK, you could also consider booking onto one of Wise Owl’s Power BI courses).
Using the RANKX Function to Rank Data
Out of all the DAX functions, the one which trips me up most often is RANKX – which is odd, because what it does isn’t particularly complicated. Here’s the syntax of the function:

So the function ranks a table by a given expression. Here is what the arguments mean:
- The Table argument gives the table you’re ranking over.
- The Expression argument gives the expression you’re ranking by.
- The Order column allows you to switch between ascending and descending order.
- The Ties column lets you specify how you’ll deal with ties.
You’ll notice I’ve missed out the Value argument. This is for the good reason that it is a) bizarre and b) not useful. It allows you to rank by one expression, substituting in the value for another for each row in a table. If this sounds like a strange thing to want to do, then I’d agree with you.
To see how the RANKX function works, return to the Country table in which you created a calculated column at the beginning of this article:
Suppose you now want to order the countries by sales (clearly one way to do this would just be to click on the drop arrow next to the column and choose Sort ascending!). Here’s a calculated column which would do this:
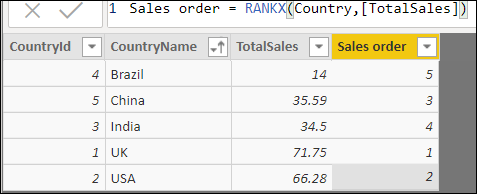
What you should notice is the unusual default ranking order: unlike in SQL (and many other languages), the default order is descending, not ascending. To reverse this, you could specify ASC as a value for the fourth Order argument:
|
1 2 3 4 5 6 7 8 9 10 11 12 13 14 |
Sales order = RANKX( // rank the rows in the country table ... Country, //... by the total sales column ... [TotalSales], // omitting the third argument , // and ranking in ascending order ASC ) |
So far, so straightforward!
Using RANKX in a Measure
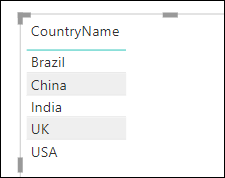
Where things get more complicated is when you use RANKX in a measure, rather than in a calculated column. Suppose that you have created a table visual like this in a Power BI report:
Suppose further that you want to create and display this measure to show the ranking order:
|
1 2 3 4 5 6 7 8 |
Sort order measure = RANKX( // order the countries by sales Country, SUMX( Sales, [Price]*[Quantity] ) ) |
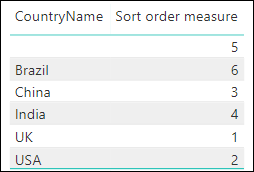
However, when you add this measure to your table, you get this:
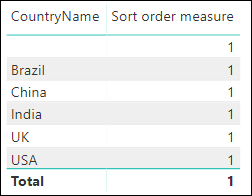
The reason for this is that Power BI evaluates the measure within the filter context of the table. So for the first row (Brazil), for example, here’s what Power BI does:
- Applies the filter context to the Country table to pick out just sales for Brazil
- Calculates the total sales for this country (14, as it happens)
- Returns the position of this figure within the table of all of the figures for the current filter context (so the returned number 1 means that 14 is the first item in a table containing the single value 14)
To get around this, you first need to remove filter context before calculating the ranking order, so that you rank the total sales for each country against all of the other country’s total sales:
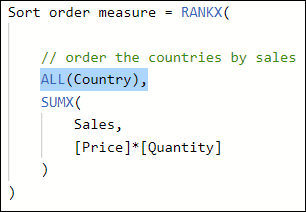
However, even this doesn’t solve the problem. The increasingly subtle problem is that the RANKX function – being an iterator function – creates a row context for each country, but then evaluates the sales to be the same for each country because it doesn’t create a filter context within this row context. To get around this, you need to add a CALCULATE function to perform context transition from row to filter context within the row context within the measure:
|
1 2 3 4 5 6 7 8 9 10 11 |
Sort order measure = RANKX( // order across ALL the countries ... ALL(Country), // by the total sales CALCULATE( SUMX( Sales, [Price]*[Quantity] ) ) ) |
This – finally – produces the correct ranking (note that there is a blank country at the top because some sales don’t have a matching country parent – although this isn’t important for this example):
It’s worth making two points about this. Firstly, this isn’t a formula you’ll often need to use; and secondly, this is about as complicated a DAX formula as you will ever see!
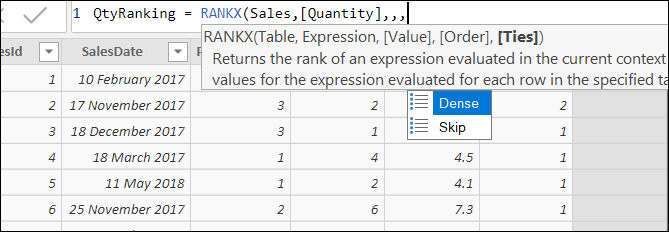
Dealing with Ties
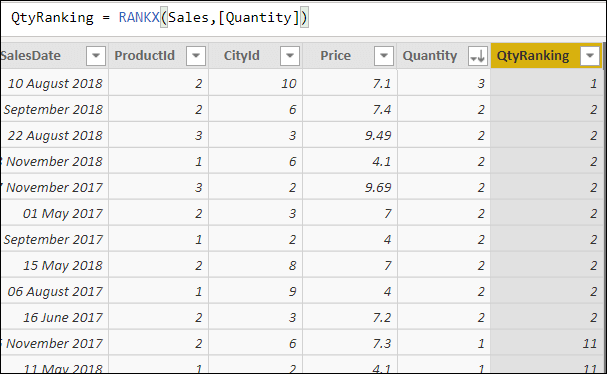
If your ranking produces ties, the default is to SKIP numbers, but you can also use the DENSE keyword to override this. To see what each keyword means, add this calculated column to the Sales table:
|
1 |
QtyRanking = RANKX(Sales,[Quantity]) |
What it will do is to order the sales rows by the quantity sold. Here’s what you’ll get if you use Skip, or omit the Ties keyword altogether:
Here, by contrast, is what you’ll get if you use Dense (I’m not quite sure why you’d ever want to do this):
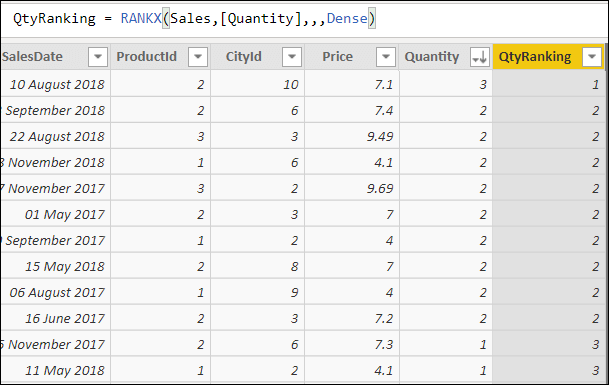
In the second screenshot, there are no gaps in the numbers.
Conclusion
You can apply the EARLIER function in various contexts to solve modelling problems in DAX, and it should be an essential part of every DAX programmer’s arsenal. The RANKX function, by contrast, solves a very specific problem – ranking data. What both functions have in common is that they are impossible to understand without a deep understanding of row and filter context, so if you’ve got this far, you can consider yourself a DAX guru!


Load comments