
One of the most effective ways to extend your SQL Server Integration Services (SSIS) control flow is to use a Script task to write custom code that perform tasks you cannot perform with the built-in components. For example, you can use the Script task to access Active Directory information or to create package-specific performance counters. You can also use the Script task to combine functions that might normally require multiple tasks and data flow components.
In this article, I demonstrate how to implement a Script task into the control flow of a basic SSIS package. The purpose of the package is to retrieve data from a comma-separated values (CSV) file, insert the data into a SQL Server table (though no data is actually loaded), and then delete the file. The package includes a Script task that will first determine if the file has been updated since the last data load and, if so, whether the file currently contains data. You can download the SSIS package file, along with the two data files (one with data, and one without) from the bottom of the article. You’ll have to rename the data file that you use to PersonData.CSV.
NOTE: The Script task is different from the Script component. The Script component can be used as a source, transformation, or destination to enhance the data flow, but it cannot be used in the control flow, just like the Script task is not available to the data flow. However, many of the basic concepts I cover in this article apply to the Script component.
Setting Up Your SSIS Package
Before adding the Script task to your SSIS package, you should add and configure any components that are necessary to support the task, such as variables, connections managers, and other tasks. For the example in this article, however, I created a CSV file named PersonData.csv before adding any components to the package. To make it simpler for you to create the file, I’m including the bcp command I used to generate the file on my system:
|
1 |
bcp "SELECT TOP 100 * FROM AdventureWorks2008R2.Person.Person ORDER BY BusinessEntityID" queryout C:\DataFiles\PersonData.csv -c -t, -S localhost\SqlSrv2008R2 -T |
Notice that the command retrieves Person data from the AdventureWorks2008R2 database and adds that data to the C:\DataFiles\PersonData.csv file. I also created a second bcp command to create an empty file with the same name. I did this in order to fully test the SSIS package. In the SELECT statement in the second command, I include a WHERE clause that references a nonexistent BusinessEntityID value:
|
1 |
bcp "SELECT * FROM AdventureWorks2008R2.Person.Person WHERE BusinessEntityID = 123456789" queryout C:\DataFiles\PersonData.csv -c -t, -S localhost\SqlSrv2008R2 -T |
Because I’m referencing a nonexistent BusinessEntityID value, the command creates an empty CSV file. You can use either file to test your SSIS package, should you decide to try the example I’m demonstrating in this article.
NOTE: I tested the SSIS package against both files. However, because the files share the same name, I had to create them one at a time, deleting the original, as necessary, after I ran the SSIS package.
The Script task that I’ll be demonstrating will reference two SSIS user-defined variables, so after I created the CSV file, I added the following two variables to my package:
- IsEmpty: A Boolean variable with a package-level scope. The variable will be used by the Script task to specify whether the source CSV file contains data. I’ve set the initial value to False, but the Script task will set the final value, so you can set the initial value to either True or False.
- LastUpdate: A DateTime variable with a package-level scope. I’ve set the value as an arbitrary date that precedes the date that I created the CSV files. In theory, the LastUpdate variable stores the timestamp of the last time the package ran and updated the database. In reality, this date would probably come from a table or some other system that logged the updates. For this article, however, it serves our purposes to set a hard-coded date.
My next step was to create a Flat File connection manager named PersonData. The connection manager connects to the C:\DataFiles\PersonData.csv file. Other than naming the connection manager and providing a description, I retained the default settings for its other options.
NOTE: This article assumes that you know how to run bcp commands as well as add and configure SSIS components, such as variables, connection managers, and tasks. If you’re not familiar how to use bcp or work with these components, you should first review the relevant topics in SQL Server Books Online or in another source.
The two variables and Flat File connection manager are the only SSIS components necessary to support the Script task that I’m going to demonstrate. So let’s look at how to add and configure that task.
Adding the Script Task to Your Package
After you add the Script task to your SSIS package, you can configure it by opening the Script Task Editor. On the editor’s General page, you should provide a name and description for the task. (I named the task Check file status.) Next, go to the editor’s Script page to configure the script-related properties, as shown in Figure 1.
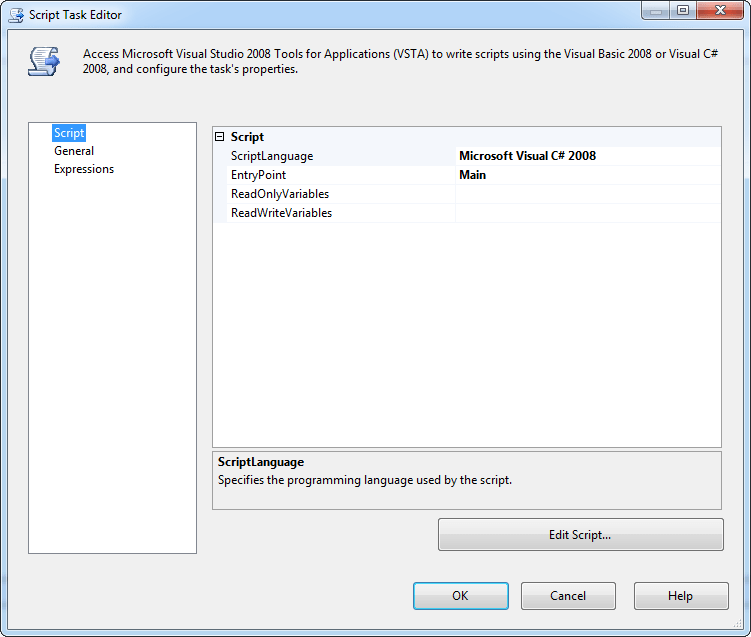
Figure 1: Script page of the Script Task Editor
The first property that you need to set is ScriptLanguage. You can create your scripts in one of two languages: Visual Basic 2008 or Visual C# 2008. I used C# for the script that I created.
The next property on the Script page is EntryPoint. This is the method (specific to the selected script language) that the SSIS runtime calls as the entry point into your code. The Main method, in most cases, should work fine. However, if you choose another method, it must be in the ScriptMain class of the Visual Studio for Applications (VSTA) project.
The next two properties on the Script page are ReadOnlyVariables and ReadWriteVariables. As the names imply, you enter the name of any SSIS variables you want to use in your script. (Separate the names with commas for multiple variables of either type.) For instance, I added the LastUpdate variable to the ReadOnlyVariables property and the IsEmpty variable to the ReadWriteVariables property. As a result, my C# script will be able to retrieve the date from the LastUpdate variable and set the file status in the IsEmpty variable.
That’s all there is to configuring the Script task properties in preparation for creating the script itself, so once you’ve configured the properties, click the Edit Script button on the editor’s Script page to open the VSTA integrated development environment (IDE) window, shown in Figure 2. All script modifications are made in the VSTA development environment.
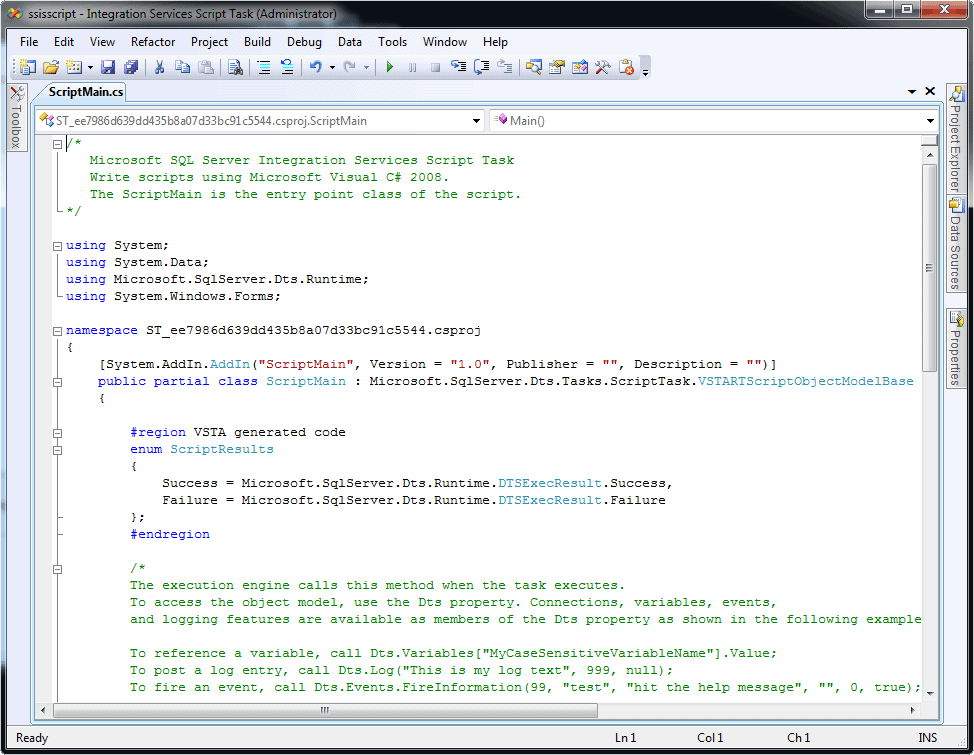
Figure 2: Default C# code in the VSTA IDE window
As Figure 2 shows, when you first open the VSTA window, you’ll see the default C# script, which includes the language necessary to work with the Main method of the ScriptMain class. Because Figure 2 shows only part of the script, I’m included the entire default code here for your convenience:
/*
Microsoft SQL Server Integration Services Script Task
Write scripts using Microsoft Visual C# 2008.
The ScriptMain is the entry point class of the script.
*/
using System;
using System.Data;
using Microsoft.SqlServer.Dts.Runtime;
using System.Windows.Forms;
namespace ST_96fb03801a81438dbb2752f91e76b1d5.csproj
{
[System.AddIn.AddIn(“ScriptMain”, Version = “1.0”, Publisher = “”, Description = “”)]
public partial class ScriptMain : Microsoft.SqlServer.Dts.Tasks.ScriptTask.VSTARTScriptObjectModelBase
{
#region VSTA generated code
enum ScriptResults
{
Success = Microsoft.SqlServer.Dts.Runtime.DTSExecResult.Success,
Failure = Microsoft.SqlServer.Dts.Runtime.DTSExecResult.Failure
};
#endregion
/*
The execution engine calls this method when the task executes.
To access the object model, use the Dts property. Connections, variables, events,
and logging features are available as members of the Dts property as shown in the following examples.
To reference a variable, call Dts.Variables[“MyCaseSensitiveVariableName”].Value;
To post a log entry, call Dts.Log(“This is my log text”, 999, null);
To fire an event, call Dts.Events.FireInformation(99, “test”, “hit the help message”, “”, 0, true);
To use the connections collection use something like the following:
ConnectionManager cm = Dts.Connections.Add(“OLEDB”);
cm.ConnectionString = “Data Source=localhost;Initial Catalog=AdventureWorks;Provider=SQLNCLI10;Integrated Security=SSPI;Auto Translate=False;”;
Before returning from this method, set the value of Dts.TaskResult to indicate success or failure.
To open Help, press F1.
*/
public void Main()
{
// TODO: Add your code here
Dts.TaskResult = (int)ScriptResults.Success;
}
}
}
For the most part, you need to be concerned only with adding code to the Main method, specifically, to the section that is marked with the comment // TODO: Add your code here. (Comments are either preceded by double slashes for a single line or enclosed slashes and asterisks-/* and */-for multiple lines.) Usually, the only exception to where you enter code is at the beginning of the script, where you include the necessary using statements to define the relevant namespaces. For instance, the script includes the using System; statement so we can access classes in the System namespace, like those that reference components such as events, interfaces, and data types.
NOTE: A full explanation of how to use the C# language within a Script task is beyond the scope of this article. For specifics about the language, refer to a more complete resource, such as MSDN.
Other than the using statements and the Main method, you should, for the most part, leave the rest of the code alone, except for perhaps deleting comments. (Unless you’re a C# pro-then have add it.) Now let’s look how to modify the script to check the status of our flat file.
Writing Your C# Script
The first step I often take when working the code in the Script task is to get rid of the comments. In this case, I removed the comments before the Main method. You can also delete the opening comments, but I left them in just to provide a few reminders about the environment in which we’re working. So let’s look at how I’ve modified the script, and then I’ll explain the changes I’ve made. The following code shows how I’ve updated the original script and expanded the Main method:
Microsoft SQL Server Integration Services Script Task
Write scripts using Microsoft Visual C# 2008.
The ScriptMain is the entry point class of the script.
*/
using System;
using System.Data;
using Microsoft.SqlServer.Dts.Runtime;
using System.Windows.Forms;
using System.IO; //added to support file access
namespace ST_5bd724e0deb3452e8646db6ec63913b0.csproj
{
[System.AddIn.AddIn(“ScriptMain”, Version = “1.0”, Publisher = “”, Description = “”)]
public partial class ScriptMain : Microsoft.SqlServer.Dts.Tasks.ScriptTask.VSTARTScriptObjectModelBase
{
#region VSTA generated code
enum ScriptResults
{
Success = Microsoft.SqlServer.Dts.Runtime.DTSExecResult.Success,
Failure = Microsoft.SqlServer.Dts.Runtime.DTSExecResult.Failure
};
#endregion
public void Main()
{
// Define C# variable to reference SSIS user variable.
DateTime LastLoggedUpdate = (DateTime)(Dts.Variables[“LastUpdate”].Value);
// Define variable for connection string.
string PersonDataConnection = (string)(Dts.Connections[“PersonData”].AcquireConnection(null) as String);
// Create file object based on file connection.
FileInfo PersonDataFile = new FileInfo(PersonDataConnection);
// Retrieve properties from file object.
DateTime LastModified = PersonDataFile.LastWriteTime;
long PersonFileSize = PersonDataFile.Length;
// If the file was modified since the last logged update,
// set IsEmpty variable and set the task result to Success.
// Otherwise, fail the task.
if(LastModified > LastLoggedUpdate)
{
if(PersonFileSize > 0)
{
Dts.Variables[“IsEmpty”].Value = false;
}
else
{
Dts.Variables[“IsEmpty”].Value = true;
}
Dts.TaskResult = (int)ScriptResults.Success;
}
else
{
Dts.TaskResult = (int)ScriptResults.Failure;
}
}
}
}
Let’s start with the using statements at the beginning of the script. You might have noticed that I added the using System.IO; statement. The System.IO namespace lets us access the language components we need in order to retrieve information about the flat file. I did not modify the script outside the Main method in any other way (except for deleting comments), so now let’s look at that method.
The first item I added after the Main method declaration is a DateTime variable named LastLoggedUpdate:
|
1 2 |
// Define C# variable to reference SSIS user variable. DateTime LastLoggedUpdate = (DateTime)(Dts.Variables["LastUpdate"].Value); |
I’ve set the variable value to equal that of the SSIS LastUpdate variable that I defined on the package. To retrieve the value of the SSIS variable, I use the Dts object’s Variables property, which returns a Variable object. I then specify the name of the variable, enclosed in double-quotes and brackets, and tag on the Value property (available through the Variable object). This lets me retrieve the variable’s actual value. Note that I also cast the LastUpdate value to the DateTime data type by preceding the Dts variable construction by the name of the data type, just like I do when I declare the LastLoggedUpdate variable. I can now reference the LastLoggedUpdate variable within the Main method, and it will return the data currently stored the LastUpdate SSIS variable.
Next I declare a string variable named PersonDataConnection to hold the connection string I retrieve through the PersonData connection manager:
|
1 2 |
// Define variable for connection string. string PersonDataConnection = (string)(Dts.Connections["PersonData"].AcquireConnection(null) as String); |
Notice that my declaration once again begins with the data type, followed by the name of the variable. I then set the variable’s value to equal the connection string. I retrieve the connection string by using the Dts object’s Connections property. This is followed by the name of the connection manager, enclosed in double-quotes and brackets, and then by the AcquireConnection method. The method takes one argument-the handle to a transaction type. In this case, we can specify NULL , which indicates that the container supports transactions but is not going to participate. In other words, you don’t need to worry about this. Just pass in NULL for this type of connection. Notice also that I’m explicitly converting the connection object to a string to pass into the PersonDataConnection variable.
The next variable I declare is PersonDataFile, which is defined with type FileInfo:
|
1 2 |
// Create file object based on file connection. FileInfo PersonDataFile = new FileInfo(PersonDataConnection); |
In this case, the variable’s value is based on a new instance of the FileInfo class. Because the FileInfo constructor takes the PersonDataConnection variable as an argument, you can use the methods and properties available to the FileInfo class to access information about the PersonData.csv file. That means you can access those properties and methods through the PersonDataFile variable, which is what I do in the next two variable declarations:
|
1 2 3 |
// Retrieve properties from file object. DateTime LastModified = PersonDataFile.LastWriteTime; long PersonFileSize = PersonDataFile.Length; |
First, I declare a DateTime variable named LastModified and set its value to equal the value of the LastWriteTime property of the PersonDataFile variable, which is a FileInfo object. This will provide me with a timestamp of the last time the file was modified. I declare the second variable with the long data type and name the variable PersonFileSize. I then set the variable value to equal that of the file object’s Length property.
After I’ve declared the necessary variables, I’m ready to implement the logic needed to check the status of the PersonData.csv file. In the next section of code, I include two if…else statements, one embedded in the other:
|
1 2 3 4 5 6 7 8 9 10 11 12 13 14 15 16 17 18 19 |
// If the file was modified since the last logged update, // set IsEmpty variable and set the task result to Success. // Otherwise, fail the task. if(LastModified > LastLoggedUpdate) { if(PersonFileSize > 0) { Dts.Variables["IsEmpty"].Value = false; } else { Dts.Variables["IsEmpty"].Value = true; } Dts.TaskResult = (int)ScriptResults.Success; } else { Dts.TaskResult = (int)ScriptResults.Failure; } |
Let’s start by looking at the outer if…else construction. Essentially, what this is saying is, “If the last modified date is more recent that the last time data was loaded into the database, run the script in the if section. Otherwise, skip to the end of the script and show the Script task as having failed.
The if statement begins by specifying the condition that determines whether to run the code in the if section or in the else section. If the condition evaluates to True-in this case, the LastModified date is more recent that the LastLoggedUpdate date-the code in the rest of the if section should run. If the condition does not evaluate to true, the code in the if section does not run and the code in the else section runs, which sets the Dts object’s TaskResult property to Failure. (The TaskResult property tells the runtime whether the task succeeded or failed.)
The embedded if…else construction checks whether the value in the PersonFileSize variable is greater than 0, in other words, whether the file contains any data. If the file does contain data, the code in the if section runs, otherwise the code in the else section runs. As a result, if the file contains data, the SSIS IsEmpty variable is set to false. If the file contains no data, the variable is set to true. Notice that after the embedded if…else construction, I’ve set the value of the TaskResult property to show that the task has successfully run.
That’s all there is to the script. Normally, you would also include code to handle exceptions, but what I’ve shown you here should provide you with an overview of the script’s basics elements. You can now close the VSTA window and then click OK to close the Script Task Editor. Be sure to save your changes.
Adding Other Tasks to Your Package
After I completed configuring the Script task and writing the C# script, I added a Data Flow task to the control flow. The data flow should, in theory, retrieve the data from the PersonData.csv file and insert it into a SQL Server database. However, for the purposes of this exercise, the Data Flow task serves only as a placeholder. It will still run like any other Data Flow task, but no data will actually be moved. Even so, you can still verify whether your control flow is set up correctly.
Next, I connected a precedence constraint from the Script task to the Data Flow task. I then added a File System task to the control flow and configured it to delete the PersonData.csv file. Next I connected a precedence constraint from the Script task to the File System task and one from the Data Flow task to the File System task. I then configured the two precedence constraints connecting to the File System task with the Logical OR option, which means that only one constraint must evaluate to True for the task to run. (By default, all constraints connected to a task must evaluate to True for the task to run.) Figure 3 shows what the control flow looked like after I added all the components.
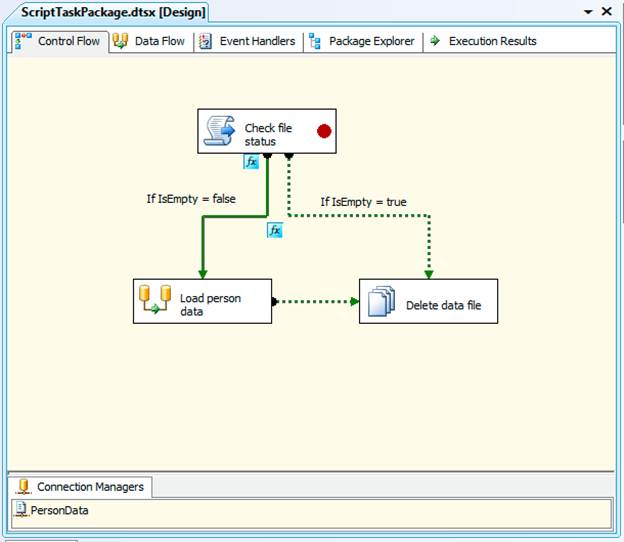
Figure 3: Adding a Data Flow task and File System task to the control flow
Notice how the precedence constraints connecting to the File System task are dotted lines. This indicates that the constraints have been configured with the Logical OR option. Also notice that an expression is associated with each of the precedence constraints leading out of the Script task (as indicated by the fx label). Both constraints are configured so that the tasks down the line will run only if the Script task runs successfully and the expression evaluates to True. I defined the following expression on the precedence constraint that connects to the Data Flow task:
|
1 |
@[User::IsEmpty] == false |
This means that the IsEmpty variable must be set to False in order for the expression to evaluate to True. The expression defined on the precedence constraint that leads from the Script task to the File System task is as follows:
|
1 |
@[User::IsEmpty] == true |
This means, of course, that the IsEmpty variable must be set to True for the expression to evaluate to True. And that about does it for setting up the SSIS package. The only other step I took was to add a breakpoint to the Script task, which I’ll explain in the following section.
Running Your SSIS Package
Before I ran the SSIS package, I added a breakpoint on the OnPostExecute event to the Script task. As a result, when I ran the package, it stopped running as it was about to complete the Script task. Figure 4 shows what the package looks like when it stopped running.

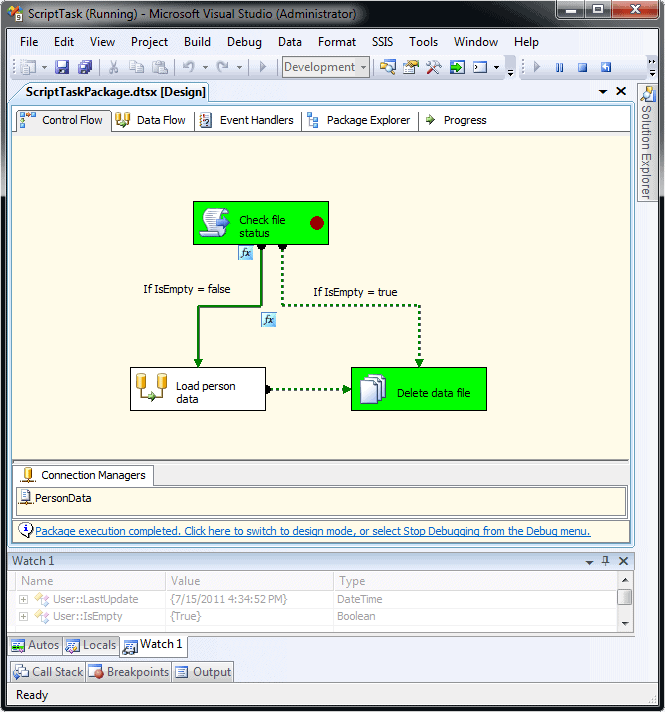
Figure 4: Using a breakpoint to view variable values
When the package stopped running, I added a watch (shown in the bottom pane in Figure 4) on each of the two variables I created early on. The watches show the variable values at the time the package reached the breakpoint. Notice that the IsEmpty variable is set to False. Had the PersonData.csv file contained no data, the variable would have been set to True.
Next, I resumed running the package until it executing all applicable tasks. As Figure 5 shows, every control flow task ran. That’s because the IsEmpty variable evaluated to False and the Data Flow task ran and then the File System task ran.
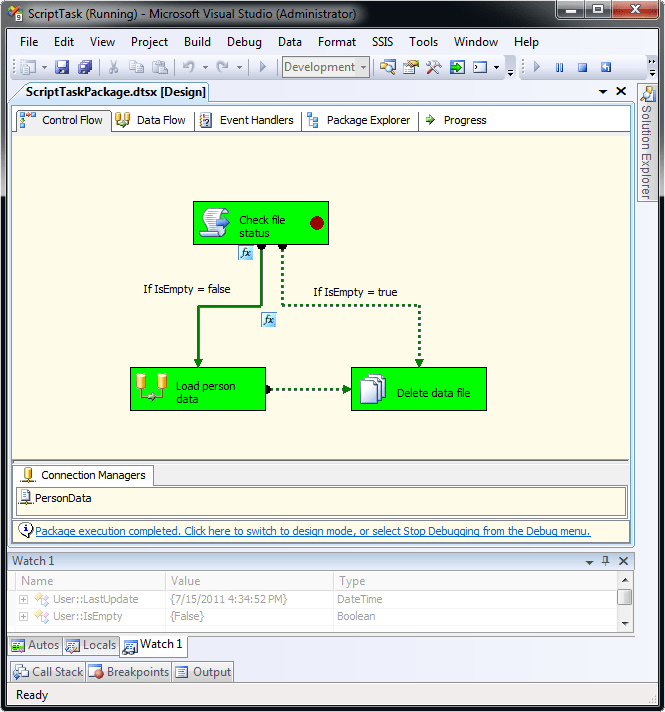
Figure 5: Running the SSIS package when IsEmpty is false.
If the IsEmpty variable had evaluated to True, the Data Flow task would not have run, which is what happened when I added an empty file to the C:\DataFiles folder. This time around, only the Script task and File System task ran, as shown in Figure 6.
Notice that the value of the IsEmpty variable shown in the Watch window is set to True. As a result, the file would have been deleted, but no attempts would have been made to load data into the database.
And It Doesn’t End There
In the example above, the SSIS package performed in two different ways, depending on whether the file contained data. But there is a third scenario: the file was not updated since the last data load. If that happens, the Script task fails and the package stops running, which is what we’d expect given the way the script is written in the Script task. Another thing that the example doesn’t reflect is what would happen if the script threw an exception. Given that I’ve included no exception handling, I would again expect the task to fail. What this points to is that the example I’ve shown you here is only a simple script that contains relatively few elements. A script can be far more complex and take many more actions than what I’ve demonstrated here. However, you should now at least have enough information to get started creating your own scripts and using the Script task to extend your control flow so you can perform the tasks that need to be performed.
This document contains proprietary information and is protected by copyright law.
Copyright © 2026 Red Gate Software Limited. All rights reserved


Load comments