


This article is part of Robert Sheldon's continuing series on Mongo DB. To see all of the items in the series, click here.
When working with MongoDB, you’ll likely need to import or export document data from time-to-time. You can use MongoDB Compass for both types of operations, working with either the JavaScript Object Notation (JSON) format or the comma-separated values (CSV) format.
Both formats are commonly used to exchange data across different types of systems and applications. In Compass, you can import documents from JSON or CSV files, or you can export them in either format. You can also export an entire collection, a subset of data from a collection, or the data returned by an aggregation.
Earlier in this series, I briefly demonstrated how to use MongoDB Compass to import data from a JSON file into a target collection. In this article, I go deeper into the process of importing documents and then explain how to export documents to an external file. Compass provides an intuitive interface for importing and exporting data, making the process both quick and easy. This article provides multiple examples for better understanding how these operations work.
Note: For the examples in this article, I used the same MongoDB Atlas environment I used for the previous articles in this series. Refer to the first article for details about setting up these environments. The examples are based on the hr database and candidates collection. If you plan to try out these examples, the database and collection should already exist. In addition, the collection should contain no schema validation rules or documents. You’ll also need to download the candidates.csv file and the candidates.json file from here.
Import data from a CSV file into a MongoDB collection
Comma-separated values (CSV) files are commonly used to transfer data between systems, applications, and individuals. It does not matter how the data is generated or used, as long as it shares a common format.
Strictly speaking, a CSV file is a text file that uses a comma as its delimiter. However, MongoDB Compass uses the term CSV file in a broader sense. To this end, the interface supports four delimiter types: comma, tab, semicolon, and space. In addition, the file does not necessarily need to take a .csv extension. For example, you might use a file that has a.txt extension.
Regardless of the delimiter used, the file must follow a specific format. To begin with, the file’s header row must list the document fields, separated by commas or by one of the other supported delimiters. The header row should contain all possible fields, even if some documents don’t include those fields.
Each subsequent row in the file should list a document, or more specifically, the document’s values, specified in the same order as the fields in the header row. The values should also be separated by the same delimiter used for the header row.
The following figure shows the contents of the candidates.csv file, which you’ll be importing into the candidates collection. The first row lists the field names, and the remaining rows list the field values, with each document on a separate line. A comma is used as the delimiter.

When specifying the field names, you must take into account fields that are objects (embedded documents) and fields that are arrays. In this case, all the documents include the position field, which is an embedded document that contains the title and dept subfields. Many documents also include the skills field, which is an array that can contain a varying number of values.
To help you better understand the type of documents in the candidates.csv file, the following code shows the first document, formatted as JSON:
|
1 2 3 4 5 6 7 8 9 10 11 12 13 14 15 |
{ "_id": 101, "name": "Drew", "position": { "title": "Senior Developer", "dept": "R&D" }, "yrs_exp": 18, "skills": [ "Java", "SQL", "Python", "PHP" ] } |
The document includes the position field, which contains the two subfields. In the CSV file, the embedded field names are listed as position.title and position.dept, indicating that they’re both subfields in the position field.
This document also includes the skills array, which contains four values. In the CSV file, the skills field is listed multiple times in the header row, with each value specified with an index number, as in skills[0] or skills[1]. The documents in the CSV file that include the skills array contain up to six values within the array, so the index values range from 0 to 5. (An array’s index is 0-based.)
When a CSV file includes documents that don’t contain a field listed in the header row, the delimiter must still be included so the number of values associated with each document matches the number of fields listed in the header row, in the order the field names are specified. If one of the fields is an array, a document must include a delimiter for each possible array value listed in the header line.
For example, the following code shows the first three documents included in the candidates.csv file:
|
1 2 3 |
101,Drew,Senior Developer,R&D,18,Java,SQL,Python,PHP,, 102,Parker,Data Scientist,R&D,14,Python,SQL,R,Scala,Java,Julia 103,Harper,Marketing Manager,Marketing,22,,,,,, |
The first document includes the skills array, but the array contains only four values, so the document is listed with two trailing commas. The commas serve as placeholders for the remaining two array values. However, the skills array in the second document includes six values, so no extra commas are needed. The third document does not include the skills array, so six commas are required to correspond to the array’s number of potential values.
You might have noticed that the documents in the CSV file include an _id field. If you import documents that don’t include this field, MongoDB will automatically add the field to each document and generate a unique value for that document.
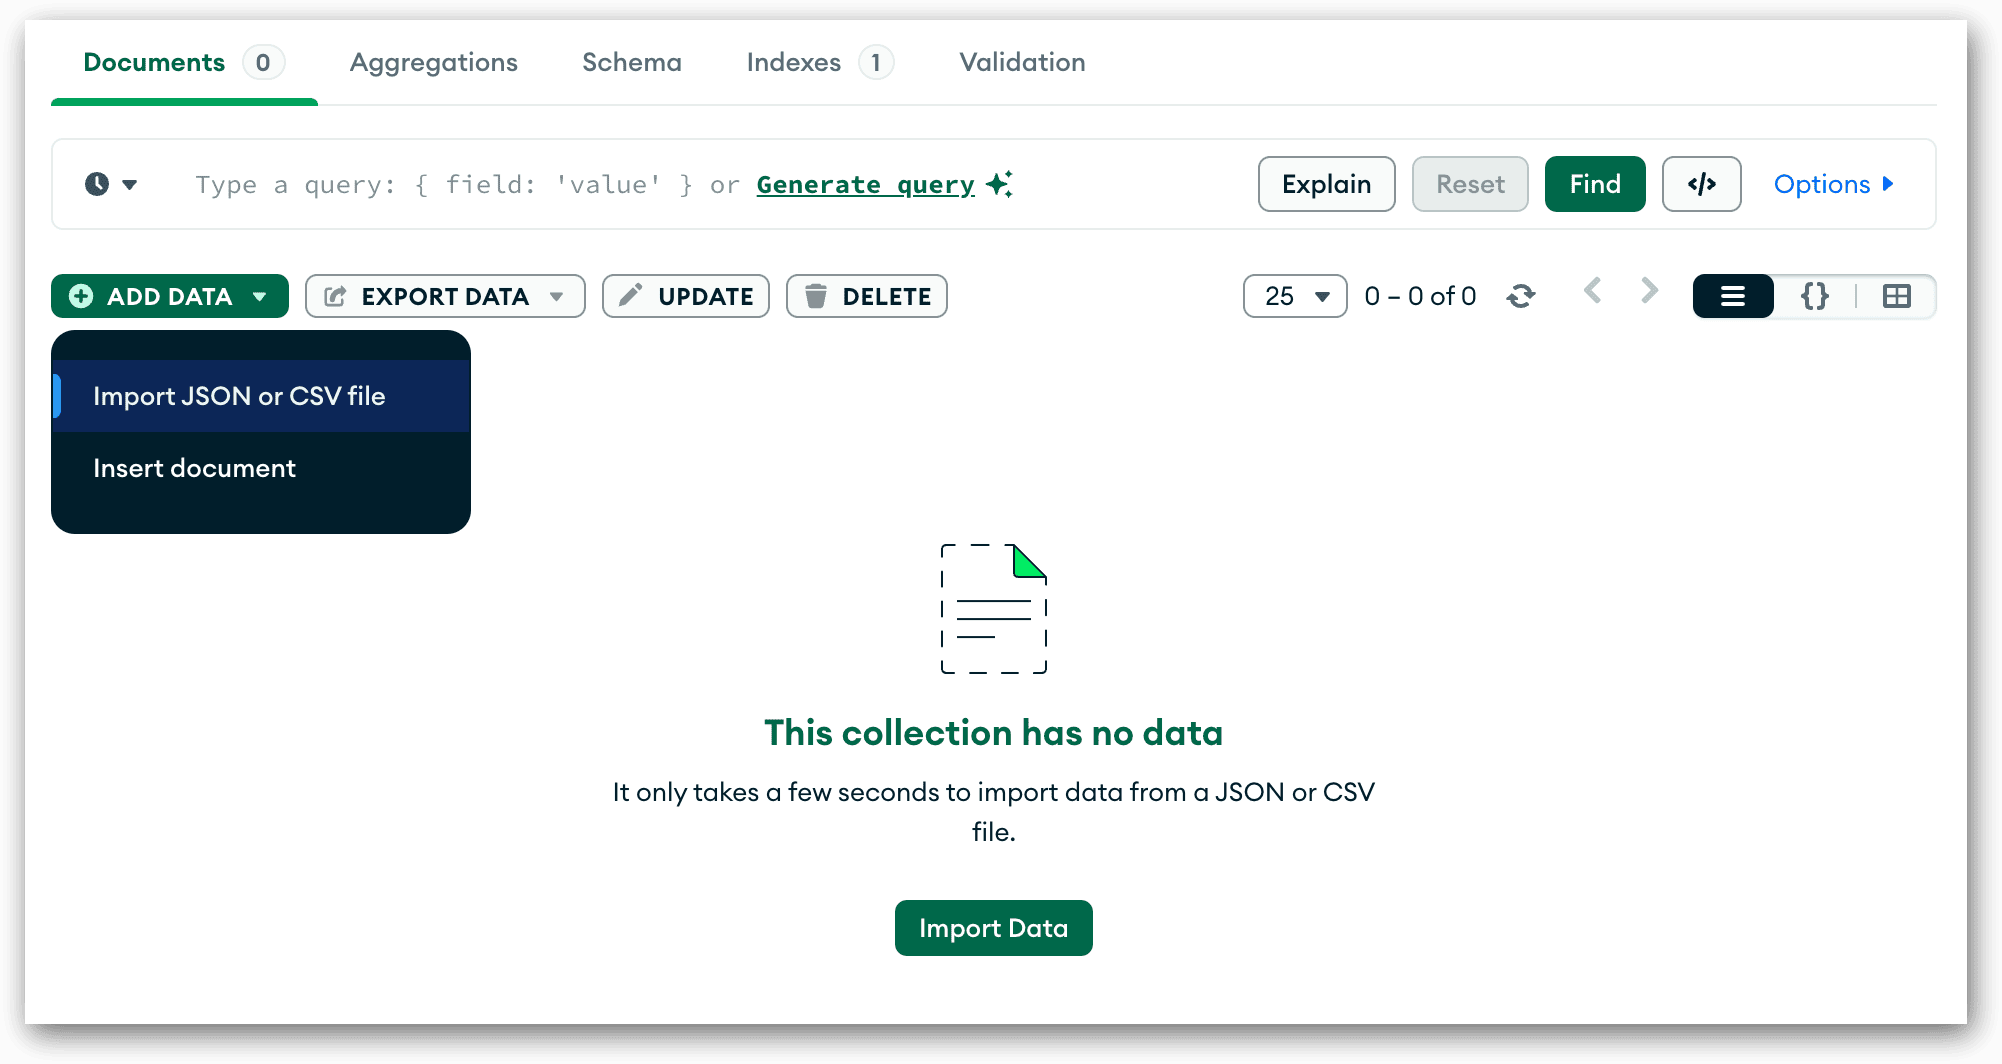
Once your CSV file is in the proper format, you can import it into your MongoDB collection. To import the data from the candidates.csv file into the candidates collection, you should first open the collection in the main window of the Compass interface. From there, click the Add Data drop-down arrow near the top of the window and then click Import JSON or CSV file.
When your system’s file manager window appears, navigate to the folder that contains the candidates.csv file, select the file, and click Select. Compass will launch the Import dialog box, as shown in the following figure.
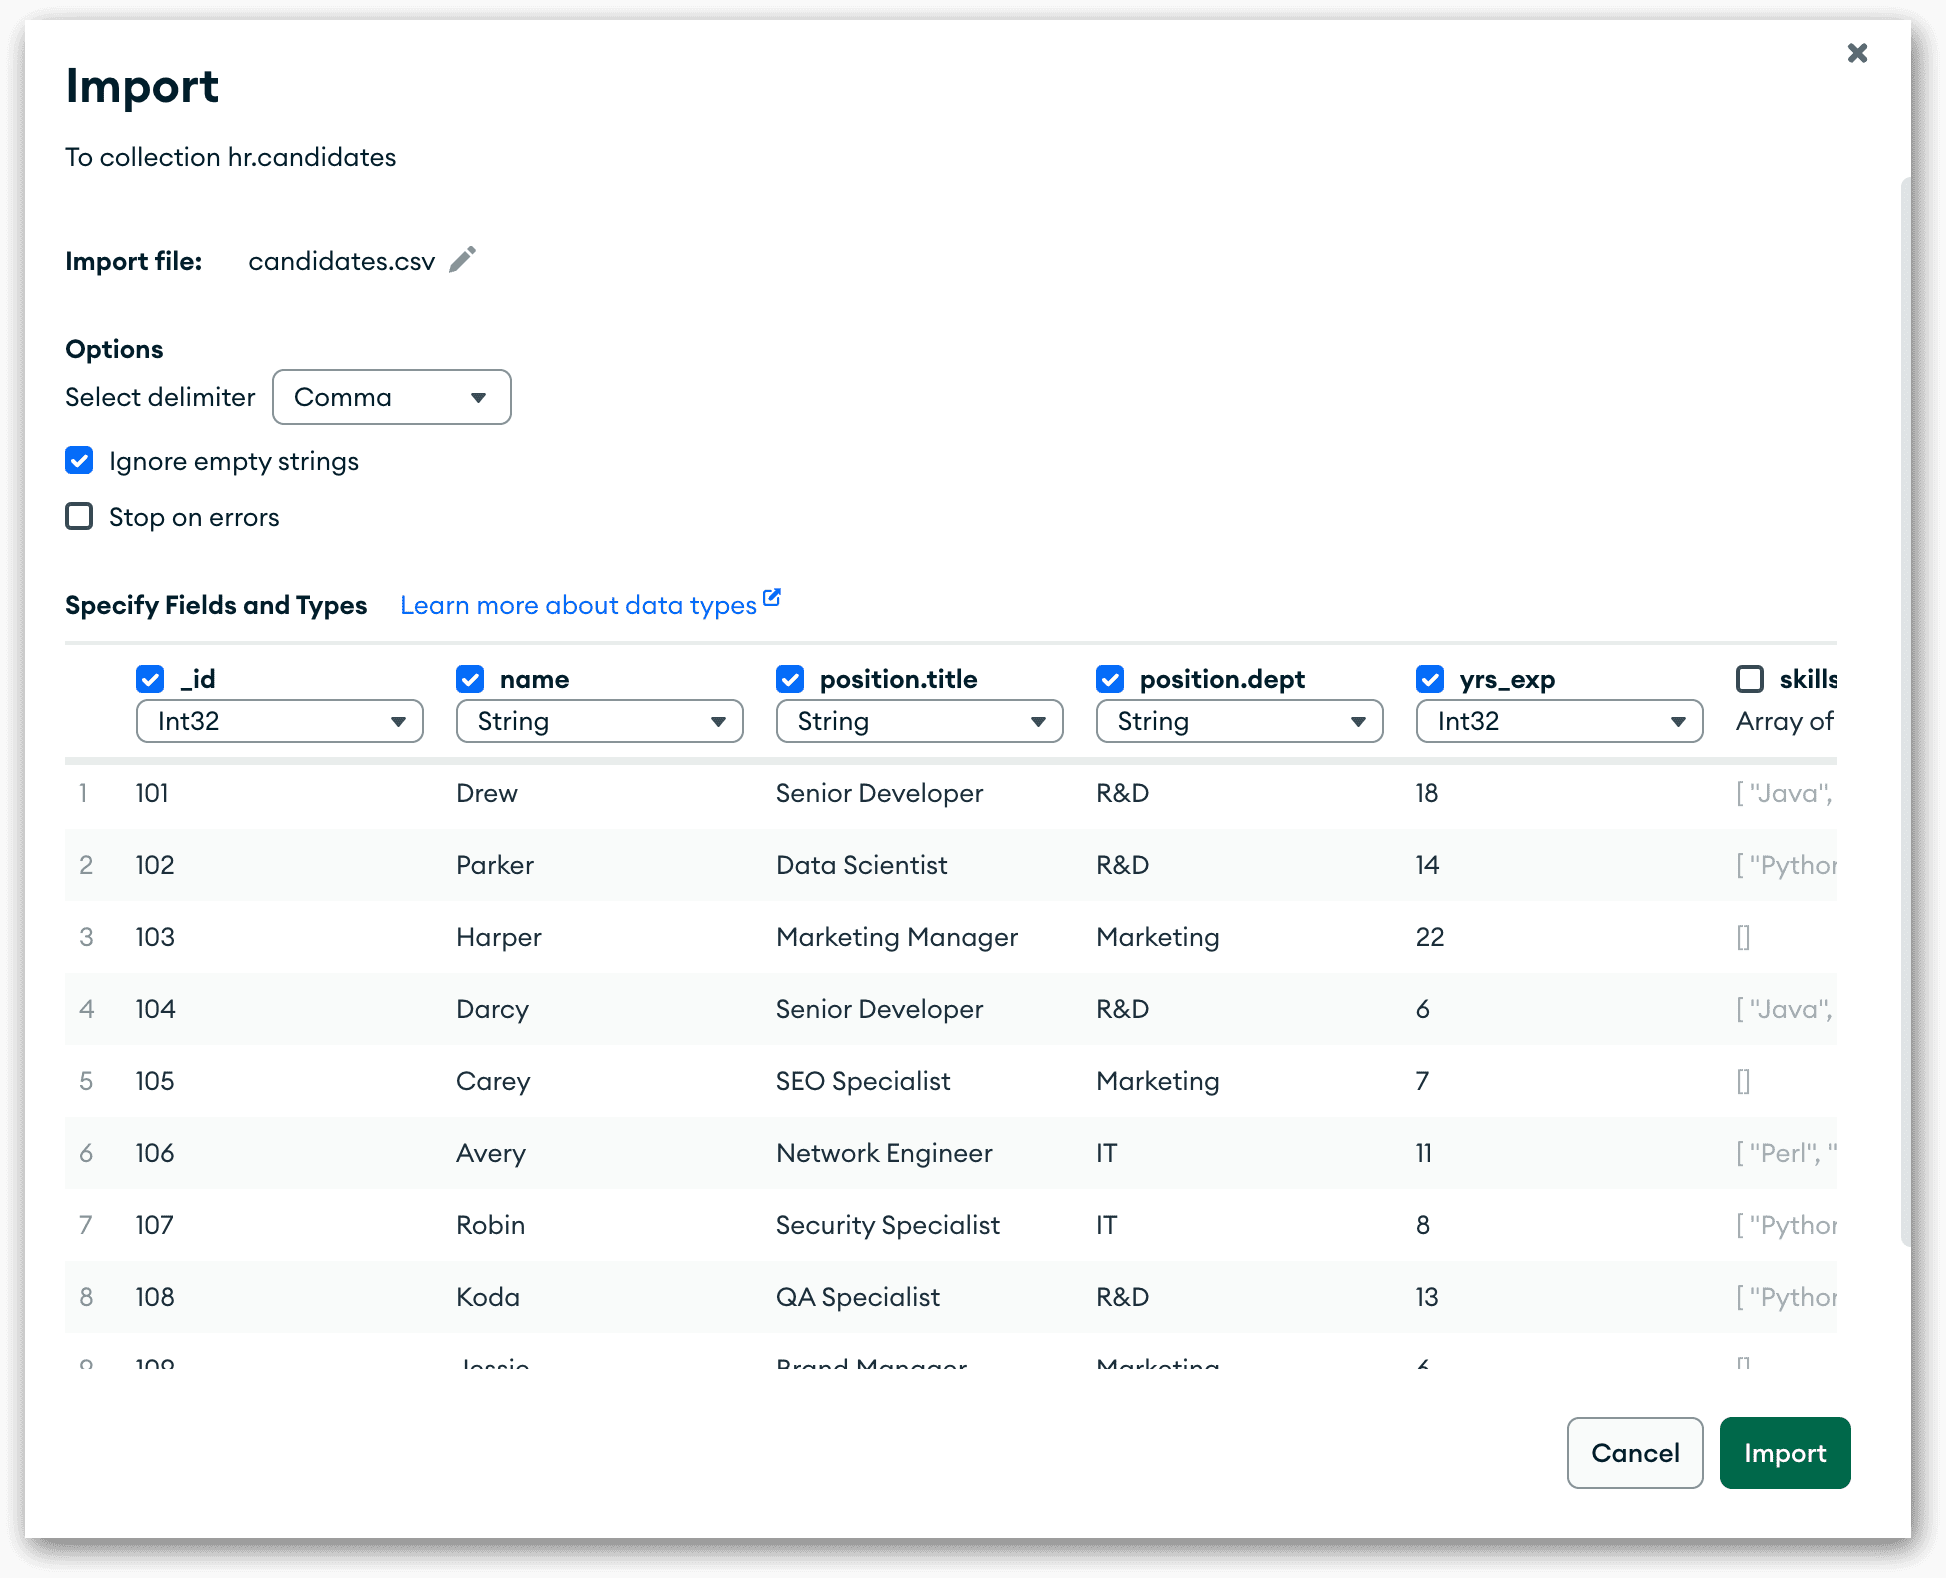
The default delimiter is Comma, but you can instead select Tab, Semicolon, or Space. The source file will determine which delimiter you should use. The dialog box also includes two options that you can clear or select:
- Ignore empty strings. If selected, MongoDB will drop fields that contain empty strings, rather than including them. This option is selected by default.
- Stop on errors. If selected, MongoDB will not import any documents if it detects an error. Otherwise, MongoDB will insert the documents that are processed up to the point that the error is detected. This option is unselected by default.
You can also select which fields to include, and you can select different data types, if appropriate. For this example, I cleared the skills[] checkbox, which means that the skills field will not be included in the imported documents. I also left the data types as defined.
After you’ve made your selections, click Import. Compass will then import the data into the candidates collection and display the documents in the main Compass window, as shown in the following figure.
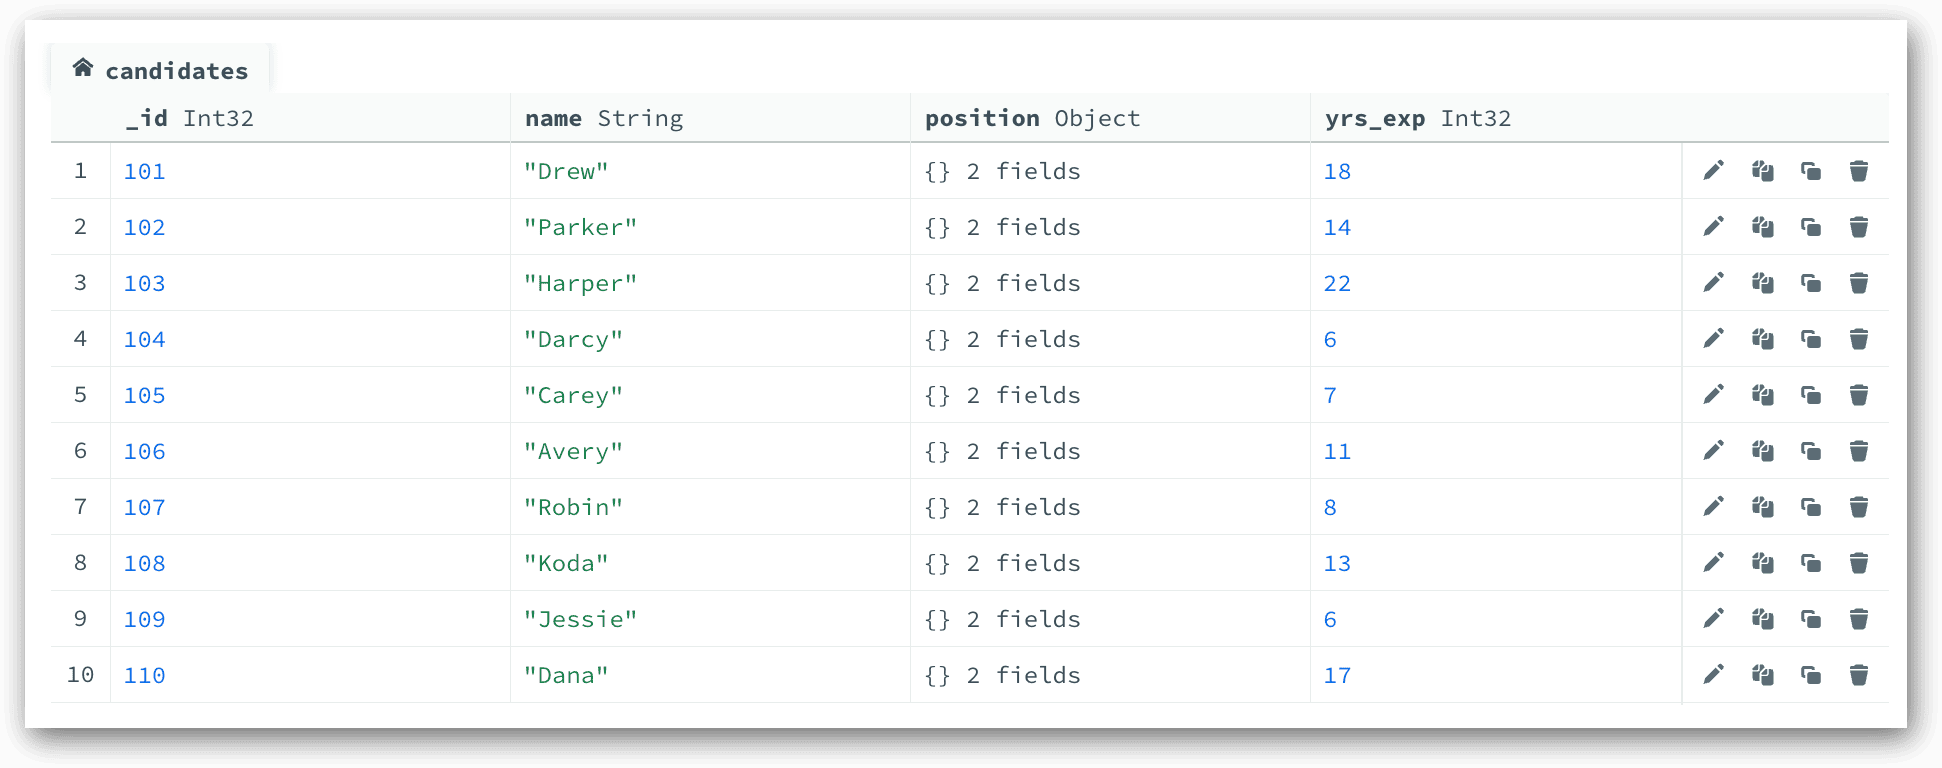
In this case, the documents are displayed in Table View, but you can display them in any view, and you can work with them just like any other documents in a collection.
Import data from a JSON file into a MongoDB collection
Now that you’ve seen how to import a CSV file, let’s look at how to import a JSON file. For this, you’ll be using the candidates.json file, which contains the same documents as the candidates.csv file, only in the JSON format.
Before you import the JSON data, you should first remove the existing documents in the candidates collection (just to keep things simple for this article). To delete all the documents, click Delete in the main window. When the Delete dialog box appears, click the Delete 10 documents button and then click the button again. You should also refresh the Documents tab to verify that all the documents have been deleted.
The following code shows the first four documents as they appear in the candidates.json file. Before you import any data, you should verify that the data is in the correct format, unless you’re already certain of its validity.
|
1 2 3 4 5 6 7 8 9 10 11 12 13 14 15 16 17 18 19 20 21 22 23 24 25 26 27 28 29 30 31 32 33 34 35 36 37 38 39 40 41 42 43 44 45 46 47 48 49 50 51 52 53 54 55 56 |
{ "_id": 101, "name": "Drew", "position": { "title": "Senior Developer", "dept": "R&D" }, "yrs_exp": 18, "skills": [ "Java", "SQL", "Python", "PHP" ] }, { "_id": 102, "name": "Parker", "position": { "title": "Data Scientist", "dept": "R&D" }, "yrs_exp": 14, "skills": [ "Python", "SQL", "R", "Scala", "Java", "Julia" ] }, { "_id": 103, "name": "Harper", "position": { "title": "Marketing Manager", "dept": "Marketing" }, "yrs_exp": 22 }, { "_id": 104, "name": "Darcy", "position": { "title": "Senior Developer", "dept": "R&D" }, "yrs_exp": 6, "skills": [ "Java", "Csharp", "Python", "R" ] }, |
Although the code shows only four documents, the candidates.json file includes all 10 of the documents you saw in the CSV example. To import those documents, open the candidates collection in the main window of the Compass interface (if it’s not already open). Next, click the Add Data drop-down arrow and then click Import JSON or CSV file.
When the file manager window appears, navigate to the folder that contains the candidates.json file, select the file, and click Select. Compass will launch the Import dialog box, as shown in the following figure.
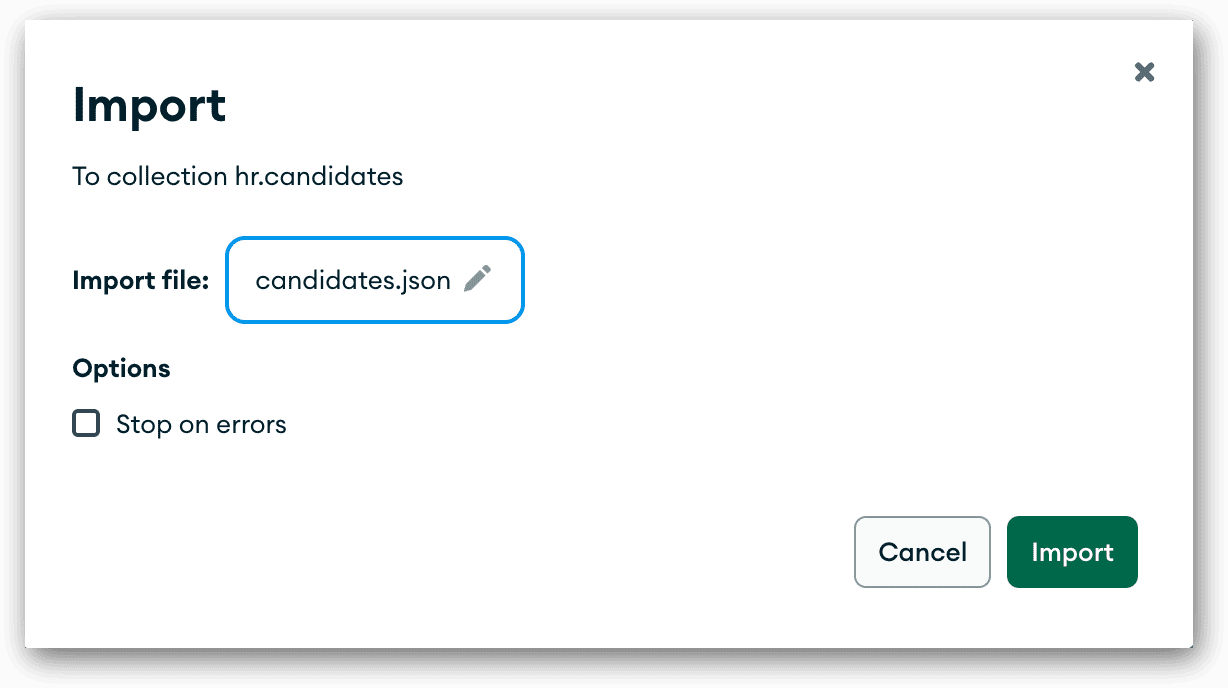
The only option available to a JSON import is the Stop on errors checkbox, which you can select or leave unselected. You should then click the Import button to pull the data into the candidates collection. The data will be displayed in the main window, as shown in the following figure.
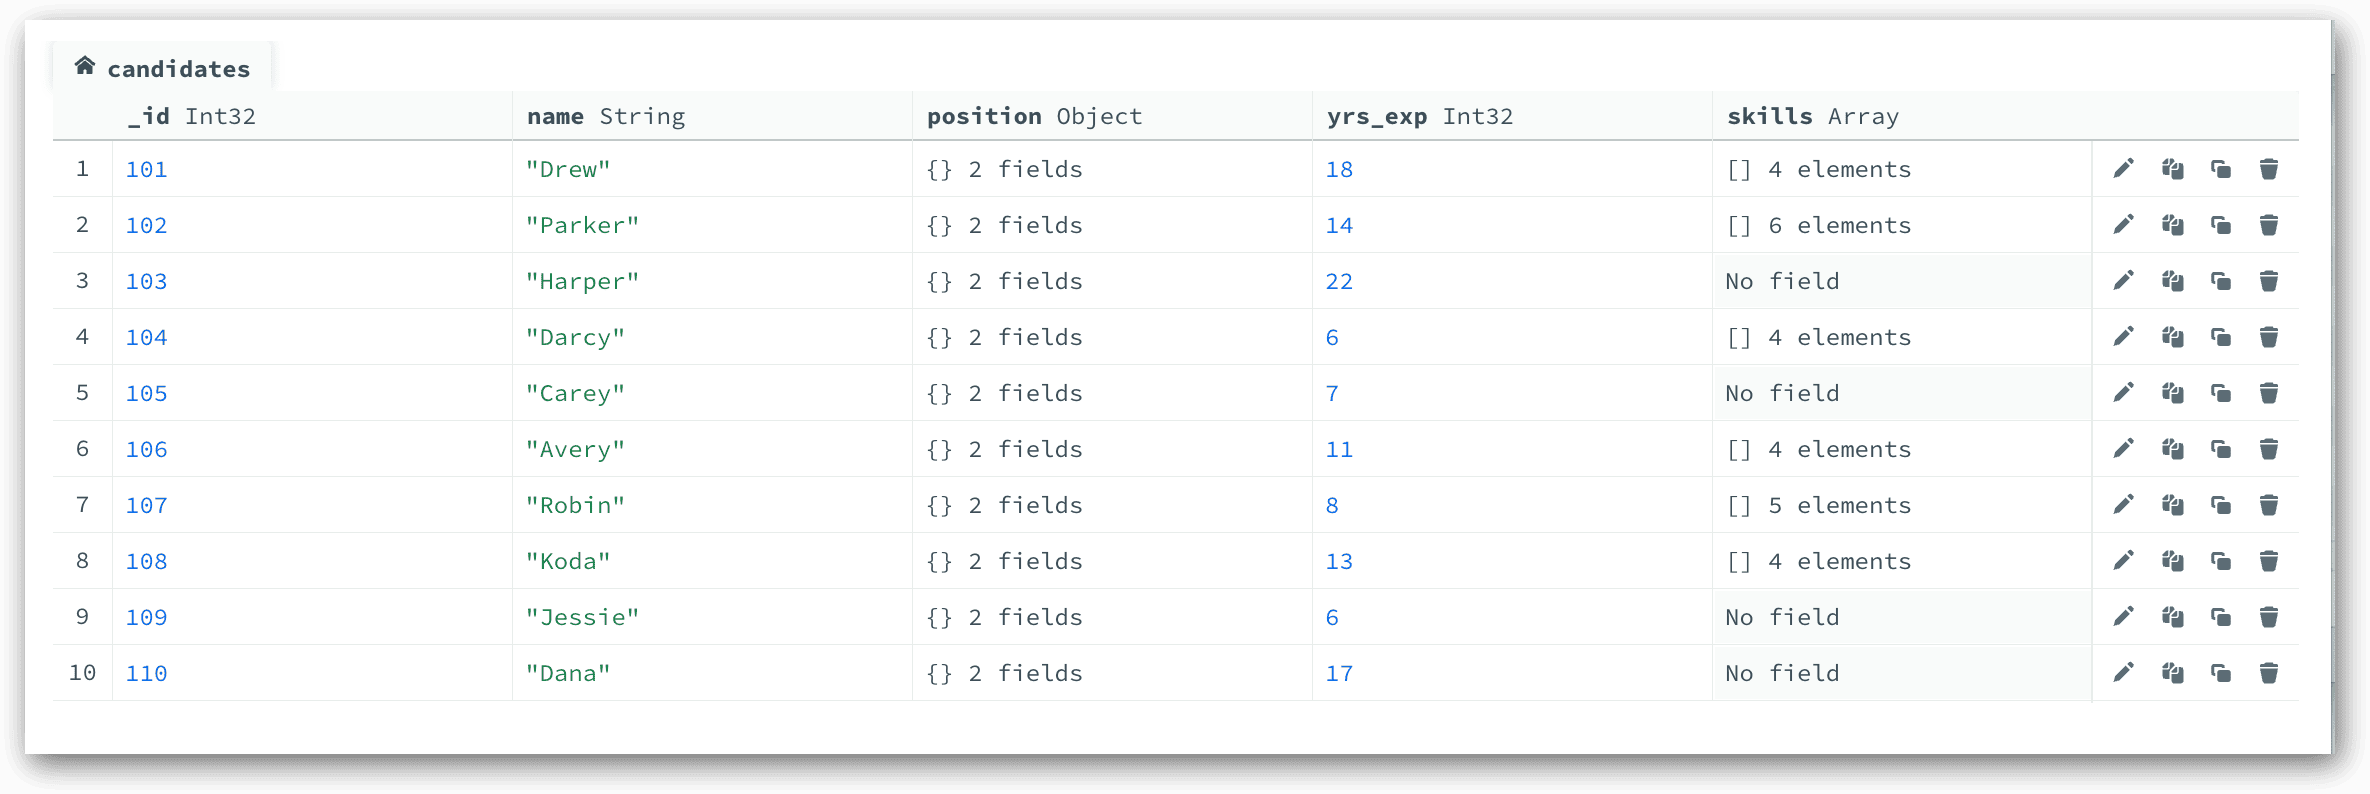
After you import the data, you can work with the documents just like you could when you imported the CSV data. The main difference is that some of the documents now include the skills array, which we did not include with our CSV import.
Export a MongoDB collection to a JSON file
In MongoDB Compass, you can export a collection’s documents to either a JSON file or CSV file. That said, MongoDB documentation recommends that you avoid exporting to a CSV file because “CSV files may lose type information and are not suitable for backing up your data.” The Compass interface provides a similar warning.
Because of these warnings, the rest of this article focuses exclusively on exporting data to JSON files. If you still want to export your data to a CSV file, refer to the MongoDB article Import and Export Data for more details about exporting to the CSV format.
To demonstrate how to export data to a JSON file, we’ll again use the candidates collection, only this time, it should now contain the data imported in the previous section. Be sure to reopen the collection if you’ve already closed it.
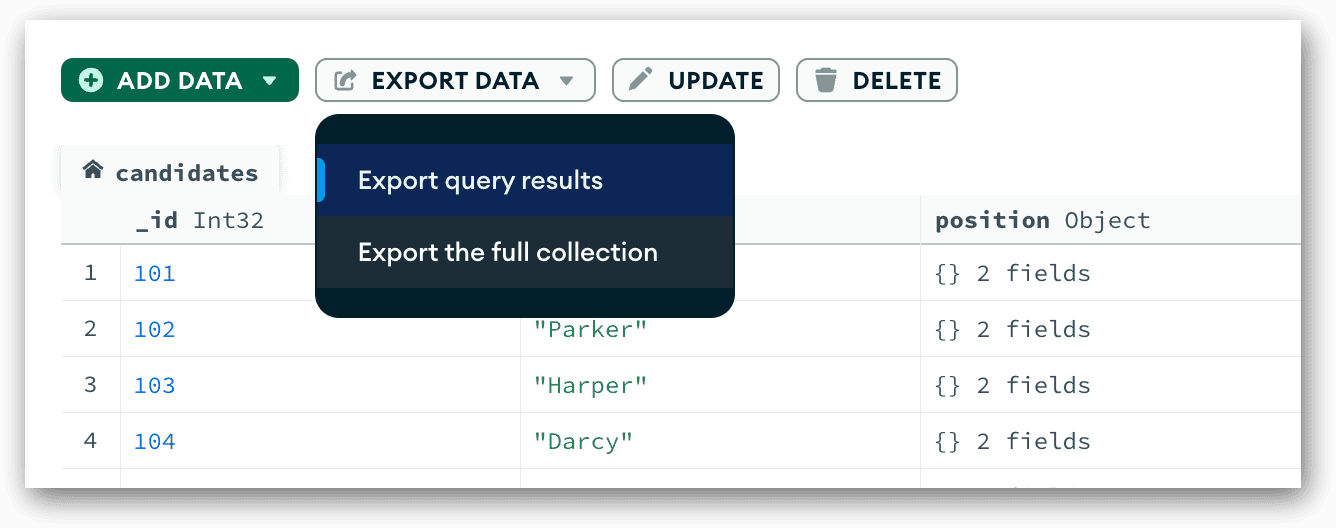
To export the collection’s documents, click the Export Data drop-down arrow and then click Export the full collection. (I’ll discuss the other option—Export query results—in the next section.)
When you click the option, Compass launches the Export dialog box, where you can choose the export file type. You have two options: JSON (the default) or CSV. If JSON is selected, you can also select the JSON format type. To access the format options, click the Advanced JSON Format down arrow, as shown in the following figure.
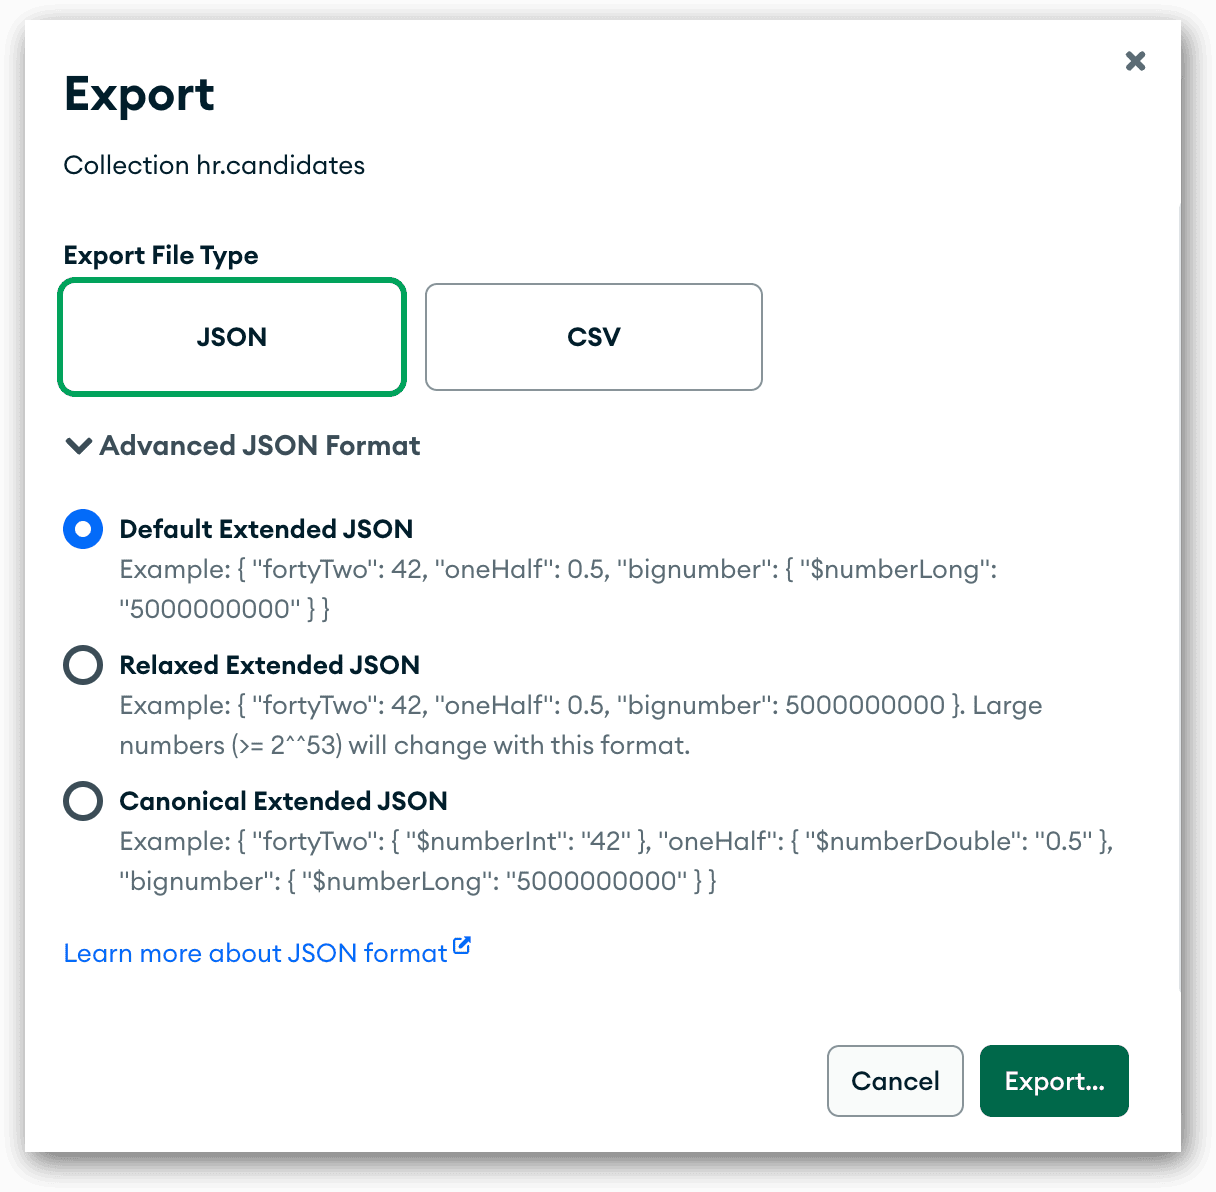
The dialog box provides three JSON format options:
- Default Extended JSON. This format preserves all BSON type information. This option is selected by default.
- Relaxed Extended JSON. This format prioritizes readability and interoperability over type preservation. MongoDB documentation warns again using this option because it might not preserve data integrity.
- Canonical Extended JSON. This format prioritizes type preservation over readability and interoperability. It ensures that data can be converted from a canonical format to BSON in most situations.
As you can see in the figure, each format option includes examples of how different values might be rendered. For this example, we’ll stick with the default option, Default Extended JSON.
When you’re ready to export the collection’s documents, click Export. You’ll then be presented with the file manager window. Navigate to the folder where you want to save the file, type a file name (or use the default), and click Select. MongoDB will create the file in the designated folder. The following figure shows the first five documents, as they appear in the new file.
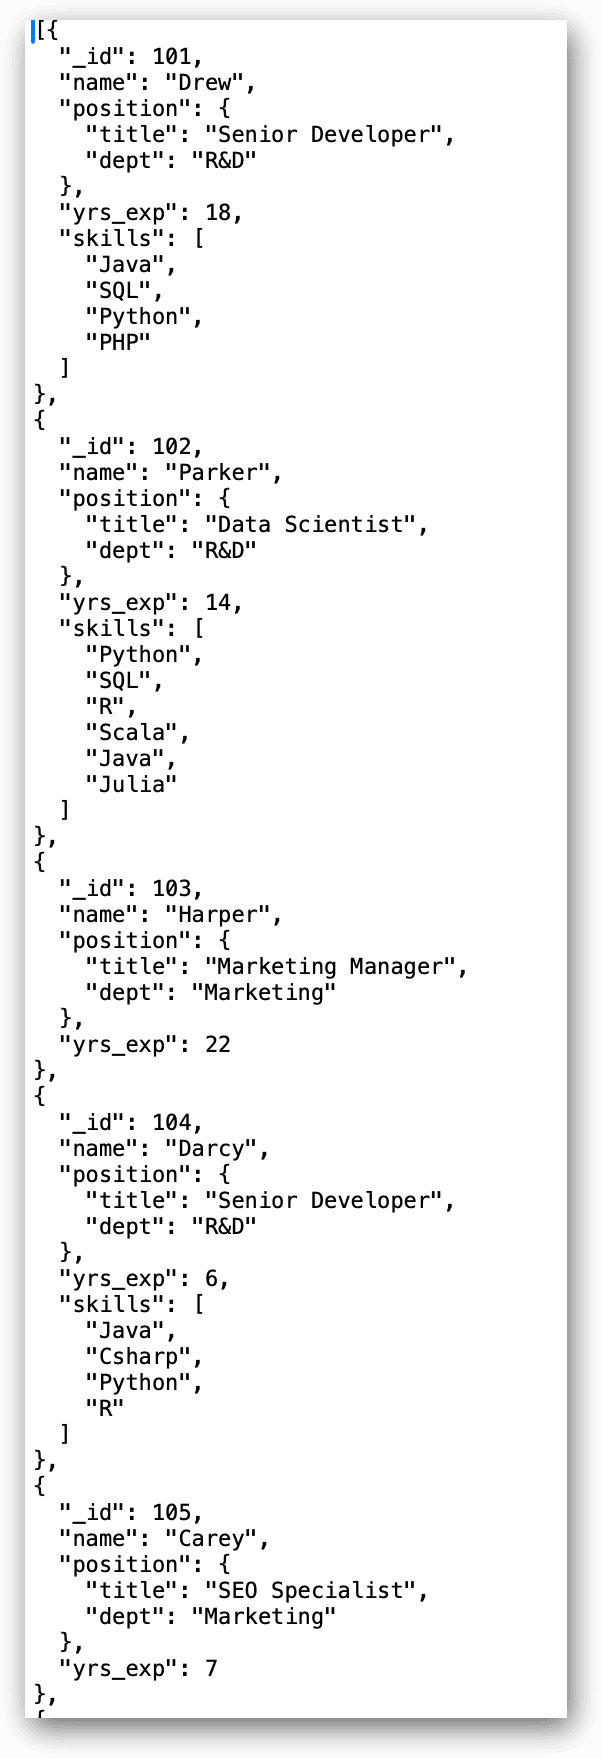
If you had exported the data to a JSON format other than the default, you might see different values. For example, the first document shows the _id field and its value as follows:
|
1 |
"_id": 101 |
However, if you had used the Canonical Extended JSON format, the field and its value would appear as follows:
|
1 2 3 |
"_id": { "$numberInt": "101" }, |
When exporting document data to JSON, you should fully understand the differences in the format options and how they can potentially impact your data.
Export query results to a JSON file
In some cases, you might not want to export all the documents in a collection, only a specific subset of them. You can achieve this by defining a query in the Compass interface and then exporting the query results to a JSON or CSV file. (If you’re not familiar with how to define a query in Compass, refer to the article Querying MongoDB Documents.)
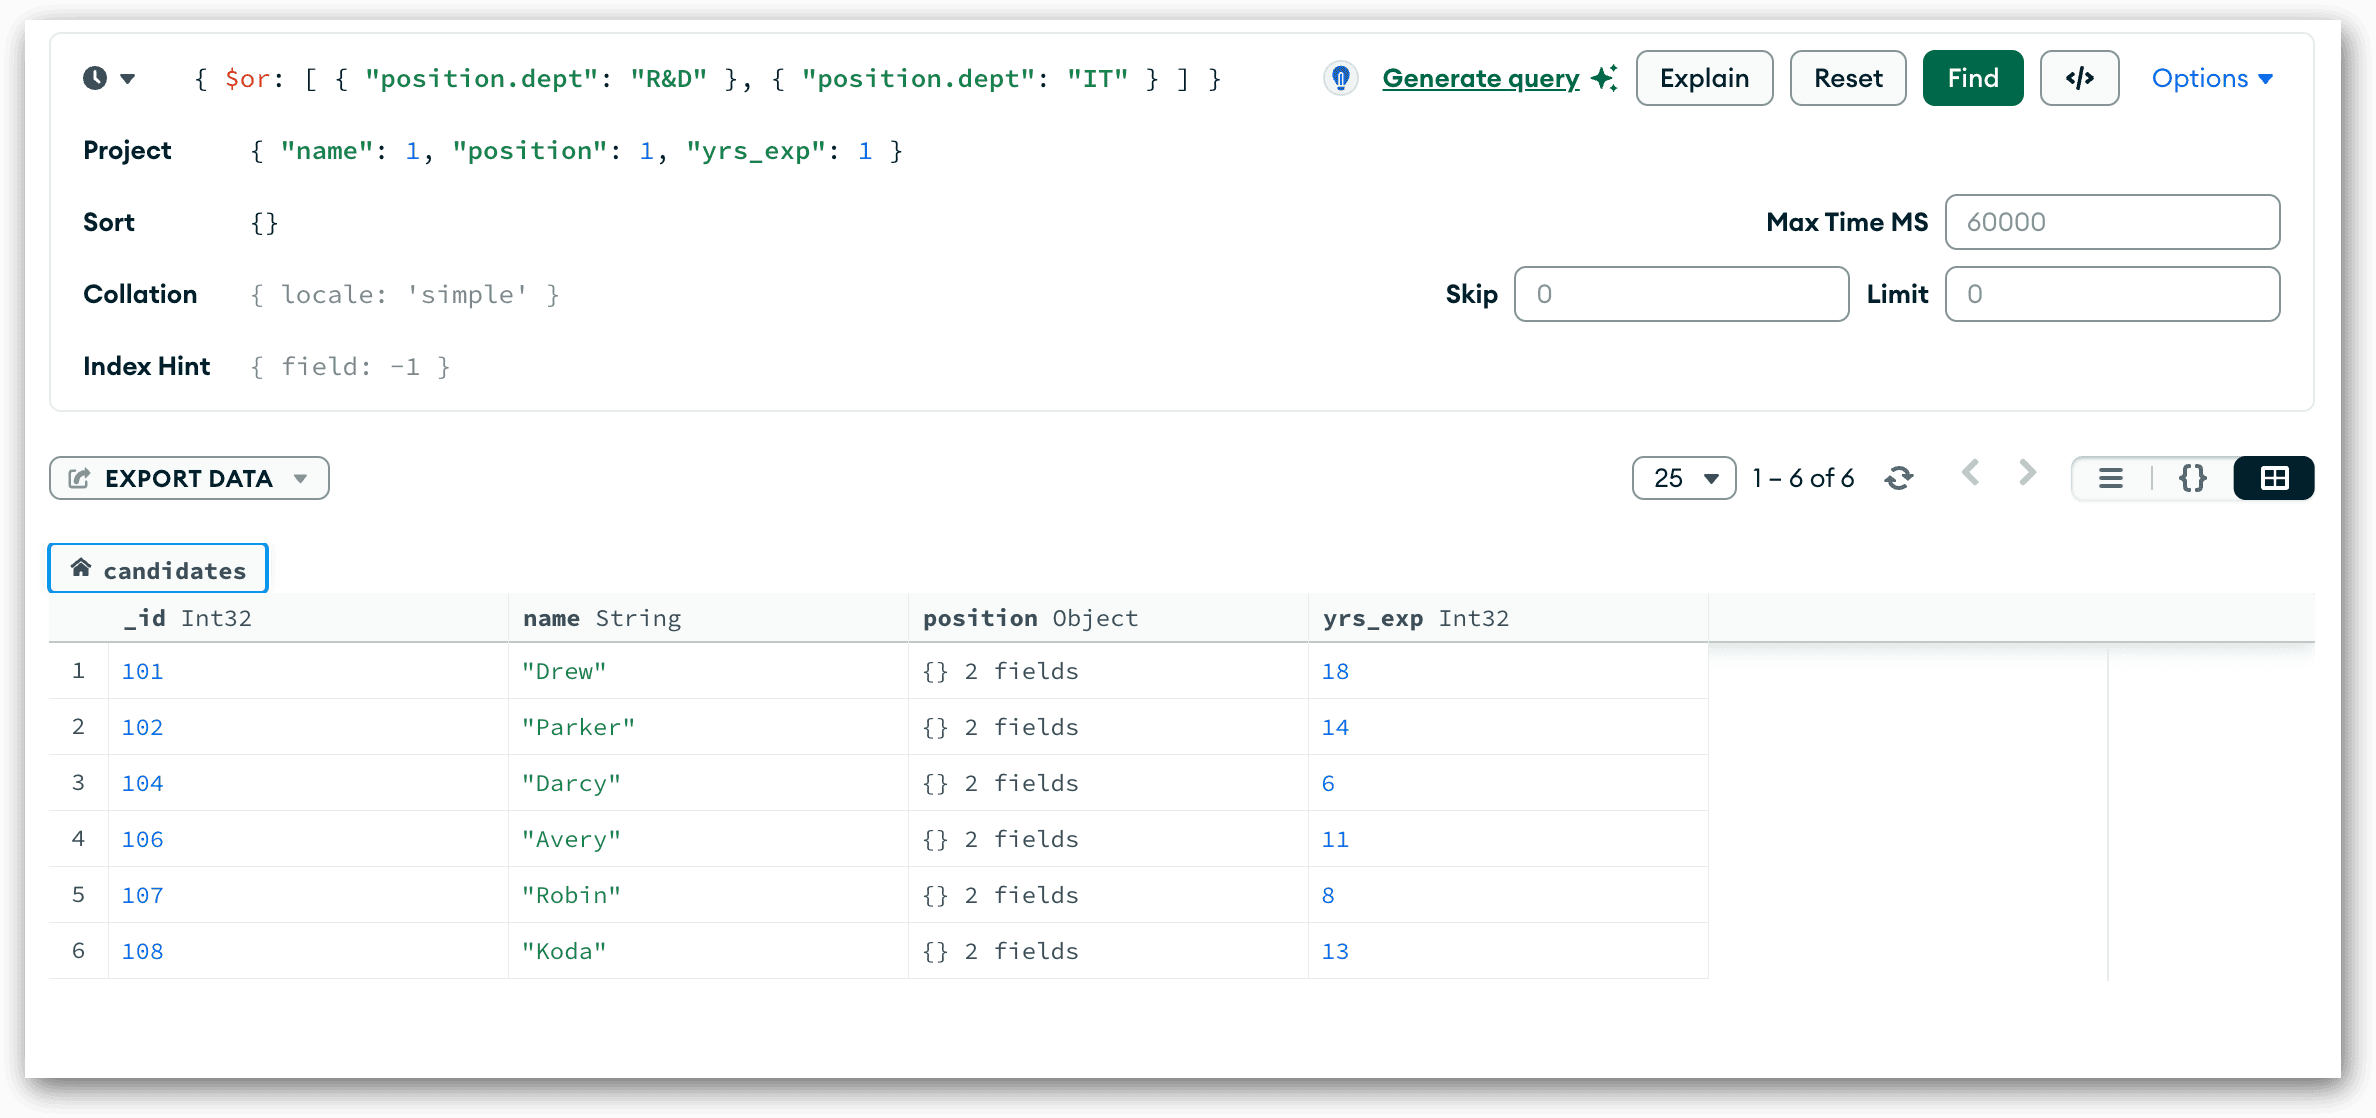
To export a subset of the candidates collection to a JSON file, ensure that the collection is still open and then type the following code in the Filter text box, which is in the query section near the top of the Documents tab:
|
1 |
{ $or: [ { "position.dept": "R&D" }, { "position.dept": "IT" } ] } |
The code specifies that a document must contain a position.dept value of R&D or IT for it to be included in the query results. Next, in the Project text box, type the following code:
|
1 |
{ name: 1, position: 1, yrs_exp: 1 } |
This code specifies that only the name, position, and yrs_exp fields should be included in the results. MongoDB will also automatically include the _id field.
After you define your query, click the Find button to display the query results in the bottom pane. There should be six documents in the results, as shown in the following figure.
To export the documents in the query results, click the Export Data drop-down arrow, and then click Export query results, which launches the Export dialog box. Ensure that JSON is selected as the export file type, and then click Export.
When the file manager window appears, navigate to the folder where you want to save the file, type a file name (or use the default), and click Select. MongoDB will create the file in the designated folder. The following figure shows the documents as they appear in the new file.
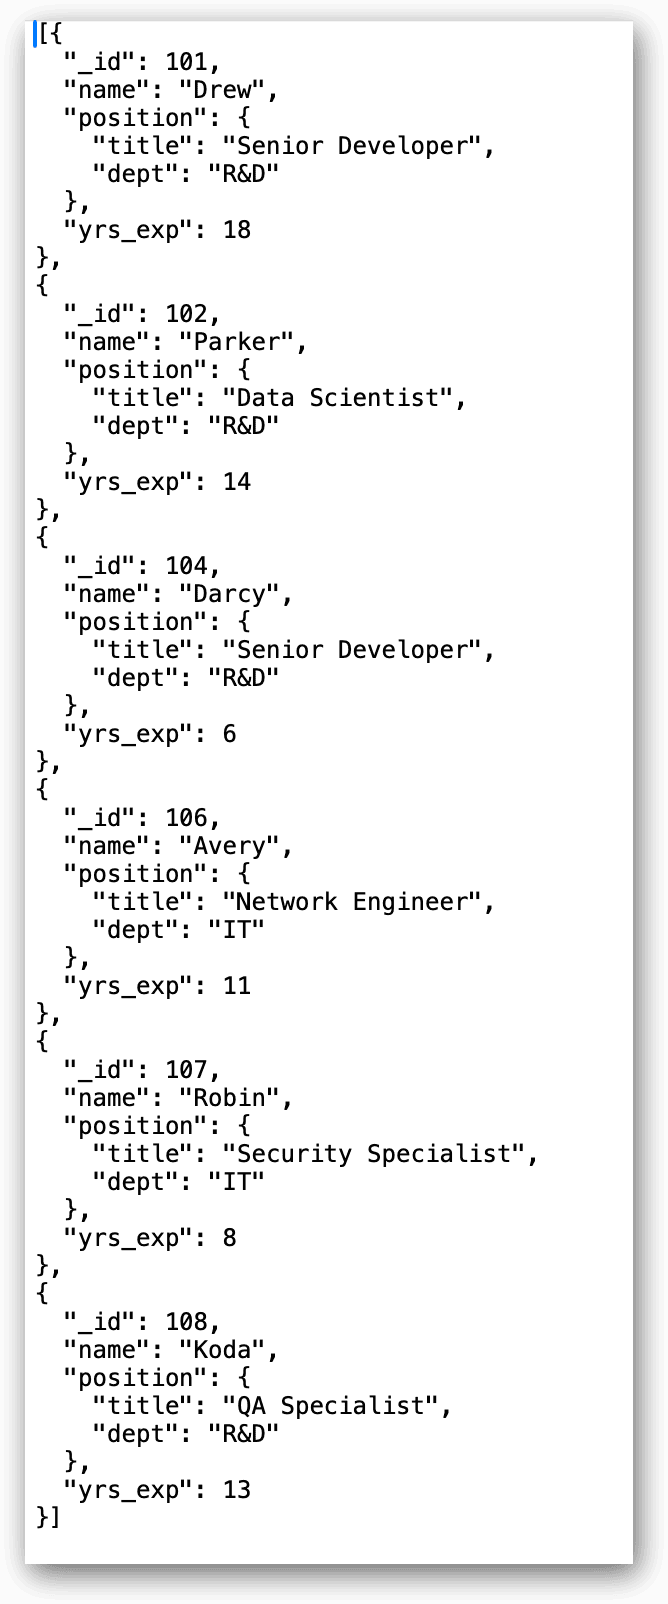
As you can see, the file contains six documents formatted according to the JSON standard. Notice that each document contains a position.dept value of R&D or IT. In addition, each document includes only the _id, name, position, and yrs_exp fields.
Export aggregate results to a JSON file
MongoDB Compass also lets you export the results returned by an aggregation. To export the data, you must first open the collection (if it’s not already open), go to the Aggregations tab, and define and run your aggregation. You can then export the aggregation’s results. (If you’re not familiar with how to create aggregations in Compass, refer to the article Building MongoDB Aggregations in MongoDB Compass.)
To demonstrate how to export aggregated data, we’ll again use the candidates collection. For the aggregation itself, we’ll use the following definition:
|
1 2 3 4 5 6 7 8 9 10 11 12 13 14 15 16 17 18 19 20 21 22 23 24 25 26 27 28 29 30 31 |
[ { $match: { $or: [ { "position.dept": "R&D" }, { "position.dept": "IT" } ] } }, { $group: { _id: { dept: "$position.dept" }, total: { $count: {} } } }, { $project: { _id: 0, dept: "$_id.dept", total: 1 } } ] |
The aggregation, includes the following three stages:
$match. The stage filters out all documents in the pipeline except those with aposition.deptvalue ofR&DorIT.$group. The stage groups the pipeline’s documents based on theposition.deptvalues. Because the documents include only the ofR&DorITdepartments, the pipeline will now contain only two groups. This stage also calculates the total number of candidates in each group.$project. The stage removes the_idfield from each group and assigns the namedeptto the_id.deptfield.
When you plug these stage definitions into the Compass interface, the Aggregations tab should look similar to the following figure. In this case, only the $project stage is expanded.
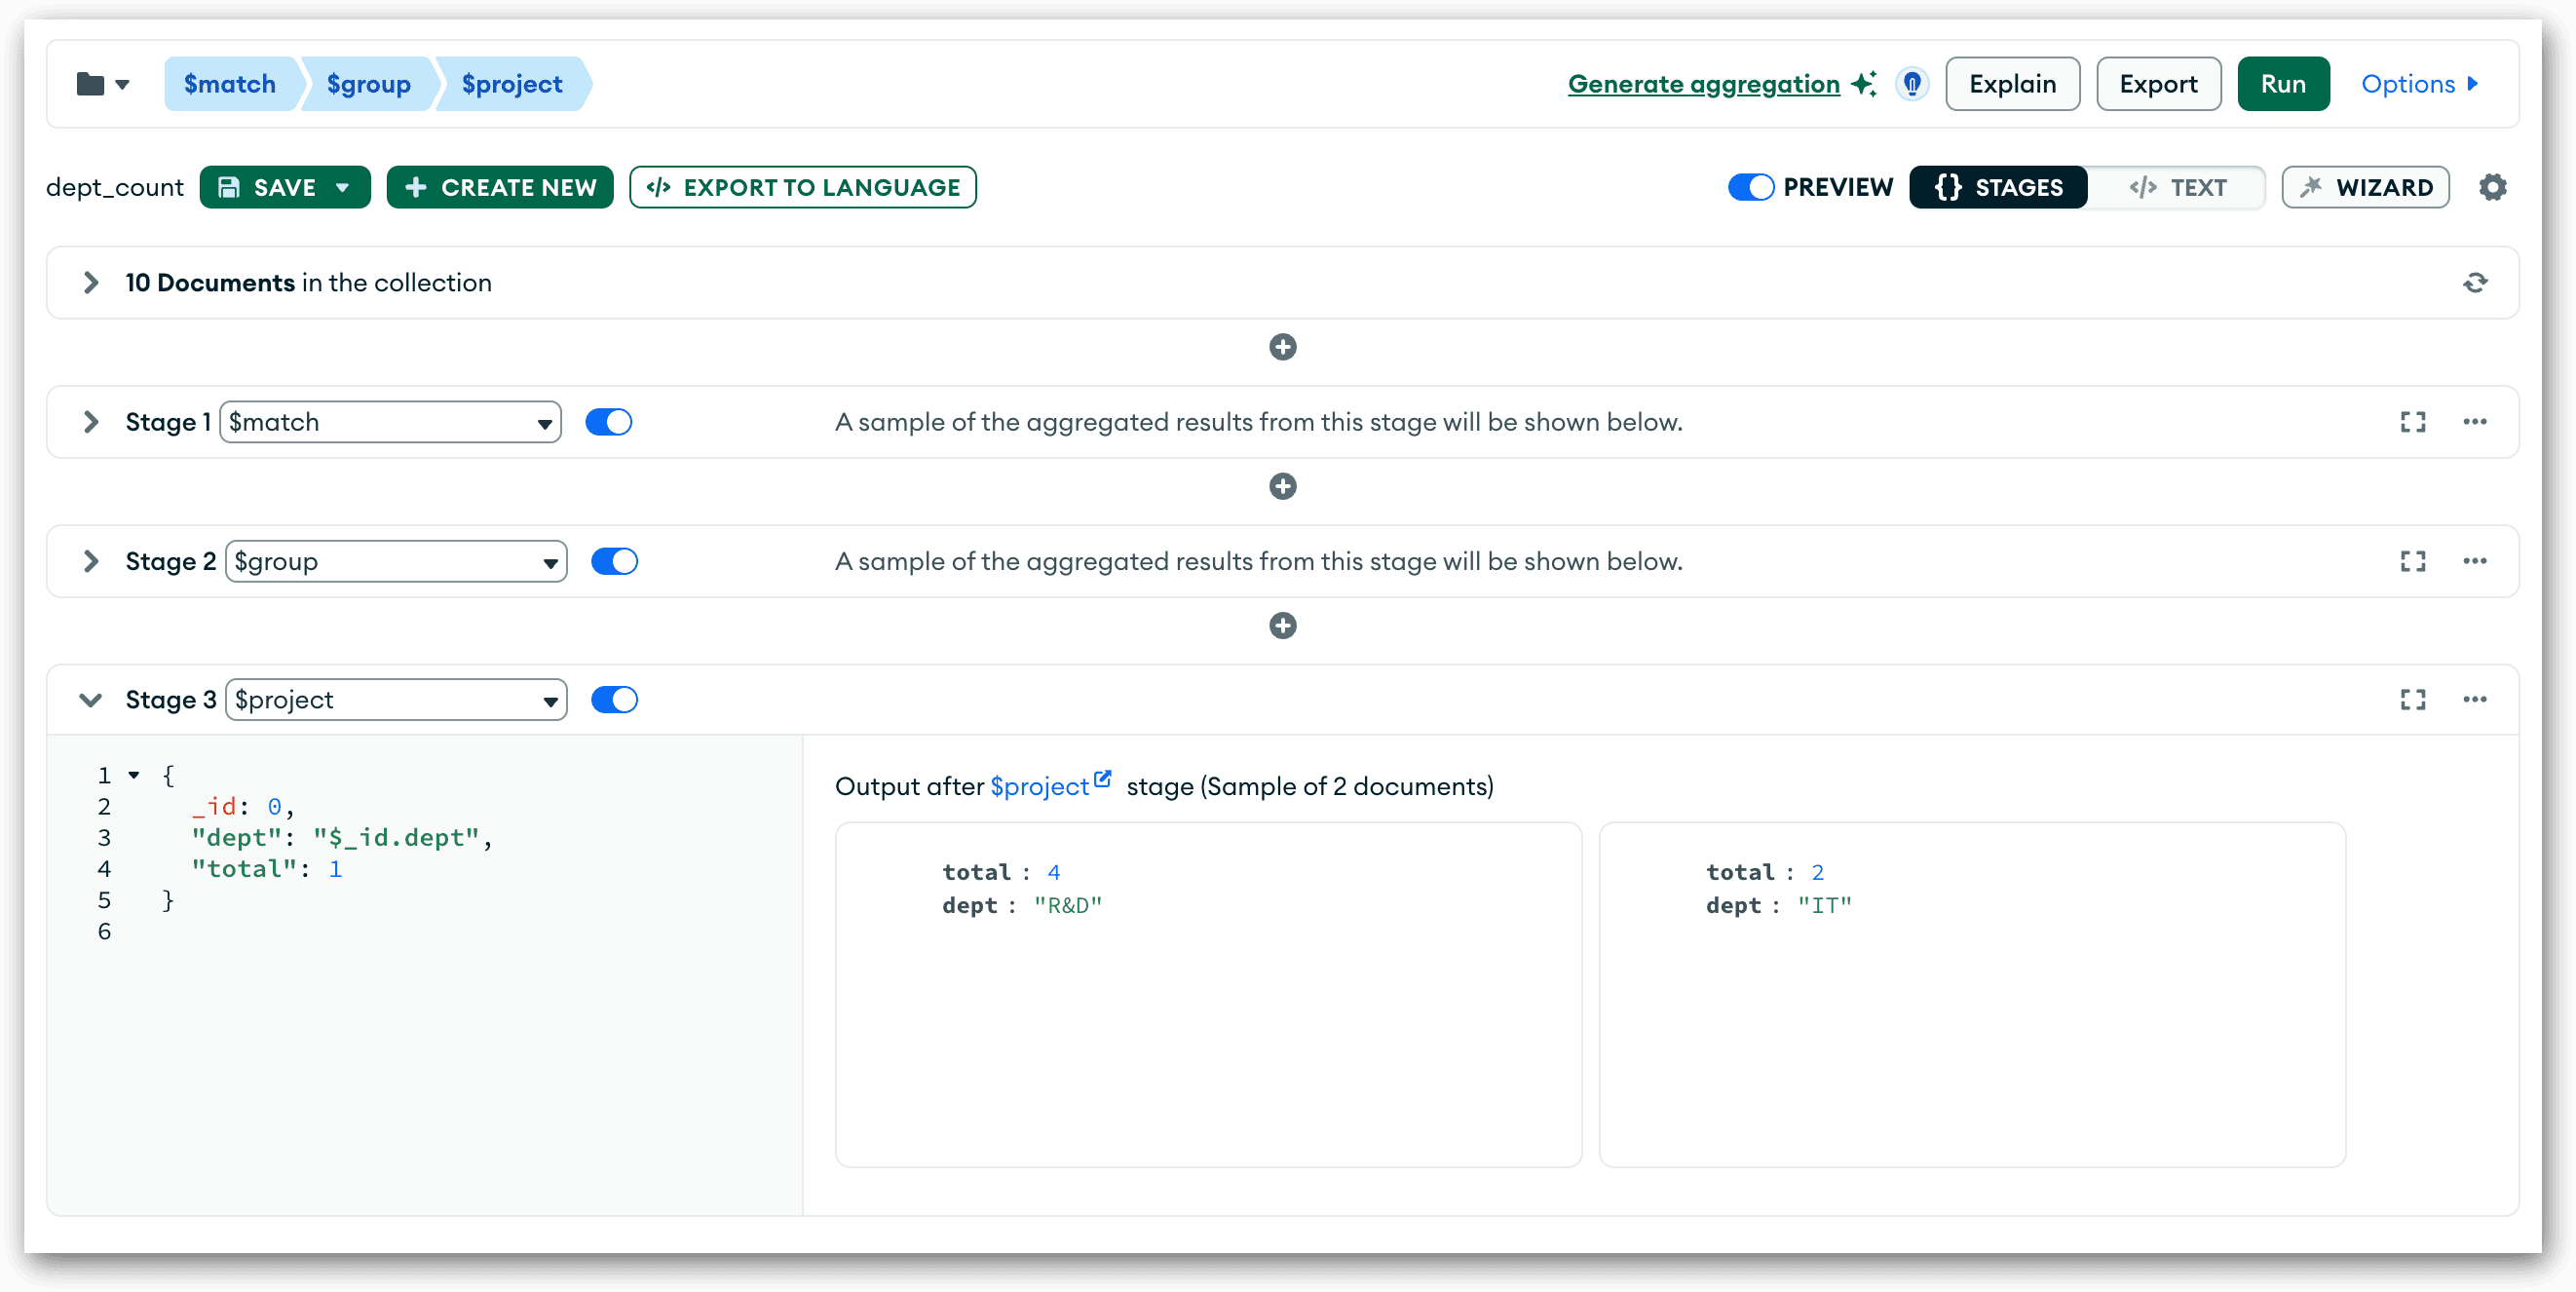
After you define your aggregation, click the Run button in the upper right corner to execute your query. The query should return only two documents, each one showing the total number of candidates in that department.
To export your results, click the Export button in the upper right corner. This launches the Export dialog box. The dialog box displays the aggregation and lets you choose between the JSON and CSV formats, as you’ve seen in the previous examples. The following figure shows the Export dialog box with the JSON option selected.
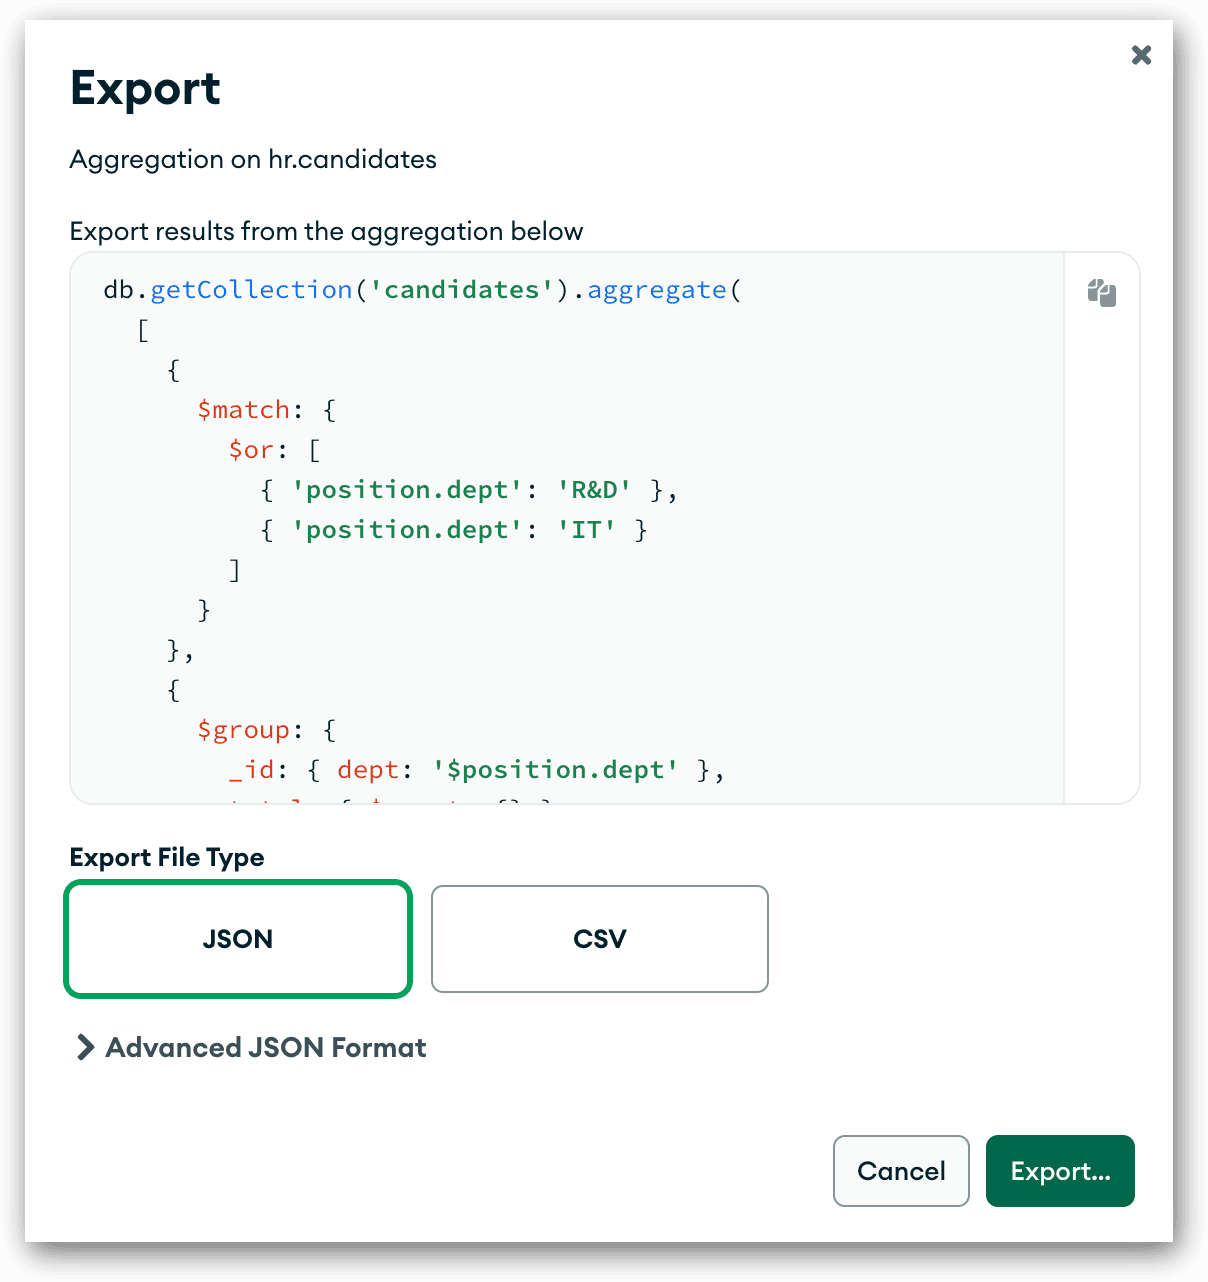
As with the previous examples, we’ll stick with the JSON format, which is selected by default. To export the data, click the Export button.
When the file manager window appears, navigate to the folder where you want to save the file, type a file name (or use the default), and click Select to generate the export file. The following figure shows the documents as they appear in the new file.
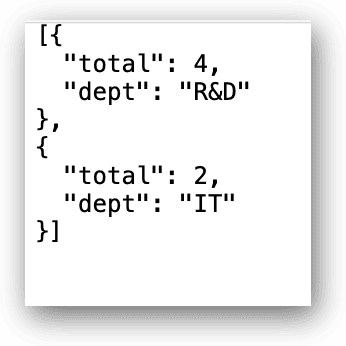
As expected, the file contains two documents. Each document shows the name of the department and the number of candidates in that department.
Getting started with importing and exporting data in MongoDB Compass
As this article has demonstrated, MongoDB Compass makes it relatively easy to import and export data. The key to importing data is to make sure that your JSON or CSV files are in the correct format. The key to exporting data is to determine whether you want to export the entire collection, a subset of the documents, or only aggregated data. You can find more details about importing and exporting data in the MongoDB topic Import and Export Data. In the meantime, the information we covered here should give you a good sense of what it takes to import and export document data in MongoDB Compass.
This document contains proprietary information and is protected by copyright law.
Copyright © 2026 Red Gate Software Limited. All rights reserved


Load comments